| Author |
Message |
 |
|
|
|
|
Advert
|
Forum adverts like this one are shown to any user who is not logged in. Join us by filling out a tiny 3 field form and you will get your own, free, dakka user account which gives a good range of benefits to you:
- No adverts like this in the forums anymore.
- Times and dates in your local timezone.
- Full tracking of what you have read so you can skip to your first unread post, easily see what has changed since you last logged in, and easily see what is new at a glance.
- Email notifications for threads you want to watch closely.
- Being a part of the oldest wargaming community on the net.
If you are already a member then feel free to login now. |
|
 |
2009/03/31 07:04:19
Subject: Salamander Land Speeder (*Finished 4/12/09)
|
|

Fresh-Faced New User
|
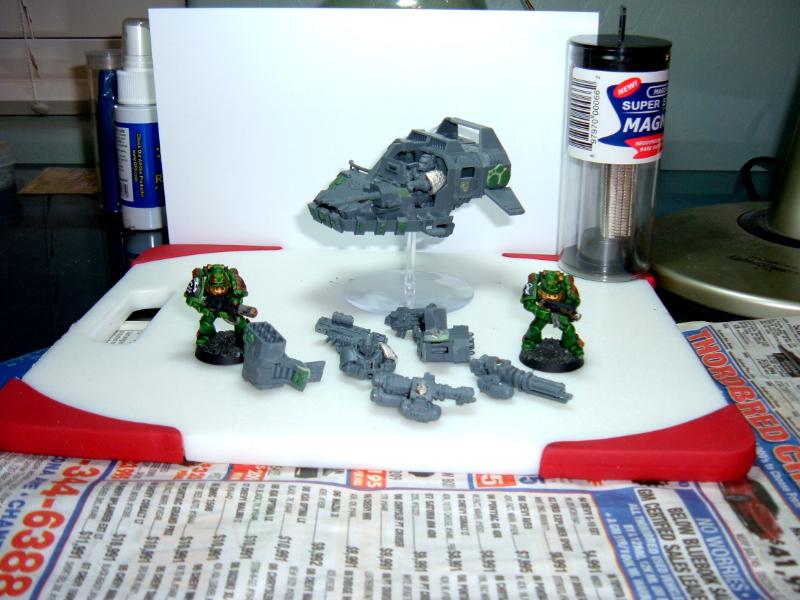
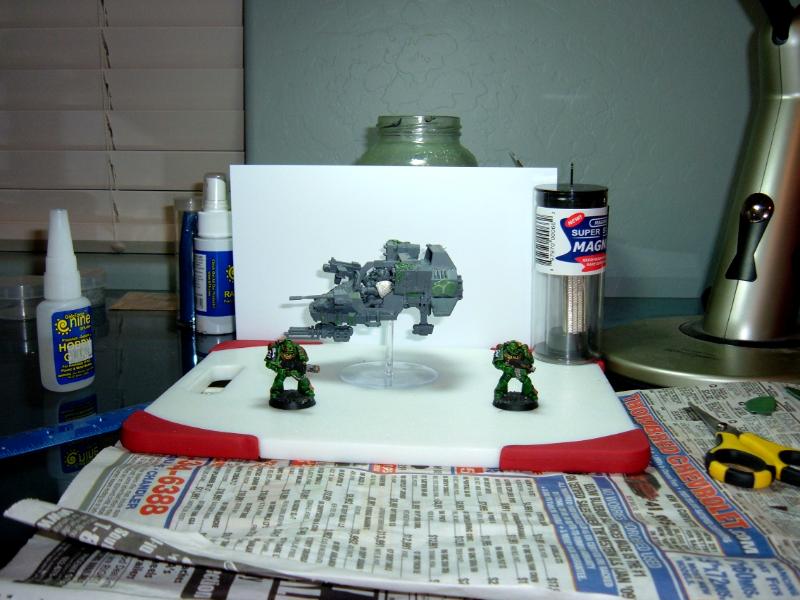
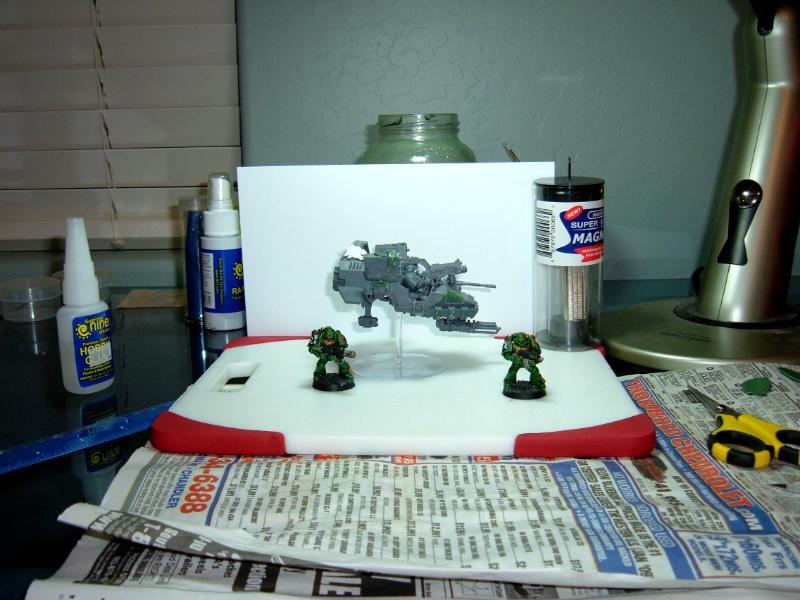
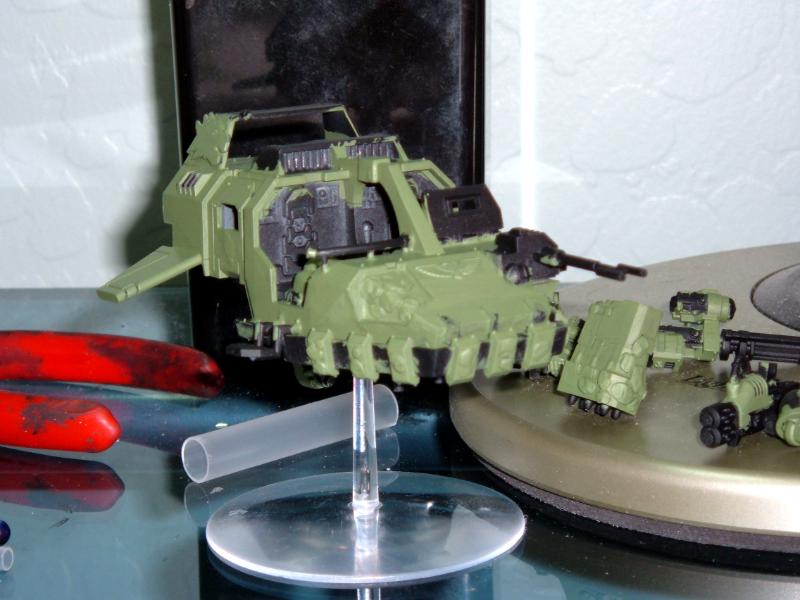
After years of gaming a friend finally got me to try 40k. The end result is me starting a salamander army. After painting 20 marines and a Librarian over a month, I decided to switch things up by working on my unit of three land speeders.
I put together my first landspeeder, and also used green stuff for the first time. Not just to fill in gaps but to actually add salamander scale detail to the model. I also magnatized everything, which was another first for me, and cut a salamander head out of plasticard. Did I mention it was my first time assembling a Land Speeder? Anyhow about 8 hours later the first landspeeder will be ready for priming tomorrow. Plan is to ultimately have 3 landspeeders done linke this, and then paint them all together. This will be my most ambitious "conversion", "build", whatever you want to call it to date.
BTW I tried two different methods of green stuff scales. The first was to ball up green stuff and randomly smash it which ultimately looks really nice and is easy if the green stuff doesn't stick (a friend told me to use some vasoline next time to help with sticking). The other method was to roll out some green stuff, let dry over night, cut the basic shape with scissors and then use a hobby knife to cut detail lines to form the scale shapes. While the latter also looks nice, it takes a lot more work and gives a completely different thicker look.
|
|
This message was edited 7 times. Last update was at 2009/04/13 01:18:08
|
|
|
 |
|
2009/03/31 08:13:00
Subject: Re:Salamander Land Speeder
|
|
Fixture of Dakka
drinking ale on the ground like russ intended
|
Just so you know you can't have a assault cannon on a typhoon land speeder.
|
 Logan's Great Company Oh yeah kickin' Logan's Great Company Oh yeah kickin'  and not even bothering to take names. and not even bothering to take names.  2nd company 2nd company  3rd company ravenguard 3rd company ravenguard  House Navaros Forge world Lucious & Titan legion void runners House Navaros Forge world Lucious & Titan legion void runners    314th pie guard 314th pie guard  warboss 'ed krunchas waaaaaargh This thred needs more cow bell. Raised to acolyte of the children of the church of turtle pie by chaplain shrike 3/06/09 Help stop thread necro do not post in a thread more than a month old. "Dakkanaut" not warboss 'ed krunchas waaaaaargh This thred needs more cow bell. Raised to acolyte of the children of the church of turtle pie by chaplain shrike 3/06/09 Help stop thread necro do not post in a thread more than a month old. "Dakkanaut" not "Dakkaite"
 Join the Church of the Children of Turtle Pie To become a member pm me or another member of the Church Join the Church of the Children of Turtle Pie To become a member pm me or another member of the Church  |
|
|
|
|
2009/03/31 08:17:44
Subject: Salamander Land Speeder
|
|

Member of the Malleus
|
Can we get some close ups please? Looks great, but if we could see more detal it would be better
|
|
|
|
|
|
2009/03/31 08:34:14
Subject: Re:Salamander Land Speeder
|
|

Cold-Blooded Saurus Warrior
|
Close up pics please.
|
|
|
|
|
2009/03/31 13:11:03
Subject: Salamander Land Speeder
|
|

Ork-Hunting Inquisitorial Xenokiller
|
Why don't you just get some plasticard, cut it up into scale shapes, and stick it on.... simple and much cheaper than gs.
|
 The oonivers vill burn! The oonivers vill burn! |
|
|
|
|
2009/03/31 15:37:59
Subject: Re:Salamander Land Speeder
|
|
Growlin' Guntrukk Driver with Killacannon
No. VA USA
|
sonofruss wrote:Just so you know you can't have a assault cannon on a typhoon land speeder.
With it being magnetized, I imagine that he will place the weapon on that he needs based on mission or enemy army comp.
|
A woman will argue with a mirror..... |
|
|
|
|
2009/03/31 15:44:03
Subject: Salamander Land Speeder
|
|
Horrific Hive Tyrant
London (work) / Pompey (live, from time to time)
|
Just so you know you can't have a assault cannon on a typhoon land speeder.
just so you know, thats why everything is fitted with a magnet 
i like it, and these days there are too many plain vehicles about, people need to start working on them more 
|
 Suffused with the dying memories of Sanguinus, the warriors of the Death Company seek only one thing: death in battle fighting against the enemies of the Emperor. Suffused with the dying memories of Sanguinus, the warriors of the Death Company seek only one thing: death in battle fighting against the enemies of the Emperor. |
|
|
|
|
2009/03/31 18:04:16
Subject: Salamander Land Speeder
|
|
Drop Trooper with Demo Charge
|
paint it paint it
|
 1500 Points Catachan 1500 Points Catachan
 1500 Points AdMech 1500 Points AdMech
 2000 Points Imperial Fists 2000 Points Imperial Fists
4000 Points mixed Order Grand Alliance
 Elven Union BB Team Elven Union BB Team
|
|
|
|
|
2009/03/31 21:22:20
Subject: Re:Salamander Land Speeder
|
|
Fresh-Faced New User
|
Thanks for the comments all.
Yes I know I cannot load out the speeder like that (although it would rock), I just didn't want to post a ton of pictures of different magnet options.
I'll try to get some more close up pictures before I prime it. My camera is not that great though, so I am not sure how close up I can get.
Part of me want's to just paint this one, part of me wants to model the other two and paint them all at once. Too many decisions.
For a further teaster, I got 5 drop pods screaming for modification too.
|
|
|
|
|
2009/03/31 21:31:36
Subject: Salamander Land Speeder
|
|

Crafty Clanrat
Stockholm, Sweden
|
I would like to know a bit more about those magnets. I'd like to be able to try and outfit my own land speeders, and posibly other vehicles with the same kind of weapon customisation.
I like WYSIWYG, but do not want to buy every configuration posible, especially not on vehicles.
How do you get those magnets to fit good, so they aren't blocky and pushes the weapons outwards? Did you drill them in a bit?
|
|
This message was edited 1 time. Last update was at 2009/03/31 21:34:10
|
|
|
|
|
2009/04/01 01:18:16
Subject: Re:Salamander Land Speeder
|
|
Fresh-Faced New User
|
I bought the smallest rare earth circular magnets possible.
Bascially, I figured out where I wanted them to go and then drilled several small holes with a standard hobby hand drill.
then I used an exacto knife to smooth out the hole until I could fit a magnet flush. Then I used super glue to hold them magnet in place, and green stuff to fill in any gaps from mess ups etc.
Do not use a real power drill. I tried to thinking that it would be great since I had bits the same size and i melted the model and ruined it. i was amazed how fast it happened too.
The weapons that mount under the land speeder pose a problem in that the mounting is not really large enough to house 2 magnets (on to attach to the speeder one for the weapon). for these I just traded for extra mounting bits and/or lights. Evidentially these used to come in some sort of space marine conversion kits so a friend had a few extra.
The Missile launchers are also not big enough to completely hide the thickness of the magnet. I basically drilled a cut a hole right through the ammo feed design on the other side. After fixing the magnets I then added in green stuff in the rough shape of bullets to cover it up. this was a little harder then it looked, and didn't come out as well as I would have liked. I plan on some kind of fade to black paint wise to help cover up some of the imperfection there.
The passenger mounted weapon is way to small for a magnet housing (at least for magnets I have seen). For that I drilled a small hole and attached a paper clip. Once the torso of the gunner is in place it is enough to hold the weapon on as long as you don't turn the craft upside down. While it makes flying the craft around the house harder, it will be good enough to suit tabletop needs.
|
|
This message was edited 1 time. Last update was at 2009/04/01 01:18:49
|
|
|
|
|
2009/04/01 01:31:26
Subject: Salamander Land Speeder
|
|
Crafty Clanrat
Stockholm, Sweden
|
I will have to try that out myself when I get a land speeder, or similiar vehicle. Do you reckon it could work the same on a dreadnaughts arms, or are there better ways to make it modular?
|
|
|
|
|
2009/04/01 07:07:27
Subject: Re:Salamander Land Speeder
|
|
Fresh-Faced New User
|
Not sure, I have been holding off on buying Dreads until this summer so I can get the Ironclad ones. Most of the ones I have seen seem to allow the arms to be easily pulled off and on anyway so they may not need magnets.
|
|
|
|
|
2009/04/01 10:59:32
Subject: Re:Salamander Land Speeder
|
|
Drone without a Controller
My Dark Tower Of Everlasting Doom
|
The scales look quite nice
Build the rest and paint them quickly and after that, post some pics of it!
|
|
|
|
|
|
2009/04/01 11:24:13
Subject: Salamander Land Speeder
|
|
Possessed Khorne Marine Covered in Spikes
|
cant wait to see the painted modal
|
|
|
|
|
|
2009/04/02 05:53:47
Subject: Re:Salamander Land Speeder
|
|
Fresh-Faced New User
|
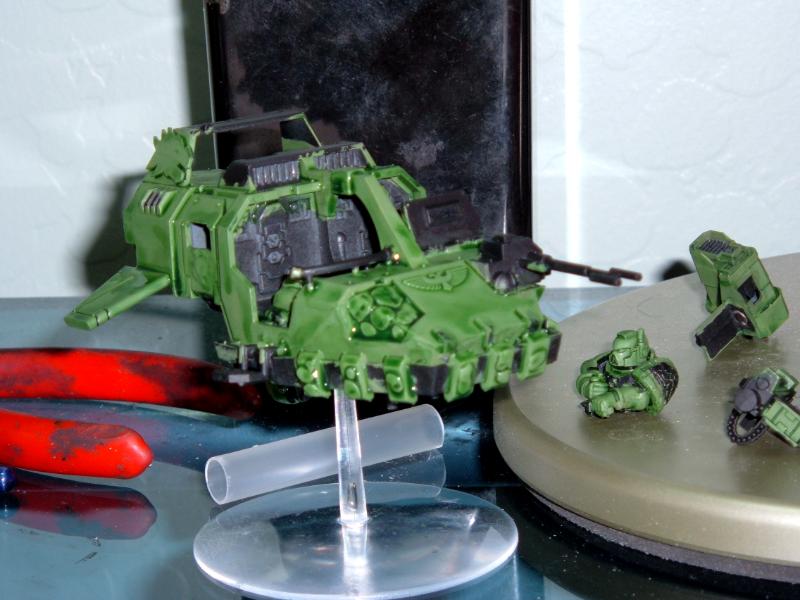
Step #1: Trying a step by step for something new. First thing is to prime in black like the rest of my space marine army.
Time 15 mins, plus another 15 for drying time.
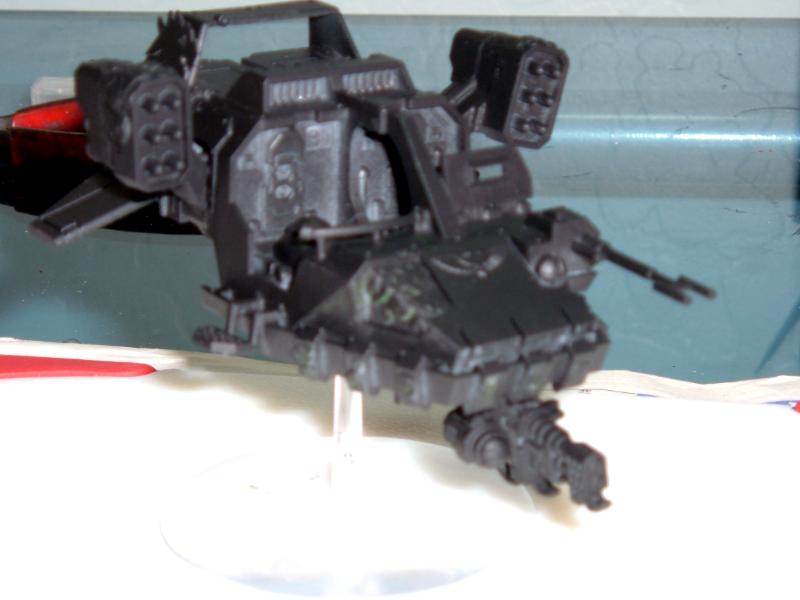
Step #2: Next is to use a tank brush and liberally apply some watered (with future floor wax) down Citadel Knarloc Green.
Total time about 1 hour.
Step #3: Next step is to again use the tank brush to apply a layer of thraka green. This both gives the next layer of paint a lighter prime, but also helps to keep the full color of snot green coming next. You can see that I liberally applied it, and that it is still a little wet. I will let this dry overnight, and I am gaming tomorrow so you will have to wait a few days for more updates.
Total time 15 minutes.
|
|
|
|
|
2009/04/02 06:48:16
Subject: Salamander Land Speeder (*Updated 4/1/09)
|
|

Fresh-Faced New User
|
I like it, but I'm partial to the 'manders'.
|
|
|
|
|
2009/04/02 15:36:26
Subject: Salamander Land Speeder (*Updated 4/1/09)
|
|
Regular Dakkanaut
|
Very nice I particularly love the scales.
And shame on you! You know we do not use anything that goes faster than a rhino!
|
|
|
|
|
2009/04/02 17:59:06
Subject: Salamander Land Speeder (*Updated 4/1/09)
|
|
Tzeentch Aspiring Sorcerer Riding a Disc
|
Ok, looking like its working so far, lets keep it coming.
|
|
|
|
|
|
2009/04/06 06:24:50
Subject: Re:Salamander Land Speeder (*Updated 4/1/09)
|
|
Fresh-Faced New User
|
Steps 4&5: Ok, Next step is to go over the green with a watered down layer of Snot Green, and then another layer of the same wash. This results in a deeper, nicer green color.
Total time about an hour. Again I used the tank brish.
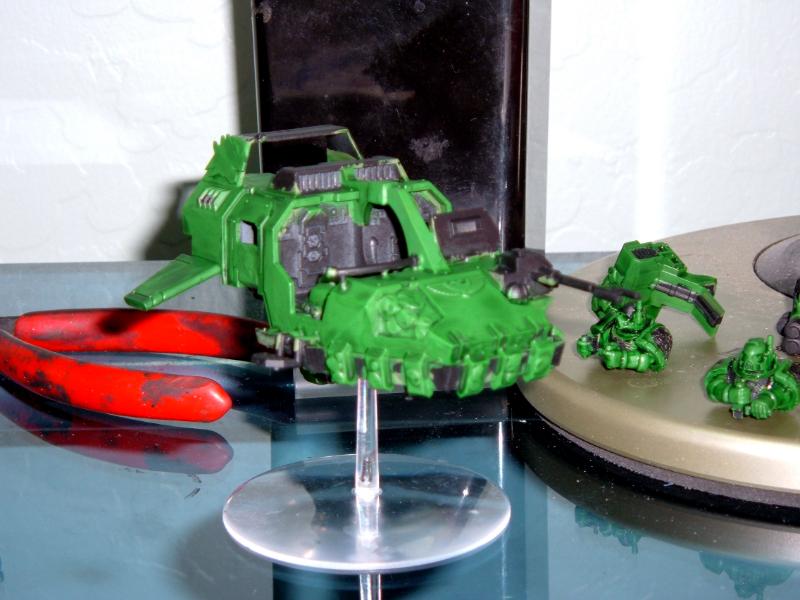
Step 6: Next I switched to a standard brush and lined on some scorpion green highlights. Once I am completely done with the highlights you can touch up any fat lines with Snot Green.
Total Time about two hours.
Step 7: Use the same wash and go over the entire model once more. This will tone down the highlights and is faster than making blends.
Total Time about 15 minutes.
Step 8: Using a standard brush and P3 Boostrap Leather I paint all of the scales I added. These I wash twice with Ogryn Flesh. On purpose make sure you get around the scales onto the green as well.
Total Time about 15 minutes.
Step 9: Reblack the black areas. I got about halfway done here. At this point my wife bought me some black felt so I don't have to show my dusty desk anymore. Looks much better, but I don't have a photo box. I'll take a new photo in the daylight. You can see how this one messed up the colors a tad. No the scales are not orange and the highlights are a lot finer and look a lot better in real life.
Total Time so far about 15 minutes.
I also put my other two landspeeders together this weekend. This time building only took 5 hours total for the other two. I gained a lot of time because I used my power drill, after testing on a scrap piece of plastic sprue. Even using the highest speeds I could not get the plastic to melt so long as I drilled pilot holes. For these magnets I drilled the holes to the correct size using three different sizes of drill bits, while everything was still attached to their sprues. Just note, if you do the doors, be willing to let go of the entire sprue if the largest drill bit takes hold. Otherwise you might destroy the door due to it's fragile nature. If you add the missiles, note that I sanded off the little plastic tab first. This gave my drill a smoth surface to work on.
|
|
This message was edited 1 time. Last update was at 2009/04/06 06:29:39
|
|
|
|
|
2009/04/06 11:18:20
Subject: Salamander Land Speeder (*Updated 4/5/09)
|
|
Pyre Troll
|
looking good so far man.
The rare earth magnet setup is rather cool also
|
|
|
|
|
2009/04/06 11:21:07
Subject: Salamander Land Speeder (*Updated 4/5/09)
|
|
Possessed Khorne Marine Covered in Spikes
|
that looks amasing
|
|
|
|
|
|
2009/04/06 12:35:46
Subject: Salamander Land Speeder (*Updated 4/5/09)
|
|
Waaagh! Warbiker
|
Gonna look great when it's finished, I reckon.
|
 92% of teens have moved on to rap. If you are one of the 8% who still listen to real music, copy and paste this into your sig. 92% of teens have moved on to rap. If you are one of the 8% who still listen to real music, copy and paste this into your sig. 
GENERATION 8: The first time you see this, copy and paste it into your sig and add 1 to the number after generation. Consider it a social experiment
Us Orkses isn't dum - stoopid, jus' not dum.
 1000 pts. 1000 pts.
 500 pts. 500 pts.
 puny amount puny amount
 1500 pts. 1500 pts.
 soon... soon... |
|
|
|
|
2009/04/06 15:08:55
Subject: Re:Salamander Land Speeder (*Updated 4/5/09)
|
|
Decrepit Dakkanaut
|
Nice work! 
|
|
|
|
|
2009/04/07 05:16:39
Subject: Re:Salamander Land Speeder (*Updated 4/5/09)
|
|
Fresh-Faced New User
|
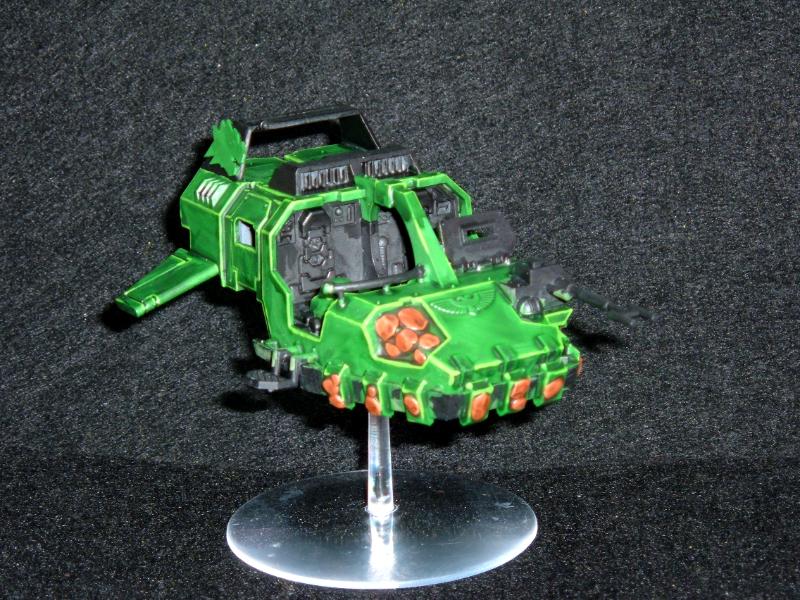
Ok once the green is done a lot of the other steps go pretty fast. I just wanted to focus on the main speeder body so the rest of my pieces are still waiting for lining on step 6.
Anyhow I finished reblacking which was Step 9, which took another 15 minutes.
Step 10: Throw down some Burnished gold on the eagle and gas cap thing on top of the model.
Total time was 5 minutes.
Step 11: Paint mithril Silver on steps, rail, radar thing, little metal cleats on under belly, metal wires underneath and blast guard. Most people prefer bolt gun metal, but I like my metals to look a little brighter, plus this way I can literally gob on Badab Black wash later and my metal still looks about the same, but just a tad lighter in the end.
Total Time about 15 minutes.
Step 11: Paint P3 Ember Orange on the lights (there are three, one below, one by radar and one on top fin). Don't worry about black grill I plan on repainting it on later.
Time 5 Minutes.
Step 12: Paint some Ral PArtha red on wings to make some painted on fire type design. I am not big on blending realistic looking fire balls. Also painted all buttons on the console and two light like things undeneath.
Time 15 minutes.
Step 13: Badab Black on all metal colored areas.
Total time abour 15 minutes.
Step 14: P3 Cygnus Yellow for highlights on lights. Then re-black in bars on front light.
Total time about 10 minutes.
Step 15: Mix a tad of P3 Morrow White with Ral Partha Red (1:3). Use this to just dab corners for highlights on all red areas except underneath.
Total time 5 minutes.
Step 16: P3 Umbral Umber on the Salamander head Icon. Although the color turned out to close to black so I might do something else to it later.
Total time 5 minutes.
Sorry I had to take the pictures at night again. The first photo is the closest to real life colors. At this point the main body piece is near complete. I still have to base it to match my army, plus do something with the icon to make it stand out more, In real life it is so near black it blends in with the fin. Then I plan on doing something else, some kind of writting ot something, just don't have any ideas yet. I am open to them if you have any.
After that I plan on fully finishing this land speeder before painting the other two at the same time. I definately would have save time overall, but updating a message board every few days with almost no difference is kind of slow.
Thanks, to all those who have been offering encouragement so far. I should have more updates towards Friday or so.
|
|
This message was edited 1 time. Last update was at 2009/04/07 05:17:20
|
|
|
|
|
2009/04/07 06:04:04
Subject: Re:Salamander Land Speeder (*Updated 4/6/09)
|
|
Fixture of Dakka
|
Impressive! I like the scales. At first I wasn't sure what you were talking about but then the closer up painted pics have it show up pretty cool.
|
|
|
|
|
2009/04/07 06:08:18
Subject: Salamander Land Speeder (*Updated 4/6/09)
|
|
Lone Wolf Sentinel Pilot
|
I really love how you painted this and made the scales and magnetized the thing. The only thing I don't like is the fact that it is a Salamanders Land Speeder, and by the fluff they don't train in them or have any.
|
My Blog http://ghostsworkfromthedarkness.blogspot.com/
Ozymandias wrote:
Pro-painted is the ebay modeling equivalent of "curvy" in the personal ads...
H.B.M.C. wrote:
Taco Bell is like carefully distilled Warseer - you get what you need with none of the usual crap. And, best of all, it's like being a tourist who only looks at the brochure - you don't even have to go, let alone stay.
DR:90S+GMB+I+Pw40k01-D++A++/areWD 250R+T(M)DM+ |
|
|
|
|
2009/04/07 16:23:09
Subject: Re:Salamander Land Speeder (*Updated 4/6/09)
|
|
Fresh-Faced New User
|
I am actually extremely new to 40k. This is my first army. I picked Salamanders because they looked cool. I bought Land Speeders because everyone at my local game store said that they are too good not to have one unit of three. I am on the fourth Horus heresy book, but other than that I haven't read much other fluff yet. there really isn't much in the 5th edition book for Salamanders either. Also they have pictures of painted salamanders sppeders in the space marine codex so I never really thought of it being out of place.
So far my army list (Once completed) will be targeted for 1750:
4 tactical squads (2 are painted) - one with flamer/heavy flamer/combi flamer, one with melta/Multi Melta/combi melta, two with flamer/heavy bolter/powerfist. I am making an extra four missile launcher guys too so i can swap them in or out based on points needs.
1 Sterguard Squad - 5 combi meltas, 5 combi flamers
3 land Speeders - Meltas for sure
5 drop pods
Vulcan hestan
Librarian
|
|
This message was edited 1 time. Last update was at 2009/04/07 16:24:21
|
|
|
|
|
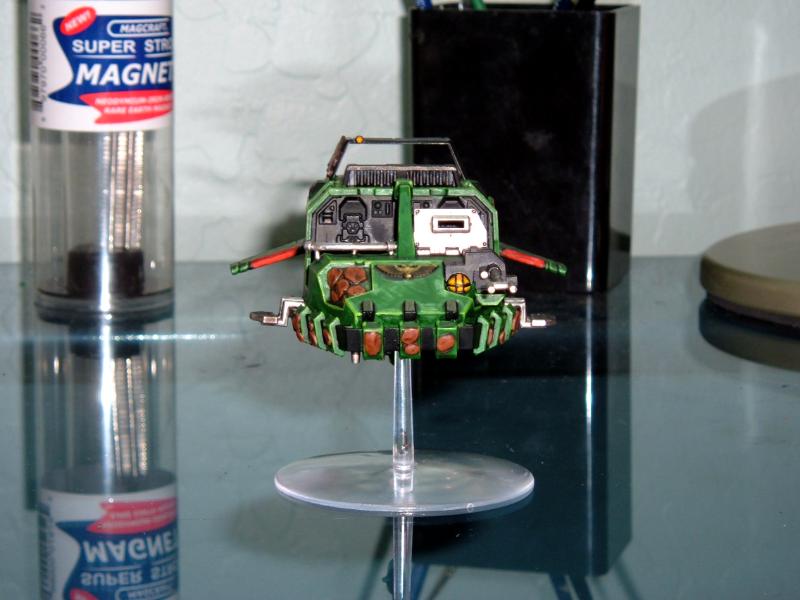
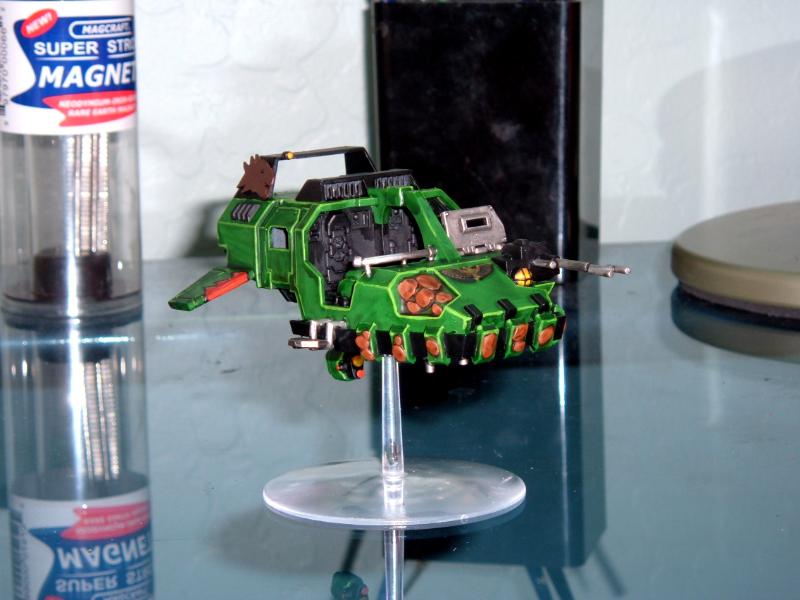
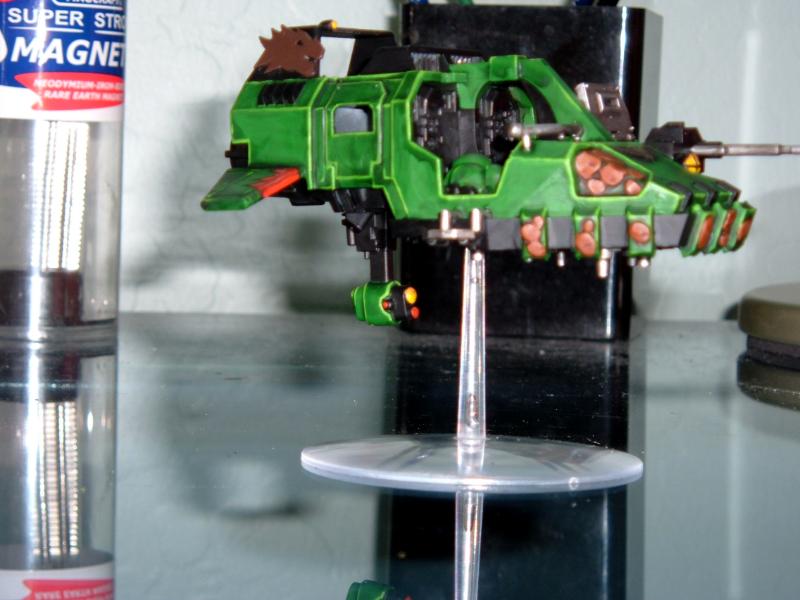
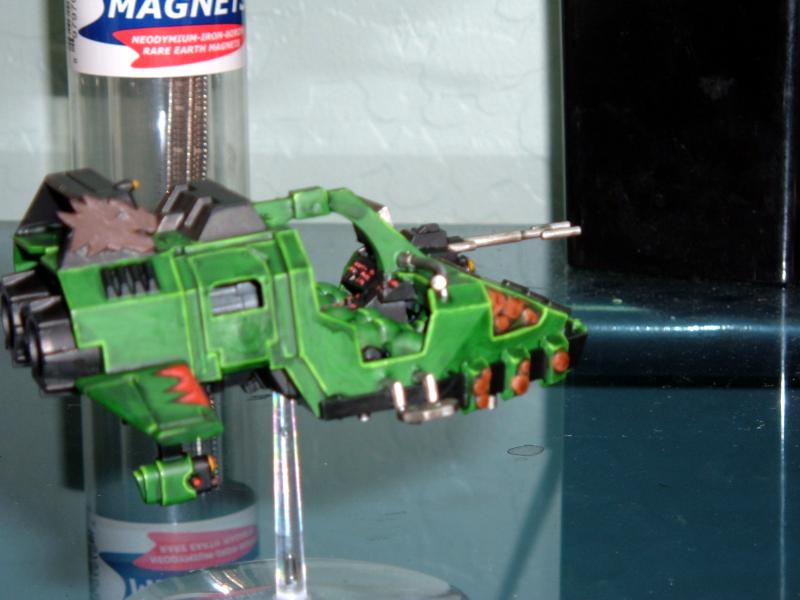
2009/04/13 01:17:51
Subject: Re:Salamander Land Speeder (*Updated 4/6/09)
|
|
Fresh-Faced New User
|
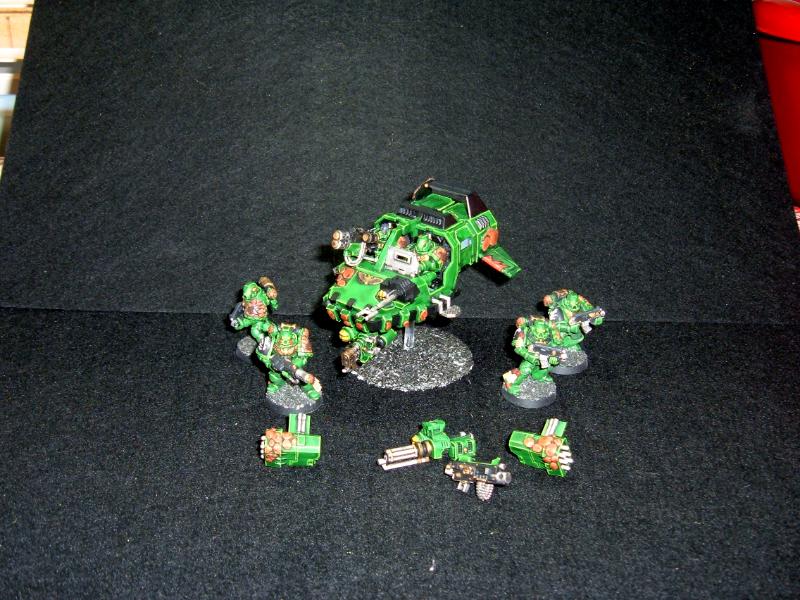
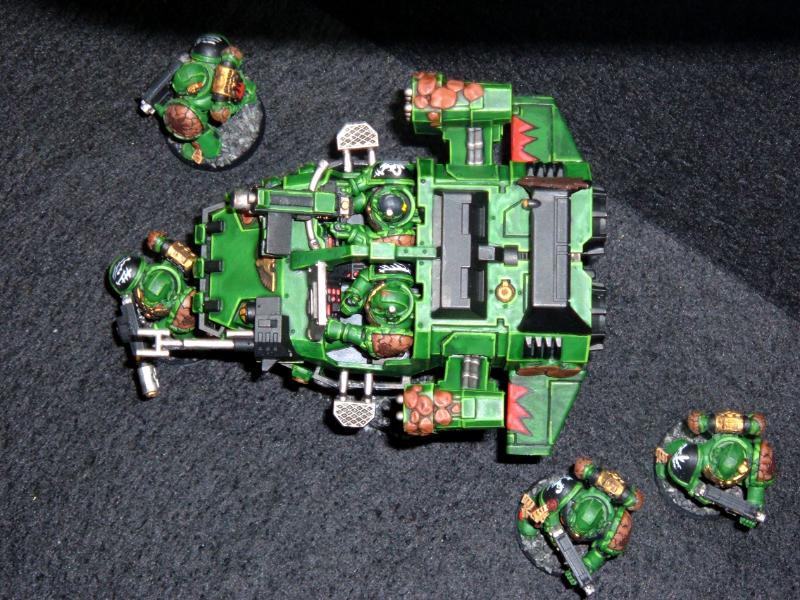
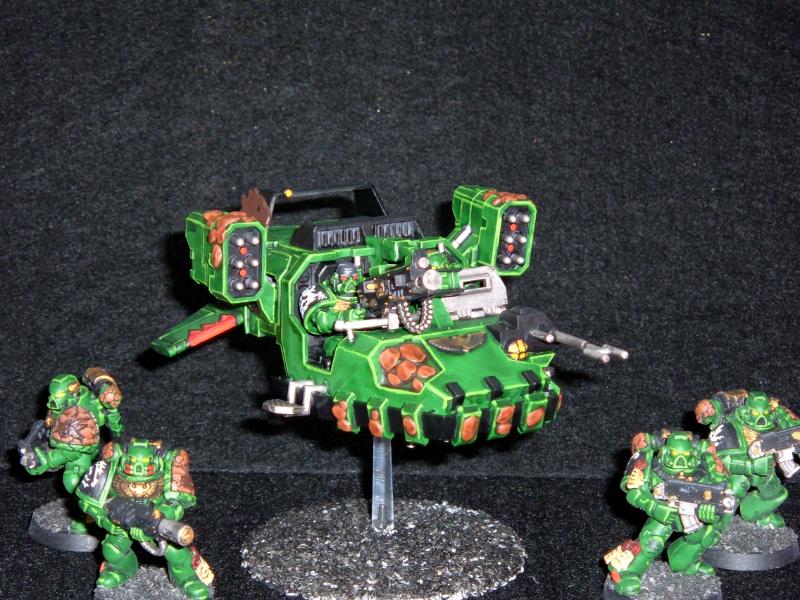
After getting a bit side tracked, I ended up adding scales to my other two speeders, Getting new, even smaller magnets, which allowed me to magnetize even the gunner's weapons and scratch built and added scales to a Vulcan model, I finally finished my first land speeder.
Nothing new in paiting techniques from what I already showed. I just repeated them again for the remaining weapons and the top half of both passengers. Painting the torsos was a pain as the metal shoulders made them very top and side heavy (meaning I dropped them a lot), but ofter placing them painted inside the vehicle with the pre painted buttons I am very happy with how the model looks. I'd say I spent about another 8 hours overall on the remaining pieces. I think I used too much PVP glue on the basing and I am not happy with how it turned out. I think I may scrape it off and try again.
Anyhow, thanks for tuning in.
|
|
This message was edited 1 time. Last update was at 2009/04/13 16:25:50
|
|
|
|
|
2009/04/13 07:05:57
Subject: Salamander Land Speeder (*Finished 4/12/09)
|
|
Pyromaniac Hellhound Pilot
|
Whoa, nice. I like it.
|
It's better to simply be an idiot, as no one can call you on it here. -H.B.M.C.
Cap'n Gordino's instant grammar guide:
"This is TOO expensive." "I'm going TO the store, TO get some stuff."
"That is THEIR stuff." "THEY'RE crappy converters."
"I put it over THERE." "I'll go to the store THEN."
"He knows better THAN that." "This is NEW." "Most players KNEW that." |
|
|
|
|
|
|