| Author |
Message |
 |
|
|
|
|
Advert
|
Forum adverts like this one are shown to any user who is not logged in. Join us by filling out a tiny 3 field form and you will get your own, free, dakka user account which gives a good range of benefits to you:
- No adverts like this in the forums anymore.
- Times and dates in your local timezone.
- Full tracking of what you have read so you can skip to your first unread post, easily see what has changed since you last logged in, and easily see what is new at a glance.
- Email notifications for threads you want to watch closely.
- Being a part of the oldest wargaming community on the net.
If you are already a member then feel free to login now. |
|
 |
2009/05/03 13:17:47
Subject: IG command squad conversions - Now with MOAR!!!11 Also (hopefully) better image quality
|
|

Dangerous Leadbelcher
|
Edit - scroll down for the rest of the conversions.
Well, I bought the cadian command squad yesterday, and I have to say, it is amazing. There are a few weird bits and other bits which aren't particularly practical, even if they are an interesting concept. But, anyhoos, this is a thread about conversions using this set (and the catachan one if anyone wants to post their own conversions). Here are some of mine.
Some shots of my platoon commander and company standard bearer.


A veteran sergeant with a stormbolter (credit is due to whoever came up with the original idea for that design) and a vox operator.


Two of my grenadiers, using the conversion that I posted in my tutorial.

And finally, a medic, working desperately to save the live of one of his comrades.


So yeah, I'll update this as I make more, and anyone else should feel free to post their own pictures in here if they want.
|
|
This message was edited 1 time. Last update was at 2009/05/08 09:15:51
|
|
|
 |
|
2009/05/03 13:49:54
Subject: Re:IG command squad conversions
|
|
2nd Lieutenant
|
How is the command squad in the sense of it being practical, lots of options? so that i won't be seeing the same squad each time i verse an imperial guard army? and what are the strange sprues that you stated before? back to your models, i really like how you did the medic, nice and original but not too busy
|
*Ex Username: Gutteridge*

|
|
|
|
|
2009/05/03 15:49:59
Subject: IG command squad conversions
|
|

Guardsman with Flashlight
|
I did basically the same medic conversion a while back. It just makes sense.
I used Catachans however because i had a load left over.
Great work.
|


The Lord said, "Thou Shalt Not Kill", now listen to me. F**K THAT S**T. |
|
|
|
|
2009/05/03 18:14:37
Subject: Re:IG command squad conversions
|
|

Calculating Commissar
|
Gutteridge wrote:How is the command squad in the sense of it being practical, lots of options? so that i won't be seeing the same squad each time i verse an imperial guard army? and what are the strange sprues that you stated before? back to your models, i really like how you did the medic, nice and original but not too busy
It's a pretty nice spread. If you used some regular joes to provide riflemen or additional bodies, you could make 2 command squads off it easily. There's way more bits that any one five-man unit can make use of.
|
The supply does not get to make the demands. |
|
|
|
|
2009/05/03 22:50:33
Subject: Re:IG command squad conversions
|
|
Leader of the Sept
|
Agamemnon2 wrote:Gutteridge wrote:How is the command squad in the sense of it being practical, lots of options? so that i won't be seeing the same squad each time i verse an imperial guard army? and what are the strange sprues that you stated before? back to your models, i really like how you did the medic, nice and original but not too busy
It's a pretty nice spread. If you used some regular joes to provide riflemen or additional bodies, you could make 2 command squads off it easily. There's way more bits that any one five-man unit can make use of.
That's kind of the point 
@lalabox - Nice work and all, but you do know that Guard characters can no longer get storm bolters?
|
Please excuse any spelling errors. I use a tablet frequently and software keyboards are a pain!
 Terranwing - w3;d1;l1 Terranwing - w3;d1;l1
 51st Dunedinw2;d0;l0 51st Dunedinw2;d0;l0
Cadre Coronal Afterglow w1;d0;l0 |
|
|
|
|
2009/05/04 06:37:27
Subject: Re:IG command squad conversions
|
|
Dangerous Leadbelcher
|
Flinty wrote:@lalabox - Nice work and all, but you do know that Guard characters can no longer get storm bolters?
Wait, what...  Sorry about that. I guess they now count as bolters. And after all the converting I've done. Damn. Thanks for telling me though, I guess I should have picked it up. Edit: Wait. There's still apocalypse. And most of the store games I play are apocalypse. 2nd Edit: Also, I forgot to give explain what I meant before about the set. You can make some pretty varied models out of it. Of course, some people lack imagination and won't do much that's exciting, but they should be pretty varied. Definitely no identical copies of models. The odd bits refer to these rebreather packs that it comes with, that attach onto the face and the front of the flack armor. It was just a bit confusing trying to figure out exactly how they work at first, and that the head seems to be forced into facing directly ahead when using it, but that should be able to be remedied with a little bending. Also, the right arm for the vox caster takes a little green stuff to align it properly, so that the head doesn't have to be leaning away at quite an acute angle. Also, there's a piece with what seemed to be a folded bit of cloth. I'm still trying to figure out what it's for. The person who posted their conversions in another thread used it as a map, which seems to work pretty well. The cloak of the sniper definitely needs gs to go together well. Also I'm not so big on the new heavy flamer design, but that's just me. Also, they have used different sculptors (of course) than the old guard models, so some of the small details are different. For example, the cheek supports on the helmets are much more prominent, and the heads seem a little smaller. The dents for the neck nub on the body pieces are also further set back, so when attaching the new heads to old bodies, they tend to stick out slightly. (most of this stuff is very subtle though) Also, the bottom of the shirts (or 'the skirt bits on the legs' as I've head it called) is quite a bit longer on some of these legs (I ended up filing it down on the grenadier resting his gun on his shoulder) Also, the head with the cap is quite wierd. Although he's supposed to have a visor, it just looks like he's been blindfolded with a strip of metal. Also, they inexplicably recycled a single ammo pouch bit and a water bottle/knife bit from the old catachan sprue. But, anyhoos, onto the good. This may not mean much for the majority of people, but all the new leg poses are really good and useful. All the heads, even if I don't approve of the more prominent cheek pads, are very expressive. It's cool that they made the different signs on the shoulder pads and heads, though it might get a wee bit annoying if you try to intergrate them into normal squads. The arm in a sling works really well, and is a great piece. Even though I've said more baddish things than good, it's still a great set, and is also great for conversions. Of which there should be more.
|
|
This message was edited 6 times. Last update was at 2009/05/08 11:22:49
|
|
|
|
|
2009/05/08 09:10:10
Subject: Re:IG command squad conversions
|
|
Dangerous Leadbelcher
|
Well, I've finished converting the rest of my models, all using the command squad bits in some way, which, after around a year and a half of collecting, has finally brought it up to the minimun of an hq, 2 platoons with 2 squads each. I've also taken more photos of the other models in this thread, hopefully they will be of higher quality, as this time, I used natural light, rather than direct lamp-light, and I rested the camera on something when I took the pictures. First of all, 2nd Platoon commander and the Company standard bearer.  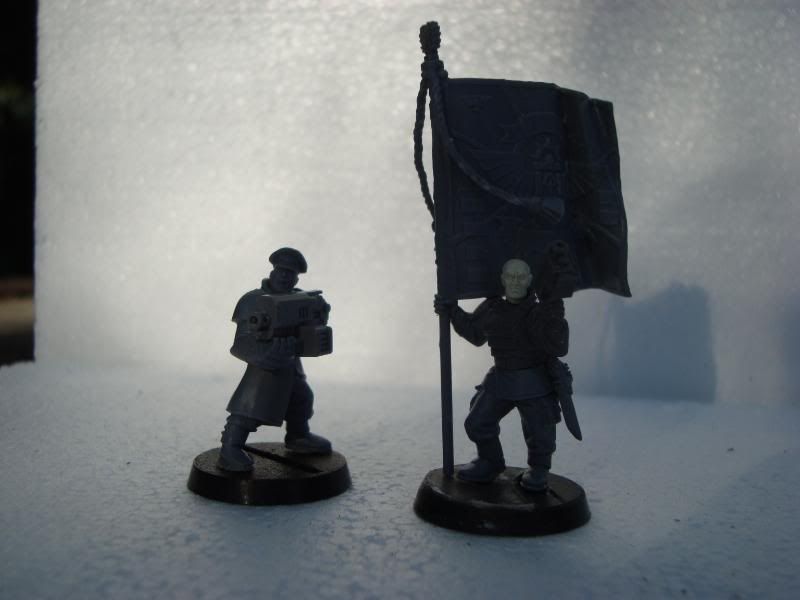 The two grenade launchers.  The company command squad medic. I didn't say it before, but I'm really please with the facial expressions for these two heads in the command squad box.  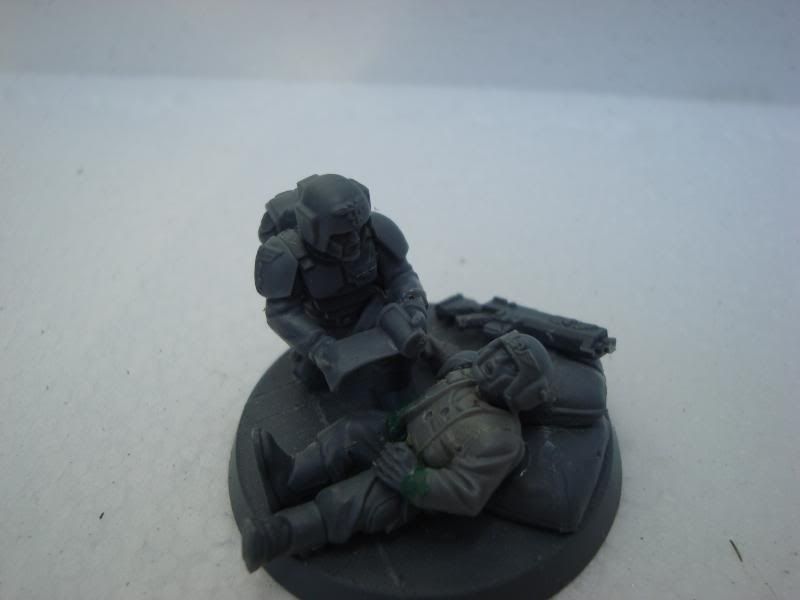 A trooper with a det-charge and another with a massive sword and an smg (based off the one that appeared in the wd quite a while ago. When they still had proper modeling articles).  A trooper with a shotgun and a massive knife, and one of my vet sgt.s with the great sling piece and a custom storm bolter. Even though they can't take them any more.   A plasma gunner with a large 'cooling and safety' pack (if I could take a master crafted plasma gun, I would make it, just to fit in with the background of my army) and an unfinished melta gunner. I'm going to add one of the storm trooper melta gun backpacks if I can get hold of it, just to make it fit in a bit more with the conversion I made with the melta gunner from the old command squad. I've already sculpted the gloves. 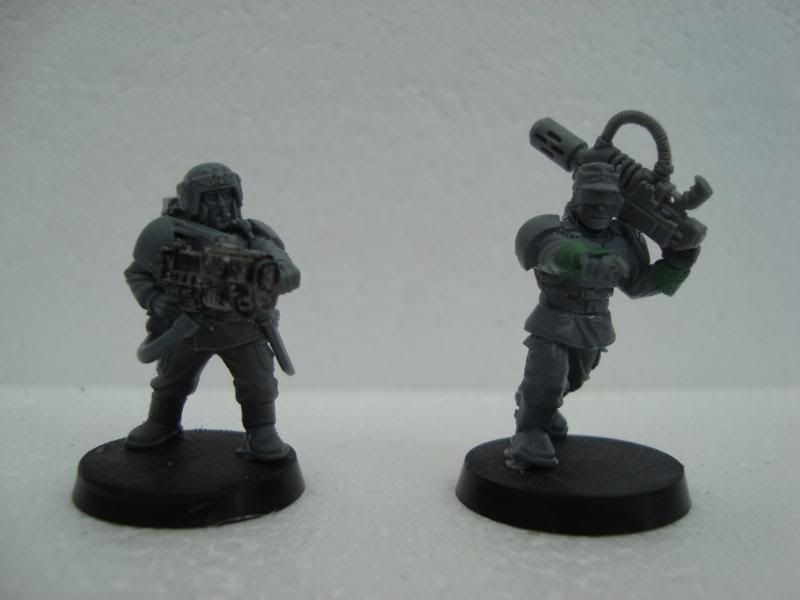  The two vox casters.  Some trooper with a shotgun (copied from someone on here. If it was you, feel free to say so and I'll add your name), a knife and a rebreather. If you use a good head, it does sit on the model's face pretty well. Apart from that, it's a pretty annoying piece. Ignore the fact that his arm is purple. I used to collect chaos, and I used a box of catachans for mutants.   And finally a medic. The only real conversion is that I used the medic arm off the sm command squad. But I did modify it so that it doesn't (hopefully) look like a space marine arm just stuck onto the end of a guard arm. It was built very fast, as I had just found the piece I needed, and I wanted to build and photograph it before the sun went down.   Edit: And here's a photo of the entire army, which incidently, showcases the state of my desk for most of the time when I have something to make.  Well, that's all. After looking at the photos while writing this, I have to say that taking the photos outside hasn't made a huge different, but that might just have been that I took it at the wrong time of day (4ish in the afternoon, just as the sun sank down behind a tree) or that I need to get a better photo hosting site than photobucket. Anyhoos, comments and criticisms are a requirement for reading this thread. Failure to do so will result in me launching a deathstrike at you from 960 inches away. Thanks.
|
|
This message was edited 2 times. Last update was at 2009/05/08 10:08:29
|
|
|
|
|
2009/05/08 22:11:59
Subject: Re:IG command squad conversions - Now with MOAR!!!11 Also (hopefully) better image quality
|
|

Pulsating Possessed Chaos Marine
|
Nice conversions, I was just wondering how you made the "storm bolter" for the guy with the sling? I've always wanted to turn the grenade launcher into a drum ammoed machine gun, but never got around to it. Did you just cut out a slot from a flamer? What did you use for your barrel?
|
|
|
|
|
2009/05/08 23:22:24
Subject: Re:IG command squad conversions - Now with MOAR!!!11 Also (hopefully) better image quality
|
|
Dangerous Leadbelcher
|
It's basically a flamer, with the flame-thrower bit at the end cut off, most of the details on the side shaved off, and a chunk cut out for the drum clip.
Here's a betterish picture

|
|
|
|
|
2009/05/08 23:29:08
Subject: IG command squad conversions - Now with MOAR!!!11 Also (hopefully) better image quality
|
|
Leader of the Sept
|
Really nice models there. Regarding your pictures, does your camera have a Manual mode? If it does try using that and playing with the exposure time. That will brighten up your pictures, although you might need to use a tripod to prevent bluriness.
|
Please excuse any spelling errors. I use a tablet frequently and software keyboards are a pain!
Terranwing - w3;d1;l1
51st Dunedinw2;d0;l0
Cadre Coronal Afterglow w1;d0;l0 |
|
|
|
|
2009/05/09 00:53:37
Subject: Re:IG command squad conversions - Now with MOAR!!!11 Also (hopefully) better image quality
|
|
Dangerous Leadbelcher
|
I'm pretty sure it does. Though I used the close up mode (little flower symbol) for these.
I'll try out manual, as I do have a tripod, but it'll have to be after they are painted, as I've already undercoated them. Thanks a lot.
|
|
|
|
|
2009/05/09 10:02:40
Subject: IG command squad conversions - Now with MOAR!!!11 Also (hopefully) better image quality
|
|
Leader of the Sept
|
Yeah, you need to use Macro mode as well, but I think Macro mode may actually reduce the amount of light getting through the optics... or maybe thats just when you use zoom... Anyway, try fiddling with ISO numbers and exposure time and you should be able to lighten the pics up
|
Please excuse any spelling errors. I use a tablet frequently and software keyboards are a pain!
Terranwing - w3;d1;l1
51st Dunedinw2;d0;l0
Cadre Coronal Afterglow w1;d0;l0 |
|
|
|
|
2009/05/09 11:50:51
Subject: Re:IG command squad conversions - Now with MOAR!!!11 Also (hopefully) better image quality
|
|
Dangerous Leadbelcher
|
Cool, thanks a lot. If it's nice tomorrow, I'll do that.
|
|
|
|
|
|
|