| Author |
Message |
 |
|
|
|
|
Advert
|
Forum adverts like this one are shown to any user who is not logged in. Join us by filling out a tiny 3 field form and you will get your own, free, dakka user account which gives a good range of benefits to you:
- No adverts like this in the forums anymore.
- Times and dates in your local timezone.
- Full tracking of what you have read so you can skip to your first unread post, easily see what has changed since you last logged in, and easily see what is new at a glance.
- Email notifications for threads you want to watch closely.
- Being a part of the oldest wargaming community on the net.
If you are already a member then feel free to login now. |
|
 |
2009/06/20 14:29:11
Subject: Painting valkyrie insides?
|
|

The Last Chancer Who Survived
|
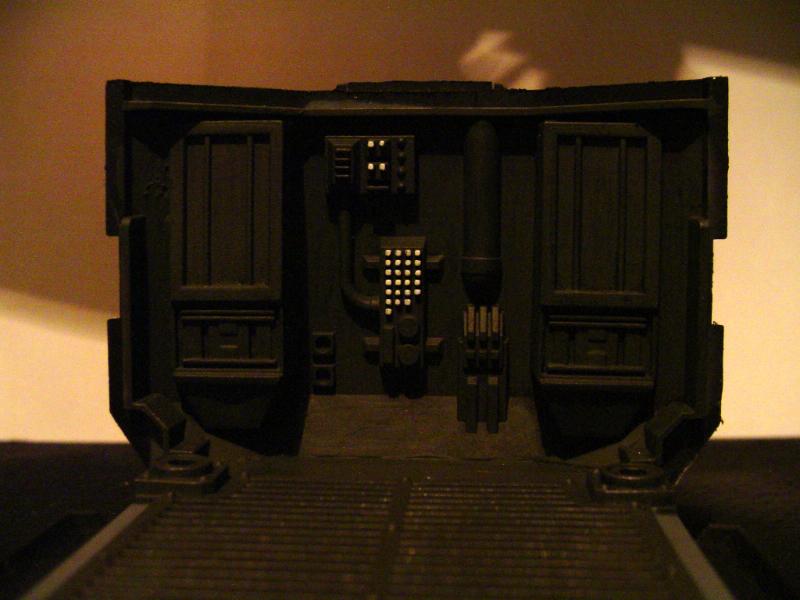
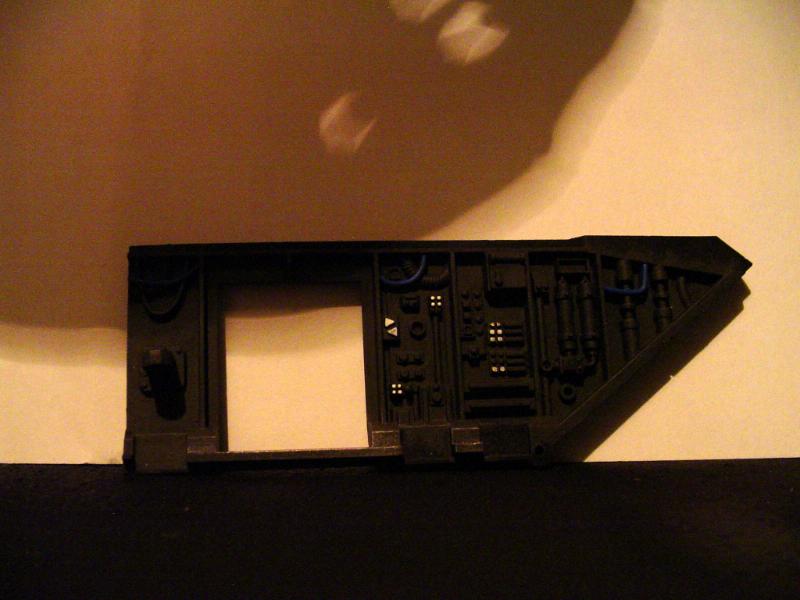
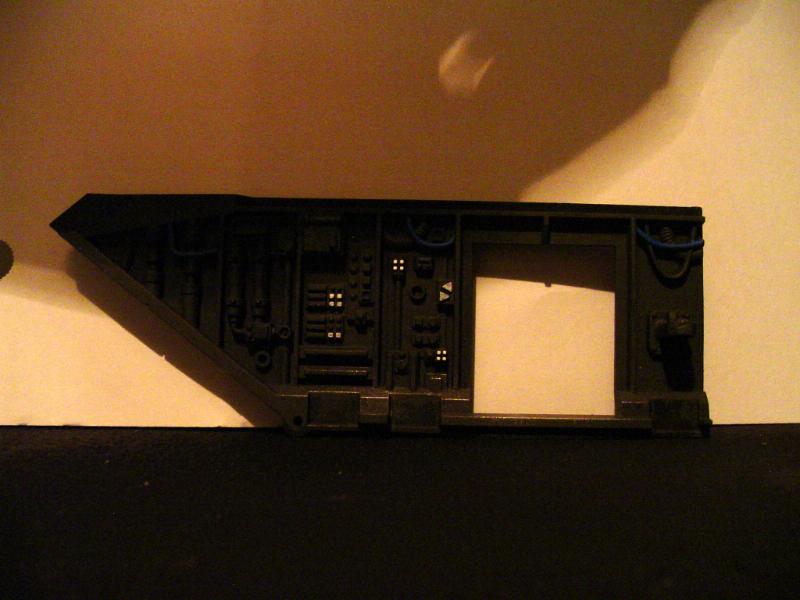
I'm just getting my model area back together now after my move, and I sat down and cracked open a valkyrie box. I had this plan to paint up the insides and make it look like there's guardsmen inside getting ready to hop out, or pointing their lasguns out the door like they mean bidness.
So how do I do that?
I'm one of those guys that needs to paint every little nook & cranny. I know some folks think "if the brush can't reach it, you can't see it anyway" but not me  So first I need to prime the thing. I'm sure I can build & paint the inside crew compartment without the roof first, but with guys hanging out the door it's gonna be tough to prime the outside without the primer going inside and screwing up the paint job. I could maybe use some masking tape, but getting my pudgey fingers in those tight spaces will be a pain. And then there's the pilots, I guess I will have to paint the inside cockpit areas first, then mask it off to spray prime the outside?
Or should I just prime everything first, then glue? I kinda didn't want to do that because I wanted the bonds to be strong.
Or, should I just skip the insides? Looking at the door gunners, they look like they'd make for some nice carapace vet bodies... makes me wonder if they're how the plastic stormtroopers might end up looking like...
|
|
|
|
 |
|
2009/06/17 15:10:36
Subject: Re:Painting valkyrie insides?
|
|
Regular Dakkanaut
|
If I were painting the insides (I sealed mine up because I am rough on my models), I would leave the wing assemblies, the roof, the cockpit, and the gunners to paint separately. Just assemble most of the valk and prime the major assemblies together, paint them separately, then glue it all together at the end.
|
|
|
|
|
2009/06/17 15:15:31
Subject: Painting valkyrie insides?
|
|
Stalwart Veteran Guard Sergeant
|
If you want a strong bond just put some masking tape over the portions that you want to glue together. Then just peel off after painting and glue together.
|
 Kroissen 31st 2000pts Kroissen 31st 2000pts
"What the hell do you mean we're out of Ammo"
Every Commander's worst nightmare
"If the voices stop talking to me, how will I know I'm insane"
Best friend. |
|
|
|
|
2009/06/17 15:23:44
Subject: Re:Painting valkyrie insides?
|
|
Screeching Screamer of Tzeentch
hole in the ground
|
I did mine with the green "GO GO GO" light shading everything green. Basically I assembled the floor to one side and the front wall, and then let it dry. I primed this assembly and the other wall and roof as separate pieces. Just go to town form there, and remember you get light from three sources inside, each waist gun, and the rear ramp. Easy! 
|
|
|
|
|
|
2009/06/17 15:30:49
Subject: Painting valkyrie insides?
|
|
The Last Chancer Who Survived
|
any pics?
I guess I'll do that 3 wall thing. sounds like a good plan. I think I'm more concerned with getting spray primer inside the crew area after that's already painted. I'll just have to try and mask it off. Maybe I'll just paint the men separately and glue them on at the very end
|
|
|
|
|
|
2009/06/17 17:57:58
Subject: Re:Painting valkyrie insides?
|
|

Liberated Grot Land Raida
|
I just undercoated everything while on the sprue, and painted the insides while it was on the sprue. You need to file off the unbdercoatd on the parts you want to glue, but that's pretty easy. It required very lttle touching up as well.
I assembled the engines and part of the cockpit before painting, then painted all the inside stuff and the engines, then glued the whole thing together and painted the outer hull.
|
A Squeaky Waaagh!!
Camkhieri: "And another very cool thing, my phones predictive text actually gave me chicken as an option after typing robot, how cool is that."'
Meercat: "All eyes turned to the horizon and beheld, in lonely and menacing grandeur, the silhouette of a single Grot robot chicken; a portent of evil days to come."
From 'The Plucking of Gindoo Phlem' |
|
|
|
|
2009/06/18 09:59:48
Subject: Re:Painting valkyrie insides?
|
|
Fixture of Dakka
drinking ale on the ground like russ intended
|
I assembled the cockpit the front wall and the floor together, then the tail booms the heavy bolters with the pivot thingy and the arm. Masked all the glue surfaces and primed every thing.
Painted the interior the door interior and then dullcoated the interior. Assembled the rest of the hull with the gun arms inside and the doors closed taped the doors with the tape covering the windows in the doors and the back ramp closed from the inside put on the roof and prime the outside.
|
|
This message was edited 1 time. Last update was at 2009/06/18 10:05:02
 Logan's Great Company Oh yeah kickin' Logan's Great Company Oh yeah kickin'  and not even bothering to take names. and not even bothering to take names.  2nd company 2nd company  3rd company ravenguard 3rd company ravenguard  House Navaros Forge world Lucious & Titan legion void runners House Navaros Forge world Lucious & Titan legion void runners    314th pie guard 314th pie guard  warboss 'ed krunchas waaaaaargh This thred needs more cow bell. Raised to acolyte of the children of the church of turtle pie by chaplain shrike 3/06/09 Help stop thread necro do not post in a thread more than a month old. "Dakkanaut" not warboss 'ed krunchas waaaaaargh This thred needs more cow bell. Raised to acolyte of the children of the church of turtle pie by chaplain shrike 3/06/09 Help stop thread necro do not post in a thread more than a month old. "Dakkanaut" not "Dakkaite"
 Join the Church of the Children of Turtle Pie To become a member pm me or another member of the Church Join the Church of the Children of Turtle Pie To become a member pm me or another member of the Church  |
|
|
|
|
2009/06/19 14:19:00
Subject: Painting valkyrie insides?
|
|
The Last Chancer Who Survived
|
I got lazy :( I was building mine and then I decided it was too much work to do the insides so I left it as is. Also, the rear door is kind of a pain, it won't stay closed and it's already bugging me so I might just glue that shut. However, I will be painting the guys in the cockpit and that whole area before I do the rest.
But right now I can't decide if I want to paint it to be mostly black like my russes and chimeras, or gray like my baneblade...
Anyway, since I will be building a 2nd one and now that I know how they go together maybe I'll do the 2nd one with the sponsons. I'm thinking if a squadron of 3 maybe the lead one would have sponsons, and the other 2 wouldn't. Thats how I was planning to do my russ squadrons too.
|
|
|
|
|
|
2009/06/20 01:08:06
Subject: Painting valkyrie insides?
|
|

Anti-Armour Swiss Guard
|
I found the way to make the rear hatch stay closed was to use two thin strips of plasticard (one on either side) glued in place to the sides of the hatch (010 or 0.25mm) - or the mating areas on the side hulls. Trim them to the length of the large armour panels and they hold fine, and even let the door open still. You can sand them back a little if you get too snug a fit.
Similar strip was used with the side doors to stop them sliding too much. They still slide open and closed, but they stay in place during movement.
I also added two pieces of sprue underneath the hinge pivot that 'catches' the hatch and stops it opening further than the landing gear.
|
I'm OVER 50 (and so far over everyone's BS, too).
Old enough to know better, young enough to not give a ****.
That is not dead which can eternal lie ...
... and yet, with strange aeons, even death may die.
|
|
|
|
|
|
|