
+++++++++++++++++++++++++++++++
Friday Quick Tip: Spackle Basing
By: grey_death

After aquiring an
APE Grunt mini from
Iorek over on
Dakka, I couldn't wait to get started on it. I have been following
Incursion for some time now, and I'm really excited to actually own a piece from such a cool game. Hopefully the first of a full set yet to come! Once I ripped open the package and pulled all of the parts out, I realized that the basing was of the 'fill in' variety, similar to
Battletech bases. I had just recently posted my
spackle terrain tips and immediately thought to make use of the filler for basing for the first time.

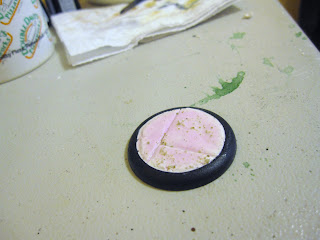
To start me off, I just globbed a good amount of filler onto/into the base. I am never really worried about 'over doing it' at this stage as spackle is pretty simple to clean up! Just get the stuff on the base!

To clean up your mess, just use a finger around the rim of the base. Any spots that might give you issue, just use a wet rag and they'll come right up. It's not a huge issue if it's on the base, as you'll likely paint it over anyways, but too much can leave a gnarly texture with no context!

When the spackle starts to hint that it's drying (in this case the white ring), you can start to shape it with a sculpting tool in the styling of your choice. In my case, I went with a concrete paved base. Since
Incursion takes place in an underground bunker at
Gibralter, it made sense! The lines and carving should go easy at this point, but make sure not to press too hard in any direction, as it'll push the spackle back into the detailing you just made! Once you've got your rough details on, let it dry completely. Any additional details can be carved out of the spackle (carefully!) once dry. It is slightly brittle though, so a steady hand and pressure will be vital in not ruining what you've already created.
As I said above, this stuff is brittle. It needs some sort of sealer. I decided that PVA glue would be my best bet, so I took some watered down glue and painted it over the entire base surface. And since I was adding glue, I went ahead and added a bit of fine sand to add a bit more texture. If you've been reading all of my basing articles, you might start to see a bit of a pattern here!

And here we have the finished base, ready for its model. I kept my edges rough on purpose and it gave me a great worn concrete look. But it's up to you, the creator, to make your base in your minds eye a reality.

One consideration you need to take into account when using this method of basing though, is the weight of the model! The
APE Grunt is a heavy chunk of metal! And like I said earlier, spackle can be brittle, and I just don't trust it to hold such a big hunk of mini to itself without cracking out, even with the PVA glue wash. So pinning a heavy metal model to the base is probably a good idea.
How well this would work on a model that doesn't have a recessed base like this is all up to how thick you are willing to go with your base. I personally don't know that I would use it on a flat
GW style base. But don't let that stop you.
So there you have it, another basing type to put into your repitoire of basing tricks! Any new ideas for basing out there?


