| Author |
Message |
 |
|
|
|
|
Advert
|
Forum adverts like this one are shown to any user who is not logged in. Join us by filling out a tiny 3 field form and you will get your own, free, dakka user account which gives a good range of benefits to you:
- No adverts like this in the forums anymore.
- Times and dates in your local timezone.
- Full tracking of what you have read so you can skip to your first unread post, easily see what has changed since you last logged in, and easily see what is new at a glance.
- Email notifications for threads you want to watch closely.
- Being a part of the oldest wargaming community on the net.
If you are already a member then feel free to login now. |
|
 |
2009/10/14 20:52:27
Subject: Pros/Cons of painting bases before glueing the miniature?
|
|

Nimble Mounted Yeoman
|
I ordered these bases for my IG army:
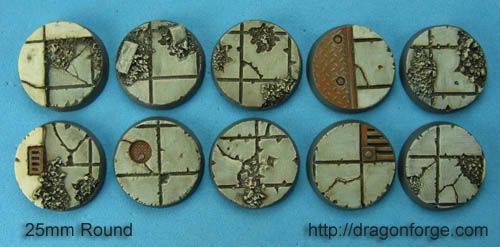
I ordered the bases for about 75% of the army. I am planning on using a lot of Forgeworld stuff and with a limited budget it will be awhile before I get all the minis. So now I am wondering if I should paint up all the bases in the meantime, but do not know if this is a good idea or not. Any suggestions will help.
|
|
|
 |
|
2009/10/14 21:19:55
Subject: Pros/Cons of painting bases before glueing the miniature?
|
|
[DCM]
.
|
I'd love to hear opinions on this as well.
I'm thinking that it might in fact be a good idea to paint these bases first, knowing that you might have to touch them up later, depending on you 'sloppy' you get on the model's feet...
|
|
|
|
|
2009/10/14 21:23:15
Subject: Pros/Cons of painting bases before glueing the miniature?
|
|
Executing Exarch
|
If you paint them before hand how are you going to prime the models?
|
|
|
|
|
2009/10/14 21:29:54
Subject: Pros/Cons of painting bases before glueing the miniature?
|
|
Nimble Mounted Yeoman
|
I would be painting them as two separate pieces and then attaching them. If this is a good idea. Why I am asking for pros/cons.
|
|
|
|
|
2009/10/14 21:31:02
Subject: Pros/Cons of painting bases before glueing the miniature?
|
|

Mutilatin' Mad Dok
|
you can always paint the bases and then pin the models to their normal base for painting thenput them on the fancy pants ones when they're done?
|
|
|
|
|
|
2009/10/15 02:58:11
Subject: Re:Pros/Cons of painting bases before glueing the miniature?
|
|
Khorne Rhino Driver with Destroyer
|
Pro: you can can paint both the base and the mini with out having to worry about ruining hours of work.
Con: you have to pin the model to the base
|
|
|
|
|
|
2009/10/15 03:01:27
Subject: Re:Pros/Cons of painting bases before glueing the miniature?
|
|

Sinewy Scourge
|
My plastic models are always painted separately from the base and then glued on later. Metal models require gap filling, so I'm often forced to glue them to the base and fill in around the slots before painting. The style I use on my base is a directly painted sort of swirling mix with no flock or sand and so it is a heck of a lot easier to batch paint half a dozen or so loose bases at a time. I can't really do as much of a design on the slot bases because of the model being in the way.
Ironically, this means that my troops tend to have slightly more intricate bases than my HQs... yet somehow it works.
|
|
|
|
|
|
2009/10/15 03:45:50
Subject: Pros/Cons of painting bases before glueing the miniature?
|
|
Fresh-Faced New User
|
I like to put the mini on the base first then prime and paint both at once. I've found that if you do get a tiny amount of whatever color you drybrush your bases (if you drybrush your bases I suppose) on your mini's feet, it just looks like whatever the ground is made of has dusted up onto his feet.
|
|
|
|
|
|
2009/10/15 03:53:23
Subject: Pros/Cons of painting bases before glueing the miniature?
|
|
Crazed Spirit of the Defiler
|
If you put the money into fancy bases, I would do them separately, just to get your money's worth. I always do my bases before I prime so the models look like they are actually standing on ground and making foot prints. However, with your concrete city bases that won't matter so like I said, do them separately.
|
|
|
|
|
|
2009/10/15 15:04:58
Subject: Pros/Cons of painting bases before glueing the miniature?
|
|
Erratic Knight Errant
|
Paint the bases, then paint their shoes before you cut 'em off the sprue. Then glue them on and go from there.
I'm not the only one who just basecoats then applies a wash when it comes to feet, am I?
|
|
|
|
|
|
2009/10/15 15:23:28
Subject: Re:Pros/Cons of painting bases before glueing the miniature?
|
|
Alluring Sorcerer of Slaanesh
Union, Kentucky United States
|
honestly I wouldn't more to the fasct of just having to many mishaped and then you have wasted time and money.
|
Listen, my children, as I pass onto you the truth behind Willy Wonka and his factory. For every wonka bar ever created in existance, Mr. Wonka sacraficed a single Oompa Loompa to the god of chocolate, Hearshys. Then, he drank the blood of the fallen orange men because he fed them a constant supply of sugary chocolate so they all became diabetic and had creamy, sweet-tasting blood that willy could put into each and every Wonka bar. That is the REAL story behind willy wonka's Slaughter House! |
|
|
|
|
2009/10/15 15:34:07
Subject: Pros/Cons of painting bases before glueing the miniature?
|
|
Stealthy Warhound Titan Princeps
|
I always paint the miniatures on the normal black bases that come with them, and then paint the bases separately. I don't pin them, I super glue them, because odds are good i'll want to remove the model from the base at a later time if I choose to do a conversion, or need the base for another model, or something like that. They break off the bases every once in a while, but for standard plastic models, it doesn't really matter, the glue holds strong enough 99% of the time unless you drop a mini. even then, something has to give, and i'd rather it be the glue on the feet instead of the glue holding the arms on the mini.
|
|
|
|
|
2009/10/15 15:36:46
Subject: Pros/Cons of painting bases before glueing the miniature?
|
|
[ARTICLE MOD]
Fixture of Dakka
|
IF you're using cool resin bases, you need to pin the models to the bases anyway.
Look at my khorne, nurgle, or tzeentch daemon armies (click icons in profile) to see how it turns out... I've had no problems painting the bases first and the guys second and then attaching them.
In fact, it makes it considerably easier to get the sort of look to the resin bases that you want, and get it consistent for the whole army as you can assembly-line the bases too.
|
|
|
|
|
|
2009/10/15 15:42:34
Subject: Pros/Cons of painting bases before glueing the miniature?
|
|

Torch-Wielding Lunatic
Canada
|
I think a miniature needs to be built with a specific base in mind to really look natural. Make sure his feet etc work with the ground, and I'd tack him in place for when you prime the model. Then photo the model with a top down lightsource to see the natural light. Pop him off and paint the two seperately. There will still be a mark on the base from where he was tacked so you can put him back in position later.
|
|
|
|
|
2009/10/15 16:02:04
Subject: Pros/Cons of painting bases before glueing the miniature?
|
|
Alluring Sorcerer of Slaanesh
Union, Kentucky United States
|
oldschoolmonk wrote:I think a miniature needs to be built with a specific base in mind to really look natural. Make sure his feet etc work with the ground, and I'd tack him in place for when you prime the model. Then photo the model with a top down lightsource to see the natural light. Pop him off and paint the two seperately. There will still be a mark on the base from where he was tacked so you can put him back in position later.
Agreed. Thats why I always start with the feet and the base. I know some people like to build the who thing first but I like to start ground up. This way you want to prop the feet whatever much easier to do.
|
Listen, my children, as I pass onto you the truth behind Willy Wonka and his factory. For every wonka bar ever created in existance, Mr. Wonka sacraficed a single Oompa Loompa to the god of chocolate, Hearshys. Then, he drank the blood of the fallen orange men because he fed them a constant supply of sugary chocolate so they all became diabetic and had creamy, sweet-tasting blood that willy could put into each and every Wonka bar. That is the REAL story behind willy wonka's Slaughter House! |
|
|
|
|
2009/10/16 01:20:34
Subject: Pros/Cons of painting bases before glueing the miniature?
|
|
Nimble Mounted Yeoman
|
Redbeard - Do you have a tutorial or can you explain to me how you pin to the base? Also I love your Khorne army, being an ex-Khorne worshiper it really embodies Khorne well.
oldschoolmonk - I like this idea a lot, where do you get blue tack?
|
|
|
|
|
2009/10/16 02:03:01
Subject: Pros/Cons of painting bases before glueing the miniature?
|
|
[ARTICLE MOD]
Fixture of Dakka
|
There's really not much to it.
First, cut off any slotta tab, file down model's feet so they're flat. Then use a pin vise to drill a hole in the model's foot. Stick a paperclip in it, and then cut it off with a few (3-5)mm sticking out.
Paint the base & model. Figure out where you want the model, mark where the pin needs to go, and then drill the matching hole into the base. Stick model on base and make sure it's where you expected it.
Pull it out again, put glue on the pin, and on any other part of the model that will touch the base, and push the pin back into the base. Let glue set, and it should last forever.
If you're doing a lot, I recommend using a power drill for pinning.
|
|
|
|
|
|
|
|
 Angels of Excess Slaanesh PLOG
  way too much
 Doom legion


