Hello Dakka!
So I've been something of a ghost lately, since my semester started I haven't had time for much beside sleeping, working, and school. Despite all that, John and I managed to get another one in the books, this time it's the first battle of a little campaign I'm running at the store. This time, a lonely, dusty company of Space Wolves, posted in the desert from from more preferable climes, attempt to hold a windswept ruin of an outpost from the Tyranid menace. Here we go!
The Lists:
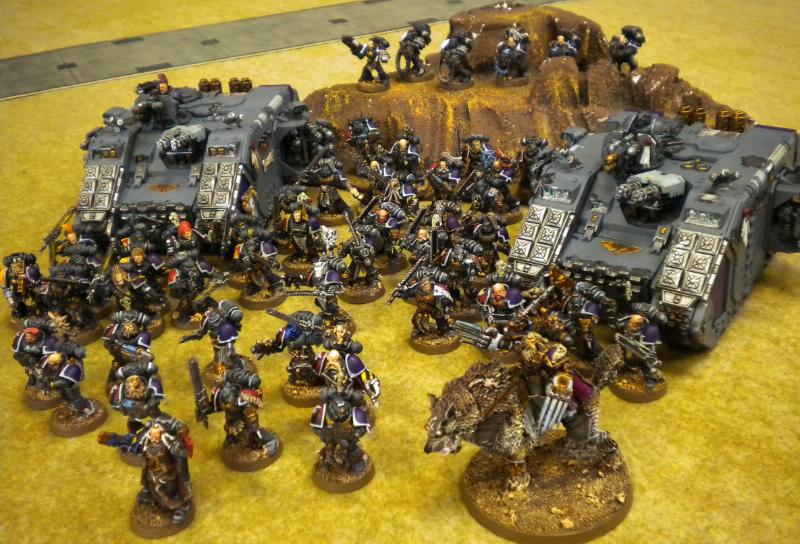
Space Wolves
HQ
-Canis Woflborn
-Wolf Priest w/Plasma Pistol
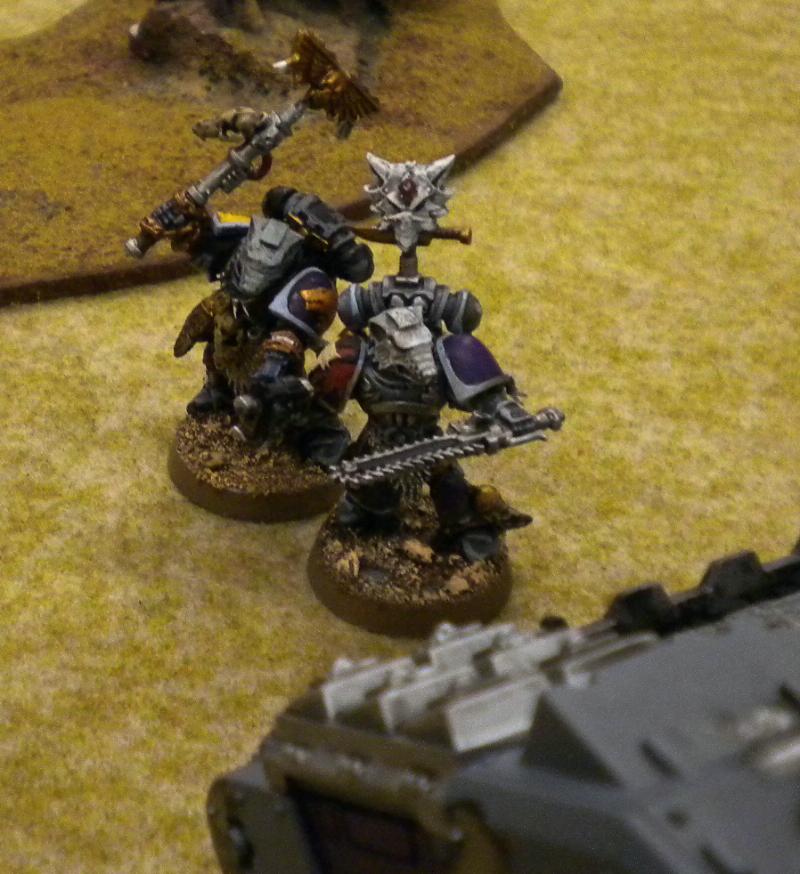
-Wolf Priest
-Rune Priest w/ Living Lightning,
JotWW
Troops
-Grey Hunters (10)
2 Meltaguns,
MoTW, PFist
-Grey Hunters (10)
2
PG, 1PP, PFist
-Grey Hunters (10)
PG,
MoTW, PFist
-BloodClaws
Flamer, PFist
Heavy Support
-
LRC w/
MM
-
LRC w/
MM
-Long Fangs (6)
3
PC, 2HB PFist/
PG
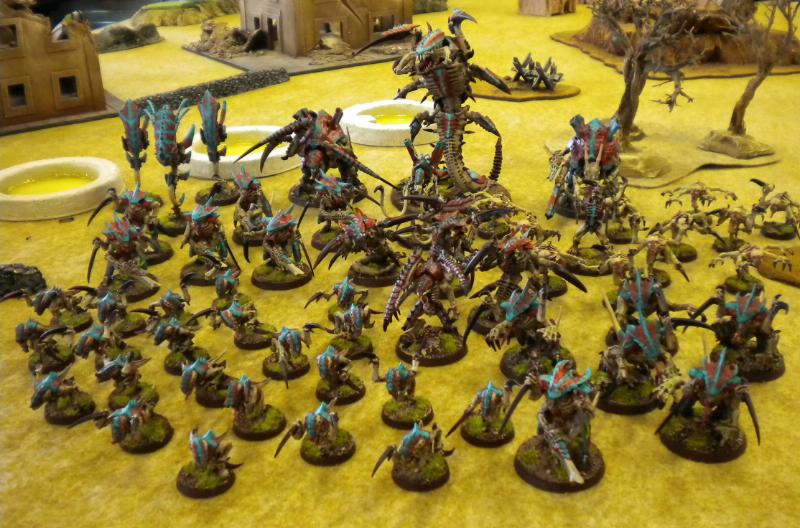
 Tyranids
HQ
Tyranids
HQ
- Tyranid Prime w/Deathspitter, 2x Bonesword
Elites
- Venomthrope
- 3 Zoanthropes
- Deathleaper
Troops
- 6 Shooty Warriors w/ Deathspitters, Strangler
- 5 Fighty Warriors w/ glands, rending claws
- 20 Hormagaunts w/ toxin sacs
- 11 Genestealers w/Talons, Broodlord w/Talons
Fast Attack
- 3 Raveners w/ Rending Claws, Devourers
Heavy
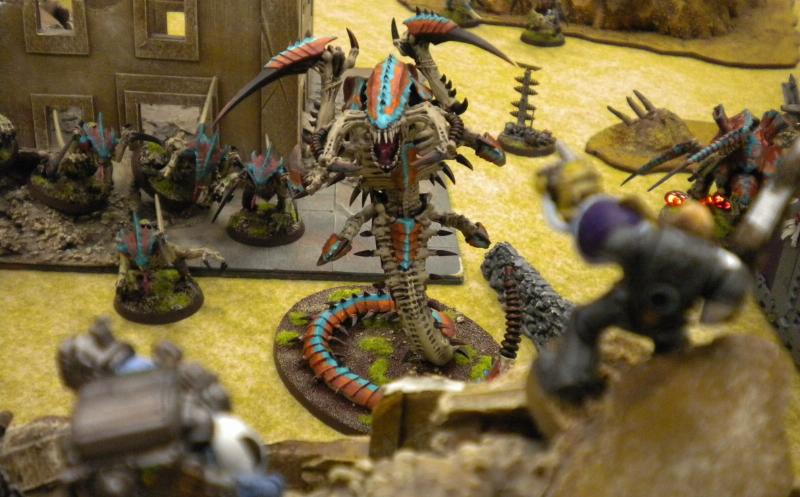
- Trygon Prime w/ glands
- Carnifex w/ 2x Talons, Glands, Frag, Plasma
- Carnifex w/ Stranglethorn, 2x Devourer
 Mission:
 Seize Ground
Deployment: Spearhead
I win the roll to pick and deploy and I cede first turn to John, he takes it and deploys in the north-west quadrant.
Objectives: We rolled a total of 4 objectives, and I won the roll to place first. The objectives were placed as shown:
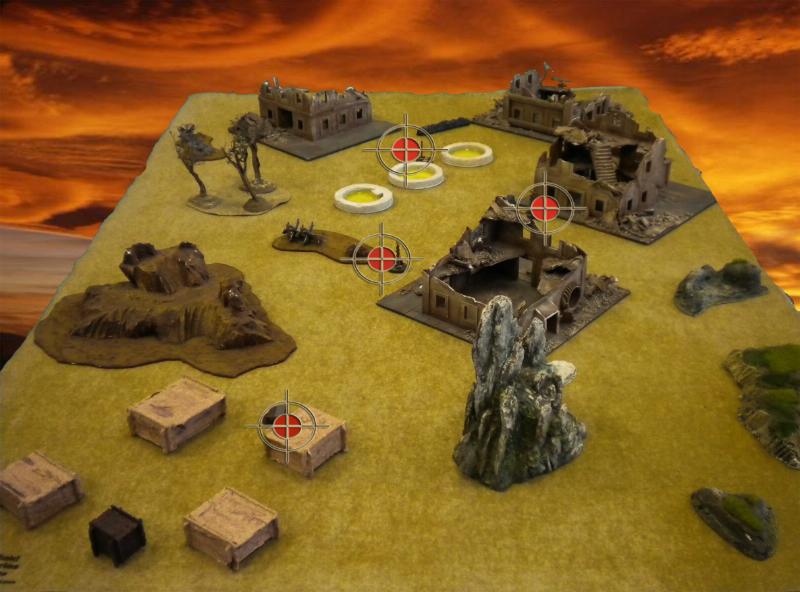
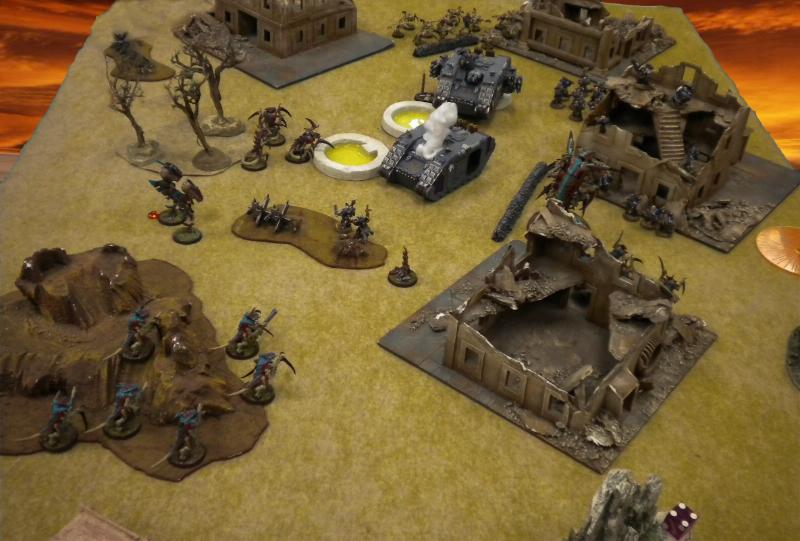
One in the center-west by the three reflecting pools, one up near his the center north by the ruined building, one completing the little ‘triangle of doom’ near the center of the board between the building and the tank traps, and the last one in the southeast nestled in with the desert shanties.
Deathleaper chooses his Rune Priest for “It’s After Me!”, and I roll a 1 for the leadership deduction. Woo!
 Deployment:
Tyranids:
Deployment:
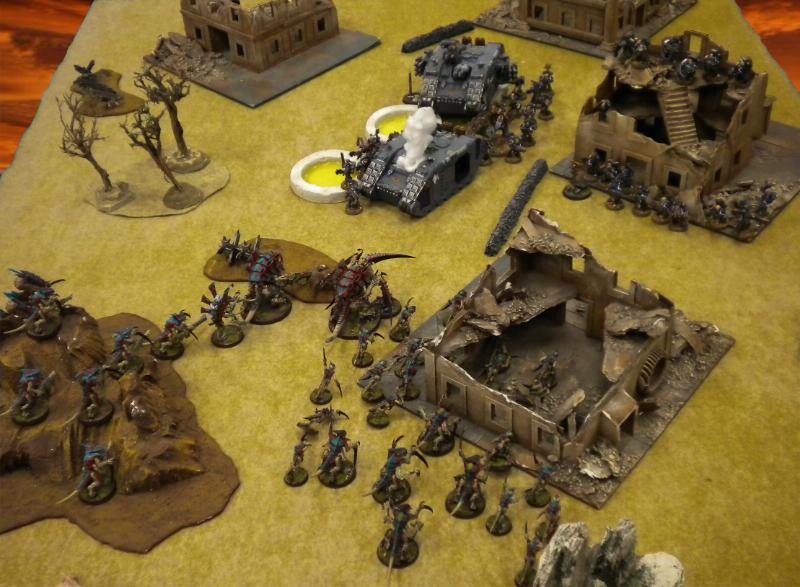
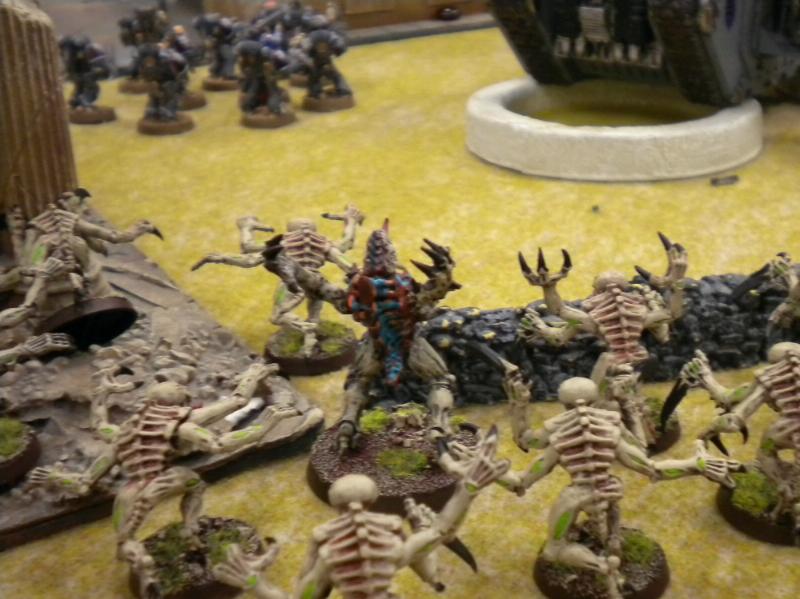
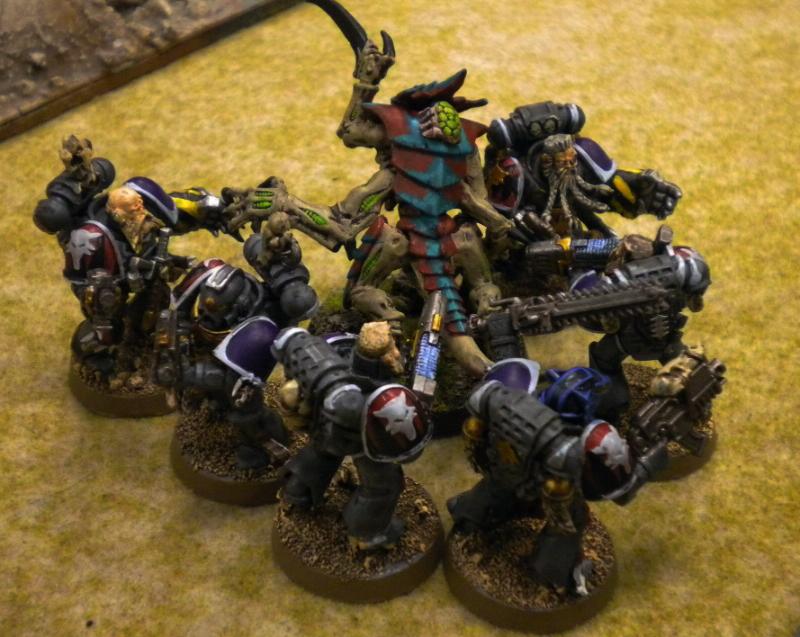
Tyranids: Shooty Warriors take up positions on the hill overlooking the city, flanked by Zoanthropes to their left by my edge and the Venomthrope to the right, closer to the center of my battleline. Carnifexes front and center within Poison cloud range, Hormagaunts spread over the north edge of my Dzone, interspersed with the Fighty Warriors. Trygon and Raveners are deep-striking, Deathleaper has Chameleonic Skin on, Genestealers and Broodlord are outflanking.
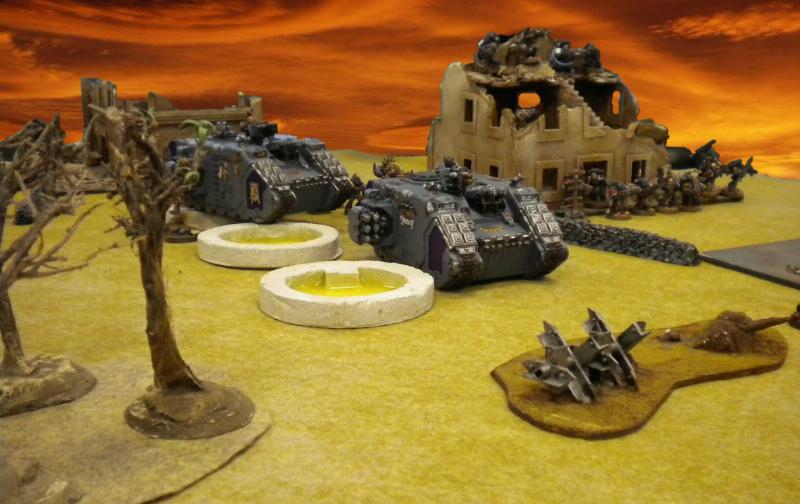
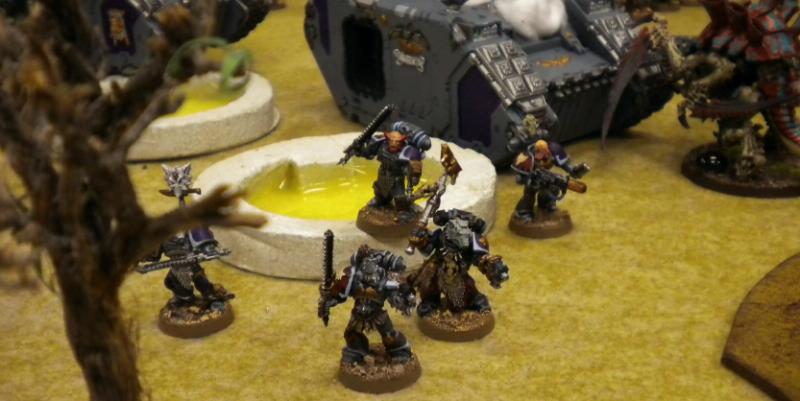
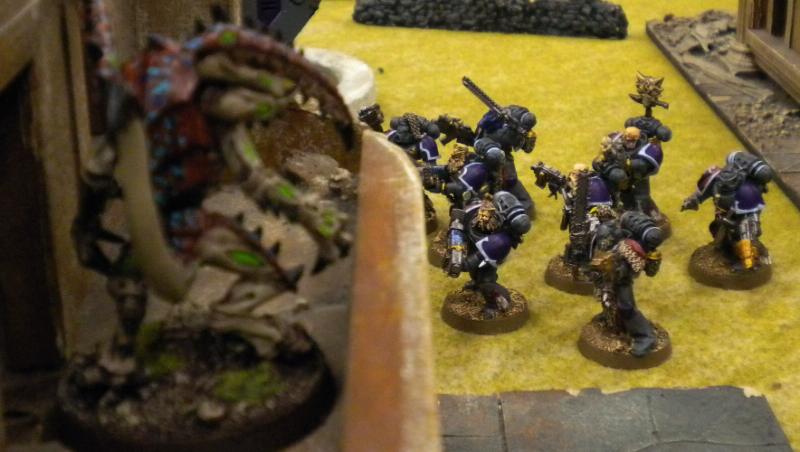
Space Wolves: Long Fangs with the Runepriest are in top story of the north-center building over looking the center of the field. Crusaders front and center. The one to the rear has Blood Claws with a Wolf Priest, the one in the front has Grey Hunters w/meltaguns and a Wolf Priest. Grey Hunters on foot deploy in the bottom floor of the building holding the Long Fangs, and Canis is behind the Raider wall with the other squad of Grey Hunters.The Wolf Priests both decide their Preferred enemy will be Infantry models.
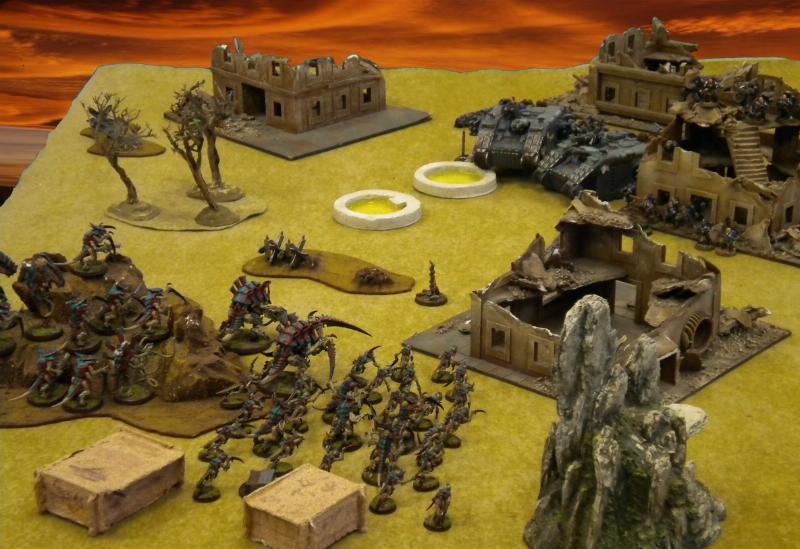
I decline to attempt to seize.
Turn 1
Space Wolves: Land Raiders roll forward, the
LRC loaded with Blood Claws tracks itself on the reflecting pool before it moves an inch. Canis hangs back behind the mobile
LRC, and the rest of the firebase jostles slightly. Pot-shots kick up sand on the Tyranid lines but generate no kills,
JoTWW cracks the desert open, one of the Shooty Warriors nimbly jumps aside, one of the Zoanthropes falls in.
 Tyranids:
 The front line surges forward; Fexes run up the center, Gaunts and Fighty Warriors move up toward the ruin. Strangler and Stranglethorn blasts hammer into the Long Fangs but generate no kills, one Zoanthrope makes lance range on the lead
LRC and cracks it, rolling a result of 5-wrecked, and the Grey Hunters inside pile out.
 Turn 1 Thoughts
John:
Turn 1 Thoughts
John: Push button, I was simply getting myself into position. Immobilizing my own
LRC was catastrophically horrible. I wanted to consolidate control on the two objectives I controlled and make sure I had a clear line to use
JotWW. This was only my 4th game playing
SW and my first using a Rune Priest and Long Fangs so I neglected to split fire and shoot my
PC or
HB at another target once the Zoanthrope died, oops. Losing my other
LRC on Travis' first turn stung pretty bad. I decided to stick to my plan and hold onto my two objectives since I still had a huge number of troops on them and make a bee line to try and contest the one in the center.
Travis: Turn one was simple for me… Charge! I was planning on losing at least one of my Fexes to Jaws, if not eventually both, so I wanted to make sure they were properly shoved down John’s throat before they died. The rest of the turn was more of the same, and I weighed the lack of a kill on the Long Fangs (which I had my fingers crossed for; a pin from one of the Strangler-class weapons would have meant a turn free from Jaws) against cracking the Grey Hunter
LRC first turn. It seemed to work in my favor, since one got tracked and one was tracked right out of the gate… I’d have rather gotten the Long Fangs and that damnable Psyker pinned. I abandoned my starting objective right away to move on his base, with the general plan that the Zoes and the Shooty Warriors would hold the hill and move to claim later, while the rest of the force hit the pedal hard and got busy presenting him with better targets. So far, so good!
Turn 2
Space Wolves: Canis breaks for the Tyranid fighting flank and gets in position to hit the Gaunts. The Grey Hunters all jostle nervously without committing anywhere just yet. Grey Hunters that bailed from the wrecked
LRC put shots on the Zoes to little effect, and the rest of the shots are less-than-lethal.
JotWW lances out from the second floor of the firebase, and the Shooty Fex, one of the Shooty Warriors, and the Venomthrope all fall into cracks in the desert. Canis barrels into the Gaunts and eats half of them between lightning claw kills and No Retreat! Saves, but takes two wounds himself thanks to Poisoned Attacks.
 Tyranids:
 Deathleaper joins the party, appearing on the balcony behind the Rune Priest. The Fighty Warriors move up further through the building next to the Canis/Gaunt assault, and the Zoes float forward a bit. The Shooty Warriors begin to fall back slightly and the Fighty Fex moves up to cover behind the wrecked
LRC. Shots from Strangler weapons and Bio-Plasma all either miss horribly or fail to wound. Warp Blast vaporizes some of the Grey Hunters in the open center. Fighty Warriors run up a bit and the Gaunts finish off Canis with envenomed talons; a meager four models from the unit survive to consolidate toward the Space Wolf firebase.
 Turn 2 Thoughts
John:
Turn 2 Thoughts
John: Losing the two
LRCs is really beginning to hurt. I have lost my mobility meaning I will have fight this battle in my own table quarter whereas I had hoped to duke it out either in the center or, best case scenario, in Travis'. Alas that is not to be, I lost Canis to a silly unit of Gaunts which is only fitting since Canis is kind of a silly character. To be honest I played him because I had the model and my initial plan for him was to charge the warriors, but as they say "the best laid plans..." Regardless,this turn was pretty good for me;
JotWW is terribly good (borderline broken in my opinion) and I still have around 40 marines left on the table plus and
LRC that can shoot.
Travis: Bleh! Have I mentioned that
JotWW is a dumb power? Well, it is. Other than that… ...I can’t complain; Canis is now dead, exchanged for what was only basically a meatshield/speedbump unit, and the plan is still underway well enough. I was expecting to lose a Fex to Jaws, at the moment I’m happy it was the Shooty Fex, so that I can try and leverage the Fighty Fex against the other
LRC, hopefully after eating some Grey Hunters! Fingers crossed Deathleaper lives, but I’m not holding my breath.
Turn 3
 Space Wolves:
 Grey Hunters behind the Raider wall move back a bit and take aim on Deathleaper. Grey Hunters from the wrecked
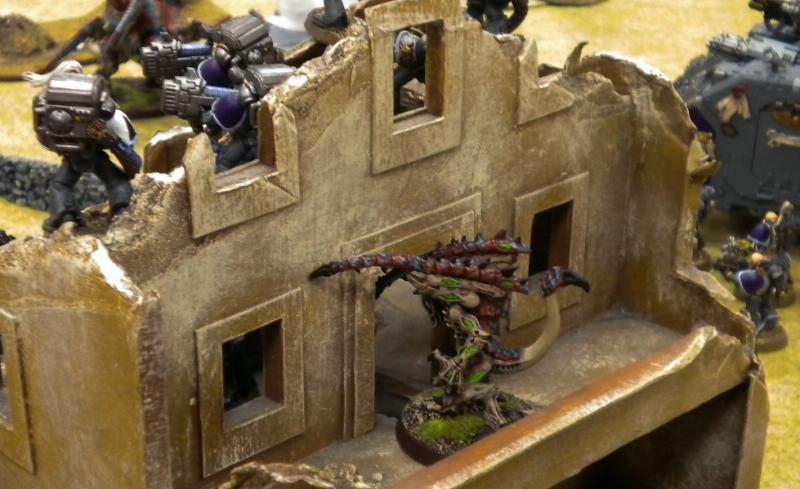
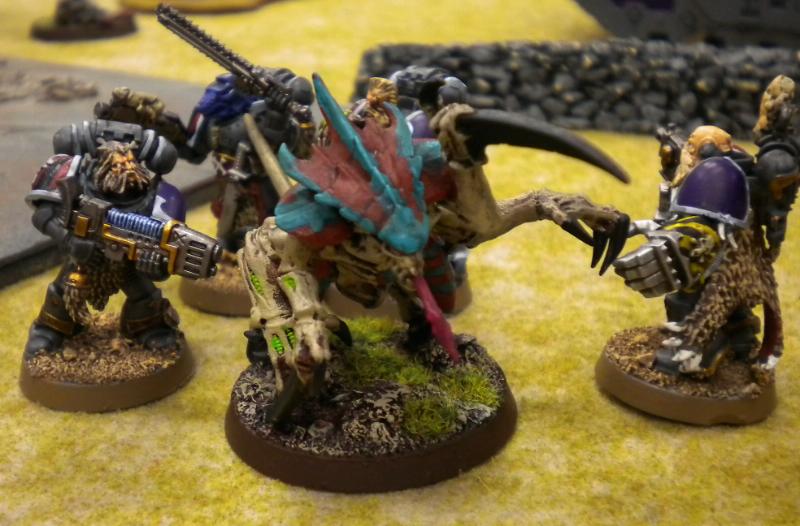
LRC move on the remaining Fex, and the Long Fangs plant their feet again. Grey Hunters on the bottom floor of the firebase dakk-dakk the rest of the Gaunts down with bolter fire, and heavy fire fries the Fex for two wounds. John goes for Living Lightning this turn but fails the Psychic Test. Deathleaper dies unceremoniously to massed Grey Hunter fire, and the Fex gets charged! Two wounds stick on the Fex; it’s still breathing (barely), and swings back, impaling 3 Wolves on its claws. The Marines hold, so the fight goes on.
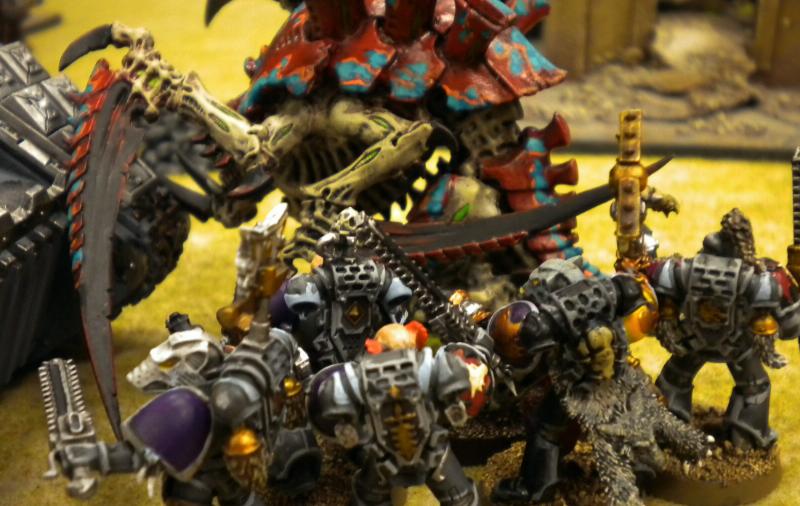
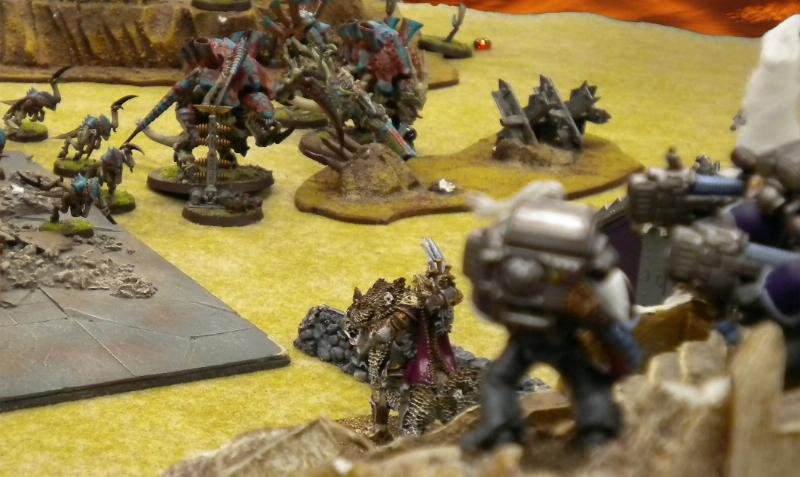
Tyranids: The rest of the Tyranid reserves arrive, with a roar the Trygon Prime explodes from the desert in a shower of sand right in front of the Space Wolf firebase. Genestealers Outflank behind his forces and move toward the Grey Hunters that just killed Deathleaper. Raveners scatter from their intended point next to the
LRCs, and slither from the dunes 8” back, toward the center of the board. Shooty Warriors continue to pull back toward my sole uncontested objective, and Fighty Warriors claw further through the rubble toward the Trygon and the Grey Hunters. Pot-shots from Warriors continue to be useless, and the Zoes are found to be just short of Lance range on the remaining
LRC. Trygon Prime unleashes a crackling burst of energy that deep-fries the Long Fangs down to a
PC, the pack leader with a
PG, and that damn Priest. Fighty Warriors roll too low on their Dangerous Terrain test to make assault, and the Fex eats one
MotW attack (John rolled really well for these most of the game) too many, dying before his second chance to swing. The gore-splattered remnants of the Grey Hunter squad in the center consolidates toward the center objective.
 Turn 3 Thoughts
John: I am not too excited about all the rest of his reserves coming in at once but I know from previous experience that the Trygon is going to die next turn to massed fire anyway. What concerns me the most is the Outflanking stealers and the fighty warriors beginning to close in on my Grey Hunters holding the objective below the Long Fangs. Losing most of the Long Fangs hurt but they had basically just been taking potshots at the shooty warriors all game doing a wound here and there, so no big loss.
Travis: Good, good… processing nicely. My assault elements are poised to strike, I’m consolidating my ‘safe’ objective (which is unequivocally mine now), and John’s taken some heat. The Grey Hunters in the center are manageable and the Long Fangs have been well-whittled. The only unquantifiable now is the Blood Claw squad waiting with uncharacteristic calm in the tracked
LRC. I’m not quite to the catbird and seat introductions just yet, but I’m still confident in the plan. Whatever’s left of my assault elements will hit in hard next turn and should gum up the center enough that my back-pocket Shooty Warriors can get the job done.
Turn 4
 Space Wolves:
 The last
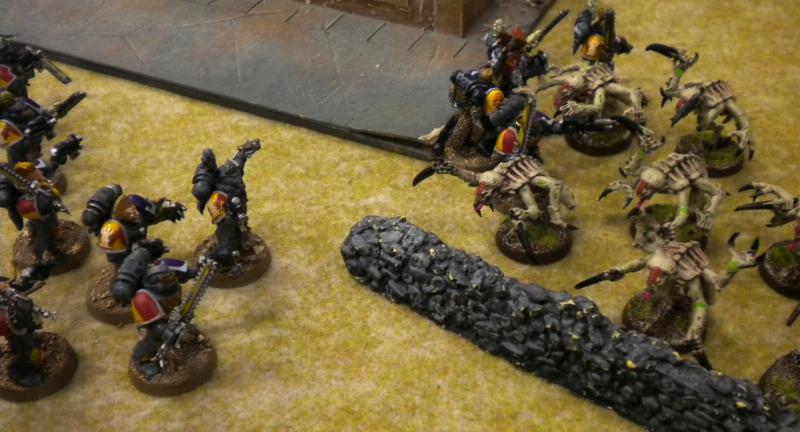
GH and Wolf Priest struggle up into terrain next to the center objective in an attempt to claim/contest it. Blood Claws pile out and break back toward the Genestealers. The Grey Hunters in the backfield that waxed Deathleaper swing around toward the Trygon and the center. The remaining Long Fangs hold firm, and the Grey Hunters on the ground facing off against Warriors and Trygon Prime grit their teeth and move out into the open? (heavy sigh from John). Pistol fire kills a few Genestealers, and a volley from the
LRC fails to wound the Zoanthropes. Hot Plasma death and singing bolters from one Grey Hunter squad and the Long Fangs drop the Trygon, thanks to great rolls and a couple failed armor saves. The Grey Hunters in the open rapid fire into the Warriors doing 1 wound. Blood Claws roast only 2 stealers with the flamer and then charge the Genestealers; the Marines swing in and maul the Stealers; winning the combat by one! Stealers biff the break test, then get caught and killed. Blood Claws consolidate into cover in the building.
 Tyranids:
 Shooting Warriors drop back and string out to double-claim. Raveners move up on the full squad of Grey Hunters that took down the Trygon, drawing a line through a gap between the
LRCs. Zoanthropes advance on the surviving
LRC. Deathspitters and a Strangler blast on the Grey Hunters in the center kill them a few more. Zoanthropes fail their Warp Blast strikes on the Blood Claws as one gets foiled by the Rune Priest's psychic hood, and the other's shot flies wide. Fighty Warriors finally make assault, slamming into the Grey Hunters that have been holding the bottom floor of the firebase all game until they moved off the objective and out of cover during the top of the turn...(another heavy sigh from John). Adrenal Glands make the Warriors swing first, and kill the Marines down to just the Plasma Gunner and the Power Fist. Return swings put one down, but the Warriors live and win the fight. Grey Hunters hold. Raveners make the long charge to the Grey Hunters, threading the needle between the
LRCs. The Space Wolves make their counter-attack check though, and strike first at the Raveners, which were slowed by difficult terrain going over the reflecting pools, killing all three before they got a single attack! The Grey Hunters consolidate toward the fighty warriors.
 Turn 4 Thoughts
John:
Turn 4 Thoughts
John: Alright, I admit it, I am a moron sometimes. Moving the Grey Hunters out of cover and into the open to rapid fire warriors that are IN cover was monumentally stupid. Had I remained in cover I would have swung first against the warriors and stood a better chance in that close combat. The Stealers had me a little worried but I figured the Blood Claws w/ a Wolf Priest could handle it. Rhe raveners all dying to my 5
MoTW attacks with the regular attacks was nice, I didn't even need the fist this turn (...and now a heavy sigh from Travis)! Trygon, as I learned from last game, is nothing to worry about; plasma and massed bolter fire can take them out no problem (...and another!). I do realize at this point however that something amazing needs to happen next turn during assaults for me to win this.
Travis: God Raveners suck.

Ok, I'm only using 3 of them, and I should have known better, but come on! The wheels have come off at this point, and I'm already shifting to damage control mode. The plan's still sound, except that now it's hanging on by the tiniest of threads. My Zoanthropes can't hold their flank alone, and there's nothing left to reinforce them, so, barring a long game and spot-on Lance strikes followed by Warp Blasts to pop the Raider and kill the Blood Claws, that side is a lost cause. It's down to the Shooty Warriors killing the rest of the Grey Hunters in the center and holding out themselves to try and double-claim, and if the Fighty Warriors can hold out I might be able to gum up the works on the Space Wolf side enough to pull the W. Fingers crossed!
Turn 5
Space Wolves: The last
GH and Wolf Priest still hunker down in the middle of the board trying desperately to keep hold of the center objective. Blood Claws sprint back to the safety of the
LRC, the fresh Grey Hunter squad that ate the Raveners moves around the firebase to support the assault in the center. Shots from the
LRC drops a Zoe and leaves a wound outstanding, and heat from the Long Fangs kill one of the Shooty Warriors. Grey Hunters join the party (John only rolls a 2 this time for
MoTW!!) and killing 2 more Warriors, but they hold out, killing another
PG and some others and sticking around.
 Tyranids:
 Shooty Warriors redress their lines and fill the gap to maintain the double-claim, Zoanthrope floats toward the last
LRC. Heavy fire from the Warriors kills the last of the Grey Hunters, leaving only the Wolf Priest in the center of the field. One last try at a Warp Blast on the Blood Claws fails. Back at the firebase, the Warriors/Grey Hunters assault grinds on, the last of the first squad of Grey Hunters finally dies, John rolls another great roll for
MotW (4) and takes down another warrior but the Powerfist misses, leaving one last Warrior to hold on and keep the combat going.
Turn 5 Thoughts
John: The game feels good at this point. I have overcome the initial disappointments I had, thanks in large part to the fact that Space Wolf troop choices are awesome. I would really have liked to finish off the last Fighty Warrior with my PFist but such is life. I really like the
MotW. I actually feel that at this point in the game I had a fairly good chance at drawing/winning, I expected my
GH to finish off the last Warrior giving me two objectives and I would make a mad dash to try and contest the center one too or shoot Travis off of it.
Travis: Woof. Any advantage I had mid-game has evaporated completely and left me bleeding from the gums! I'm winning the game by literally a string and a prayer; as in, if the Shooting Warriors take another casualty there won't be enough left to hold on to both objectives, and the last Fighting Warrior doesn't have a prayer to live! If this goes on much longer it's going to be bad. Fingers and toes crossed!
Random Game Length: It's my game to win at this point, so I throw the die. On to turn 6! (of course!)
 Turn 6
Space Wolves:
Turn 6
Space Wolves: Mostly administrative movement this turn, Blood Claws load up into the
LRC and clamp down their objective. Shots from the Long Fangs thankfully miss, and Shadows in the Warp from the last Fighty Warrior fumbles the Rune Priest (John "^%&!*&"). Shots from the
LRC put some heat on the last Zoe and waste it. On to the main event: the last Warrior deals a tiny portion of death and whittles the last squad of Grey Hunters stuck to it a bit more, and return swings deal no damage (
MotW whiffs HUGE this turn John rolls a 1!!!) the
MotW GH fails a save and dies, then the Powerfist swings in... and misses! The Warrior holds on!
Tyranids: Not much left now... shots from the Shooty Warriors kill off the Wolf Priest in the open by the center objective. Back at the firebase, the Fighty Warrior kills one, takes a wound in response, and the Powerfist... misses again! The Warrior holds on one last time!
 Turn 6 Thoughts:
John: I make 2 more critical errors this turn. 1st: I should have detached the Rune Priest and sent him to help finish off the last Warrior. 2nd: I should have moved the Wolf Priest out of cover and assaulted the shooty warriors, since Travis had conga lined them I would have had a good chance at only fighting two of them and they would have been forced to move the full 6 inches off the objective in the backfield to try and get into combat. If either had worked I would have drawn, if both had worked I would have won. Sometimes your brain just doesn't want to work these things out until the game is over!
Travis: Thank the Hive Mind for
WS 5! I feel like Stallone in the opening of Cliffhanger right now... "Yer not gunna die!!" I just need that damn clip to hold!
Random Game Length: With a tense hand I clutch the die that will determine my fate... a 2! Finally! I get to win a game! Woooo!
Final Thoughts
John: Awesome game. I am am glad to get another one under my belt with the
SW and I got to use 3 new units (
LF, Rune Priest, Canis), which is never a bad thing. I made some huge mistakes this game which is uncharacteristic of me (Seconded -Travis). Normally I am very methodical with my play, in any game the path to victory will present itself to you and normally I am able to recognize that path and take it. This game just wasn't one of those times but if you won every game then you'd never learn anything! I have to say
JotWW is an amazing power to behold on the table top,
MotW is a great 15 point addition to
GH squads, and I really miss being able to buy dozer blades for my
LRCs... I have got to hand it to Travis. He kept his strategy straight and his eye on the ball no matter how many times I managed to counter what he did, he played really well and deserved this win for sure!
Travis: Oi Vey! Talk about tense! This one started off a little staid; John and I were on autopilot for the first couple turns getting in position, but once we got stuck in it got real intense, real fast. At about turn 5, I realized that I had stopped taking pictures and notes, because I was so focused on what was going on in the game. With all that in mind, we had yet another great game! I hadn't felt the fury of
JotWW yet, and man did that sting! It didn't help that I was piloting a list that was largely full of stuff I'm less competent with. Tactically, I practiced what I always preach: that in a strategic game like
40k (as opposed to a tactical game like Warmachine), you've got to have a plan from the get-go and stick to it for better or worse, because if you start trying to make changes on the fly mid-game, you'll end up diluting or discounting all the work you've already done. In this case, the plan was to run red-line at John to force him to fight me in his territory and make it difficult for him to break off and make a play for the objectives in and close to my Deployment Zone. And it worked! Not by much, but sometimes a tiny bit of luck is all you need.
Man of the Match
John: Any Grey Hunter with Mark of the Wulfen. Those guys took down 3 raveners, a Carnifex, and 3 fighty Warriors! Big thumbs up!
Travis: Fighting Warriors. Despite their characteristic difficulty with difficult terrain, they definitely earned their slimy, chitinous laurels this time! They slogged it all the way to the party, and then got to work grinding down Grey Hunters and not dying. If I could paint some purity seals on them, I would. Come to think of it, I can probably just paint their carapaces with some extra spots or something, which is even easier than painting purity seals. Awesome!
Final Grades
John:
Canis: F. Didn't get his points back, failed to do much good. I like Wolf Lords on Thunderwolves... just not Canis, had he been supported by some other
TWC or wolves I am sure he would have done better, i really just wanted to try him out.
Wolf Priests: B+, they are great. They confer Preferred Enemy and have power weapons!
Rune Priest: A. He killed a Carnifex, Zoanthrope, Warrior, and Venomthrope and all he costs is 100 points. Brilliant!
Grey Hunters: B+ Couldn't ask for a better troops choice, I think their horns have been blown sufficiently here on Dakka already so I will say no more.
Blood Claws: B+ I love
BCs I think they are just as good as
GH when you use them correctly and team them up with a Wolf Priest.
LRCs: F. They both fail-boated completely this game. Normally they work so well for me they would get an A but I definitely feel that if they had lasted at least until turn 3 this game would have been in the bag for me.
Long Fangs: C. They could have done a lot better, I should have brought all
ML Long Fangs but seeing as they aren't painted yet...
Travis
Tyranid Prime - C, A Resounding 'Meh' here, he fulfilled a Force Org. requirement and gave the Shooty Warriors BS4, otherwise, whatever. I had a Spore-podding bonesword-wielding Prime leveraged against me during the team tournament earlier this month, and I was impressed enough to give him a try again. I didn't really give him any kit to do anything spectacular though.
Deathleaper - F, I knew I'd only roll a 1 for the leadership deduction, and he killed nothing before dying, so I didn't even get to use Pheromone Trail!
Zoanthropes - B-, This was actually a good game for my floating brains; they earned back their points and then some in their opening volley, and managed to stay relevant most of the game. If their shooting had been more accurate they'd be As for sure.
Venomthrope - F, Though that's a failure of opportunity, not performance. Nothing I can do about the desert opening up to swallow the poor bastard whole!
Shooting Warriors - B, They were reliable. Of course, being reliable rarely equates to being exemplary, but they did kill some
GHs and win me the game.
Fighting Warriors - A, These guys were due. Plain and Simple, they did the job with aplomb, and kept me in it when the chips were way down.
Hormagaunts - B, They killed Canis (poison sacs are a must on these guys!), so I'm totally satisfied with their performance, but their death was a little anti-climactic.
Stealers with Broodlord - F-,

There's no words for the magnitude of their failure.
Raveners - F, See above.
Shooty Fex - F, He got some ineffectual shots off, then fell in a hole. It's not his fault, per se, but still...
Fighty Fex - C+, He drew out the
GHs from the popped
LRC, then ate a few and took some fire, which kept the heat off other elements of my army that ended up being way more important. So he was an 'assist' player this game. Nothing wrong with that.
Trygon Prime - C+, He bent the Long Fangs over pretty good, then drew all of the clutch turn 4 fire that kept both of the Warrior units healthy going into the late game. His job was to show up, kill a few guys, be scary, then die. I know John knows how to deal with these things, so I didn't give it any more to do than that. If he'd have lived, the grade would have gone up, but he still did what I asked. Yet more reason that I love Trygons.
All told, another great game, full of everything you'd want to see. I'm hoping to get some more in soon, and maybe now that my semester is settling down a bit I'll even be able to take a stab at painting another army.
Anyway, thanks again to John for a great game and taking time out of his own busy schedule to chime in on this report, and thanks for reading!
-Dis.


 Capture and Control, the blog!
 My most recent Battle Report:
  4500 Tau Army
  4000+
4000+
 6000+ Order. Unity. Obedience.
 Thousand Sons 4000+


 Eldar Corsairs: 4000 pts
 Imperial Guard: 4000 pts
 Corregidor 700 pts
 Acontecimento 400 pts


 ,
,  ,
,  ,
,  ,
,  ,
, 


 65/4/6,
  10/2/1,
  10/3/0,
  2/0/1,


