| Author |
Message |
 |
|
|
|
|
Advert
|
Forum adverts like this one are shown to any user who is not logged in. Join us by filling out a tiny 3 field form and you will get your own, free, dakka user account which gives a good range of benefits to you:
- No adverts like this in the forums anymore.
- Times and dates in your local timezone.
- Full tracking of what you have read so you can skip to your first unread post, easily see what has changed since you last logged in, and easily see what is new at a glance.
- Email notifications for threads you want to watch closely.
- Being a part of the oldest wargaming community on the net.
If you are already a member then feel free to login now. |
|
 |
2008/04/05 09:08:45
Subject: Need some help with Dipping figures. Thanks Guys
|
|

[MOD]
Madrak Ironhide
|
work/trade agreement = discount on work in return for word
of mouth posting, I believe?
diablobats: how do apoc tournaments work? Last person
standing wins?
|
|
|
|
 |
|
2008/04/05 09:15:42
Subject: Re:Need some help with Dipping figures. Thanks Guys
|
|
Virulent Space Marine dedicated to Nurgle
|
This topic peaked my interest on the black dip idea. I special ordered some minwax polyshades "classic black". I dont have pics at the moment, but I can tell you about my experimentation.
I tested a mini by dipping it straight in the can. I have done this onces before with antique walnut and just had to shake it off a bit and it came out fine..... the black however is so thick and dark that it turned the whole mini solid black. So that was ruined. No worries as it was an expendable junk model.
I then cut the minwax with one part minwax and 2 parts turpentine. The consistency was much better and easier to shake off some. The final results were nice form a color/ tint perspective. However, it was raining that day and the wax dried kinda splotchy 
Just in case it was not the humidity alone that caused the splotchyness and maybe the mix had too much turpentine I added about 2/3 of a cup of straigh minwax back to the mixture. I am now waiting for a non rainy day to try it out.
I think the results can be very closely mimiced by using black in and some water and some future floor wax. I will do both next week and try to post comparison pics if weather permits.
|
|
|
|
|
|
2008/04/06 16:14:28
Subject: Need some help with Dipping figures. Thanks Guys
|
|
Longtime Dakkanaut
|
Obviously I'm not charging enough. I charge $5 each for a human-sized or smaller, $8 for cav or characters, and price-of-the-model plus $1 per pin for bigger stuff. And I don't dip. Or "glaze".
But I'm not a painting service, either, nor am I interested in becomming one. Still, I don't think you paid a fair price, but if you are happy... .
|
He's got a mind like a steel trap. By which I mean it can only hold one idea at a time;
it latches on to the first idea to come along, good or bad; and it takes strenuous effort with a crowbar to make it let go.
|
|
|
|
|
2008/04/07 06:05:48
Subject: Need some help with Dipping figures. Thanks Guys
|
|
Fresh-Faced New User
|
I don't mean to thread-hijack, but this seems close enough to not warrant a new thread:
If I want to dip my Guard, but am planning on painting them in the run-of-the-mill Cadian way, what base colors/minwax do you think I should use?
On topic: All the painting service argument doesn't really belong.. from what I can see, OP is happy with the service he received, so take that as you will.
|
|
|
|
|
2008/04/07 19:32:05
Subject: Need some help with Dipping figures. Thanks Guys
|
|
Phanobi
|
If you want to thin your dip, mineral spirits are the way to go. Learned that from sennecharib, he has a thread here somewhere with his dipped nids.
Also, you don't just want to dip and then let it sit, you need to shake or, my preferred method, spin the model to remove the excess stain. I glue a wooden dowel to the bottom of the model then dip and roll the dowel between my hands to remove the excess. I do this in a box to I don't splatter stain everywhere. Then let them dry overnight and hit them with a Matte spray finish if desired.
Ozymandias, King of Kings
|
|
This message was edited 1 time. Last update was at 2008/04/07 19:34:20
My name is Ozymandias, King of Kings.
Look on My works, Ye Mighty, and despair.
Chris Gohlinghorst wrote:Holy Space Marine on a Stick.
This conversation has even begun to boggle my internet-hardened mind.
A More Wretched Hive of Scum and Villainy |
|
|
|
|
2008/04/08 18:31:50
Subject: Re:Need some help with Dipping figures. Thanks Guys
|
|
Nasty Nob on Warbike with Klaw
|
diablobats wrote:Teek, thank you for getting back on track. It seems that my questions turned into a personal battle between former enemies. Since first posting, I picked up all the needed supplies. I have an Apoc tournament tomorrow, but should try this system out by Sunday night. I'll post the results to see how they compare. That should solve this problem once and for all.
Thanks to everyone that has posted, but please don't use other peoples topics to fight over past problems. The studio I used were very nice people and I was very satisfied with the end product. I just want to do a few onesy twosy figures here and there that match their work.
FWIW, I had no idea until seeing the " MM" post above that we were "former enemies," or current ones, for that matter.
I've PMed WD to try to figure the situation out, and to take it to PMs, where it belongs.
Back on track, Please post your results. I know I'd love to see how closely you manage to get your results.
Eric
|
Black Fiend wrote: Okay all the ChapterHouse Nazis to the right!! All the GW apologists to the far left. LETS GET READY TO RUMBLE !!!
The Green Git wrote: I'd like to cross section them and see if they have TFG rings, but that's probably illegal.
Polonius wrote: You have to love when the most clearly biased person in the room is claiming to be objective.
Greebynog wrote:Us brits have a sense of fair play and propriety that you colonial savages can only dream of.
Stelek wrote: I know you're afraid. I want you to be. Because you should be. I've got the humiliation wagon all set up for you to take a ride back to suck city.
Quote: LunaHound--- Why do people hate unpainted models? I mean is it lacking the realism to what we fantasize the plastic soldier men to be?
I just can't stand it when people have fun the wrong way. - Chongara
I do believe that the GW "moneysheep" is a dying breed, despite their bleats to the contrary. - AesSedai
You are a thief and a predator of the wargaming community, and i'll be damned if anyone says differently ever again on my watch in these forums. -MajorTom11 |
|
|
|
|
2008/04/08 20:12:27
Subject: Re:Need some help with Dipping figures. Thanks Guys
|
|
Banelord Titan Princeps of Khorne
|
This has gone to PM's.
|
|
|
|
|
|
2008/04/08 22:07:56
Subject: Re:Need some help with Dipping figures. Thanks Guys
|
|
Gargantuan Gargant
|
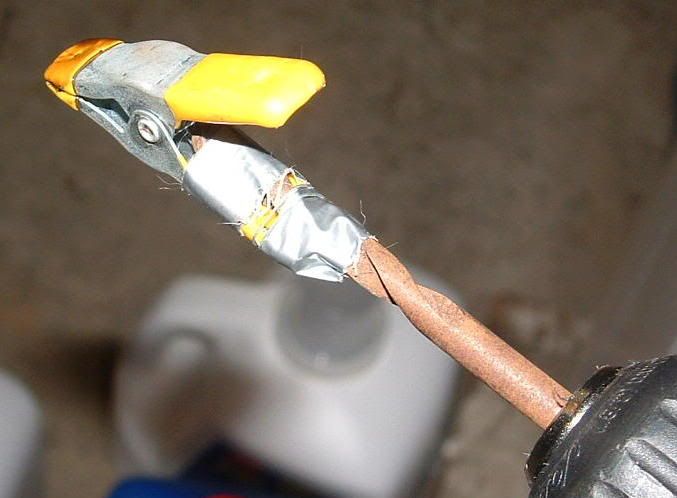 How big is that clip ?
Is it large enough to grip the entire base, or the foot tab of the model ?
I've got a huge Ogre Kingdoms army I need to paint and I was considering dipping it to expedite the process.
|
|
|
|
|
|
2008/04/09 07:17:50
Subject: Re:Need some help with Dipping figures. Thanks Guys
|
|
Stabbin' Skarboy
|
Ok guys, I figured this madness out. Its very simple, but I must say that the studio in Utah was truthful in some ways, but not totally when they said they don't dip. Here is what I found out after doing some trial runs and testing some models. I'm also including a list of the exact items I used to get the same result. Keep in mind that the studio may not of used this exact system, but if my version got me to the same result, it does not really matter.
Step 1. Pick up the following items from your local Lowes, or Home Depot. One can of Minwax Polyshades Stain & Poyurethane in 1 Step. The Color is antique walnut.
Step 2. Pick up the following items from your local hobby center or GW online store. One pot of ARDCOAT (gloss varnish) One pot Black Inc, and what ever other inks you may want your models to have on them.
Step 3. Pick up a light colored primer from any automotive store in your area. I went to Autozone and got DUPLI-COLOR Sandable Primer. It comes in all kinds of colors and by far stick the best to all types of models. Works like glue on resin forgeworld stuff. Will never use anything else then this stuff. Plus its only $4.99 per can and you get more then GW's canned paint. I used a sand color for my IG guys, but white works great on skeletons and most other models.
Step 4. Start painting your figure with the colors you want them to be once they are finished. This system does not require you to go with lighter shades just paint like normal. Due keep in mind that the color will be a bit darker, but not as much as I had expected. This is also very fast painting since the next step will take care of most over strokes and sloppy painting. It took me less then 2 minutes to paint the Vox guy with my armies colors. Also keep in mind that this was my second attempt at this system of painting. I'm guessing that with a bit of practice and about 100 troops I could knock that down to lest then a minute per model.
Step 5. Once your done with a very rough paint job, move to the mixing section of the project. Take 1 / 3 part water, 1 / 3 part black ink, and 1 / 3 part Ardcoat Varnish. Mix these up and you should get the look of the stuff I have pictured. You'll notice how it pools in the edges just like it will on models. The mix should have a runny look and feel to it. Something like 2% milk.
Step 6. Grab a small brush and just slap it all over the model. Don't worry about details or small areas. The stuff works like magic. It goes to all the little parts it needs too. No work needed. I actually timed this part with my watch to see how long it took. 37 seconds to do the Vox Caster pictured here with this system of inking.
Step 7. Get a fine detail brush and add the small stuff like eyes, eagles, and other little nick nacks. This was the most time consuming part of the project. It took a whole 3 minutes.
Step 8. Wait about 10 minutes for the figure to dry. At this point it will be very shiny, and glossy looking. Don't let this scare you. You have done everything right up to this point. Get your can of minwax and dipping system. I used my Dewalt drill with a very similar clamp system as pictured by other posters. All you do is grab it on the very edge of the lip with the clamp. Don't worry, it will not fly off. Those clamps have like a 30 pound per square inch spring in them. I tried flinging my model off to test it, and nothing happened. My guardman did say he had a headache after the test. LOL.
Step 9. Dip the whole model into the minwax past his boots but NOT all the way in. This will come into play in a minute. Slowly pull the model out and put it into a bucket, box, or bag. Slowly press your drills button and start spinning it. Spin each model about 20 seconds at a slow speed. You don't have to go fast here to get the minwax off. Gravity and centrifugal force will take care of everything.
Step 10. Once your done spinning the model, you'll need to find a dry air tight place. I used a normal plastic bin with a cover on it. You can find these at walmart in hundreds of sizes, shapes and colors. Just get one that's big enough to fit lots of guys and still allow your hands to get in and out of the box without knocking guys over. Remember when I said not to dip past the feet of the model. That's because you'll need to grab the model from some place to set it into the box. If the whole thing was covered, your finger prints would melt into the paint and would look like crap later when the model is dry.
Step 11. I have not gotten any of my model dry yet, but I know it takes about 3 whole day to dry completely. I'll have my second text model dried by Thursday to post.
Step 12. Once the minwax has dried, just grab a matt varnish from any supplier you prefer and spray the shiny model. It will get a matt finish and look just like the Ogryn and Guardsman at the beginning of this post.
Note, I have not finished all 12 steps of this process, but I felt that by the looks of the project to this point, I'll reach the desired results. I figured out a few other things that are important to note. Depending on what army your painting, your ink color you mix with your water and Ardcoat will be different.
Orks will use a Dark Green Ink
Skeletons will use a Brown or Black Ink
and so on. Your ink color will need to be the dark shad dependent on your army.
Keep in mind that the pictures I have posted here are not the finished product, so they still do not look like the first picks. I will post the finished product later. Also, I did the first ink mix a bit dark. It needed a bit more water so that is why the new mix is 1 / 3 part instead of my first attempt of much more black ink then water. Also, note the figure to the far left. That was my first test model and I did the same steps minus the Ardcoat mix. The minwax didn't really do anything to it but make it look shinny. The minwax is more of a protection system then a dipping system. It protects the Ardcoat mix.
Please feel free to comment or correct me on this matter if you have reached different results. I hope this helps people out.
Total time spent on second test model was about 5 minutes. WOW
![[Thumb - IMG_2370.JPG]](/s/i/at/2008/4/9/e77a912234b12be4678c66264caa4373_5914.jpg__thumb)
|
![[Thumb - IMG_2372.JPG]](/s/i/at/2008/4/9/fcd4756ee44a61ac390de02d9b778978_5914.jpg__thumb)
|
![[Thumb - IMG_2371.JPG]](/s/i/at/2008/4/9/bde83bf317cae6094f94929ab48f70fc_5914.jpg__thumb)
|
![[Thumb - IMG_2373.JPG]](/s/i/at/2008/4/9/202ce3535426a13834dd70904dee2d22_5914.jpg__thumb)
|
![[Thumb - IMG_2375.JPG]](/s/i/at/2008/4/9/0ddeaa8dfebbc94ad2a1270575733f85_5914.jpg__thumb)
|
![[Thumb - IMG_2376.JPG]](/s/i/at/2008/4/9/a5308c9fb2d1dd453a520af0d3f3e7a7_5914.jpg__thumb)
|
|
|
This message was edited 6 times. Last update was at 2008/04/09 07:43:15
Custom Cut Foam Trays and Carrying Cases. WWW.BATTLEFOAM.COM Serving the world from our two locations in the US and UK. |
|
|
|
|
2008/04/09 17:21:29
Subject: Need some help with Dipping figures. Thanks Guys
|
|
Dakka Veteran
|
Not bad. Looks rather like the effect I've seen with Tamaya (sp?) Smoke.
|
Bernard, float over here so I can punch you. |
|
|
|
|
2008/04/09 17:29:09
Subject: Need some help with Dipping figures. Thanks Guys
|
|

[MOD]
Anti-piracy Officer
Somewhere in south-central England.
|
There are several threads on dipping -- you might want to do a search.
Something to consider when spinning the figures is to do it somewhere where the dip flying off will not hit something bad. You could probably do it in a big box.
|
|
|
|
|
|
2008/04/09 17:35:21
Subject: Re:Need some help with Dipping figures. Thanks Guys
|
|
Stabbin' Skarboy
|
Ya, I know about the box thing. If you notice I mentioned putting your figure into a bucket, box or bag. Anything will work as long as it catches the minwax.
|
Custom Cut Foam Trays and Carrying Cases. WWW.BATTLEFOAM.COM Serving the world from our two locations in the US and UK. |
|
|
|
|
2008/04/09 17:39:50
Subject: Need some help with Dipping figures. Thanks Guys
|
|
Dakka Veteran
|
Very nice results! The gun and armor being the same color and so close together looks a bit off, but otherwise they look very nice.
Though the effect isn't the same, I would recommend buying P3 Paints' "Armor Wash." I've been using it a lot recently, diluting it with water a bit, and just washing large areas of my models with it. I think with the color scheme you're working with you may like the results.
|
|
|
|
|
2008/04/09 21:14:50
Subject: Need some help with Dipping figures. Thanks Guys
|
|
Shas'la with Pulse Carbine
|
Diablo this was very informative
thank you
The model on the far right... is that the most recent one?
|
|
|
|
|
|
2008/04/09 21:39:19
Subject: Re:Need some help with Dipping figures. Thanks Guys
|
|
Stabbin' Skarboy
|
Yes, but it still needs to dry and have the matt varnish spraid on. I should have those pics up later tonight or tomorrow.
|
Custom Cut Foam Trays and Carrying Cases. WWW.BATTLEFOAM.COM Serving the world from our two locations in the US and UK. |
|
|
|
|
2008/04/09 23:10:10
Subject: Need some help with Dipping figures. Thanks Guys
|
|
Gargantuan Gargant
|
Nice work, both on the miniatures and the tutorial.
I know I've seen those types of clamps before, but what are they called ?
|
|
|
|
|
|
2008/04/11 05:43:15
Subject: Re:Need some help with Dipping figures. Thanks Guys
|
|
Fresh-Faced New User
Payson, Utah
|
I'll keep this short, so as not to derail the thread - but fyi - glazes are not the reason people left BTP, in part or in whole.
I'd be happy to explain to anyone why people left BTP (such as my wife and I) but it's probably not appropriate for general forum discussion, as the truth isn't all that pretty.
That being said, a matching shading glaze can easily be formulated with Delta Ceramcoat Sealer (or FFF, or Polycrylic, or matte Minwax) and Vallejo Black Game Color - mix to your personal taste for opacity and coverage, and dip and shake - or brush on, it amounts to the same thing. Thinning the shade is easiest by adding a drop or three of water, or just wetting your brush before you load it with the shading mix.
theHandofGork wrote:I didn't mean to start anything MM- and appreciate your info. From what I know BrandX does not use the Blue Table "glaze" method and stick to "standard" painting methods only. I was told by a client/friend of the Brand X team that the glaze was the reason for the split. This is again from a friend/client and not from them directly. All the minis he had painted by Brand X did not have the glaze/dip look that his Blue Table minis have.
|
|
This message was edited 1 time. Last update was at 2008/04/11 06:38:17
9+ Years of Professional Painting
www.middlepillarpathpainting.net |
|
|
|
|
2008/04/11 23:55:57
Subject: Need some help with Dipping figures. Thanks Guys
|
|
Decrepit Dakkanaut
|
I've used acrylic stain and it's thin enough already - just don't be too ham-fisted, and let gravity do the work.
As Blue Table Dipping and the others demonstrate, you can get very fast results because the process is very simple.
Personally, having seen the top picture, if you did the hard work of cleaning and assembly, then the "painting" would have been child's play:
- spray bomb with white primer
- light silver / chainmail for weapons
- quick 2-color blob "camo"
- "dip" in Future for skin / weapon / uniform
Assembly-line, this goes *very* fast. One guy could easily have knocked this out in a day, then let it dry overnight to ship out the next day.
Anybody who claims that the figures weren't dipped is either lying or playing Clintonesque-word games. Those are definitely dipped minis, and Blue Table Dipping should admit this to their clients.
|
|
|
|
|
|
2008/04/12 17:16:36
Subject: Need some help with Dipping figures. Thanks Guys
|
|
Banelord Titan Princeps of Khorne
|
I notice you're using antique walnut GLOSS. The Antique Walnut SATIN works much better.
|
|
|
|
|
|
2008/04/18 07:48:55
Subject: Re:Need some help with Dipping figures. Thanks Guys
|
|
Fresh-Faced New User
|
If you want to know a couple quick, cheap and easy ways to make what Shawn calls a "glaze" choose one of the recipes below. Most of the painters had their own style and some used the glaze and some didn't. Some dipped and some didn't. Some used a traditional style with inks and solid paints and a traditional glaze with ink and paint. There was a standard we all tried to keep so any of us could match each others' work if needed.
Recipe #1
1 bottle Delta Ceramcoat All Purpose Sealer
1 drop per ounce Color Float (this will help break up surface tension)
Add pigment to your liking. The black usually has around 30 drops of Vallejo Black. The brown has 3 drops black and one (possibly 2) bolter bottle of brown ink (assuming 8oz of glaze made).
Recipe #2 (AKA Dip)
6oz Future Floor Finish
1 drop per ounce Color Float (this will help break up surface tension)
Add pigment to your liking.
Recipe #3
1 Cup Corn Starch
1 Package of plain gelatin (no sugar or colors)
1 can Minwax Polycrilic (I would say medium can)
Dissolve the gelatin in cold water and set aside. Mix corn starch and 4 cups water in saucepan and heat over medium heat. Once it is dissolved and appears to be a clear gel, add the gelatin. This will thicken up quite a bit after a little time. Once everything is mixed completely, remove from heat and mix in the Polycrylic and stir. You will need to mix enough Polycrilic into the mixture to keep the gelatin and starch from setting. After everything has cooled to room temperature, put 3 drops of Vallejo Black per 8oz of glaze. This will create the "glaze" base. From this you will pigment to your liking. This is probably the closest to what the glaze is and will get the same effect. You can thin this with water or more Polycrilic to your liking.
This does create a fairly easy and decent paint job using one or more of the recipes above. It also helps make the process go by fairly quickly. Most of the painters could knock out between 10-20 L3 models in a couple hours. When you have several projects and a week to finish all of them, you find ways to speed the process along. Is it wrong to glaze or dip? I would have to say it depends on you as a client. If you don't want something glazed or dipped, there are other ways to paint the model. You just need to voice your opinion when setting up the project. We are all (BTP and us) very open to different painting styles and detail levels. All you have to do is ask us!
If you have any further questions about the glaze method, feel free to PM me and I'll answer any questions you have.
Brand X Painting
|
|
This message was edited 1 time. Last update was at 2008/04/18 07:50:06
|
|
|
|
|
|
|

 -- $k
-- $k  -- 9k
-- 9k  -- 6k
-- 6k  -- 4k
-- 4k  --
--