| Author |
Message |
 |
|
|
|
|
Advert
|
Forum adverts like this one are shown to any user who is not logged in. Join us by filling out a tiny 3 field form and you will get your own, free, dakka user account which gives a good range of benefits to you:
- No adverts like this in the forums anymore.
- Times and dates in your local timezone.
- Full tracking of what you have read so you can skip to your first unread post, easily see what has changed since you last logged in, and easily see what is new at a glance.
- Email notifications for threads you want to watch closely.
- Being a part of the oldest wargaming community on the net.
If you are already a member then feel free to login now. |
|
 |
2011/04/08 17:48:08
Subject: Re:Warmill's Valkyrie and IG conversion project and other assorted bitz
|
|

Dakka Veteran
|
Hi all
So since this thread has been getting a little derailed I thought I'd bring it back on topic and start a dedicated plog for the bases and stuff like rhino doors that would be related, and get this thread back on topic with a valkyrie update. The idea for the valk was to totally self-produce a proper kit on a sprue, modelled in CAD and moulded and cast totally in-house. When I say in-house I really mean in the flat me and my girlfriend were renting while we bought our house, since all our tools and stuff were in boxes and the only things I had out were my PC and the CNC, which was sat in the living room as it wouldn't fit anywhere else. Of course there's nothing about it that some of the awesome scratchbuilders on here and warseer, WIP etc couldn't have made with some styrene, but that wasn't an option and I didn't want to wait because I'm a bit of an impatient git sometimes.
So it seemed pretty straightforward, ignoring the fact I hadn't used Rhino in 4 years and the CNC had never been used as we were told our landlord was selling our rented house just as we got all the bits for it. How hard can it be to make a sprue, right? Really, face-achingly hard, apparently. Still, progress was made. The basic turret is finished, I thought adding some rivets but decided against it as I wanted some loose detail bits like aquilas and stuff that could be stuck on, the rotors got redesigned as they just looked too flimsy and small, though there's still a bit of work to do on them, and the skids and wings were tweaked but are now finished.
As far as cutting sprues goes, we've been focussing on the turret as a guy I work with wants to buy a few for a terrain diorama he's working on, and with a couple of tweaks it would look pretty sweet on a chimera. We've had a couple of goes at cutting a sprue, obviously having never done anything like this before it's been a slog but we've pretty much nailed it. Once that's perfected, probably rotors then wings. We're also doing a custom GK dread spear with a heavily engraved blade for the guy who wants the turrets, but that's only come up in the last couple of days so pics'll be a while.
So here's some pics of the valk 
Harry - Warmill
|
|
|
|
 |
|
2011/04/08 18:25:51
Subject: Warmill's Valkyrie and IG conversion project and other assorted bitz
|
|
Snivelling Workbot
|
So the turret I'm guessing will be built for underneath the Valkyrie...?
|
|
|
|
|
2011/04/08 18:38:59
Subject: Warmill's Valkyrie and IG conversion project and other assorted bitz
|
|
Dakka Veteran
|
Yeah theres a cutout underneath the bottom turret ring that fits over the four pegs on the valk where the landing gear used to go. The turret will have full rotation and elevation, which is why it's been such a nut crusher to model.
|
|
|
|
|
|
2011/04/08 18:43:02
Subject: Re:Warmill's Valkyrie and IG conversion project and other assorted bitz
|
|

Hurr! Ogryn Bone 'Ead!
|
So, you make prosthetics for a living, eh? One of our group used to do that. He had access to so many tools and exotic materials...I hate you. I really hate you. And I mean that in the most loving way possible.
Your stuff looks great. I'd gladly shell out cash for those bases.
Automatically Appended Next Post:
Seriously, if you want to make a few extras of those Inq. bases and sell them, P.M. me.
|
|
This message was edited 1 time. Last update was at 2011/04/08 18:51:36
The Emperor loves me,
This I know,
For the Codex
Tells me so....
http://fallout15mm.wordpress.com/ |
|
|
|
|
2011/04/08 19:14:21
Subject: Warmill's Valkyrie and IG conversion project and other assorted bitz
|
|
Freaky Flayed One
|
Wonderful work. You have quite an impressive set up.
|
|
|
|
|
|
2011/04/08 19:18:27
Subject: Warmill's Valkyrie and IG conversion project and other assorted bitz
|
|
Sneaky Kommando
|
This is great stuff, im eager to see what your wolves bases look like
|
|
|
|
|
2011/04/08 19:53:58
Subject: Re:Warmill's Valkyrie and IG conversion project and other assorted bitz
|
|
Dakka Veteran
|
Lol if you could see my tools.... I have dremel heads glued into empty biro tubes, lollypop sticks glued together with nylon stocking wrapped round them, and fishing wire. Not quite so exotic. It is fun though.
If you want some custom designs, PM us with an idea of what you're after and we may be able to sort you out.
Harry - Warmill
|
|
|
|
|
|
2011/04/10 00:09:34
Subject: Re:Warmill's Valkyrie and IG conversion project and other assorted bitz
|
|
Dakka Veteran
|
Hi all
So we're pretty busy on bases and other little nik naks, not to mention day jobs, and I wanted to show that this somewhat ambitious project isn't gonna turn into vapourware. We have got a s far as cutting a tester for a sprue, unfortunately having absolutely no experience in this area means I wasn't in the slightest bit surprised when the tester exploded while roughing out the second side. The first side had been finished off with a 0.5mm square endmill and was looking beautiful, unfortunately the sprue frame wasn't strong enough to hold up to roughing the other side, plus the chemiwood was a really soft variety. We've learnt though, and I'm confident that it only needs a couple of supports adding and it'll be a goer. The cannon wasn't on the sprue as we have a rotary axis that we plan on using to cut a range of different guns that fit into the turret. I have a couple of weeks holiday coming up that is gonna be mostly finishing off my house and garage, but I hope I can get the definitive sprue cut.
Harry - warmill
|
|
|
|
|
|
2011/04/10 00:49:43
Subject: Warmill's Valkyrie and IG conversion project and other assorted bitz
|
|

Storm Trooper with Maglight
|
I was just about to ask what happend to the valk idea, NICE JOB! 
|
|
This message was edited 1 time. Last update was at 2011/04/10 00:50:07
|
|
|
|
|
2011/04/10 15:51:15
Subject: Warmill's Valkyrie and IG conversion project and other assorted bitz
|
|
Implacable Skitarii
|
This is simply amazing, awesome work all around
just wondering what program do you use to draw the parts in? Cause I'm taking a stab and saying solidworks?
|
|
|
|
|
|
2011/04/10 15:55:22
Subject: Warmill's Valkyrie and IG conversion project and other assorted bitz
|
|
Blood Angel Terminator with Lightning Claws
|
this is a great thread.customisation options are brilliant.
|
|
|
|
|
|
2011/04/10 16:38:24
Subject: Re:Warmill's Valkyrie and IG conversion project and other assorted bitz
|
|
Dakka Veteran
|
@Da Big Mek
Cheers mate it's been a grind but I've learnt a lot and hopefully the rotors and wings should be a lot easier once we've nailed the technique with the turret.
I'm using Rhinoceros 4.0 for these bits, Ed mostly uses solidworks for his 3D modelling but we prefer Rhino for 2D stuff as it's nicely compatible with illustrator.
@shingouki
Thanks for the support! What's here is about 4 months worth of work condensed into a week so the updates will be slowing down while we get some other projects out the way but it's very much first in my heart and will definitely not be allowed to die even if I have to give up sleep for the next few months! We're also planning a battle tank version of the turret that can use the same guns as well as some bigger ones.
On the one hand, it's taken a lot of work to get this far, but on the other I hadn't done any 3D modelling for years at the start so I am getting quicker. The hammer for my mate's dread in our other thread only took a couple of hours to model, and involved a lot less screaming and throwing things at the cats, who have a tendency to lie on my arms when I'm trying to work. Consider this the thread for major projects and our other one the thread for quicker smaller projects, so it should get updated more frequently.
Cheers everyone
Harry - warmill
|
|
|
|
|
|
2011/04/12 03:48:58
Subject: Warmill's Valkyrie and IG conversion project and other assorted bitz
|
|
Storm Trooper with Maglight
|
Any updates?
|
|
|
|
|
|
2011/04/12 17:45:48
Subject: Re:Warmill's Valkyrie and IG conversion project and other assorted bitz
|
|
Dakka Veteran
|
Hi all
@bigmek35
It's good to have someone keeping me motivated lol. I've been cutting out the thunder hammer for my mate's dreadnought, which is taking quite a while as I'm using a 0.5mm tool to get a really nice finish and fine detail, so I won't be having another go at the sprue for a couple of days, but I did get a little bit of time on the rotors, just making a new fan and putting a guard around it that attaches to the axle that supports it. It does clear the wing, just about!
I also modelled up a cutom base for my AOBR marines and any marines I get after them, I've set it up so that I only have to change one bit and I can use it for my guard as well. the WarMill writing and the scroll will be 3D off the base surface with the Tactical or whatever writing engraved on the scroll. For the guard I'll probably go for squad names on there. I'm on holiday for a couple of weeks after friday so I'll be cramming in as much modelling as I can in between finishing off my house, and Ed is back so we will be steaming ahead with some ongoing projects.
Here's some pics, I'll get some up of the hammer once it's finished.
Cheers guys!
Harry - warmill
|
|
|
|
|
|
2011/04/12 23:00:02
Subject: Re:Warmill's Valkyrie and IG conversion project and other assorted bitz
|
|
Dakka Veteran
|
Hi all
The rotors for the valk are finished, I didn't add much, just a few panel lines and a slightly beefier clamp for the main axle. I also split the support for the fan up so that it will be movable when the kit's assembled. Now I just have to cut it up into machinable pieces (this is the part that causes the real headaches) and arrange it on a sprue.
Had a bit of a mishap with the hammer when it popped off the bed of the CNC, double-sided tape is just never as strong as you want it to be. Luckily I had a jig set up so I could stick it back down and get it going again, but let's just say it's going to look a bit battle damaged ;P My mate is planning to model his dread fighting a daemon or CSM anyway, so maybe it'll look alright.
Cheers guys
Harry - warmill
|
|
|
|
|
|
2011/04/21 15:35:08
Subject: Re:Warmill's Valkyrie and IG conversion project and other assorted bitz
|
|
Dakka Veteran
|
Hello!
Been a while since i updated anything - to busy being on holdiday!
So we have had a couple of requesest by fellow dakkerites, and got some cool pics to show off our new 'generic APC top access hatch' 
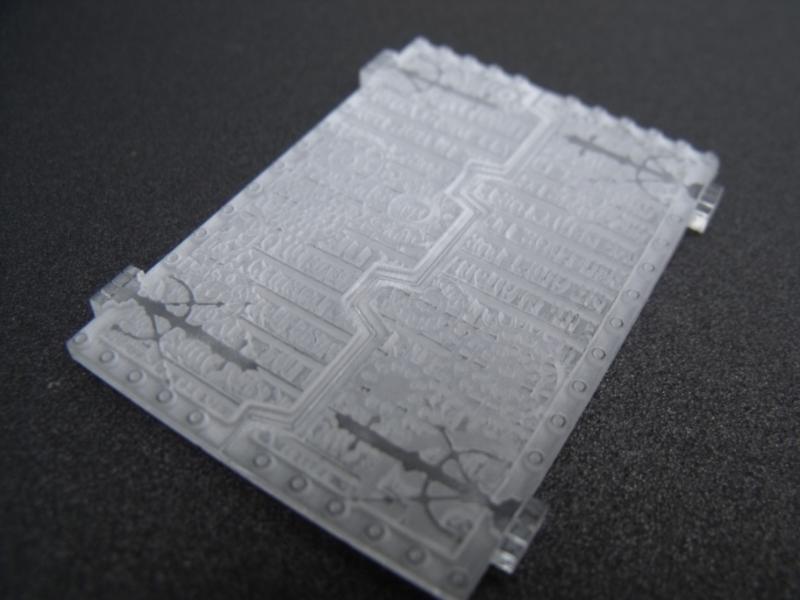
fresh off the laser
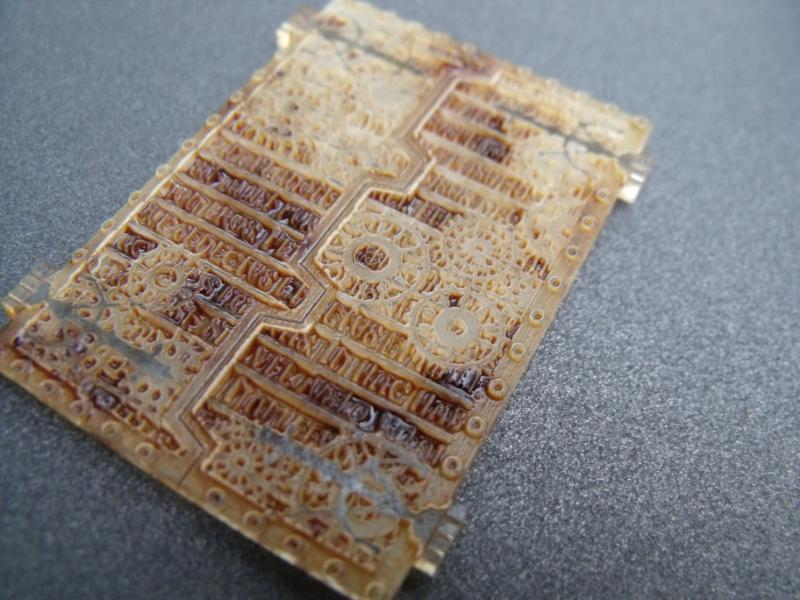
With a wash to shot the detail
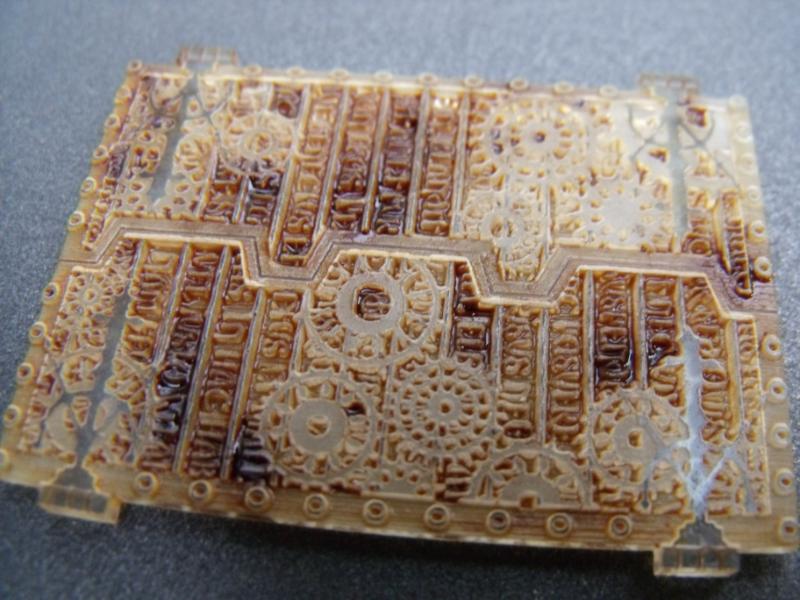
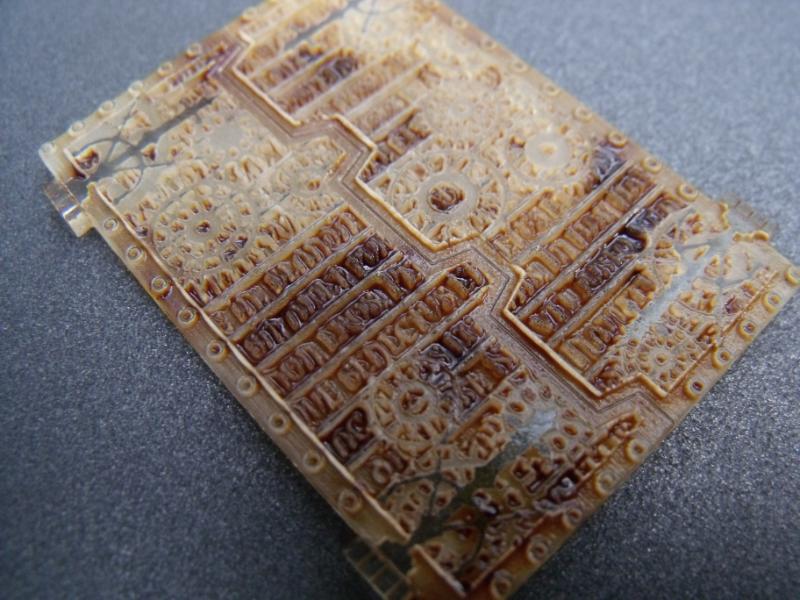
The hatch was created for dakka user poly8D
I hope you all like it! Hopefully we'll get an image of it painted, and glued to poly8D's model, so we can upload that to!
Automatically Appended Next Post: Repost from our other post!
Hey!
We had a request for some less than ordinary movement trays from a fellow Dakkerite - as he was fed up moving 60 boys in his first turn of movement!
So the brief was to replicate something that looks like a 5 on the face of a D6 - whilst keeping all units within coherency! As an Ork player, we felt something Orkish would be most appropriate!
The image below is more a taster of whats to come really, until we get some more cut, designs finalised, and some sexy pictures taken!
What you can see in this pic - a base big enough for 5 guys on 25mm bases! wither troops or perhaps a command squad!
Eldar, Ork and Marines - the bottom plate has a small recess which is apace enough for a small washer - so magnets on the underside of our bases can be inserted and keep the models in place!
Please give us your thoughts and suggestions - as they are still in their prototype stages!!
Ed - WarMill
|
|
This message was edited 1 time. Last update was at 2011/04/21 15:52:52
|
|
|
|
|
2011/04/21 16:17:03
Subject: Warmill's Valkyrie and IG conversion project and other assorted bitz
|
|
Snivelling Workbot
|
sweet mother of lord that hatch is amazing! Thanks a lot guys! I can't wait for it to come now!
|
|
|
|
|
2011/04/21 16:20:54
Subject: Warmill's Valkyrie and IG conversion project and other assorted bitz
|
|
Blood Angel Terminator with Lightning Claws
|
great updates,the apc hatch looks naughty.
|
|
|
|
|
|
2011/04/21 16:37:44
Subject: Re:Warmill's Valkyrie and IG conversion project and other assorted bitz
|
|
Dakka Veteran
|
Hey!
Glad you like it!
Naughty is good, right
|
|
|
|
|
|
2011/04/24 18:24:29
Subject: Warmill's Valkyrie and IG conversion project and other assorted bitz
|
|
One Canoptek Scarab in a Swarm
|
Subbed! Hoping to see more of those sexy clear bases.
|
|
|
|
|
|
2011/04/24 19:29:22
Subject: Warmill's Valkyrie and IG conversion project and other assorted bitz
|
|

Osprey Reader
Poland, Masovian Voivodeship, Otwock
|
Horribly intricate stuff, and I seem to know where the idea of those fenestrons came from. Joking aside, remarkable work, both as far as CAD (Solidworks, correct?) and the real world results are concerned.
|
"It's twenty six kilometers to Warsaw, I've got a box full of putty, half a cup of tools, it's dark, and I'm wearing a head magnifier. Hit it."
My blog: http://statuesofwar.blogspot.com/ |
|
|
|
|
2011/04/24 19:44:27
Subject: Warmill's Valkyrie and IG conversion project and other assorted bitz
|
|
Dakka Veteran
|
Rhinoceros 4.0 and Illustrator actually Whats a fenestron?
|
|
|
|
|
|
2011/04/24 20:03:19
Subject: Warmill's Valkyrie and IG conversion project and other assorted bitz
|
|
Osprey Reader
Poland, Masovian Voivodeship, Otwock
|
Oh, I wouldn't mind learning a bit more about your workflow, I've been dabbling in Illustrator a bit. As for the fenestron, well, it's actually a shrouded tail rotor, used primarily on helicopters made by Eurocopter. The entire rotor assembly of yours reminded me, apart from "Avatar", of United States Coast Guard Dolphins, and the sadly discontinued Comanche.
|
"It's twenty six kilometers to Warsaw, I've got a box full of putty, half a cup of tools, it's dark, and I'm wearing a head magnifier. Hit it."
My blog: http://statuesofwar.blogspot.com/ |
|
|
|
|
2011/04/24 20:17:42
Subject: Warmill's Valkyrie and IG conversion project and other assorted bitz
|
|
Dakka Veteran
|
Ah consider me educated
The nice thing about Rhino is you can drop illustrator files straight in without any converting, as the bezier curves in Illustrator are basically the same as the NURBS curves that Rhino uses. We created a bundle of icons and shapes in Illustrator and then we can use those as the basis for our 3D models for the CNC, so you could do a technical drawing in Illustrator and drop it straight into Rhino to be turned into surfaces and solids.
Hope that helps
|
|
|
|
|
|
2011/04/24 20:21:37
Subject: Warmill's Valkyrie and IG conversion project and other assorted bitz
|
|
Osprey Reader
Poland, Masovian Voivodeship, Otwock
|
WarMill wrote:Ah consider me educated
The nice thing about Rhino is you can drop illustrator files straight in without any converting, as the bezier curves in Illustrator are basically the same as the NURBS curves that Rhino uses. We created a bundle of icons and shapes in Illustrator and then we can use those as the basis for our 3D models for the CNC, so you could do a technical drawing in Illustrator and drop it straight into Rhino to be turned into surfaces and solids.
Hope that helps
That's a great explanation. I'll have to try it out for myself. Thanks!
|
"It's twenty six kilometers to Warsaw, I've got a box full of putty, half a cup of tools, it's dark, and I'm wearing a head magnifier. Hit it."
My blog: http://statuesofwar.blogspot.com/ |
|
|
|
|
2011/05/01 23:59:54
Subject: Re:Warmill's Valkyrie and IG conversion project and other assorted bitz
|
|
Dakka Veteran
|
Hi All!
Everyone who's been following us will (hopefully) have noticed that this thread's been a bit quiet for a while, what with us going full steam ahead on our bases and brainstorming lots of things we could develop, like our "generic APC" doors and display bases, as well as a couple of commissions. Well, I managed to squeeze in a day on our Valk kit, and I've managed to make a decent bit of progress.
Having had a bit more practice on the CNC and a good old chat with Ed, I've decided not to do the sprue for the time being and concentrate on getting a kit made first. I've worked on the rotors, tweaking the design a bit, and broken up the model into kit form. I've made it so that I can split the model in half then pour silicon into the recess to make a mould. At least then we can get a few kits cast up for our own models and anyone who wants one, then later I'll go back and try the sprue when I've got a bit more experience.
I've also had a bit of a rethink about the turret, and decided to remodel a bit of it to make it look a bit more Imperial-y, give it a bit more detail and what-not. Most of it'll be the same, as I can't bring myself to redo all that work splitting it up 
We're also cutting some bases for our AoBR orks, I'll post pics in the other thread tomorrow when they're finished.
So without further ado, here's the assembly instructions for the rotors! Hopefully I can get the master cut over the next week or two and we can get one cast up!
Comments and suggestions always welcome!
Cheers all!
Harry - Warmill
|
|
|
|
|
|
2011/05/07 23:50:23
Subject: Warmill's Valkyrie and IG conversion project and other assorted bitz
|
|
Avatar of the Bloody-Handed God
Inside your mind, corrupting the pathways
|
Why did I not notice you had 2 threads? 
Love the "APC" hatch (having seen it I may have to look into seeing if you could do a drop pod "extra armour" kit *whistle/designs*) and your IG conversion work is looking rather fun
|
|
|
|
|
|
2011/05/08 05:57:29
Subject: Warmill's Valkyrie and IG conversion project and other assorted bitz
|
|
Umber Guard
|
Wow, awesome work! I've done some fooling around with Solid Edge and other 3d programs, but this is beyond awesome.
Any chance of C&Cing some extras and putting them up on Ebay or the Swap Shop? I'm sure lots of people would love their own custom Valkyries.
|
|
|
|
|
|
2011/05/08 07:42:21
Subject: Warmill's Valkyrie and IG conversion project and other assorted bitz
|
|
Virulent Space Marine dedicated to Nurgle
|
WOW! These are amazing! I've got your ebay on my favorites right now. I'll be watching these plogs for your progress.
|
|
|
|
|
2011/05/08 08:47:07
Subject: Warmill's Valkyrie and IG conversion project and other assorted bitz
|
|
Dakka Veteran
|
Thanks for the kind comments guys! The valk is still being worked on, it's just a considerably bigger project than the bases so updates are a bit slower. I've got the wings ready for test cutting and I'm working on improving the turret at the mo. I may just have to start cutting the rotors today :-)
The valkyrie kit will be on ebay and our website, I've modelled it so that I can cut the model in half and CNC a 2 part mould to churn them out :-)
|
|
|
|
|
|
|
|


