| Author |
Message |
 |
|
|
|
|
Advert
|
Forum adverts like this one are shown to any user who is not logged in. Join us by filling out a tiny 3 field form and you will get your own, free, dakka user account which gives a good range of benefits to you:
- No adverts like this in the forums anymore.
- Times and dates in your local timezone.
- Full tracking of what you have read so you can skip to your first unread post, easily see what has changed since you last logged in, and easily see what is new at a glance.
- Email notifications for threads you want to watch closely.
- Being a part of the oldest wargaming community on the net.
If you are already a member then feel free to login now. |
|
 |
2013/06/09 19:56:12
Subject: Re:Big Daddy - Hellbrute of Nurgle
|
|

Guard Heavy Weapon Crewman
|
Really nice model looks awesome!
|
|
|
|
 |
|
2013/06/09 20:08:55
Subject: Big Daddy - Hellbrute of Nurgle
|
|

Phanobi
Canada,Prince Edward Island
|
This is amazing work! The modelling, creativity and now the lights are all super impressive. 
|
|
|
|
|
|
2013/06/10 01:09:31
Subject: Re:Big Daddy - Hellbrute of Nurgle
|
|

Masculine Male Wych
|
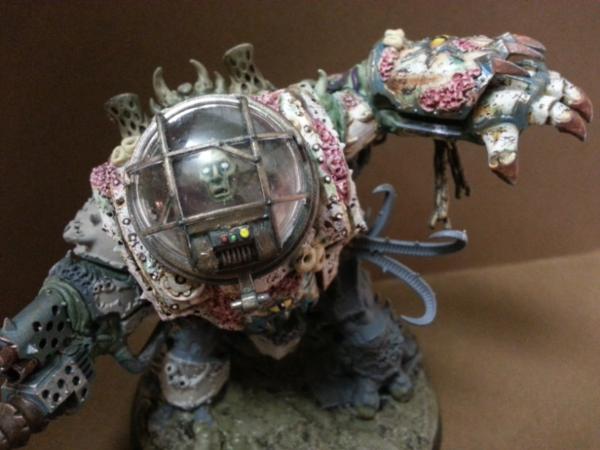
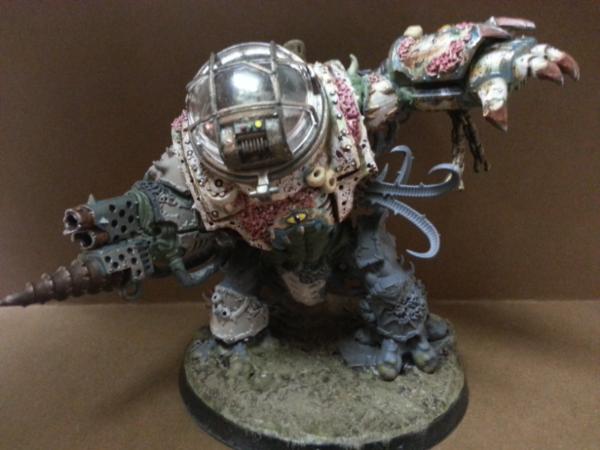
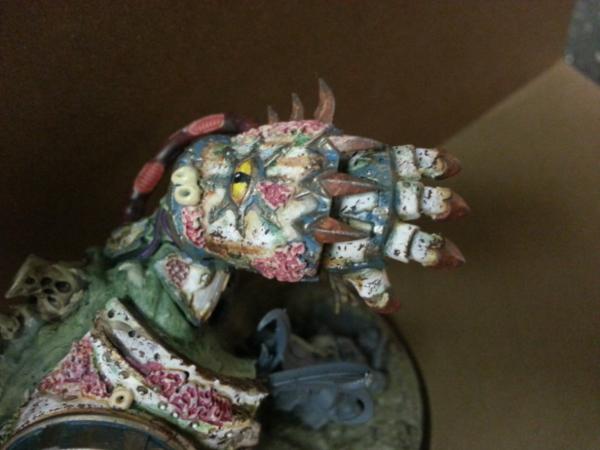
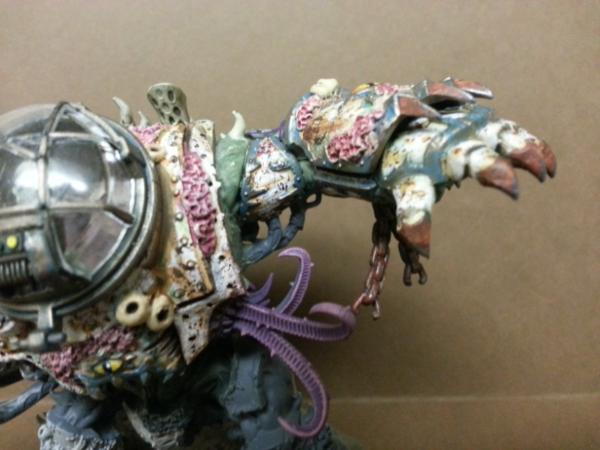
So I worked on the arm plate to try and figure out what my process is going to be for the rest of the model:

I like the uniform green color on Nurgle armor, but I decided to try something different. I'm going to go with white armor with bronze trim, then weather it...a lot. I base coated the armor section, layering it up from Dheneb Stone to Skull White. I made some washes for the rust streaks myself. I did the trim in Dwarf Bronze and washed it with watered down Hawk Turquoise. For the growths, I decided to go with a pink coral for contrast. The claws/spikes I rusted up and did the tips/edges with Boltgun Metal.
This little piece took about 45 minutes, but now that I've got the process down the rest shouldn't take...uh...too long.
|
|
|
|
|
2013/06/10 01:26:32
Subject: Big Daddy - Hellbrute of Nurgle
|
|
Dakka Veteran
|
This Hellbrute looks amazing! My only complaint is that you kept the tentacles coming out the side. I can see it as being aquatically themed, but it's just not so appealing to the overall model. But that's just me, can't wait to see it fully painted! It looks Bioshock-y already.
|
|
|
|
|
2013/06/10 07:13:26
Subject: Big Daddy - Hellbrute of Nurgle
|
|

Chaplain with Hate to Spare
|
I think this is looking simply amazing, such a brilliant conversion showcasing some real skill and the test so far for the paint is looking spot on and altogether I am excited to see such a journey of work come to fruition. you should be very proud of this model!
|
 Flesh Eaters 4,500 points Flesh Eaters 4,500 points

" I will constantly have those in my head telling me how lazy and ugly and whorish I am. You sir, are a true friend " - KingCracker
"Nah, I'm just way too lazy to stand up so I keep sitting and paint" - Sigur
"I think the NMM technique with metals is just MNMM. Same sound I make while eating a good pizza" - Whalemusic360 |
|
|
|
|
2013/06/13 20:47:38
Subject: Big Daddy - Hellbrute of Nurgle
|
|
Masculine Male Wych
|
 Deunstephe wrote: Deunstephe wrote:This Hellbrute looks amazing! My only complaint is that you kept the tentacles coming out the side. I can see it as being aquatically themed, but it's just not so appealing to the overall model. But that's just me, can't wait to see it fully painted! It looks Bioshock-y already.
Honestly, I had originally planned to remove the tentacles but somewhere along the way I forgot and didn't remember until it was assembled...and at that point trying to cut them off would have been difficult. I'm still considering it, though.
|
|
|
|
|
2013/06/14 05:07:37
Subject: Big Daddy - Hellbrute of Nurgle
|
|

Nurgle Chosen Marine on a Palanquin
|
Leave the tentacles! They look the part for a sub-mariner type dread.
BTW, I have seen some great rusted up Sub-Marines done using two blank shoulder pads mounted on the neck ring of a marine torso to give it an old style diving suit look, just wish I could remember where so I could post a link...
|
 BobtheInquisitor wrote: BobtheInquisitor wrote:I tend to glue metal models with a combination of BSI cyanoacrylate and my tears of frustration.
|
|
|
|
|
2013/06/14 05:14:24
Subject: Re:Big Daddy - Hellbrute of Nurgle
|
|

Virulent Space Marine dedicated to Nurgle
|
EPIC!! Loving it!!
|
|
|
|
|
|
2013/06/14 05:21:10
Subject: Big Daddy - Hellbrute of Nurgle
|
|
Blood Angel Chapter Master with Wings
|
Amazing.... probably the best use of LEDs I have seen... usually it's so OTT but this one is subtle and well done, and very atmospheric!
|
|
|
|
|
|
2013/06/14 16:48:54
Subject: Re:Big Daddy - Hellbrute of Nurgle
|
|
Masculine Male Wych
|
So the armor is coming along nicely, but I'm kind of stuck on the flesh. The way I did the head was to base it with Bleached Bone, then wash it with Thraka Green and add highlights with thin Bleached Bone. I think it gives it a nice, pickled look. I started doing the flesh along the arm I'm painting the same way, and it doesn't look bad...but with the white armor the whole things just looks kind of light. There's not much contrast between the flesh and the armor. I thought about doing the flesh light pink with a purple wash, but I made the coral pink and I don't want it to be confused for flesh growth. I'd love to hear some suggestions, everyone has offered some really great feedback so far.
I plan on using clear casting resin to do the water, based on a really excellent guide that I read. I'm not sure how I want to tint it, though. I thought with nurgle it would be better to make the water green/brown, but I think it would be easy to confuse it with a swamp rather than an ocean. I thought about blue/green, but that might look too bright. I could do the murkier water, and perhaps use a clear gloss gel to make waves - would that be enough to show that it's an ocean?
|
|
|
|
|
2013/06/14 17:20:04
Subject: Big Daddy - Hellbrute of Nurgle
|
|
Dakka Veteran
|
For the water, I'd recommend a mix of bottle-greens and mid-tone blues, with spots of brown in it or as an underlying colour. Maybe you could try a Loch Ness look, with a very dark, black looking surface and a "poo-brown" colour underneath.
Not sure what you could do with the skin other than make it a red-rot colour, or attempting a leathery/dry, papery look on the skin.
|
|
|
|
|
2013/06/14 17:58:08
Subject: Re:Big Daddy - Hellbrute of Nurgle
|
|

Growlin' Guntrukk Driver with Killacannon
|
I follow this thread from the beginning, lurking from the deep.
Now You ask for suggestions ansd I wanna help to bring You at the end of this masterpiece.
For the skin why don't You try a blu/black, the color You got when blood is not arriving in a part of the body...
No idea for the sea,but I'll think about.
|
|
|
|
|
|
2013/06/14 19:36:06
Subject: Re:Big Daddy - Hellbrute of Nurgle
|
|
Masculine Male Wych
|
 SelvaggioSaky wrote: SelvaggioSaky wrote:I follow this thread from the beginning, lurking from the deep.
Now You ask for suggestions ansd I wanna help to bring You at the end of this masterpiece.
For the skin why don't You try a blu/black, the color You got when blood is not arriving in a part of the body...
No idea for the sea,but I'll think about.
That's not a bad idea. I could use a pale purple or white, with a dark blue/purple wash. That would give it a coagulated blood look and contrast nicely.
I think I'll try it on an extra model tonight and see how it looks. Thanks! Automatically Appended Next Post: Deunstephe wrote:For the water, I'd recommend a mix of bottle-greens and mid-tone blues, with spots of brown in it or as an underlying colour. Maybe you could try a Loch Ness look, with a very dark, black looking surface and a "poo-brown" colour underneath.
Not sure what you could do with the skin other than make it a red-rot colour, or attempting a leathery/dry, papery look on the skin.
The ground is a dark khaki color right now, I was trying to make it look like wet sand and I think I achieved that. I like your bottle green/mid-tone blue suggestion, I think I'll try that first on a test base and see how it looks. Have you done clear resin before? All the stuff I've read refers to "inks", which I don't have. I'm wondering if watered down paint or a wash would do. I've also heard food coloring works.
|
|
This message was edited 2 times. Last update was at 2013/06/14 19:38:31
|
|
|
|
|
2013/06/15 13:01:49
Subject: Big Daddy - Hellbrute of Nurgle
|
|
Chaplain with Hate to Spare
|
I suggest painting the skin as if it's a rotting corpse that's been submerged in water for days, i'm sure if you wanted you could gather some images or even look for movie references, so bluish purples and mottled/bruised?
|
Flesh Eaters 4,500 points
" I will constantly have those in my head telling me how lazy and ugly and whorish I am. You sir, are a true friend " - KingCracker
"Nah, I'm just way too lazy to stand up so I keep sitting and paint" - Sigur
"I think the NMM technique with metals is just MNMM. Same sound I make while eating a good pizza" - Whalemusic360 |
|
|
|
|
2013/06/20 23:55:25
Subject: Big Daddy - Hellbrute of Nurgle
|
|
Masculine Male Wych
|
I just wanted to provide a quick update to let everyone know that I've been on the road for work, so painting is kind of on pause. I head home tomorrow, so hopefully this weekend I can get back to it and add some new photos.
|
|
|
|
|
2013/07/02 14:01:07
Subject: Re:Big Daddy - Hellbrute of Nurgle
|
|
Masculine Male Wych
|
Things have been moving along...slowly. My girlfriend suddenly displayed an interest in painting miniatures, so I primed up an old 2nd edition Tyranid Warrior for her. My brushes hit the point of no return, so unfortunately it was a short lesson. I'm trying to find that balance on the armor between keeping the white visible while adding the orange/brown of the rust and the green of the slime. I darkened the coral a bit so that it doesn't look so much like patches of flesh. I finally found a nice grey/green shade for the organic parts and I'm still fiddling with the color for the tubes (most likely a red/brown). Here's where we are so far:
I picked up some new brushes on the way to work this morning, so tonight while I watch the baseball game I should be able to finish up the armor. New pics for you all tomorrow, then.
|
|
|
|
|
2013/07/02 15:00:33
Subject: Re:Big Daddy - Hellbrute of Nurgle
|
|

Skillful Swordsman
|
Freaking awesome! You rule.
|
|
|
|
|
2013/07/02 15:50:30
Subject: Re:Big Daddy - Hellbrute of Nurgle
|
|
Hulking Hunter-class Warmech
|
This looks fantastic mate!  Love it!
|
|
|
|
|
|
2013/07/02 15:55:24
Subject: Re:Big Daddy - Hellbrute of Nurgle
|
|
Stealthy Space Wolves Scout
Rynn's World
|
Brilliant.Love it.
|
|
|
|
|
|
2013/07/02 16:56:33
Subject: Big Daddy - Hellbrute of Nurgle
|
|
Lone Wolf Sentinel Pilot
|
Really good work mate, like it a lot!
|
|
|
|
|
2013/07/02 17:59:14
Subject: Big Daddy - Hellbrute of Nurgle
|
|
Dakka Veteran
|
Looking awesome!
|
|
|
|
|
2013/07/03 13:17:04
Subject: Re:Big Daddy - Hellbrute of Nurgle
|
|
Masculine Male Wych
|
I got done with all the armor on the chest and left arm, and started working on the right arm. It takes a little bit of time because I'm layering the white, then layering on the stains, then adding the chips, etc., but I'm really happy with how it's turning out. I'm going to try and finish the left arm and leg armor tonight, and the various tubes if I'm able to. That just leaves the flesh then. Friday I'm going to pick up my clear resin to do the water base, so hopefully Saturday I should have some pictures of the finished work.
I tried doing the tubes in brown, brownish red, purple, bluish purple...and finally decided on intestine pink. You can't see it in the picture above, but when I start working on the flesh I'll take some pictures from the back.
Thanks to everyone for the positive comments and support - I kind of hit the burnout point this week, but honestly I've managed to stick to it because I'm anxious to show everyone updated pictures.
|
|
|
|
|
2013/07/03 19:26:24
Subject: Re:Big Daddy - Hellbrute of Nurgle
|
|
Hurr! Ogryn Bone 'Ead!
|
You know, Rapture is actually a pretty good example of a Chaos takeover...
Love your work, subbed and bookmarked for reference.
|
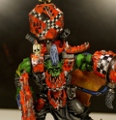
{url=http://www.dakkadakka.com/dakkaforum/posts/list/675142.page]{img]http://images.dakkadakka.com/gallery/2012/11/8/429237_md-.jpg{/img]{/url] |
|
|
|
|
2013/07/03 22:23:54
Subject: Big Daddy - Hellbrute of Nurgle
|
|
Growlin' Guntrukk Driver with Killacannon
|
It's turning to be a great thing (like It started something else  )
Color of the skin then? Decided?
|
|
|
|
|
|
2013/07/04 03:35:34
Subject: Re:Big Daddy - Hellbrute of Nurgle
|
|
Masculine Male Wych
|
I tried a couple different tests on the back, which is why I haven't shown any pictures of it yet. Blues and grays look too much like it's made of stone and the purple reminded me too much of Barney the dinosaur. I did a fleshy, intestine pink that looked good, but with the white armor the entire model would look too light and there wouldn't be much contrast between the flesh and the armor. Since I went with a non-traditional white on the armor, I decided to go with a standard Nurgle green. I don't actually have Rotting Flesh, so I mixed some Bleached Bone, Fortress Grey and Camo Green together and ended up with a reasonable substitute. I really like it - the green just screams "Nurgle".
|
|
|
|
|
2013/07/06 22:54:56
Subject: Re:Big Daddy - Hellbrute of Nurgle
|
|
Masculine Male Wych
|

I've kind of been going at it in fits and starts, so you can see that all the armor on the right half is done, and the armor on the left half is base coated. The same goes for the skin - the right leg is done, but the left leg and abs are just base coated. I accidentally got some paint on the tentacles, so I need to clean those up a little bit. Still chugging away...
Looking at the right leg, what does everyone think of the skin color? Too green? Too pale?
|
|
|
|
|
2013/08/14 18:50:30
Subject: Re:Big Daddy - Hellbrute of Nurgle
|
|
Masculine Male Wych
|
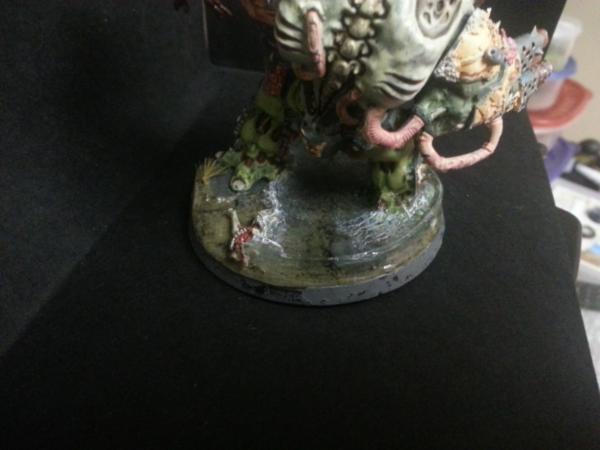
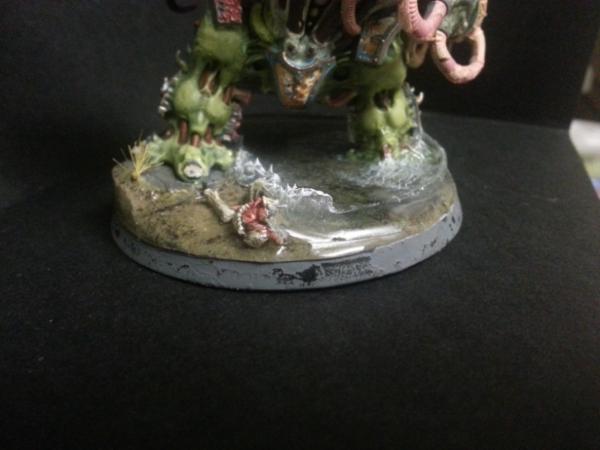
So, there's been a lot of craziness since my last update...
After a lot of reasearch (and I mean a lot), I decided to go with a two-part clear resin for the water effect. I found some EasyCast resin at my local Michael's for $13, got home and decided to try a sample base. I wrapped electrical tape around the base to form a lip, mixed the resin, poured and let it sit for 24 hours. When it had dried, I went to remove the electrical tape and noticed it left a sticky residue around the rim of the resin. I figured this was due to the adhesive on the tape, so I tried to come up with a better plan.
I had mixed the resin in a simple plastic cup, so I had an idea - I'd trim the cup and use that around the base to form a lip. I cut out an appropriate sized section, made sure the base fit snug and then poured. Can anyone guess my mistake here? I didn't use a practice base first. The "snug fit" was actually not so snug and the resin leaked out around the edges of the base. The base edge was covered, the underside was covered...it was everywhere. It had gotten into the wiring and was firmly set around the leg, so there was no way to remove the figure from the base and use another base. I was crushed. It sat for days.
Finally I figured, "What do I have to lose?" I took my hobby knife and slowly trimmed off the resin that was around the edge and got into the switch. The light worked, which was my main concern. The rim looks OK, but I need to repaint it. I felt a lot better.
I tried another sample base, this time folding over the electrical tape so that only the bottom of it was adhesive and the top part was the outer face folded in. This meant the sticky part wouldn't touch the resin. I let it sit for 24 hours and...it worked great. It peeled off fine with no sticky residue.
So then came two more practice bases as I tried to figure out how to tint it. A little GW wash mixed in was good enough and I got the color I wanted, but it was another 48 hours while I did this.
The next step was to make some waves, so I got a little clear silicone and slapped it on a practice base. This stuff took FOREVER to dry. Also, it dries very rubbery, which I didn't really like, and it was hard to get a stiff shape to hold. Some more research lead me to a product by Liquitex called Gloss Heavy Gel. Apparently you add it to paint to thicken it for shaping. THIS STUFF WORKED GREAT. It was very easy to use, held a great shape, held its height and held the nice, sharp points. It took about a day to dry, but I used a few layers to give it some body.
So...that's what I've been doing.
I painted both legs and the abdomen, but I still need to finish the armor on the right arm, the gun, and the flesh above the waist. Here's some pictures of the finished water effect on the base (I lightly drybrushed some white on the waves to make them stand out). The water was tinted with a little blue, green and sepia.
Once I repaint the rim and finish painting the model, I should have final pictures up. FINALLY.
|
|
|
|
|
2013/08/15 02:42:44
Subject: Big Daddy - Hellbrute of Nurgle
|
|
Dakka Veteran
|
It looks fantastic.
|
|
|
|
|
2013/08/15 02:47:55
Subject: Big Daddy - Hellbrute of Nurgle
|
|
Basecoated Black
|
That is.... (insert adjective).... I am at a loss for words at the moment. Maybe it is the anti-biotics... anywho, that is awesome, just awesome.
|
"If you hear a voice within you say 'you cannot paint,' then by all means paint, and that voice will be silenced." - Vincent Van Gogh |
|
|
|
|
2013/08/15 11:40:39
Subject: Re:Big Daddy - Hellbrute of Nurgle
|
|
Violent Enforcer
|
Absolutely amazing conversion 
If I might be so bold as to suggest some sort of running water effect coming off Daddy.
This would concrete the feeling of emergence as though he'd only just ambled out of the ocean.
Either way I'm sure the finished result will look amazing.
Keep up the great work
|
|
|
|
|
|
|
 ~2500p
 ~1750p
  : Catachans
 : Chaos Space Marines


 : 3000+


 : 2000+
 : 2000+