| Author |
Message |
 |
|
|
|
|
Advert
|
Forum adverts like this one are shown to any user who is not logged in. Join us by filling out a tiny 3 field form and you will get your own, free, dakka user account which gives a good range of benefits to you:
- No adverts like this in the forums anymore.
- Times and dates in your local timezone.
- Full tracking of what you have read so you can skip to your first unread post, easily see what has changed since you last logged in, and easily see what is new at a glance.
- Email notifications for threads you want to watch closely.
- Being a part of the oldest wargaming community on the net.
If you are already a member then feel free to login now. |
|
 |
2017/07/11 22:49:07
Subject: Sculpting, casting, kit-bashs and conversions - Stormhammer cometh... 10/07/17
|
|

Growlin' Guntrukk Driver with Killacannon
|
Don't think i have commented on this thread before but been subbed for a while.
Like the troops, the custom jump packs really develop over time. And your a mould natural by the looks of things.
Love the new tank, you can never have enough guns on a tank, keep it up.
|
|
|
|
 |
|
2017/07/12 23:18:28
Subject: Re:Sculpting, casting, kit-bashs and conversions - Stormhammer cometh... 10/07/17
|
|
Hardened Veteran Guardsman
|
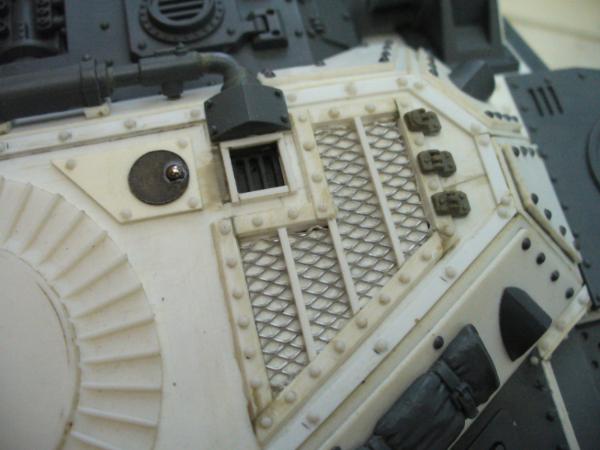
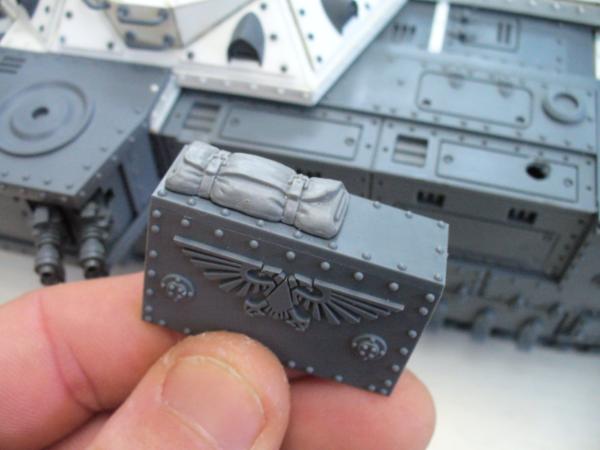
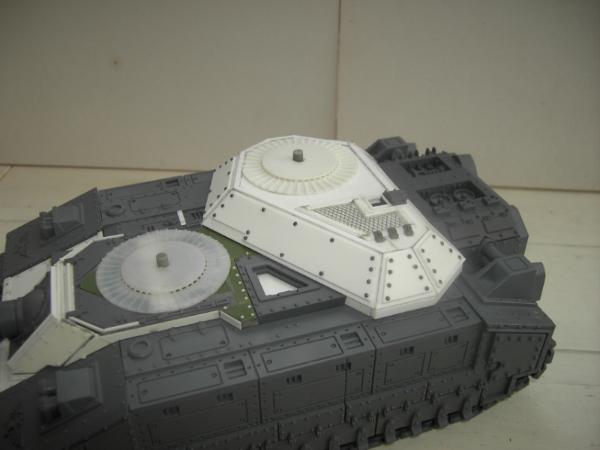
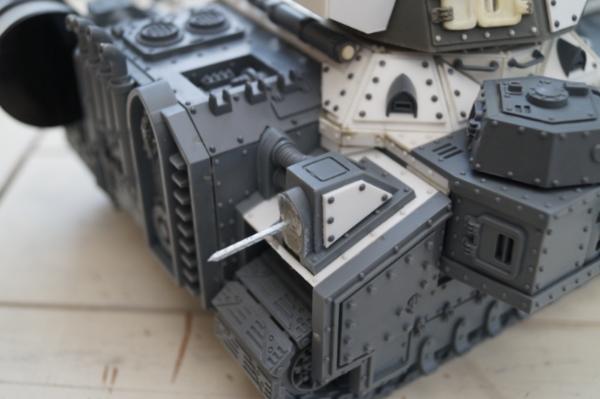
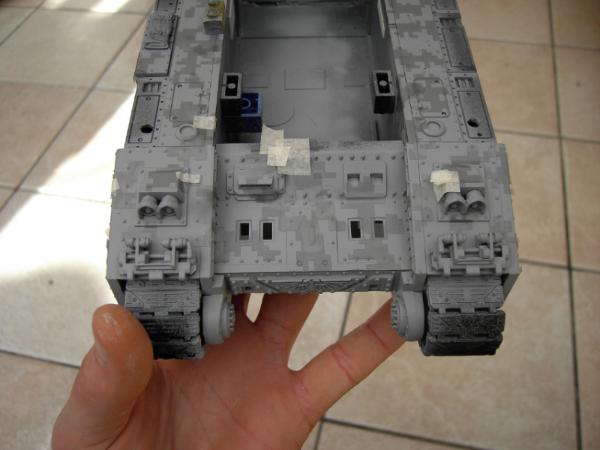
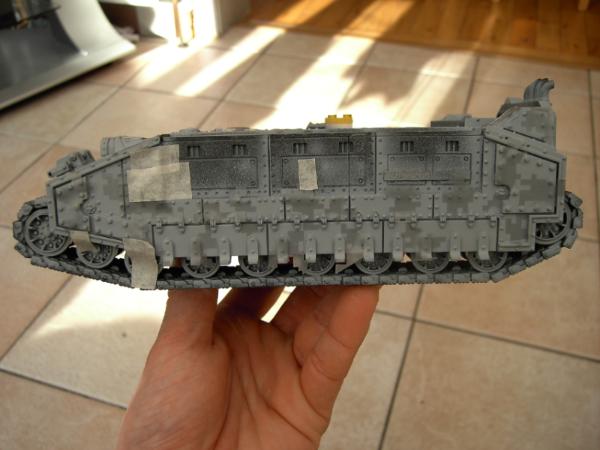
Hey again, a wee update for you: progress on the Stormhammer and some sculpted torso's for an alternative Guard regiment...
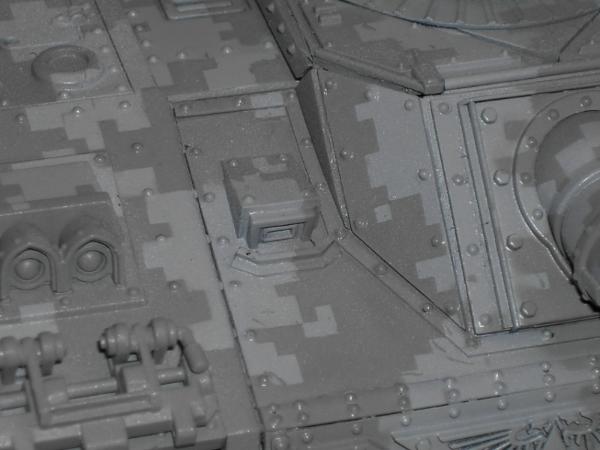
First off though, Meer_Cat: thanks man, the rivets i'm using are produced by Grandt Line for railway modellers, you should be able to get them on ebay...
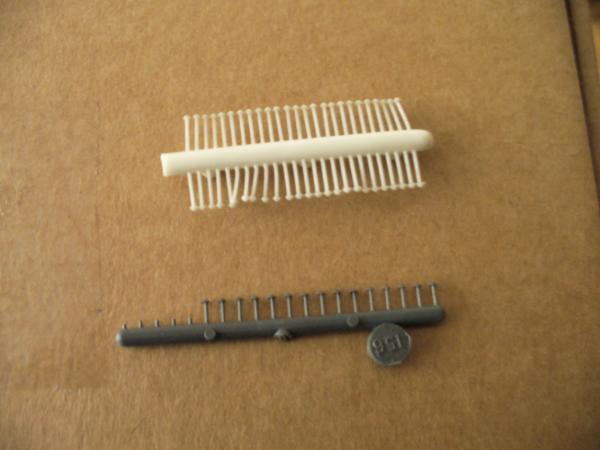
Basically a plastic rivet in miniature, just drill a small hole, add a dab of superglue with a pin or needle and insert the 'stem'. The smaller white rivets are near a perfect match to the original GW model. I'll be using the larger grey rivets for bolted on armour panels. Speaking of pins, you can use steel dressmaking/sowing pins to make rivets too if you clip the pinhead off. Check out my Ragnarok scratchbuild in my gallery for an example of this!
kestral: me too! Is 2 primary, and 4 secondary turrets, multi enough for you? 
stonned_astartes: thanks for subbing and sticking with it! I'll get back to the Harakoni one day, honest...
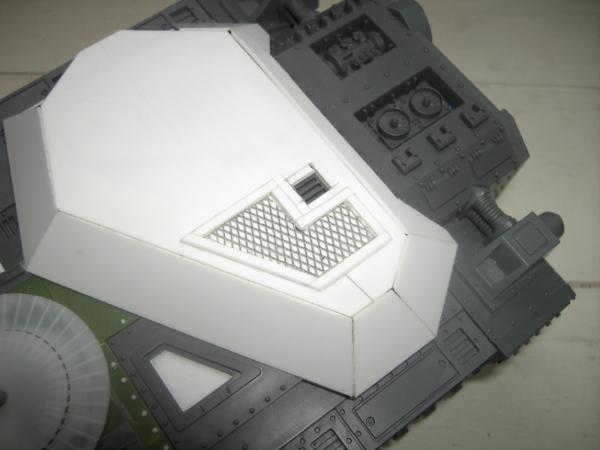
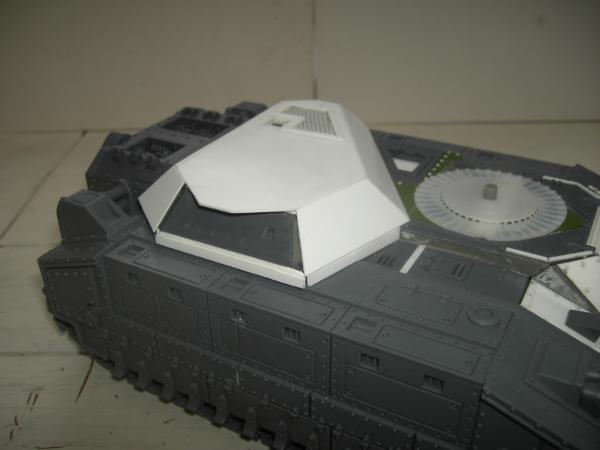
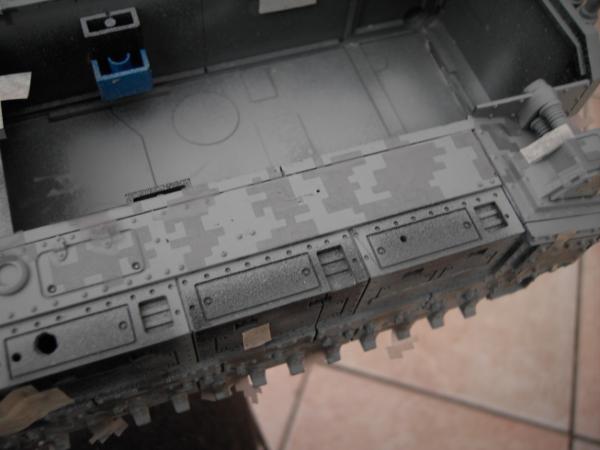
But anyways i've put some plasticard down on the raised rear superstructure to cover up the unsightly mess...
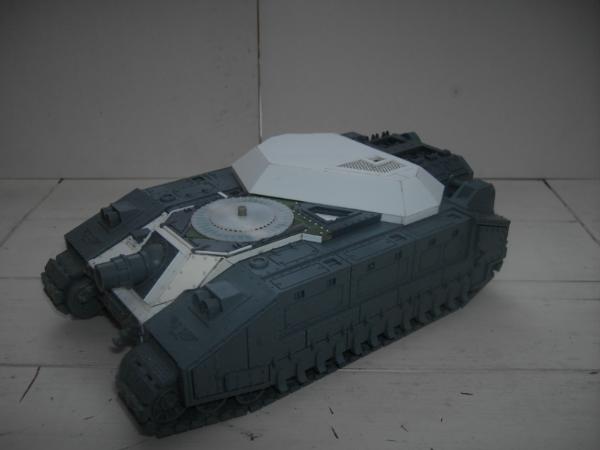
Gonna have a big grill here and wanted to keep the little, now recessed, vent feature...
You may notice above that the original Baneblade top structure doesn't sit flush with the rear left hand corner of the engine wall... it must have been damaged in the post or something because its all warped... I've tried heating and bending the plastic and scoring the underside but it still pops up like that... I could glue it down but then i wouldn't be able to make the whole build modular so i can make a Stormlord or Shadowsword or whatever and that's the grand plan!
The top plate will have jutting out structure here because the rear turret needs a bit more room, kind of like on the right side of a IG Chimera, only superheavy sized!
So thats where i'm at...
But i've been doing some sculpting and casting too!
I while ago i got some Afterlife Unity Council Tracer Exo-Mechs and Unity Marine Corps legs from Anvil Industry... The Exo-Mechs are badass but they need some regular grunts to go with. As yet though there's no Unity Council torso (without arms and heads that is) so i had a go at producing one myself.
I used this torso from the Tracer set as a reference...
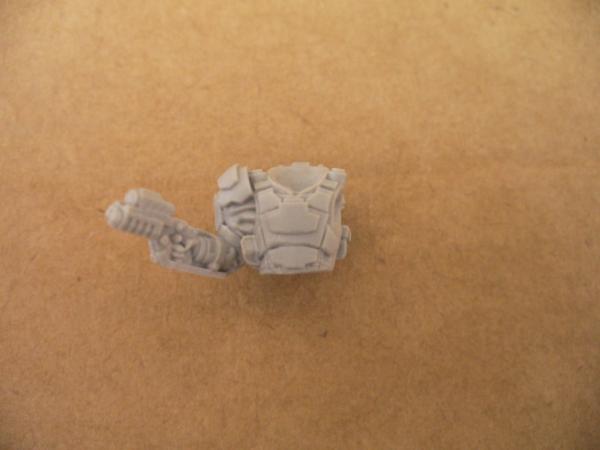
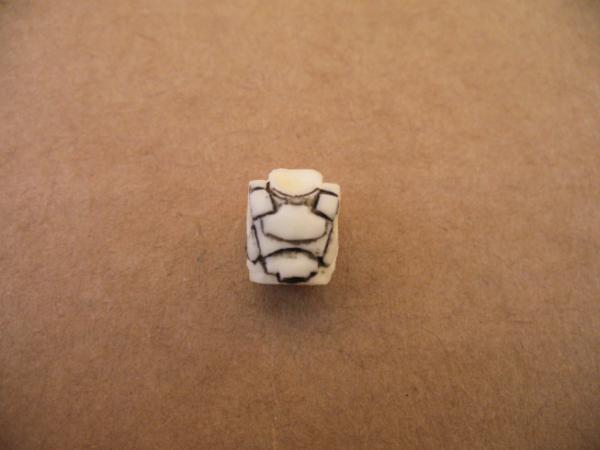
And used a good 'ol plastic Cadian torso as a base, i shaved off most of the front detail, scored some panel lines and built the rest up with brown stuff...

I've put some Badab black on this one so the detail is clearer...
Torso, Unity legs and a rather cool helmet/rebreather from Victoria Minis...
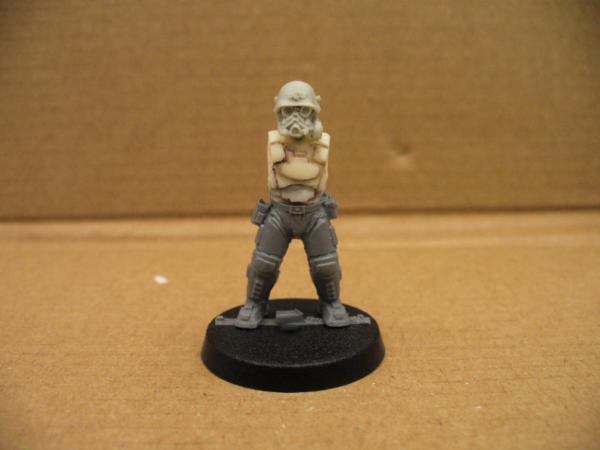
Tau arms with Unity shoulder pads and the barrel from a Sicarian stubcarbine to make a bullpup autogun...
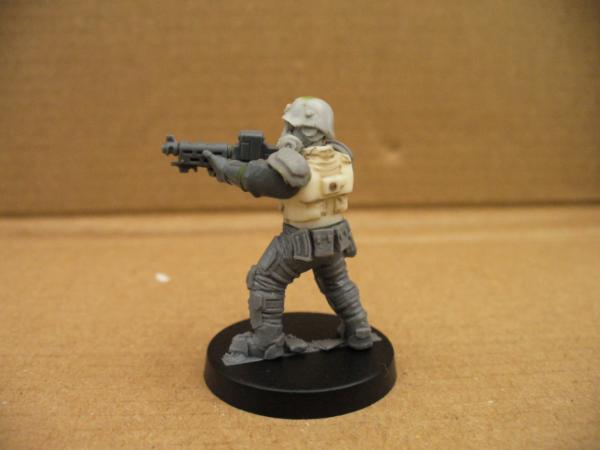
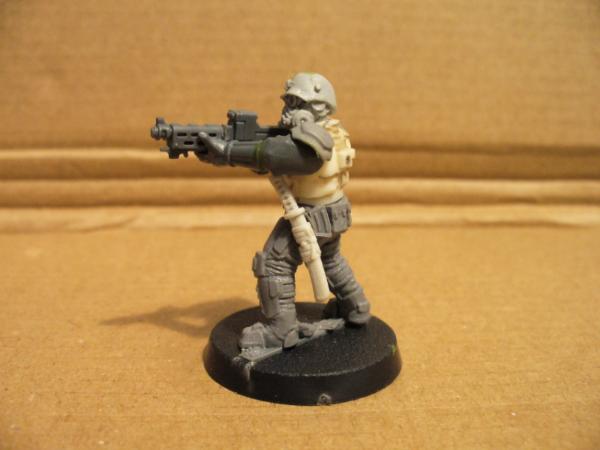
Just got to green stuff a combat mitten onto the guy above's left hand and maybe shorten the magazine a little, what do you think? Looks a little unbalanced to me...
Thanks for taking the time to have a look (turned out not so wee an update in the end), cheers for now!
|
Know your enemy... and then learn about his favourite sport - Nelson Mandela |
|
|
|
|
2017/07/13 00:02:38
Subject: Re:Sculpting, casting, kit-bashs and conversions - Stormhammer cometh... update 13/07/17
|
|

[DCM]
Boom! Leman Russ Commander
|
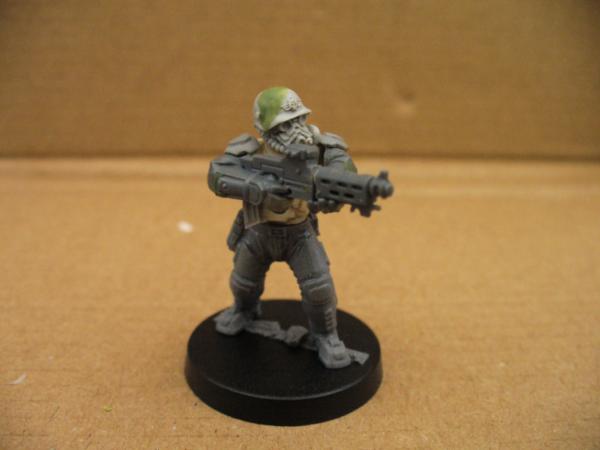
Love the build on this figure- terrific animation in the posing.
Regarding the mag on the bullpup, I could see it going either way- and be good either way: shorten it and you have a slightly more realistic ratio length to depth- but you can't see it on the figure; leave it as is and it does look just a tad back-heavy.
Shave just a scooch?
|
"He fears his fate too much, or his desserts are small, who will not put it to a single touch; to win- or lose- it all."
Montrose Toast

|
|
|
|
|
2017/07/18 13:19:37
Subject: Re:Sculpting, casting, kit-bashs and conversions - Stormhammer cometh... update 13/07/17
|
|
Hardened Veteran Guardsman
|
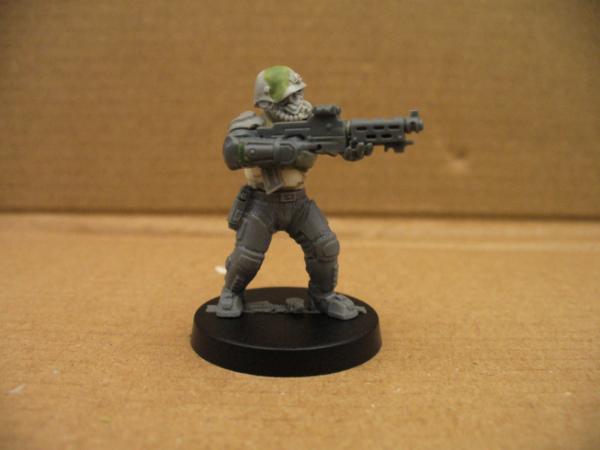
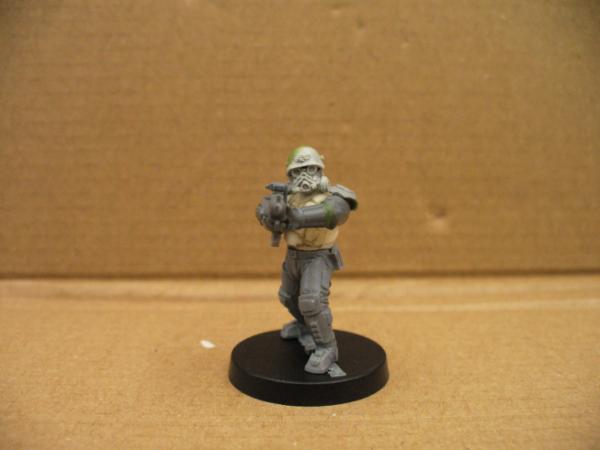
I've taken your advice Meer_Cat, and shortened it a scooch as you say... By about a millimetre... which in this scale is quite a lot! It does make the weapon look a whole better so thanks!

And just gotta show off his close combat weapon...
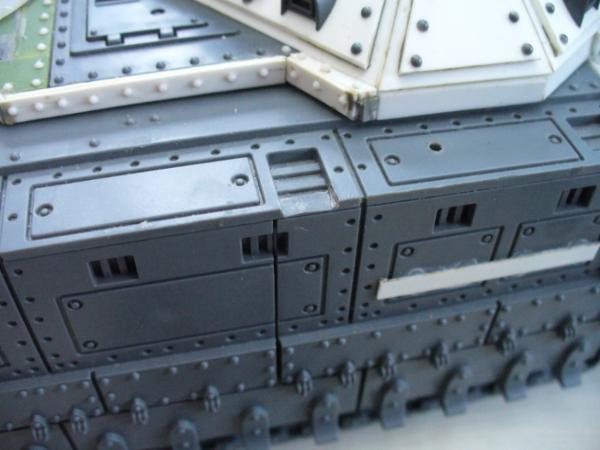
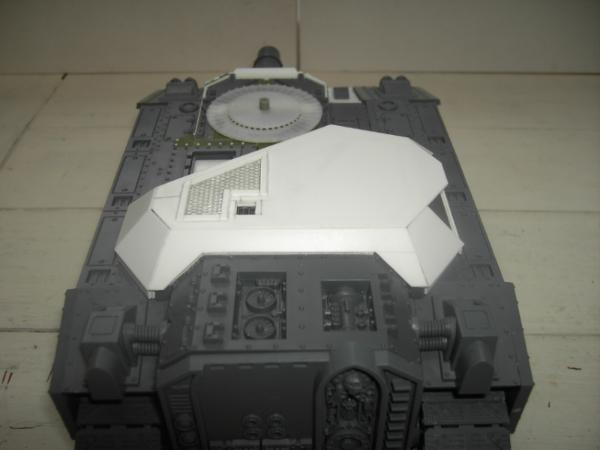
And i've added some armour plates to the Stormhammer rear turret housing...
I made a mould of the Baneblade hatches to make these hinges for the big grill...
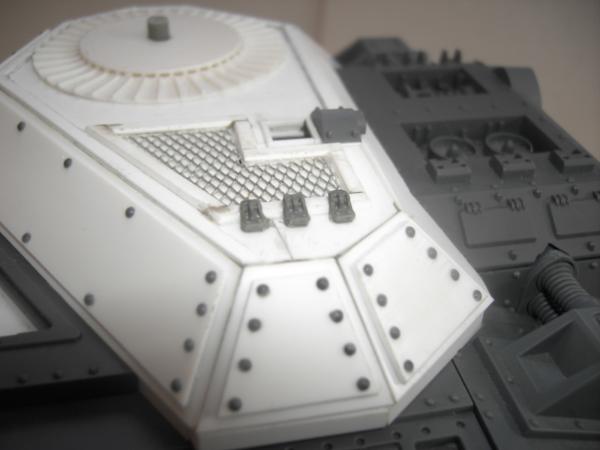
Its all starting to come together now!
I want to do some big Forgeworld style fuel tanks for the rear and an armour plate for the machine spirit gubbins with maybe another grill so you can still see the servo skull through it... The Stormhammer differed to other Imperial superheavies in that it had extra side and rear armour to help protect from infantry closing in behind it...
Thanks for taking a look!
|
Know your enemy... and then learn about his favourite sport - Nelson Mandela |
|
|
|
|
2017/07/19 12:53:02
Subject: Sculpting, casting, kit-bashs and conversions - Stormhammer cometh... update 18/07/17
|
|
Using Inks and Washes
|
More clinical work on that tank! I'm impressed at the clean lines - my plasticard work is all over the place and filled with gaps.
Nice job with the torso. That's a really close replica, and should give you a lot more freedom with posing your forces. Cadian torso is actually really versatile with a little shaving, isn't it?! I think you've nailed it with that rifle - I couldn't quite put my finger on what wasn't quite right, but shortening the magazine makes it click.
Interesting use of those railway rivets - I've not seen them before. Sounds fairly labour intensive, and I feel like I may be missing something. Is there an advantage to using the whole rivet over, say, a slice of plasticard rod glued in place?
Keep up the ace work!
|
|
|
|
|
2017/07/21 20:39:43
Subject: Re:Sculpting, casting, kit-bashs and conversions - Stormhammer cometh... update 18/07/17
|
|
Hardened Veteran Guardsman
|
Hey Scarper thanks for your kind comments!
On the subject of the Grandt Line rivets i would say the only real advantage to using them is on the aesthetic level, they're round headed and as i mentioned in a previous post the smaller white ones i'm using for the armour panels are a dead match to the Baneblade kit. I'd say also they're probably no more labour intensive than cutting up plastic rod and they would give a uniform 'manufactured' finish if you get me.
Besides ebay i know of at least 2 UK companies that sell something similar to what i'm using
https://www.zinge.co.uk/collections/small-parts-forest-sprues/rivets
https://www.antenocitisworkshop.com/scratchbuilders-paradise/augmentables-nuts-rivets-bolts/
Progress so far...
I wanted the rear sponsons to be elevated slightly like in the original depiction of the Stormhammer...
For want of a better term i've called these 'sponson holders', they clip into the Stormhammer chassis and the sponson sits on top... I won't be glueing these down though so i can swap them out to build it as the standard kit configurations... Disregard the heavy bolters by the way, they're just for show for now, i'm gonna build them with the twin heavy flamers in the sponsons and twin heavy bolters in the sponson turrets... Being a close assault tank i can just picture it rolling towards (over!) the enemy troop formations, with the heavy flamers flushing infantry out of cover, the heavy bolters mopping up the survivors and the main turret mounted battlecannons taking on any enemy armour or fortifications!
Apologies for the glare off the plasticard!
Thats all for now, thanks as ever for having a look!
|
Know your enemy... and then learn about his favourite sport - Nelson Mandela |
|
|
|
|
2017/07/22 16:49:21
Subject: Sculpting, casting, kit-bashs and conversions - Stormhammer cometh... update 21/07/17
|
|
Lone Wolf Sentinel Pilot
Chandler, AZ
|
Wow, great work. Keep it up!
|
|
|
|
|
|
2017/07/23 10:47:33
Subject: Re:Sculpting, casting, kit-bashs and conversions - Stormhammer cometh... update 21/07/17
|
|
Hardened Veteran Guardsman
|
|
Know your enemy... and then learn about his favourite sport - Nelson Mandela |
|
|
|
|
2017/07/23 20:24:31
Subject: Sculpting, casting, kit-bashs and conversions - Stormhammer cometh... update 23/07/17
|
|

Sinister Chaos Marine
|
I love your stormhammer, i cannot wait to see more of this.
Cheers.
|
|
|
|
|
|
2017/07/30 21:28:38
Subject: Re:Sculpting, casting, kit-bashs and conversions - Stormhammer cometh... update 23/07/17
|
|
Hardened Veteran Guardsman
|
Hey kitbashermagos, thanks for taking an interest!
Well here you go then, you can see more of this now... 
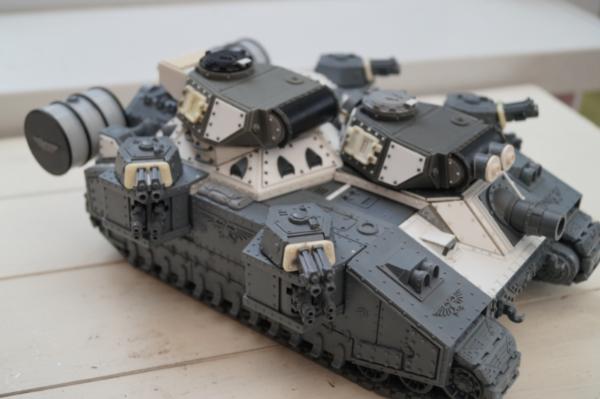
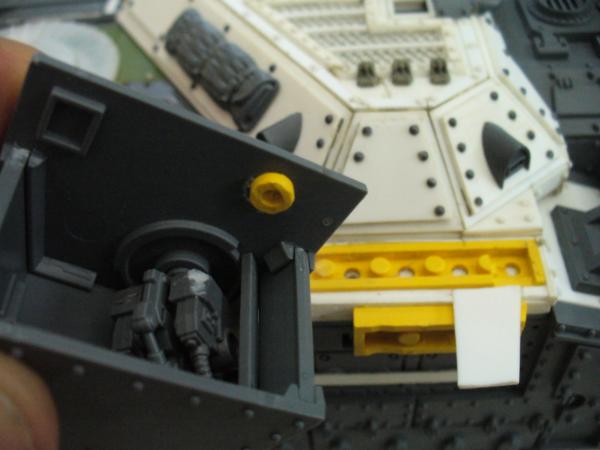
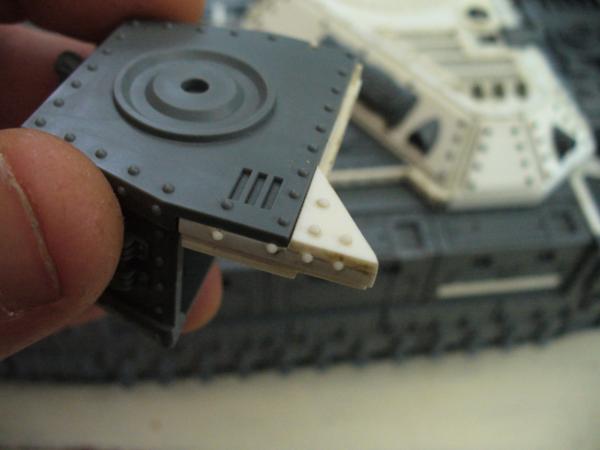
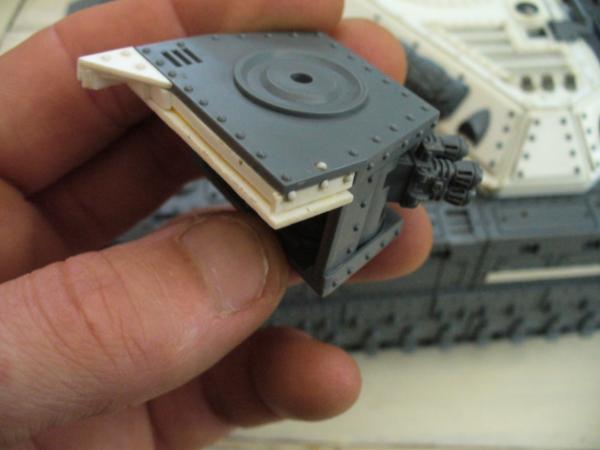
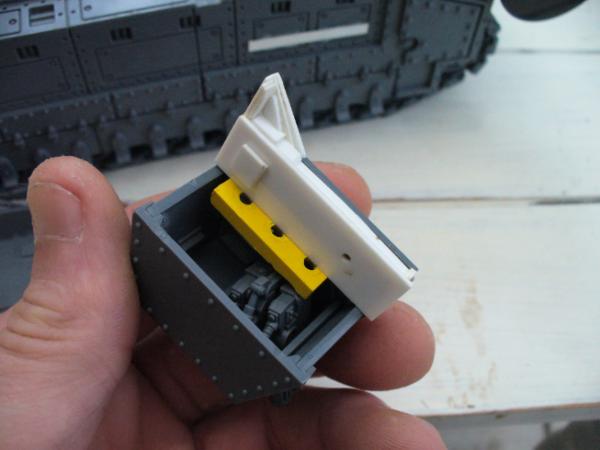
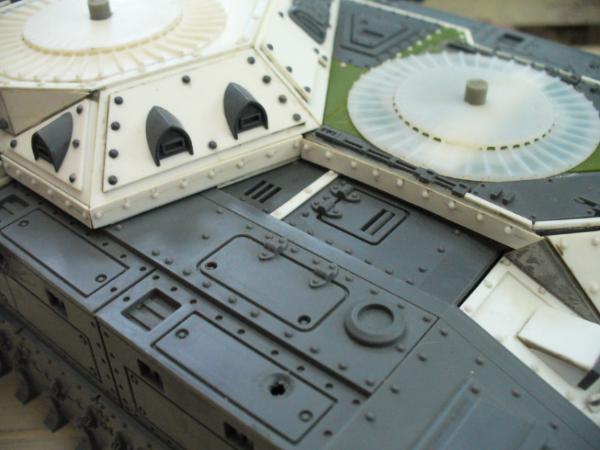
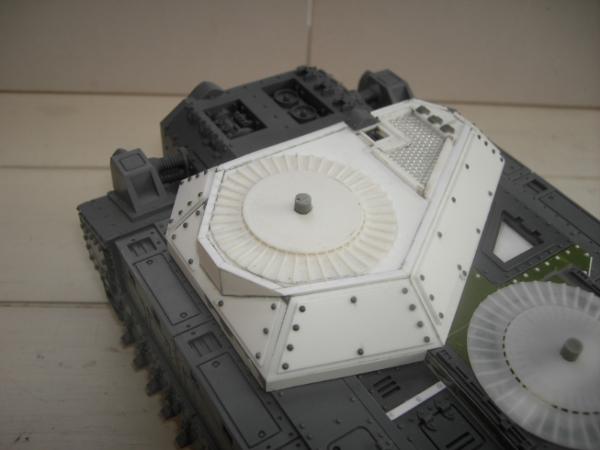
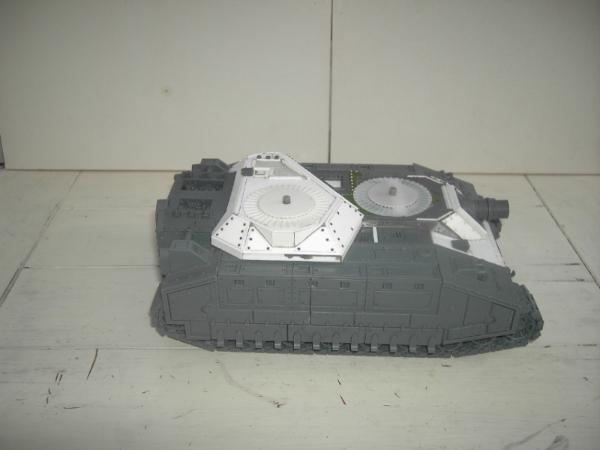
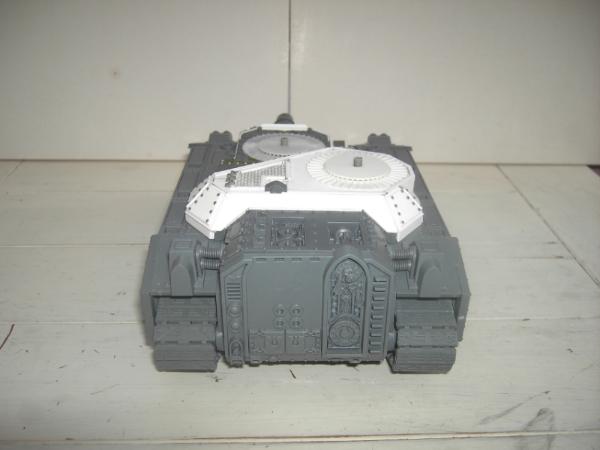
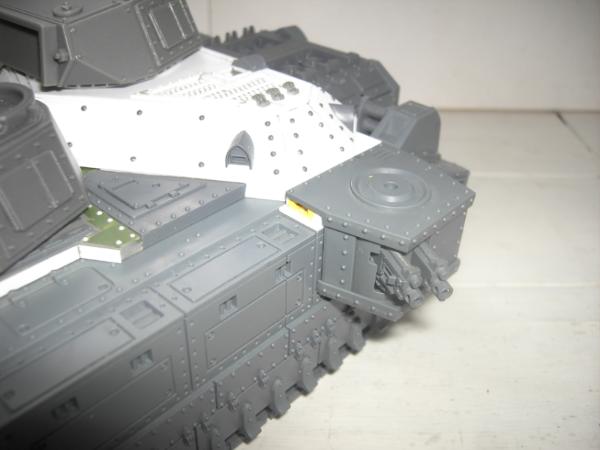
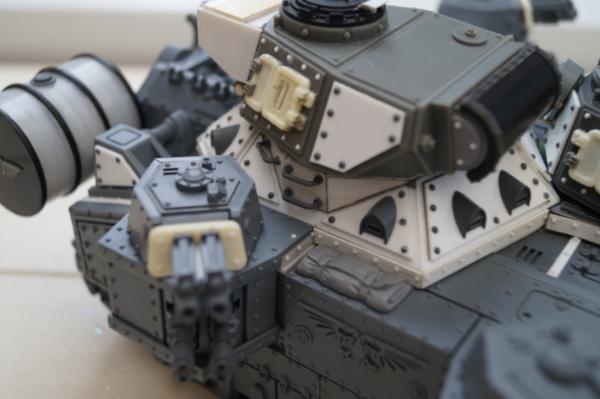
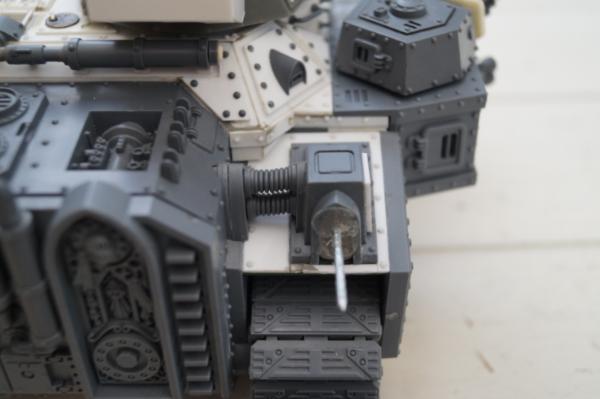
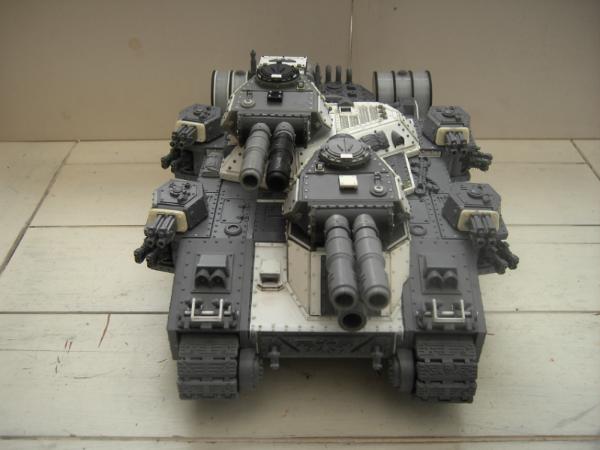
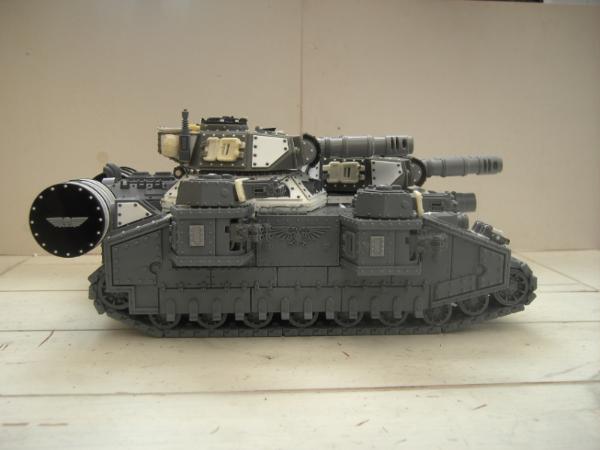
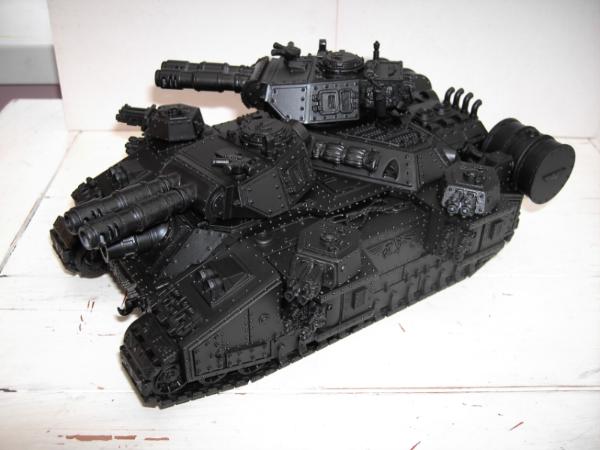
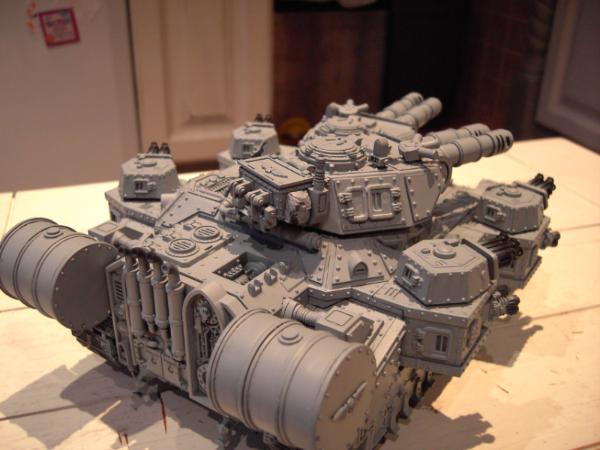
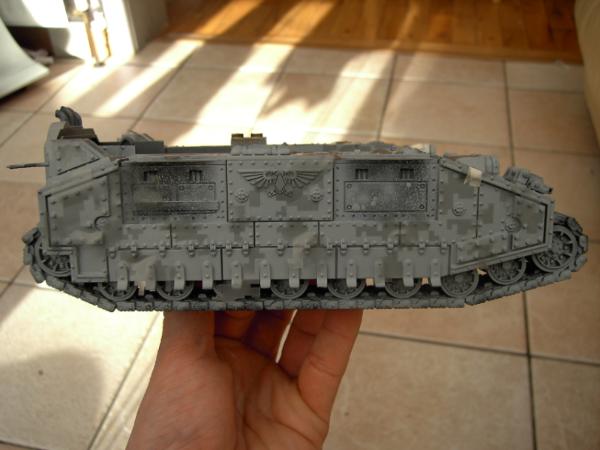
So i've up-armoured the 2 main turrets and added a gun mantlet to them and started work on the connection points for the twin linked battlecannons... The rear main turret is getting a turret bin for storage... The 4 sponson turrets have been equipped with twin linked heavy bolters... And i've started work on the auxiliary fuel tanks, they just need a few rivets to finish!
The Anarchy turrets are undoubtedly cool but i thought they needed to be given an Imperial makeover, so more armour, more rivets and the double door hatches were replaced with ones that would tie in with the other hatches on the original kit...
The forward main turret got some extra armour plates and a spare road wheel too for some added rear protection, though i notice i've lost one of the brass strip holding brackets somewhere, grrr...
The turrets are pretty much complete though i'm still debating whether to add more armour to the turret tops... What do you guys think, yay or nay...?
I made the fuel tanks out of some sellotape rolls and laser cut plastic circle bases to make the fuel tank shapes...
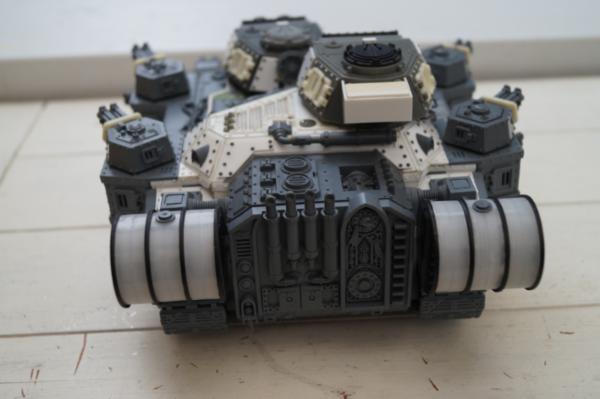
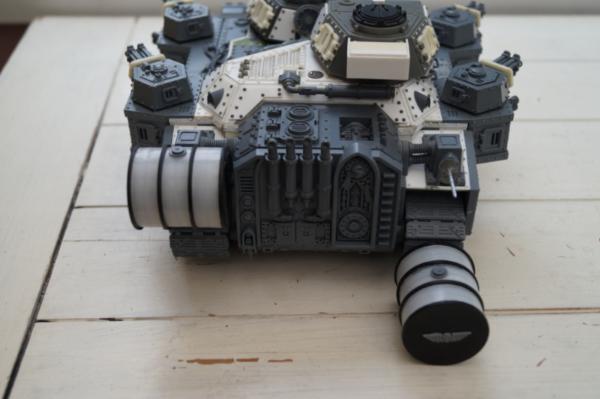
The thing was though they were too big to fit! So after some head scratching i finally decided to move the fuel pump housing out towards the edge of the tank... Which meant removing them and creating a whole new plate for them to sit on...
So that's where i'm at currently, thanks as ever for taking a look!
|
Know your enemy... and then learn about his favourite sport - Nelson Mandela |
|
|
|
|
2017/08/19 22:31:14
Subject: Sculpting, casting, kit-bashs and conversions - Stormhammer cometh... update 30/07/17
|
|
Sinister Chaos Marine
|
Vikingchild, love the it,But i should add a studded plate on the flat surfaces of your turrets and it should be fine, Good luck with the fuel problem.
cheers
|
|
|
|
|
|
2017/08/20 09:10:02
Subject: Sculpting, casting, kit-bashs and conversions - Stormhammer cometh... update 30/07/17
|
|

Longtime Dakkanaut
|
Nice idea with the lego connector!
|
|
|
|
|
2017/08/20 10:03:36
Subject: Sculpting, casting, kit-bashs and conversions - Stormhammer cometh... update 30/07/17
|
|
Avatar of the Bloody-Handed God
Inside your mind, corrupting the pathways
|
I came here to say the same thing as nareik; good thinking with the lego connectors. The tank is looking great and I love the new torsos.
|
|
|
|
|
|
2017/08/22 00:24:09
Subject: Re:Sculpting, casting, kit-bashs and conversions - Stormhammer cometh... update 30/07/17
|
|
Hardened Veteran Guardsman
|
Hey! Thanks guys!
Glad you're liking it, sorry i haven't posted an update in a while... I've been mega busy since the summer holidays started and haven't had much time to work on the Stormhammer...
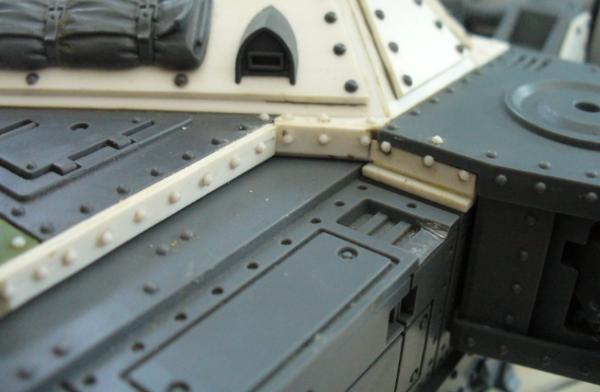
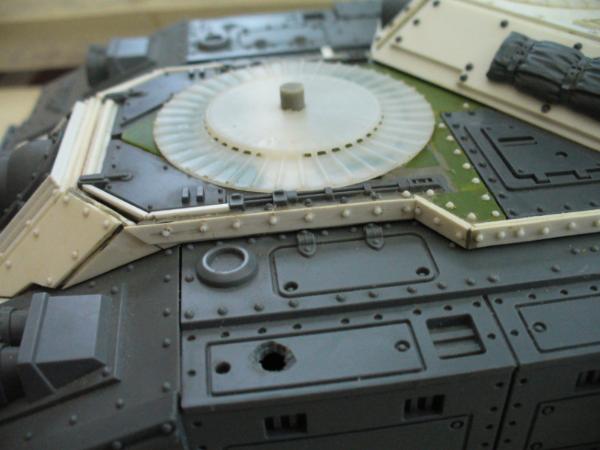
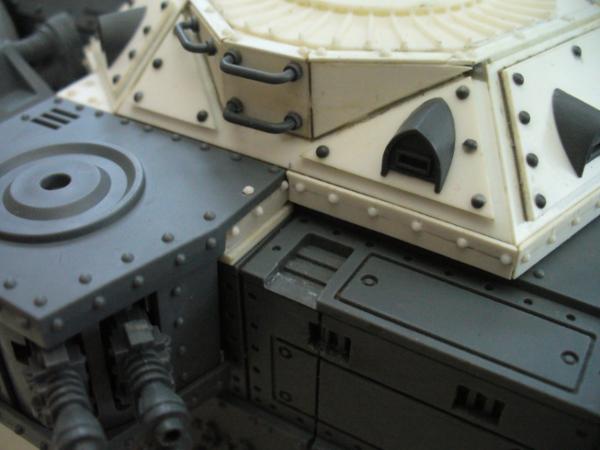
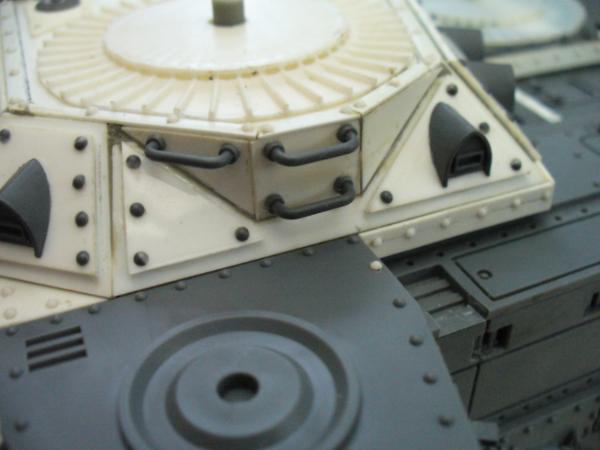
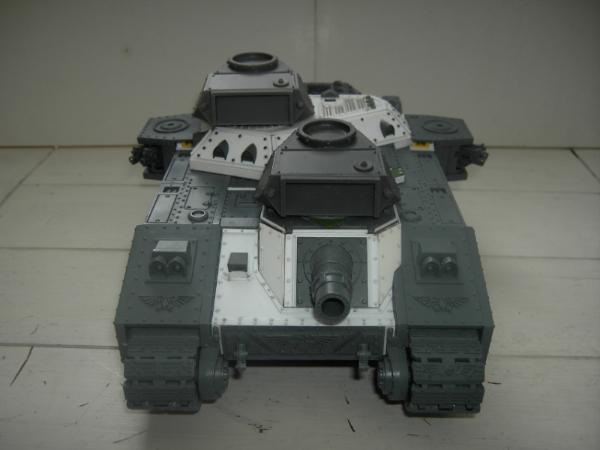
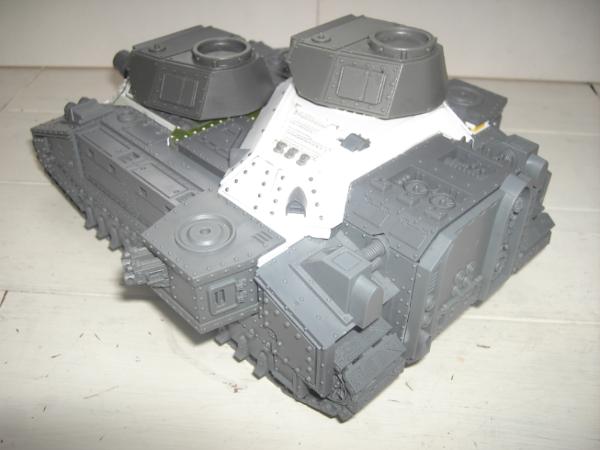
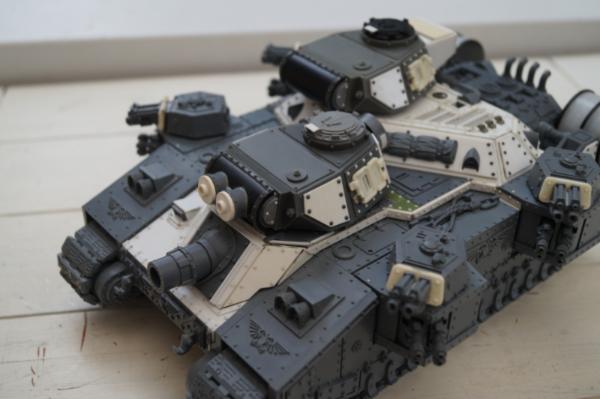
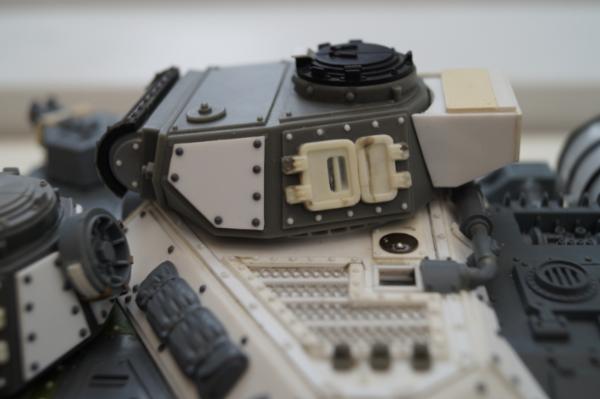
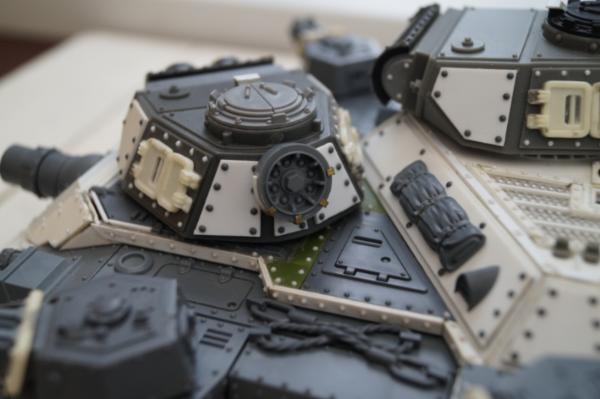
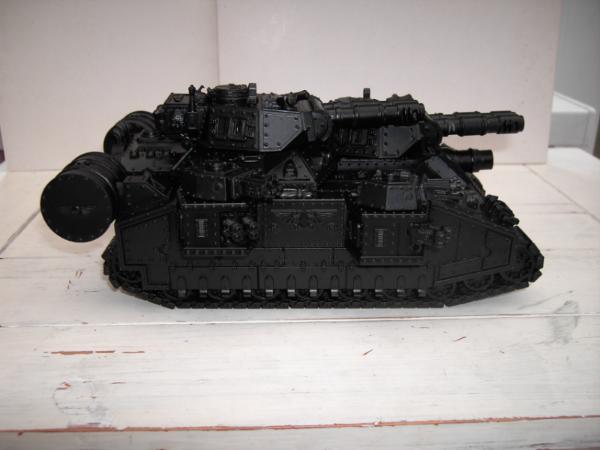
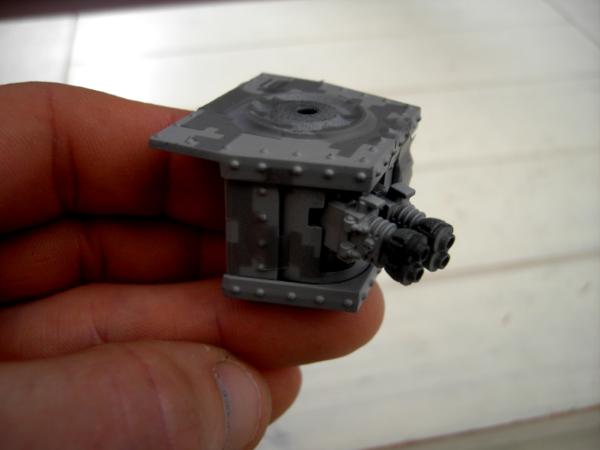
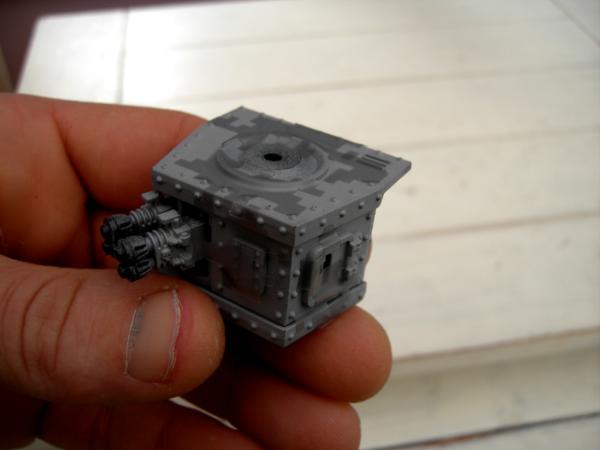
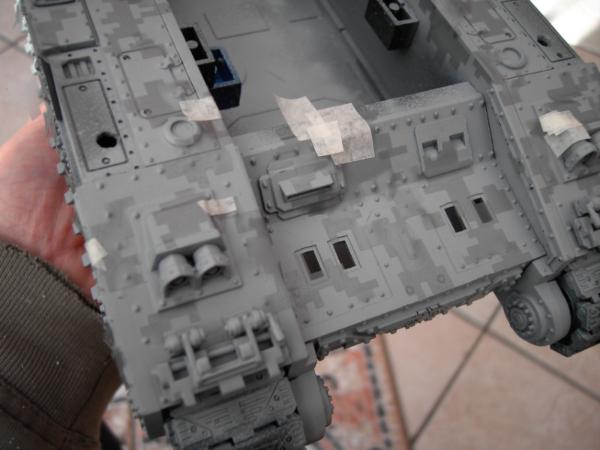
So the turrets are pretty much done, i decided not to armour up the turret tops and instead just added more rivets and an aiming viewport for the turret gunner, a commander's periscope next to the top hatch and some gubbins to house the smoke launchers. I wasn't happy with the battlecannon connection points i had posted previously so they got ripped off and i made new ones using some searchlight parts...
I made some holding clamps for spare tank tracks to serve as extra armour on the front of the tank...
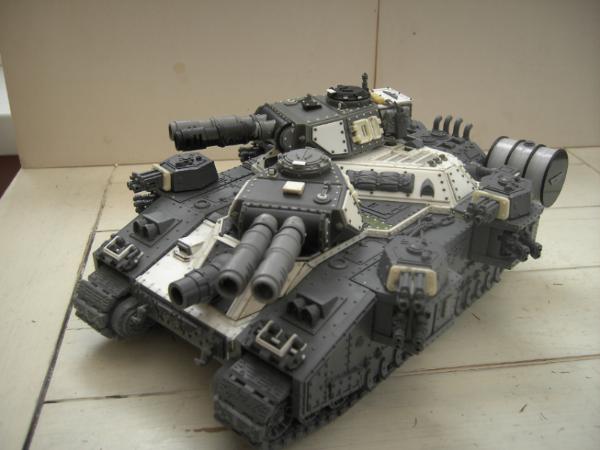
There will be a third to go on the rear of the turret storage bin which is now complete...
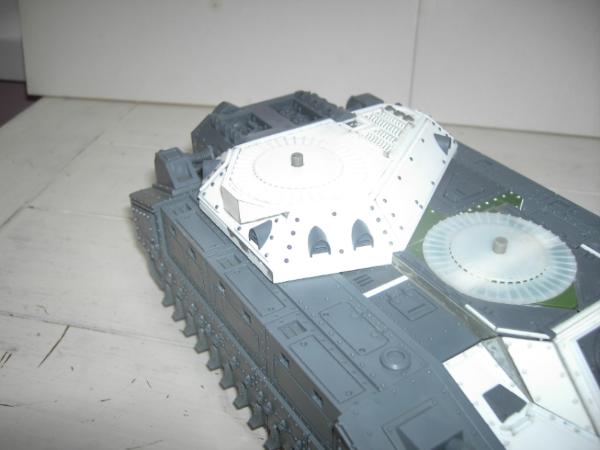
Some side details added to the sponsons...
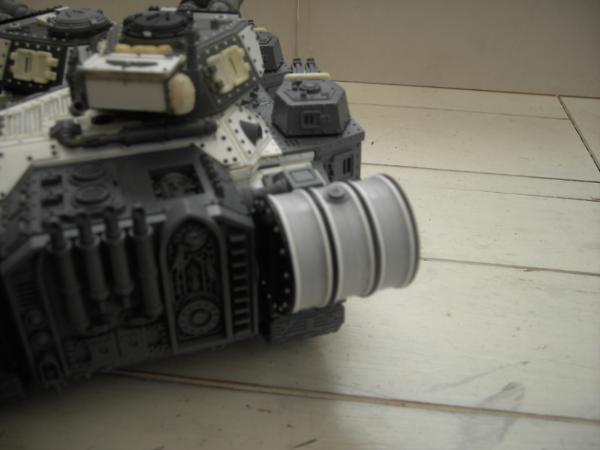
And completed one of the fuel tanks with rivets and added extra banding to give it more surface detail...
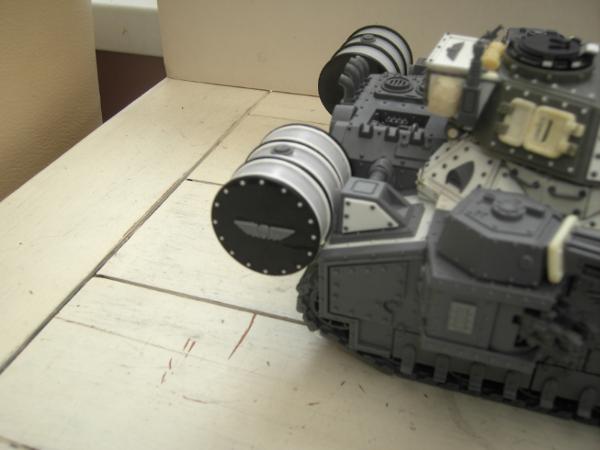
So that leaves the other fuel tank to complete and some gaps to make good with a little brownstuff, oh, and i still want to make some armour for the rear shrine and then it'll be all go for painting!
Thanks guys for taking a look and your comments!
|
Know your enemy... and then learn about his favourite sport - Nelson Mandela |
|
|
|
|
2017/08/27 19:17:48
Subject: Sculpting, casting, kit-bashs and conversions - Stormhammer cometh... update 22/08/17
|
|
Sinister Chaos Marine
|
Looking great chap, I can't wait to see it painted.
Cheers.
|
|
|
|
|
|
2017/09/12 12:47:40
Subject: Re:Sculpting, casting, kit-bashs and conversions - Stormhammer cometh... update 22/08/17
|
|
Hardened Veteran Guardsman
|
Cheers kitbashermagos!
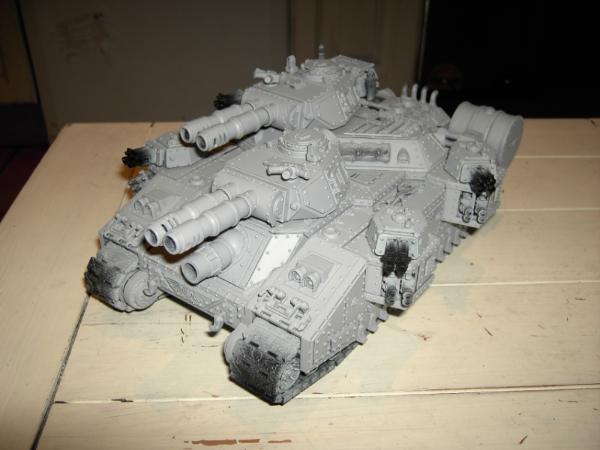
So....... Finally the tank is finished and so starts the painting!!!
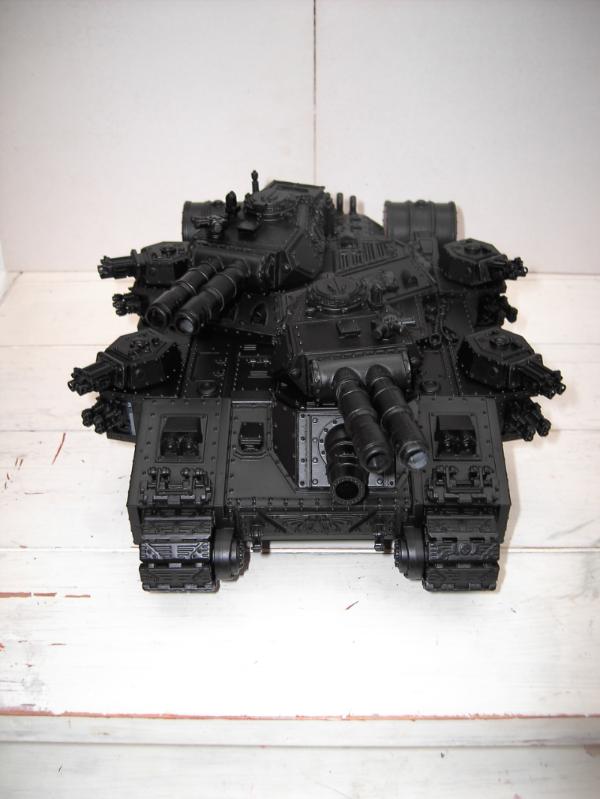
Actually its been finished for over a week now probably but every time i've had some spare time to basecoat it the weather has been rubbish outside... Until today, hurrah!
There's still some little cracks and crevices where the spray paint hasn't reached, i'll use my air brush for that, but on the whole it's ready for the next coat. I'm going for an urban camo scheme so hope y'all like grey, grey and more grey... in varying shades of course!
Thanks all for stopping by!
|
Know your enemy... and then learn about his favourite sport - Nelson Mandela |
|
|
|
|
2017/09/13 17:20:19
Subject: Sculpting, casting, kit-bashs and conversions - Stormhammer cometh... update 12/09/17
|
|
Sinister Chaos Marine
|
I love your choice of color, I use the Eshin grey for my traitor tanks and then dark-line everything with a highlight. I can't wait to see it's first colors.
Cheers.
|
|
|
|
|
|
2017/09/18 00:01:02
Subject: Re:Sculpting, casting, kit-bashs and conversions - Stormhammer cometh... update 12/09/17
|
|
Hardened Veteran Guardsman
|
Hello again
So with the continuing good weather i've been busy putting down the next coat of paint...
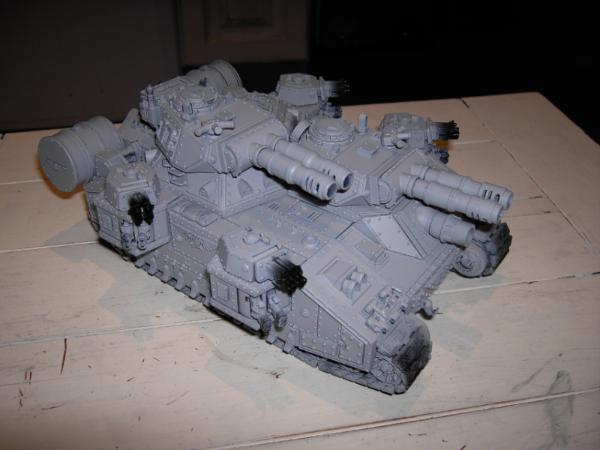
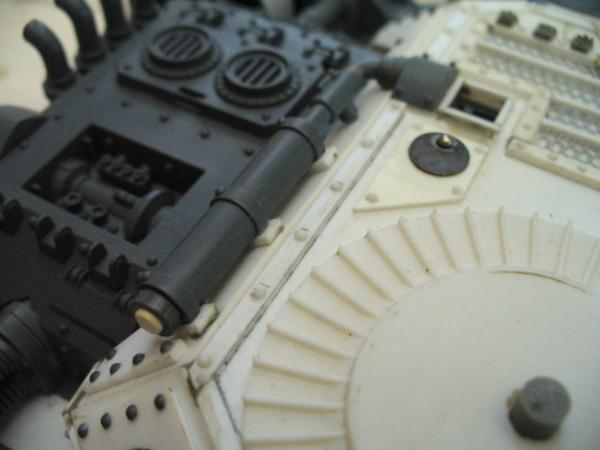
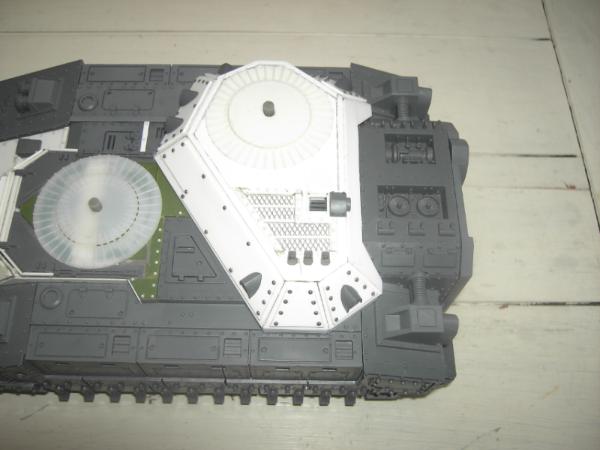
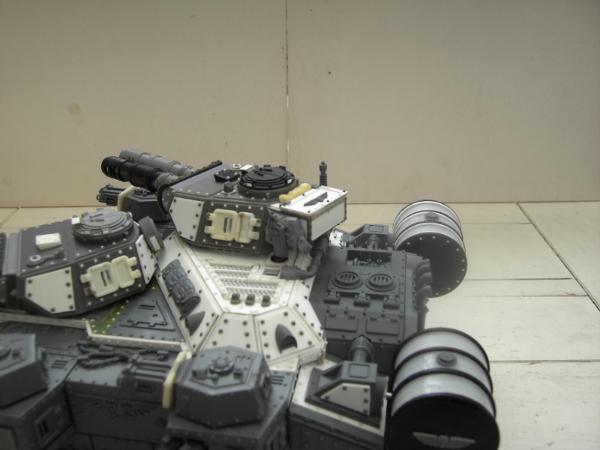
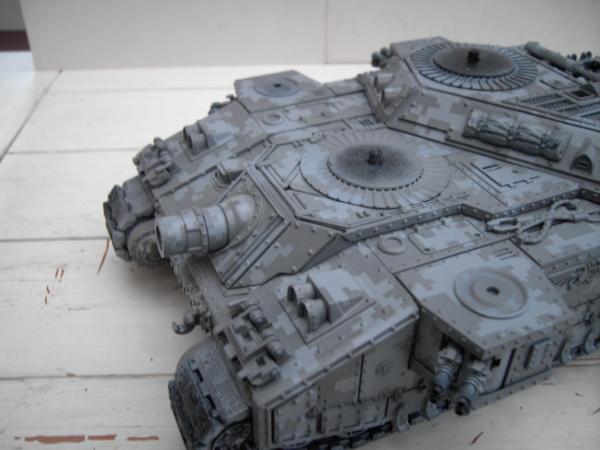
Close up of the the turret autolaunchers and baneblade targetting gubbins...

And a better rear shot of the turret bin storage and fuel tanks...
kitbashermagos; thanks mate! I'm not familiar with eshin grey but i had a look at your traitor tanks, love what you did with the chaos havoc lauchers mounted on the turret sides of your baneblade, very cool! 
The grey i used is Vallejo model air Light Grey... its probably lighter than i expected... but it should darken down nicely once i weather it with scuffs and chips and dirt. And of course this is just the initial base colour for the camo scheme...
For the airbrush aficionados out there maybe some of you guys could give me some advice. I'm having a bit of trouble with my compressor at the moment, its an Elephant AS16, cheap and cheerful, that i bought 4 or 5 years ago. In that time i've probably used it about a dozen times! And only ever to basecoat models. The problem though is that when i turn it on it seems to take a good 15 to 20 minutes to build up a head of steam before i'm able to start spraying... Which i'm pretty sure is a tad too long to be normal. Any suggestions? Usually i'll turn it on and then go do something else because i'll know by the change in the noise it makes that its good to go... And it'll work perfectly then.
I also wrecked my very best airbrush the last time i stripped it down to clean it... I was removing the screw in fluid nozzle and it broke away leaving the thread section still inside the airbrush... thus rendering the whole fething thing useless! I have a second airbrush but i've never liked it because it has a side mounted reservoir whereas i much prefer the top mounted variety... oh well, lesson learned... 
Thanks as ever for having a look, i'll leave you a preview of where i'm going next as regards to the camo...
Wish me luck!
|
Know your enemy... and then learn about his favourite sport - Nelson Mandela |
|
|
|
|
2017/10/01 17:01:22
Subject: Sculpting, casting, kit-bashs and conversions - Stormhammer cometh... update 18/09/17
|
|
Sinister Chaos Marine
|
Looking good chap, Good luck. 
Cheers
|
|
|
|
|
|
2017/10/09 11:00:53
Subject: Re:Sculpting, casting, kit-bashs and conversions - Stormhammer cometh... update 18/09/17
|
|
Hardened Veteran Guardsman
|
Hey folks
So since my last update i've suffered a minor setback...
My compressor is well and truly bollocksed... banjaxed... kaput... I really don't know what the craic is up with it, i bought a brand new airbrush to see if that would make a difference but when it arrived and i hooked it up the pressure was still far too low - it can't even spray water never mind paint! I've even taken the casing off the compressor to see if there's any obvious wear and tear to the the motor and pistons but everything looks as it should be... I'm in no way mechanically minded like but you would assume that there would be some kind of 'tell' as to why the pressure has dropped so much.
And so i've resorted to canned propellant to keep going on this; it's not ideal but i really can't justify purchasing a new compressor this side of Christmas... I might have to drop some subtle hints to the family from now on in!
And don't worry i have kept going...
I've used Anarchy Models' HD DigiCam stencils on the Stormhammer for my urban camo...
These stencils are really rather cool! I got them and a few other designs in their KS a few years ago for this very project and now i'm ready to see what they're like...
I had to use a bit of masking tape too because of the masses of surface detail on the tank - in some places you just can't avoid getting gaps in the pattern but you can cover them up with no bother.
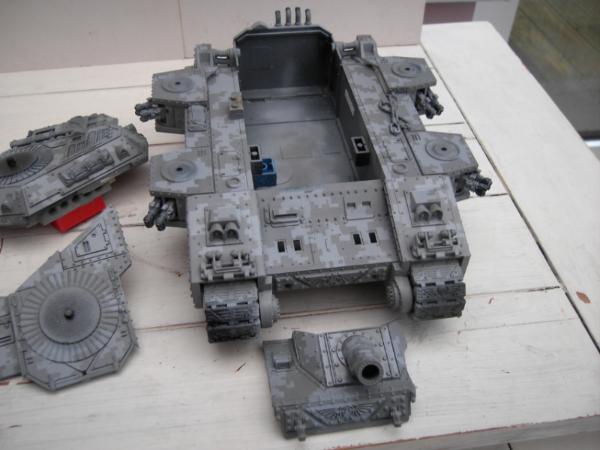
And so this is the Stormhammer now...
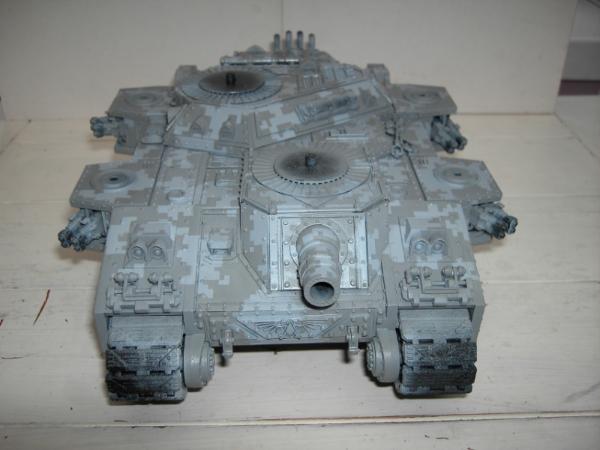
I've used Vallejo Cold Grey which funnily enough is pretty much the same colour as the Anarchy stencil so i had an idea as to how the two shades of grey would end up looking like...
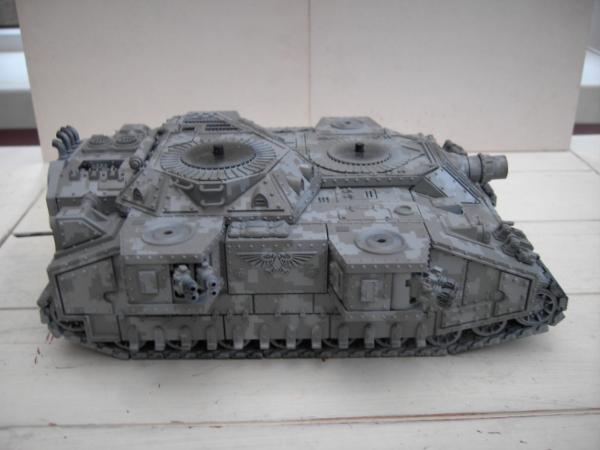
I'm really quite pleased with the effect so far, there are few areas that i'll have to use my paintbrush on to straighten up and that but on the whole the stencils were a joy to use (and i can reuse them too, bonus!)...
Here's the disassembled parts for the Stormhammer configuration. Because of the nature of this modular build i thought the use of digital camo would ideal as some of the pattern will stop at panel lines and others extend beyond them...
PHASE 2
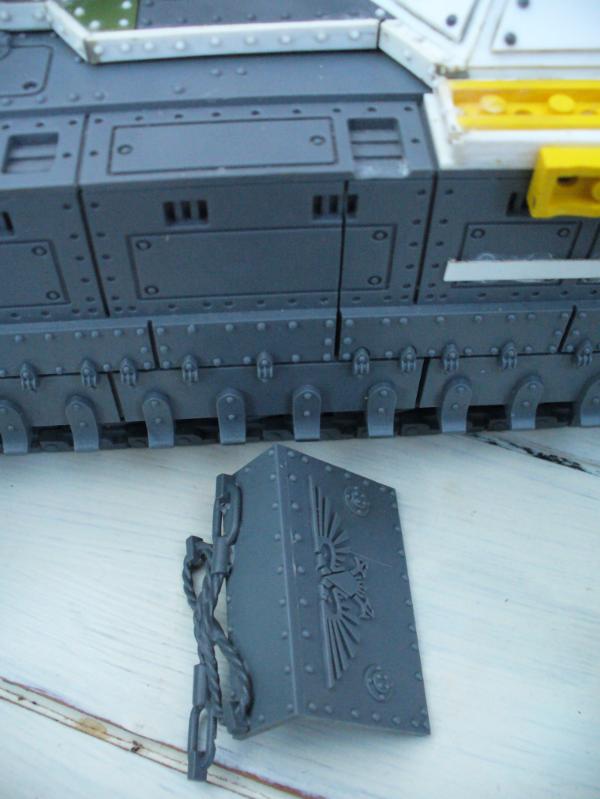
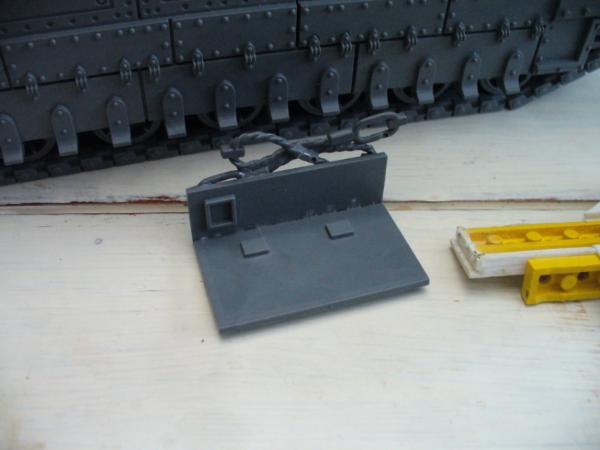
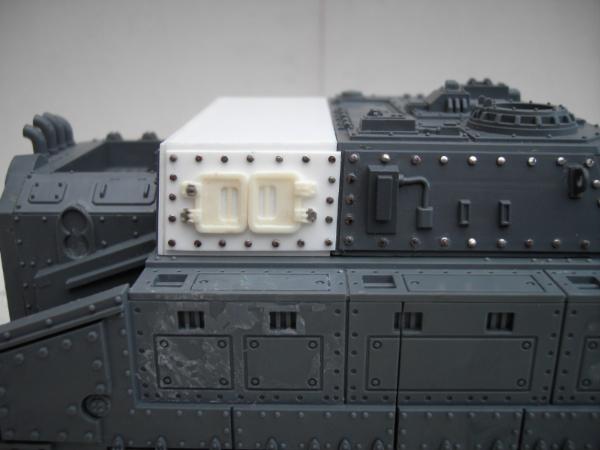
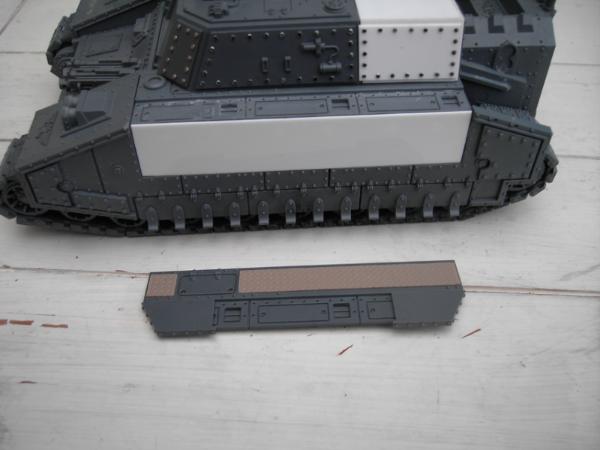
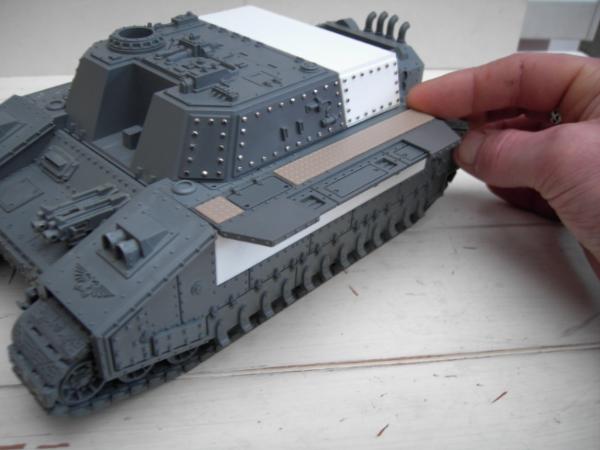
And so while i was cursing my compressor and in between waiting for the new airbrush to arrive and then the airbrush propellant aswell to come in the post i started work on the rest of the original Shadowsword kit options. I've always loved the concept of the Stormlord - a superheavy troop transport, who wouldn't?! But i wanted to make a few changes to mine and to differentiate between the more shooty variants and the Stormlord with it's transport ability. So i made this extended armoured crew compartment to fit neatly between the forward main superstructure and the rear open deck...
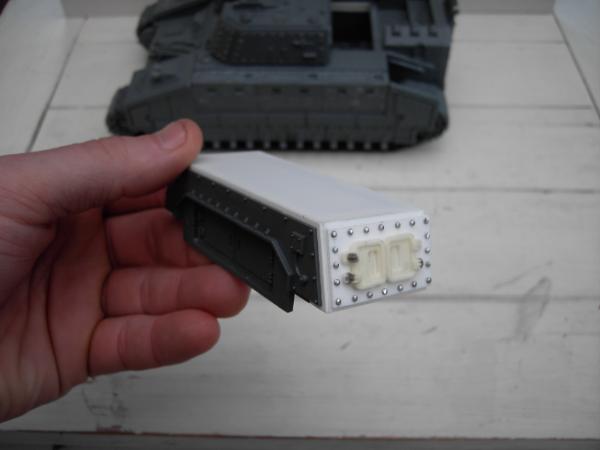
Made from a core of Lego...
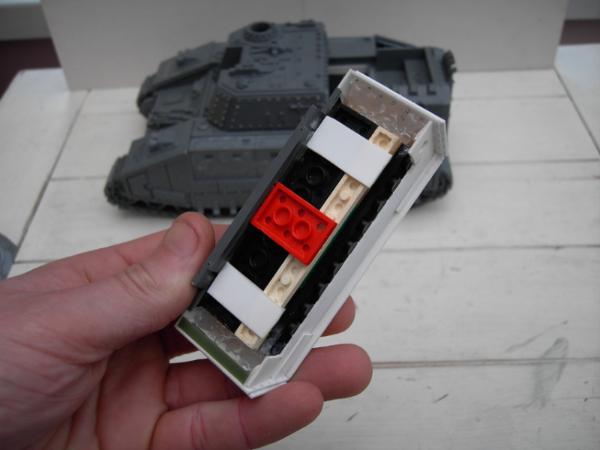
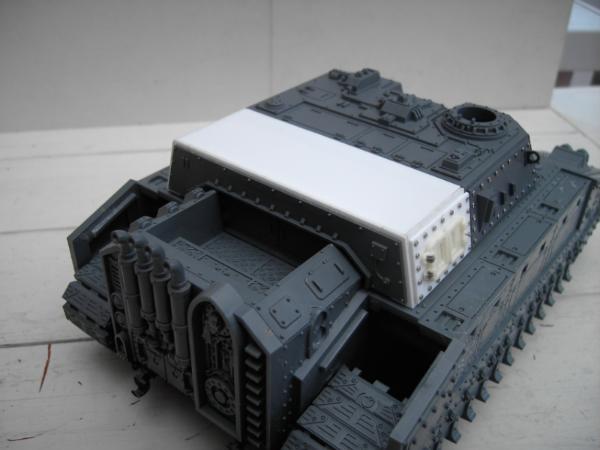
For the rivets i used dressmaking pins and replaced the original rivets on the original superstructure so that the two parts look as one...
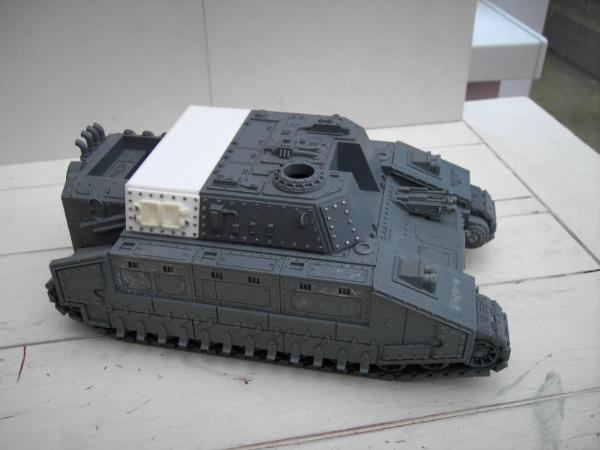
And instead of using the original sponsons for the Stormlord i'm going to make long side structures with forward and aft weapon points and centrally located drop down assault ramps...
So lots to do still, both paint-wise and modelling-wise, but thanks as ever for having a look and apologies for the pic heavy update...
Cheers for now!
|
|
This message was edited 1 time. Last update was at 2017/10/09 11:50:22
Know your enemy... and then learn about his favourite sport - Nelson Mandela |
|
|
|
|
2017/10/09 13:13:23
Subject: Re:Sculpting, casting, kit-bashs and conversions - Stormhammer cometh... update 09/10/17
|
|
[DCM]
Boom! Leman Russ Commander
|
Good to see you posting again- and glad to see you've been working right along. So much for me to learn here! Love the tip for the Lego connectors, as others have mentioned. I've been eyeballing the Anarchy stencils for doing camo patterns- watched their demo on YouTube and am wild to give it a try. You've got your super-project looking like a professional, production-run item.
Can't believe how precise your cuts are when doing the fiddly work, like attaching the sponsons. I'm doing a 'sort-of' scratch build (really, about half WWII Soviet artillery piece, half scratch) and am at the 'messing about with rivets and detail pieces stage'- your models set a great standard for me to shoot for.
I look forward to seeing more! (And good luck with the hints to family for a new compressor.)
|
"He fears his fate too much, or his desserts are small, who will not put it to a single touch; to win- or lose- it all."
Montrose Toast
|
|
|
|
|
2017/10/10 18:55:21
Subject: Sculpting, casting, kit-bashs and conversions - Stormhammer cometh... update 09/10/17
|
|
Sinister Chaos Marine
|
Great work as always
|
|
|
|
|
|
|
|