| Author |
Message |
 |
|
|
|
|
Advert
|
Forum adverts like this one are shown to any user who is not logged in. Join us by filling out a tiny 3 field form and you will get your own, free, dakka user account which gives a good range of benefits to you:
- No adverts like this in the forums anymore.
- Times and dates in your local timezone.
- Full tracking of what you have read so you can skip to your first unread post, easily see what has changed since you last logged in, and easily see what is new at a glance.
- Email notifications for threads you want to watch closely.
- Being a part of the oldest wargaming community on the net.
If you are already a member then feel free to login now. |
|
 |
2017/02/07 02:15:47
Subject: WIP: The beginnings of a Truescale Blood Ravens Army.
|
|

Huge Hierodule
|
Plodmarine wrote: lindsay40k wrote: lindsay40k wrote:Oh, definitely, there's a world of difference between natural and artificial light. I find a satin varnish coat helps, it eliminates differences in the various paints' reflective properties.
Thanks for the tip, I'll take a look at that. Do you get from the citadel paint collection or another brand?
Humbrols only for me. Never been impressed with a Citadel varnish.
|
|
|
|
 |
|
2017/02/12 23:48:57
Subject: Re:WIP: The beginnings of a Truescale Blood Ravens Army.
|
|
Stalwart Space Marine
|
So...just as expected I got distracted, and began modelling a few more minis. I had an Ahriman model from the burning prospero box, and despite initial concerns about chopping him I decided to go for it and make the mini more imposing with more "truescale" height. I haven't widened him at all as the mini is in my opinion too detailed and I'd rather not lose that intricate detail under greenstuff. Pics to follow, although not related to my Ravens.
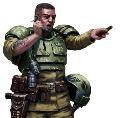
I've begun another 2 Blood Ravens, one will be the sergeant for the tactical squad, pointing at an incoming enemy and drawing a pistol from its holster, the other, walking, no decision on arms/weapons yet.
|
|
This message was edited 2 times. Last update was at 2017/02/13 00:05:23
I'm doing my own thing because it's fun. And it takes longer, which means more entertainment value for my cash. So there  |
|
|
|
|
2017/02/13 05:06:47
Subject: WIP: The beginnings of a Truescale Blood Ravens Army.
|
|

Regular Dakkanaut
|
Loving the poses and scale and that paint scheme is totally on point! Love the depth of your red.
If I had one thing it'd be the thigh width. The plate around the thigh would mean they have gangly chicken legs. Outside that it's spot on! Awesome work!
|
|
|
|
|
|
2017/02/13 08:29:30
Subject: WIP: The beginnings of a Truescale Blood Ravens Army.
|
|
Stalwart Space Marine
|
Monkeh wrote:Loving the poses and scale and that paint scheme is totally on point! Love the depth of your red.
If I had one thing it'd be the thigh width. The plate around the thigh would mean they have gangly chicken legs. Outside that it's spot on! Awesome work!
Thanks for your feedback. I very much agree on the width, I had been contemplating moving to termi legs but there's an additional cost and the limited poses to deal with, greater variety comes with the later marine kits (I sometimes buy spares/single pieces of it suits what I want). I know there's another blog on here where he builds the upper leg entirely from geeenstuff, I may try that at some point and gradually build up the width.
|
I'm doing my own thing because it's fun. And it takes longer, which means more entertainment value for my cash. So there |
|
|
|
|
2017/02/13 20:56:56
Subject: Re:WIP: The beginnings of a Truescale Blood Ravens Army.
|
|
Stalwart Space Marine
|
I've done a little painting, working towards final touches on the painted models. Mostly satisfied but not happy with the freehand Ravens insignia yet...I sense a do-over on some of these.
Anyone have any tips for painting the chapter logo/insignia neatly?
|
I'm doing my own thing because it's fun. And it takes longer, which means more entertainment value for my cash. So there |
|
|
|
|
2017/02/13 21:03:44
Subject: WIP: The beginnings of a Truescale Blood Ravens Army.
|
|
Huge Hierodule
|
My tip is use a mechanical pencil to sketch in the shape and keep checking it in a mirror - easiest way to spot errors in symmetry that your eye had got accustomed to
|
|
|
|
|
|
2017/02/13 22:03:32
Subject: WIP: The beginnings of a Truescale Blood Ravens Army.
|
|
Stalwart Space Marine
|
lindsay40k wrote:My tip is use a mechanical pencil to sketch in the shape and keep checking it in a mirror - easiest way to spot errors in symmetry that your eye had got accustomed to
Thanks, I'll have a crack at that. More to come once I've redone those haha.
|
I'm doing my own thing because it's fun. And it takes longer, which means more entertainment value for my cash. So there |
|
|
|
|
2017/02/14 03:01:46
Subject: WIP: The beginnings of a Truescale Blood Ravens Army.
|
|

Jinking Ravenwing Land Speeder Pilot
|
Honestly practice helps, so does using pencils and micron pens to outline
|
|
|
|
|
|
2017/02/14 10:37:08
Subject: WIP: The beginnings of a Truescale Blood Ravens Army.
|
|
Storm Trooper with Maglight
|
Tip; practise practise practise.
|
|
|
|
|
|
2017/02/16 22:58:46
Subject: Re:WIP: The beginnings of a Truescale Blood Ravens Army.
|
|
Stalwart Space Marine
|
So I've had some practice at the chapter insignia, using a mechanical pencil definitely helped. I'm still not 100% but I'll have to keep practicing on further models. Here's the results so far.
In addition, I've done more green stuff work on the next two units, and begun piecing them together ready for paint. (I may hold off at this point and build more so I can batch paint them, otherwise it's going to be very slow doing 2 at a time.
|
I'm doing my own thing because it's fun. And it takes longer, which means more entertainment value for my cash. So there |
|
|
|
|
2017/02/17 00:21:22
Subject: WIP: The beginnings of a Truescale Blood Ravens Army.
|
|
Storm Trooper with Maglight
|
Nice mate, group shot looks rad!
|
|
|
|
|
|
2017/02/17 07:09:55
Subject: Re:WIP: The beginnings of a Truescale Blood Ravens Army.
|
|
Walking Dead Wraithlord
|
Impressive looking group. Great poses.
|
|
|
|
|
2017/02/19 09:31:45
Subject: Re:WIP: The beginnings of a Truescale Blood Ravens Army.
|
|
Stalwart Space Marine
|
A little more progress. I've redone the last one I modelled (last post 5th pic down right side), the pose just didn't look right. So I've given him a new pose and started work on a reflex sight for his bolter. I cut up an old auspex, removing the knobs and dials at the top, trimmed the edges to be symmetrical and made the screen recess into a full square by cutting the last corner out. I'll add a front screen to it and sculpt some rails, but for now I'm out of green stuff.
I've also begun modelling a batch of legs, 7 ready for filling/filing and building onto. When I get more GS I might try wider thighs as suggested, and see where it takes me.
|
I'm doing my own thing because it's fun. And it takes longer, which means more entertainment value for my cash. So there |
|
|
|
|
2017/02/21 23:34:10
Subject: WIP: The beginnings of a Truescale Blood Ravens Army.
|
|
Stalwart Space Marine
|
Monkeh wrote:Loving the poses and scale and that paint scheme is totally on point! Love the depth of your red.
If I had one thing it'd be the thigh width. The plate around the thigh would mean they have gangly chicken legs. Outside that it's spot on! Awesome work!
As per your suggestion I've had a play with the upper thighs (giggidy), and looking at the minis I am confident it will be better looking to do throughout. Pics below. Thanks again.
I used a small strip of green stuff for each thigh, a few mm narrower than the plastic itself. I wrapped it around and pressed it down (I will photograph this process at some point). Then I loaded up the carving tool that looks like a tiny flat spade with Vaseline and began smoothing. Once the free stuff looked smooth and even I carved some detail in similar to the marks on the plastic, using a scalpel.
I did find the lower leg greaves appeared a little narrow, the photo may not show it much but I used the same technique to wrap the outer 1/3 of the greaves and smoothed it in, just widening them slightly.
Open to feedback. It takes about 30- 40mins per model to widen the legs so it may not be worth doing all of them. I reckon it looks better than the termi legs too, I feel that it's closer to the power armour than converted terminator armour can get.
![[Thumb - IMG_3818.JPG]](/s/i/at/2017/2/21/027f607a08d390e50c6efb3441e161ea_109164.jpg__thumb)
|
![[Thumb - IMG_3819.JPG]](/s/i/at/2017/2/21/8027e2e608bbf2e0e7a3a5c394df7fe1_109164.jpg__thumb)
|
|
I'm doing my own thing because it's fun. And it takes longer, which means more entertainment value for my cash. So there |
|
|
|
|
2017/02/22 03:03:07
Subject: WIP: The beginnings of a Truescale Blood Ravens Army.
|
|
Huge Hierodule
|
I think the thicker legs work. They're meant to be stronger than the biggest heavyweight fighters, and they've got extra weight to carry in their Black Carapace. They'd have proper chunky quads!
|
|
|
|
|
|
2017/02/22 04:49:01
Subject: WIP: The beginnings of a Truescale Blood Ravens Army.
|
|
Jinking Ravenwing Land Speeder Pilot
|
^ She's got a point
|
|
|
|
|
|
2017/02/22 14:24:25
Subject: WIP: The beginnings of a Truescale Blood Ravens Army.
|
|
Storm Trooper with Maglight
|
Space marines dont skip leg day. noice
|
|
|
|
|
|
2017/02/23 11:17:49
Subject: Re:WIP: The beginnings of a Truescale Blood Ravens Army.
|
|
Stalwart Space Marine
|
Thanks for the feedback guys! Here's a bit more on space marine leg day...
|
I'm doing my own thing because it's fun. And it takes longer, which means more entertainment value for my cash. So there |
|
|
|
|
2017/02/23 15:37:34
Subject: WIP: The beginnings of a Truescale Blood Ravens Army.
|
|
Storm Trooper with Maglight
|
How exactly are you making the legs fatter? i can see that its greenstuff, but whats the method?
Are you just putting a blob on and smoothing it out till the leg is much thicker?
Nice though.
Also click HERE to see a great thread on truescaling, he also has a great tutorial on posing that's worth looking at. have a read, i recommend.
|
|
This message was edited 2 times. Last update was at 2017/02/23 15:40:56
|
|
|
|
|
2017/02/23 22:14:40
Subject: Re:WIP: The beginnings of a Truescale Blood Ravens Army.
|
|
Stalwart Space Marine
|
STG Pretty much yeah, I wrap a strip around the thigh, and smooth it out. I then add a little detail to the panel (need to improve that). For the greaves I add a blob and smooth it to the outer edges with Vaseline, trying to keep the added width to the outer rear of the panel. Thanks for asking, reminds me to show how to...will take pics on the next go.
That thread looks awesome, I'll have a proper dig around it later. I like how he's changing the poses down to bending the toes...such detail!
|
I'm doing my own thing because it's fun. And it takes longer, which means more entertainment value for my cash. So there |
|
|
|
|
2017/03/04 11:56:39
Subject: Re:WIP: The beginnings of a Truescale Blood Ravens Army.
|
|
Stalwart Space Marine
|
As promised I've taken step by step pics of how I fatten up the legs. I'm expecting a couple of sideways pictures here, I was pretty carried away with the sculpting. I forgot to mention last time, once the green stuff is set I file out any wonky or rough areas the same as I would on plastic.
I've also found that paint doesn't like to stick to the green stuff, especially if like me you add water to thin out the under/base coats. I imagine this is the Vaseline I use to smooth it out, so I've tried washing them with cold water (glues don't like hot) and fairy liquid. Hopefully this will help. Anyone else have recommendations?
|
|
This message was edited 2 times. Last update was at 2017/03/04 14:27:12
I'm doing my own thing because it's fun. And it takes longer, which means more entertainment value for my cash. So there |
|
|
|
|
2017/03/04 12:09:18
Subject: WIP: The beginnings of a Truescale Blood Ravens Army.
|
|
Pious Palatine
|
Looking good. I really like the reposing on the power fist guy.
EDC
|
|
|
|
|
2017/03/04 12:32:18
Subject: WIP: The beginnings of a Truescale Blood Ravens Army.
|
|
Storm Trooper with Maglight
|
yeah, vaseline is a petroleum (oil) based substance, so if you scrub in fairy liquid you should be all good, as fairy liquid breaks down oils. dont ask me how but it works.
|
|
|
|
|
|
2017/03/06 03:36:01
Subject: WIP: The beginnings of a Truescale Blood Ravens Army.
|
|
Huge Hierodule
|
Instead of Vaseline, I find if I let GS set for a half hour or so after applying it to a surface, it is still workable but plain water is enough to keep it from sticking to tools. Much easier come the painting stage!
|
|
|
|
|
|
2017/03/07 14:24:17
Subject: WIP: The beginnings of a Truescale Blood Ravens Army.
|
|
Stalwart Space Marine
|
lindsay40k wrote:Instead of Vaseline, I find if I let GS set for a half hour or so after applying it to a surface, it is still workable but plain water is enough to keep it from sticking to tools. Much easier come the painting stage!
Good tip, might try that as Vaseline is getting on my nerves already. I used to use water straight out and had mixed results, but I'll try the waiting first.
Thanks for your feedback guys, I've got more on the way once painted, and another 8 or so to construct.
|
I'm doing my own thing because it's fun. And it takes longer, which means more entertainment value for my cash. So there |
|
|
|
|
2017/03/12 22:48:38
Subject: Re:WIP: The beginnings of a Truescale Blood Ravens Army.
|
|
Stalwart Space Marine
|
An update at last. I've had a bit of a busy week or 2, but have squeezed a fair bit of P+M in alongside work and decorating the house. I've got some group shots if the latest few marines I've been painting, and I've begun modelling a five more, which are at various stages. Some are a little simpler so I can actually play with the units, as much as I want a lot of personality it won't work if they are too many points or unplayable on a table.
I've also had a crack at updating the armour on a couple, during the widening process I've taken inspiration from the armour on some deathwatch legs (and the new Roboute Guilliman mini) and adapted two minis to have that look.
I'm not finished with the painting on these yet, some details still missing, and I want to redo the glass on the reflex sight as I'm not happy with it. Feedback appreciated as always, pics to follow.
|
|
This message was edited 2 times. Last update was at 2017/03/12 23:20:44
I'm doing my own thing because it's fun. And it takes longer, which means more entertainment value for my cash. So there |
|
|
|
|
2017/03/27 21:23:13
Subject: Re:WIP: The beginnings of a Truescale Blood Ravens Army.
|
|
Stalwart Space Marine
|
So I've not posted for a while. I have some progress, with another 3 for the tactical squad almost complete (pics below), and a further 2 still in the posing process (just not settled on the arms yet). I've been working on the chapter logo, and practice and marking guidelines in pencil has helped a fair bit if I don't say so myself. I have however, also made a bit of a balls up...
I had debated whether or not to varnish these, after a small bout of Kill team I seemed to have rubbed/chipped a couple, repaired now but I want to avoid more of that. Back when I was a kid I used the citadel version, but I don't have many fond memories of it. To try something new I bought some Humbrol Satin Cote and set up an old space wolf as a test piece (one with a big piece of similar red to compare). Happy with this I moved to my current project...and here's where I slipped...
Rather than do one and wait, I stupidly assumed I would be as happy as with the test piece, so in my rush to get them done I did the lot...all of the current minis (bar the ones I've just been painting). And now, I look upon them and they just shine far too much. On the plus side the paint is solid now, no chance of chipping.
So, do I a) learn to deal with my error and move on, b) attempt to add enough weathering and battle damage (I intended to add some to the full group later anyway) to dull the shine, c) cover with a matt varnish (such as Humbrol Matt Cote) in the hope it improves the finish.
Open to suggestions.
On a positive note, I've had a spending spree and bought a Land Speeder storm, (more scouts to follow) and the Talons of the Emperor box set, of which the tanks and Contemptor will likely be used for the Blood Ravens army.
|
I'm doing my own thing because it's fun. And it takes longer, which means more entertainment value for my cash. So there |
|
|
|
|
2017/03/28 16:23:11
Subject: WIP: The beginnings of a Truescale Blood Ravens Army.
|
|
Storm Trooper with Maglight
|
Chapter logo's look great. and yea man its no biggie, if you hit it with some matt cote over the top, no harm done.
|
|
|
|
|
|
2017/03/29 19:46:58
Subject: WIP: The beginnings of a Truescale Blood Ravens Army.
|
|
Stalwart Space Marine
|
 STG wrote: STG wrote:Chapter logo's look great. and yea man its no biggie, if you hit it with some matt cote over the top, no harm done.
Thanks bud! I'll try to get a closer shot in better light. Matt Cote on my shopping list for start of the month 
|
I'm doing my own thing because it's fun. And it takes longer, which means more entertainment value for my cash. So there |
|
|
|
|
2017/04/01 21:50:58
Subject: Re:WIP:True-scale Blood Ravens
|
|
Stalwart Space Marine
|
My shine problem is solved! That was lucky. I tested the Humbrol Matt Cote and was more than satisfied so I've done the whole squad so far. For these guys, future change will only be a little weathering and basing. I've got 2 more in progress, part painted but working on the posing, and 5 more tactical marines to go. This should amount to a squad of 15, plus a veteran Sergeant. I may bump this up to 20 total for 2 squads of 10.
I have realised from a glance at the codex that the combo weapon guy may have to be "counts as" a bolter, due to my 10+ year absence I've forgotten who can have what and may have messed up there.
I've got one hell of a backlog now with the talons kit, but I've been thinking about kitbashing the Sanguinary guard squad for an assault crew, I really want them to have winged jump packs, like my converted BA chaplain. Another option would be the FW Raven Guard kit with winged packs but costly and more of a legion look to them.
Here's some pics...
|
I'm doing my own thing because it's fun. And it takes longer, which means more entertainment value for my cash. So there |
|
|
|
|
|
|


