| Author |
Message |
 |
|
|
|
|
Advert
|
Forum adverts like this one are shown to any user who is not logged in. Join us by filling out a tiny 3 field form and you will get your own, free, dakka user account which gives a good range of benefits to you:
- No adverts like this in the forums anymore.
- Times and dates in your local timezone.
- Full tracking of what you have read so you can skip to your first unread post, easily see what has changed since you last logged in, and easily see what is new at a glance.
- Email notifications for threads you want to watch closely.
- Being a part of the oldest wargaming community on the net.
If you are already a member then feel free to login now. |
|
 |
2010/10/02 04:51:30
Subject: vehicles and rust
|
|

Fresh-Faced New User
|
So my current project is my shotgun vets and their chimera. I run a nurgle traitor guard (few pics in gallery) and i've done some simple rust on the metal guns. Its a very simple wet brush orange dry brush gunmetal method that's satisfied me so far. My vehicles are another story tho.
I plan on going w/ an ivory/decayed flesh feel that i believe would accent the green in my army. The base will be a light brown, then a tan and finally ivory (i may add something to this for the decay effect). My idea is to add my orange wet brush rust with accents of green rust before my final coat of ivory. With caution I paint the final layer avoiding rust areas. Then go back using a sponge to apply the ivory near and a bit over these avoided rust areas hopefully giving that weathered spread look out of the cracks onto main surfaces.
I'm getting anxious to give it a try but i'm a bit worried. I'd really like some advice and am open to ideas in changing the approach and methods.

|
|
|
 |
|
2010/10/02 05:54:56
Subject: Re:vehicles and rust
|
|
Rampaging Furioso Blood Angel Dreadnought
|
I think your idea of orange and green washes will add a nice affect. For vehicle damage I'll show what I typically do. I made this image for a friend using photoshop... but basically it works like this:
Add scratches, holes, chip, dots/spots, etc... with a dark color (I prefer scorched brown) - see Step 2.
Then take your highlight color, in this case an orange/flesh mix and a lighter red for the more shadowed areas. Using this color go over your brown from step 2 and be sure to apply paint only where the light will catch the edge of your paint-chip or scratch (usually the bottom). - see Step 3
Finally add some metallic to some of the larger brown areas and also to areas that will get the most damage (sharp edges!). - see Step 4

|
|
This message was edited 1 time. Last update was at 2010/10/02 05:55:56
|
|
|
|
|
2010/10/02 06:54:11
Subject: Re:vehicles and rust
|
|
Fresh-Faced New User
|
right on man thanks. i should prolly look into making bigger damage marks in the future so they're a bit more noticeable and easier to paint. I'll definitely work your advice in.
|
|
|
|
|
2010/10/03 05:53:45
Subject: Re:vehicles and rust
|
|
Fresh-Faced New User
|
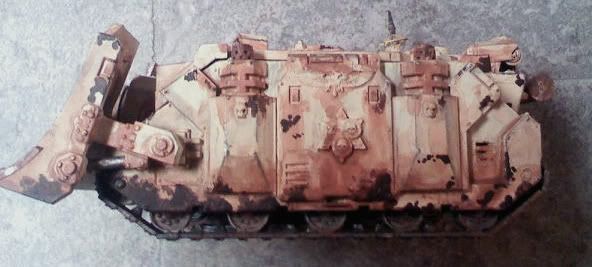
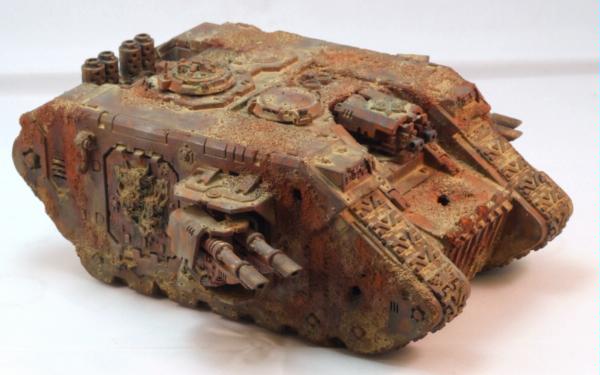
progress


sorry the second picture isn't good but you get the idea. I like how its turning out and its kind of what i had in mind, I'm just not sure how to add green rust to this. The job so far includes a layer of light brown, one of tan, all the cracks and crevices were then filled in w/ orange and finally a sponge brush layer of a sickly yellowish tan color. I'm not sure about painting metal for all my cracks and dings like the reply post. After the rusted metal portions are done I'm considering going back and adding metal where paint would have chipped away, but I'm not sure i want to do all that work or even need too. I want my vehicle to look plagued and old as hell and i think it would almost look more alive w/o the metal scratches.
Let me know what you think and would love any advice.
|
|
|
|
|
2010/10/04 01:14:32
Subject: Re:vehicles and rust
|
|
Fresh-Faced New User
|


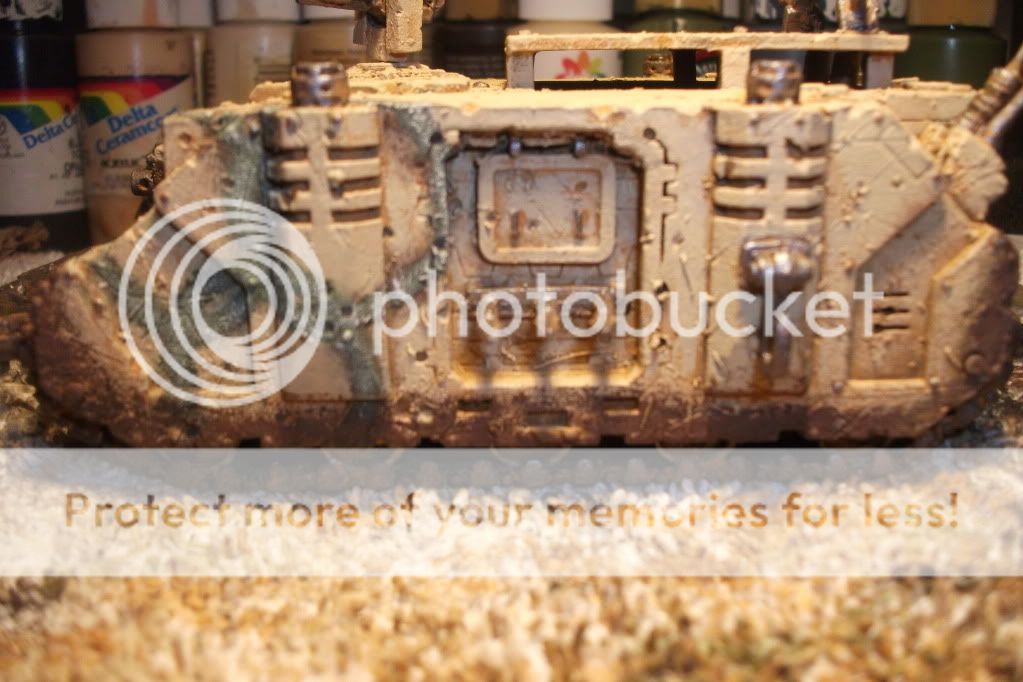
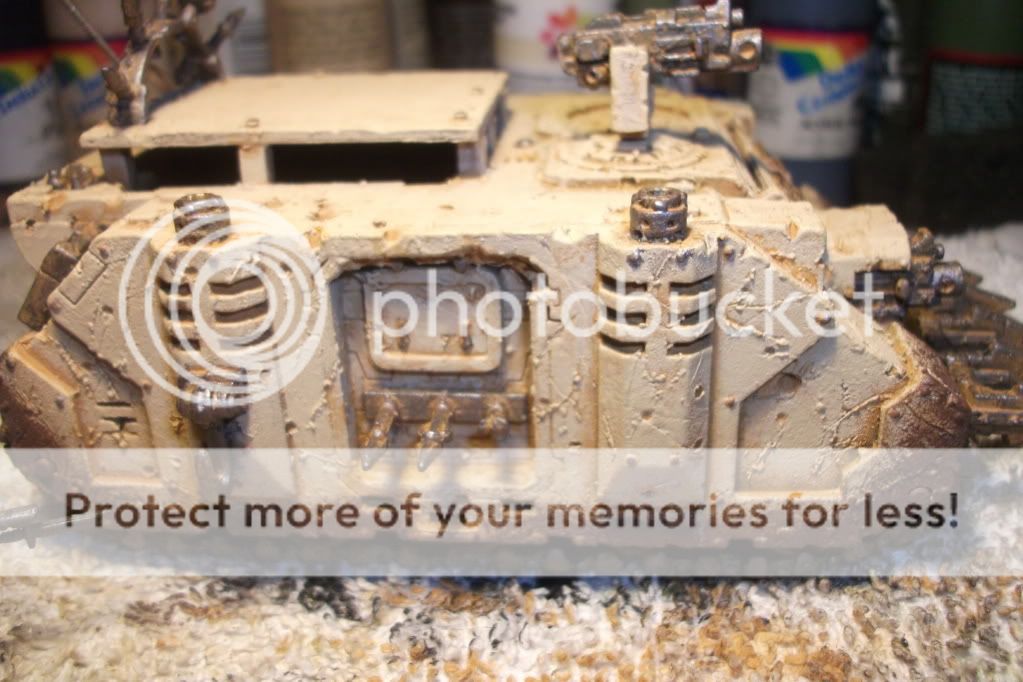
finished the metallic and did up a nurgle sign on the side. I'm worried the vehicle looks to much like its been in the desert as opposed to rusted and plagued. For this reason i really want to add the green rust but i realize now i should have done some base green color from the start. what does everyone think?
|
|
|
|
|
2010/10/04 01:34:11
Subject: Re:vehicles and rust
|
|
Decrepit Dakkanaut
|
Notice how your camera is focusing on all the stuff in the background and not on the mini infront of it? Turn on your macro setting (usually its a little flower icon) and that will work the way you want it to. It looks like your making some nice progress for sure, but the details are too fuzzy to make out
|
|
|
|
|
2010/10/04 06:21:33
Subject: Re:vehicles and rust
|
|
Fresh-Faced New User
|
|
|
|
|
|
2010/10/04 07:47:11
Subject: vehicles and rust
|
|

Sinewy Scourge
|
It looks more muddy and fleshy than rusty, but for Nurgle that's not a bad thing.
|
|
|
|
|
|
2010/10/04 09:24:31
Subject: vehicles and rust
|
|
Last Remaining Whole C'Tan
|
I agree - it doesn't look rusty at all. It does look good, however, intended effect or not. I'd intensify the weathering effect you have applied. I'd rewash it however you already are doing it a few times. Maybe do some dripping corrosion from the vents on the sides?
|
 lord_blackfang wrote: lord_blackfang wrote:Respect to the guy who subscribed just to post a massive ASCII dong in the chat and immediately get banned.
 Flinty wrote: Flinty wrote:The benefit of slate is that its.actually a.rock with rock like properties. The downside is that it's a rock
|
|
|
|
|
2010/10/04 09:49:39
Subject: vehicles and rust
|
|
Been Around the Block
|
|
|
|
|
|
|
2010/10/04 11:10:16
Subject: Re:vehicles and rust
|
|
Decrepit Dakkanaut
|
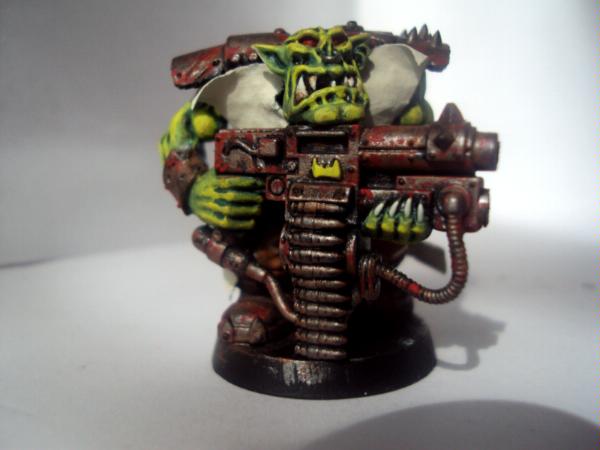
Yup, it does look muddy not rusty. I find for rust the perfect paints are blazing orange and red. I dont use citadel paints so youll have to use your imagination on the shades of red. Either way brush the intended area with boltgun metal (silver if you want the metal underneath SHINEY) I also usually wash this part with black to dirty/grim it up, then use your judgement on how much orange to splot on. I paint Ork stuff so to me, its usually alot.Then for something to pop a bit, stipple a little red here and there in corners and stuff. Even just a little bit of red adds alot to the rusting area. Try it out, you might like it alot. I like the look of your rhino though, that top you made for it is pretty damn neat looking Automatically Appended Next Post: Yea here is an example of what Im talking about, its the same method but on a mini instead of a vehicle, but it works out the same way. Just a little red stipple effect and it makes the rust pop
|
|
This message was edited 2 times. Last update was at 2010/10/04 11:12:10
|
|
|
|
|
2010/10/04 13:16:44
Subject: Re:vehicles and rust
|
|

Rotting Sorcerer of Nurgle
|
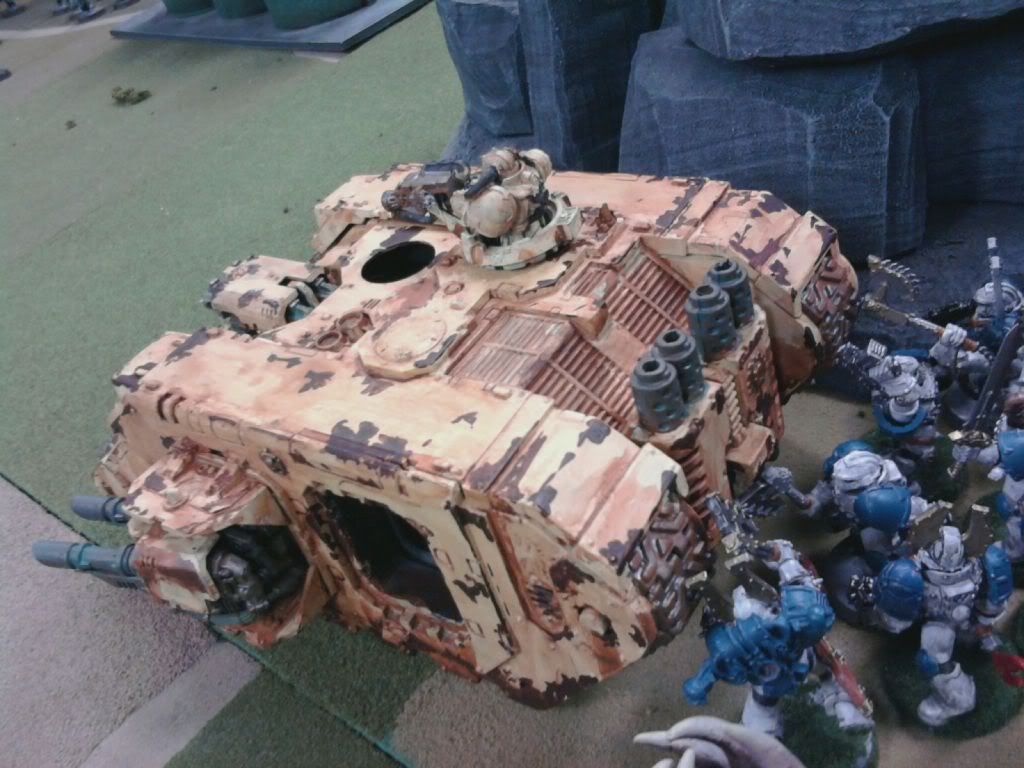
I've recently done a landraider which has a little bit of rust on it -
more images in may gallery (link in sig below).
I did a thread which explains how i did it -
http://www.dakkadakka.com/dakkaforum/posts/list/302092.page
|
Check out my gallery here
Also I've started taking photos to use as reference for weathering which can be found here. Please send me your photos so they can be found all in one place!! |
|
|
|
|
2010/10/04 13:27:29
Subject: vehicles and rust
|
|

Shroomin Brain Boy
|
you should have used rust protection first and such a big tank shouldn´t stay out unprotected in the acidy rain^^
|
|
|
|
|
|
2010/10/04 19:50:41
Subject: Re:vehicles and rust
|
|
Fresh-Faced New User
|
@ouze- good idea i'll add some drip effect
@bossgrabnutz- i like the idea of the random splotches and may try to incorporate it but most likely use the weather powder as mentioned above
@kingcracker- I used a rusty orange that just ends up blending into my tans and adds a sand/desert effect /facepalm. maybe i can incorporate some red into that or just wash it a few more times. I like the way my metal turned out but that was never my concern b/c thats how i do the rest of my army
@bubber- i like your thread man that LR looks awesome. I'll definitly be looking into weather powders. can you give me a recommendation on where to get just a couple good ones?
The model is a 'count as chimera' which is why i spiked off the side door and put a hatch. Thanks for the few compliments and i really appreciate the advice. I wasn't really pleased w/ the overall effect and I'll be making some changes with the feedback I've received.
|
|
This message was edited 1 time. Last update was at 2010/10/04 19:59:14
|
|
|
|
|
2010/10/13 10:10:50
Subject: vehicles and rust
|
|
Been Around the Block
|
There's a pretty good rust tutorial on youtube where a guy uses powders on his dread. I went out and bought the Rust/Oil grime powder set to try. The tutorial mentions 'setting' the powder with rubbing alcohol. I asked about just spraying a seal coat over it (since the alcohol seemed to dilute it too much IMO), they said that works fine.
|
|
|
|
|
|
2010/10/13 12:19:29
Subject: Re:vehicles and rust
|
|
Chalice-Wielding Sanguinary High Priest
Arlington TX, but want to be back in Seattle WA
|
Man your nurgle tank is impressive. Has lots of detail and those Nurgle rings are a perfect touch on the side. I also love the top of the tank, the part that represents the interior as being some sort of cage for the demonic....great ideas!
|
 4250 points of Blood Angels goodness, sweet and silky W12-L6-D4 4250 points of Blood Angels goodness, sweet and silky W12-L6-D4
 1000 points of Teil-Shan (my own scheme) Eldar Craftworld in progress 1000 points of Teil-Shan (my own scheme) Eldar Craftworld in progress
 800 points of unassembled Urban themed Imperial Guard 800 points of unassembled Urban themed Imperial Guard
 650 points of my do-it-yourself Tempest Guard 650 points of my do-it-yourself Tempest Guard
 675 points of Commoraghs finest! 675 points of Commoraghs finest!
The Dude - "Jackie Treehorn treats objects like women, man."
Lord Helmet - "I bet she gives great helmet."
|
|
|
|
|
2010/10/13 20:58:45
Subject: Re:vehicles and rust
|
|
Fresh-Faced New User
|
Thanks el duderino!
I'll look for that tutorial boss grabnutz thanks. Let me know how your seal coat works out. Where did you get this rust/oil grime powder?
|
|
|
|
|
|
|