| Author |
Message |
 |
|
|
|
|
Advert
|
Forum adverts like this one are shown to any user who is not logged in. Join us by filling out a tiny 3 field form and you will get your own, free, dakka user account which gives a good range of benefits to you:
- No adverts like this in the forums anymore.
- Times and dates in your local timezone.
- Full tracking of what you have read so you can skip to your first unread post, easily see what has changed since you last logged in, and easily see what is new at a glance.
- Email notifications for threads you want to watch closely.
- Being a part of the oldest wargaming community on the net.
If you are already a member then feel free to login now. |
|
 |
2011/08/05 22:21:23
Subject: A Newbies Painting Blog ***Pic Heavy***
|
|

Been Around the Block
|
Apologies, when I added my new photos I accidentally deleted my older ones! I have added what I could to the bottom of this page... Hello all, I decided it would be fun to track my progress with the painting/modelling side of the hobby. I have been a huge fan of W40k for the last decade or so, but due to circumstance have not been able to start painting or modeling and been relegated to reading the fluff and imagining everything I have been reading about. This all changed this week as my AOBR box (along with assorted paints and tools) arrived!  Above are my brushes... I have also purchased an exacto knife set and pin vice and bits... For now I believe these will be sufficient, until I get further along and master the basics. I have been planning my army (Angels Encarmine) and reading on these forums quite a bit over the last few weeks building up and found a (what I believe to be helpful) tutorial on how to pain online: http://www.youtube.com/watch?v=Ic6kTzWf2UI Since I plan on playing Space Marines I have decided to use my Orks as practice dummies for my painting and modelling skills so I lessen the chances of ruining my Marines and thus wasting money. Anyways... I tore open my box yesterday and assembled the entire group of Orks. Today (after getting off work early!) I primed and began painting the little green skins. So far this is my progress... Obviously not very... but I have all weekend with no distractions to paint! I do have one question for you dakkites... my paint seems to dry VERY fast... This is great on the models, but less desirable when in my paint dish (actually just a small plate...). I tried adding water to moisten the drying paint, but this only watered the paint down more and (as you can see from the Ork on the left...) is not that great. Is there any way to keep the paint wet so I can use it on more models???
|
|
This message was edited 6 times. Last update was at 2011/08/22 02:14:51
|
|
|
 |
|
2011/08/05 22:29:36
Subject: A Newbies Painting Blog
|
|

Contagious Dreadnought of Nurgle
|
With regard to keeping your paint wet, you could buy yourself a 'wet' palette.... If you google it I'm sure you can find one.
Good luck with practicing on those Orks! 
|
|
|
|
|
|
2011/08/05 22:30:30
Subject: A Newbies Painting Blog
|
|

Powerful Spawning Champion
|
Well, #1 - is that brush on the far right supposed to be bent? It looks weird.
#2 - you may eventually desire a much finer detail brush for tiny fiddly bits like eyes and teeth.
#3 - watering down your paints isn't a bad thing (as long as it's not wash consistency - unless that was what you're aiming for). Slightly watered down paint is good so it doesn't clog up your details, you'd just need to use another coat or two. But aside from that, to keep paint moist you can use less water (I dunno how much you added) or you can find and aquire a wet pallette (I have no idea if I spelled that right, I just got up). Wet pallettes are great for keeping paint moist which works especially well when mixing colors so you don't have to consistently remix the colors.
Well, good luck, nice start, congratulations and welcome to the joyous addicting world of hobby-ing.
|
|
|
|
|
|
2011/08/05 22:34:28
Subject: A Newbies Painting Blog
|
|

Chaos Space Marine dedicated to Slaanesh
|
ah ork are easy to paint anyway buddy so its a great way of getn started keep up the work an be patient and presice,an you will do well!
|
 Emperors Children Emperors Children
 ''Kneel,or you shall be knelt'' ''Kneel,or you shall be knelt'' 
|
|
|
|
|
2011/08/05 22:51:58
Subject: A Newbies Painting Blog
|
|
Veteran Inquisitorial Tyranid Xenokiller
|
|
|
This message was edited 1 time. Last update was at 2011/08/05 22:52:13
|
|
|
|
|
2011/08/06 00:49:50
Subject: Re:A Newbies Painting Blog
|
|
Been Around the Block
|
I was wondering how to keep mixed paints moist! i will most likely be picking up both a wet palette and a detail brush (just started doing some detail work and I dont really have the necessary brushes yet...)
and yes Bunny the brush on the right is bent... I have NO idea why but it came with my set that way
40k ninja: I unfortunately only have gnarloc green (and i dont really plan on buying more paints just for the Orks... id rather get new ones for Space Marines when I get there...) but I was planning on doing some highlights after a wash of Badab Black at the end.
thanks for the pointers!
Automatically Appended Next Post:
Tomorrow I will get a smaller brush... and then proceed to paint the teeth and touch up the areas I accidentally put color on. Also I will apply the wash...
Overall I am very pleased with my work today as it was literally my first attempt painting anything out side of 10th grade sculpture which is getting to be further and further away...
All comments/criticisms, advice and direction is appreciated!
|
|
This message was edited 2 times. Last update was at 2011/08/17 00:57:04
|
|
|
|
|
2011/08/06 06:39:15
Subject: A Newbies Painting Blog
|
|
Powerful Spawning Champion
|
Considering you need a finer brush and have some touch ups to do, these are pretty damn good for your first dive into painting wargaming minis. Better than when I first started. At the very top of the first page of my blog you'll see the third model I ever painted. Check it out if you're in for a laugh.
I'm very interested to see these all tidied up and complete.
i dont really plan on buying more paints just for the Orks
As for this, personally, I buy colors even if I'm not going to use them for what I'm working on at the moment or if I don't know if I'll use them later 'cause I never know what I'm gonna paint next, and seeing as how I paint 95% of the time I paint at night, it would drive me nuts if I can't paint something 'cause I have to wait for the store to open so I can get the color I want. So I'd get a lighter green, use it for the Orks and one never knows, ya may just need it for SMs later. Just my thoughts fwiw.
Happy painting and good luck!
|
|
|
|
|
|
2011/08/06 08:29:29
Subject: Re:A Newbies Painting Blog
|
|
Black Templar Servitor Dragging Masonry
|
You can make a wet palette yourself. Get something big enough for mixing your paints on that also has a lip so you can put water in it, then get some wax paper place it over the top and press it down into the water but not so much that water spills over or gets on top of the paper, put your paint on the wax paper and there you have it a cheap and cheerful wet palette.
|
|
This message was edited 1 time. Last update was at 2011/08/06 08:31:21
Fun fact... Bears kill thousands of salmon each year, but attacks on bears by salmon are thought to be far less. |
|
|
|
|
2011/08/06 10:14:55
Subject: Re:A Newbies Painting Blog
|
|
Sneaky Lictor
|
Very nice for a first start.
I would make a few recommendations. Buy some washes. Washes go a long way to giving your minis more depth and shading.
Second I would read up on some tutorials on drybrushing, highlighting, and blending. Take a practice model and practice practice practice. You are off to a good start. Please keep it up!
Automatically Appended Next Post:
To help with the photos I would recommend zooming out more, try adding more ambient light, and cropping. There are some fine photography articles here on Dakka.
|
|
This message was edited 1 time. Last update was at 2011/08/06 10:16:55
My P&M Blog: http://www.dakkadakka.com/dakkaforum/posts/list/315066.page
Correct. Despite countless millennia of evolution, technological advances and civilization, we're still monkeys throwing feces at things we don't like.-Zed.
Imperial Flyers don't actually "fly" they just go fast enough that they fall in an arc that keeps them parallel to the ground. -Clockwork Zion
|
|
|
|
|
2011/08/07 02:35:10
Subject: A Newbies Painting Blog
|
|
Been Around the Block
|
With regards to photos and light there is not alot I can do... I brought all the working lights in my apartment and put them around my desk and the camera is just my phone (I dont actually own a camera...)
anyways thanks for all the advice and encouragement! Today was very productive and my update below will elaborate....
|
|
|
|
|
2011/08/07 02:58:42
Subject: Re:A Newbies Painting Blog
|
|
Been Around the Block
|
Today was a great painting day. I got my new detail brush (the GW one...) and it made the finer work MUCH easier!... I will probably look around and see if there is an even finer point since I have been avoiding some of the smallest details like chain links due to my innate clumsiness and the thickness of the brushes. Regardless, I am very pleased with my work thus far.
First things first, I finished off my four original Orks from yesterday by applying a wash and some highlights (I still havent purchased an alternative green, but watering down the Gnarloc and adding light coats over the Badab Black washed skin has a good effect. I can definitely see where different colors can add that much more to your painting and models.) I then jumped in and began painting my second batch of 4. This seems to be the best sizing of batches for me since I can finish doing one color group (skin for example) and by the time I finish the fourth model, the first is dry enough to start painting again!
With this second batch I tried adding more details, such as more straps, and finer details on the models. After washing and highlighting, I wanted to try dry brushing the metals (gun metal base) with some chainmail to add definition and depth. It did not go so well. At first I thought I needed to dilute the paint like I have been when painting normally... I eventually realized that this was in fact not DRY brushing and my models were just highlighted with the paint rather than brushed. This actually turned out alright as one of my current favorite models (the single Nob) was done in that batch.
The third batch of four, I continued to develop my detailing skills. After watching a few Youtube videos, I once again attempted Dry Brushing the correct way. While it did not simply cover over the base paint layer, I am left wondering if the highlights are necessary at all? (I can barely see them and I know where to look...) Could be that I am still doing it wrong, but more practice will definitely help.
Unfortunately, I did not take progress shots as I was too engrossed in my work to stop, but I do have some final product pictures below. Once again c/c and advice are always welcome! I will leave any readers with a brief summary.
Things I Seem to do Well:
1. Watering down paints (smooth application and very little obstruction of detail)
2. Brush Control (very few touch ups in the later batches)
Things I Need to Improve
1. Dry Brushing
2. TEETH! they have turned out ok, but there HAS to be a better way of painting these little details....
3. Detailing in general
|
|
This message was edited 1 time. Last update was at 2011/08/17 00:56:47
|
|
|
|
|
2011/08/07 10:02:32
Subject: Re:A Newbies Painting Blog ***Pic Heavy***
|
|

Squishy Oil Squig
|
Not looking to bad! 
I like the big shoota boyz eye.
I get 000 size brushes that are useful.
Keep it up!
Going better than my blog... 
Vez...
|
|
This message was edited 2 times. Last update was at 2011/08/07 10:06:57
|
|
|
|
|
2011/08/16 16:04:44
Subject: Re:A Newbies Painting Blog ***Pic Heavy***
|
|
Been Around the Block
|
|
|
This message was edited 2 times. Last update was at 2011/08/17 02:57:16
|
|
|
|
|
2011/08/19 03:06:32
Subject: Re:A Newbies Painting Blog ***Pic Heavy***
|
|
Been Around the Block
|
Not a whole lot to share today... built 3 combat termies and magnetized them so I can switch between LC/ TH & SS o also... this came

|
|
|
|
|
2011/08/19 05:19:33
Subject: A Newbies Painting Blog ***Pic Heavy***
|
|
Fixture of Dakka
|
Go get 'em boss! You're stuff looks good.
When of if you go for smaller brushes if you have a Hobby Lobby nearby watch thier sale ads for 30-50% paint brush sales and find the miniature (size 2-10/0) pack or buy individually.
I am a huge fan of 10/0 filbert for tiny drybrushing like skulls. 0 spotter, and 18/0 shaders.
|
 Avatar 720 wrote: Avatar 720 wrote:You see, to Auston, everyone is a Death Star; there's only one way you can take it and that's through a small gap at the back.
Come check out my Blood Angels,Crimson Fists, and coming soon Eldar
http://www.dakkadakka.com/dakkaforum/posts/list/391013.page
I have conceded that the Eldar page I started in P&M is their legitimate home. Free Candy! Updated 10/19.
http://www.dakkadakka.com/dakkaforum/posts/list/391553.page
Powder Burns wrote:what they need to make is a fullsize leatherman, like 14" long folded, with a bone saw, notches for bowstring, signaling flare, electrical hand crank generator, bolt cutters..
|
|
|
|
|
2011/08/19 09:57:01
Subject: A Newbies Painting Blog ***Pic Heavy***
|
|
Powerful Spawning Champion
|
The Orks look really really good. Sorry to hear about the red. Only things I can really think of would be to do multiple thin layers of Blood Red or get yourself a darker shade like Red Gore, apply that first then put on Blood Red afterwards. You could maybe also try mixing in a touch of Blazing Orange. That's what I did for my CSM Khorne Berzerkers that are all red and seemed to be quite a hit. I have pics of them in the first few pages of my blog (not spamming, just letting you know) or in my gallery if you want to see how it looks.
Good luck.
|
|
|
|
|
|
2011/08/19 13:48:50
Subject: Re:A Newbies Painting Blog ***Pic Heavy***
|
|
Been Around the Block
|
Thanks! The orks were more of a quick "can i actually paint on this scale" test so i wasnt too concerned with painting them to an incredble level. Although I am pleased with the way the Warboss turned out (with the exception of the powerklaw... I think I over did the white). The marines will be another story.
I have picked up a couple small brushes (20/0) online that have allowed me to paint smaller details like teeth, eyes, skulls etc so I am happy with them.
From my readings and eveyone's advice (thanks!) I will most likely be picking up a few more paint pots today or tomorrow depending on when I get off work... I am looking at a Scab Red, a warm brown (for gold base coats), Shinning Gold, perhaps a grey for highlights and a Baal Red wash.
|
|
This message was edited 1 time. Last update was at 2011/08/19 13:51:12
|
|
|
|
|
2011/08/20 11:56:44
Subject: A Newbies Painting Blog ***Pic Heavy***
|
|
Powerful Spawning Champion
|
My personal fav greys are Fortress Grey and Shadow Grey. I use those the most.......in case you cared... >_>
|
|
|
|
|
|
2011/08/20 14:19:54
Subject: A Newbies Painting Blog ***Pic Heavy***
|
|

Poxed Plague Monk
|
lol, some of them look better then mine  looks really good!
|
 ~1200 pts ~1200 pts
*poison wind mortar explodes* "Oh well. At least I tried." |
|
|
|
|
2011/08/22 02:14:11
Subject: Re:A Newbies Painting Blog ***Pic Heavy***
|
|
Been Around the Block
|
Here is another monstrous update!
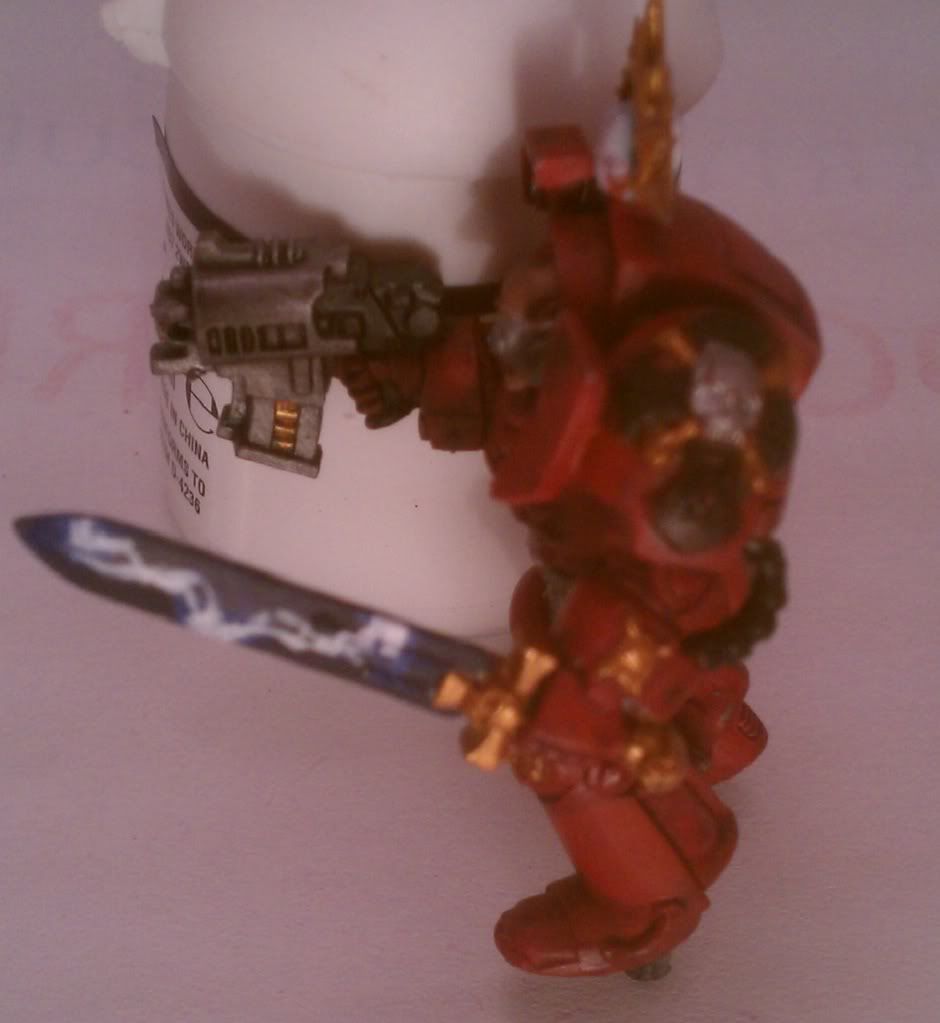
This weekend was GREAT for painting! No distractions and the entire apartment to myself! After having built my new CC termie box and the death co. + assault marines from the Blood Angels Battleforce... I decided to start painting and forgo the modeling until this week. First things first were to get a proper red that I was happy with. I started by re-priming my AOBR marines and experimenting. The one I finally settled one was a 50/50 mix of blood red and mechrite red. A solid undercoat of this washed with badab black and then highlighted with the same color yields a rich/dark red that is just about perfect for my tastes. Here are the AOBR marines and the Dreadnought! They are still lacking bases... but I will be doing cork board for those and wanted to wait until I have a more substantial number to do at one time. This did however create problems with photographing them... so I hope people can still make out at least some of the details off my camera phone's pics.


Next I went to the AOBR terminators... Here I wanted to layout my scheme a bit more especially for the "elite" group of the army... this meant including more golds/silvers. Also I experimented with Catattafish's power weapon painting and I must say it is great!!!


After finishing those, the next project was to crunch through and magnetize the new close combat termies. Their TH/ SS and LC are all magnetized and are fully swappable since I have no idea how I want to run them. Anyways here I expanded on the detailing that I started with the AOBR termies.


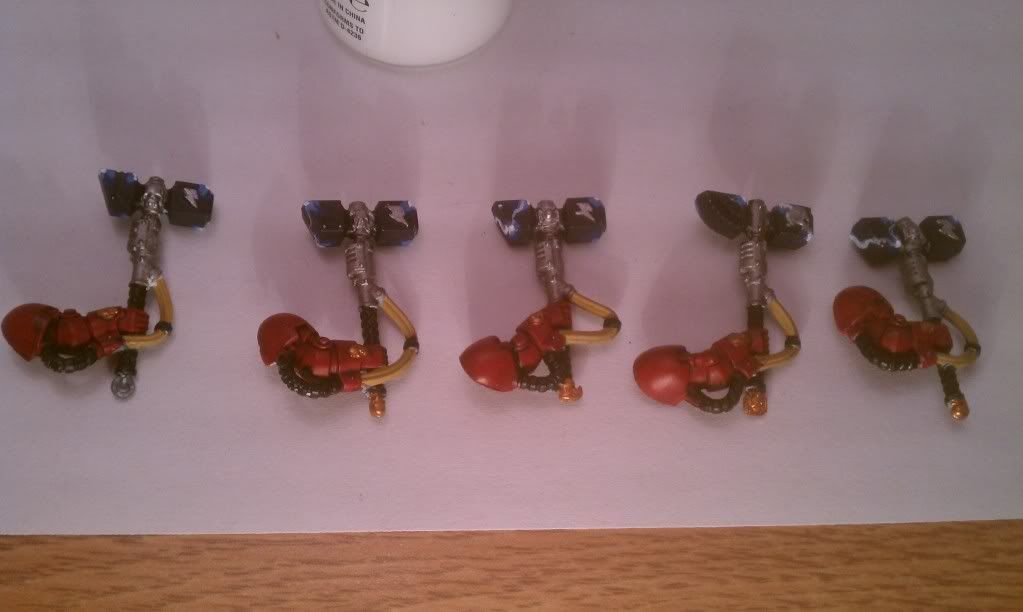


I am particularly pleased with the Sergeant's shield... I think it is a great design. Unfortunately, I have no Idea what to name my marines (or what to write on their scrolls)... Ideas would be great. Finally I painted up the 10 Jump packs from the Battleforce box... (5x dc, 5x regular) I filed off all the DC insignia on both the marines and JP's that way I can get a full squad of Assault Marines from the one box. I will then convert the tacticals to DCs.. or potentially sternguard (undecided). With the backpacks, I attempted an OSL technique similar to Catattafish's power fields. I am not quite sure how well they came out... I may start over on this before I glue them onto the marines. Here is how they turned out.


As always C&C is appreciated
|
|
|
|
|
2011/08/22 11:22:59
Subject: A Newbies Painting Blog ***Pic Heavy***
|
|
Powerful Spawning Champion
|
The faces look great (I see pupils!!!), the lightning effect on the weapons is much much better and the red looks nice and solid. However I do see some banners on the armor that would look much better if made to stand out with a different color like Bleached Bone. Otherwise you're improving very nicely, good for you. Keep it up!
|
|
This message was edited 1 time. Last update was at 2011/08/22 11:24:52
|
|
|
|
|
2011/08/22 12:23:15
Subject: A Newbies Painting Blog ***Pic Heavy***
|
|

Pyromaniac Hellhound Pilot
|
Really nice work on the powerweapoins! You're getting the hang of this painting thing
If you don't have washes, you should at least try to leave some of the primer showing in the recesses. It will add depth, especially with the metallics.
Keep it up!
Cheers,
Rawson
|
 The 104th Vostroyan Mechanized The 104th Vostroyan Mechanized
 Rawson's Reboot Rawson's Reboot

Viktor von Domm: nope... can´t do that for the sake of all lving creatures that dwell on earth....
dsteingass: That's like saying "I forgot to tell you who your real father is"
nerdfest09: Rawson speaks the truth! |
|
|
|
|
2011/08/22 13:41:28
Subject: Re:A Newbies Painting Blog ***Pic Heavy***
|
|
Been Around the Block
|
Thanks bunny! I was thinking the same thing about bleached bone... guess I need to buy more paint.... *sigh*
Rawson: thanks! I have Badaab, Ball, Devlin and Gryphon washes... I have not applied any to the metalics yet, but the reds/tans (banners) have been washed with badaab and devlin mud. I was worried about dulling down the metal with a wash... I may test the gryphon sepia on them.
|
|
|
|
|
2011/08/22 14:12:23
Subject: Re:A Newbies Painting Blog ***Pic Heavy***
|
|
Pyromaniac Hellhound Pilot
|
Crusher050 wrote:
Rawson: thanks! I have Badaab, Ball, Devlin and Gryphon washes... I have not applied any to the metalics yet, but the reds/tans (banners) have been washed with badaab and devlin mud. I was worried about dulling down the metal with a wash... I may test the gryphon sepia on them.
Sorry, I must have missed the post where you picked up your washes. I use gryphon sepia on the gold for my Vostroyans. It makes the color warmer and adds some depth, imho. If you're nervous about it, paint up a random bit (or ork head) with the gold and hit it with the wash.
Good luck!
|
The 104th Vostroyan Mechanized
Rawson's Reboot
Viktor von Domm: nope... can´t do that for the sake of all lving creatures that dwell on earth....
dsteingass: That's like saying "I forgot to tell you who your real father is"
nerdfest09: Rawson speaks the truth! |
|
|
|
|
|
|


