| Author |
Message |
 |
|
|
|
|
Advert
|
Forum adverts like this one are shown to any user who is not logged in. Join us by filling out a tiny 3 field form and you will get your own, free, dakka user account which gives a good range of benefits to you:
- No adverts like this in the forums anymore.
- Times and dates in your local timezone.
- Full tracking of what you have read so you can skip to your first unread post, easily see what has changed since you last logged in, and easily see what is new at a glance.
- Email notifications for threads you want to watch closely.
- Being a part of the oldest wargaming community on the net.
If you are already a member then feel free to login now. |
|
 |
2011/09/20 20:51:57
Subject: d-usa's P&M Blog - True Scale Raven Guard, Adeptus Mechanicus, and other games
|
|

Decrepit Dakkanaut
|
Well, I feel that I have reached a point in my modeling & painting that should honestly qualify as "tabletop" quality painting. I enjoy painting, even though I feel that I still have a long way to grow, and I even like to dabble in conversions here and there.
So to either give myself a motivational boosts from all the "atta boy's", or some growth from the constructive beat downs, I am going to start sharing my progress with everyone.
I have a half painted High Elf army, a half painted Space Marine army that is a former DIY chapter that I need to convert to Raven Guard, and some Protectorate of Menoth from Warmachine. I usually switch between the different systems after painting a few units to keep from getting burned out on any particular system, hence the "all over the place" theme of the blog. I will try to keep the title updated on what I am currently working on.
Thanks to everyone in advance for what I hope is going to be some constructive feedback, and I hope you enjoy.
d-usa
|
|
This message was edited 6 times. Last update was at 2012/05/03 10:23:18
|
|
|
 |
|
2011/09/20 21:15:13
Subject: d-usa's "All over the place" Blog
|
|

Pyromaniac Hellhound Pilot
|
d-usa wrote: I am going to start sharing my progress with everyone.
I'm gonna hold you to that...
|
 The 104th Vostroyan Mechanized The 104th Vostroyan Mechanized
 Rawson's Reboot Rawson's Reboot

Viktor von Domm: nope... can´t do that for the sake of all lving creatures that dwell on earth....
dsteingass: That's like saying "I forgot to tell you who your real father is"
nerdfest09: Rawson speaks the truth! |
|
|
|
|
2011/09/20 21:46:54
Subject: d-usa's "All over the place" Blog
|
|

Warning From Magnus? Not Listening!
|
ooo
|
Notice: If you notice this notice you will notice that this notice is not worth noticing
|
|
|
|
|
2011/09/20 22:44:08
Subject: d-usa's "All over the place" Blog
|
|

Powerful Spawning Champion
|
Looking forward to some goodies.
|
|
|
|
|
|
2011/09/21 02:27:12
Subject: Re:d-usa's "All over the place" Blog
|
|
Decrepit Dakkanaut
|
Alright, gonna start by posting a few of my recent work, just to show some of my progress.
Gonna start off by throwing up a couple pictures of my High Elf Battle Standard Bearer. I feel fairly happy with the way he turned out, especially since this was during a time when I really started to focus on my painting. My High Elves were the first models that I started to base. It is amazing how much simply basing your models can make a difference.
The theme for the High Elves is that they are a band of warriors that are protecting a high pass over the mountains, hence the snow drifts on the base and the blue colors on the clothes.


These have not had any varnish on them. I just now started to actually put coats of gloss coate and dull coate on these models...
And of course, looking at those pictures in their nice big glory, I instantly notice the flash lines on the bottom of the banner that I somehow missed when I was staring right at it.......  Automatically Appended Next Post:
Switching it up to a few of my Protectorate of Menoth models. The plan is to throw up a sample from each of my armies, then switch to focusing on whatever I am currently working on.
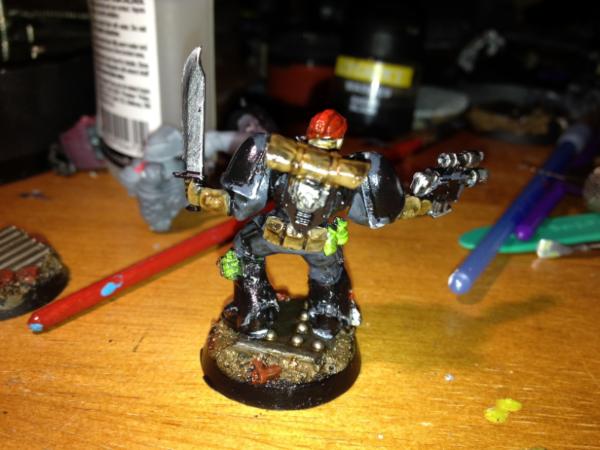
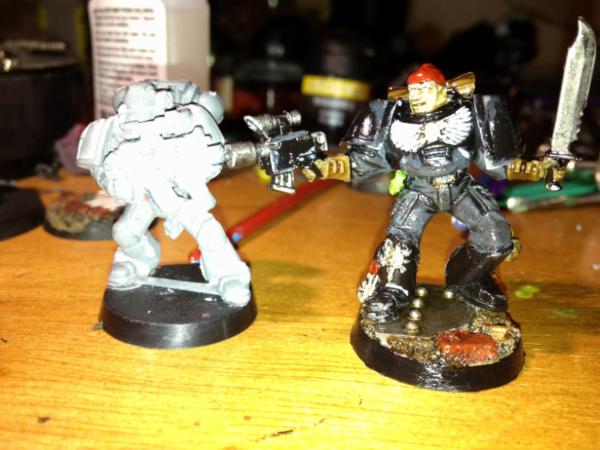
Warmachine is the latest game I started up, and all together it is the latest army that I have completed models on. Here is pKreoss from the PoM Battle Box. I did switch it up from the almost white/red-maroon color scheme and used a Bleached Bone/Blue color scheme. I do like the way the color scheme turned out.


My number 1 priority with this model is to finish the base. I want to add the front arc to the model and repaint the remaining areas black.
EDIT TO ADD:
And since the forum software is amending my posts together I will add the next pictures in the morning. I hope that there might be some feedback awaiting me. I know I can take it 
|
|
This message was edited 4 times. Last update was at 2011/09/21 02:38:03
|
|
|
|
|
2011/09/21 16:05:05
Subject: Re:d-usa's "All over the place" Blog
|
|
Decrepit Dakkanaut
|
Allrighty then,
let's put the focus on my current project, Raven Guard:
When I first started back up with Space Marines 2-3 years ago, I really liked the style of the Raven Guard but I ended up painting my army in a DIY color-scheme. I do like the scheme, but I want to do the Raven Guard justice so I decided to jump back on my SM and give them the proper Raven Guard treatment.
Of course this also means that I have to strip down a lot of my old Space Marines to re-paint them from the ground up.
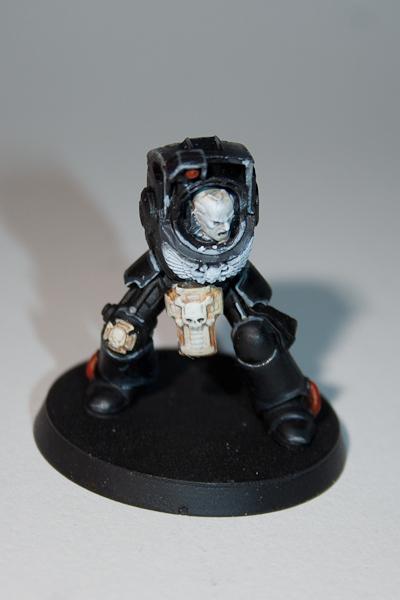
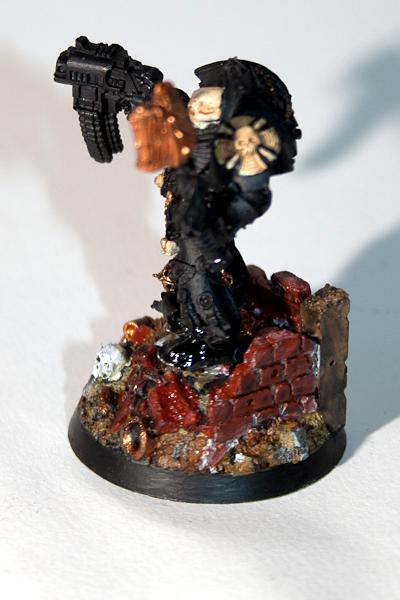
I decided to touch up my Assault Chaplain to get myself started with at least one 'proper' Raven Guard model.
The paint job is not as good as the pKreoss IMO, he was first painted almost 3 years ago and since he was already black I did not want to strip him down and repaint him from scratch. I did touch him up and used the opportunity to work on my dry brushing and highlighting techniques. I think I am going to stick with a Chaos Black, Chaos Black/Adeptus Battlegrey, Battlegrey progression for my highlighting. I like the way the parchment turned out, but I am not a big fan of the skull. I was still doing a lot of learning when I painted this mini. It was during that time that I first started to use washes and dry brushing.
I am still trying to decide on a theme for the bases for this army. I have done a lot of grass/rocks on my High Elves and PoM, so I think I want to go for a city/industrial feel with this one. Any suggestions?


|
|
|
|
|
2011/09/21 16:15:21
Subject: d-usa's "All over the place" Blog
|
|
Veteran Wolf Guard Squad Leader
|
Cool stuff so far D! For the basing question my only concern with your Raven Guard in an industrial setting would be that it would be just a sea of black and grey.
What about more of a tanish ruin to make your models pop? It can still be city like but i think that could be a good option.
As far as painting technique it seems like you have a great grasp of both what you want and how to get there so just keep rocking and you'll have an awesome army!
Edit: Is your black the straight primer? I cant tell but if it is you should totally go over it again because the primer will look different than the other shading.
|
|
This message was edited 1 time. Last update was at 2011/09/21 16:16:49
|
|
|
|
|
2011/09/21 16:15:28
Subject: d-usa's "All over the place" Blog
|
|
Pyromaniac Hellhound Pilot
|
The jump pack chaplain is such a sweet model! I based a Wolf Priest off of one!
How about painting the eye lenses? Have you picked out a color for those in your Raven Guard scheme?
|
The 104th Vostroyan Mechanized
Rawson's Reboot
Viktor von Domm: nope... can´t do that for the sake of all lving creatures that dwell on earth....
dsteingass: That's like saying "I forgot to tell you who your real father is"
nerdfest09: Rawson speaks the truth! |
|
|
|
|
2011/09/21 16:42:22
Subject: d-usa's "All over the place" Blog
|
|
Decrepit Dakkanaut
|
FearPeteySodes wrote:Cool stuff so far D! For the basing question my only concern with your Raven Guard in an industrial setting would be that it would be just a sea of black and grey.
What about more of a tanish ruin to make your models pop? It can still be city like but i think that could be a good option.
Tanish might work, I do worry about a lot of black & grey. I know there are some scenic bases that have more of a "ruined church/temple" theme that would give it some more color. Or maybe I can go with a Ork settlement to give it more of a dirt/wood/metal/colorful ork pieces feel instead of an asphalt/metal feel. Of course there are snow worlds, lava worlds, etc...but I think I want to be able to customize bases more than just "the rock is over here on this one" and "look, grass".
FearPeteySodes wrote:As far as painting technique it seems like you have a great grasp of both what you want and how to get there so just keep rocking and you'll have an awesome army!
Edit: Is your black the straight primer? I cant tell but if it is you should totally go over it again because the primer will look different than the other shading.
I use the Army Painter Black as a base coat, then highlight, dry brush from there, and then I found that giving the whole thing a go with black wash gives it a good effect. I saw in a tutorial where a guy uses a black sharpie to really make shadows stand out, but I have not tried that yet.
Rawson wrote:The jump pack chaplain is such a sweet model! I based a Wolf Priest off of one!
How about painting the eye lenses? Have you picked out a color for those in your Raven Guard scheme?
I would love to paint the eyes on the Chappy, but since I was not very good on my technique when I painted the skull so there is a crap load of paint on it already. i have started a few guys with red lenses, which look okay. But I have seen a few examples of yellow/orange, as well as light blue that look cool. The yellow has an aviator lenses feel to it, so I might give that a try. Automatically Appended Next Post: And now the first actual true Work in Progress pictures:
I am currently working on putting together a squad of assault terminators. So far my only experience with magnets has been to glue magnets on the bottom of my High Elves to stick them to their movement trays. Not very sophisticated, but it does the job.
So since the eternal discussion of TH/ SS vs. LC Assault Terminators will likely never be settled, I turned to my trusty magnets to help me out.

The body of the Sgt, magnets in both shoulder joints, and magnets on both sides of each arm.


Does the job, but I need to work on getting better with how far to drill the holes and make sure the magnets are flush.
The magnets do the job though, so here is the Sgt with TH/ SS

And after an easy switch to LCs:

They switch out easy enough, but I am not sure how I feel about the shoulder pads. They are a pain to drill and glue, and seem to feel pretty loose on the arms. I am seriously considering just buying a second set of shoulder pads for each model and glue the pads to the arms and just have the completed set to switch out.
I also have not glued the little shields to the arms. I honestly just think they look stupid, so I will probably just leave those off.
I also feel the same way about "crotch plates"......I put one on the Sgt, but I am thinking about leaving them off as well...Space Marines don't use their crotch for recreational use anyway 
The only downside to gluing the shoulder pads on the arms is that I loose the ability to make cools TH/ SS/ LC marines!

The forces of chaos get all the fun... Automatically Appended Next Post: Drilled out and magnetized the rest of the bodies of the terminators, so this evening I think I will prime them while waiting for the shoulder pads to come in. I will probably prime all the arms once the shoulder pads are attached.
I also ordered some scenic bases for the Ravens, so they should be getting here within a week I think. Of course I already glued the Terminators to the plain bases, but it should be pretty easy to change those over. Trying to decide if I should go ahead and paint them on their current bases, painting the scenic bases separately once they get here, then gluing the finished pieces together; or if I should just do it all together.
I have been having a bad habit of putting these models together and then trying to squeeze my brush into cramped areas, so I will try to take thinks slowly and paint them separate.
I also got this guy in the mail today http://www.forgeworld.co.uk/Warhammer-40000/RAVEN-GUARD-SHADOW-CAPTAIN-KORVYDAE.html so this will give me a project once the assault terminators are done. I am planing on doing a JP Vanguard body guard for Shrike, and plan on using Korvydae as a Sgt for the Vanguard Squad. I got bits and pieces ordered for the squad, and I am thinking about getting the Raven Guard upgrade squad to flesh out this squad and make it unique.
Automatically Appended Next Post: Got the Assault Terminators magnetized, and the bodies primed. I will prime the arms once the extra shoulder pads come in.

|
|
This message was edited 3 times. Last update was at 2011/09/22 00:59:15
|
|
|
|
|
2011/09/22 14:57:36
Subject: Re:d-usa's "All over the place" Blog (Currently working on Raven Guard)
|
|
Decrepit Dakkanaut
|
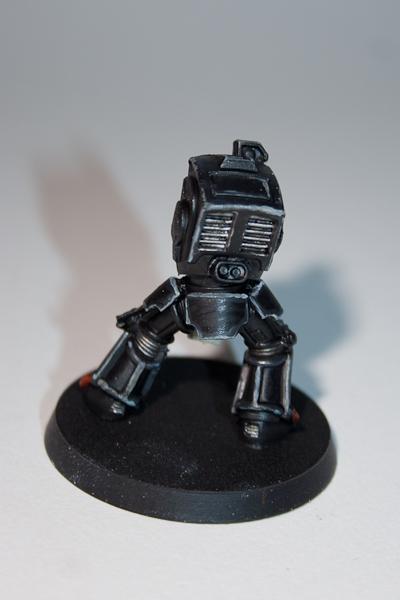
Finished the initial highlight on all 5 Terminators last night before work:
I use the Chaos Black primer, touching up any areas that I missed, then highlighted the edges using a 50/50 mix of Adeptus Battlegrey and Chaos Black. I finally invested on a few decent brushes that hold the paint well, hold their point well, and I have been pretty vigilant about cleaning them after each session.
The initial highlight didn't take that long, somewhere between 1 and 2 hours for all 5 guys. I am trying to be slow and steady, making sure the brush doesn't dry out or flake, and making sure it stays pointy.
This morning I started to finish the highlighting on the sarge:

First  moment of the bad......stupid mold lines. I filed all the flash, all the trim, cleaned the plastic with soapy water (even though it is not resin), magnetized the models.....and then I didn't remember to file away the mold lines..... 
But back to what I did do: The final highlight is a thinned down edge of Adeptus Battlegrey. I think it is a good shade, and I also think I got the consistency down pretty good. I thinned it down until it was the consistency of cream, and it did pretty well. I am getting better (a relative term) with keeping my lines straight, but still have a lot of room to improve there.
I also gave the chest piece an initial coat of thinned down Battlegrey (which I will end up highlighting to white, a technique I will probably use on the helmets as well), and I also put down an initial thinned down coat of bleached bone on the Terminator Crux on the crotch and knee. I ended up buying little resealable containers to transfer some paint into and water down. That way I can shake it up and use the thin paint sticking to the lid for my brush. Thinning down my paints has really been one of the things I am focusing on so far. I hope I learned my lesson from many "thick" paint jobs on old models.
Here are a few more views of the sarge at this point:


In the close ups, and while I am painting, I can really tell that the highlights are still uneven in thickness. But from a tabletop distance (about 3 feet away) it really looks pretty smooth and does a great job at breaking up the big mass of black. I don't plan on entering any painting competitions, my main goal is to be able to field a good looking tabletop quality army.
The skull/eagle will get one more coat of thinned down grey, a black wash, and white highlights and/or drybrush. I will probably use the same technique for the helmets and use a similar buildup from black/grey/white for the shoulder pads (If you make it to the 1st company, you should be a Veteran I think).
The Terminator Crux will get a second thin coat of bleached bone, then probably a wash of mud (might go with black, but I think mud would be a better complement to the bleached bone) and then a highlight/drybrush of skull white.
All the black/grey parts will get a wash of black, that will mute the colors a little and tie the shading together.
My main question at this point is this: How to paint a Raven Guard face...
I know that according to fluff, they turn pale the older they get. The Forge World painted example of the Shadow Captain does a good job with that. But I am not sure what colors to use as a base/wash/highlight......any suggestions are welcome.
Thanks for the feedback so far.
|
|
This message was edited 1 time. Last update was at 2011/09/22 14:59:25
|
|
|
|
|
2011/09/23 15:01:30
Subject: Re:d-usa's "All over the place" Blog (Currently working on Raven Guard Assault Terminators)
|
|
Decrepit Dakkanaut
|
Another morning (or evening for us crazy folk who work night shift) has gone, and I made some more progress on the Sgt of the Assault Marines.
I think I like the color I settled for the face. It seems that fluff wise there is not much guidance other than "due to genetic defects Raven Guard skin turns white and eyes and hair turns black". However I did want to give some range to the skin and I ended up with the following process.
1) Paint over the black base coat with a thin layer of Adeptus Battlegrey.
2) Paint over the grey with what I now call "Raven Guard Skin", a mix of roughly equal parts Adeptus Battlegrey, Skull White, and Elf Flesh (I think that is what the lighter skin tone is called). I also added a small part of Bleached Bone. They Grey/White portion of the mix gives it a nice sickly pale looking complexion that can still be drybrushed with pure Skull White for highlights, and the small portion of Elf Flesh and Bleached Bone give the color some depth and just enough warmth to show some humanity.
3) Applied a wash of "Raven Guard Skinwash" which is 50/50 Black & Ogryn Flesh. Again, black to make it dark, and the Flesh to give it a touch of depth.
4) Drybrush with Skull White.
The chest was based with Adeptus Battlegrey, but looking back I probably should have used Astronomican Grey as the base. After that I applied a black wash, and highlighted with Skull White.
The Crux Terminatus was given a bleached bone highlight, washed with Sepia, broad drybrush with Bleached Bone again, and then a final drybrush with Skull White.
I also gave the whole model a wash of black ink to tone down the highlights and bring out some depth in the model.

I am also starting to work on the arms. I actually did remember to file down the mold lines this time before giving them a base coat of black  . I also filed down the skulls on the side of the thunder hammer for the sgt, and applied a small brass Raven Guard symbol on each side instead. I also learned that magnetizing arms comes in handy when priming your models. You can use a thin metal pipe or strip to hold your model and spray it from all angles pretty easy.
Painting has been a slow process this week, especially when working 12 hour days. But I am enjoying going nice and slow on these guys so far. Learning a lot and feeling like I can be proud to put the Ravens on the table when I am done.
|
|
|
|
|
2011/09/24 06:27:35
Subject: d-usa's "All over the place" Blog (Currently working on Raven Guard Assault Terminators)
|
|

Decrepit Dakkanaut
|
A really enjoyable blog so far! I like your menoth scheme, although it borders on Cygnar. If I've anything to suggest about that it would be avoid gold and brass for the metals but rather go silver, and maybe shade the blue with purples. I like seeing your raven guard technique stage by stage. Atta boy indeed!
|
Theophony"... and there's strippers in terminator armor and lovecraftian shenanigans afoot."
Solar_Lion: "Man this sums up your blog nicely."
Anpu-adom: "being Geek is about Love. Some love broadly. Some love deeply. And then there are people like Graven.  |
|
|
|
|
2011/09/29 21:20:42
Subject: Re:d-usa's "All over the place" Blog (Currently working on Raven Guard Assault Terminators)
|
|
Decrepit Dakkanaut
|
Back at it, spend the last 5 days on vacation, but jumped back into the painting today and will post some of the progress I have made as well as some of the progress I made before I left.
I got the TH/ SS Sgt finished, but I am still waiting on the second set of shoulder pads I got on Ebay to start painting the LC version of the arms.
So here is the Sgt:

I am pretty happy with him, especially for a table top quality character. I am also still waiting on the scenic bases I ordered, so once they come in I will get him finished up and ready to play.
I think I was able to capture the "sick/pale Raven Guard skin" on the face, but I know I still need to work on getting better on my highlighting.

A close-up of the Thunder Hammer. I was trying to make get a good Force Weapon effect going while still keeping the colors subdued to avoid clashing with the dark Raven Guard colors. The tutorial for the technique can be found over here
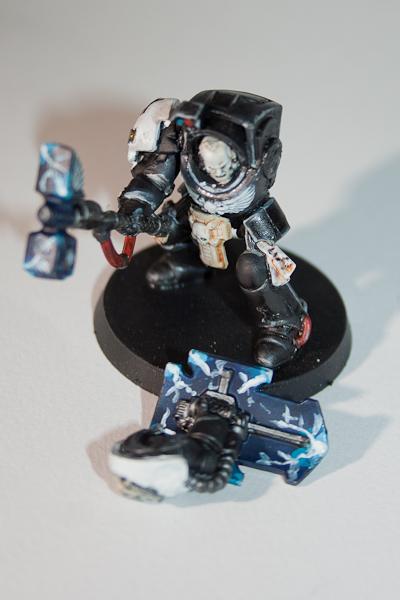
I used the same technique on the back of the Storm Shield as well as the edge of the front of the storm shield, while maintaining a simple scheme on the rest of the storm shield. Raven Guard don't strike me as a very flashy army, so I tried to keep it simple.

Another close-up of the Thunder Hammer. I filed off the skull and attached small Raven Guard brass on each side, and painted the sides of the back portion white.

The rest of the unit. I need to put down a layer of wash on the armour and the Terminator Crux, and touch up the eyes some more as well. I think the yellow eyes are working out pretty good though. Of course I still have 5 sets of LC and 4 sets of TH/ SS to paint before the unit is finished.
I also found some old arms from the AoBR Terminators, so I will magnetize them as well. that way I can field these 5 guys as either Assault or Tactical Terminators. The plan would be to purchase a box of tactical Termies later on and be able to field 5 assault/5 tactical or a 10 strong unit of either.
I also base coated a Land Speeder Storm and a Dreadnaught, and will use them to break up the feeling of painting the same thing over and over. I am also waiting on a few kits from FW to start working on a 8 man Vanguard Veteran JP squad to hang with Shrike and the Chappy.
|
|
|
|
|
2011/10/01 20:22:12
Subject: d-usa's "All over the place" Blog (Currently working on Raven Guard Assault Terminators)
|
|
Decrepit Dakkanaut
|
No progress, pictures just spam....
I have been getting more painting done, and should have the whole assault squat finished by the end of the coming week. The extra shoulder pads came in the mail yesterday, so that was the main thing I was waiting on. Only remaining piece of the puzzle are the bases.
Also have been doing some painting on a Dreadnaught and a Land Speeder Storm.
But today I finally got my FW order that I needed to finish out the JP Vanguard Squat. That will take up a big junk of my time for the next few weeks, but I am very excited about it. Automatically Appended Next Post: Just because I could not help myself, here is a set of pictures of Vanguard Vet #1 (I need to come up with some names for these guys, since I spend so much time painting them...)
He will be armed with a bolt pistol and a storm shield.

Not the best picture, didn't set up my little photo-booth, just wanted to get a feel for how he looks. The body itself is from the Vanguard Veterans set, I think he was the one with the relic blade. Left arm replaced with one of the FW shields from the boarding party upgrade set. I saw that set and thought it would work great as a storm shield. It is big enough to make the 3++ seem logical, and it looks like he could just bash somebody over the head with it.

Left shoulder pad will be one of the pads from the FW Raven Guard veteran upgrade set.

Right arm is a basic bolt pistol arm. Pointed straight out to go with the dynamic motion of the model looking like he is running towards a target.
You will also notice that I did not use the Vanguard Veteran jump packs. I like the detail, but they do tend to make the model more top heavy. This might have been an instant where finecast would have been nice, but I bought those guys quite a while ago. The plastic JP also made it pretty easy to magnetize them and gain the ability to run the Vanguard Veterans as a squad running on foot:

|
|
This message was edited 1 time. Last update was at 2011/10/01 22:08:20
|
|
|
|
|
2011/10/05 14:12:10
Subject: Re:d-usa's "All over the place" Blog (Currently working on Raven Guard Assault Terminators)
|
|
Decrepit Dakkanaut
|
The last week has not been the most productive. Working 12 hour night shifts gets you beat, but I am trying to commit myself to at least 30 minutes a day of painting/converting/building.
Since my OCD was kicking in, I am currently building a Vanguard Veteran Squat. I got a few different weapon load outs to give the unit some flexibility. I also magnetized all the backs so that they can either wear regular backpacks or jump packs. I figure that these guys can then also be used as Sergeants for regular squads if I want to.
So my last pictures were a "proof of concept" to myself to see if I can use FW boarding shields as storm shields and still have the model look good. I think the pose looked pretty good, so I included 2 SS/ BP units in my squad. Here is the 1st one I should have finished:

The eyes, oh the eyes....
I still suck at getting fine detail down. Got a fine brush, trying to rest my hand on the table when I do hold a model and rest my forearm of my painting arm on the table as well to steady myself. But eyes still give me extra trouble.

Different angle: I was trying to get the pose dynamic enough to make him look like he is on the move, reacting to a threat that cropped up on his left. Need to finish up the helmet (eyes and veteran laurels) and the details on the right shoulder pad. I think I am mostly happy with the shield. Raven Guard are not flashy, so I think the only other thing I will add is a RG transfer.

Another look at my attempt to get a dynamic shifting to the left pose going. I wanted to feel like his momentum was towards the right lower corner of the picture when something got his attention at the top right corner. The RG symbol is pretty much done, now I am trying to complete the skull, the chain, and the seals.

In the background you can see one of the resin bases that I am working on. Finally got them in the mail on Monday, and they look great. I ended up with a city ruins theme. I will try to keep the colors to a light brown earth, and the brick will be a terra cotta. There is so much black/grey with Raven Guard, so I am going to use the base to get some color and variety to the models.
|
|
|
|
|
2011/10/07 15:19:26
Subject: Re:d-usa's Raven Guard Blog
|
|
Decrepit Dakkanaut
|
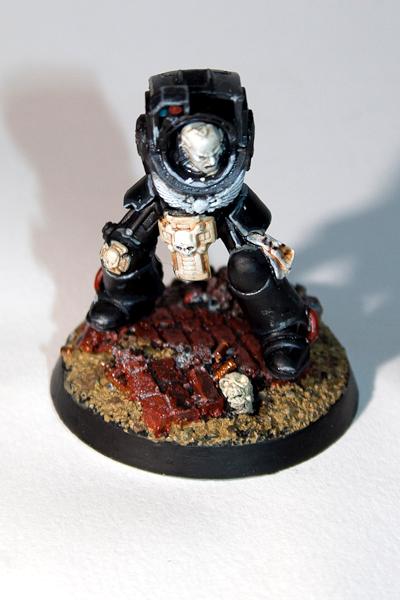
Time for updates again:
Had my string of work days, so when working 12 hour nights, I usually only end up painting for 30 minutes a day or so. Now I have off again for a few days, so I should be able to get some stuff done.
I was able to strip all my old SM models during the last week though. So no more weird red/white & black SM mixes when I play games. I need to lay down a base coat on all of them, but now I will be able to field a whole army of black space marines. I found out that this is a big benefit of playing Raven Guard. You can play a game with base coated guys, and they don't look horribly out of place with the painted models.
I have been working on the resin bases I ordered, and I think they ended up being great. I think I have the colors that I want for them, and they seem to work good with the models. I wanted to do an urban rubble theme, and one of you guys mentioned that it might cause a black/grey overload. I did end up going with the urban bases, but I am using a light brown for earth, a terra cotta for the brick work, metal for pipes, brass for shell casings (to keep the grey/silver to a minimum), and some grey for concrete pieces. I think the bases bring some much needed color variety to the finished models.
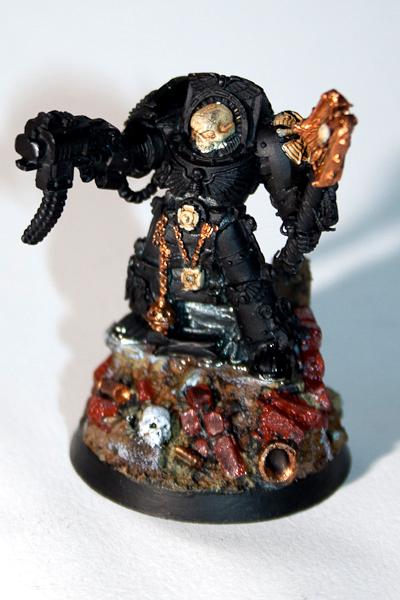
Let me start off with some WIP shots for this week:
Our fancy FW Shadow Captain:


No highlighting yet on the model, just a base coat of white on the Raven Guard icons, etc...still got a ways to go with him. Also includes a view of the resin bases I am using.
My Terminator Sgt on his new base. I still have to finish some highlights on the base and put some wash on the skull, but I think the red/brown gives a good contrast to the color of the armor.
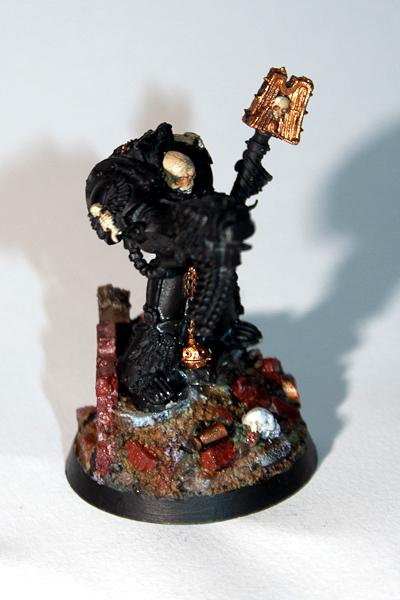
My Terminator Chaplain. Still very WIP, but I think his base is finished for the most part. Since he is a fancy HQ I got him on a more heroic base. I think it looks pretty good (the base, not necessarily the paintjob...).
But my highlight for the day is this: I actually have a model I would consider finished!
Let me present Battle Brother Meallan:

He is a Vanguard Veteran, 7th Squad 1st Company. Equipped with Storm Shield (using the FW Boarding Upgrade), bolt pistol, as well as parts from the FW Raven Guard Veteran Upgrade Kit. The only thing he is missing is his backpack. He is magnetized to be used as either a JP Vanguard Vet, or walking on foot. The company marking is on his knee, and the squad marking is on the storm shield.
I am trying to give my guys unique names, and work a bit of a back story into them. ICs, HQs, and leaders of squads will all have names, as well as the squads themselves. I ended up putting together a list of around 50 names to use. Gonna write them on the bottom of the bases so that I can see who the guy is that held off a demon prince for 3 turns. Meallan is Irish for lightning, so since he has a storm shield that is going to be his name.


I think the yellow works great for the eyes, and I like the half white MK VI helmet. The base gives some much needed color to the model as well.
|
|
|
|
|
2011/10/25 00:45:19
Subject: d-usa's Raven Guard Blog
|
|
Agile Revenant Titan
|
Nice job!
|
 Eldar Eldar  -5000 points -5000 points |
|
|
|
|
2011/10/25 00:50:58
Subject: d-usa's Raven Guard Blog
|
|
Decrepit Dakkanaut
|
Man, I need to get my butt back in the chair and behind my painting desk. I need to finish the bases for the Vanguard Vets and get them painted up. Been slacking, someone please beat me and motivate me.
|
|
|
|
|
2011/10/25 00:53:50
Subject: d-usa's Raven Guard Blog
|
|
Mounted Kroot Tracker
|
Your stuff is coming along...i think your painting would benefit from a finer brush and for you to thin down your paints more. Some things look a little goopy. But otherwise its good
|
|
|
|
|
|
2011/10/25 01:00:26
Subject: d-usa's Raven Guard Blog
|
|
Decrepit Dakkanaut
|
Thanks. I got a finer brush (0/3 I think) but I almost feel like I have better brush control with the 0/2. Also started to wash the brushes with real brush cleaner and conditioner, and storing them upside down (hanging of course so the brush doesn't touch anything) to dry them. Also I will clean them during longer painting session to keep paint from drying in them and flaking.
And I also got some medium to start watering down the paints, so I hope that the next few models will show some improvement in that department. What sections would you point out as particularly goopy? I know the Jump Pack Chaplain has a lot of sections with thick paint, but I have been trying to do better.
I think my biggest personal complaint with the Stormshield Vet would be the highlighting on the shield. I feel like I am getting the hang on organic lines (or as organic as power armor can be), but the straight lines are giving me a headache.
That and eyes, I hate eyes...
|
|
This message was edited 1 time. Last update was at 2011/10/25 01:01:38
|
|
|
|
|
2011/10/25 01:40:04
Subject: d-usa's Raven Guard Blog
|
|
Mounted Kroot Tracker
|
your lighter colors and your metallics in particular. Both to get realllly smooth coverage need extremely thin coats. You might also want to try starting with grey for your whites. For straight lines, sometimes you dont want to actually paint a straight line, rather, you use the side of the brush on a right angle edge. Its called edge highlighting. Alot of space marine models benefit from that. I do like your lightning on your hammers and axes. That looks really nice. Over all the care is coming through, so dont be too worried bout it. Its often times just slowing down and thinning paint which makes a massive improvement Keep it up, im subbed here so ill be looking forward to new updates
bebop
|
|
|
|
|
|
2011/10/25 02:51:01
Subject: d-usa's Raven Guard Blog
|
|
Decrepit Dakkanaut
|
Thanks, will work on the metallics. I have started to work from black, to grey, to white and I am seein a much better buildup in the color. Of course those layers add up, so working on thinning.
On the edge highlighting: are you talking of using the bottom edge of a flat brush, or the side edge of a long brush? Might have to hit up YouTube.
|
|
|
|
|
2011/11/14 01:27:14
Subject: Re:d-usa's Raven Guard Blog
|
|
Decrepit Dakkanaut
|
Well, after just slowly painting away for the last few weeks and not making too much progress, I have been suckered into switching my Raven Guard up to a True Scale Space Marine force. Of course, being Raven Guard, that includes a lot of True Scale Scouts.
I have seen lots of True Scale tutorials and blogs on here, but only one dealing with Scouts. So this is going to be interesting.
It also looks like I might be playing in the Team Tournament at Adepticon, which led to the whole True Scale Space Marine adventure to begin with, so I have come up with a 1000pt force that I need to finish by April, nothing like a little pressure to get you going.
So over the next 5+ months I need to build and paint:
10 Sniper Scouts
10 Bolter Scouts
5 Close Combat Scouts
3 Biker Scouts
1 Land Speeder Storm
and 6 traditional True Scale Marines (Captain & Command Squad)
So my first step was to try a proof of concept for a True Scale Scout and try to figure out how I am going to build the 6 regular True Scale Marines.
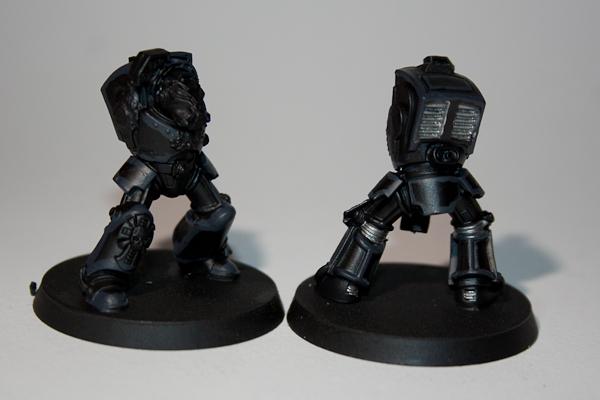
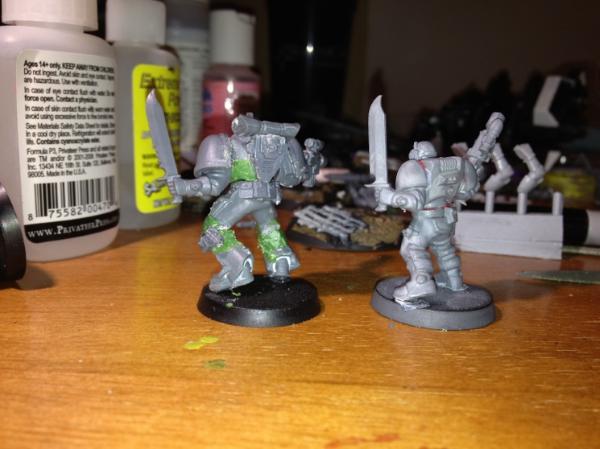
Here is my first attempt at a True Scale Marine:


The basic attempt with him was to bulk up the Terminator bags, attempt to use a regular torso and bulking it up and raising the body with green stuff, and using the regular helmet. I will try to keep these pre-heresy, so I was hoping to avoid using terminator fronts in order to utilize older marks of armor instead. I tried to make a new belt using some green stuff and hide my crappy work by attaching lots of goods to the belt....not sure if that worked.
I will probably use regular marine arms, but use terminator shoulder pads to add some bulk. I will have to see how he turns out after some paint.
The Scout was surprisingly a lot easier than the regular marine:

The steps for him were as follows: Use the bottom half of regular space marine legs as "shin guards" to add some height below the knee, and then using a pair of Catachan legs from the knee to the belt. I did not use scout legs, it seems that since the regular space marine models are already close to the size of regular humans, it seems like the scouts are even smaller than regular soldiers so that they look "scoutish" next to regular marines. Using catachan legs also got rid of the David Bowie Cod Piece thing the regular scouts got going on.
I used the chest piece of a regular Space Marine, cutting off the armor that covers the abdomen and making a green stuff midsection to attempt to mimic the scout model a bit. I filled the neck with some green stuff and added a catachan head to it. Arms are regular scout arms with space marine shoulder pads.

The new scale does make the combat blade look more machete like and more size appropriate.
The hump/powerback from the regular scout is replaced by a cut down marine powepack, and of course Mr. Scout has to keep his sleeping bag somewhere. Also lots of goodies added to the belt.
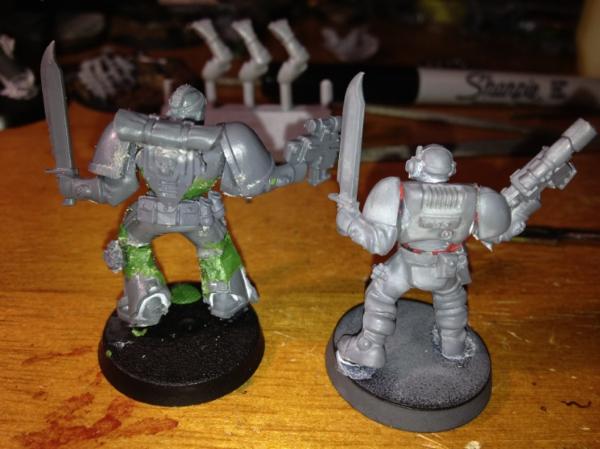
And as a comparison to the scale:
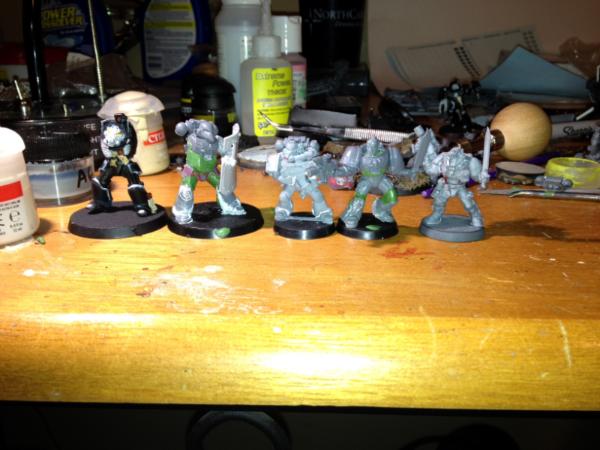
Regular scout next to True Scale Scout next to Regular Marine next to True Scale Marine next to Terminator.
Automatically Appended Next Post: And here is the scout after a day of painting. Keep in mind that he was JUST sprayed with clearcoate. That combined with the ultra bright flash washes out a lot of the shading. Tomorrow I will apply decals, hit him with dullcoate, and photograph him in front of a proper background with my good camera.

And for a comparison between sizes again between a regular Space Marine and the True Scale Scout (and a good example of how washed out the photograph really is):
|
|
This message was edited 1 time. Last update was at 2011/11/14 03:06:47
|
|
|
|
|
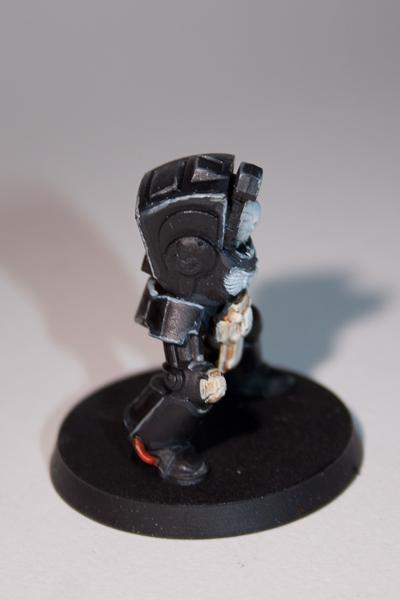
2011/11/14 21:30:11
Subject: Re:d-usa's Raven Guard Blog (Now in True Scale!)
|
|
Decrepit Dakkanaut
|
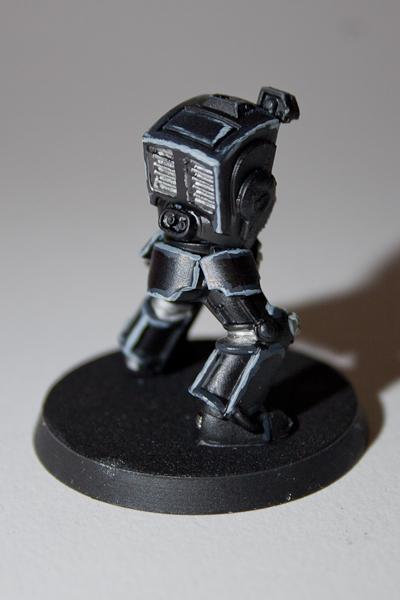
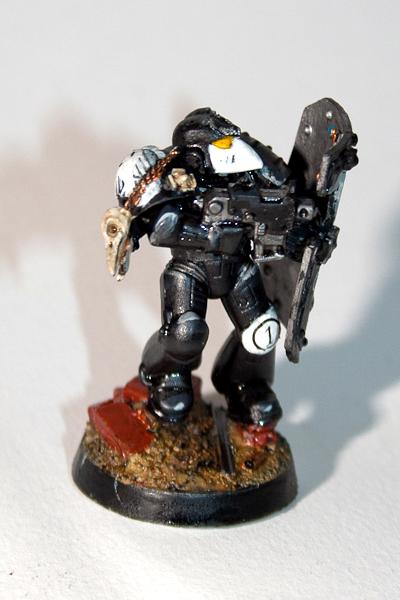
Got my True Scale Scout painted to see how the concept would turn out in the end.
The basic paint scheme was to keep the armor in line with the traditional Raven Guard black and highlight the edges. The cloth part of the scout armor was painted with a very dark grey and given a black wash. Leather and gloves were painted brown, grenades green.

Faces are still one of the things I am not good at painting. If I try to paint eyes on them they always just end up looking like zombies. Usually not a problem with marines, but I am going to have a grand total of 29 faces to paint since this is a very scout heavy force.
This force is also most likely going to go be situated during the heresy, so the majority of the Raven Guard will have been lost during the drop site massacre and is heavily relying on scouts to make up the numbers.
I was thinking about using the tactical markings on the right pad to clarify the function of individual troops on the battle field. The close combat scouts and bikers would have the assault markings. The regular guys with bolters the tactical markings, and the snipers the heavy support markings.
If I am going to stick with the same heads all the way around I might use the color of the headbands as a way to mark troops as well.

Despite my less than stellar painting, I think this guy cam out pretty decent, and more importantly he gave me the confidence that a true-scale scout force could actually work.


|
|
|
|
|
2011/11/20 01:04:30
Subject: Re:d-usa's Raven Guard Blog (Now in True Scale!)
|
|
Decrepit Dakkanaut
|
Did some more work on the Close Combat Scout Squad this week. I ordered some different helmets since I suck at painting faces and I wanted the scouts to still be distinct from the regular marines. I also ordered some Secret Weapon Backpacks to replace the power packs on all the scouts.

The squad with have 2 Scouts with BPs and Combat Knives, two with Shotguns, and the Sgt will have a Combi-flamer and Shotgun. I still need to put the weapons on the Sgt, and then put accessories on all the remaining scouts.

Closeup of the new Backpacks. They come in small and large, and I think both sizes look decent. I will probably do a random mix for each squad to get at least a little variety in there.

Close up of Shotgun Scout, better look at the helmet
I am also working on a True Scale Scout and should have some progress on him by next week (I hope).
I did learn a lot more about the whole process of converting Scouts to True Scale, most of which probably seems pretty obvious. Two of the biggest lessons that helped a lot once I figured them out are this:
1) Try to match up the pose of the Power Armour legs and the Catachan legs. You will have a lot more success matching up a pair of legs that are both running with the same leg forward, than you will matching up a standing pair with a running pair. Just makes the whole model look a lot more natural (you will find a good example of how not to match up legs in the above pictures (see if you can spot the marine that looks like he has to pee really bad).
2) Before gluing on scout arms to the power armor torso, make sure that you can fit power armor shoulder pads over the arms. A few of the scout arms are positioned in a way that prevent them from being used with shoulder pads.
|
|
This message was edited 1 time. Last update was at 2011/11/20 01:10:42
|
|
|
|
|
2011/11/23 19:51:04
Subject: Re:d-usa's Raven Guard Blog (Now in True Scale!)
|
|
Decrepit Dakkanaut
|
Alright, did some more fixing up of the models, and finished with the first Scout Squad.
I ended up switching the heads back to Catachan heads. The idea of helmets turned out to be a bust, the helmets just seemed a hair to small and threw of the scale of the model. So while I suck at painting faces, faces it will be.
Other lessons learned: The knee joint is one of the most unstable parts of the model. Even after reinforcing the joints with green stuff they were still fairly unstable. I will try pinning the next lot to see if that will improve the stability.
I think I am also going to try leaving the abdominal section intact, just to see how it looks, and I will try some Cadian heads, to see if I can get some helmets. If I stick with Catachan heads then I will use the headbands to assist in marking the squads. The "assault" marines ended up with red headbands, which without even thinking about it is the shoulder trim color for post heresy assault marines. So I will keep green headbands to the "tactical" scouts and yellow for the "heavy support" scouts.
So here are the first 5 scouts for my Adepticon Team Contribution:
Aspirant/Acolyte/(what do you call scouts?) Oisin, armed with BP and Combat Blade:


Daithi, armed with BP and Combat Blade:


Neacel, armed with Shotgun:


Bertram, armed with Shotgun:


And Sargent Loegaire, armed with Shotgun, Combi-Flamer, and Melta-bombs:


And the whole team together, Scout Squat Ekkehard:

And with a regular scout for size comparison:

|
|
|
|
|
2011/12/02 17:20:41
Subject: Re:d-usa's Raven Guard Blog (Now in True Scale!)
|
|
Decrepit Dakkanaut
|
So this weekend I am staring up the True Scale Land Speeder Storm project. The regular storm feels pretty crammed as is, and putting it next to true scale scouts is only going to make it seem even more out-of-scale. So the main parts of the build will be to replace the small crew section with a larger version by adding length, width, and some height.
Today I worked on length and width:

You can make out the size of the original Storm pretty easily since the cross bar is supposed to be one piece. So all in all I did a little more than double the size of that section. I

The gray plastic piece is the entire mid-section of the original scout, so every bit of plasticard is added real estate.
So the agenda for this week is to finish the floor space, add seats, finish the crossbar, and add a top section for it.
|
|
|
|
|
2011/12/03 16:16:32
Subject: Re:d-usa's Raven Guard Blog (Now in True Scale!)
|
|
Decrepit Dakkanaut
|
Some more progress pictures on the Storm before I head to see the in-laws today:

The final height of the Storm, obtained by adding two plasticard bars to the top of the regular frame. Also added a connecting bar to the bottom of the cross-frame and a couple of plasticard stubs to help attach the seats.
The 1st bench is build from both small benches from my original storm, connected with a small piece of plastic to get past the cross-frame. Both benches form the second Storm will be used to make a similar bench at the front end of the compartment.

The new passenger delivery system. The regular storm has 2 sets of these that extend just past the crew compartment. I am going to use three sets, taking advantage of the added length and just because it makes more sense to have 6 ropes for 5 passengers than 4 ropes for 5 passengers (maybe the heavy weapon can be lowered by the 6th, or some sort of Special Ops Space Marine Dog). The bars are extended with plasticard and a few thin strips of plastic were added between the original sections to simulate the rope traveling from the wenches in the center to the end of the bars. It is also only a dry-fit at the moment, so when it gets glued it should not be uneven anymore .
Considering that this is my first time ever working with plasticard and attempting a conversion like this I am pretty happy so far. I am trying to find some sort of diamond plate or something similar to place on the bottom of the crew compartment to keep it from looking so bland, and any suggestions are welcome.
|
|
|
|
|
2011/12/05 16:33:46
Subject: Re:d-usa's Raven Guard Blog (Now in True Scale!)
|
|
Decrepit Dakkanaut
|
Time for more WIP True Scale Storm pictures:
Spend Saturday with the family, and Sunday at the FLGS to play some games, so I didn't have a huge amount of modeling time. Of course this probably gave the plastic glue more time to set, so it's all good.
As for the actual progress, the deployment system for the passengers is complete. 3 sets of rappelling devices on either side of the Storm to allow for fast deployment of baby-marines.

I think 3 pairs ended up being a good number, keep it from looking to bare-bones but also not cluttering it too much. I also added the foot steps on either side of the crew compartment to give it some more width and character. The original crew compartment was shorter than the pedals, they connected right behind the driver and on the rear section of the storm, so they are a good visual clue to give a sense of scale to this thing.
The only thing I am unhappy with is the rappelling hardware. Even with my "measure 8 times, cut 11 times" approach they are still not completely even. This could probably be fixed by making one true set that is 100% right, and then making a mold and casting them. In the meanwhile I decided that it would be very impractical for the Storm to fly around with the rappelling hardware extended, so of course it is able to be retracted and the bigger portions would actually touch in the pre-deployed (and pre-cut) position. The individual sections are currently being extended to prepare for deployment, so they are not exactly even because they have not all arrived at their final position  (anyone, anyone, is this thing on?)

Side picture, flying base provided by my High Elf Eagle. Both sets of benches in place, some handles to the top of the cross bar to make it look less plain, good view of the foot rests, and a look at the beginning of the under-carriage.
Which brings us to:

The progress on the bottom of the Storm. Got the Heavy Flamer from the regular Land Speeder set and attached it to the storm. GW really did a horrible job executing the model for this idea. It comes with a weapon attached to the passenger seat, but nobody to actually fire it. If you glue all the passengers in place, then the gunner is passenger #5 and nobody would be left to fire the weapon after the passengers leave. Moving the flamer to the bottom solves that problem, now I just need to decide if I want to have the driver fly and shoot at the same time, or if I still want to go ahead and add a gunner to the passenger seat. If not the Sgt could be assumed to fly Shotgun while onboard.
Also already attached is the "whatever it is called" that hangs below the speeder, and I think I got it in a good spot to balance the Storm when it is all said and done. The only thing left to do is to add platicard bars to make the rest of the bottom match the ribbed look of the GW parts, and to attach the Cerberus Launcher. The regular Storm has the Launcher underneath the nose section (which is now occupied by the Heavy Flamer). So my two options right now are to either:
a) try to scrape and cut the Cerberus Launcher from my original Storm, and then try to add them somewhere near the crew compartment.
b) use the Typhoon Missile Launchers, convert them a bit, and attach them below the crew compartment.
If I can cut the Launcher from the original Storm I will make some try fits and post pictures, if not then I will just have to go the Typhoon route.
|
|
|
|
|
2011/12/06 18:07:42
Subject: Re:d-usa's Raven Guard Blog (Now in True Scale!)
|
|
Decrepit Dakkanaut
|
Well, I think that at least structurally the Storm is as finished as it can be. I need to finish up the cosmetic work (filling in all the gaps with green putty, filing the edges, etc) and add the diamond/treat plate and some Raven Guard icons. I also need to finish up the crew as well. The Storm crew has the weird models that are mostly one piece with an arm glued at the elbow here and the wrist there, so I am thinking about getting two more biker Scout bodies and converting them into driver/gunner.
I think I learned a gak-load about converting from this model, and I think the next time around it would be a lot easier to cut out the new floor section and model the entire under carriage before gluing it to regular storm parts, adding the ribs on the bottom before adding the launchers, stuff like that.
The only part I from the regular Land Speeder that I ended up using was the Heavy Flamer, and the only other piece that would probably be needed is the Assault cannon if you want to arm a Storm that way. But both pieces are pretty easy to find in bits stores, so that is a lesson for the future.
But as to the actual results:


Like I said previously, my only main complaint about the rappelling system is that they are not all even. Something to work toward in the future. Also need to work on making straight angles, straight cuts, etc. I am buying a professional mat cutting system for my photography (got some art grant money to spend) and I think I am going to buy a dedicated set of blades to use for styrene. So that should help a lot.
As for the bottom of the Storm:

Good view of the position for the Grenade Launchers. The small optics sections on either side really did do a great job with securing the step boards. They are solid as a rock now, and I don't think they look that unreasonable there.

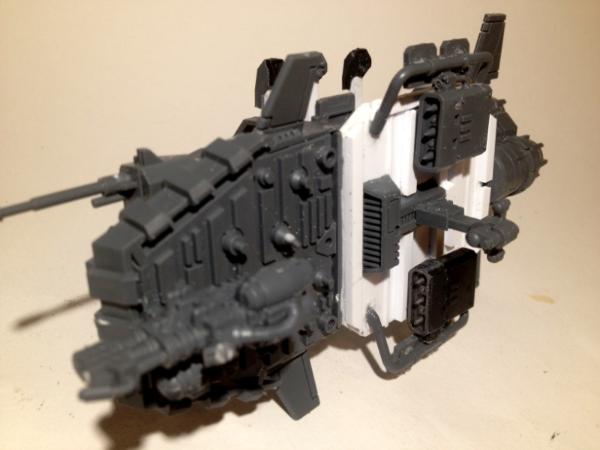
The ribs were actually the hardest part at this point. I think in the future I will add all the ribs first, that way I can cut them even and file them smooth, then add the steps and launchers and stuff. I am waiting for the glue to set, then I will cut them even and file them smooth.
Not a bad first stab at converting something I think.
|
|
|
|
|
|
|


