| Author |
Message |
 |
|
|
|
|
Advert
|
Forum adverts like this one are shown to any user who is not logged in. Join us by filling out a tiny 3 field form and you will get your own, free, dakka user account which gives a good range of benefits to you:
- No adverts like this in the forums anymore.
- Times and dates in your local timezone.
- Full tracking of what you have read so you can skip to your first unread post, easily see what has changed since you last logged in, and easily see what is new at a glance.
- Email notifications for threads you want to watch closely.
- Being a part of the oldest wargaming community on the net.
If you are already a member then feel free to login now. |
|
 |
2012/01/15 20:38:15
Subject: Will Wright's Heretically Good Model Thread
|
|

Dakka Veteran
|
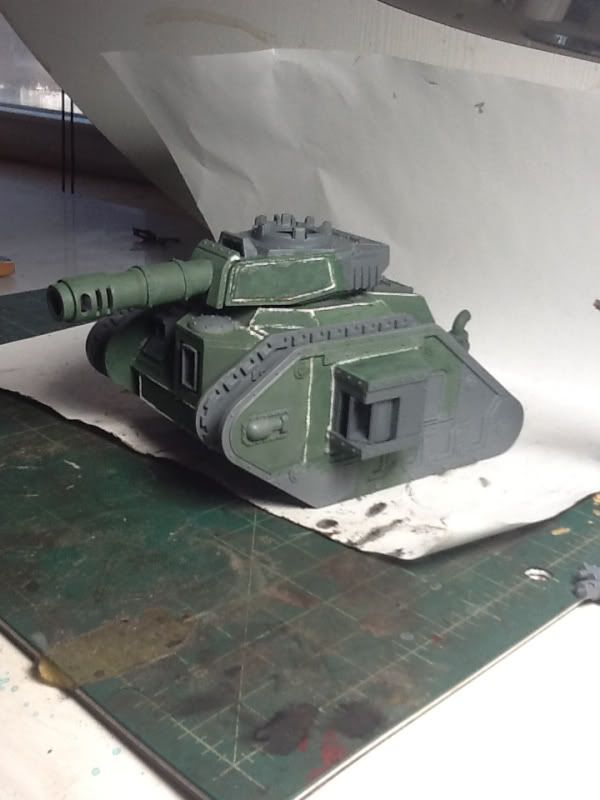
Well with the money I made cleaning out old 40k stuff I went and bought new 40k stuff.
This time I am doing a Tank Army.
10 Leman Russes all modified and superdetailed,I am taking my time on these guys.
I bought about 80% of the AK Interactive weathing products,so you guys are going to be in for a treat.
It is going to be a winter themed paint sceme with faded winter camo over Olive Drab.
Picking the Merican Lancers I can use the Archer transfers I had for my Sherman Stars in 1:48 which work well for 40k.
So without further ado I have the first one underway.
This one is welded using .020 plastic rod coated in Tenax plastic glue,then pressed into shape with a brass rod cut at a 45 degree.
This process leaves glue residue around the welds so I thinned Liquid Green Stuff and applied a skim coat over the glue areas.
Wow this stuff is sooo underated,I really really like this stuff a must have for the toolbox.
Thinned to the consistancy of paint it provides a velvetly smooth undercoat,it like cover-up for the surface of a model.
I also put it on right out of the bottle on the turret plates then stippled it with the stipple brush to provide a roughcoat texture you see on heavy armor plate.
|
|
This message was edited 3 times. Last update was at 2012/05/19 06:51:14
|
|
|
 |
|
2012/01/16 18:45:40
Subject: The 1st Merican Lancers an Superdetailed Imperial Guard Tank Army.
|
|
Dakka Veteran
|
Steadily made progress last night,added moderate stowage.
I just bought a grip load of 1:35 accessory kits from tamiya and afv,next tank is going to look sweet,but I am getting ahead of myself.


|
|
|
|
|
|
2012/01/16 19:09:19
Subject: The 1st Merican Lancers an Superdetailed Imperial Guard Tank Army.
|
|
Dusty Skeleton
Houston, TX
|
I really like what you're doing here! I plan to definitely keep my eye on your thread good sir!
|
You can't spell Slaughter without Laughter! 
|
|
|
|
|
2012/01/16 22:30:38
Subject: Re:The 1st Merican Lancers an Superdetailed Imperial Guard Tank Army.
|
|

Guard Heavy Weapon Crewman
|
Keep them coming 
|
|
|
|
|
|
2012/01/17 00:20:50
Subject: Re:The 1st Merican Lancers an Superdetailed Imperial Guard Tank Army.
|
|
Dakka Veteran
|
Ok here is the first step of the painting process.
Black primer and Tamiya Hull Red for the tank's primer layer.
I am foing to let this dry overnight so the paint has time to set.
The weathering process is going to use alot of rubbing so you want the undercoat hardened.
Even though you think it is dry acrylic paint takes about 24 hours to fully cure.
If you ever did the hairspray technique and pulled up more than the top layer revealing plastic,that is why.
I bought quite a bit of 1:35 scale tank stowage,some really neat woodgrain crates,should look awesome painted.
Some even come with brass-etch !!!

|
|
|
|
|
|
2012/01/17 00:32:35
Subject: The 1st Merican Lancers an Superdetailed Imperial Guard Tank Army.
|
|

Hardened Veteran Guardsman
|
Very interesting,definitely following this one.
|
Please check out my Fan Fiction Stories at
http://www.dakkadakka.com/dakkaforum/posts/list/392566.page
 |
|
|
|
|
2012/01/17 02:29:26
Subject: Re:The 1st Merican Lancers an Superdetailed Imperial Guard Tank Army.
|
|
Dakka Veteran
|
I just wanted to show you guys the model I made a while back that inspired this army
Here is the Regimental Standard for the 1st Merican Lancers
I used the Cadian 8th banner from the new kit shaved down
( GW stop with the Pre-Detailed banners :angry: )
I also used bits from the Cadian Vet pack from forgeworld


|
|
|
|
|
|
2012/01/19 22:40:45
Subject: The 1st Merican Lancers an Superdetailed Imperial Guard Tank Army.
|
|
Dakka Veteran
|
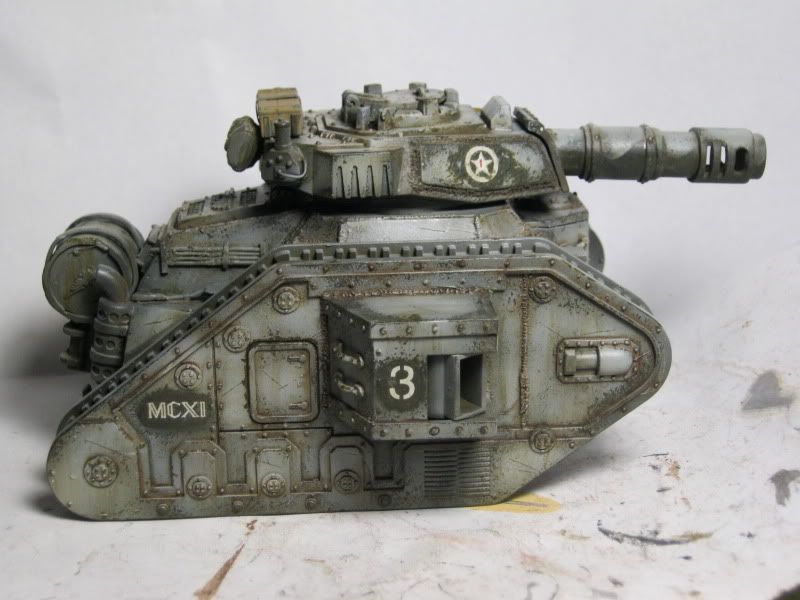
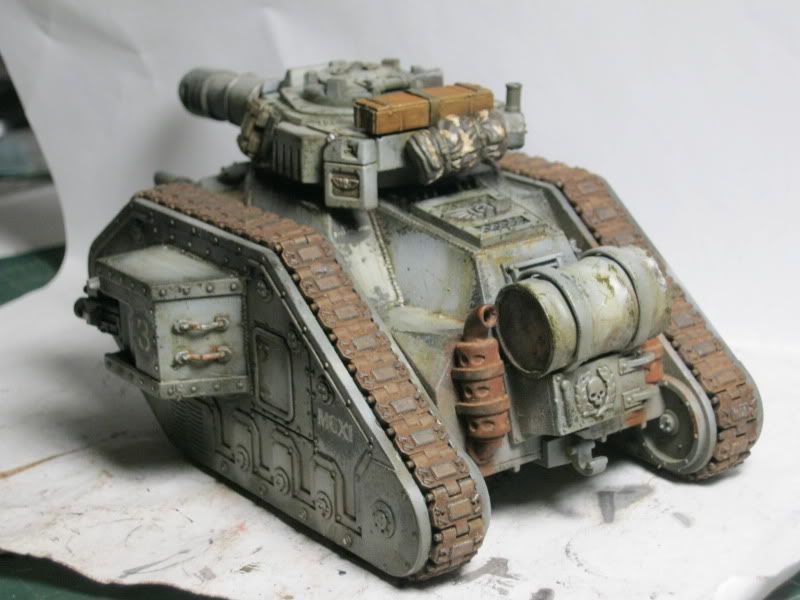
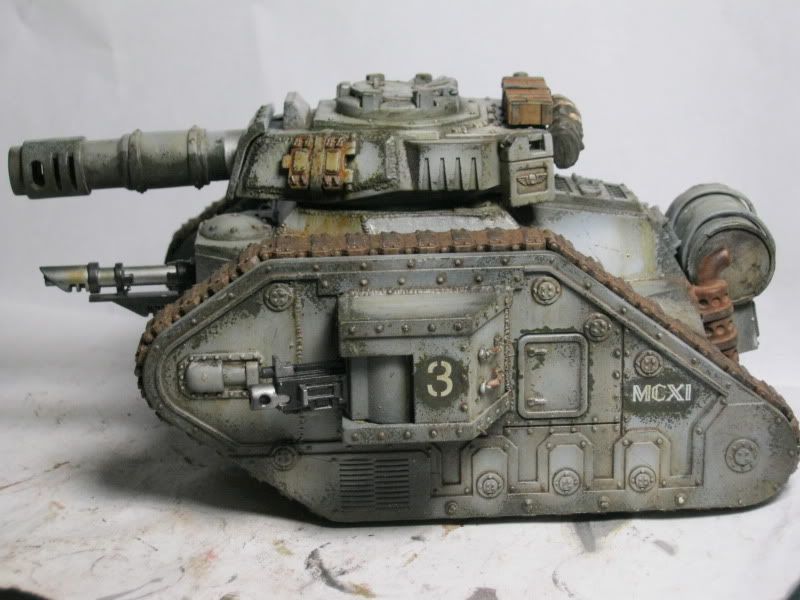
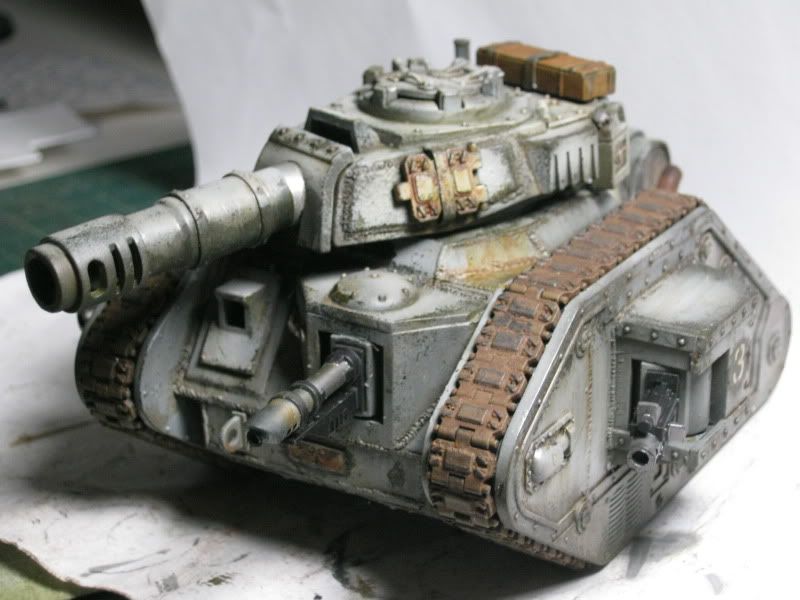
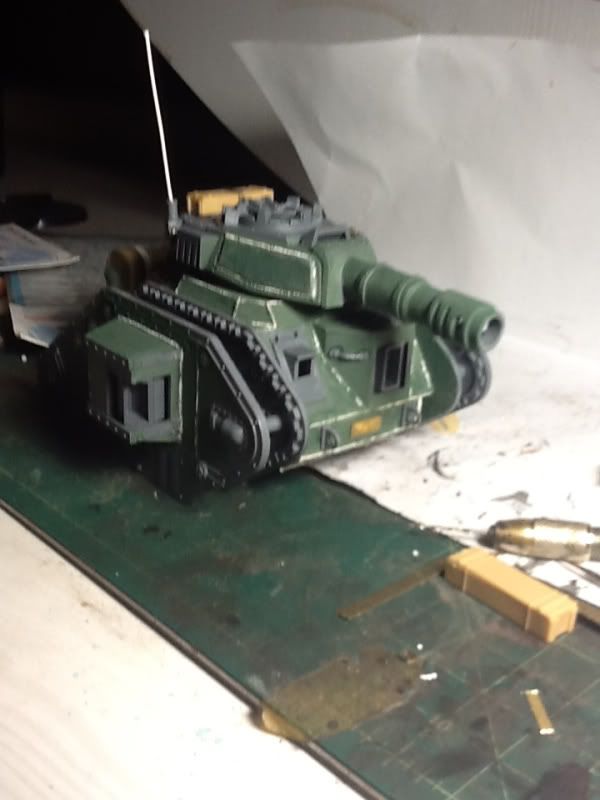
Here is the first tank I am doing with Winter Camo
Nowhere near finished ,now it gets weathered 
I numbered it tank 3 because 1 and 2 are going to be the CO and XO with special tanks.

|
|
This message was edited 1 time. Last update was at 2012/01/19 22:41:30
|
|
|
|
|
2012/01/19 23:35:41
Subject: Re:The 1st Merican Lancers an Superdetailed Imperial Guard Tank Army.
|
|

Maddening Mutant Boss of Chaos
|
Oh lordy - it is too tempting, I'm sure I am a treadhead at heart. Your tanks are coming on great, I must say however I dislike the banner- seems a bit uncreative and a stars and strips knock off.
|
|
|
|
|
|
2012/01/20 03:15:40
Subject: The 1st Merican Lancers an Superdetailed Imperial Guard Tank Army.
|
|
Wicked Warp Spider
|
Excellent details and weathering on the tank!
|
 Eldar Corsairs: 4000 pts Eldar Corsairs: 4000 pts
 Imperial Guard: 4000 pts Imperial Guard: 4000 pts
 Corregidor 700 pts Corregidor 700 pts
 Acontecimento 400 pts Acontecimento 400 pts |
|
|
|
|
2012/01/20 04:19:21
Subject: The 1st Merican Lancers an Superdetailed Imperial Guard Tank Army.
|
|
Dakka Veteran
|
|
|
This message was edited 1 time. Last update was at 2012/01/20 10:45:54
|
|
|
|
|
2012/01/21 19:07:58
Subject: Re:The 1st Merican Lancers an Superdetailed Imperial Guard Tank Army.
|
|
Dakka Veteran
|
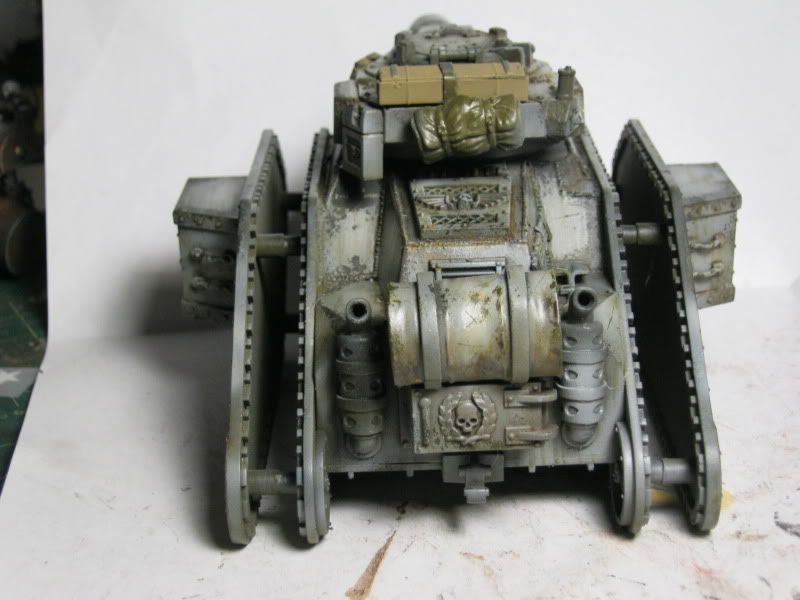
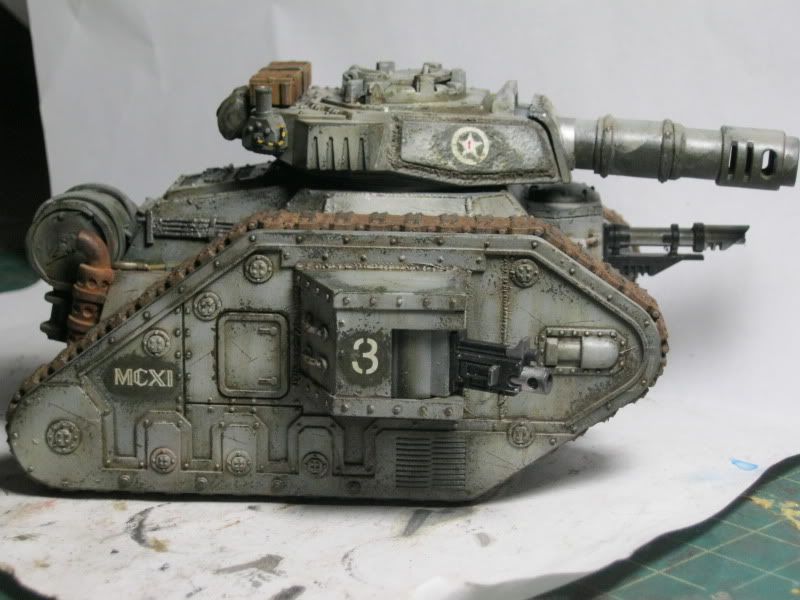
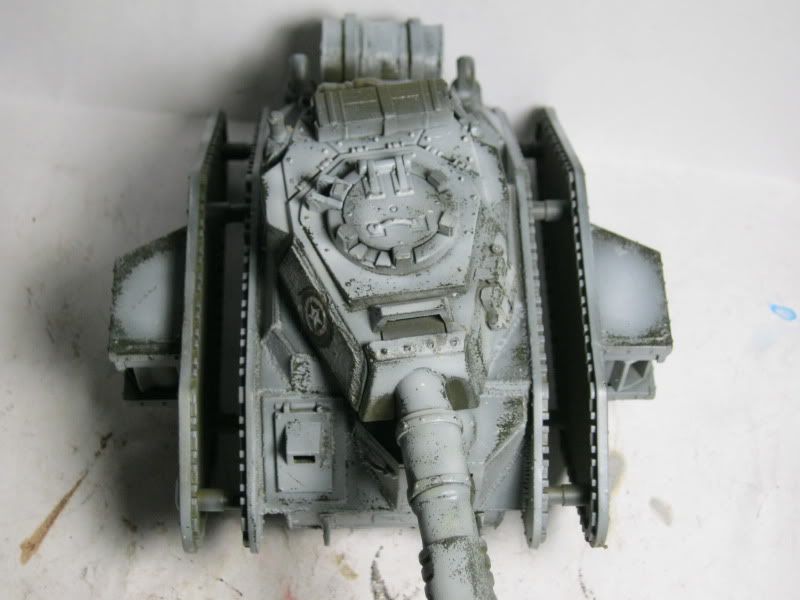
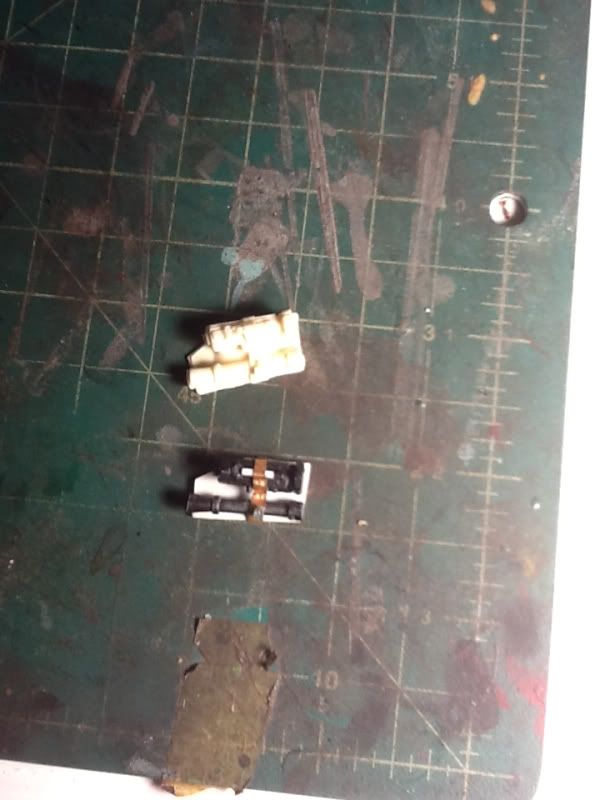
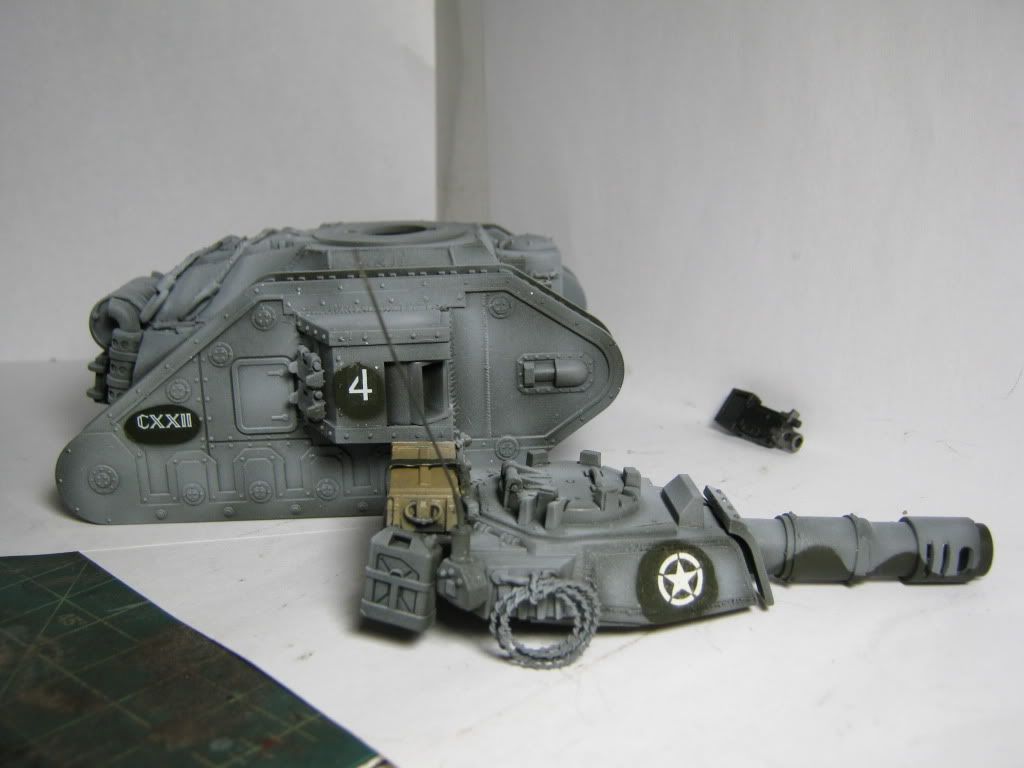
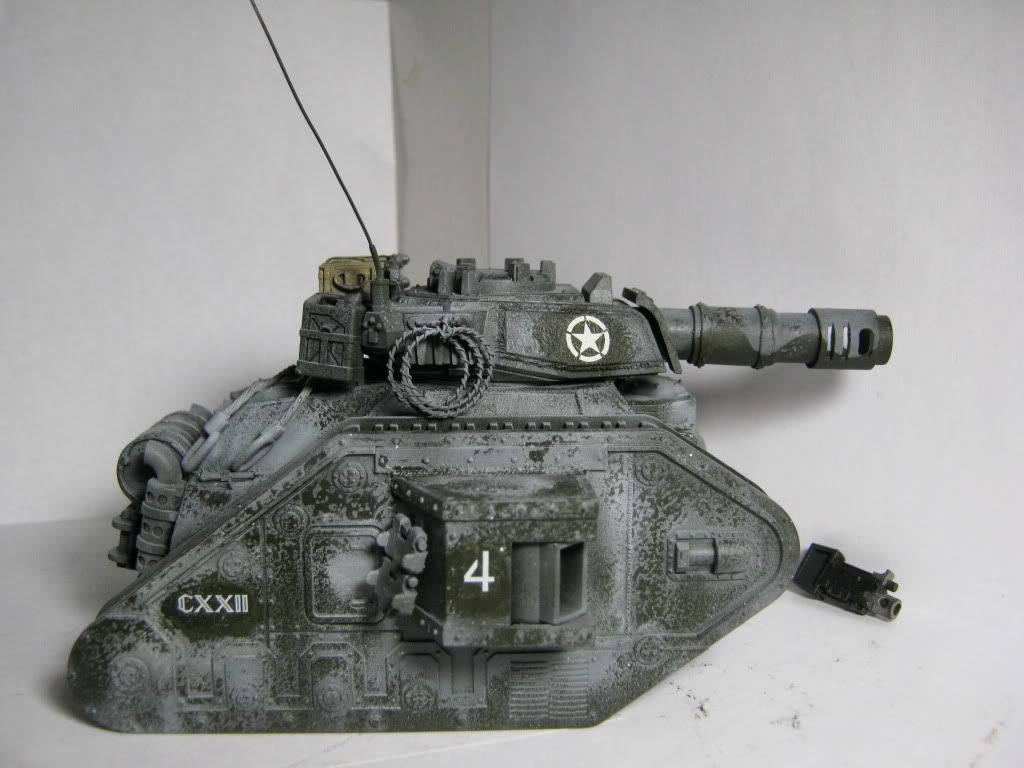
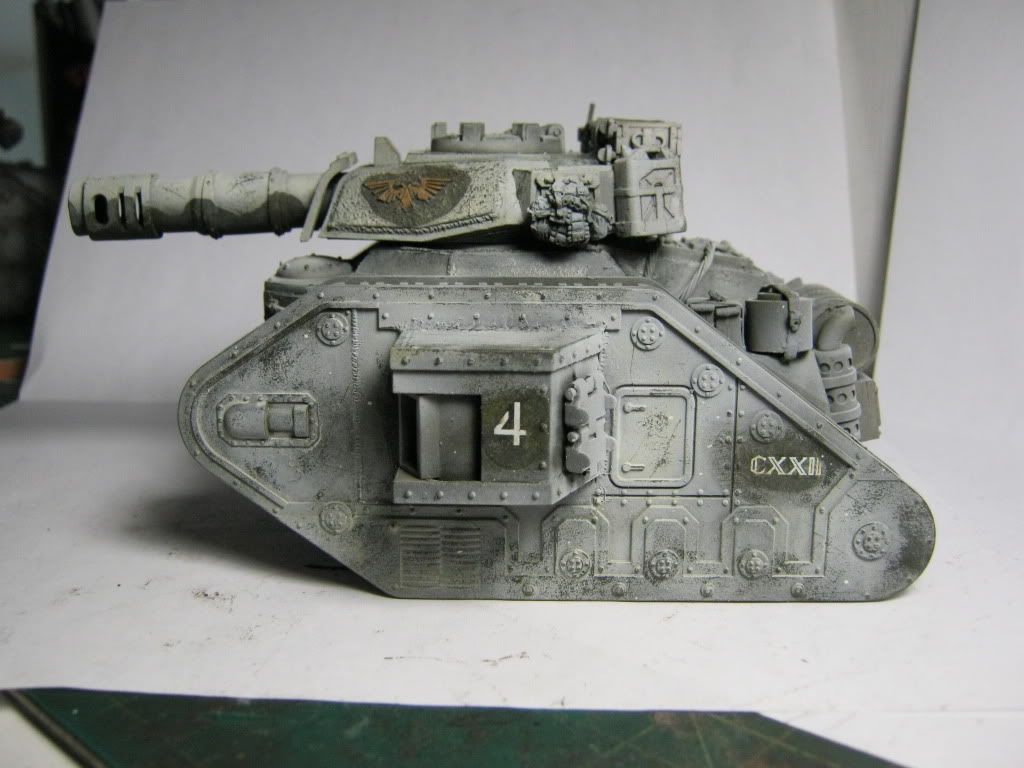
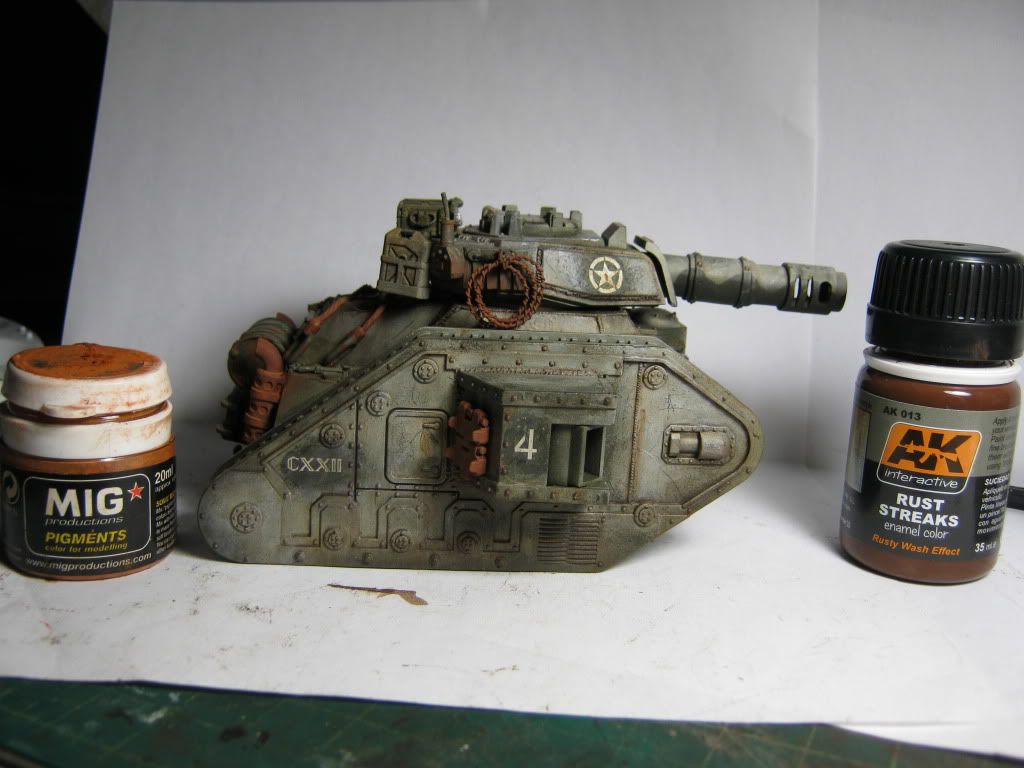
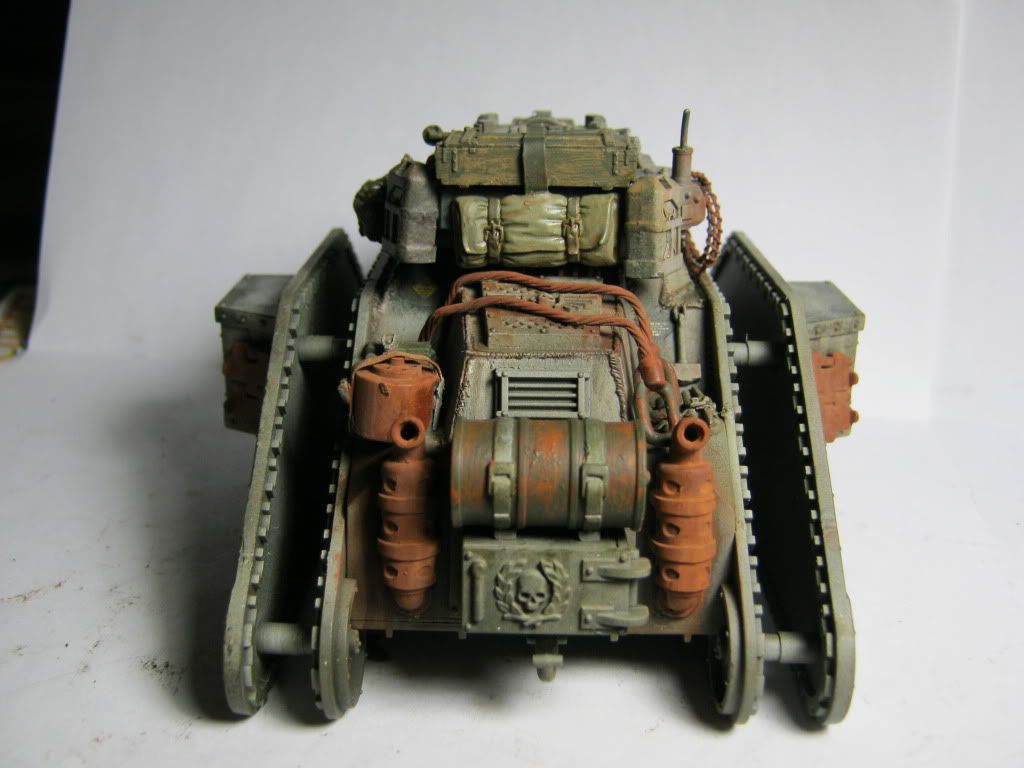
I finished the build for number 4.
Stowage is better placed ,paying more attention to straps.
If you have the Tamiya 1:35 German jerry can set the fuel caps look like very convincing strap brackets like the kind you see on semi loads.
I cast a bunch of the stowage such as bedrolls and they cme out really well.
I would like to try to make fitted stowage pieces on card with pinoner tools that you could just glue in place and save on the amount of pickaxes and shovels I buy.
Like last tank I added welds like last time this time with brass strip brackets I made buy cutting brass etch sprue.


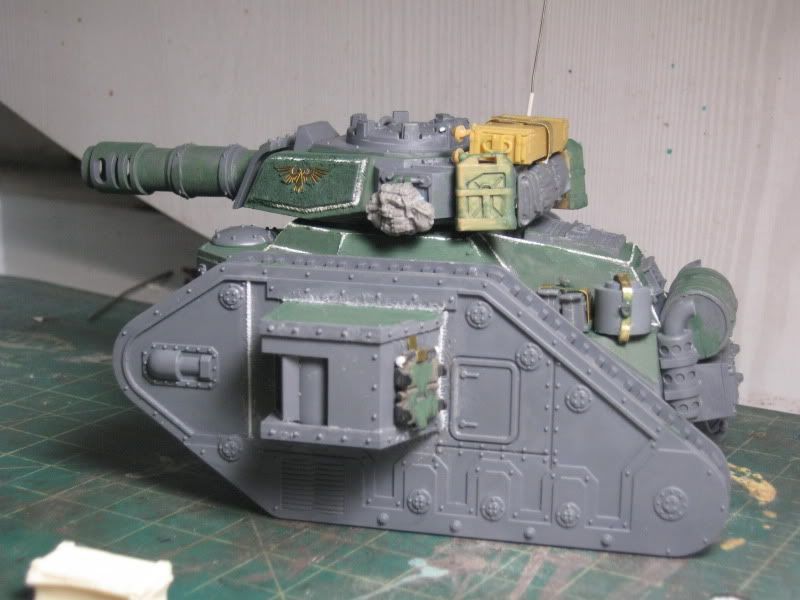
 Automatically Appended Next Post: Automatically Appended Next Post: I came up with this idea looking at the Sherman stowage
Pre fitted pieces to kit out tanks.
I'd like to make a few of these a poineer tool one,an ammo one and more
This one is a broken down heavy stubber strapped down

|
|
This message was edited 1 time. Last update was at 2012/01/21 23:23:34
|
|
|
|
|
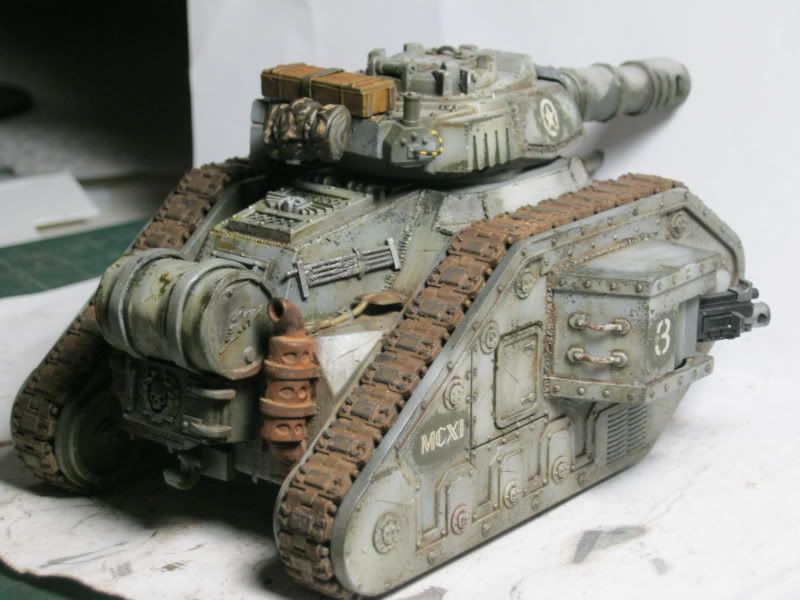
2012/01/25 17:04:36
Subject: The 1st Merican Lancers an Superdetailed Imperial Guard Tank Army.
|
|

Feldwebel
|
Wow, nice results with the camo and weathering. Thanks for telling me about the powders in my thread. 
But you know what you need more, imho? Mud! 
Just kidding, they are good. I especially like the contrast of the tracks to the camo.
|
|
|
|
|
|
2012/01/25 17:50:51
Subject: The 1st Merican Lancers an Superdetailed Imperial Guard Tank Army.
|
|
Dakka Veteran
|
I was planning on adding light mud when they are all finished so it is same texture and shades.
|
|
|
|
|
|
2012/01/25 20:09:46
Subject: The 1st Merican Lancers an Superdetailed Imperial Guard Tank Army.
|
|

Pyromaniac Hellhound Pilot
|
Great results! I wasn't sure what you were doing at first, but now the details really show up! I especially am fond of your welded seams. Great touch!
Keep up the great work!
Rawson
|
 The 104th Vostroyan Mechanized The 104th Vostroyan Mechanized
 Rawson's Reboot Rawson's Reboot

Viktor von Domm: nope... can´t do that for the sake of all lving creatures that dwell on earth....
dsteingass: That's like saying "I forgot to tell you who your real father is"
nerdfest09: Rawson speaks the truth! |
|
|
|
|
2012/01/25 21:53:16
Subject: The 1st Merican Lancers an Superdetailed Imperial Guard Tank Army.
|
|
Dusty Skeleton
Houston, TX
|
I love how these came out, got time to do a write up on how you did tank #3 painting?
|
You can't spell Slaughter without Laughter!
|
|
|
|
|
2012/01/28 02:38:46
Subject: The 1st Merican Lancers an Superdetailed Imperial Guard Tank Army.
|
|
Dakka Veteran
|
I'll do a step by step when I paint tank 4
An airbrush is required though
|
|
|
|
|
|
2012/01/28 11:20:39
Subject: The 1st Merican Lancers an Superdetailed Imperial Guard Tank Army.
|
|

Pyromaniac Hellhound Pilot
|
do they comes from Terra? (there was a hive city named Merika and it is said to take part so early in any Imperial campaigns. as far as the late 29th millenia. or early 30th millenia. yes by the time the Imperium was born.
|

http://www.dakkadakka.com/dakkaforum/posts/list/408342.page |
|
|
|
|
2012/01/28 15:55:10
Subject: The 1st Merican Lancers an Superdetailed Imperial Guard Tank Army.
|
|
Dakka Veteran
|
One and the same Lone Cat.
I am dying to hear more about Merica and Ancient Terra in the coming Horus Hersy books.(Check out Outcast Dead as it is set on Terra)
The only kind of offical mention of an actual unit is the Merican Fusilers from the Mecharian Crusade of Lord Solar Mecharuis.
I see the Merican Fusilers part of the Old 100,regiments spared by the Emperor during the Unification Wars.
The 1st Lancers are the Top Elite Company in the whole army.
Armored Cav that is suited for all possiblities.
I see any Terran based unit having only the very best in eqiupment.
Automatically Appended Next Post:
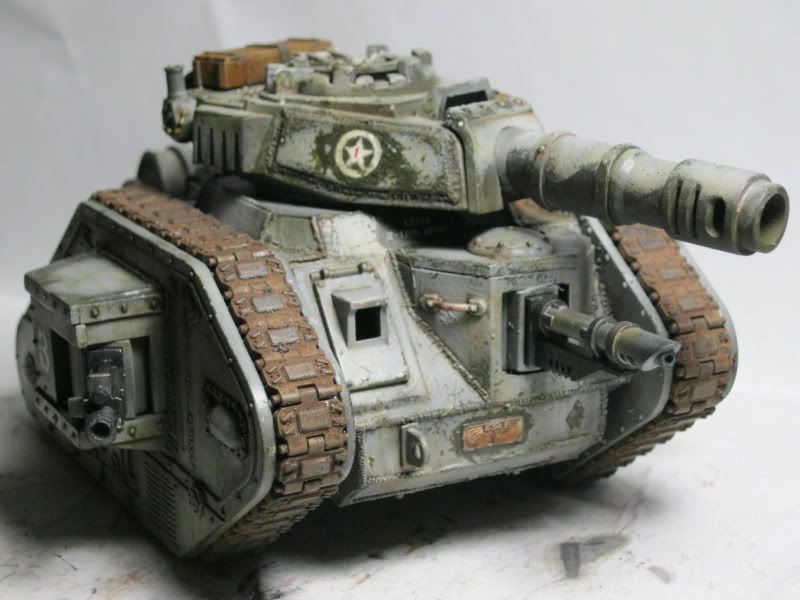
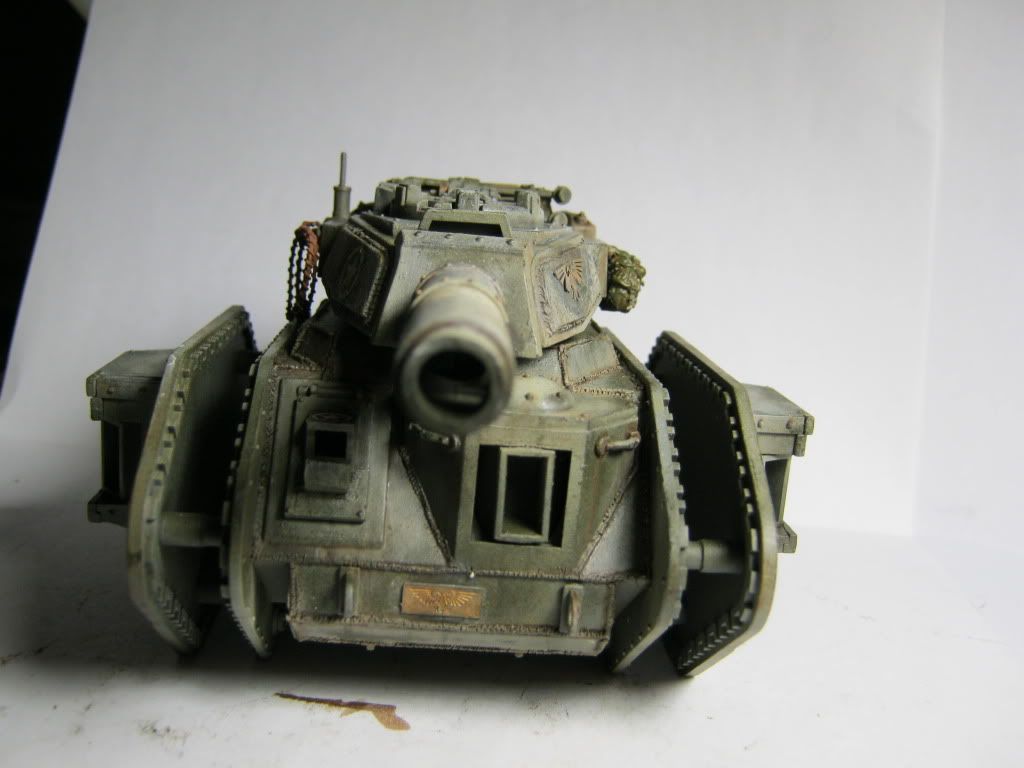
Here is the Step by Step for Tank Number 4.
I am going to put down the products I use,you can always use subsitutes with varing degrees of sucess.
I like to use Tamiya for my Winter Camo.
Even though it is advertised as acrylic it is in fact a lacquer based paint,which is more durable.
-First prime your model Black using whatever primer you usually use.
-Using 8 parts Tamiya Olive Drab X-62 to 2 parts Tamiya Clear X-22 to make a Satin Finish Olive Drab,thin with Lacquer Thinner
-Spray Tank Completely with Olive Drab.
The Satin Finish Helps with Decals and is the ideal surface for the AK washes I will be using.
-Let this Dry for an Hour or Two
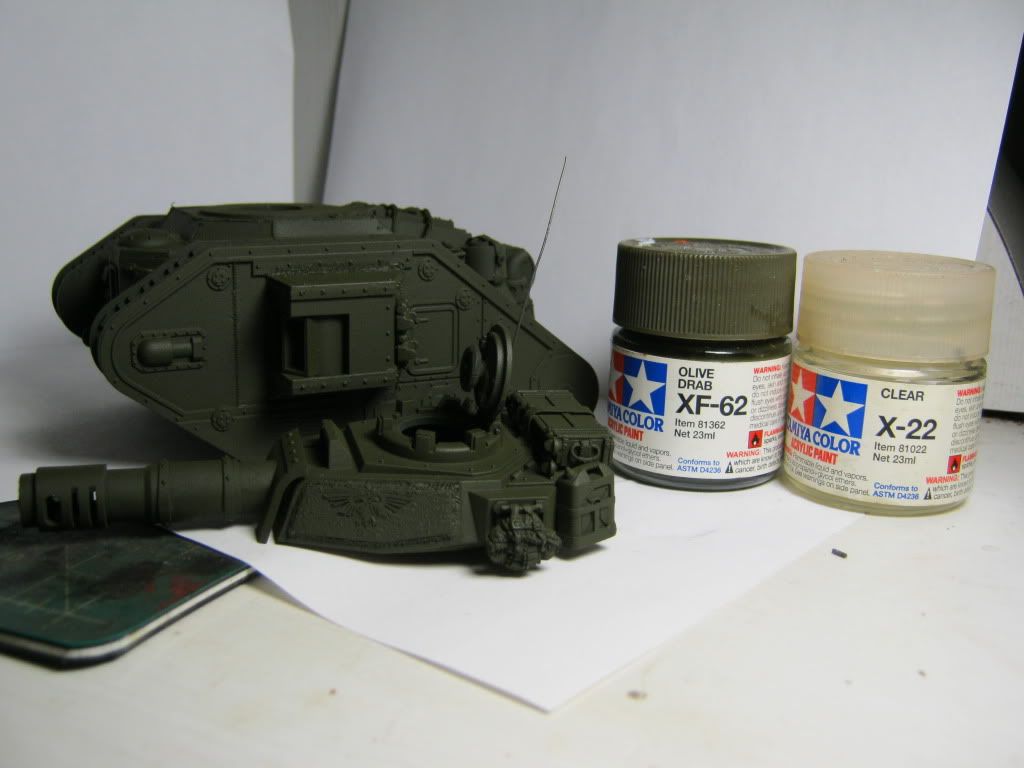
Then add Decals,spray with Testors Glosscote to seal the decals,then with Dullcote to bring back the matt/satin fiinish
 Automatically Appended Next Post:
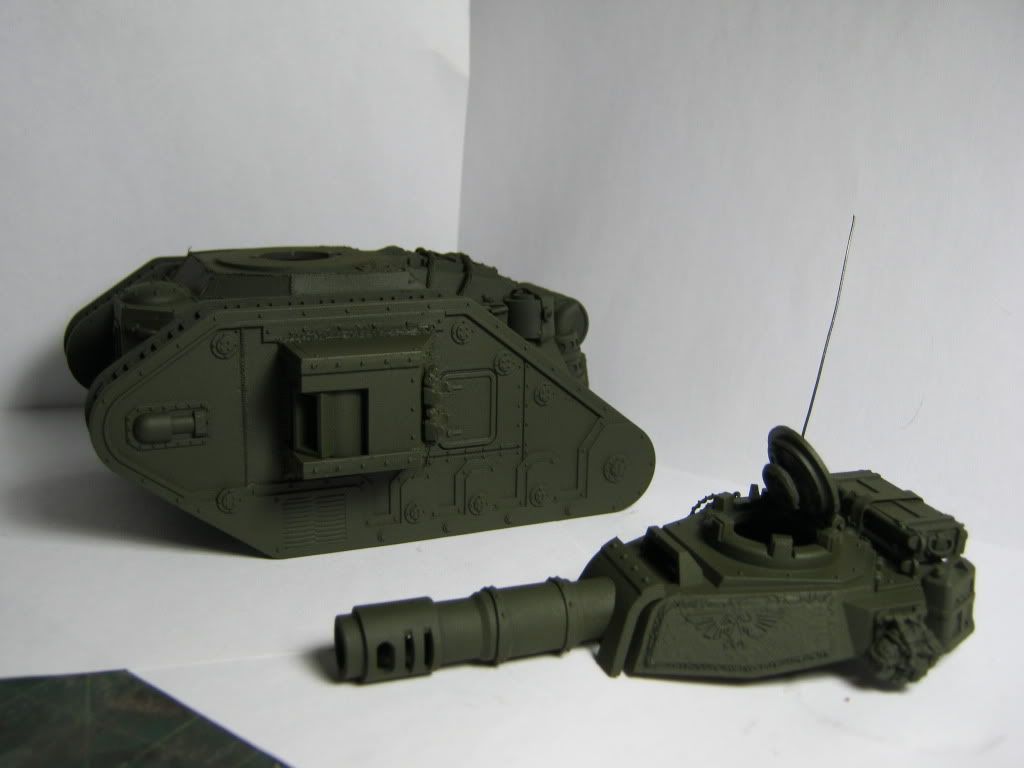
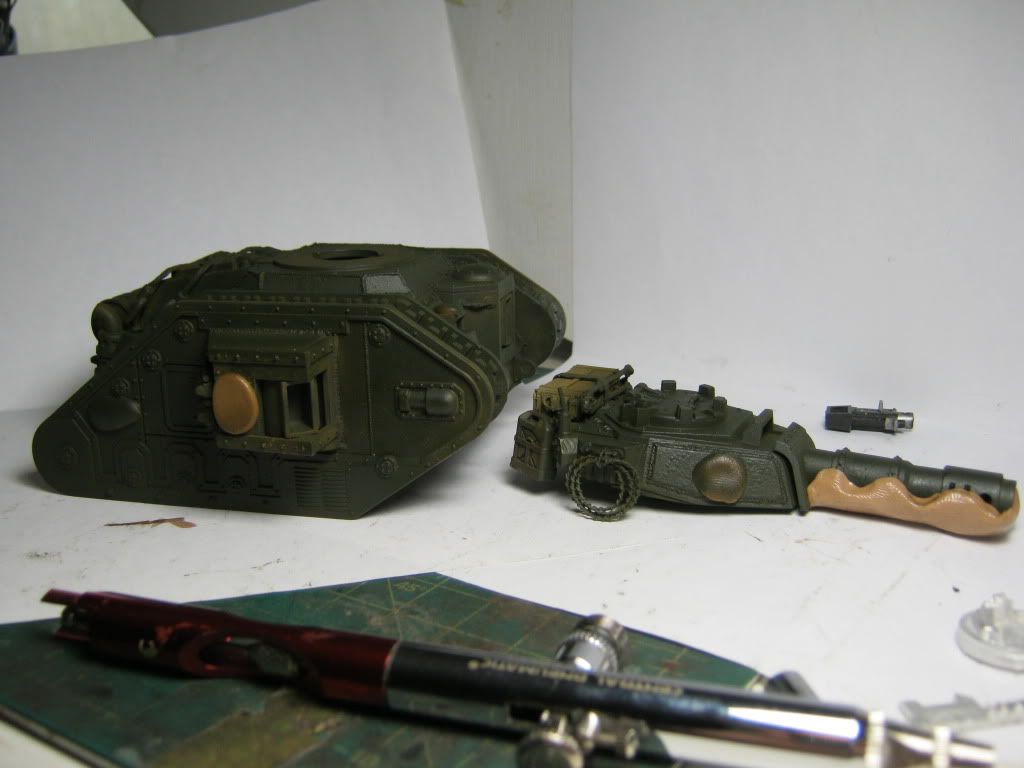
The next step is to cover the decals and aquilas with silly putty.
I also went along the barrel in a wave pattern shermans used to hide thier barrel length.
Once this was done I coated the tank in two layers of Worn Effects fluid from AK

I then used 4 parts Tamiya Flat White # XF-2 and 6 parts Lacquer thinner and sprayed the tank in a patchy fashion.
You want the center panels whiter that the edges,and anything you want chipped needs to be slightly translucent.
This tank I wanted to have alot more chipping and ware than the last tank so I sprayed the whit a little lighter than last time
Then using a flat brush dampened with water lightly brush away where you want the chipping.
Take your time work the tank in sections,not the whole thing at once(ie left side,barrel,right side.top.
Go panel by panel.

If the chipping is too much,spray with Dullcote,recover the decals and respray the white and chip again.
|
|
This message was edited 8 times. Last update was at 2012/01/29 06:20:05
|
|
|
|
|
2012/01/29 06:24:22
Subject: Re:The 1st Merican Lancers an Superdetailed Imperial Guard Tank Army.
|
|
Dakka Veteran
|
After working the weathering step,I am not too happy with the outcome,so like I said I sprayed with Dullcote recovered the decals and will try again tomarrow.


|
|
|
|
|
|
2012/01/29 08:00:29
Subject: Re:The 1st Merican Lancers an Superdetailed Imperial Guard Tank Army.
|
|
Fixture of Dakka
|
Man, those tanks a beautiful!
Fantastic work!
|
"But i'm more than just a little curious, how you're planning to go about making your amends, to the dead?" -The Noose-APC
"Little angel go away
Come again some other day
The devil has my ear today
I'll never hear a word you say" Weak and Powerless - APC
|
|
|
|
|
2012/01/29 18:37:35
Subject: The 1st Merican Lancers an Superdetailed Imperial Guard Tank Army.
|
|
Pyromaniac Hellhound Pilot
|
The paintjob is based on the WW2 G.I. Joe.
is it an 'official' colour scheme the HH novels describe Mericans ?
|
http://www.dakkadakka.com/dakkaforum/posts/list/408342.page |
|
|
|
|
2012/01/29 19:30:03
Subject: The 1st Merican Lancers an Superdetailed Imperial Guard Tank Army.
|
|
Dakka Veteran
|
The only real mention of Merica is when they are talking about the parlours of Merica.
I think in Fulgrim describing the composer lady.
She was really famous in the parlours of Merica.
Seems even in 40k,Merica is the place to go to tie one on
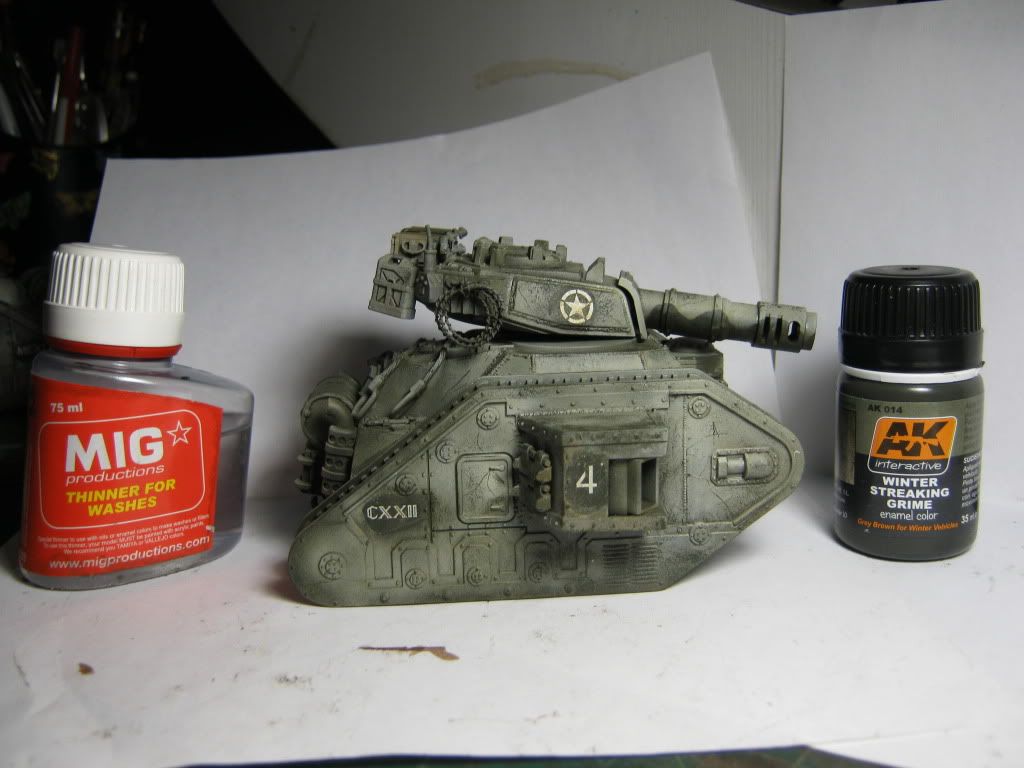
Yes I am basing the paintjob off of WW2 Winter Camo Shermans,even bought Flames of War stars for the turrets.
Just resprayed 4 back to olive drab and I am going to give it "A Nother Go"
Then I went back through the winter camo process as I said before,this time I went heavier with the white.
The more white you put on the harder it is ti chip off,with the chipping fluid if you lightly drag tweezers across the tank you get wicked cool scratches.
Once you have the camo the way you like it,varnish with Testors Dullcote or Satin Varnish,you can the continue with the filters and washes.
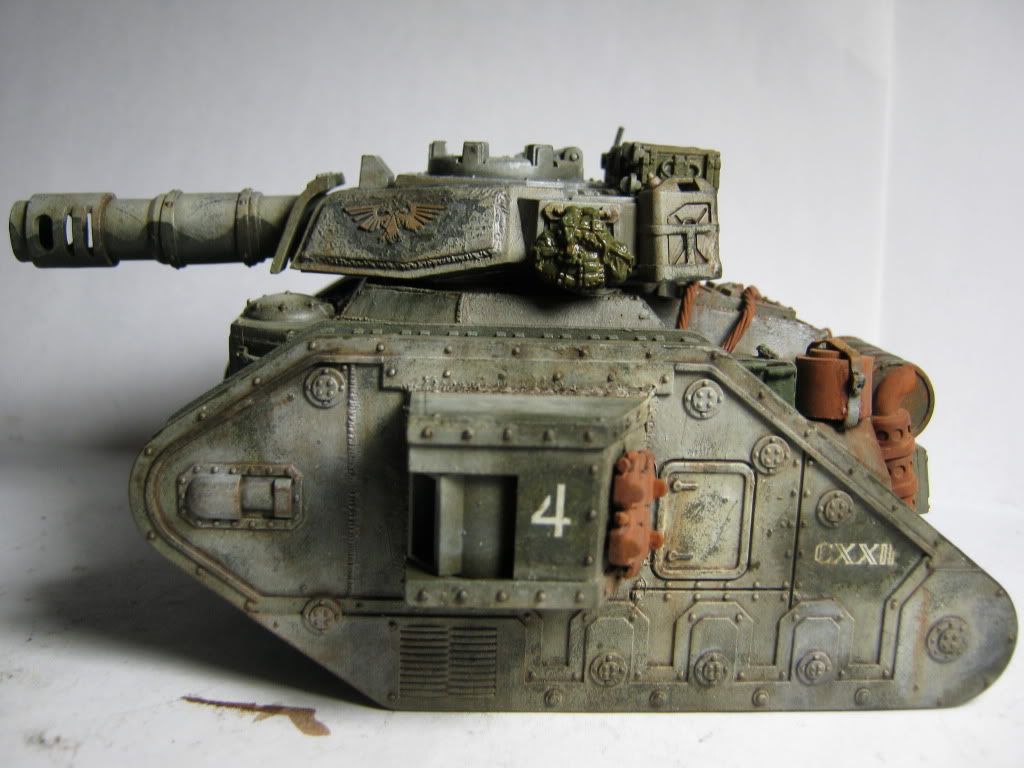
I used Mig Thinner for Washes(Odorless thinner will work too) and AK Winter Streaking Grime(WSG) to make a filter.
I used 8 parts thinner to 2 parts (WSG)
A filter is an enamel wash that changes the tone of the color depending on the wash.
(WSG) is a nice green/grey wash that brings everything together nicely on this type of paint sceme.
You want the surface wet but do not let the filter pool
 Automatically Appended Next Post:
Then use Flat White Enamel to brighten up the white.
A few patches here and there and then stump them with Thinner

Once again spray with Dullcote
Then use Streaking Grime to apply a pinwash to all rivets and recesses and let dry.
Once dry I used AK's White Spirit to clean the model of wash where I do not want it.
The white Spirit is a little stronger than odorless thinner more of a turpentoid.
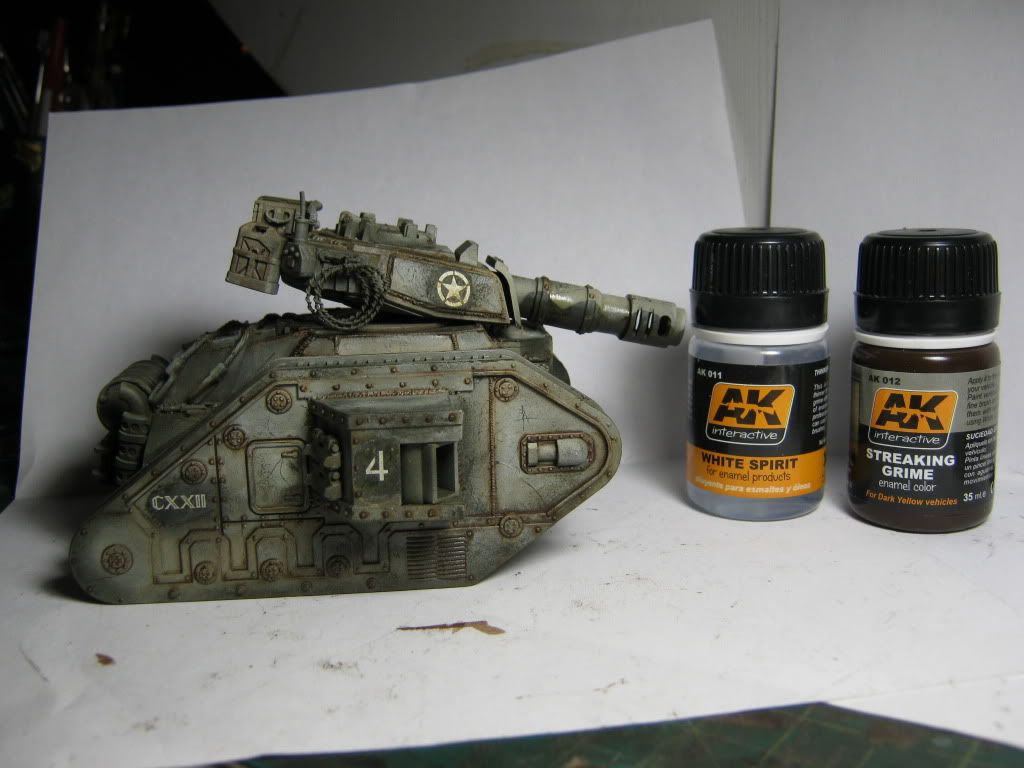
Then use (WSG) to make streaks down the side,have them come off rivets and handles
After this dries spray again with Dullcote.
Then use the Flat White enamel again to brighten the White areas of the model.
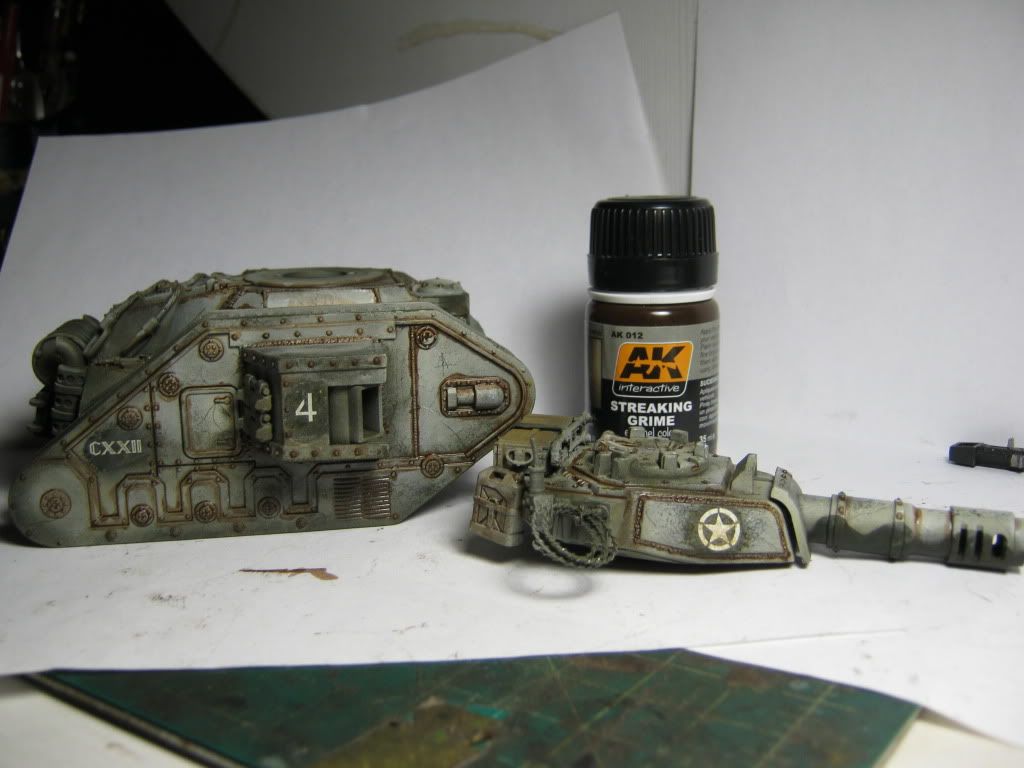
Then paint your stowage and exhusts.
I used a basecoat of Dark Flesh then ran through the gamut of MIG rust powders(dark,rail,standard,light,fresh,)
to go over any rust colored areas.
I then used MIG Europe Dust to dust over the rust.
I then sealed this with Thinner.
I also pick out 2-3 spots for a rust streak down the side using AK Rust Streaks,once dry then stump with thinner.
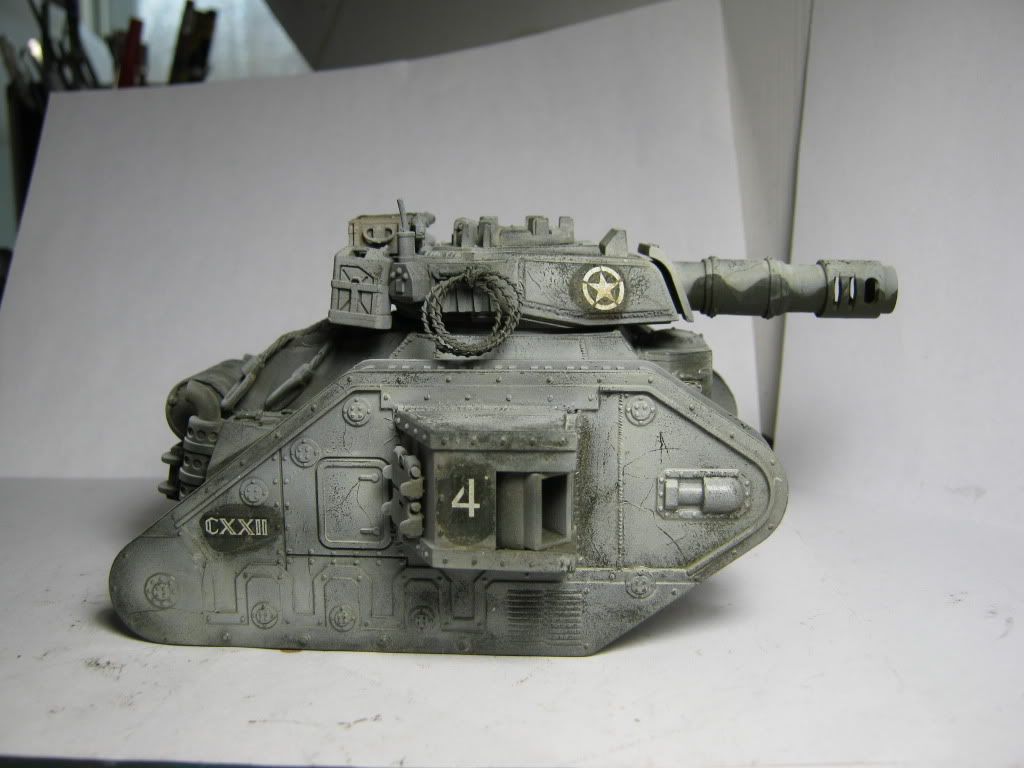
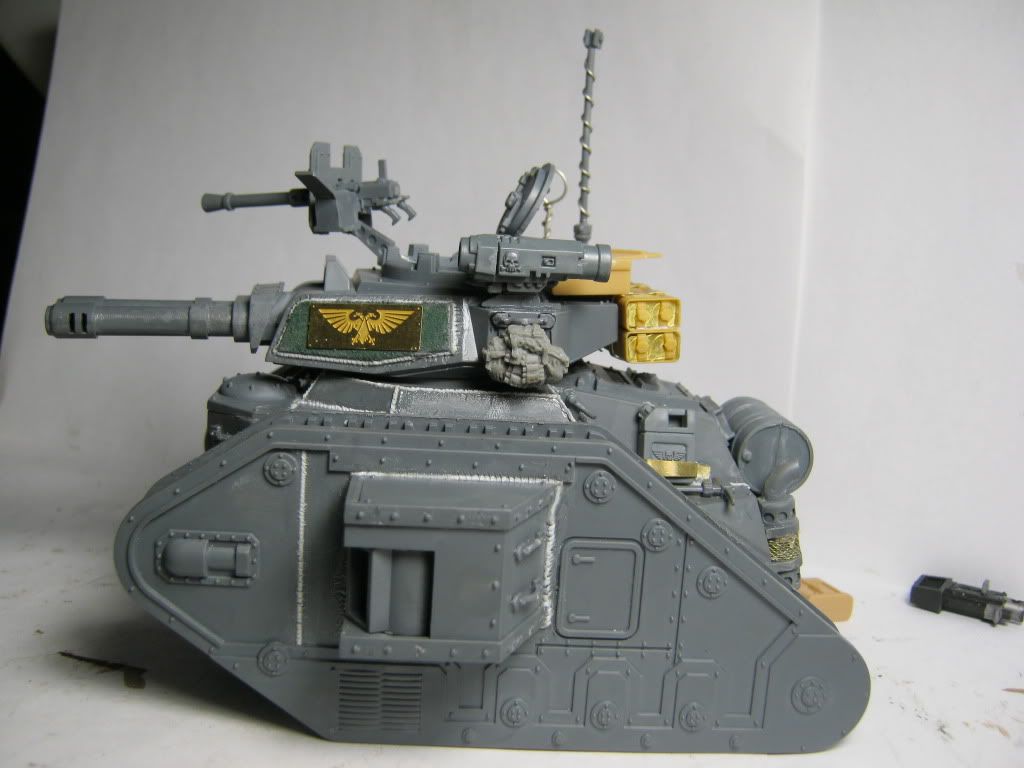
And there you have it the Completed Chassis for Tank #4

|
|
This message was edited 9 times. Last update was at 2012/01/30 05:23:05
|
|
|
|
|
2012/01/30 08:41:06
Subject: Re:The 1st Merican Lancers an Superdetailed Imperial Guard Tank Army.
|
|
Dakka Veteran
|
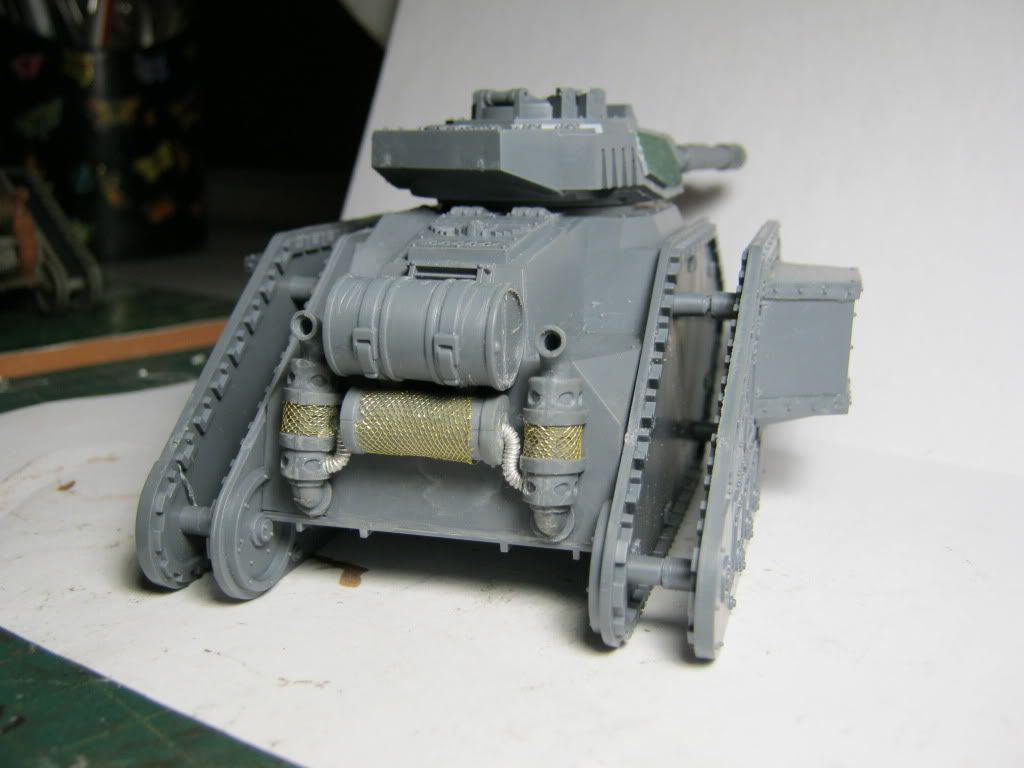
Work has begun on Johnny #5
This is going to be the scout tank with autocannon.
No toolbox in the back for this guy,he has a supercharger.

|
|
|
|
|
|
2012/01/30 12:40:52
Subject: Re:The 1st Merican Lancers an Superdetailed Imperial Guard Tank Army.
|
|
Pyromaniac Hellhound Pilot
|
Eisenhorn wrote:Work has begun on Johnny #5
This is going to be the scout tank with autocannon.
No toolbox in the back for this guy,he has a supercharger.
I like the concept! Stripped down, just the essentials This is just a fluffy idea, right? Or will you impliment some special rules?
|
The 104th Vostroyan Mechanized
Rawson's Reboot
Viktor von Domm: nope... can´t do that for the sake of all lving creatures that dwell on earth....
dsteingass: That's like saying "I forgot to tell you who your real father is"
nerdfest09: Rawson speaks the truth! |
|
|
|
|
2012/01/30 13:29:26
Subject: Re:The 1st Merican Lancers an Superdetailed Imperial Guard Tank Army.
|
|
Doc Brown
|
'Merica F  Yea!
Nice work man!
|
Mordian Iron Guard, Red Ork Waaagh, Space Wolves, Dark Angels, Praetorians IG & Fenris IG, Saxons/Vikings Warhammer Ancients as well as some Warmachine/Hordes Cygnar, Khador, Mercenary, Menoth models and a Giant Cardstock Pirate Ship P&M Blog
Mordian Iron Guard IG Army Progress Image Gallery
Space Wolves Image Gallery
Warmachine / Hordes Houston, Texas
Warhammer 40k Houston, Texas
Warhammer Fantasy Facebook Houston, Texas
Warhammer Fantasy Yahoo Group Houston, Texas
|
|
|
|
|
2012/01/30 14:01:38
Subject: The 1st Merican Lancers an Superdetailed Imperial Guard Tank Army.
|
|
Expendable Defender Destroid Rookie
Australia
|
Looking superb mate, the painting is very professionally executed, I really like the tut you did too.
|
|
|
|
|
|
2012/01/30 15:06:01
Subject: Re:The 1st Merican Lancers an Superdetailed Imperial Guard Tank Army.
|
|
Dakka Veteran
|
Rawson wrote:Eisenhorn wrote:Work has begun on Johnny #5
This is going to be the scout tank with autocannon.
No toolbox in the back for this guy,he has a supercharger.
I like the concept! Stripped down, just the essentials This is just a fluffy idea, right? Or will you impliment some special rules?
Just fluffy the way I like my pillows,just trying to justify a tank company choosing an oversized machine gun over a cannon.
I see this,like you said a stripped down,moblie pointman
|
|
|
|
|
|
2012/01/30 15:20:44
Subject: Re:The 1st Merican Lancers an Superdetailed Imperial Guard Tank Army.
|
|

Lord of the Fleet
|
Fantastic looking tanks. I wish mine looked half as good as these!
|
Mordian Iron Guard - Major Overhaul in Progress 
+Spaceship Gaming Enthusiast+
Live near Halifax, NS? Ask me about our group, the Ordo Haligonias! |
|
|
|
|
2012/01/31 04:17:40
Subject: Re:The 1st Merican Lancers an Superdetailed Imperial Guard Tank Army.
|
|
Dakka Veteran
|
Finished the build for tank #5
Like I said I envision this to be the pointman tank
I added advanced comms to relay to the commander,he also has a H/K missle to take care of anything big he sneaks up on.
The heavy stubber is renforced with a gun shield from the HW kit.
I added rivets to the lower portion like the Mars pattern
Just gotta add the tow cable and clean up the glue residue.
This tank is also going to have a dozer blade.


|
|
|
|
|
|
|
|
 ~1750p