There are a few things, in my mind, which really make a game of
40k fun. Among them are having a good opponent and a good time, but to really get in to it, it helps to have everything looking right. Built/painted models are always good, but they're almost nothing without good terrain. Your board should look good, you shoulder really feel like you've got ten foot tall giants in powered armor tromping around a real city, or some rolling hills covered in alien crystals, or something like that. "But Coogaar", I hear you saying, "I have neither the money nor the materials to make good terrain!" I am here to tell you that you don't need either: all you need is a little time and a little creativity. I hereby bring you the construction of a ruined Administratum building, step by step, in pictures. At the end I'll even throw in a couple more buildings that I've built using similar materials, although in less detail.
Administratum
Inspiration: The inspiration for this building came from the Administratum building found
here. Scroll down slightly and you'll find it; the link for the studio that produced it is
3t-studios. I used a lot of the look for reference; this being my first foray in to something a lot more detailed, I wanted to see how other people had done similar.
Materials:
Okay, I lied a little. You're going to need a few materials other than garbage you can find around your house. Most of what you'll have to buy is cheap, though.
1) Cardboard, a fair amount of it and in big pieces if you're going to build a big building like this. Corrugated cardboard is easy to come by and fairly sturdy, if you get thick stuff. Some of it's not, though: make sure if you use it that the cardboard is not soft. I've started working with thick, non-corrugated cardboard lately (like the kind that backs note and art pads), and while it's not as commonly found lying around it's even better stuff because it solves a few problem.
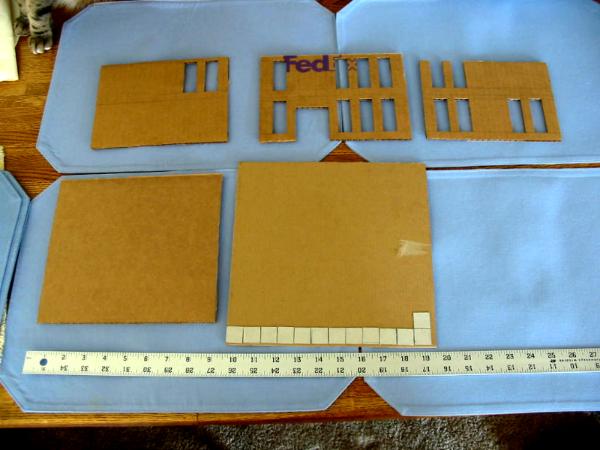
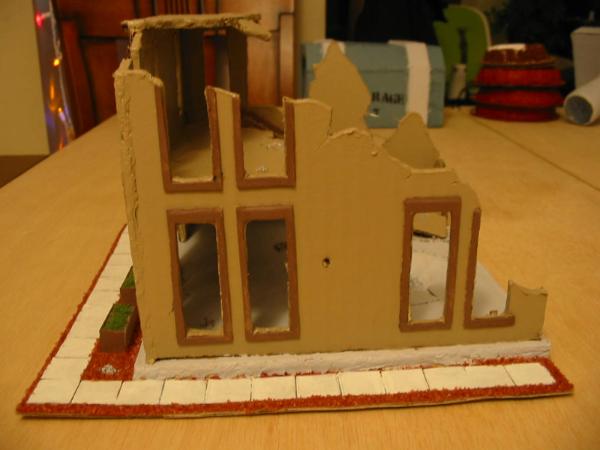
The bottom center piece is the base everything else will fit on; the little squares around it will eventually be a sidewalk. There are two of the bottom left piece: they were stacked and glued together to form the concrete foundation of the building, it's raised off the ground to allow for a crater. The other pieces are walls.
2) Wood filler. I used Elmer's wood filler, it worked fairly well. This is used for filling in the edges of the corrugated cardboard; you can also use masking tape, but I prefer not to since it stays visible after you paint. This was my first experiment with wood filler, it worked well.
3) Hot glue and Elmer's glue-all (or your favorite white glue). The hot glue works great for things like this because it hardens quickly: you don't have to worry about it shifting while drying. The problem is it has a lot of volume and things don't always fit tight together, so I prefer Elmer's if I'm not worried about shifting or if I'm gluing small things together (like the base and window frames).
4) I also used aquarium sand for terrain. I've since picked up better modeling terrain (ballast and talus), which is noticeably more expensive but has a much higher variety of sizes.
5) Paper clips or wire (for rebar)
6) Paint. I used a mix of cheap modeling paints and paint samples from the hardware store.
Construction:
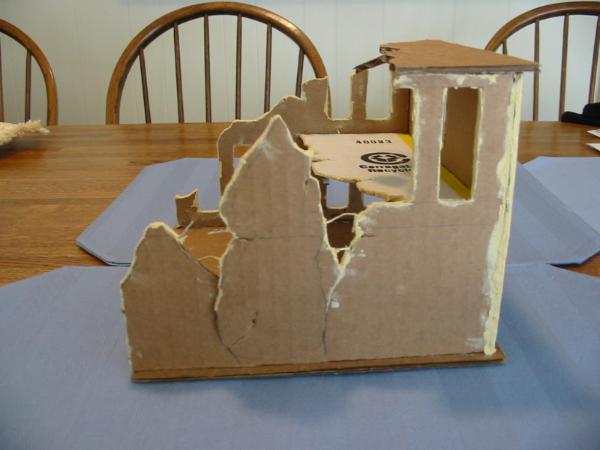
The first step was to get everything glued together. The 3 base parts were all put together with white glue: like I said, it takes up a lot less space so when you're dealing with big attachments like that and don't want gaps between, white glue it is. The rest of the building was put together with hot glue so they'd stay where I put them: you just have to make sure not to use so much that it gloops out when you press the pieces together. This is one way that corrugated cardboard wins: the glue tends to gloop up in to the cardboard.
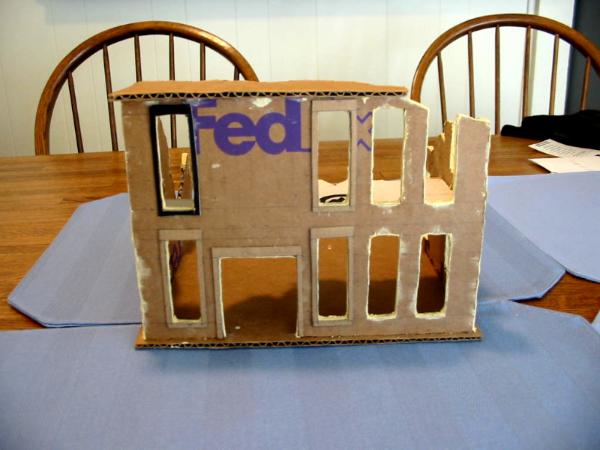
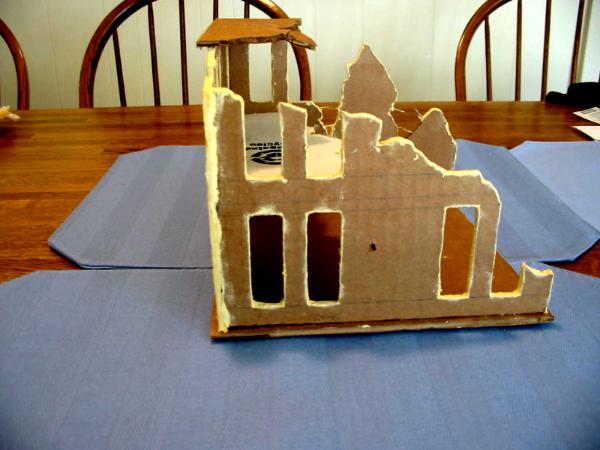
Next, I cut out thin pieces of cardboard in to rectangles; the inside of the rectangle was the same size as the windows, the outside about 1/8" thicker on all sides. These made up the window frames (and the door frame). You could just paint window frames on, but this is a simple way to add that third dimension to the walls and make it more real. Other three-dimensional additions were rebar along the torn out walls: pour a little white or hot glue in to the edge of the cardboard and stick a bent piece of paper clip in there. The falling wall added more of that third dimension, and the rebar there really made the wall, if you ask me. Bits of sprue were also used as support struts in a few places beneath the second floor and roof.
Finally, wood filler was used to fill in all the edges. This takes a while and you want to make sure to press it in to the gaps. If you leave too much outside it chips off really easily, especially in transport. I was especially happy with the way it made the torn up wall look.
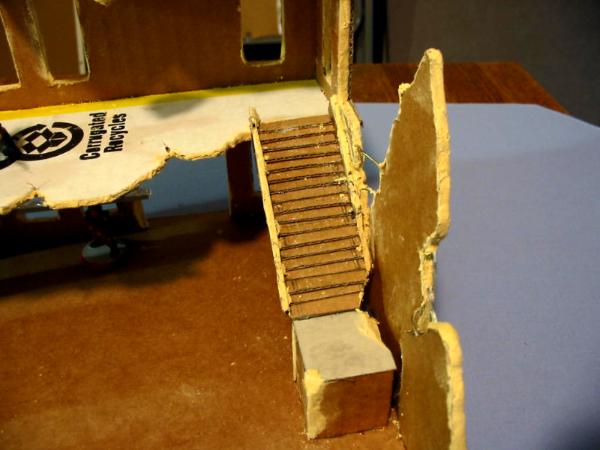
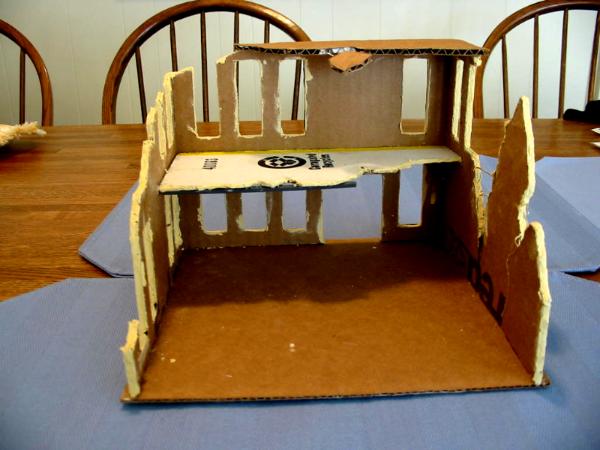
The beginning of the stairwell was added later. It was intended to be half a stairwell with a landing: the lower half has collapsed, and rubble will fill in that edge for model climbing. The stairs were fun: it's a whole lot of cardboard strips, as wide as the stairwell and 1/8" long. There's a ramp beneath them; white glue was used (so that they wouldn't gap) and the stairs were laid one atop another and against the ramp. More wood filler, especially on the damaged edges, although I gave up on trying to wood filler the ends of the stairs.
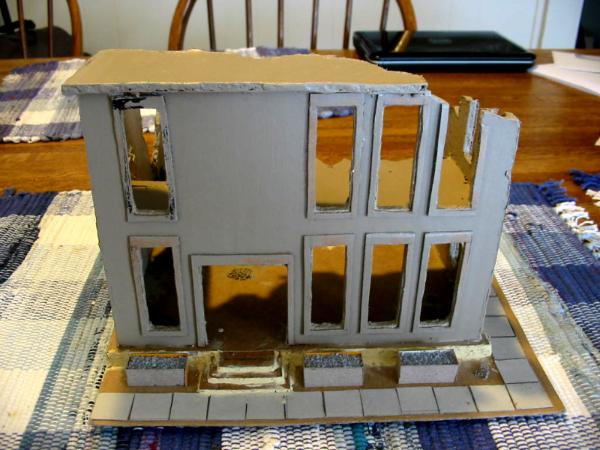
The base paint job; I wanted a color like stucco over wood, which I managed to eyeball fairly well, although it needed a wash and some detailing work to make it look believable. The problem with the paints from the hardware store is they only had paint samples in Satin glossiness, which made this whole thing come out looking a bit too shiny. The wash later helped solve that really well, but I'm a little surprised how hard it is to get paints in small quantities (or big quantities for that matter) with a matte finish. Note the addition of the planters out front: I wanted to give the impression in the end of an official government or commercial building, and what better way than a few pretty little planters? How they survived what wrecked the building is beyond me.
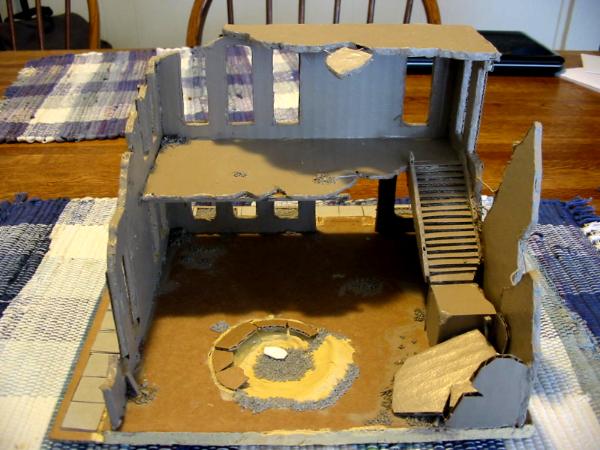
The inside, painted and with the crater done up a bit. Lacking really fine terraining materials, I had to make do with wood filler and aquarium rocks for the rubble at the bottom. I would have liked something grainier, in the end. The same rocks are strewn about the floors to give the place a rubbly feel: blasted up ground, collapsed bits of wall, garbage left behind by previous inhabitants. The rubble on the right at the foot of the stairs is just pieces of cardboard and some sprue, hot glued in to place, with a bit of aquarium sand scattered around.
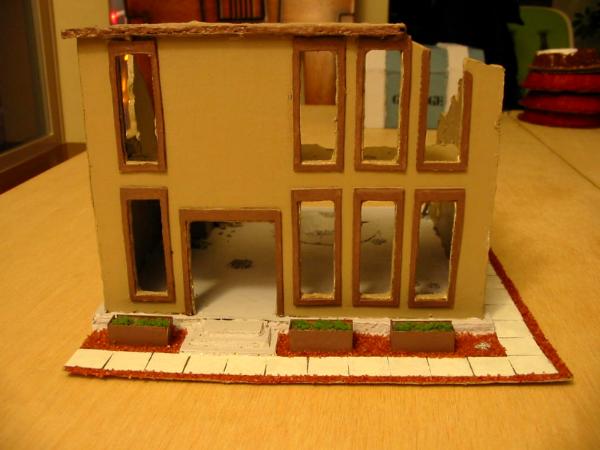

A few things happened between these pictures and the last ones. First of all, the concrete got painted and oh boy, does it need a wash of some sort. The combined effect of the paint and the gravel at this point makes the whole thing way too clean, that'll have to get fixed. The next is the addition of a different color of aquarium rocks, the red ones. A lot of the terrain I've been building is, supposedly, on a red planet (a la Mars) (you can see my grossly oversized craters in the background of one of these pictures), hence the red ground. The detail work has been done around the windows as well: those rectangular window frames I was talking about before done in a nice wooden brown, and just that broke up a lot of the color monotony really well.
Finally, the planters are complete too. That's flock, so I guess I didn't mention it in my materials. Paint and green plants! Green plants on a red planet, and in a war zone? We've been thinking we should get a little model with a watering can to explain that one away.

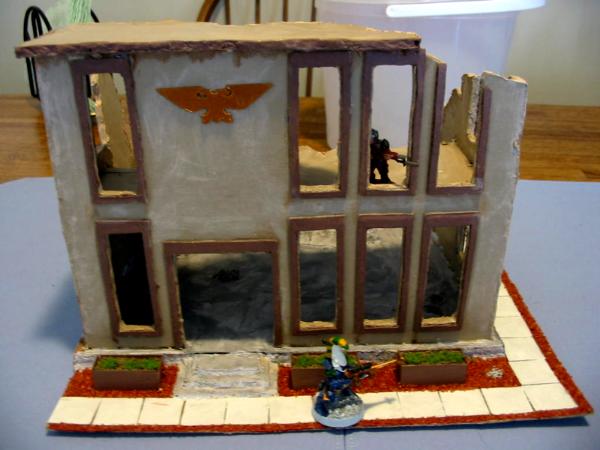
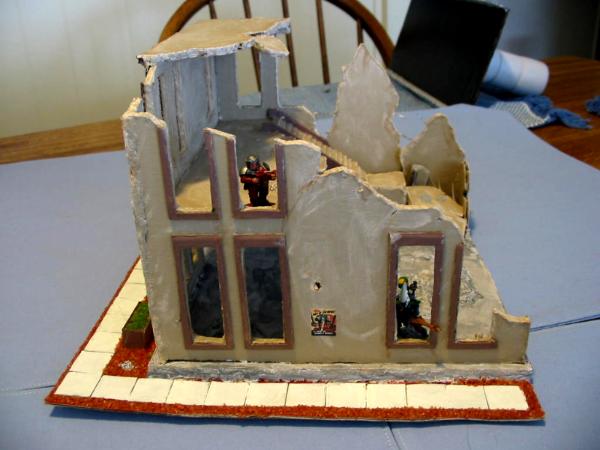
The finished product, complete with the last of the detail work and the washing done. The washes were made by mixing the base color of the paint with white (for the walls, to lighten it) and black (for the ground, to darken in). The first few tries it was far too thick; I kept adding water until I got the consistency I wanted, but I can't give exact ratios. It was brushed on for the walls, and for the floor (since I wanted it a lot thicker), I smeared it on fairly thick, then rubbed it around with my fingers to get an effect I was fairly pleased with. Note the posters on the walls, too: those are images from the internet, printed out, cut out, and glued to the walls (using a glue stick so it didn't soak the paper). The only thing I wasn't really pleased with was the crater: it still looks too regular. It needed more grit and it didn't more paint, or at least more of a variety of paint, something to better define where the edges and depths of the crater are.
There you have it, a cheap (and if you ask me fairly good looking) building for your minis to shoot at/through/out of, using stuff you've mostly got lying around in your house.
The Silo
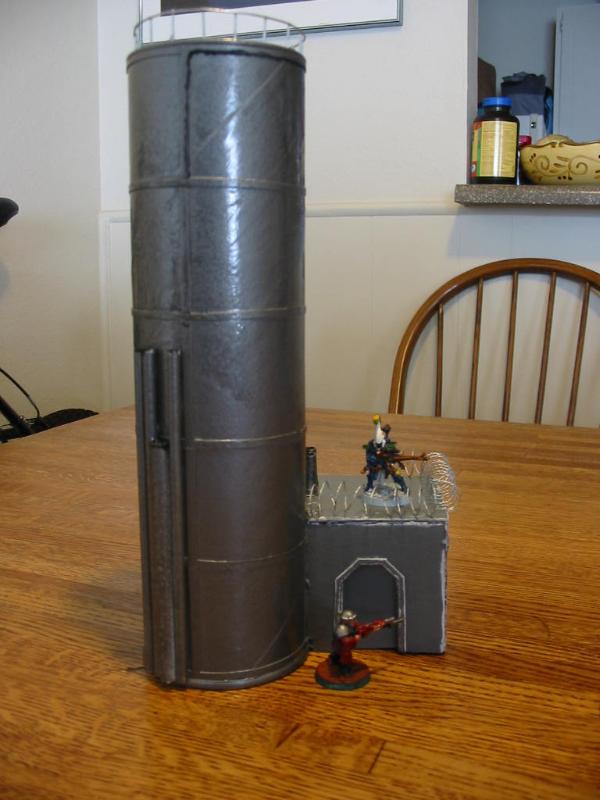
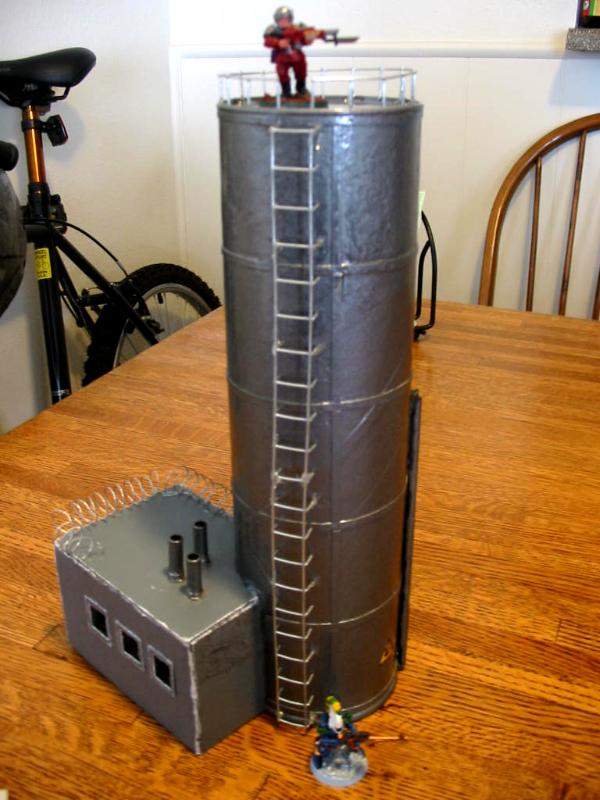
Got less time but still want something fairly cool? I give you the silo. It's made out of cardboard and a Pringles can. The stairwell and railing are... dang now I've forgotten the name. Somethingorother fabric, like builder's fabric or something close. It's basically chickenwire, but the holes are smaller. The barbed wire was made using a method I saw online involving twisting metal around itself a lot (that's how it gets the barbed look), and the rods and pipes are all either wooden dowel or
Bic pens (as are the smoke stacks).
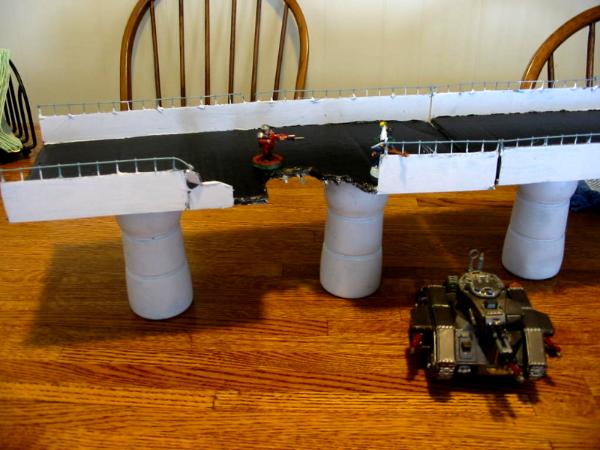
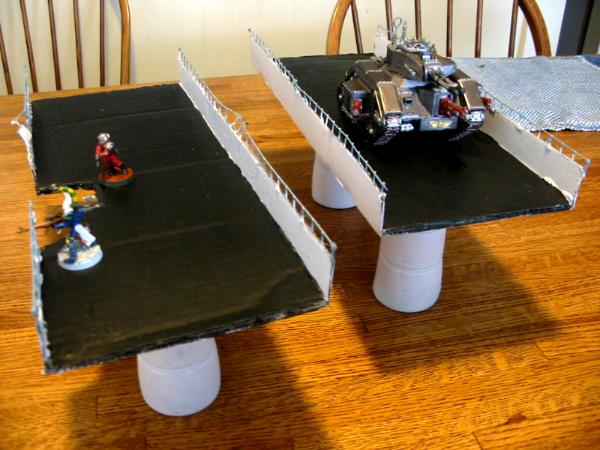
I love this one. It's my firm belief that vertical changes add a lot to the tactics of the game, be it multiple stories of a building or freeway overpasses, and these freeways (as well as the incomplete onramp that is not shown) have really done just that: they allow units to fire down on the enemy (negating their cover) and they give different kinds of mobility across the field. These are mostly cardboard, again; the pillars are made from nutrition shake bottles (clean thoroughly first) that have had their bases filled with lead shot. It doesn't take too much, just enough to weight it down, but originally, without the shot, these freeways had a serious tipping problem. Now it's just a minor tipping problem. As you can see, it even supports the mighty Dakkawagon In future, I would build them with pillars that stretched further, width-wise, to decrease the tipping. They are wide enough apart to let a Land Raider through. Finally, the railing is, again, "builder's" fabric.
And there you have it! Cheap and generally fairly good looking terrain for your battlefield. I hope I have inspired some others to go the same route and try building something of their own for their games, because it really does add a lot to have constructions, even cardboard ones, for your minis to fight around and in.
Also, if anyone knows the actual name of the fabric wire stuff, could you tell me?


 , but I like the design and I might add some fortifications to it like girders and the like thrown up in front, as well as a rubble path made through as if the planet has only just begun being invaded and the
