| Author |
Message |
 |
|
|
|
|
Advert
|
Forum adverts like this one are shown to any user who is not logged in. Join us by filling out a tiny 3 field form and you will get your own, free, dakka user account which gives a good range of benefits to you:
- No adverts like this in the forums anymore.
- Times and dates in your local timezone.
- Full tracking of what you have read so you can skip to your first unread post, easily see what has changed since you last logged in, and easily see what is new at a glance.
- Email notifications for threads you want to watch closely.
- Being a part of the oldest wargaming community on the net.
If you are already a member then feel free to login now. |
|
 |
2012/10/14 18:55:22
Subject: Finishing Bases
|
|

Drop Trooper with Demo Charge
|
I'd like to break out of my mediocre-ness for the bases on my models. I'll be the first to admit that I'm not a very good painter, and I'm okay with that. However, I'm looking for a nifty way to finish the bases on my infantry models.
I'm handicapped right out of the gate by the fact that I'm using the GW black bases that come with the kits. Not something that I thought about when I first started hobbying. I decided to try some black basalt (model train set stuff) on the bases, but it definately turned out really flat. I have a minimal budget, and a butt-load of models. . . Any suggestions on what I should use to finish the bases of my models?
(I've painted alot of my models as having a tinge of mud/dirt on thier boots, so the incorporation of dirt/dust elemets would be awesome!)
Cheers
|
 I love the smell of cordite in the morning. I love the smell of cordite in the morning. |
|
|
 |
|
2012/10/14 19:26:42
Subject: Finishing Bases
|
|

Fighter Ace
|
Small stones (usually found on roofs) are great. Also cork is apparently a loved material for making stoney bases.
Besides i like to work with plaster and pva glue to seal it but that's not very sturdy so not useful if you travel and play with your models.
Hmm besides that, cleap stuff can be plastic bits, small parts of wood etc etc. Really anything can be used to make a stunning looking base!
|
Life is like a box of chocolates. A cheap, thoughtless and perfunctory gift nobody ever asked for. Unreturnable because all you get back is another box of chocolates. So you're stuck with this undefinable whipped mint crap that you mindlessly wolf down because there's nothing left to drink. Sure once in a while there's a peanut butter cup or a English toffee, but they're gone too fast and the taste is fleeting. So you end up with nothing but broken bits of hardened jelly and teeth shattering nuts. If you're desperate enough to eat those all you've got left is a. An empty box, filled with useless brown paper wrappers. |
|
|
|
|
2012/10/14 20:16:49
Subject: Finishing Bases
|
|
Drop Trooper with Demo Charge
|
That just gave me an idea. Do you think it might look good if I ground up some empty plastic sprues, painted them to look like steel and then drybushed the black basalt with a light brown?
Oh man, I need to try this! Thank you very much for the brain-storm!
Also, your signature makes me contemplate suicide. . . hahahahaha!
|
I love the smell of cordite in the morning. |
|
|
|
|
2012/10/14 20:27:04
Subject: Finishing Bases
|
|
Gargantuan Gargant
|
A lot can be done with nothing more than glue, paint, and found materials (soil, sand, gravel, twigs, etc.). Model railroad ballast can be used to good effect, but even the smaller sizes tend to be equivalent to medium-coarse sand and cost significantly more. A bit of size variation in your grains (representing rocks, clumps of dirt, etc.) helps lend both visual interest and realism.
The paintjob is what will really tie your bases together with the army, though. If you already have mud and/or dust on your models, make sure your colors make sense. They needn't necessarily be identical, depending on the situation (e.g. wet mud tends to appear darker than the soil it contains, when dry), but grey-brown soil and red-brown crud on boots won't make much sense.
There are a number of great mud base tutorials out there (I'm a big fan of DoubleT's, which can be seen in his "Muddy Times" plog on Dakka), if you want to take it to the extreme. Otherwise, PVA glue, fine sand, a bit of grit for variety, and perhaps some gloss varnish to establish wetter spots is all you'll need, aside from paint you already have (since you put it on their boots).
|
The Dreadnote wrote:But the Emperor already has a shrine, in the form of your local Games Workshop. You honour him by sacrificing your money to the plastic effigies of his warriors. In time, your devotion will be rewarded with the gift of having even more effigies to worship.
|
|
|
|
|
2012/10/15 00:45:28
Subject: Re:Finishing Bases
|
|
Perfect Shot Black Templar Predator Pilot
|
I have a big tub of brown paint that I use to cover the entire base with...I follow that up with some gravel or sand, (apply a dark wash to this once it dries) then I dab some super glue onto random parts of the base and dump flock onto those areas...I tap the excess flock off and BAM, instant grass base.
|
|
|
|
|
2012/10/15 02:00:21
Subject: Finishing Bases
|
|

Perfect Shot Dark Angels Predator Pilot
|
Always thought grass was a bit incongruous regarding 40k armies. Like, guard are holding a planet and its a mess of trenches and foxholes, CSM are churning it up and turning it into hell. SM are dropped into fights the IG can't finish and nids are actually changing the biological landscape.
I tend to pva, sand then use thin chaos black then work up to space wolves gray through adeptus, fortress and codex. Finally I give it a brush of boltgun to make it shine. The end result kinda looks like the igneous rock in granite.
|

For the Lion and Terra!
Because nothing in the galaxy is black and white, Mankind views the Space Marines as a last resort. The last line. When all else fails. They take up the burden. The noble defenders of Mankind. The last hope.
With finecast you can bypass the washing stage and throw them straight into the bin.
Or cut out the middleman and just flush some money down the toilet.
-Chromedog |
|
|
|
|
2012/10/15 02:29:42
Subject: Finishing Bases
|
|
[DCM]
Tilter at Windmills
|
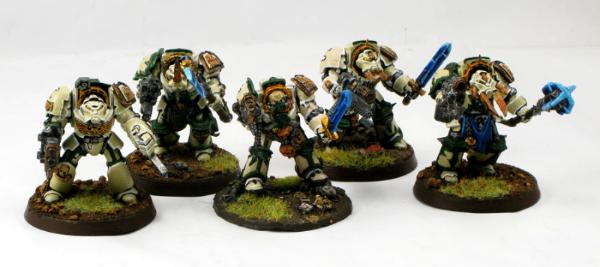
My standard technique is really quick and easy. Half the time spent is just waiting for drying, though that can be sped up by having the models sit under a desk lamp while they dry.
The models below also have a couple of resin bits, but the core recipe is really straightforward.
You need:
Dark brown paint
Light brown paint
Dark brown wash/ink.
White glue (Elmer's/PVA)
A cheapass brush (like for kids' waterpaints)
A drybrush (old, beat-up regular minis paintbrush)
A small plastic tub of sand, with a mixed grit/size. Natural sand from outdoors can work fine.
A small plastic tub of static grass (green or yellow).
A disposable plastic mixing container (I actually use and re-use old blisters; and I've been using the same two blisters for years).
Paint the bases dark brown. Allow to dry.Mix some white glue and some tap water in your mixing container, and paint it on top of the base using the cheapass watercolor brush. You just want enough water to let the glue flow around easily/smoothly and coat the top of the base. If you slop some over the side of the base, wipe it off with your thumb and dry that on a paper towel.Dip the base in the tub of sand, letting the top get coated, then turn it sideways and pour the excess sand back in the tub. Tap the bottom of the base a couple of times. Wipe the edges if you have extra sand sticking to the side because you missed wiping off slopped glue. Allow to dry.Once the bases are completely dry, coat the sand with the brown wash/ink, darkening all the sand. Use the drybrush to spread it as needed. Allow to dry.Once the bases are dry again, drybrush the sand the light brown, to give it contrast and visible texture from table-height view. In the course of inking and drybrushing, you will have messed up the edges of the bases a bit. Clean them up with another smooth layer of the dark brown paint.Take the watered-down white glue again, and using the cheapass brush, paint it in one or two spots on the base, then hold the mini over/in the tub with the static grass, and just throw a little bit of the static grass on the glued spots, covering the white completely. Turn the model sideways/upside-down (in/over the grass container!) to dump off the excess, and again tap the bottom of the base to help get rid of loose material and make the stuff that sticks stand up a bit.
Done!
|
|
This message was edited 3 times. Last update was at 2012/10/15 02:38:13
Adepticon 2015: Team Tourney Best Imperial Team- Team Ironguts, Adepticon 2014: Team Tourney 6th/120, Best Imperial Team- Cold Steel Mercs 2, 40k Championship Qualifier ~25/226
More 2010-2014 GT/Major RTT Record (W/L/D) -- CSM: 78-20-9 // SW: 8-1-2 (Golden Ticket with SW), BA: 29-9-4 6th Ed GT & RTT Record (W/L/D) -- CSM: 36-12-2 // BA: 11-4-1 // SW: 1-1-1
DT:70S++++G(FAQ)M++B++I+Pw40k99#+D+++A+++/sWD105R+++T(T)DM+++++
A better way to score Sportsmanship in tournaments
The 40K Rulebook & Codex FAQs. You should have these bookmarked if you play this game.
The Dakka Dakka Forum Rules You agreed to abide by these when you signed up.
Maelstrom's Edge! |
|
|
|
|
|
|