| Author |
Message |
 |
|
|
|
|
Advert
|
Forum adverts like this one are shown to any user who is not logged in. Join us by filling out a tiny 3 field form and you will get your own, free, dakka user account which gives a good range of benefits to you:
- No adverts like this in the forums anymore.
- Times and dates in your local timezone.
- Full tracking of what you have read so you can skip to your first unread post, easily see what has changed since you last logged in, and easily see what is new at a glance.
- Email notifications for threads you want to watch closely.
- Being a part of the oldest wargaming community on the net.
If you are already a member then feel free to login now. |
|
 |
2013/01/03 12:57:43
Subject: Matching GW colours to bulk brand for gameboard
|
|

Tough-as-Nails Ork Boy
UK
|
Hi All,
I wish to get a large container of paint to start painting my game board.
I want to make it in a desert colour which will match the bases of my troops. Half of my troops bases have yet to be painted/finished, so I can adapt them to fit with the table colour if I have to. I would LIKE to get a final colour close to the old "Snakebite Leather". (Although it this is a bad colour for a game table please let me know).
I'm thinking, start off with a darker brown and then do a heavy drybrushing of "snakebite-coloured" paint followed by a paler highlight.
I'm based in the UK and have had a good look on B&Q's website for brown paint, but nothing seems to come close to Snakebite. Any other suppliers people can recommend?
I have considered the GW scenery kit and just not using the grassy flock. (Brown & Ochre... is this close to Snakebite?)
Plan so far...
(Using particle/chip board)
Method 1
1. Seal with an oil-based varnish (Not sure)
2. Paint it with the dark brown
3a. Apply watered down PVA glue
3b. Apply sand
4. Apply heavy drybrush of "snakebite" coloured paint
5. Apply highlight of lighter colour
Method 2
1. Seal with an oil-based varnish (Not sure)
2a. Mix dark brown paint with sand (50/50?)
2b. Apply Paint/Sand mix.
3. Apply heavy drybrush of "snakebite" coloured paint
4. Apply highlight of lighter colour
Any suggestions/help?
|
|
This message was edited 2 times. Last update was at 2013/01/03 12:58:40
We need MOAR Dakka! 
|
|
|
 |
|
2013/01/03 13:10:10
Subject: Matching GW colours to bulk brand for gameboard
|
|
Parachuting Bashi Bazouk
|
What you need is a Dulex paint centre. There is one near me in Hemel Hempstead, and I was also found one in my local B&Q. They'll instantly mix you up a big tin of vinyl matt paint to whatever colour you wish for around a tenner, and if you give them a swatch of the desired colour they can scan it with an optical device to get a precise match. I was very impressed with the service!
I painted patches of bestial brown, bubonic brown and bleached bone onto a cardboard cereal packet and came home with 3 tins to do my board in exactly the same colours as my army bases.
The basecoat tin is half gone, but the bubonic brown and bleached bone tins were used for drybrushing and so even after a whole board and scenery they're above 90% full- you need far, far less for the drybrush!
|
|
This message was edited 1 time. Last update was at 2013/01/03 13:11:09
|
|
|
|
|
2013/01/03 13:20:52
Subject: Re:Matching GW colours to bulk brand for gameboard
|
|
Tough-as-Nails Ork Boy
UK
|
Thats a great help!
I know the local B&Q can mix up paint (Dulux and own brand I think).
I wasn't aware you could take an item in and they can scan it, thats awesome news.
Stupid query, but what size tins did you buy?
Any suggestion about which method to go for with regards to the painting? Got any pictures of your board would love to see how it turned out!
|
We need MOAR Dakka!
|
|
|
|
|
2013/01/03 19:51:14
Subject: Matching GW colours to bulk brand for gameboard
|
|
Parachuting Bashi Bazouk
|
Thats alright! I'm not sure if all stores have the scanner, and whatever you want them to scan had better be flat. The tins I got were 1L each of Dulux Trade Vinyl Matt. My board is 6x4 and has plenty of scenery.
As for painting, I sealed in the sand coating the board in grey matt primer from Wickes (expensive... in hindsight i'd use something cheaper. I was using the paint as adhesive for the sand though, as in the lava field gaming board tutorial on dakka- have a search for that. If I did it again I'd use wood glue or PVA as adhesive). I had to do two coats of the basecoat because of the heavy texture I had- you really had to work the paint into the board to stop there being the primer showing in the crevasses. Once that was dry I drybrushed bubonic brown using an ordinary large wall paintbrush, and that again took some elbow grease- working the colour into the sand so that it'd still be visbile after the third lighter drybrush of bleached bone (that one just took 10 minutes). When drybrushing you really have to be careful not to overload the brush or you'll have a stripe on your board that is difficult to do anything about, so you might want to use less paint and drybrush harder for longer.
I don't have any pics myself but I'd love to post some- my buddy took some the other day with his phone, I'll see if I can get them off him.
|
|
|
|
|
|
2013/01/04 12:19:36
Subject: Re:Matching GW colours to bulk brand for gameboard
|
|
Tough-as-Nails Ork Boy
UK
|
That would be awesome if you can upload some pictures!
Cheers for your instructions, will take a look for the Lavaboard tutorial 
I'm wondering about sealing the board first with a varnish to stop it warping, what sort of board did you use and has yours warped at all?
|
We need MOAR Dakka!
|
|
|
|
|
2013/01/04 12:55:56
Subject: Matching GW colours to bulk brand for gameboard
|
|
Parachuting Bashi Bazouk
|
I'm not sure that varnish will stop a board warping... it'll probably MAKE it warp if you only do one side and the wood is absorbant. If you're going for a one piece table the way to do it is to use quarter inch plywood and hammer/screw/glue it onto a frame made of pine or something. That should make everything nice and rigid, but takes some basic carpentry skills.
...But thats not how mine was done, since mine is in 2x4 sections for ease of transport. Each piece is 3 inch insulation polystyrene glued with wood glue onto 1/4" ply, then the edges shored up with thin mdf round the side (to stop the polystyrene breaking down). It's very sturdy and doesn't warp, but I'd really recommend the making a frame instead (unless you want to carve hills and valleys out of the polystyrene). They're a bit bulky, see.
The only reason I overcomplicated things is that I was in fact restoring some battered old gaming boards that had been in the shed for years- the edges were all broken down, hence the mdf round the sides. I filled in the gaps with glaziers putty (concerned that filler would just crack), reglued stuff, resurfaced it and repainted it... And then made another piece to extend to 6x4. In hindsight I should have just chucked the old boards out and made new ones with a frame...
|
|
|
|
|
|
2013/01/04 13:15:51
Subject: Matching GW colours to bulk brand for gameboard
|
|
Dakka Veteran
|
One thing to watch out for with your snakebite leather board is that it will be incredibly dark without any drybrushing of other shades. By all means give it a go, but just be aware that a dark table can affect the way your models look on it...
|
Okay, I've been on a bit of a hiatus 2011-14
Currently working on my Riot Guard.
DA:90-S+++G+M++++B+++I+Pw40k99+D++A+++/cWD142R++T(M)DM+ |
|
|
|
|
2013/01/04 13:36:12
Subject: Matching GW colours to bulk brand for gameboard
|
|
Tough-as-Nails Ork Boy
UK
|
cosmic pixie wrote:One thing to watch out for with your snakebite leather board is that it will be incredibly dark without any drybrushing of other shades. By all means give it a go, but just be aware that a dark table can affect the way your models look on it...
Thanks for the heads up, I was thinking of using a DARK brown first coat, mixed with the sand, and then using snakebite over the top, but leaving the dark brown showing through in the deepest cracks and bits, then highlighting with a mixture of snakebite and possibly bleached bone, and work my way up the shading scale until its a decent shade.
Cheers for the tips, do you have any desert colours you would recommend instead?
Arclaw wrote:I'm not sure that varnish will stop a board warping... it'll probably MAKE it warp if you only do one side and the wood is absorbant. If you're going for a one piece table the way to do it is to use quarter inch plywood and hammer/screw/glue it onto a frame made of pine or something. That should make everything nice and rigid, but takes some basic carpentry skills.
...But thats not how mine was done, since mine is in 2x4 sections for ease of transport. Each piece is 3 inch insulation polystyrene glued with wood glue onto 1/4" ply, then the edges shored up with thin mdf round the side (to stop the polystyrene breaking down). It's very sturdy and doesn't warp, but I'd really recommend the making a frame instead (unless you want to carve hills and valleys out of the polystyrene). They're a bit bulky, see.
The only reason I overcomplicated things is that I was in fact restoring some battered old gaming boards that had been in the shed for years- the edges were all broken down, hence the mdf round the sides. I filled in the gaps with glaziers putty (concerned that filler would just crack), reglued stuff, resurfaced it and repainted it... And then made another piece to extend to 6x4. In hindsight I should have just chucked the old boards out and made new ones with a frame...
Interesting. It's 6 2x2 Tiles. I did wonder about gluing some insulation foam on to them, but decided against it and then down the line making a few more tiles and can add insulation foam to that sculpted in to hills. Maybe use some polyfiller in a very thin layer over the tiles as a first coat to create a barrier for the paint... will have to test it I guess!
|
We need MOAR Dakka!
|
|
|
|
|
2013/01/04 16:17:50
Subject: Matching GW colours to bulk brand for gameboard
|
|
Fixture of Dakka
|
My boards are flat 12mm plywood, one side Snakebite Leather, the other Goblin Green (or rather, colour-matched Dulux matte vinyl emulsion). Snakebite Leather is a fairly neutral tone; not that dark after all.
The few terrain pieces I've based to match have the textured surface drybrushed Bleached Bone, but the boards are flat colours.
I primed both sides with white primer (brush-on wood primer, not the stuff in a can), and because I used plywood and did both sides, they've not warped.
|
|
|
|
|
2013/01/04 16:18:12
Subject: Matching GW colours to bulk brand for gameboard
|
|
Longtime Dakkanaut
The ruins of the Palace of Thorns
|
You may be interested enough to have a look at this thread. Nothing revolutionary, but it is similar to what you are doing.
|
|
|
|
|
|
2013/01/04 17:29:20
Subject: Matching GW colours to bulk brand for gameboard
|
|
Tough-as-Nails Ork Boy
UK
|
AndrewGPaul wrote:My boards are flat 12mm plywood, one side Snakebite Leather, the other Goblin Green (or rather, colour-matched Dulux matte vinyl emulsion). Snakebite Leather is a fairly neutral tone; not that dark after all.
The few terrain pieces I've based to match have the textured surface drybrushed Bleached Bone, but the boards are flat colours.
I primed both sides with white primer (brush-on wood primer, not the stuff in a can), and because I used plywood and did both sides, they've not warped.
I was thinking of doing a 2 sided board, even if I just paint the underside and never use it, might stop it warping. Cheers for the suggestion.
Fifty wrote:You may be interested enough to have a look at this thread. Nothing revolutionary, but it is similar to what you are doing.
Really helpful, thanks! Will deffo take inspiration from that when I have a crack at it!
|
We need MOAR Dakka!
|
|
|
|
|
2013/01/04 18:45:56
Subject: Re:Matching GW colours to bulk brand for gameboard
|
|
Parachuting Bashi Bazouk
|
Here's those pics you asked for. This was one of the games in my campaign- Imperial Guard forces had to rescue a platoon of Tallarns at an oasis from an ork attack. The water is just some greaseproof paper.
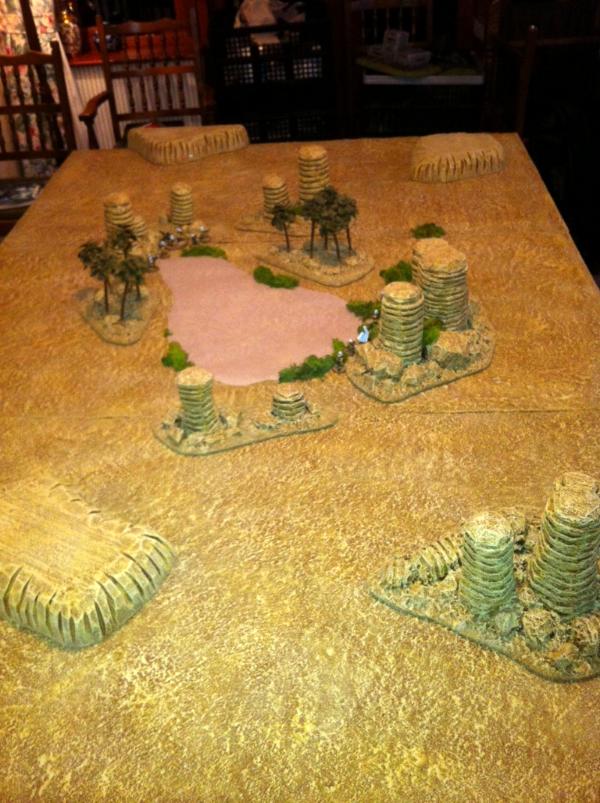
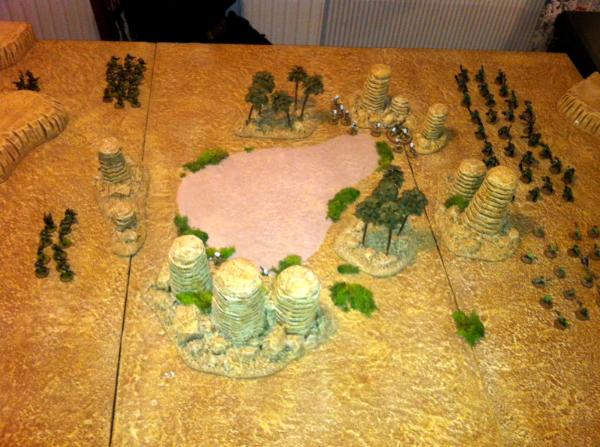
I'll have to get a pic with all the proper scenery on sometime, there's loads more!
|
|
|
|
|
|
2013/01/07 12:17:11
Subject: Re:Matching GW colours to bulk brand for gameboard
|
|
Tough-as-Nails Ork Boy
UK
|
That looks really awesome! Nice one
I'm looking forward to getting started on mine, money is an issue atm though :( Might have to wait until pay day now.
|
We need MOAR Dakka!
|
|
|
|
|
|
|
