Testors makes a blank decal sheet (in clear and white) that is A5 paper sized (about 5x8).
So here is what I did. I found a good quality picture of the image on the net. Saved it as a BMP file. Opened the image in Paint and cleaned it up then select the image and move it as far into the upper left corner as possible. I then collapsed the lower and right edges until I had just a bare border around the image.
Then I resized the image until it was the right size i was looking for...usually about 1/4" x 1/4". I then saved that as a JPEG file.
Then I opened MS Word and set the paper size to A5 and set the margins for as small as possible (you dont want to waste decal paper...you get 1 shot at printing). Then use the "insert image" function to place the image on the blank page. Copy the image. Then hit the space bar 3 times and paste the image. Space Bar 3 times and paste. Repeat until your eyes bleed.
You now have an entire sheet loaded with your custom badge. The spaces between the images allow you enough room to cut the individual badges out with scissors.
Take the Testors Decal paper and manual feed it into your printer and print your page.
DO NOT TOUCH THE FACE OF THE PAGE!!!!!
Very carefully hold the edges and set the printed decal sheet face up and let it sit for an hour minimum. The ink from the printer is exposed and laid on top. It must be allowed to dry. Once dry, carefully take it outside and spray a couple of thin coats of clear varnish over the decal paper. This covers the ink and seals it in place. Once dry...24 hours to be safe...cut out the individual decals and apply.
Application:
Go buy a bottle of Micro-Set and Micro-Sol from a hobby store. About 4 bucks each. Micro-Set has a small amount of vinegar like solvent and adhesive. Micro-Sol has just the vinegary mix (you could probably just use vinegar, but it may be too strong).
I found the best method is to pre-coat the application area with gloss varnish. This gives you a very smooth surface. Once dry, brush Micro-Set onto the model surface where the decal will go. Take your trimmed decal and set it in a shallow pool of clean water (I use a small saucer plate). Let the decal float on the surface. After 15-30 seconds the adhesive will soften and the decal can slide off the paper freely. Use a small brush to carefully move the decal in place while the surfaces are still wet and to get any airbubbles out. Once positioned where you want it dont touch it. Let it dry naturally. The Micro-Set adhesive will help the decal stick better while the solvent part will disolve the varnish away. Once dry brush on some Micro-Sol onto the decal. This will dissiolve more varnish, softening the plastic base of the decal letting it lay perfectly flat. Let dry. 1 more application of Micro-Sol and your decal will be pretty thin and the image will look painted on.
Once dry spray the model with dull coat or a Matte Varnish. This seals the model from damage and seals the decal onto the model. At that point you cant even see the decal plastic anymore.
Total cost was about $15 and you can get something like 350-400 shoulder pad sized decals per sheet. Of course you dont need that many so think ahead of time about custom decals for your tanks and vehicles. Banners and Objectives. Once you run a sheet through the printer you can not reuse it. So get as much stuff onto the sheet keeping in mind how fine are your scissors to cut them out.
All from 1 sheet with tons of spares left over.
Decals on a tank:

Different banner decals (these are each about 3/8" square):
These are Vet SGts. Every member of the squad has a banner with the same decal symbol as his SGT (So...20 decals per squad; 1 on each side of the banner).
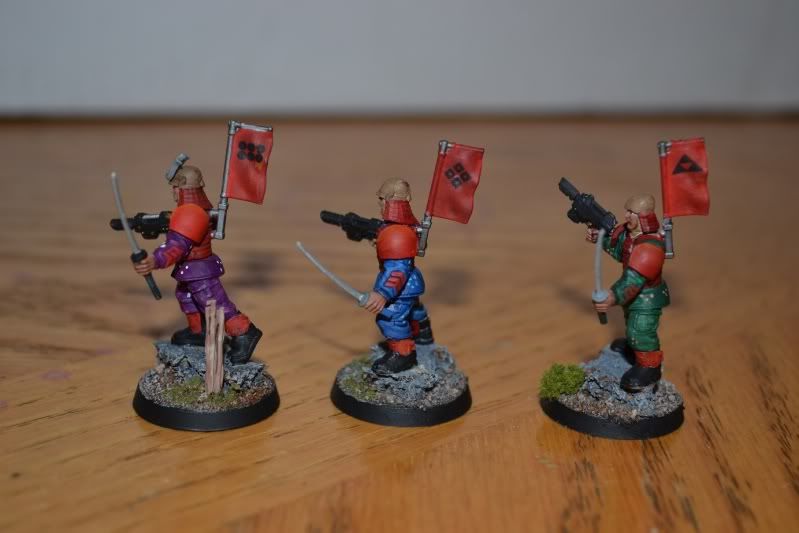
All the dudes (Plattoon troops dont get banners except the Sgts...still thats 40-50 banners. Almost 100 decals on the dudes alone).

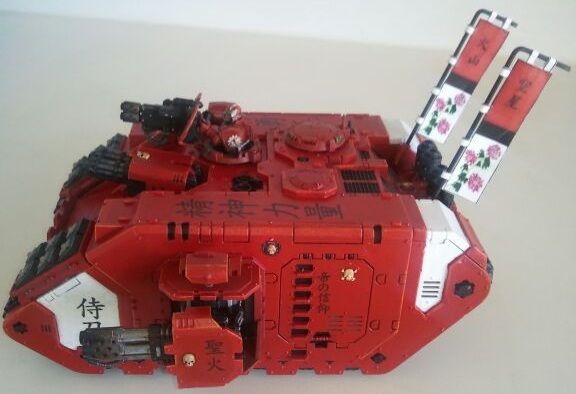
Gotta have allies: Many different sized decals on the Land Raider.
In short, I was able to make enough decals to fully mark over 100 troops and 15 various tanks (from Rhinos/Chimeras to Leman Russ/Land Raiders for less than the cost of a Happy Meal at McDs.


 Angels Amaranthine - growing slowly
 Currently 200pts