Switch Theme:

Pinning and Model Prep on Exemplar Errants (metal)  [RSS] Share on facebook Share on Twitter Submit to Reddit
»
Author Message
Advert


Forum adverts like this one are shown to any user who is not logged in. Join us by filling out a tiny 3 field form and you will get your own, free, dakka user account which gives a good range of benefits to you:
  • No adverts like this in the forums anymore.
  • Times and dates in your local timezone.
  • Full tracking of what you have read so you can skip to your first unread post, easily see what has changed since you last logged in, and easily see what is new at a glance.
  • Email notifications for threads you want to watch closely.
  • Being a part of the oldest wargaming community on the net.
If you are already a member then feel free to login now.


Made in us
Focused Dark Angels Land Raider Pilot


Dallas, TX, USA

I have the old Exemplar Errant models. I was wondering what the dakka community things in regards to how to set up their arm/shoulder joint to prevent breakage and promote a sturdier model.

Errants come with a torso, two arms, and large shoulderpads as separate metal bits. I have the old metal versions of these models. I was thinking of drilling through the arm piece and into the torso at an angle and then pinning with a longer than needed brass pin/rod. I would then turn the shoulderpad upside down, drill into that, and then attach to the rod sticking from the shoulder.

Essentially, this:


The studio folks at PP suggested pinning straight through the outside of the shoulder, cutting and smoothing it off on the outside. For a squad of 12 guys, all being done at once, what do you think would be better and look better on the model once primed/painted?


Automatically Appended Next Post:
Addendum:

For those that haven't seen the model ---


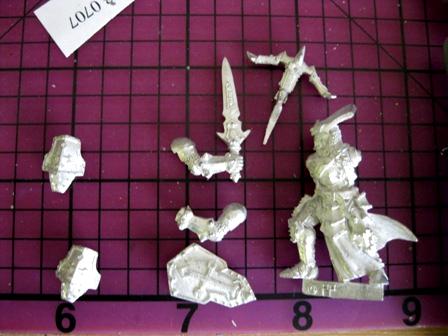
((Image nabbed from djphranq's army blog. Not mine, definitely theirs, just using as illustration.))

This message was edited 2 times. Last update was at 2013/03/15 17:50:09


Dark Angels (Black Armor Themed)
WarmaHordes - Protectorate / Skorne - ~100pts of each
Dark Angels P&M Blog
WarmaHordes P&M Blog

Playing only painted since 2012


Made in us
Gargantuan Gargant


Binghamton, NY

As long as you do a decent job cleaning up afterward, pinning all the way through will look no different than your "capping the pin" method, once you've primed. PP's method is a bit more foolproof, as you can simply hold all parts in place, then drill through in one go to guarantee alignment. If you think you can manage a good fit without that, though, your "capping the pin" method saves you the effort of cleanup. Looking at the pads, it would be hard to place the pin in such a way as to allow a simple, quick filing to take care of the cleanup - you'd likely need to cut it short and fill the hole with putty. That considered, I say go with your idea.

The Dreadnote wrote:But the Emperor already has a shrine, in the form of your local Games Workshop. You honour him by sacrificing your money to the plastic effigies of his warriors. In time, your devotion will be rewarded with the gift of having even more effigies to worship.
 
   
Made in de
Slaanesh Chosen Marine Riding a Fiend


Babenhausen, Germany

Yeah i have to agree with oadie. If you'd drill completely through you'd risk damaging the details on the shoulderpads while trimming. So you'd have to cut the wire short before glueing the pad onto. And if you already doing that you could just do it the way you said.

   
Made in us
Focused Dark Angels Land Raider Pilot


Dallas, TX, USA

Thanks for the advice. I appreciate it. Also, by pinning on the shoulderpads as a 'cap', that allows me to leave them off until painting is complete. Due to their size, it's rather hard to get under them for detail work.

Dark Angels (Black Armor Themed)
WarmaHordes - Protectorate / Skorne - ~100pts of each
Dark Angels P&M Blog
WarmaHordes P&M Blog

Playing only painted since 2012


Forum Index » Painting & Modeling
Go to: