Switch Theme:

Flak style Imperial Guard heavy weapon bases  [RSS] Share on facebook Share on Twitter Submit to Reddit
»
Author Message
Advert


Forum adverts like this one are shown to any user who is not logged in. Join us by filling out a tiny 3 field form and you will get your own, free, dakka user account which gives a good range of benefits to you:
  • No adverts like this in the forums anymore.
  • Times and dates in your local timezone.
  • Full tracking of what you have read so you can skip to your first unread post, easily see what has changed since you last logged in, and easily see what is new at a glance.
  • Email notifications for threads you want to watch closely.
  • Being a part of the oldest wargaming community on the net.
If you are already a member then feel free to login now.


Made in gb
Mysterious Techpriest


Hello Dakka

Here is part one of my tutorial on how to build my version of the now quite old "le mediko" heavy weapon team. After being asked how I made it and with no real plans around I thought I'd have a bash at doing something for everyone else to copy away and spread the scratch building love.
The originals can be found on warseer and a few other places I cant remember, I'm not doing this with permission so do feel free to try and kill me if you wish if my bad english doesn't get you first .


This design works best with lascannons or autocannons, I think, but in this case since I've got a few Heavy bolters spare I'll be using one and building it as - or part of - a terrain piece.
The images will be small you can see larger images by clicking on them.
Also I'm not being particularly precise or detailed with this, Its just a rough design so you can freely change what you like, just specifications that I list will fit on a 60mm base

Part 1: The base

The tools you will need


most of the above you should already have, but I'll go over it anyway

  • square: you'll need this for getting accurate right angles

  • card circle cutter

  • metal rule

  • permanent pen

  • needle file

  • glue

  • and most importantly a sharp knife


  • materials:
  • 1mm 0.040" plasticard sheet

  • 0.5 mm 0.020" plasticard sheet

  • 1 25mm base

  • An IG heavy weapon of your choice

  • and some 1mm diameter rod


  • I buy most of my plasticard from squires tools a mail order catalogue in the UK, but I have found evergreen to be a good supply of very accurate styrene bits and sheets

    Step 1:
    Cut out two discs out of the 0.5 mm sheet, when cutting the holes you will end up with a dimple with lump from the centre point of the circle cutter, just file this lump down to stop it lifting parts off the next layer, alternatively you can drill though it to more precisely align discs.

  • 28mm diameter

  • 25mm diameter


  • next cut 3 discs each of 10mm and 12 mm diameter out of the 0.5mm sheet


    and stick each of the 10mm to a 12mm leaving a 1mm ring around and do the same for the larger discs with the 25mm base, making sure there is an equal overlap around the base.


    Step 2:
    Now for the supporting struts, you will need both 1mm and 0.5 mm plasticard for this. So using the following plans will give you three trapezium shapes of each, I've stuck the two small struts together on the images as its easier to cut out of plasticard and less wasteful

    from the 1mm


    and the 0.5mm


    once you have these they should look something like this:


    after cutting these out debut and use the file to bevel the edges on the 1mm pieces and rounding the corners, they should when glued together look like this:


    Step 3: put it all together

    assemble the parts glueing the thickest sides of the struts to the overlapping discs on the base. You will also need to add some scraps of 0.5 mm plasticard to the underside of the discs on the support struts to bring them level with the height of the 25mm base.


    now add 3mm lengths of the 1mm rod roughly over where the holes on the support discs would be on the struts, and there you have it you can add or modify this how ever you like this is just the basic design.


    In part 2 I'll show you how to make the gun screen and mount

    Questions, comments and criticism welcome.

    Noodles


    Made in gb
    Mysterious Techpriest


    Ok, time for part 2.

    So in this part I will show you how to make the weapon mount and gunshield I was planning on mounting a heavy bolter on it but it turns out it doesn't fit without a redesign so never mind.

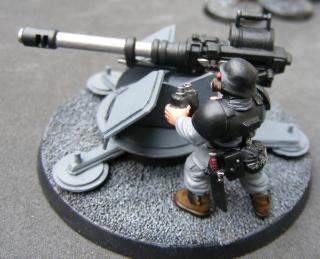
    here is what you will be aiming for

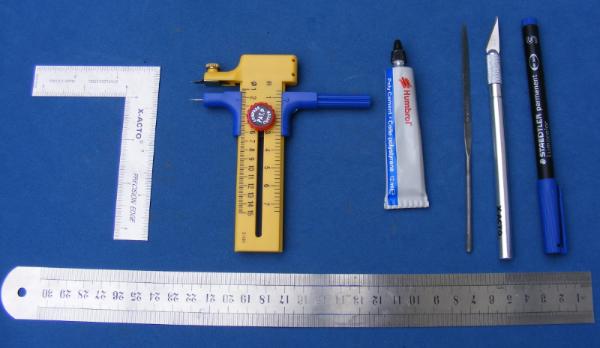
    so firstly you will need:

    of 1mm thick plasticard (left side of the image):

    a 20 x 8 mm strip, this is to make the little box that will fill the centre of the gun mount, cut this into 2 5 x 8 mm and one 10 x 8 mm pieces

    a 22x22 mm square,

    take your 22mm square and mark 8mm in from one edge
    that 8 x 22mm strip will form the base of the gun mount, with the remaining rectangle mark corner-to-corner,
    the two triangles you get are your sides for the gun mount


    now for the 0.5mm thick plasticard.

    use the circle cutter to make a 22mm diameter disc, drawing through the centre marking two equal halves.

    for the gunshield cut two rectangles

    24 * 18 mm, this will form the front of the shield
    pick a corner, on the narrow side mark 7 mm from that corner and 11 mm on the long side, them mark using the square to the opposite sides

    27 * 20 mm and this the back of the shield
    do as per the previous but mark 8 and 12 mm respectively.

    be careful not to get these mixed up the smaller pieces are to be the top/ font of the shield.

    now the indentations inthe bottom corners of the shield, follow the following image for their dimensions, these are going to be cut out and thrown away


    Now cut everything out, should look a bit like this, triming the outer corners for the shield and the top corner for the weapon mount, just to bevel the corners and ignoring the heavy bolter.


    So lets assemble the weapon mount, stick one of the 22 mm triangles to the 8mm base strip,
    and use the two 5 x 8 mm as back and front verticals with the 10 mm as the top of the box, like this


    The box is just there to fill space and add some strength

    add the other side and the 2 halves of the 22mm diameter circle and your gun mount is done


    If you want you can add magnets small disc magnets to where the gun would sit and magnetise the weapons or you can put some rod through to make a pivot,
    though if you are going to do this I recommend doing it whilst assembling not after.

    now for the gunshield

    I've tried 6 times to describe how to to do the following part, even though I think of it as easy, everything I write about it sounds confusing.
    ... So just try and make it look like the following picture, using the smaller pieces as the front and filing the joints for the joints on the angles till they fit nicely.


    in the end It should look roughly like this:


    Don't worry If yours don't look identical, so long as everything fits together and if you are going to make multiples you have consistency.

    Don't be afraid to modify this design as much as you like, I've built a quad stubber sabre defence platform from a modification of this deesign and I would love to see what other people can come up with.

    Best of luck Scratch building and have fun.

    Noodles

    This message was edited 1 time. Last update was at 2013/05/08 18:39:23


    Made in us
    Decrepit Dakkanaut


    Vallejo, CA

    This is some pretty classy work.

    I suppose my only complaint is that they don't look even a tiny bit portable, but if you're not usually moving the heavy weapons around anyways...


    Your one-stop website for batreps, articles, and assorted goodies about the men of Folera: Foleran First Imperial Archives. Read Dakka's favorite narrative battle report series The Hand of the King. Also, check out my commission work, and my terrain.

    Abstract Principles of 40k: Why game imbalance and list tailoring is good, and why tournaments are an absurd farce.

    Read "The Geomides Affair", now on sale! No bolter porn. Not another inquisitor story. A book written by a dakkanought for dakkanoughts!
     
       
    Made in us
    Member of the Ethereal Council


    I can also see these as GREAT for making Hyperios weapons.

    5000pts 6000pts 3000pts
     
       
    Made in us
    Virulent Space Marine dedicated to Nurgle


    Portland, OR

    Awesome, simply and plainly awesome. I'm stealing this for my WGF Greatcoat Troopers.
       
    Made in sg
    Quick-fingered Warlord Moderatus


    Lost in the Warp

    I love this. I'm going to scratch-build my Tarantula sentry guns from this.

    Click here for my Swap Shop post - I'm buying stuff!
    DR:90-S++G++M+B++I+Pw40kPbfg99#+D++A++/eWDR++T(T)DM+
    Black Legion/Iron Warriors/Night Lords Inquisitorial Friends & Co. (Inq, GK, Elysians, Assassins) Elysian Droptroops, soon-to-add Armored Battlegroup Adeptus Mechanicus Forge World Lucius


    Forum Index » Painting & Modeling Tutorials
    Go to: