| Author |
Message |
 |
|
|
|
|
Advert
|
Forum adverts like this one are shown to any user who is not logged in. Join us by filling out a tiny 3 field form and you will get your own, free, dakka user account which gives a good range of benefits to you:
- No adverts like this in the forums anymore.
- Times and dates in your local timezone.
- Full tracking of what you have read so you can skip to your first unread post, easily see what has changed since you last logged in, and easily see what is new at a glance.
- Email notifications for threads you want to watch closely.
- Being a part of the oldest wargaming community on the net.
If you are already a member then feel free to login now. |
|
 |
2013/07/04 17:57:45
Subject: Airbrushing. Have I got the basic technique?
|
|

Swift Swooping Hawk
England, Sunderland, Hetton-Le-Hole
|
I've had an airbrush for several months now and have only recently started to use it properly. I would just like to know if I have some of the basics with it. I have the AS-186 airbrush kit and the compressor is ok but the brushes I have aren't very good and so have caused some problems. Like when pressing for air splattering a little paint has left dots of paint on the model where they shouldn't be. The nozzle is to wide and has also resulted in me over spraying onto the front panel, admittedly this was mainly me not being careful enough. Paint also seemed to come of on the edges possibly due to how I was handling it and I will need to be more careful in the future. i tried to cover it by using a silver to make it look like weathering. but stupidly added badab black and we all know that a wash on a flat surface won't go well. i don't know what was going through my head.  But here are some pics of my first attempt with my airbrush, a rhino chassis, that I am working on. For the most part the airbrushing is done. I just need to touch up in places. I would just like to know how I can improve further. Thanks Red 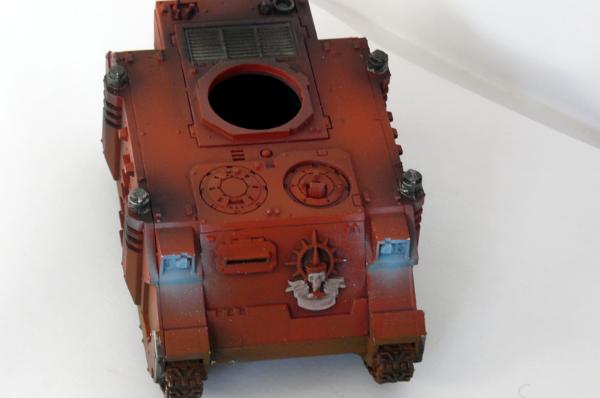 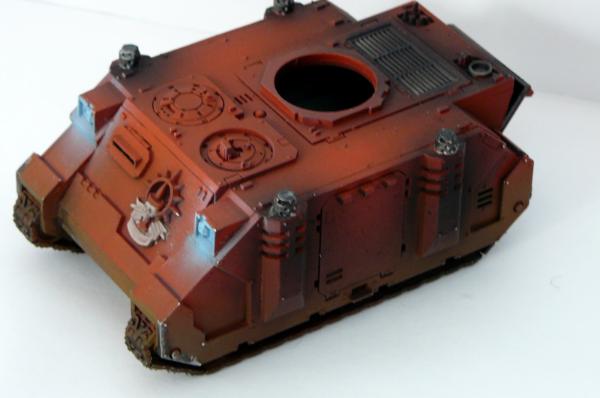 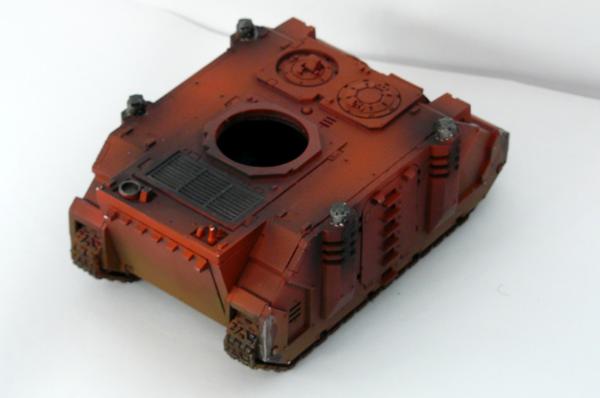 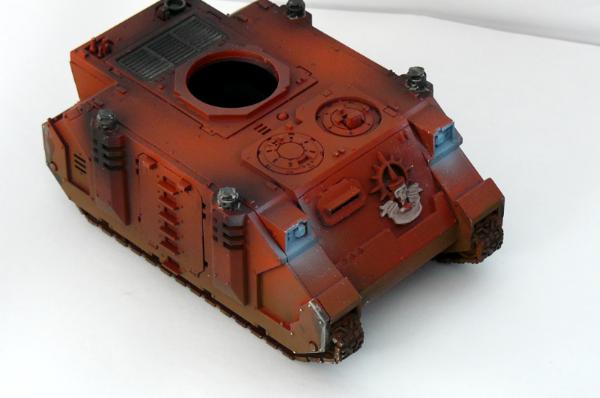 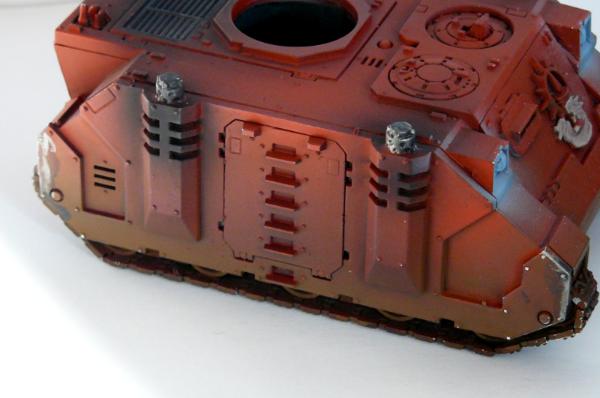 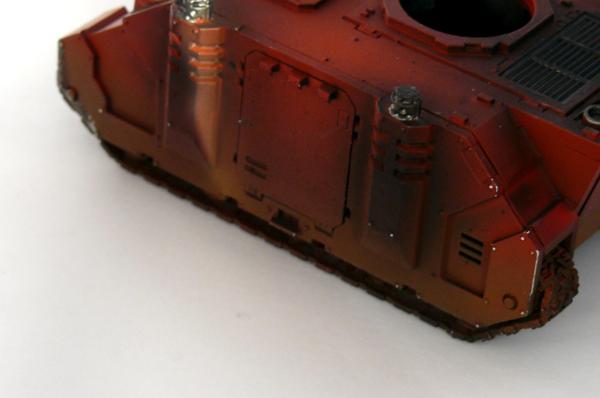
|
|
This message was edited 1 time. Last update was at 2013/07/04 18:01:50
|
|
|
 |
|
2013/07/04 18:23:36
Subject: Airbrushing. Have I got the basic technique?
|
|
Hurr! Ogryn Bone 'Ead!
|
TBH bud, its looking pretty dang nice so far, still a novice myself with airbrush so just a comment on the work here.
|
 4000 pts 4000 pts
 2500 pts (half Flesh Tearers, soon to be all) 2500 pts (half Flesh Tearers, soon to be all)
 1k 1k
 Fresh start Fresh start |
|
|
|
|
2013/07/04 18:29:56
Subject: Airbrushing. Have I got the basic technique?
|
|
Swift Swooping Hawk
England, Sunderland, Hetton-Le-Hole
|
Thanks for the kind words. I'm worried were the same person haha. Both play Eldar and Blood Angels and even live in the same parts .
All the best with your airbrushing work hope you turn out some top notch stuff.
|
|
|
|
|
|
2013/07/04 18:52:54
Subject: Airbrushing. Have I got the basic technique?
|
|

Longtime Dakkanaut
|
It's a good start
i would thin your paints more, especially for the OSL. If i can see the splotchyness at this distance it's not a good thing. Also consider masking tape next time, you got blue paint where there shouldnt be any.
|
|
|
|
|
2013/07/04 20:43:14
Subject: Airbrushing. Have I got the basic technique?
|
|

Trigger-Happy Baal Predator Pilot
|
Yeah, judging from the OSL you're getting a lot of spatter. Try thinning down your paint a bit more.
Looks like you're getting the hang of it though 
|
|
|
|
|
|
2013/07/04 20:46:54
Subject: Airbrushing. Have I got the basic technique?
|
|
Tough Tyrant Guard
|
Thinning helps the splatter, or painting faster, I get it a lot when being slow, bits of paint dry and I have to give it a few blasts to clear.
|
It's my codex and I'll cry If I want to.
Tactical objectives are fantastic |
|
|
|
|
2013/07/04 21:10:27
Subject: Re:Airbrushing. Have I got the basic technique?
|
|
Longtime Dakkanaut
|
depends on the thinner you use, a good thinner will make it spray much smoother with much less splatter.
thinning also improves transparency and increases drying time so if you screw up it will be easier to wipe off or if it does dry it will not be as opaque.
|
|
|
|
|
2013/07/04 22:22:43
Subject: Airbrushing. Have I got the basic technique?
|
|

Martial Arts Dāturazi
Philadelphia, Pensylvania
|
I'm not sure how you are airbrushing but if you do have properly thinned paints for your needle size and are getting splatter like that then remember to puff the airbrush then go to the model if you had stopped spraying and want to start spraying again. What I mean is just tap the air it will blast all the paint that didn't quite make it off the needle off and so when you start spraying again you'll have a clean spray, Also be sure you aren't spraying to close to the model for the psi you are using. With higher pressure you need to be farther out otherwise you are paint blasting the model.
I would also advise against spraying for "mud" or "grime" effects as often times it simply looks like just a random spot of color on your tank instead of actual wear and tear.
All in all though it looks nice for starters just play with it a lot.
|
|
|
|
|
|
2013/07/05 05:37:23
Subject: Airbrushing. Have I got the basic technique?
|
|

Xeno-Hating Inquisitorial Excruciator
|
I highly recommend practicing on a piece of cardboard with dots, lines and filling in basic shapes. You can have the best setup but will still need to get the muscle memory down - your fingers need to learn the exact pressure to exert on the nozzle, plus you can achieve different effects with increasing and decreasing distance as you spray
|
|
|
|
|
|
2013/07/05 07:50:12
Subject: Airbrushing. Have I got the basic technique?
|
|
Stealthy Grot Snipa
|
 Citizen Luka wrote: Citizen Luka wrote:I highly recommend practicing on a piece of cardboard with dots, lines and filling in basic shapes. You can have the best setup but will still need to get the muscle memory down - your fingers need to learn the exact pressure to exert on the nozzle, plus you can achieve different effects with increasing and decreasing distance as you spray
this^^
I got myself an airbrush a couple months back and my control is still rather poor. I just do some basic exercises for 20 mins everytime I pick up my airbrush, as doing something routine or consistant will get you used to the work, rather than have the practice being the first model of the day.
I saw a really nice video of a guy who had a technique for all the plate joints and grooves. Basically:
He would use black straight onto the unpainted model, tracing along all the joints and grooves. Then, when he picks up his main colour (red in your case) he applies that onto all the armour plates and what occurs is the black acts to darken the main hull colour but only in the grooves and edges. Ahh think its called pre-shading. Also found the video too http://www.youtube.com/watch?v=d4mYrl-nzio&feature=c4-overview-vl&list=PLE071F9B3FBCC532C
But all in all I like the work I tried OSL myself the other day and its harder than I thought 
|
Favourite Game: When your Warboss on bike wrecks 3 vehicles simply by HoW - especially when his bike is a custom monowheel.
|
|
|
|
|
2013/07/05 08:48:58
Subject: Airbrushing. Have I got the basic technique?
|
|
Dakka Veteran
South East London
|
I would agree with all of the above.
Thinning your paints a bit more will help with splatter and definitely practice on card first, or even old models that you can strip and re-use just for practice.
I have an old battered Leman Russ that's been repainted about 30 times!!
Also with things like OSL you don't necessarily have to spend ages masking off areas, you can just use a small piece of card to cover up areas you don't want the paint to go. This is really easy on vehicles like the Rhino which have lots of straight lines.
Something else to consider though is your compressor.
To be honest in my opinion the compressor is more important than the brushes themselves, as if you have a good compressor you can still do decent work with fairly cheap brushes.
Paint splatter like you have above can also be caused by moisture building up in the brush.
This is quite common as obviously the brush gets cold and at room temperature cause drops of water to spray out with the paint causing splatter.
Does your compressor have a moisture capture? This essentially prevents moisture build up and should stop splatter, but obviously getting the right amount of thinner to paint ratio is also key.
Again I always test spray on card before hitting the model.
But you definitely have the techniques themselves down, the Rhino is looking good, I just think a bit more experimentation and practice will help, but the Rhino is looking great so far, and as you say any mistakes can be covered by weathering.
|
"Dig in and wait for Winter" |
|
|
|
|
2013/07/05 08:59:03
Subject: Airbrushing. Have I got the basic technique?
|
|

Stormin' Stompa
|
Regarding "splatter";
Possible issues could be;
- Paint not thin enough. If the paint is too thick to atomize properly you can get spatters.
- Pressure not high enough. The higher the pressure the thicker the paint can be. Conversely you really need to thin a lot when using low pressure.
- Mechanical mishandling. When using the airbrush you should always try to start and finish with clean air. What I mean is that you activate the air, then activate the paint (you are using a double action airbrush, right?), shut off the paint and THEN kill the air.
This is rather important. If you push down, pull back and then just releases the trigger (or worse just shuts of the air but keeps the trigger pulled back) you risk leaving some paint both on the tip of the needle and in the nozzle. When you then activate the air again you will get a splatter.
Always blow the needle and nozzle clear as it will prevent splatter and help when cleaning the brush.
- Moisture. Make sure your moisture trap is working and drained.
....
|
|
This message was edited 2 times. Last update was at 2013/07/05 09:01:07
-------------------------------------------------------
"He died because he had no honor. He had no honor and the Emperor was watching."
 18.000 3.500 18.000 3.500  8.200 8.200  3.300 3.300  2.400 2.400  3.100 5.500 3.100 5.500  2.500 2.500  3.200 3.200  3.000 3.000
|
|
|
|
|
2013/07/05 11:00:09
Subject: Airbrushing. Have I got the basic technique?
|
|
Swift Swooping Hawk
England, Sunderland, Hetton-Le-Hole
|
Steelmage99 wrote:Regarding "splatter"; - Mechanical mishandling. When using the airbrush you should always try to start and finish with clean air. What I mean is that you activate the air, then activate the paint (you are using a double action airbrush, right?), shut off the paint and THEN kill the air. This is rather important. If you push down, pull back and then just releases the trigger (or worse just shuts of the air but keeps the trigger pulled back) you risk leaving some paint both on the tip of the needle and in the nozzle. When you then activate the air again you will get a splatter. Always blow the needle and nozzle clear as it will prevent splatter and help when cleaning the brush.
I'm pretty sure that's my problem. I do turn on the air first but when it comes to shutting off I do it simultaneously. So when I go to press the air again paint is splattering out. I will also make sure to press for the air away from the model, move it to the model and then pull back for the paint and I'll be sure to kill the paint first. Thanks for all of the help you have all given me. it's greatly appreciated.
|
|
This message was edited 1 time. Last update was at 2013/07/05 22:04:31
|
|
|
|
|
2013/07/05 21:14:28
Subject: Airbrushing. Have I got the basic technique?
|
|
Stormin' Stompa
|
 redkeyboard wrote: redkeyboard wrote:
I'm pretty sure that's my problem. I do turn on the air first but when it comes to shutting off I do it simultaneously. So when I go to press the air again paint is splattering out. I will also make sure to press for the air away from the model, move it to the model and then pull back for the paint and I'll be sure to kill the air first.
Kill the air last.
The sequence is; Air ON, Paint ON, do your thing, Paint OFF, Air OFF.
|
-------------------------------------------------------
"He died because he had no honor. He had no honor and the Emperor was watching."
18.000 3.500 8.200 3.300 2.400 3.100 5.500 2.500 3.200 3.000
|
|
|
|
|
2013/07/05 22:04:13
Subject: Airbrushing. Have I got the basic technique?
|
|
Swift Swooping Hawk
England, Sunderland, Hetton-Le-Hole
|
Steelmage99 wrote: redkeyboard wrote: I'm pretty sure that's my problem. I do turn on the air first but when it comes to shutting off I do it simultaneously. So when I go to press the air again paint is splattering out. I will also make sure to press for the air away from the model, move it to the model and then pull back for the paint and I'll be sure to kill the air first.
Kill the air last. The sequence is; Air ON, Paint ON, do your thing, Paint OFF, Air OFF.
Haha that's what I meant, I have no idea why I wrote air instead of paint. I'll amend my post.
|
|
This message was edited 1 time. Last update was at 2013/07/05 22:04:51
|
|
|
|
|
2013/07/06 03:12:48
Subject: Airbrushing. Have I got the basic technique?
|
|
Secretive Dark Angels Veteran
UK - Warwickshire
|
Steelmage99 wrote:
Kill the air last.
The sequence is; Air ON, Paint ON, do your thing, Paint OFF, Air OFF.
great advice, but...
Even better;
The sequence is; Aim away from job, Air ON, Test Paint ON, Paint OFF, Move to work area and aim at job, Paint ON do your thing, Paint OFF, Move away from the job again, Air OFF
Having a piece of scrap board laying around to test on is handy... piece of a card box? perhaps one that the model came in
|
'Ain't nothing crazy about me but my brain. Right brain? Riight! No not you right brain! Right left brain? Right!... Okay then lets do this!! |
|
|
|
|
|
|
 3000p
3000p
 2000p
2000p
 7500p
7500p 


