Forum adverts like this one are shown to any user who is not logged in. Join us by filling out a tiny 3 field form and you will get your own, free, dakka user account which gives a good range of benefits to you:
No adverts like this in the forums anymore.
Times and dates in your local timezone.
Full tracking of what you have read so you can skip to your first unread post, easily see what has changed since you last logged in, and easily see what is new at a glance.
Email notifications for threads you want to watch closely.
Being a part of the oldest wargaming community on the net.
If you are already a member then feel free to login now.
2013/09/21 17:58:54
Subject: 1850pt Tournament - Calypso2ts's Daemons - Game #1, #2 and #3 - Complete
This weekend I had the chance to attend an 1850 tournament at Millennium Games in Rochester. This would be the first game I had played in a few months - and it would be the first tournament I had played since April of this year. As such, it was a perfect opportunity to test out my Da Boyz GT list and start to get familiar with how it played.
Here is the Daemon list I brought with me - compliant with the Da Boyz GTcomposition requirements.
HQ Fateweaver
Khorne Herald w/ Juggurnaut, Locus of Fury, Exalted Gift (Grimoire + possible Axe)
Elites 5x Fiends
4x Fiends
Troops 18x Daemonettes
10x Horrors
10x Horrors
Fast Attack 17x Flesh Hounds
18x Seekers of Slaanesh w/ Heartseeker
Heavy Support 1x Skull Cannon of Khorne
1x Skull Cannon of Khorne
I designed this list to take advantage of the natural synergy between the Grimoire and Fateweaver - plus Fateweaver the the Warp Storm table. With the lack of grenades on Daemons, the Skull Cannons are there to make charging into cover a better proposition and inspiring opponents to spread out a bit more. It also helps dig units out from behind an Aegis line. I have a more thorough discussion of this list (although I swapped a Fiends for the Locus) here.
The pairings go up for the first game and, naturally, I am matched up against Grey Knights (GK). I think I have played more Grey Knight armies than any other since the new codex came out. The advantage to this is I think I have a much better understanding of the matchup than most GK players. The downside is that GK get an unnatural number of rerolls against Daemons.
Heavy Support 1x Nemesis Dreadknight w/ Teleporter, Heavy Incinerator
1x Dreadnought w/ 2x Autocannon, psybolt ammunition
1x Dreadnought w/ 2x Autocannon, psybolt ammunition
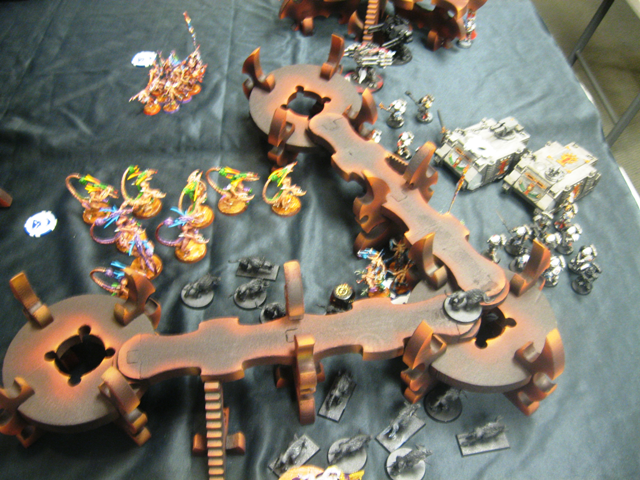
Hammer and Anvil is a rough deployment for Daemons - and we are playing on a board that can generate a lot of 4+ cover, but not a significant amount of true LOS blocking. The board, though, is a beautiful Dark Eldar set with a lot of interesting play options.
I lose the roll to place the majority of the objectives, and I weight them heavily to one side of the board. My theory is I need to advance regardless of the objective placement or get shot to pieces. If all the objectives are on my side of the board, then I can push into a massive assault and tie up his units while I happily sit on objectives. If I get the side with less objectives, I will Deep Strike my troops forward - ideally after I push into a few murderous assaults.
Psychic Powers/Gifts: Fateweaver: Left Head (Precog/Flame Breath) Right Head (Smite/Puppet Master)
Khorne Herald: Grimoire of True Names
Pink Horrors: Flickering Fire/Bolt of Tzeentch
Deployment
Spoiler:
I end up losing the deployment roll, so I have to take the side with only 2 objectives on it. My opponents Reserves his Terminators and then deploys in a broad front across the board. This is exactly the type of deployment I liked to see with the old Daemons - and with the new ones too. I decide to use the central buildings as cover and I refuse his right flank. This will give me 4+ cover from the dreads, make it so they cannot tarpit the Flesh Hounds and let me sweep him away from the objectives up his flank.
I reserve the Horrors and Daemonettes. I debated outflanking the Hounds/Seekers but with no reserve manipulation I wanted them to hit all at once.
In spite of going 2nd I scout up the hounds still. If he is going to be foolish enough to give me the chance at a Turn 1 charge, I am going to take it.
We have Turn 1 Night Fight so the Cannons are out of range while the hounds will get 2+ cover from any shooting that goes through the Dark Eldar building.
Turn 1 - GK
Spoiler:
My opponents fails to take the bait - or succeeds in not taking the bait and backs up. The problem GK have with a 24" range is they only really get 1 turn of shooting before Beasts/Cavalry tend to be on top of them. This is compounded by the fact that Night Fight is giving that units a 3+ or 4+ save for at least part of that shooting.
Turn 1 - Daemons
Spoiler:
Fate gets Precognition and the hounds get the Grimoire - this would continue each turn unless otherwise specified.
Everything moves up, and I am careful to give the cannons cover. I had hope poor placement of a Vindicare might enable me to snag First Blood but it was not to be. After runs there is a huge teeming mass of Daemon wounds. The Warp Storm is uneventful.
Turn 2 - GK
Spoiler:
The retreat - or delaying action? - continues but my saves are hot and I do not lose anything up front.
The terminators want to take down a Skull Cannon for First Blood and make a risky Deep Strike. With all those Seekers and Fate bearing an AP 1 Large Blast this is a bit risky. They fail to scratch the paint on the Skull Cannons.
The GK disembark in order to start shooting and remove a few Flesh Hounds The Dredknight Shunted forward - shown in the next turn.
Turn 2 - Daemons
Spoiler:
I prepare for a big assault with the Hounds and Fiends on the Purifiers. I plan to eat overwatch with the Fiends - who will also prevent me from getting Force Weaponed in a terrible way.
The seekers prepare to charge the Terminators - assuming Fate does not kill them all with a lucky hit - she does not.
This is where the Dreadknight used to be before the Warp Storm aced him. I rolled a 6,1 originally and cashed in the 1 with Fateweaver's Staff of Tomorrow to grab the needed 11. That is a huge threat removed.
There are a lot more models not in combat here than I wanted. The far Fiends failed their charge (expected) while the Flesh Hounds rolled a 3 and then used fleet to turn it into a 4 to fail their 5" charge! I am going to eat another turn of Shooting this means.
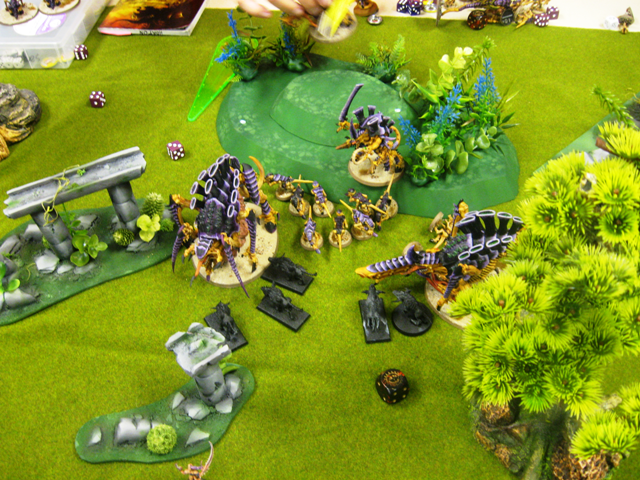
I apologize for the blur - the flash was malfunctioning on the camera and I must have been enraged by the failed charge. I somehow lose a lot of Seekers to overwatch - but there is only a single Terminator remaining after combat.
Turn 3 - GK
Spoiler:
In spite of my failed charge - things are not looking good for the GK. Interestingly, I scored First Blood with the Dreadknight possession, but no other units had been killed except for my Fiends who are about to finishing losing terribly their combat!
The GK lineup their shooting and kill a single hound. That hound keeps them from being able to charge the unit. The horrors with 5 left were shotup by the Dreadnoughts and I lose a Skull Cannon in the mix too.
Turn 3 - Daemons
Spoiler:
The Daemonettes come in and Deep Strike by the rear objective to sit and hold it.
Turn 4 - GK
Spoiler:
The GK player surveys the field and I have First Blood and Linebreaker. I also have 2 objectives to his 0 and he is about to lose his last scoring unit. At this point we call the game - although we play out an assault on Crowe to see if I can snag Slay the Warlord. Unfortunately, Crowe's Blade Parry is too much for me to punch through by Turn 5.
The finals score is Daemons: 11 GK: 0
Major Victory for the Daemons
Turn 4 - Daemons
Spoiler:
Game Completed Turn 4 GK.
Turn 5 - GK
Spoiler:
Game Completed Turn 4 GK.
Turn 5 - Daemons
Spoiler:
Game Completed Turn 4 GK.
Game Thoughts
Spoiler:
When I saw my opponents list I knew this was going to be an uphill battle. It takes a lot of small arms fire to knock away as many wounds as I am packing with this list - and the Fiends provide a significant amount of support against psyker heavy armies. The board also favored me slightly with the availability of 4+ cover. Overall though I am not sure what else my opponent could have done this game other than trying to bring his purifiers in later to claim/contest objectives. In a head on fight, this Daemon list wrecks MEQ too easily - especially 20+ point marines.
The real tipping point in this game was the removal of the Dreadknight via the Warp Storm. With him still in play I would have had to risked the Daemonettes or Seekers to take him down - neither of which were in a good position to catch the fast moving model. The struggle against 2+ multiwound models, however, was just about to begin.
This message was edited 5 times. Last update was at 2013/09/24 01:07:21
I really like the battlefield here more a than anything. Tables should be a landscape, not a conglomeration of pieces placed so it always favors shooting armies.
It seems here that your player was rather inexperienced, as his list was not good at all and was pretty doomed against your army.
However, you are using a list that is far from a netlist, I'm interested to see how it does.
Argel Tal and Cyrene: Still a better love story than Twilight
2013/09/21 19:43:59
Subject: 1850pt Tournament - Calypso2ts's Daemons - Game #1
Armies: Lokisons (The Rout), Sluts and Puppies: A Chaos Daemon Experience (Daemons), PDF of the Union of Surviving Slavic Regimes (Imperial Guard), The Dead Live! (Chaos Marines), Loke's Blokes (Orks), The Kabal of the Hidden Blade (DE)
2013/09/22 00:51:55
Subject: 1850pt Tournament - Calypso2ts's Daemons - Game #1
herpguy wrote: I really like the battlefield here more a than anything. Tables should be a landscape, not a conglomeration of pieces placed so it always favors shooting armies.
It seems here that your player was rather inexperienced, as his list was not good at all and was pretty doomed against your army.
However, you are using a list that is far from a netlist, I'm interested to see how it does.
The table was beautiful, it came as part of a prefab foam set that a local - many will know Courtney from Da Boyz - made some modifications to and painted it. The interesting part of the table is it has a lot of 4+ cover and multiple levels, but there is not a lot of true LOS blocking terrain on it. It also has a variety of ramps, stairs and access points that can really influence whether the assault is through cover or not.
I have played a lot of Grey Knights over the last three years - and in general Daemons have always done well killing MEQ - so that experience coupled with the units in my list itself made for a rough matchup. I do not know how my opponent finished, but I would not have been surprised if he managed to win his next 2 games.
I feel sorry for MEQ in the Age of the Xenos that is 6E.
BTW, awesome terrain and congrats on the win.
Thanks - having such great terrain locally really sets these tournaments apart. MEQ have a rough road of it at the moment, that 3+ armor save just does not seem to go that far anymore.
anonymou5 wrote: Love the list and I love the terrain. I wish more tournament tables looked like that. Really improves the game tactically and aesthetically.
The list took a while to craft - I had Screamers in there at one point and without getting any games in since mid-July the evolution was largely theoretical. The idea is to really support the Assault phase for the Seekers, Hounds, Daemonettes and Fiends as much as possible. This table was probably the most impressive I played on, but the others were also well done.
With a victory in the first game of the tournament I was in rare company - with approximately half the field - of being undefeated. This game saw me matched up on a fairly open table - there is a hint on the table as to my opponent's army.
It appears Grey Knights (GK) are appropriately hunting Daemons. I discuss my list (with a swap of a fiend for a Locus of Fury) here. My opponent brought a hybrid mech list with a pair of Dreadknights, summarized below:
HQ Grand Master w/ Blind Grenades, Rad Grenades, Psycannon Warlord Trait: Opponent's use lowest leadership for tests
Heavy Support Dreadknight w/ Jump Pack, Greatsword, Heavy Incinerator Dreadknight w/ Jump Pack, Greatsword, Heavy Incinerator
Mission Parameters Mission: Big Guns Never Tire Deployment: Vanguard Strike
Pregame Thoughts This game is going to come down to - more than any other - the specific matchups that I can achieve. The Hounds need to get into the Strike Squad while avoiding the Terminators and Dreadknights. They need to do so with a Fiend Escort to prevent power weapon shenanigans from wrecking them and to let them go first. The Fiends really need to avoid the Dreadknights - since they can instant kill them very easily and force a terrible instability test.
The Daemonettes and Seekers are perfect to hit the Dreadknights and/or the Terminators who will waste their force weapons on those units. With Dark Excommunication not removing rending anymore - nor more Daemonic Gift of Rending Claws - they can finally eat up Dreadknights without requiring multiple rending units to hit at once. If I miss on any of these charges it could cost the game. In the meantime Fateweaver's role is to whittle down the Terminators with her AP1/2 weapons and tear open transports where possible. She needs to survive for me to manipulate the Warp Storm effectively so I will play fairly conservatively.
Psychic Powers/Daemonic Gifts Fateweaver: Left Head (Misfortune/Molten Beam)/Right Head (Endurance/Psychic Shriek) Horrors: Flickering Fire/Flickering Fire Khorne Herald: Grimoire of True Names
Deployment
Spoiler:
I win the first turn and decide to deep strike the Horrors and Daemonettes. The rest of the army lines up as close as possible - if I am seized on and the Dreadknights teleport forward they are dead on the spot from Seekers/Fiends/Hounds hitting them all at once - so I am not worried about being too clumped.
Both Skull Cannons are deployed to be able to move up as the game progresses and grab the objectives.
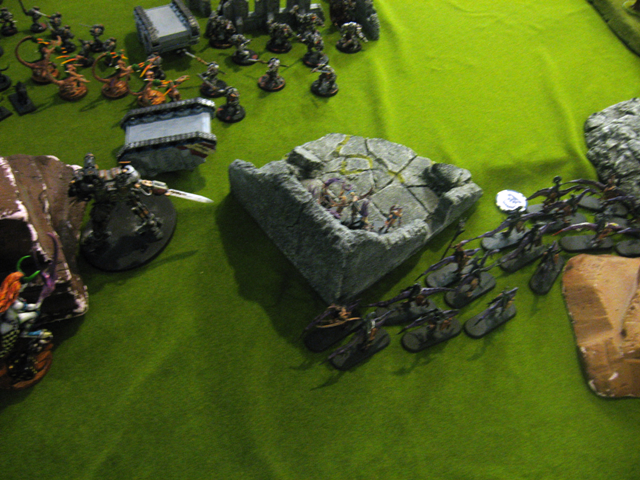
The Grey Knights deploy weighted towards their left flank.
With the Terminators deployed dead center and the Rhinos spread out a bit I have a good opportunity to get the hounds out of Line of Sight and away from the Dreadknights. I am going to try to sweep up his right flank and pivot around a central stronghold of Fiends and Seekers.
Turn 1 - Daemons
Spoiler:
The GK fail to seize the initiative and I move up - keeping most units out of Line of Sight. Fateweaver casts Endurance on the hounds and will do so each turn while the Hounds get the Grimoire - they succeed unless otherwise specified.
Between the Skull Cannons and Fateweaver I managed to grab first blood with a Rhino Kill through Hull Point attrition - those GK are not dead, they just have not been placed yet. I also manage a 10 on the Warp Storm table.
Turn 1 - GK
Spoiler:
I missed a picture of Turn 2 because it got a little more intense than I intended for it to be. My opponent moved forward with his 2x Strikes and Terminators and took aim at Fateweaver - the first round of shooting grounded her - even with a reroll. She then loses 3 of her 5 wounds - and was very close to losing the last two. I also learned a valuable lesson here - psycannons firing in heavy mode can lay down snap shots at flyers - so I was eating 8 psycannon shots from the first strike squad rather than 4. Luckily for me, one of the Dreadknights advanced dangerously close to my seekers. My opponent also wisely Flat Outed a rhino to block my advance.
Turn 2 - Daemons
Spoiler:
I get a Horror squad from reserve and deep strike it towards the left flank to take some shots at the Rhino blocking my path and everything moved forward. I use the Skull Cannon to give my Seekers Grenades against the Dreadknight - and to eat overwatch.
The Hounds move into the first strike in conjunction with the Fiends and wipe the unit before they can swing.
Turn 2 - GK
Spoiler:
The Fiends who wrecked the Rhino are ready to get pasted by the free Dreadknight.
The Dreadknight makes me miss Eternal Warrior as it wipes the squad. In the background my opponent made a slight mistake and fired his Strike Psycannons in Heavy mode which means he cannot charge the Hounds.
The left flank is looking good at this point for the Daemons, while the Dreadknight on the right bites the dust.
Turn 3 - Daemons
Spoiler:
Fateweaver cannot see the Dreadknight to misfortune it, but advances to attempt psychic scream. She gets denied by the Dreadknight!
The fiends in this picture are moving so after they crush the strikes they can shield the hounds.
The Seekers are close on a charge - it is about 8" from this position but overwatch means I lose the front 2! With fleet I get an 11" which is enough to make it - especially when measuring from the Seekers near the wall. I thought about charging Fate to eat overwatch first, but if I failed with the Seekers I did not want to lose her to the S10 hits.
While note in the combat, the Daemonettes run behind the wall to avoid being toasted by the terminators.
Turn 3 - GK
Spoiler:
The GK have taken a beating, but the central Terminator unit remains a huge threat - especially with defensive grenades on the unit.
The terminators charge and wipe out all but 1 Seeker - who is too far away from combat to consolidate back in. The seeker was originally almost 11" away, but rolled a great consolidation so she can die for the cause.
Turn 4 - Daemons
Spoiler:
The terminators Deny the witch on misfortune - which means no Psycchic Scream. Fates other shooting knocks down a pair of Terminators. The other Horrors come in near the far objective and sit on it.
The last seeker dies for the Daemonettes overwatch while a combine charge of Fiends, Hounds and Daemonettes creates a giant scrum in the center. I setup the Fiends so that the Brotherhood Banner and a Hammer are going to have to take most of their damage - and I ace the Banner to prevent automatic Force Weaponing of Hounds/Fiends.
The Dreadknight endures the Daemonettes while all but two Terminators are taken out from the combined might of the Fiends, Daemonettes and Flesh Hounds.
Turn 4 - 5
Spoiler:
These turns move quickly since there is only the assault to worry about. I resist additional damage but somehow cannot get down the Grand Master. I even throw Fate in there on the last turn - because who else should be fighting a GK Grand Master!
Final Score is Daemons: 8 GK: 0
Major Victory for the Daemons!
Game Thoughts
Spoiler:
I made a mistake early with Fateweaver and almost lost her far too early in the game - which could have been a huge hit. Luckily, she managed to stick around and just reaffirmed why I generally dislike using expensive multi-wound models like Daemon Princes or Greater Daemons. My experience with Daemons in this game definitely worked out, I think the way to handle my army would have been to focus on the Seekers/Daemonettes early - and then to use the Dreadknights aggressively afterward. Even if they had played keep away for most the game and then Teleport contested (or even scored due to Big Guns) this could have easily been a draw. In most cases, though, playing Dreadknights aggressively up a flank is going to overwhelm many opponents.
I took a look around after the round and I saw that among the undefeated players thus far were Hyv3mynd and Crimaathan from the Blog plus two other players. From an army composition standpoint that is an Eldar/DE, Tyranids, Space Marines (with 2 Land Raiders!) and Guard. Finally, I was going to play something that was not Grey Knights.
This message was edited 3 times. Last update was at 2013/09/22 01:16:32
I love the list! I actually run a similar base for my daemons with a herald of khorne (grimoire and fury locus) with a large unit of hounds, fatey, and 2 skull cannons. I do not know why there is such internet bashing of skull cannons. They are wonderful. The cannon having ap5 ignores cover means dead lootas, pathfinders, or even cultists. Grenades for our daemons is just a bonus.
Do you play the fiends as being cumulative? I am contemplating trying those out next.
Good games especially because they are grey knights losing .
-Drakkol
2013/09/24 00:49:53
Subject: Re:1850pt Tournament - Calypso2ts's Daemons - Game #1 and #2 of 3
I love the list! I actually run a similar base for my daemons with a herald of khorne (grimoire and fury locus) with a large unit of hounds, fatey, and 2 skull cannons. I do not know why there is such internet bashing of skull cannons. They are wonderful. The cannon having ap5 ignores cover means dead lootas, pathfinders, or even cultists. Grenades for our daemons is just a bonus.
This is exactly why I opted to bring the cannons - it seems like everyone is bringing their Aegis to generate 4+ or 2+ saves on generally annoying units like Heavy Weapons Squads, Cultists, or Lootas. The Grenades also proved to be very useful in a number of cases to be sure I could deliver the death blows I needed to avoid eating Force Weapons.
Do you play the fiends as being cumulative? I am contemplating trying those out next.
We played them as cumulative as per the Da Boyz GtFAQ - I would not bring 2 units if it was not played this way, but so many armies are trying to abuse psychic powers that it really throws them to have to take tests at -4, 5 or 6. The -5 I for Fiends is also very good - especially when it forced units to roll a 1 for their Hit and Run rolls. The Fiends also provide great overwatch absorption and help makeup for the I4 on the Hounds.
I want to start off by noting a few mistakes that were made this game - they were pure accidents and I realized them as I received feedback on this Battle Report through the Mandulian Chapel (see signature for link!).
1 - Gaunts cannot assault out of reserve. I knew this since my Seekers do not do so, but somehow missed it the next turn.
2 - Feel No Pain cannot be taken against an Axe of Khorne roll of a 6.
3 - Spore mines do not give up First Blood (no impact on the game)
It is the last round of the tournament and I had forgotten how tiring 3 straight games of 40k can be - I am going to need to train (or something?) for the upcoming GT. I think the biggest problem is reaching across the table - shooting armies are definitely easier on your back.
In the first game of the tournament I took down a GK player with a little help from the Warp Storm table and in the second game the GK looked to purge the Daemon threat - but were rebuffed again. This puts me at 2 - 0 thus far along with 4 other players (SM, Eldar/DE, IG and Tyranids). I drew the Tyranid matchup at the second table which would be my first tournament game at Millennium against non-GK since last November.
The opposing army included:
HQ Hive Tyrant w/ Old Adversary, Two Twin Linked Devourerers w/ Brainleech Worms, Armored Carapace
Hive Tyrant w/ Heavy Venom Cannon, Armored Carapace
Heavy Support 1x Tyrranofex
1x Tyrranofex
2x Biovores
Mission Parameters Mission: The Relic
Deployment: Dawn of War
Pregame Thoughts
Spoiler:
This is a very unorthodox Tyranid list, but it has all the elements that the lists I tend to build struggle against. he has 6x MC - four of which are T6 that I have to assault to kill. He has some medium ranged templates/blasts that can take out my rending units - the ones I need to use to take down the MC and he can smash apart my Fiends/Hounds who are fairly useless against most of his threats. Finally, the Biovores I have no real good way to deal with and I need to remove them to hold onto The Relic. On top of it all, if he gets the first turn he can grab The Relic and then pass it off to a Tervinon if I do not wipe away the unit - which is actually pretty likely given the range of the Hounds and Fiends.
My advantage is I can disrupt his psychic powers, he needs to be wary of my Rending units and if I can get the relic or divert him his army moves pretty slowly.
Psychic Powers/Daemonic Gifts
Spoiler:
Fateweaver: :Left Head (Prescience/Spontaneous Combustion) : Right Head (Enfeeble/Psychic Shriek)
Khorne Herald: Grimoire of True Names and bonus Axe of Khorne
Tervigons: Keep Catalyst
Hive Tyrant: (Endurance/Psychic Shriek) : (Iron Arm/Psychic Shriek)
The Doom: Psychic Shriek
His warlord trait is Night Attacker, which he opts not to use for Turn 1 Night Fight.
Deployment
Spoiler:
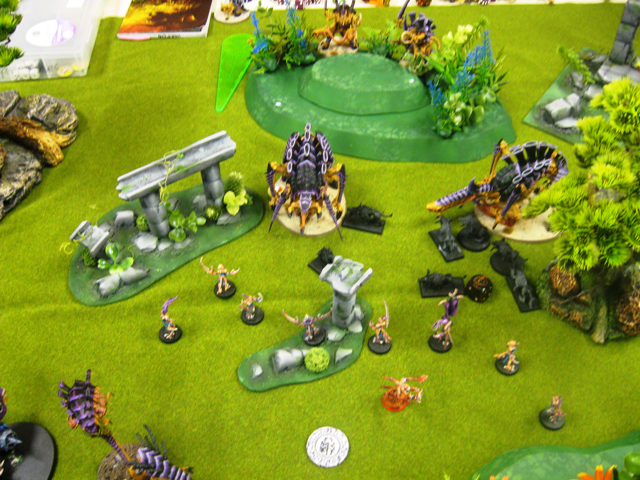
We both lineup in front of one another - I am way of being stolen on so I opt to leave the Seekers in Outflank reserve to reduce my footprint and I hide Fateweaver and the Skull Cannons behind the brick wall on my left flank. The Fiends are on the wide flanks to push in Turn 2 and utilize the trees to block LOS and get cover. I cannot scout the Flesh Hounds due to the Spore Mines sitting on The Relic. The Horrors are also in reserve - potentially to shoot down the Biovores.
(Picture of deployment seen on turn 1!)
Turn 1 - Daemons
Spoiler:
The Tyranids do not steal the initiative and we start. I move the Daemonettes up and move the Fiends, but conservatively keep back the hounds for a countercharge. I have a slight disagreement about my Grimoire roll - if I cannot put a dice on one that is rolled I normally reroll it - but my opponents want me to keep the initial roll. I have to exercise Fateweaver reroll to put the Grimoire on the Daemonettes
I annihilate the Spore Mines with a Skull Cannon shot for First Blood!. I also manage to wound Fateweaver with a nurgle Warp Storm result - one that is normally good against Tyranids since it is 4+ poison. I roll 5 Wounds onto Fateweaver, but manage to save two of them and Fate is looking a bit vulnerable. I had kept him back to avoid the Rupture Cannons from the Tyrannofexes - which was a lucky decision.
Turn 1 - Tyranids
Spoiler:
I did not manage to inflict much damage last turn, so the Tyranids are free to cast all their psychic powers - which they will do every turn unless specified.
Both Tervigons spawn Gaunts and luckily for me they both run out on relatively low spawns. Almost all the shooting goes into my Daemonettes who weather the storm with limited casualties.
Turn 2 - Daemons
Spoiler:
The Seekers outflank on the right side - in retrospect I should have done so on the other flank further back to avoid the Termagants in reserve . Unfortunately I had tunnel vision for the biovores. I also mishap a unit of horrors on an 11" scatter so that I cannot waste the Biovores with shooting.
The Daemonettes move up to claim the Relic and the hounds move to annihilate the Gaunts so the Daemonettes can escape.
The Hounds and Fiends easily take down both units of Gaunts and spread across the front to create a barrier against Tervigon charges.
Turn 2 - Tyranids through Turn 3 - Tyranids
Spoiler:
The conflict became a little intense at this point so I do not have a full set of pictures. I am going to provide the general flow of the game. One unit of Gaunts arrive from reserve, but nothing else makes it in. The Hive Tyrant assaults the Seekers supports by charging gaunts to keep rending attacks off of it - I realize just now that those gaunts could not charge right out of reserve. This is huge since a set of 12-14 Seekers has a very good chance to kill an Iron Arm Tyrant on 1 turn of combat (36 attacks, 18 hits, 3 Rends with a lot of upside). In spite of this the combat goes on for a few turns until both Tyrants finish the Seekers.
The Hounds get charged by a Tyrranofex - he does not challenge in the first round which lets the Khorne Herald Instant Kill one Tevigon. The Herald would later die in a challenge with the other Tervigon due to four 5+ Feel No Pain saves keeping it from being Instant Deathed
The Tyrannofex would be eaten by the Daemonettes while Fiends sneak around back to take down the Biovores.
The Horrors play backup to grab the Relic if it is dropped by the Daemonettes.
The Fiends are disrupting psychic powers and about the charge the Biovores here.
The Doom comes in and almost wipes out the Daemonettes and Horrors. It gets most of the Horrors but a Skull Cannon hit Instant Kills it before it can do much more damage.
In spite of not doing much damage, the Doom took out all but one Horror while the Flesh Hounds stand strong though instability tests.
Turn 4 - Daemons
Spoiler:
I just need to do the minimum to make sure I cannot lose this game by giving it away.I have First Blood, can grab Linebreaker with Fateweaver and I need to keep the Relic away/create a movement blockade. At worst I will get a tie if he can ground Fateweaver.
The Daemonettes move backward and the Horror moves up to get in the way while the Skull Cannon moves forward as part of my blockade.
The hive Tyrant shown in this picture becomes Possessed by a Nurgle Herald - saving me from Devourer shots and providing another unit to tie up the Tervigon. The Gaunts are killed by a Skull Cannon shot. One single hound holds strong to tie up his two monsters for one more turn.
Turn 4 - Tyranids
Spoiler:
My blockade of Fate and Skull Cannon remains in place. The hounds finally give out, but his shooting cannot take down the Daemonettes since all he has at this point is the Large Blast from the Heavy Venom Cannon. We call it here and total up the points:
Final Score is Daemons: 4 Tyranids: 0
Turn 5 - Daemons
Spoiler:
Game ended turn 4!
Turn 5 - Tyranids
Spoiler:
Game ended turn 4
Game Thoughts
Spoiler:
I always struggle against Tyranids - especially when they have this many large monsters. This list is really designed to take down large numbers of enemies or to pile wounds onto T3/4 models until they start failing saves. I made a few mistakes this game - compounded by the rules error in allowing the Gaunts to put a lot of pressure onto the Seekers. Overall though, focus on the mission and sacrificing units one by one to keep the Tyranids tied up meant a win. A little luck one way (or another) may have also led to a stronger win on my part - if the Tervigon had not passed his Catalyst on a -4 from the Fiends or failed a 5+ feel no pain against the Axe of Khorne.
Tournament Results With a 3 - 0 record and 5 of 9 potential bonus points (taken from Slay the Warlord, Linebreaker and First Blood for each game) I took 2nd place - I will leave out to whom to not spoil the results. I did not miss out on first place though for Battle Points - it was the unpainted Flesh Hounds and Seekers that brought down my score. I am pretty happy though with the performance of this list and I had a chance to play 3 great opponents over the day. Coming up soon, I will talk through the list and the aspects I liked/disliked and the weaknesses associated with the list.
This message was edited 1 time. Last update was at 2013/09/24 01:06:50


 .....Bay Area Open GT 2013 - Best Tyranids
 .....LVO GT 2014 Team Tournament - Best Generals


 11k+
11k+
 4k
4k
 7k
7k
 3k
3k  .
.


 Cowards will be shot! Survivors will be shot again!