| Author |
Message |
 |
|
|
|
|
Advert
|
Forum adverts like this one are shown to any user who is not logged in. Join us by filling out a tiny 3 field form and you will get your own, free, dakka user account which gives a good range of benefits to you:
- No adverts like this in the forums anymore.
- Times and dates in your local timezone.
- Full tracking of what you have read so you can skip to your first unread post, easily see what has changed since you last logged in, and easily see what is new at a glance.
- Email notifications for threads you want to watch closely.
- Being a part of the oldest wargaming community on the net.
If you are already a member then feel free to login now. |
|
 |
2013/10/22 16:59:01
Subject: "Inking" the lines of Vehicles/Tau Mech Armor without Smudging the surface area
|
|

Longtime Dakkanaut
|
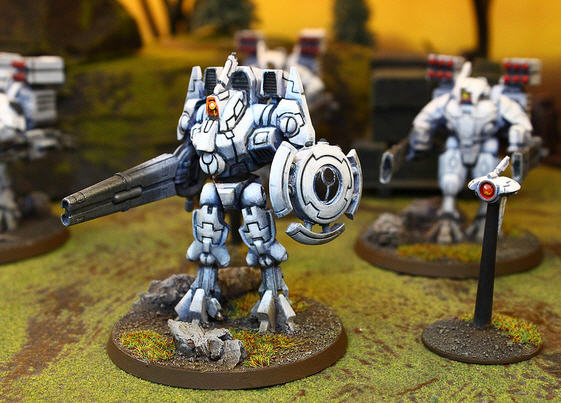
Hi guys. Referencing the picture below, is there any advice or tips for quickly inking a models "recess" detail lines. In the case of the picture below I'm talking about the black lines across the models armor. When I get my brush and brush my badab black shade all over the model a lot of it tends to hit the surface areas and stay there as well as hit the recesses.
-Should I not be shading over the entire Surface area and just pinpointing and drawing the lines in the recesses with my brush? I've tried this before and it's super hard for me to just stay inside the lines... especially on smaller models like Crisis Suits.
-I've heard of airbrushing the model first in Satin Varnish then brushing on the shade over the entire surface area and it keeps it off the actual surface area and only into the recesses because of the Satin Varnish. Does this really work?
I'd really appreciate any advice/tips on doing this shading into the recesses of the armor QUICKLY but also without messing up the rest of the models surface area I've taken so long to airbrush nicely.
|
|
This message was edited 2 times. Last update was at 2013/10/22 16:59:42
Easy Stable Flying base tutorial here on Dakka:
http://www.dakkadakka.com/dakkaforum/posts/list/356483.page
Check out my Tyrannofex Conversion tutorial here on Dakka:
http://www.dakkadakka.com/dakkaforum/posts/list/334523.page
Check out my Librarian holding fire tutorial here on Dakka:
http://www.dakkadakka.com/dakkaforum/posts/list/314801.page |
|
|
 |
|
2013/10/22 18:12:45
Subject: "Inking" the lines of Vehicles/Tau Mech Armor without Smudging the surface area
|
|
Gargantuan Gargant
|
If you want tutorials, search for "pin washes." They're meant for this exact sort of thing - blacklining models, darkening panel lines. Varnishing the model first does help control the wash, but gloss is generally recommended over satin. The lack of tooth helps the wash flow more easily, allowing capillary action to draw it down the lines. A gloss coat would help control surface staining even with an overall application, but it wouldn't avoid it, entirely. Best to go with a limited application, since you want to leave the surface undisturbed.
Also, note that "pin wash" is a general term referring to the technique - it's how you apply the wash, not the specific formulation of what you're applying. I might recommend using an oil wash, if you're able and willing. The varnish will protect the paint from the solvent used, so you can capitalize on the oil's long dry time (in a manner of speaking - solvent-heavy mixes don't take that long to dry in place, but they can be re-wet for some time, afterward) and use a thinner-dampened sponge or cotton bud to clean up any pigment that spilled over onto the face of the panels.
|
The Dreadnote wrote:But the Emperor already has a shrine, in the form of your local Games Workshop. You honour him by sacrificing your money to the plastic effigies of his warriors. In time, your devotion will be rewarded with the gift of having even more effigies to worship.
|
|
|
|
|
2013/10/22 21:05:07
Subject: "Inking" the lines of Vehicles/Tau Mech Armor without Smudging the surface area
|
|
Longtime Dakkanaut
|
Do your pin wash with oil paints, that will help.
|
|
|
|
|
|
2013/10/22 21:58:33
Subject: "Inking" the lines of Vehicles/Tau Mech Armor without Smudging the surface area
|
|

Morphing Obliterator
|
Do the wash first. Then carefully paint the armour around the lines.
|
 12000 pts 12000 pts
 5000pts 5000pts |
|
|
|
|
2013/10/22 22:01:04
Subject: Re:"Inking" the lines of Vehicles/Tau Mech Armor without Smudging the surface area
|
|
Fighter Ace
|
An alternate option is to pick up some art pens, 0.2mm tip black ink, it's what i've use to do the lines on white without messing up anything. You do need a steady hand though, and if you're looking for a gentle transition it won't be awesome. I did it on these guys though and I like the effect. They're relatively cheap though and you can grab em at most craft/hobby stores.

|
|
|
|
|
|
2013/10/22 22:17:03
Subject: "Inking" the lines of Vehicles/Tau Mech Armor without Smudging the surface area
|
|
Longtime Dakkanaut
|
I'm just using the GW Nuln oil, of course my color scheme is dark grey and red already so some smudging probably doesn't matter so much to me.
|
Like watching other people play video games (badly) while blathering about nothing in particular? Check out my Youtube channel: joemamaUSA!
BrianDavion wrote:Between the two of us... I think GW is assuming we the players are not complete idiots.
Rapidly on path to becoming the world's youngest bitter old man. |
|
|
|
|
2013/10/23 03:13:43
Subject: "Inking" the lines of Vehicles/Tau Mech Armor without Smudging the surface area
|
|
Longtime Dakkanaut
|
Easiest way I can think of and to contribute something different. Is prime the model black. Do a grey/blue base coat over the armor panels and to create all your "black lines" then build up white over it. Or another color whatever.
|
|
|
|
|
2013/10/23 03:35:18
Subject: "Inking" the lines of Vehicles/Tau Mech Armor without Smudging the surface area
|
|
Secretive Dark Angels Veteran
UK - Warwickshire
|
Pin washing is what your after. But is not fast  takes a lot of care and attention.
Havent got around to trying oil washes yet, but they would be the fast easy way to do it;
Spray gloss varnish,
Thin oil paint with mineral spirits untill its wash like.
Apply it, no need to be tooo careful.
Use a cotton bud, soaked in mineral spirits to clean up and remove any wash in areas you dont want it.
Varnish again with gloss and then matt varnish before applying more work over the top of the oil...
And leave it to dry long enough between each layer oils are slow drying.
|
'Ain't nothing crazy about me but my brain. Right brain? Riight! No not you right brain! Right left brain? Right!... Okay then lets do this!! |
|
|
|
|
2013/10/23 03:37:14
Subject: "Inking" the lines of Vehicles/Tau Mech Armor without Smudging the surface area
|
|
Longtime Dakkanaut
|
Use a lacquer based thinner and they will dry as fast as the lacquer dries, which is pretty dang quick.
|
|
|
|
|
|
2013/10/23 03:43:12
Subject: "Inking" the lines of Vehicles/Tau Mech Armor without Smudging the surface area
|
|
Secretive Dark Angels Veteran
UK - Warwickshire
|
The point of using the mineral spirits is that it wont eat away at the gloss lacquer underneath it.
Also... what lacquer are you using that dries fast?
2K High Gloss Acrylic Urethane Lacquer (what goes onto cars,bikes,boats etc etc) takes around 24 hours to dry at room temps (90minutes at 70degrees C)
...Not sure I can advise the use of lacquer thinners... but as I said I'm yet to try oil washes. Just doesn't sound sensible in my head... I've used lacquer thinners to strip a model and it took quite literally 30 seconds to go from caked on paint to bare metal. sooo... can't see myself trying that for oil washes ever lol.
|
|
This message was edited 2 times. Last update was at 2013/10/23 03:46:46
'Ain't nothing crazy about me but my brain. Right brain? Riight! No not you right brain! Right left brain? Right!... Okay then lets do this!! |
|
|
|
|
2013/10/23 03:44:37
Subject: "Inking" the lines of Vehicles/Tau Mech Armor without Smudging the surface area
|
|
Longtime Dakkanaut
|
HairySticks wrote:The point of using the mineral spirits is that it wont eat away at the gloss lacquer underneath it.
Also... what lacquer are you using that dries fast?
2K High Gloss Acrylic Urethane Laquer (what goes onto cars,bikes,boats etc etc) takes around 24 hours to dry at room temps (90minutes at 70degrees C)
Testors dull cote, dries in about 20 min, been doing it for years. Also using an acrylic based gloss coat, like future floor polish, will alleviate a lot of the headaches when doing pin washes.
|
|
This message was edited 1 time. Last update was at 2013/10/23 03:45:34
|
|
|
|
|
2013/10/23 03:54:19
Subject: "Inking" the lines of Vehicles/Tau Mech Armor without Smudging the surface area
|
|
Secretive Dark Angels Veteran
UK - Warwickshire
|
Ahh I see, Your talking about 1K lacquers. (if it comes in a rattle can it has to be 1k, or celluslose pretty much... certainly cant be 2K)
What I know as lacquer thinners, thins 2K paints, that is paints which have a chemical hardener in the mix, that is not added untill just before spraying the job - as once its added the clock is ticking);
No paint store in the world should be selling these thinners to the kids that make up a large part of our hobby community tbh.
But mineral spirits come from the hardware store and the art supply store so can probably be gotten a hold of easier.
If it works for you I can't argue hehe, but would still reccomend using mineral spirits as thats the done thing for artists oils. Surely theres goood reason that the oil painters of the world arent using lacquer thinners with oil paints?
|
'Ain't nothing crazy about me but my brain. Right brain? Riight! No not you right brain! Right left brain? Right!... Okay then lets do this!! |
|
|
|
|
2013/10/23 03:56:50
Subject: "Inking" the lines of Vehicles/Tau Mech Armor without Smudging the surface area
|
|
Longtime Dakkanaut
|
we are talking about two different things hear. Sorry if I was not clear, use the OMS to thin and apply and clean up the oil paint and pin washes, but hit it with a lacquer thinner, aka Testors, and it will be dry and safe to handle in 20min.
Ashton
|
|
This message was edited 1 time. Last update was at 2013/10/23 04:23:35
|
|
|
|
|
2013/10/23 04:31:01
Subject: "Inking" the lines of Vehicles/Tau Mech Armor without Smudging the surface area
|
|
Secretive Dark Angels Veteran
UK - Warwickshire
|
 Redfinger wrote: Redfinger wrote:we are talking about two different things hear. Sorry if I was not clear, use the OMS to thin and apply and clean up the oil paint and pin washes, but hit it with a lacquer thinner, aka Testors, and it will be dry and safe to handle in 20min.
Ashton
I see
Yeah I get you now, I'd still say to let the oil wash dry properly before applying a clear coat over it? Otherwise youl just trap wet paint in leaving it no way to evaporate off its solvents surely?
|
'Ain't nothing crazy about me but my brain. Right brain? Riight! No not you right brain! Right left brain? Right!... Okay then lets do this!! |
|
|
|
|
2013/10/23 04:48:32
Subject: Re:"Inking" the lines of Vehicles/Tau Mech Armor without Smudging the surface area
|
|

[MOD]
Anti-piracy Officer
Somewhere in south-central England.
|
|
|
|
|
|
|
2013/10/23 05:42:49
Subject: Re:"Inking" the lines of Vehicles/Tau Mech Armor without Smudging the surface area
|
|

Sneaky Striking Scorpion
|
Looking at the crispness and darkness of the lines I would say an art pen was used. I have done similar with a 005 black micron.
Make sure its the last step on the model and make sure the paint is 100% dry, micron pens will bleed out ink into wet paint, then you have a mess.
|
|
|
|
|
|
2013/10/23 07:43:04
Subject: "Inking" the lines of Vehicles/Tau Mech Armor without Smudging the surface area
|
|
Trustworthy Shas'vre
|
HairySticks wrote:Pin washing is what your after. But is not fast takes a lot of care and attention.
Havent got around to trying oil washes yet, but they would be the fast easy way to do it;
Spray gloss varnish,
Thin oil paint with mineral spirits untill its wash like.
Apply it, no need to be tooo careful.
Use a cotton bud, soaked in mineral spirits to clean up and remove any wash in areas you dont want it.
Varnish again with gloss and then matt varnish before applying more work over the top of the oil...
And leave it to dry long enough between each layer oils are slow drying.
This...this is almost exactly the technique I use and it works very well.
One note on the pens: the tips don't work well in the crevice of the panel lines, and can get damaged and give inconsistent results.
(I know its hard to beleive if you have not actually tried it on a tau suit - but I have - many pens died to bring you this information....)
The wash method above is what I have found to work very well.
|
DavePak
"Remember, in life, the only thing you absolutely control is your own attitude - do not squander that power."
Fully Painted armies:
TAU: 10k Nids: 9600 Marines: 4000 Crons: 7600
Actor, Gamer, Comic, Corporate Nerd
|
|
|
|
|
2013/10/23 10:10:27
Subject: "Inking" the lines of Vehicles/Tau Mech Armor without Smudging the surface area
|
|
Discriminating Deathmark Assassin
|
And you don't wind up with loads of varnish? Are these thin coats of varnish? I'm starting an IG army and I want to get my tanks as good as possible first time out. I've watched a couple of tutorials, but I feel vague on the varnishing thing.
So a (thin?) coat of gloss. Pin wash. Then another coat of gloss (is this to fix the wash?). then Matt to bring it back to a matt finish. What other work would you be doing now? And do you need ANOTHER coat of matt varnish after THAT?
|
|
|
|
|
2013/10/23 10:35:28
Subject: "Inking" the lines of Vehicles/Tau Mech Armor without Smudging the surface area
|
|
Secretive Dark Angels Veteran
UK - Warwickshire
|
I would imagine that theyre thin coats  try to avoid caking in details. The first is just to protect the acrylic paint underneath from the mineral spirits used in the oil's and the cleanup stages.
The 2nd one would be just to seal it in to protect it from handling (especially for gaming mini's)
You could probably skip the gloss and just do matte the 2nd time around if you wanted, (or satin if thats what you like) But I gather a lot of people like to do gloss then matt for durability.
Really need to try this out for myself... im giving advice here on something which I've not done personally hehehe but am confident that I've got the jist of how it works.
|
'Ain't nothing crazy about me but my brain. Right brain? Riight! No not you right brain! Right left brain? Right!... Okay then lets do this!! |
|
|
|
|
2013/10/23 13:33:42
Subject: "Inking" the lines of Vehicles/Tau Mech Armor without Smudging the surface area
|
|
Swift Swooping Hawk
|
Yeah Pin Washes is pretty much the last step on a model. Make sure you finish everything else. Seal in Gloss. Pin Wash. Seal in Gloss. Matt varnish until happy.
I use it for the lines on my Wave Serpents. Works great.
|
|
|
|
|
2013/10/23 16:19:15
Subject: "Inking" the lines of Vehicles/Tau Mech Armor without Smudging the surface area
|
|
Longtime Dakkanaut
|
You should be doing a thin coat yes. As a general rule I always do 2 coats gloss and 2 coats matt even if I'm not pin washing. Turns out pretty good. Make sure the previous coat is dry before you add the next. I usually let it go 24 hours between coats just to be on the safe side.
|
|
|
|
|
2013/10/23 19:31:14
Subject: Re:"Inking" the lines of Vehicles/Tau Mech Armor without Smudging the surface area
|
|
Brigadier General
The new Sick Man of Europe
|
I was think you could apply black pen ink using a small brush.
|
DC:90+S+G++MB++I--Pww211+D++A++/fWD390R++T(F)DM+
|
|
|
|
|
2013/10/23 22:16:36
Subject: Re:"Inking" the lines of Vehicles/Tau Mech Armor without Smudging the surface area
|
|
Focused Fire Warrior
|
Nuln oil straight into the gaps, I know my white is nowhere near as good as the examples but i think the lines look fine

|
|
|
|
|
2013/10/23 23:52:17
Subject: "Inking" the lines of Vehicles/Tau Mech Armor without Smudging the surface area
|
|
Trustworthy Shas'vre
|
awesome!
One important point;
The first layer of thin gloss is more than just to "protect" the paint from any wiping of other washes/mineral spirits.
It also makes the upper layers less "absorbent" which means that if you do get wash on the flat surface areas, they wash will tend to not stain as much, and can be easily wiped off.
Note, you can use nulin oil (or any other black wash) in this method. The key to getting the wash into the panel lines is having it with very low viscosity (i.e. like water) so capillary action will draw it along the cracks.
The biggest advantage of the mineral spirits/oil paint method is that you get some incredible pigment density (i.e. very dark) coverage in a very thin medium. This covers exceptionally well compared to a normal acrylic medium based wash.
This is kind of an experiential thing (i.e. you have to try it to believe just how good it is). However, if you are getting good results vs. work with other methods...keep doing what you are doing...
best of luck!
|
DavePak
"Remember, in life, the only thing you absolutely control is your own attitude - do not squander that power."
Fully Painted armies:
TAU: 10k Nids: 9600 Marines: 4000 Crons: 7600
Actor, Gamer, Comic, Corporate Nerd
|
|
|
|
|
2013/10/24 18:03:40
Subject: "Inking" the lines of Vehicles/Tau Mech Armor without Smudging the surface area
|
|
Longtime Dakkanaut
|
Thanks guys! This has been a great help. I think since I already own some Vallejo tank washes I will try those out. But now I know the process! Gloss > Pin Wash > Gloss > Matte and to do all this as the last step once all my airbrushing is done.
Thanks!!!!!
|
Easy Stable Flying base tutorial here on Dakka:
http://www.dakkadakka.com/dakkaforum/posts/list/356483.page
Check out my Tyrannofex Conversion tutorial here on Dakka:
http://www.dakkadakka.com/dakkaforum/posts/list/334523.page
Check out my Librarian holding fire tutorial here on Dakka:
http://www.dakkadakka.com/dakkaforum/posts/list/314801.page |
|
|
|
|
2013/10/24 18:17:30
Subject: "Inking" the lines of Vehicles/Tau Mech Armor without Smudging the surface area
|
|
[DCM]
Dankhold Troggoth
|
This has been really helpful to me as well, thanks for all the insights guys
|
|
|
|
|
2013/10/24 18:28:45
Subject: "Inking" the lines of Vehicles/Tau Mech Armor without Smudging the surface area
|
|
Discriminating Deathmark Assassin
|
I've got a Leman Russ and a Chimera sitting in the Man Cave (garage) awaiting my attention. My first tanks. My first airbrush. What can possibly go wrong?
|
|
|
|
|
2013/10/24 19:37:24
Subject: "Inking" the lines of Vehicles/Tau Mech Armor without Smudging the surface area
|
|
Longtime Dakkanaut
|
Kholzerino wrote:I've got a Leman Russ and a Chimera sitting in the Man Cave (garage) awaiting my attention. My first tanks. My first airbrush. What can possibly go wrong?
Most important lesson I learned during my airbrush is make sure your paints are properly thinned. That was the hardest thing for me to learn and took me the longest to master.
|
Easy Stable Flying base tutorial here on Dakka:
http://www.dakkadakka.com/dakkaforum/posts/list/356483.page
Check out my Tyrannofex Conversion tutorial here on Dakka:
http://www.dakkadakka.com/dakkaforum/posts/list/334523.page
Check out my Librarian holding fire tutorial here on Dakka:
http://www.dakkadakka.com/dakkaforum/posts/list/314801.page |
|
|
|
|
2013/10/24 20:59:44
Subject: "Inking" the lines of Vehicles/Tau Mech Armor without Smudging the surface area
|
|
Longtime Dakkanaut
|
This is where I learned the oil wash technique.
http://youtu.be/cP9cT3firLw
Technique in use on wave serpents.
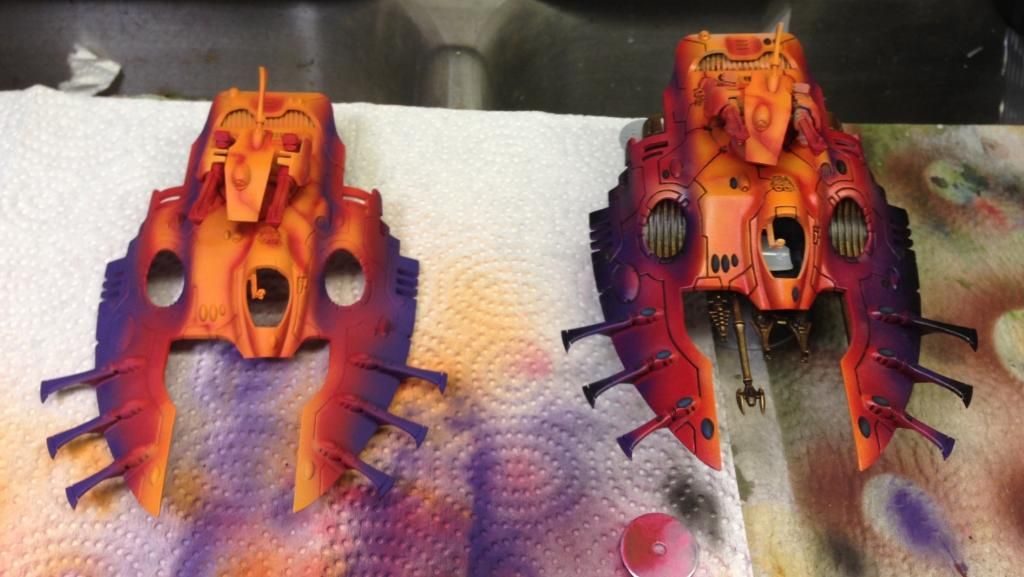
The one on the right has been varnished and oil washed. One on the left is before varnish.
The cool thing about this technique is the gloss varnish seals your undercoats. Once the oils have been applied, you can remove any unwanted color with a q-tip.
|
|
|
|
|
|
2013/10/25 00:03:16
Subject: Re:"Inking" the lines of Vehicles/Tau Mech Armor without Smudging the surface area
|
|
Been Around the Block
|
In my opinion there's never a reason to do anything other than oil washes. Trivially easy, and phenomenally forgiving when you make mistakes. Can't imagine a reason to do it any other way these days.
|
|
|
|
|
|
|
 2000 Points IG
 2000 Points SM

