| Author |
Message |
 |
|
|
|
|
Advert
|
Forum adverts like this one are shown to any user who is not logged in. Join us by filling out a tiny 3 field form and you will get your own, free, dakka user account which gives a good range of benefits to you:
- No adverts like this in the forums anymore.
- Times and dates in your local timezone.
- Full tracking of what you have read so you can skip to your first unread post, easily see what has changed since you last logged in, and easily see what is new at a glance.
- Email notifications for threads you want to watch closely.
- Being a part of the oldest wargaming community on the net.
If you are already a member then feel free to login now. |
|
 |
2013/11/26 20:58:25
Subject: Tau - Chipped Armor Edges and surfaces
|
|

Longtime Dakkanaut
|
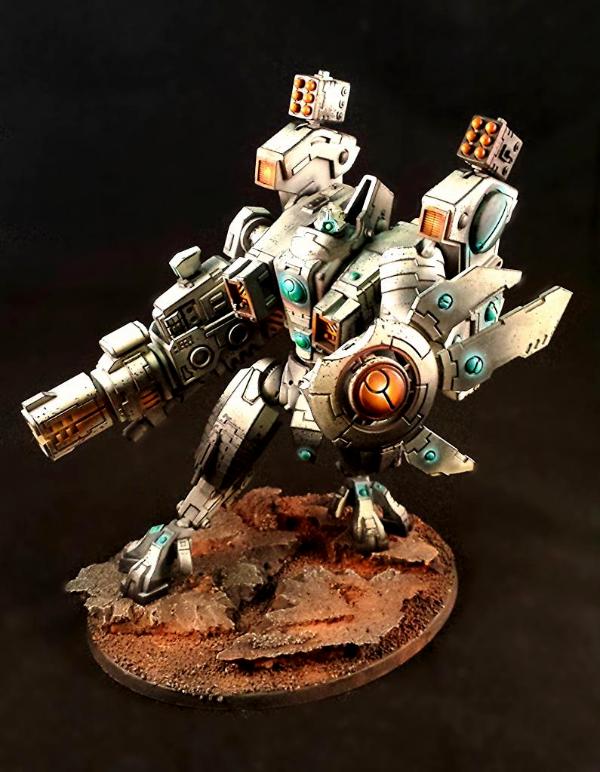
I'm wondering how this painter did the chipping effects to the edges and spot like chipping on the surfaces of this model. You can see the effect really well on the shield. I saw a painter once primer black > airbrush base > airbrush highlights then take a wet toothbrush and brush the paint off the edges of the model. Does this actually work consistently?
|
|
This message was edited 1 time. Last update was at 2013/11/26 20:59:02
Easy Stable Flying base tutorial here on Dakka:
http://www.dakkadakka.com/dakkaforum/posts/list/356483.page
Check out my Tyrannofex Conversion tutorial here on Dakka:
http://www.dakkadakka.com/dakkaforum/posts/list/334523.page
Check out my Librarian holding fire tutorial here on Dakka:
http://www.dakkadakka.com/dakkaforum/posts/list/314801.page |
|
|
 |
|
2013/11/26 21:03:47
Subject: Tau - Chipped Armor Edges and surfaces
|
|

Regular Dakkanaut
|
If the black primer layer is totally cured (fully hardened; usually takes 24-72 hours) and the layers on top are not (dry to the touch but not cured yet) then a stiff brush, like a tooth brush, could work to rub some of the outer paint off.
Most people paint the chips manually. Normally you put an outline of a colour lighter than the main colour and then fill it in almost completely with a darker colour (often black but sometimes dark brown). With the thin outline of lighter paint it looks like fairly realistic chips.
A third option would be to use hairspray or chipping medium. You apply it between the dark primer and lighter main colours and it prevents the paint from fully adhering. You can then chip it with a wet tooth brush which dissolves the layer in between causing the outer paint to chip or flake off a little and shows the primer layer through.
IMO the first and third are too uncontrollable. The third also has the issue of the areas not chipped where the outer paint is left is not adhered as well to the primer and may chip later on. Personally I'd go for the painted chips. Here is a tutorial video I found on YouTube that summarizes it pretty well:
http://www.youtube.com/watch?v=v4yrqR4Jw8E
|
|
This message was edited 1 time. Last update was at 2013/11/26 21:06:12
|
|
|
|
|
2013/11/26 21:06:21
Subject: Tau - Chipped Armor Edges and surfaces
|
|
Longtime Dakkanaut
|
 LUTNIT wrote: LUTNIT wrote:If the black primer layer is totally cured (fully hardened; usually takes 24-72 hours) and the layers on top are not (dry to the touch but not cured yet) then a stiff brush, like a tooth brush, could work to rub some of the outer paint off.
Most people paint the chips manually. Normally you put an outline of a colour lighter than the main colour and then fill it in almost completely with a darker colour (often black but sometimes dark brown). With the thin outline of lighter paint it looks like fairly realistic chips.
A third option would be to use hairspray or chipping medium. You apply it between the dark primer and lighter main colours and it prevents the paint from fully adhering. You can then chip it with a wet tooth brush which dissolves the layer in between a little and shows the primer layer through.
Hmm... is that third option easy to do? I'm usually a bit weary of trying new methods heh
So you black primer -> let it dry -> seal it with hairspray -> airbrush basecoat + highlights -> wet toothbrush the previous coats off? How is this different from the method I stated without the need for hairspray? Seems the same except for that step.
|
|
This message was edited 1 time. Last update was at 2013/11/26 21:06:49
Easy Stable Flying base tutorial here on Dakka:
http://www.dakkadakka.com/dakkaforum/posts/list/356483.page
Check out my Tyrannofex Conversion tutorial here on Dakka:
http://www.dakkadakka.com/dakkaforum/posts/list/334523.page
Check out my Librarian holding fire tutorial here on Dakka:
http://www.dakkadakka.com/dakkaforum/posts/list/314801.page |
|
|
|
|
2013/11/26 23:24:35
Subject: Tau - Chipped Armor Edges and surfaces
|
|
Regular Dakkanaut
|
Scratching the paint off without a buffer layer in between could also take the primer layer off. With the hairspray buffer in there (several companies also sell "chipping medium", I know Vallejo does) the top layers come off far easier without much risk to the primer layer. The water dissolves the hairspray to allow this to happen.
|
|
|
|
|
2013/11/27 03:08:29
Subject: Tau - Chipped Armor Edges and surfaces
|
|
Lieutenant General
|
|
'It is a source of constant consternation that my opponents
cannot correlate their innate inferiority with their inevitable defeat. It would seem that stupidity is as eternal as war.'
- Nemesor Zahndrekh of the Sautekh Dynasty
Overlord of the Crownworld of Gidrim |
|
|
|
|
2013/11/27 04:25:51
Subject: Re:Tau - Chipped Armor Edges and surfaces
|
|
Longtime Dakkanaut
|
|
|
|
|
|
2013/11/27 05:24:33
Subject: Re:Tau - Chipped Armor Edges and surfaces
|
|
Longtime Dakkanaut
|
kb305 wrote:http://www.youtube.com/watch?v=0D-b-xomPoU
medows right? here ya go
Ya thats the one! It looks pretty good. But now that the hairspray method has been mentioned I'm thinking maybe thats the better way to do it. So it doesn't accidentally strip the black undercoating... but that sponge method looks pretty easy to do!
|
Easy Stable Flying base tutorial here on Dakka:
http://www.dakkadakka.com/dakkaforum/posts/list/356483.page
Check out my Tyrannofex Conversion tutorial here on Dakka:
http://www.dakkadakka.com/dakkaforum/posts/list/334523.page
Check out my Librarian holding fire tutorial here on Dakka:
http://www.dakkadakka.com/dakkaforum/posts/list/314801.page |
|
|
|
|
2013/11/27 08:51:42
Subject: Tau - Chipped Armor Edges and surfaces
|
|

Fully-charged Electropriest
Varying cities in the North
|
The sponge method is the way to go imo.
|
|
|
|
|
2013/11/27 23:53:03
Subject: Tau - Chipped Armor Edges and surfaces
|
|
Big Mek in Kustom Dragster with Soopa-Gun
|
the wire brush trick is usually the easiest. Drawback you cant touch the model for 2-3 days after you prime it because if it isnt COMPLETELY cured, that brush will take it off as easy as the fresh paint.
|
 An ork with an idea tends to end with a bang. An ork with an idea tends to end with a bang. 
 14000pts Big 'n Bad Orkz 14000pts Big 'n Bad Orkz
 6000pts Admech/Knights 6000pts Admech/Knights
 7500pts Necron Goldboys 7500pts Necron Goldboys |
|
|
|
|
2013/11/27 23:57:09
Subject: Re:Tau - Chipped Armor Edges and surfaces
|
|
Longtime Dakkanaut
|
Sponge chipping is probably the easiest and fastest. The more advanced techniques are only really worth it for showpieces as they take forever.
|
|
|
|
|
|
|
|