Forum adverts like this one are shown to any user who is not logged in. Join us by filling out a tiny 3 field form and you will get your own, free, dakka user account which gives a good range of benefits to you:
No adverts like this in the forums anymore.
Times and dates in your local timezone.
Full tracking of what you have read so you can skip to your first unread post, easily see what has changed since you last logged in, and easily see what is new at a glance.
Email notifications for threads you want to watch closely.
Being a part of the oldest wargaming community on the net.
If you are already a member then feel free to login now.
2013/12/03 07:24:16
Subject: DA DV Tac Squad - Now with finished Rhino!
Update: See the bottom of the thread for the finished Rhino!!
I'm feeling rather accomplished today. I just ordered an airbrush and compressor thanks to Absolutionis. I've got my holiday shopping done (I asked the wife what I got for <insert family member here> and she had an answer for me!).
I've also finished up a full tac squad of DA from the DV set this past weekend. This makes a grand total of 16 models under my belt, having never touched a model before. I posted my first batch of practice five models HERE, and then for giggles I painted a chaos cultist before I launched into the tac squad. Before I show the squad pictures, I wanted to jot down my experiences this go-round. I'm still a very green painter and recorded knowledge is repeatable knowledge...a valuable product. Feel free to read and comment on my musings.
Brushes:
Spoiler:
I was armed this time with a set of Army Painters Wargamer brushes including the Insane Detail, Regiment, and Small Drybrush. However the most useful imho was the "Character" brush. It was great for most of the detail work. I'd equate the brush to a Size 0 if I had to guess. It held a point very well, a fair amount of paint. The snap was better than the Regiment brush (which I think is a synthetic blend) but it was still not as stiff as I would have liked it to be. I couldn't use the Insane Detail brush, I wasn't sure how to employ it properly. The Regiment brush was great for base coating but due to lack of snap the brush control was meh. Lastly the dry brush worked OK I guess. I'm still too new to the dry brush technique that I couldn't tell you what works and what doesn't. Just for giggles I picked up a GW Fine Detail brush at my LGS and I think the brush has promise, I just have to carefully trim down the tip a bit. There are about 2-3 hairs that come out longer than the rest to make the tip and I can't seem to get water/paint to flow from this point when doing things like eyes and hairline details. The jury is out until I adjust it.
Environment and Supplies:
Spoiler:
I picked up two 5600K daylight bulbs and just snagged two lamps I had lying around the house. Wow, what a difference when you can see what you're painting! One thing kinda crazy happened occasionally where the colors on the models would saturate and look almost bland, I would have to look away from my painting environment for a few seconds, let my eyes adjust then look back. The colors would again render properly in my brain. Weird...
I found a dropper from one of my son's medicine bottles that was new and never used. Made an excellent water dropper for thinning paints.
I also picked up a 1oz tub of The Master's Brush Cleaner and Preserver. This. Stuff. Is. Gold. I was able to take my totally destroyed Citadel "Starter" Brush and restore it almost back to new. I never went 1 painting session where I didn't scrub and shape all my brushes after receiving this product!
Things I did this time that Worked Well
Spoiler:
Thinning: 1:1 most of the time, and so far I've just used water. On base coats this was FANTASTIC in both coverage and maintaining surface details. Yes it added some additional time to the process.
Surface Tension: Applying watery paint to areas up to, but not over top of edges and then letting the surface tension of the water pull the pigments away from the edges as the water evaps. I learned this late in the game but it worked very well on raised edge details. I'd like to try it on a base coat with a lighter primer/undercoat to bring out some natural edge highlighting.
Multiple Thin Wash Layers: I'm not a fan of the citadel wash line, but when washing I put down two layers of wash, letting each dry completely in order to get a nice rich and deep shade color instead of just an overall muddy color. I also intentionally hit more of the recessed areas instead of drenching the model.
Drybrushing of the base texture: Lots of vids on how to do this with 2-3 colors. I really like how mine turned out. Next time I'll add some grass tuffs.
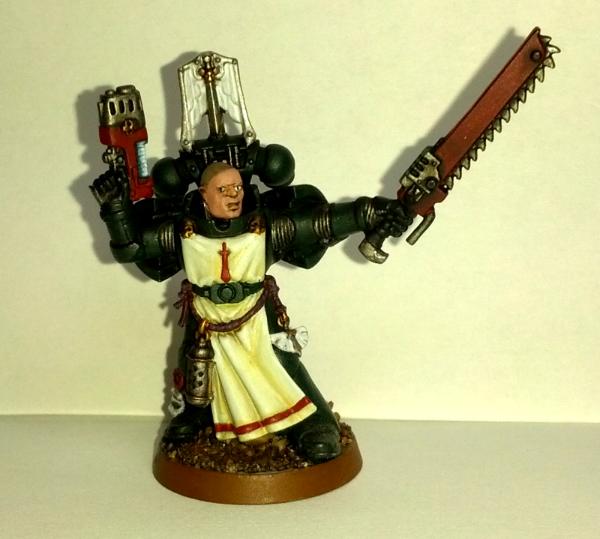
The Sergeants Face: Everything worked very well and I was happy with the 3 layer process. I even mixed in some black and got some subtle stubble...no pun intended. I did have to redo the whole head after I said "hmm, wonder what a wash would look like on the head" Baaaad Idea.
The Sergeants Tabbard: Aside from covering up an attempted wash, I was able to use a 3-4 color blend up to white and I was very pleased with the results. I hope the picture shows off the tones adequately.
The Sergeant's eyes: 2 attempts on his eyes, the first result drove me crazy when looking at it but the second came out MUCH better. Black lining the eyes is huge to making them really POP.
Things I did this time that Didn't Work So Well
Spoiler:
All Things White: I wasn't happy how any large white'ish areas came out. The aquilla's ended up being mostly bone with a AE wash. The chapter emblems turned out OK. I picked up some tips from another forum post I'm eager to try out (light greys, white primers/airbrush).
Thinned Paints and Brush Loading: Seemed Like I couldn't strike a balance when doing detail work between too much water (pooled too much on contact) or paint drying on the brush. I learned to roll the brush on the pallet to get out the excess and then I'd run the brush over some paper until I got the consistency I wanted. So, it got better, but still room for improvement.
Edge Highlighting: I will get better with time and practice...but...wow...I could not get a thin, straight, solid line when putting down highlights...this paired with the brush loading problem above. I did learn that I prefer more subtle edge highlights than some of the exaggerated versions I've seen some modelers follow. So after I would highlight I would bring back down with a glaze or a watered down base color.
Washes: generally, I'm not a fan of the results...I think I'm after a more Army Painter Shade look than the dirty wash stain. The wash on the cloth bits came out horrid so I ended up covering with watered down bone. Any thoughts here guys?
Plasma OSL: New territory here. The second attempt made me happy enough to keep it. I should have attempted more wet blending up to the pure white and then continued with thin white coats until the top was more solid than what I have here. Next go round will be with an airbrush!
Things I want to try on the next batch
Spoiler:
Pre-Shading: I want to base in black, then add grey to front areas and white to the tops before base coating, the vids I've seen this done look amazing! Hopefully the airbrush will make this more natural.
Better White: I have a Testor's brand Light Ghost Grey than has been pre-thinned for airbrush. I think I can bring this up closer to white while maintaining the smooth finish and solid coverage.
Colored Primer: I got me a can of Army Painters Colored Primer. Hoping to take an hour or two off the squad. (I will test to see if pre-shading shows through this paint)
Oh, and I figured out how to load images to the gallery, makes posting images in the forums easier! I'm rather proud of these guys. They are still light-years away from a lot of the great work you guys push out every day...you give me something to strive towards. However, when compared to my first batch of marines, I see some good progress. The images were taken with my phone while hiding at my in-laws over the Thanksgiving Holiday, so I apologize for the lack of light sources and overall image quality. Still...Enjoy.
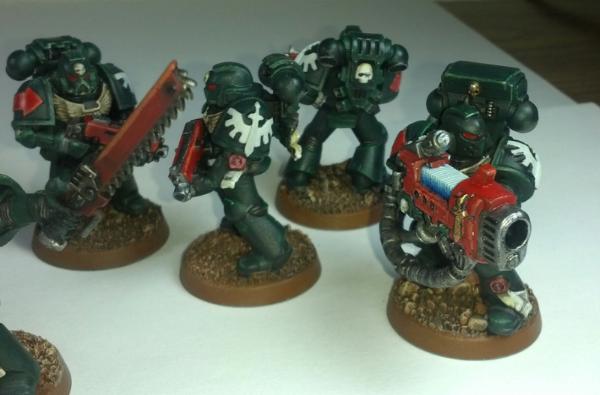
The Squad
Combat Squad Heavy
Combat Squad Special
Squad Sergeant
Thanks for viewing! My next item on the agenda is a Rhino for these guys! Hope to have it finished before the month is out!
PS. Doh! I just realized I still need squad markings! Good thing I haven't sealed them with dulcoat yet.
This message was edited 3 times. Last update was at 2013/12/18 16:03:01
1500 Dark Angels( 9 - 4 - 0 ) Humility must always be the portion of any man who receives acclaim earned in the blood of his followers and the sacrifices of his friends. - Dwight D. Eisenhower
2013/12/03 11:16:10
Subject: Re:DA DV Tac Squad - Lots of learning still going on
Looks like you're well on your way to success. The sergeant especially is showing a nice attention to detail. If you ever want to get adventurous, his big bald head is a veritable canvas. Surely a pious servant of the Emperor would get some ink done on his scalp? Also, I like the stubble effect you've done there, I think you can afford to be a bit bolder still with it, given the average viewing distance for a 40k miniature.
This message was edited 1 time. Last update was at 2013/12/03 12:56:33
The supply does not get to make the demands.
2013/12/03 17:56:15
Subject: DA DV Tac Squad - Lots of learning still going on
Looks good man! I like the stubble, I might have to try that to see what I can get going! And you fixed the eyes quite nicely! I myself prefer to leave the eyes as I get them, I find it hiliarious to have my nice looking model that's cross eyed fighting for the Emperor.
Eagles soar, but weasels don't get sucked into Jet Engines.
Looks good man! I like the stubble, I might have to try that to see what I can get going! And you fixed the eyes quite nicely!
Thanks! I applied the same technique found on some random "How to Paint DA Sergent" search. I agree with Agamemnon2 though, I might make it a bit more pronounced.
I find it hiliarious to have my nice looking model that's cross eyed fighting for the Emperor.
For your enjoyment, I give you....Stg Boggle Eyes McGee!
Spoiler:
and his cousin Bob.
Spoiler:
This message was edited 1 time. Last update was at 2013/12/10 06:08:00
1500 Dark Angels( 9 - 4 - 0 ) Humility must always be the portion of any man who receives acclaim earned in the blood of his followers and the sacrifices of his friends. - Dwight D. Eisenhower
2013/12/04 21:02:40
Subject: Re:DA DV Tac Squad - Lots of learning still going on
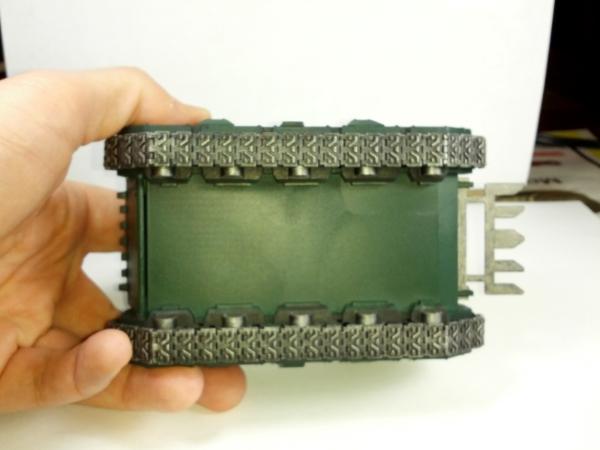
OK, so I'm on to the squad's rhino transport. I decided to make this a more "work in progress" post...not really a blog...but not a fire and forget post either.
So, my next step in my DA army is the troop transport. My attention to detail button is broken at the moment so I wanted a model I could be quick and dirty with at first.
I'm able to jump right into the project because it was a donated model and came pre-assembled (and pre-glued). I just cleaned up a few things and got to work. No pre-shading on this one either, going to wait until the airbrush comes in and I have some time to practice.
Being my first vehicle I've already learned a few things:
1) Paint before assembly : I didn't have the option but if I had done this unwittingly I would have probably needed to go outside and vent my rage at my mailbox. Too many nooks and crannies I'm not going to get into. 2) Primer Mishaps: I used Angels Green colored primer from Army Painters. The temp and humidity was good but my spray distance got too far on some passes and I ended up with "texture" on the model. I'm not gonna lie...I kinda like the effect on the panels. What I don't like is the texture on the bits and bobs (antennas, lights, etc.) Still I have 3 more rhino's unpainted so this one can serve as a learning/testbench. 2a) Glue: Some of the glue apparently ran out of the panel seams and it shows pretty badly after priming. 3) Big Brushes is Big: for coverage I'm going to need something hefty...and maybe even more paint... 4) I need to stabilize my light and camera settings...all my pictures turn out differently depending on day of the week. Oofta...
Right now it's just primed and I've blocked out areas in black that will be other colors. Pretty messy ATM.
I'm looking forward on this model to using some weathering techniques such as sponge chips, panels paint wear, rust and mud weathering powders. I'm also going to attempt some simple airbrush OSL on the lamps. Stay tuned.
Spoiler:
USER REMOVED IMAGES BECAUSE THEY WERE TERRIBLE!
Not much to look at now but it should take shape quickly!
This message was edited 3 times. Last update was at 2013/12/12 06:19:05
1500 Dark Angels( 9 - 4 - 0 ) Humility must always be the portion of any man who receives acclaim earned in the blood of his followers and the sacrifices of his friends. - Dwight D. Eisenhower
2013/12/05 15:46:24
Subject: Re:DA DV Tac Squad - Lots of learning still going on
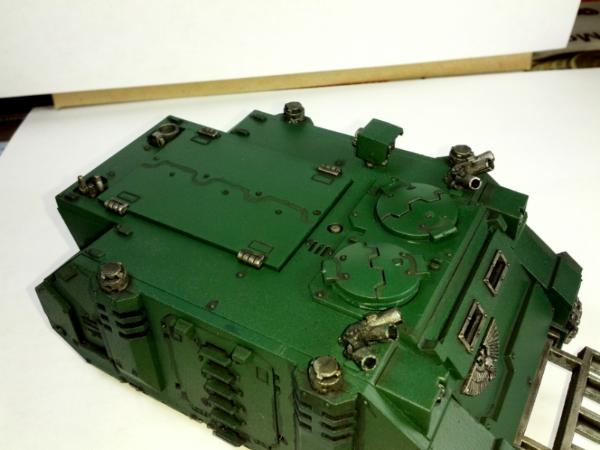
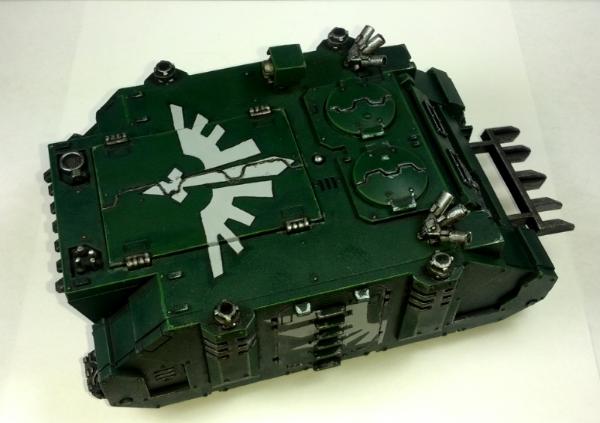
Got the base layer metalics down (leadbelcher) on the shinny bits. Dry brushed the tracks and track runners to keep some of the black base coat in tact.
I then cleaned up some of the messy areas with Caliba Green. Some spots I brushed it on, others I dry-brushed. I also really like how the aquilla looks with the metalics. I was originally going to bronze the aquilla but thought it mike contrast poorlly with the rest of the scheme.
Lastly I "pin-washed" the seams and recesses. I dont like how GW washes stain so i wanted to limit how much I'd have to re-layer with the green. It took extra time and I put down only one layer thus far. It's not dark enough yet for my liking, I'd want more black out of i so I'll go in with another wash after it dries before cutting in with Caliban Green.
Found more mold lines I missed when painting...
Spoiler:
So Next steps:
2nd Wash
Clean up with Green
Highlight Metalics (Ironbreaker)
Blackline Door/Hatches
Bunch of Weathering Effects*
1500 Dark Angels( 9 - 4 - 0 ) Humility must always be the portion of any man who receives acclaim earned in the blood of his followers and the sacrifices of his friends. - Dwight D. Eisenhower
2013/12/08 15:02:18
Subject: Re:DA DV Tac Squad - Lots of learning still going on
Second wash is done. Still not happy with the results but it will work for this project.
Drybrushed after the wash dried which worked well.
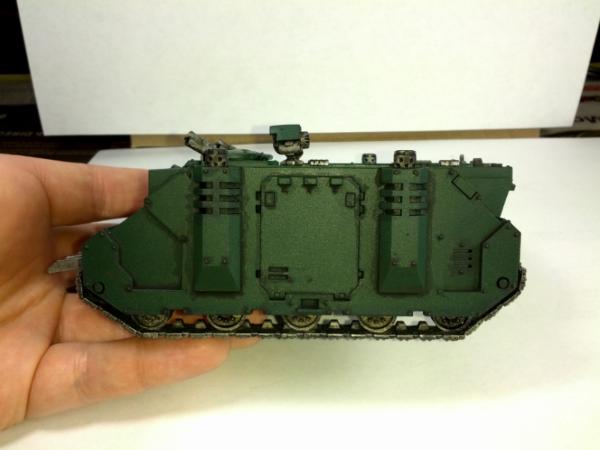
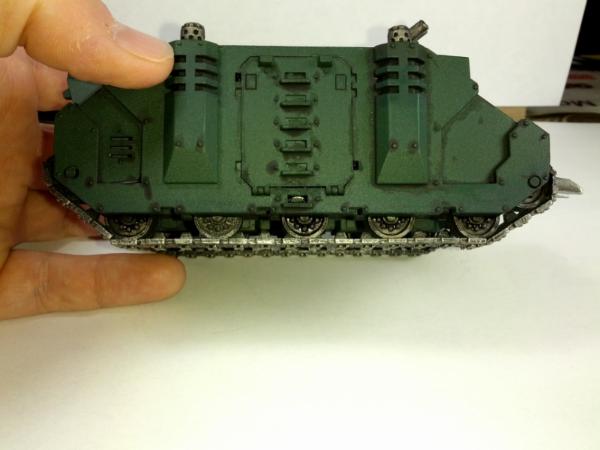
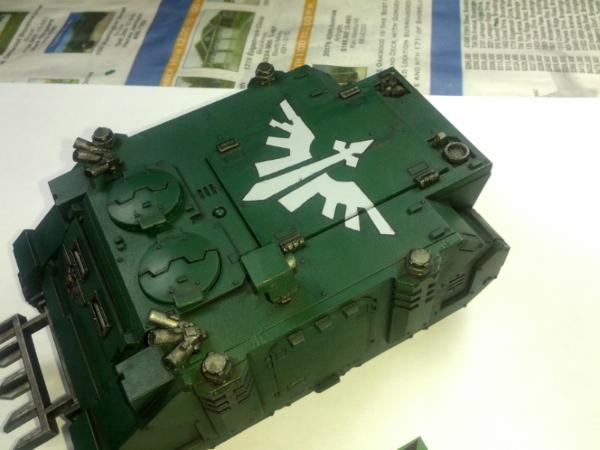
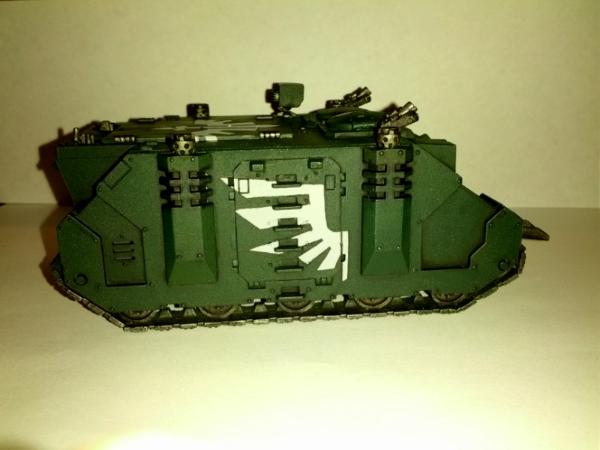
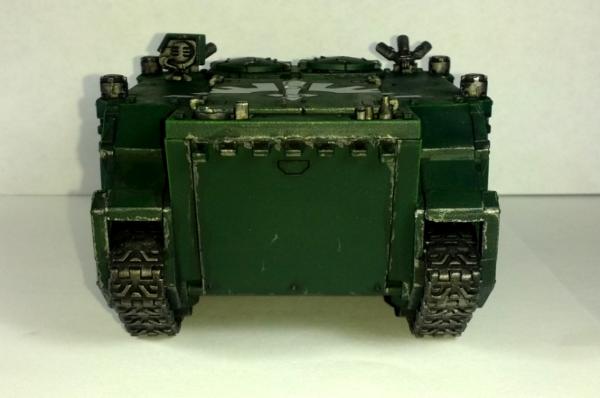
Then before I start highlighting and weathering I needed to get some icons on the rhino. I don't have any transfers yet so I tried some freehand iconography and so far I am pleased with the results. I also used a light grey instead of white which went on very smooth and covered extremely well but sstil took three solid coats. When done with the grey I cut in with black to get the edges clean and make it pop a bit. Finished with Caliban green .
I went for a more customized chapter icon to differentiate from others paint jobs. I will add the wings on the side of the rhino next. FYI Iwill add more pics from the gallery later. Trying use the phone to make the post has challenges.
Spoiler:
:
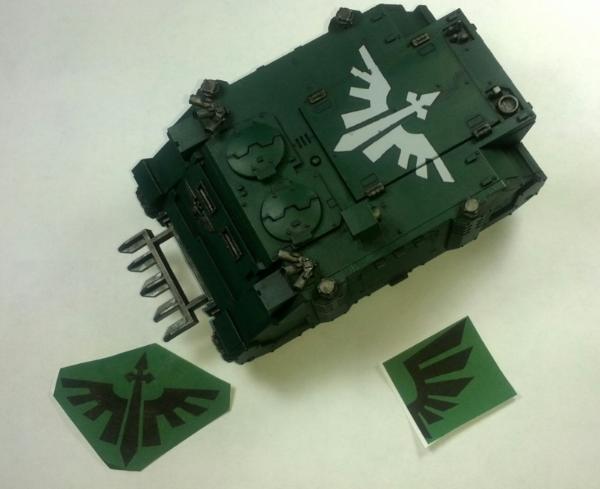
Here are the prints I used (edited and printed from MSFT paint).
This message was edited 3 times. Last update was at 2013/12/12 05:53:27
1500 Dark Angels( 9 - 4 - 0 ) Humility must always be the portion of any man who receives acclaim earned in the blood of his followers and the sacrifices of his friends. - Dwight D. Eisenhower
0001/12/02 16:18:01
Subject: Re:DA DV Tac Squad - Lots of learning still going on
I took a few days off to get ready for a physical fitness test. Short of it is, I passed the test.
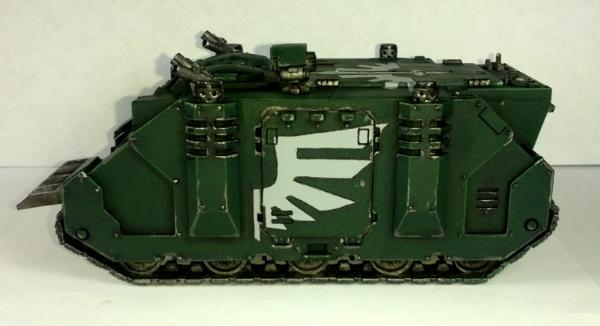
Tonight I did the freehand work on the sides of the Rhino, just the wings. I decided to do the rest of the icon's via templates. That means I need to pick up some gloss varnish, and some micro sol/set.
I'm still very happy with the results of this latest session. My hands shook more than normal and my lines were not the most straight. However, the more I use the "Character" brush from Army Painter, the more I love it. If they ever get all the import/export mumbo jumbo out of the way so the US can import Kolinsky Sable again I'd be dying to find out how a Series 7 would feel in comparison.
I'm heading to a town with a GW store on Friday. I hope they have the varnish and micro sol items...if not I'll do some research as I'm sure there is a hobby/art store in the area we can get some supplies.
Next up on my punch list is some panel wear and tear, black line and metallic scrape followed by edge highlighting and then finally weathering. Should I lock in the paint with a dulcoat before applying and fixing the powders?
Update: fixed the images so they weren't so foggy.
Spoiler:
Left Side Icon
Right Side Icon
Lastly, my Sotar 20/20 came in the mail today. Compressor is still on it's way though. Looking forward to learning to airbrush!
This message was edited 3 times. Last update was at 2013/12/12 05:53:47
1500 Dark Angels( 9 - 4 - 0 ) Humility must always be the portion of any man who receives acclaim earned in the blood of his followers and the sacrifices of his friends. - Dwight D. Eisenhower
2013/12/10 10:03:37
Subject: DA DV Tac Squad - Lots of learning still going on
Paint the face flesh (I still use Tallarn Flesh, but you want a dark-ish flesh tone). Apply wash (usually Reikland Fleshshade for me).
Then paint the whole of the eyes with an off-white (you should almost never use pure white) and dot the irises in with a mix of black and whatever iris colour you think they should be.
Put the dots to one side or the other - centred eyes almost always look 'staring'. Bear in mind the direction the model is looking.
For expert-level eyes (you will need a damn good brush and a steady hand) re-dot with a lighter 'inner iris' then again with black in the very centre. Generally I don't do this on 28mm but do on 54mm and above. You can then dot with pure white off-centre of the iris to highlight the eye (pay attention to light direction - both highlights should be in pretty much the same relative position on each eye).
Then tidy up with your first highlight pass of the original flesh colour, and carry on painting the face around the eyes.
This saves you from being too stressed about whether the eyes are initially neat enough and its much faster than being overly deliberate which you have to be if you paint the bulk of the face first.
This message was edited 1 time. Last update was at 2013/12/10 10:04:16
2013/12/10 13:19:50
Subject: DA DV Tac Squad - Lots of learning still going on
Paint the face flesh (I still use Tallarn Flesh, but you want a dark-ish flesh tone). Apply wash (usually Reikland Fleshshade for me). Then paint the whole of the eyes with an off-white (you should almost never use pure white) and dot the irises in with a mix of black and whatever iris colour you think they should be. Put the dots to one side or the other - centred eyes almost always look 'staring'. Bear in mind the direction the model is looking.
For expert-level eyes (you will need a damn good brush and a steady hand) re-dot with a lighter 'inner iris' then again with black in the very centre. Generally I don't do this on 28mm but do on 54mm and above. You can then dot with pure white off-centre of the iris to highlight the eye (pay attention to light direction - both highlights should be in pretty much the same relative position on each eye).
Then tidy up with your first highlight pass of the original flesh colour, and carry on painting the face around the eyes.
This saves you from being too stressed about whether the eyes are initially neat enough and its much faster than being overly deliberate which you have to be if you paint the bulk of the face first.
I appreciate the tips! I'm always looking for new/different techniques to try. Some are proving more difficult due to my current skill level but I'm sure it will come with time and practice.
The current method I'm using is from a Tale Of Painters blog. Here is the LINK. One difficulty I'm having with this processes is I'm trying to use Vallejo Model and Game Color instead of Citadel Paints which isn't working out too well. In addition, the paints listed are in the old range.
As for the eyes, I'm lacking in both "damn good" brush and steady hands department. The good news is I'm going for basic table top quality atm so some imperfection is acceptable
This message was edited 1 time. Last update was at 2013/12/10 13:24:29
1500 Dark Angels( 9 - 4 - 0 ) Humility must always be the portion of any man who receives acclaim earned in the blood of his followers and the sacrifices of his friends. - Dwight D. Eisenhower
2013/12/10 14:03:40
Subject: DA DV Tac Squad - Lots of learning still going on
With skin tones, never worry about precisely matching - even from model to model in the same unit. You actively want variation between individuals. It looks much better.
The W&N S7 Stahly suggests is a damn good brush, but really anything that holds a fine point works.
VMC Colours that are useful:
VMC Burnt Cadmium Red (god I love this stuff)
VMC Leather
VMC Sunny Skintone (or VGC Opaque Heavy Skintone)
VMC Ivory
With various mixes of those you can hit most skintones you need for generic caucasian faces.
This message was edited 1 time. Last update was at 2013/12/10 14:07:07
2013/12/10 14:23:05
Subject: Re:DA DV Tac Squad - Lots of learning still going on
With skin tones, never worry about precisely matching - even from model to model in the same unit. You actively want variation between individuals. It looks much better.
This. I agree, my next squad will have a much darker skin tone sergeant just to add to the flava. The trouble I was encountering was the gradient in tones I was using was too subtle based on the look i was going for. It's not allowing the model features to "pop" the way I wanted it to. Either that or I am color blind to various ranges...
The W&N S7 Stahly suggests is a damn good brush, but really anything that holds a fine point works.
Getting one is on my bucket list. Problem is there is some funky import laws that are causing supply problems with these brushes due to the hair type. All of the online retailers (except for Amazon but I'm not paying those prices) is out of stock and wont be restocked for quite some time. It's not illegal, just a ton of red tape and paper work to get them into the US of A. This goes for most artistic Kolinsky Sable brushes. This is at least the rumors I've found from the research I've done.
1500 Dark Angels( 9 - 4 - 0 ) Humility must always be the portion of any man who receives acclaim earned in the blood of his followers and the sacrifices of his friends. - Dwight D. Eisenhower
2013/12/10 14:34:52
Subject: DA DV Tac Squad - Lots of learning still going on
Decent acrylic / prolene brushes will work too. They just have a tendency to develop hook-tip quicker. But that's the difference between a £3 brush and a £12 brush.
2013/12/10 19:38:15
Subject: DA DV Tac Squad - Lots of learning still going on
winterdyne wrote: Decent acrylic / prolene brushes will work too. They just have a tendency to develop hook-tip quicker. But that's the difference between a £3 brush and a £12 brush.
Do you have any specific brand or series you would recommend?
1500 Dark Angels( 9 - 4 - 0 ) Humility must always be the portion of any man who receives acclaim earned in the blood of his followers and the sacrifices of his friends. - Dwight D. Eisenhower
2013/12/10 20:13:21
Subject: DA DV Tac Squad - Lots of learning still going on
No, not really. Some of my longer-serving ones are branded pro-arte. Just get yourself down to an art store and look for something suitably pointy. I do prefer to buy brushes in person - I can then see how the point is formed and know if the protective cap's been removed.
2013/12/10 23:16:31
Subject: Re:DA DV Tac Squad - Lots of learning still going on
Just me getting my thoughts down here: seems the painting community knows how awsome Divinchi, W&N S7, Raphael are and sing their praises. On the other side of the coin, no one has any advice on solid alternatives. This is not a bad thing. It just limits some of us to trial and error. Still, Edison did not invent the lightbulb on this first attempt!
Also, as I mentioned before I'm having a grand time with my Army Painter's Character brush!
An old proverb I keep going back to:
It is only the poor worker that blames his tools and it is not the tools we use which make us good, but rather how we employ them.
1500 Dark Angels( 9 - 4 - 0 ) Humility must always be the portion of any man who receives acclaim earned in the blood of his followers and the sacrifices of his friends. - Dwight D. Eisenhower
2013/12/12 06:10:50
Subject: Re:DA DV Tac Squad - Lots of learning still going on
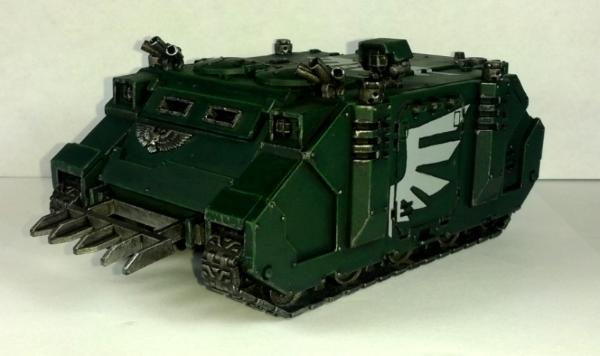
Today I give you Dakkites my first attempt at paint wear!!!
It's not perfect, and I may need to go back in with some brighter metallic to really make the scrapes and wear pop but I like what I'm seeing so far. I even got a bit over zealous and put way too much on the front and therefore went back over and covered up almost all of it. Less Is More.
Spoiler:
I also put the first color of edge highlight on the model, Warpstone Glow, doesn't pop too much yet...might need the next tone brighter.
I've got some setting solutions coming so I can apply the tac squad and squad number transfers. In the mean time I'll try my hand at some very selective sponge chipping!!! Excited I am!
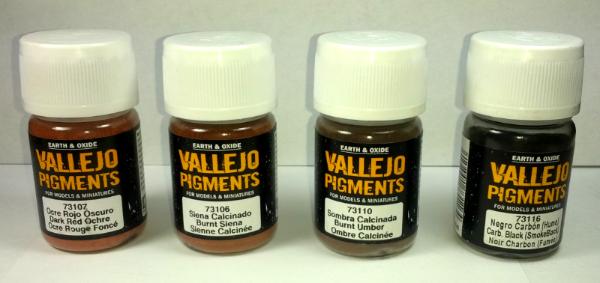
Then once I get the transfers down I'll seal in the progress with varnish before I slap on...some of these.....!!!!!
Spoiler:
Oh yeah!!!!
MUD, RUST, DUST, AND SOOT OH MY!!!
So far I have 9.5 hours spent on this guy not including photo snaps, clean up, etc. I'd say I have another 4-6 hours before I'm going to call this one done. What an awesome model. I'm way happier with this model project, from a knowledge standpoint, than the tac squad. Is that wrong?
OFF TOPIC: 470+ VIEWS ON THIS THREAD - THANKS FOR CHECKING IN AND WATCHING THE PROGRESS!!!!!
This message was edited 4 times. Last update was at 2013/12/18 13:26:55
1500 Dark Angels( 9 - 4 - 0 ) Humility must always be the portion of any man who receives acclaim earned in the blood of his followers and the sacrifices of his friends. - Dwight D. Eisenhower
2013/12/12 17:19:30
Subject: Re:DA DV Tac Squad - Lots of learning still going on
Subscribed. I like your progress. I think you and I are a lot a like when I read how flippin detailed you are, i.e. what worked/didn't work this time post. lol Check out my pics if you want, most of them are pretty crummy WIP. I do what i can with my time having a 2 year old and what not.
Very, very nice work - especially the Rhino. Only thing I noticed that was less than great is the smoke launchers - the tubes don't seem to be glued together completely. Very minor. I like the painting, the weathering, all of it. Great.
Only thing I noticed that was less than great is the smoke launchers - the tubes don't seem to be glued together completely.
This.
The more i work with the model the more I'm tempted to try greenstuff and shore up the seams. Thanks for the feedback.
Lucazi wrote:
Subscribed. I like your progress. I think you and I are a lot a like when I read how flippin detailed you are, i.e. what worked/didn't work this time post. lol Check out my pics if you want, most of them are pretty crummy WIP. I do what i can with my time having a 2 year old and what not.
I really liked your stencils you made also
Thanks! I've checked out your gallery and I really like your Dark Eldar models! And please feel free to suggest techniques and shed light on revelations you've had in your own processes.
And I have to say I'm guilty of believing that other people may actually care about the musings that happen inside my head. Sometimes it's just white noise...
The last thing I want though, is to forget my lessons.
I appreciate you sticking with me through this.
Automatically Appended Next Post: No pictures tonight but I wanted to mention that I attempted Sponge Chipping on the Rhino as I had planned to do.
I did this in two stages.
1) 2nd pass at edge wear with a light metallic color (VMC silver)
2) Larger blotches of black to simulate paint flakes and edge shadows
Less.
Is.
More.
I violated this to such an extent...it was comical. I had no clue I had put on SO MUCH. Thinking back, I know exactly what was going on in my head.
Brain: "dude, you put some scratches there, now you can't leave this other area pristine...it will look weird!"
Me to Brain: "You're right, lets do some scratches on the panel, semi-random."
Brain: "That looks ok but, I think you need a few more, maybe a bigger splotch, then rub the sponge on the edge...hmmmmm"
Me to Brain: "What now?!"
Brain: "Well, maybe...no...don't worry about it..."
Me to Brain: "No, tell me!"
Brain: "It's just that, it's starting to look like we have directional streaking, and that means we have to hit all the parallel panels the same way or it won't look realistic"
Me to Brain: "OK how about this then?"
<takes 10 minutes to add tons more>
Brain: "Oh man that looks so sweet!"
Me to Brain: "I know right!"
<and then I start to add the larger paint flakes>
Me to Brain: " I can't even pick out the paint flakes with all this other crud!!"
Brain: "That's because you lack restraint...not my fault bud."
Me: <grabs black paint and proceeds to cover 90% of the silver metallic>
I wish I could have taken a picture of the rhino before I reworked it. It looked sparkly. It took an hour to cover the metallics and layer with the base coat again. I lost some of my edge highlights in the process. What a great learning experience! I think next time I will be looking at pictures of real tanks and how the paint wears down.
This message was edited 1 time. Last update was at 2013/12/13 05:01:22
1500 Dark Angels( 9 - 4 - 0 ) Humility must always be the portion of any man who receives acclaim earned in the blood of his followers and the sacrifices of his friends. - Dwight D. Eisenhower
2013/12/18 13:26:03
Subject: Re:DA DV Tac Squad - Lots of learning still going on
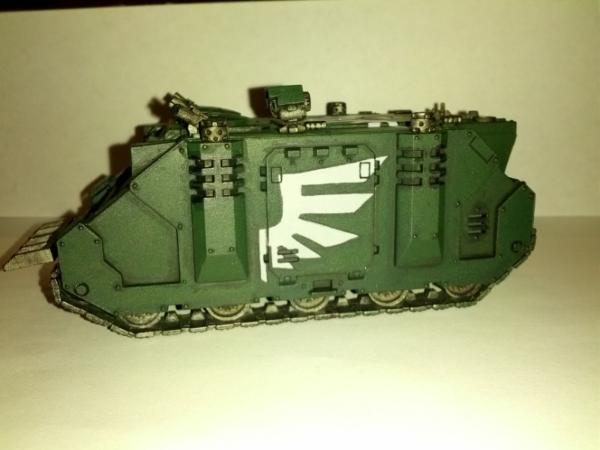
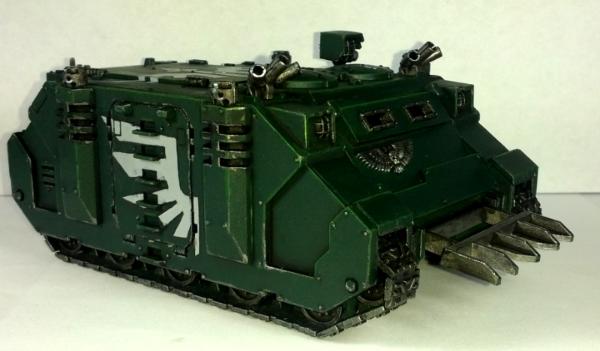
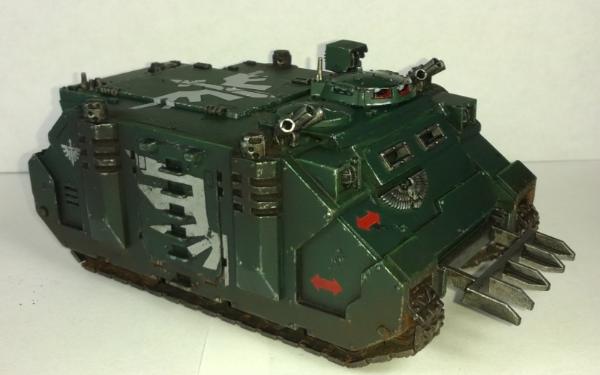
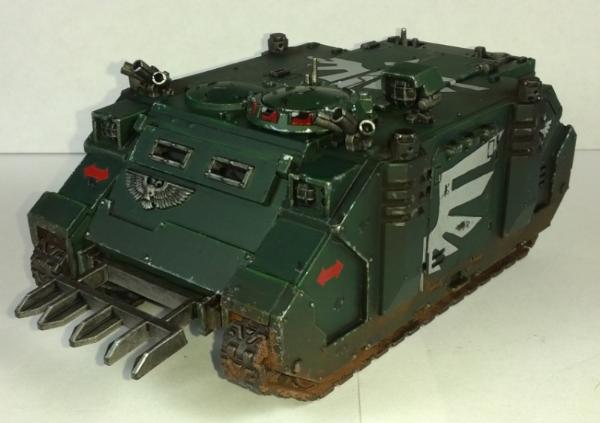
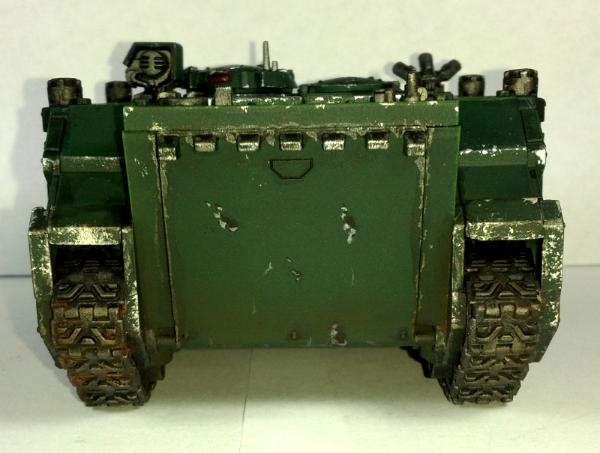
I finished the Rhino except for the squad symbol transfer I have coming in the mail.
The weathering powders were muted heavily by the matt varnish. I actually went over the areas twice to make sure the weathering showed up after varnishing. I might go back over the exhaust stacks and make the soot more pronounced. I might also try some directional streaking on the rear ramp door.
One thing that just about ruined the model was when I first applied the weathering powder I tried using 70% isopropyl alcohol as a "fixer" and to my shock and horror when it dried...IT TURNED BRIGHT WHITE!!!! I did two tests just to verify it was the rubbing alcohol. I literally had to repaint the exhaust stacks on one side due to the frosting effect. Can anyone tell me what might have happened???
Without any more delay, here ya go:
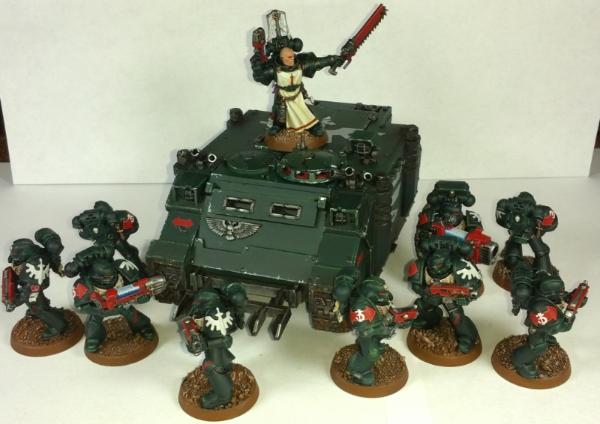
And of course no preview would be complete without the squad!
EDIT: on my next rhino (which is pre-assembled already) I'm going to attemp to remove the smoke launchers via freezing/thawing. Then I'll try regluing them together better and relocating them to another location on the vehicle which will make room for the other top hatch bitz I have.
This message was edited 1 time. Last update was at 2013/12/18 19:13:06
1500 Dark Angels( 9 - 4 - 0 ) Humility must always be the portion of any man who receives acclaim earned in the blood of his followers and the sacrifices of his friends. - Dwight D. Eisenhower


 Humility must always be the portion of any man who receives acclaim earned in the blood of his followers and the sacrifices of his friends.


 Also, I like the stubble effect you've done there, I think you can afford to be a bit bolder still with it, given the average viewing distance for a
 2000 Points IG
 2000 Points SM