| Author |
Message |
 |
|
|
|
|
Advert
|
Forum adverts like this one are shown to any user who is not logged in. Join us by filling out a tiny 3 field form and you will get your own, free, dakka user account which gives a good range of benefits to you:
- No adverts like this in the forums anymore.
- Times and dates in your local timezone.
- Full tracking of what you have read so you can skip to your first unread post, easily see what has changed since you last logged in, and easily see what is new at a glance.
- Email notifications for threads you want to watch closely.
- Being a part of the oldest wargaming community on the net.
If you are already a member then feel free to login now. |
|
 |
2014/01/20 19:31:15
Subject: Rivet Tutorial?
|
|

Regular Dakkanaut
|
So there's clearly a lot of rivet fans here, but I haven't been able to find a good guide on how to do them properly. Can anyone hook me up with a good tutorial, or just an explanation of how best to go about riveting, for example, tank armor? I have an old G.I. Joe tank that's the perfect size for a Baneblade or other supertank, but it needs some work to look properly 40k (plasticard armor plates and rivets, mostly).
Help would be appreciated!
|
|
This message was edited 1 time. Last update was at 2014/01/20 19:31:34
|
|
|
 |
|
2014/01/20 20:46:26
Subject: Rivet Tutorial?
|
|

Witch Hunter in the Shadows
|
Nothing to it mate. Just grab some thin gauge plasticard rods, cut them into little pieces, and glue them on where you want them.
|
|
|
|
|
|
2014/01/20 20:58:18
Subject: Rivet Tutorial?
|
|

Death-Dealing Devastator
|
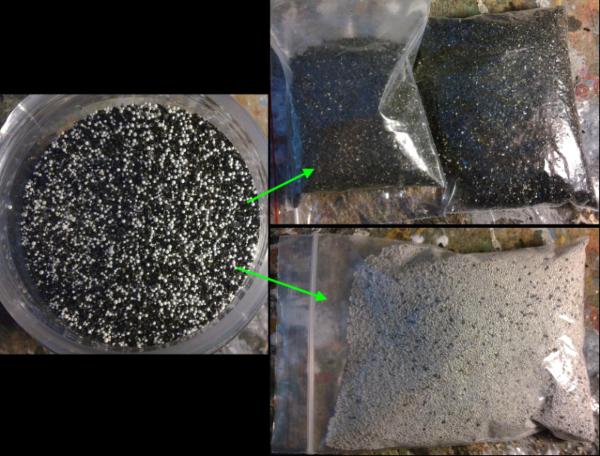
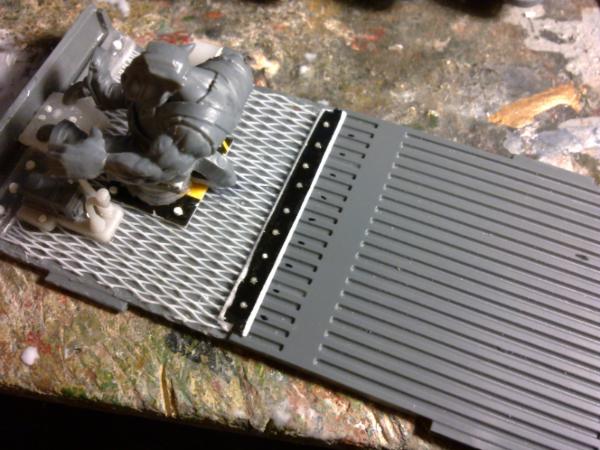
Buy a water filter (eg Brita), crack it open and harvest the carbon beads inside. Use a small drill bit to drill a little crater, apply glue and drop in a bead. Voila rivet ^^
|
|
|
|
|
2014/01/20 21:35:43
Subject: Rivet Tutorial?
|
|
Regular Dakkanaut
|
Foxfyre wrote:Buy a water filter (eg Brita), crack it open and harvest the carbon beads inside. Use a small drill bit to drill a little crater, apply glue and drop in a bead. Voila rivet ^^
That's a little expensive for me, I think.
 Barksdale wrote: Barksdale wrote:Nothing to it mate. Just grab some thin gauge plasticard rods, cut them into little pieces, and glue them on where you want them.
Hmm, I've never been able to find plasticard rods in any stores I visit. I have a sheet of plasticard somewhere, maybe I could cut out a bunch of circles... Tedious work, though. Maybe a hole punch?
|
|
|
|
|
2014/01/20 21:59:50
Subject: Rivet Tutorial?
|
|
Last Remaining Whole C'Tan
|
 facekickery wrote: facekickery wrote:So there's clearly a lot of rivet fans here, but I haven't been able to find a good guide on how to do them properly. Can anyone hook me up with a good tutorial, or just an explanation of how best to go about riveting, for example, tank armor? I have an old G.I. Joe tank that's the perfect size for a Baneblade or other supertank, but it needs some work to look properly 40k (plasticard armor plates and rivets, mostly).
Help would be appreciated!
Here is the order in which I learned to do rivets.
First I started with t this technique. Easy, but they don't really look like rivets.
Then I started to buy them on Ebay. Expensive, but they look great.
Currently, I use this method, which is free, looks great, and fast. The only downside is I keep burning my thumb.
|
 lord_blackfang wrote: lord_blackfang wrote:Respect to the guy who subscribed just to post a massive ASCII dong in the chat and immediately get banned.
 Flinty wrote: Flinty wrote:The benefit of slate is that its.actually a.rock with rock like properties. The downside is that it's a rock
|
|
|
|
|
2014/01/20 23:02:42
Subject: Rivet Tutorial?
|
|
Regular Dakkanaut
|
Ouch, yeah, that last one looks like something I'd mess up easily. It does look great... Not sure where I'd get the metal though. Buying them online is tempting, but I guess I'll start with the plasticard method first.
Thanks for the tips, everyone!
|
|
|
|
|
2014/01/21 00:26:04
Subject: Rivet Tutorial?
|
|
Mekboy Hammerin' Somethin'
|
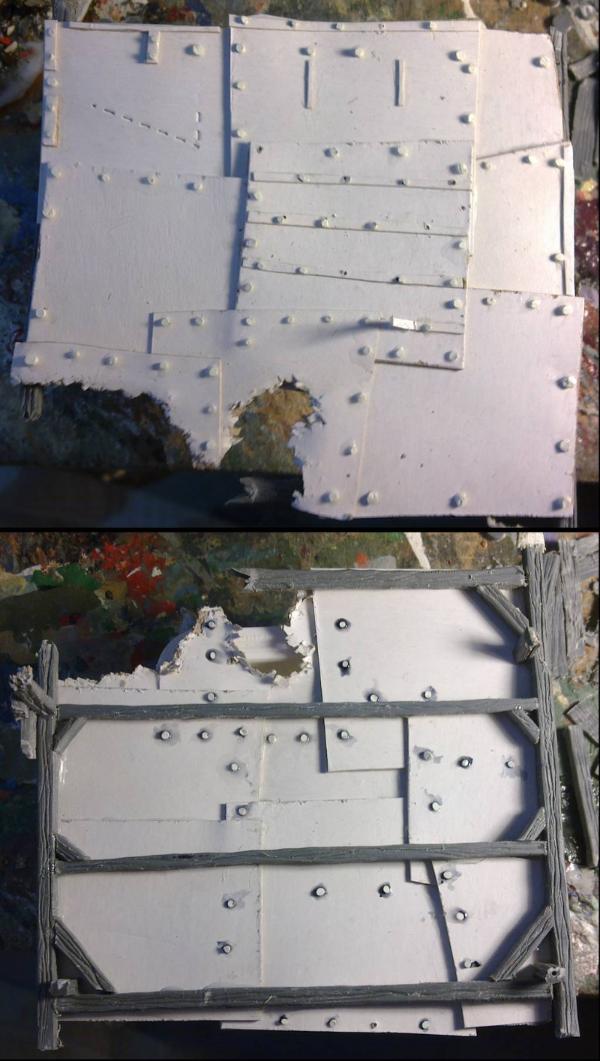
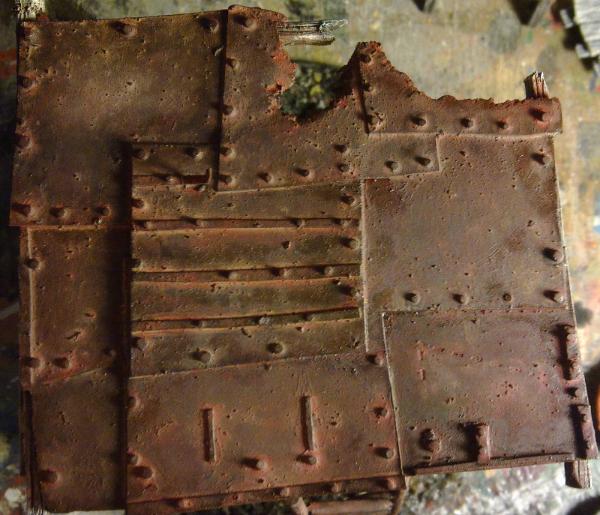
I came up with a similar technique to the one above using heated sprue. It's very simple, take some plasticard and drill holes through it (or just slightly into it) with whatever size of bit you want the eventual rivets to be; be warned, this is very tedious!
then mix up some Green Stuff and role it out into a thin sheet and press it onto the plasticard. Green Stuff will then press into the drilled holes and dome out. This does require a little technique to get right as if you press too hard you could end up with little tubes of Green Stuff but then you just trim them accordingly.
|
Be Pure!
Be Vigilant!
BEHAVE!
Show me your god and I'll send you a warhead because my god's bigger than your god. |
|
|
|
|
2014/01/21 00:34:54
Subject: Rivet Tutorial?
|
|
Savage Khorne Berserker Biker
|
facekickery wrote:Foxfyre wrote:Buy a water filter (eg Brita), crack it open and harvest the carbon beads inside. Use a small drill bit to drill a little crater, apply glue and drop in a bead. Voila rivet ^^
That's a little expensive for me, I think.
Barksdale wrote:Nothing to it mate. Just grab some thin gauge plasticard rods, cut them into little pieces, and glue them on where you want them.
Hmm, I've never been able to find plasticard rods in any stores I visit. I have a sheet of plasticard somewhere, maybe I could cut out a bunch of circles... Tedious work, though. Maybe a hole punch?
It's not called plasticard here in the USA. It's called Styrene board. Evergreen makes it for hobby trains etc.
|

https://www.youtube.com/watch?v=8xqOf-KjdVY
My Hobby Blog:
http://www.dakkadakka.com/dakkaforum/posts/list/594118.page
http://i.imgur.com/yLl7xmu.gif |
|
|
|
|
2014/01/21 00:53:02
Subject: Rivet Tutorial?
|
|
Regular Dakkanaut
|
That... makes a lot of sense. Nobody ever knows what I'm talking about when I ask if they have plasticard. Thanks, Sammoth.
|
|
|
|
|
2014/01/21 01:16:42
Subject: Re:Rivet Tutorial?
|
|
Mastering Non-Metallic Metal
|
In addition to chopping polystyrene rods (effective, you can choose the size you want, a little tedious)
and using water-filter beads and drilling pits for them (effective, very tedious and sometimes hit and miss, expensive if you don't actually use the filters)
You do also get some nice scale gravel too... with more effort...
You can also use small drops of glue ( CA or PVA), applied with a small point like a cocktail stick.
I have also used left over milliput ( GS would also work), that I've rolled into a thin sausage and left to almost fully set (otherwise you'll squash the rivets), then cut into rivets. This also lets you choose the size of your rivets and uses up that bit of putty that you always have left over.
I've also seen a tutorial of using an automatic pencil to press recessed rivets (little rings) into putty (for when you are sculpting). You could lay down a thin strip of putty and then do this for a change.
I think that's all the methods I've seen...
|
     Mastodon: @DrH@dice.camp Mastodon: @DrH@dice.camp
The army-                   ~2295 points (built). ~2295 points (built).
 
* -=]_,=-eague Spruemeister General. * A (sprue) Hut tutorial *
Dsteingass - Dr. H..You are a role model for Internet Morality!  // inmygravenimage - Dr H is a model to us all // inmygravenimage - Dr H is a model to us all 
Theophony - Sprue for the spruemeister, plastic for his plastic throne! // Shasolenzabi - Toilets, more complex than folks take time to think about! |
|
|
|
|
|
|