| Author |
Message |
 |
|
|
|
|
Advert
|
Forum adverts like this one are shown to any user who is not logged in. Join us by filling out a tiny 3 field form and you will get your own, free, dakka user account which gives a good range of benefits to you:
- No adverts like this in the forums anymore.
- Times and dates in your local timezone.
- Full tracking of what you have read so you can skip to your first unread post, easily see what has changed since you last logged in, and easily see what is new at a glance.
- Email notifications for threads you want to watch closely.
- Being a part of the oldest wargaming community on the net.
If you are already a member then feel free to login now. |
|
 |
2014/02/26 04:26:42
Subject: Land Raider assembly question?
|
|

Slashing Veteran Sword Bretheren
|
Okay so in the sprue where the tracks are, one set is marked as L and the other as R
there are also numbers.
Are you supposed to work your way (in ascending numbers) from the back of the tank to the front, or from the front to the back?
And secondly, where is left and where is right?
If I have the Land Raider sitting in front of me with its front facing pointing at me, then "my" left is its right track, and "my" right is its left track.
So should I glue the track set marked L to MY left or to the tank's left?
|
|
|
|
 |
|
2014/02/26 04:37:04
Subject: Land Raider assembly question?
|
|

Longtime Dakkanaut
Aizuwakamatsu, Fukushima, Japan
|
L and R will be from the tank's point of view, because that is the only consistent way to write the instructions. They can't predict where you're sitting and which way the tank is pointing after all.
Can't help on the numbers though sorry.
|
|
|
|
|
2014/02/26 04:47:40
Subject: Land Raider assembly question?
|
|

Martial Arts Fiday
|
The numbers refer to the instructions. Do you not have them?
|
"Holy Sh*&, you've opened my eyes and changed my mind about this topic, thanks Dakka OT!"
-Nobody Ever
Proverbs 18:2
"CHEESE!" is the battlecry of the ill-prepared.
 warboss wrote: warboss wrote:
GW didn't mean to hit your wallet and I know they love you, baby. I'm sure they won't do it again so it's ok to purchase and make up. 
Albatross wrote:I think SlaveToDorkness just became my new hero.
EmilCrane wrote:Finecast is the new Matt Ward.
Don't mess with the Blade and Bolter! |
|
|
|
|
2014/02/26 05:17:46
Subject: Land Raider assembly question?
|
|
Slashing Veteran Sword Bretheren
|
No, they do not. The instruction manual only shows a series of pictures in progressive order. The only numbers on the sheet are the big ones representing each "phase" of the assembly.
There however are small numbers embossed on each of the Land Raider track bits starting from 1 and going all the way to 9.
I guess I can use the numbers to glue them in proper order, but the direction is still something I'll have to figure out.
|
|
|
|
|
|
2014/02/26 06:41:36
Subject: Land Raider assembly question?
|
|
Lone Wolf Sentinel Pilot
|
Go to this image of a Land Raider:
http://bp.dnyarak.com/wp-content/uploads/2009/01/landraider2.jpg
Note how the upper Left tread section has an Eagle on the lowest link and the upper Right section has an Eagle towards the top.
Then its a single tread section at the extreme front, then a 3-tread section working down.
Start here and work your way around. The longer sections are keyed and fit in specific spots.
|
Life isn't fair. But wouldn't it be worse if Life were fair, and all of the really terrible things that happen to us were because we deserved them?
M. Cole.
    |
|
|
|
|
2014/02/26 19:13:42
Subject: Land Raider assembly question?
|
|
Boosting Space Marine Biker
|
Just looking at my instructions for the Land Raider I bought.
The left side is the side if you were looking at it from the rear facing forward.
As for the numbers on the tracks, they do go from 1 to 9 starting at the front of the tank and working around to the rear of the tank.
Hope that helps you out some.
|
|
|
|
|
|
2014/03/03 23:46:45
Subject: Land Raider assembly question?
|
|
Slashing Veteran Sword Bretheren
|
Thanks for the answers, I have assembled most of the tank now.
Couple more questions:
1) Of the two top hatches available to you, is it MFA if you mount the Multi-Melta on the top hatch closer to the front ramp to gain that extra inch range?
2) I cant for the life of me manage to get the top coverings of the Lascannon sponsons to "sit" on the twin-linked weapons.
They have these slots and the top parts of the weapons have protrusions, but they never manage to fit into each other and even if they do, 2 seconds later they pop out. Should I shave the protrusions on the top of the twin-linked weapons and then simply glue the top coverings? It will still alow me to swap them for the Hurricane Bolters in case I want to field the tank as a Crusader.

|
|
This message was edited 2 times. Last update was at 2014/03/03 23:48:06
|
|
|
|
|
2014/03/04 01:59:18
Subject: Land Raider assembly question?
|
|
Lone Wolf Sentinel Pilot
|
Regarding the extra inch...by all means. Just about everyone mounts the cupola weapon on the forward hatch. I picked up extra hatches and have kitted them with Bolters, Meltas, and closed hatches so I can swap them out as required.
The slots on the cover plate an be tricky. I use model airplane glue for most of my assembly so I have time to fiddle with the width of the guns to make them fit. If your using CA (superglue) then your best option is to just shave the tabs and glue the covers in place.
As for weapon swaps, place a plastic section over the interior of the hatchway. Glue a strong magnet to this plastic. Then either glue another magnet to the inside of the door/sponson or a piece of thin metal plate. This lets you swapout entire weapon sections and also place sponsons and doors where you want them.
In this pic you can see the round magnets glued (I used construction adhesive to get a manly bond) inside the hatchways and tin sheets glued to the sponson and door. The frag launcher has a magnet glued to it with another on the underside of the tread. (CAUTION: If you go magnet to magnet DO NOT forget about polarity!!!!).
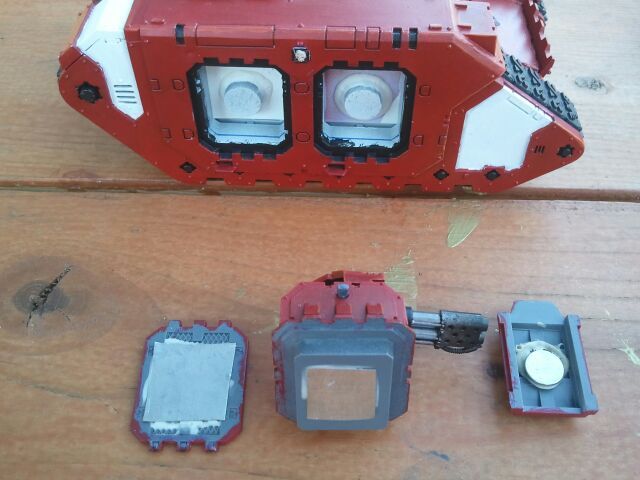
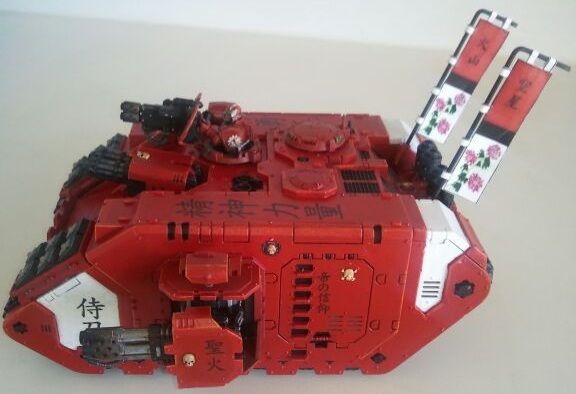
This is what it looks like assembled. The magnets and plates are quite strong enough to stand up to game use. This lets me use 1 LR Hull for any standard variation. While you have to buy extra sponsons from the bits market, the price is better than buying 6 or 7 Land Raiders.

|
Life isn't fair. But wouldn't it be worse if Life were fair, and all of the really terrible things that happen to us were because we deserved them?
M. Cole.
|
|
|
|
|
2014/03/04 02:39:57
Subject: Land Raider assembly question?
|
|
Slashing Veteran Sword Bretheren
|
Nice paintjob on your LR, btw. What red did you use?
|
|
|
|
|
|
2014/03/04 05:38:35
Subject: Land Raider assembly question?
|
|
Lone Wolf Sentinel Pilot
|
That was the old blood red working up to orange highlights, the new white base, then finished off with some homemade decals. The melta/flamers were painted gunmetal (lead belcher) blue washed then worked up through Tin Bitz to a light drybrush of black on the very end.
|
Life isn't fair. But wouldn't it be worse if Life were fair, and all of the really terrible things that happen to us were because we deserved them?
M. Cole.
|
|
|
|
|
|
|
 2000 l
  2000 l
  2000 l
  1500 l
  1000 l
  1000 l
  Blood Ravens (using Ravenguard CT) 1500 l
  1500 l