| Author |
Message |
 |
|
|
|
|
Advert
|
Forum adverts like this one are shown to any user who is not logged in. Join us by filling out a tiny 3 field form and you will get your own, free, dakka user account which gives a good range of benefits to you:
- No adverts like this in the forums anymore.
- Times and dates in your local timezone.
- Full tracking of what you have read so you can skip to your first unread post, easily see what has changed since you last logged in, and easily see what is new at a glance.
- Email notifications for threads you want to watch closely.
- Being a part of the oldest wargaming community on the net.
If you are already a member then feel free to login now. |
|
 |
2014/03/08 18:03:52
Subject: Tutorial Request: Basing for historical miniatures (Samurai)
|
|

Incorporating Wet-Blending
Wales: Where the Men are Men and the sheep are Scared.
|
Hey guys do any of you have any good basing tutorials particularly that you think will go well with a Samurai army.
An autumn theme would be perfect. But I am more than open to other themes as well.
In terms of basing I am an absolute beginner but have been looking at a bunch of tutorials to give me an idea but I am unsure of exactly where I want to go with the basing.
Thanks
Carl
|
|
|
|
 |
|
2014/03/12 09:48:34
Subject: Tutorial Request: Basing for historical miniatures (Samurai)
|
|

Fresh-Faced New User
|
 carlos13th wrote: carlos13th wrote:Hey guys do any of you have any good basing tutorials particularly that you think will go well with a Samurai army.
An autumn theme would be perfect. But I am more than open to other themes as well.
In terms of basing I am an absolute beginner but have been looking at a bunch of tutorials to give me an idea but I am unsure of exactly where I want to go with the basing.
Thanks
Carl
Ok, this is the basic system that I use. Unfortunately I don't have pictures loaded (anyway decent pictures that is).
Step 1 - paint the bases brown. The kind of dark brown that anything that shows through would be dirt in your area. In Japan, that would be very very very dark brown. Wait to dry.
Step 2 - mix up some white glue and water. About 50:50 - experiment a bit with this.
Step 3 - paint your bases with the mixture - nice thick coats.
Step 4 - Using Woodland Scenics http://woodlandscenics.woodlandscenics.com/show/category/BlendedTurf Green turf, dip the base and all into a cup of the flock.
Step 5 - tap off the excess.
Step 6 - Using Woodland Scenics http://woodlandscenics.woodlandscenics.com/show/category/BlendedTurf Earth blend, dip the base and all into a cup of the flock.
Step 7 - tap off the excess.
I tend to add some small pebbles into step 4. The idea of step 4 through 7 is to have a varying blend of flock. No grass is like a lawn. Even a lawn. The green will sink into the thicker portions of glue and so you'll have sections of glue showing through. The earth blend will stick to that and when it all dries it will blend nicely.
Step 8 - physically glue some larger pebbles and what-not onto the base in artistic manner. Remember, your warriors are not going to go headlong into a boulder field, but rocks happen. So don't go crazy, and try to keep it looking realistic.
Step 9 - using various kinds of shrubs, mosses, artificial flowers and the like (made for scale models, able to be bought at various places - personally I like noch Autumn grass tufts and flowers http://www.noch.com/en/produktkatalog/artikel_detail_neu.php?shop_artikelid=5985972&navi_Kategorie1=&navi_Kategorie2=&navi_Kategorie3=&navi_Kategorie4= bring your bases to life, remembering that most battles were not fought in a well cultivated area, they were 'in the scrub'.
Step 10 - varnish with a good quality varnish/lacquer. I use Testors.
HOpe this helps.
|
|
|
|
|
2014/03/13 04:33:32
Subject: Tutorial Request: Basing for historical miniatures (Samurai)
|
|
Incorporating Wet-Blending
Wales: Where the Men are Men and the sheep are Scared.
|
Thanks for the detailed explaination.
It does help a lot. I dont' really have the cash to pick up the woodland scenics atm but to process you go through and the colours you choose helps a lot.
I have some stuff here I may be able to use as a poorer substitute though.
Since my army is going to be Uesugi I may see if I can get some pictures of the Kawanakajima area for an idea of how the ground looked
Yeah I want to avoid it looking like they are fighting on a mowed lawn even if a battle stared in a perfect meadow it wouldn't stay perfect for long..
|
|
This message was edited 1 time. Last update was at 2014/03/13 04:34:03
|
|
|
|
|
2014/03/13 10:28:36
Subject: Re:Tutorial Request: Basing for historical miniatures (Samurai)
|
|

Drakhun
|
|
|
|
|
|
|
2014/03/13 10:30:48
Subject: Tutorial Request: Basing for historical miniatures (Samurai)
|
|

[MOD]
Anti-piracy Officer
Somewhere in south-central England.
|
If he cannot afford flock he won't want resin bases.
@OP is the army for a mass battle game like Field of Glory, or for a skirmish game like Ronin?
|
|
|
|
|
|
2014/03/13 16:37:43
Subject: Tutorial Request: Basing for historical miniatures (Samurai)
|
|
Incorporating Wet-Blending
Wales: Where the Men are Men and the sheep are Scared.
|
those resin bases are very nice but as killkrazy said money is an issue there.
I do have some flock just can't afford new flock,
It's for both. I am basing them on pennies for ronin and skirmish games then putting them on unit bases with cutouts for stuff like kings of war.
|
|
|
|
|
|
2014/03/13 19:32:50
Subject: Re:Tutorial Request: Basing for historical miniatures (Samurai)
|
|
[MOD]
Anti-piracy Officer
Somewhere in south-central England.
|
Then you need a basing that will mix well between the individual and the group bases.
Ravenflight's explanation above covers the key steps of doing a base very well.
If you don't want to use flock, sand is a good alternative and can be painted to look like organic ground cover or left its natural colour, or darkened with varnish.
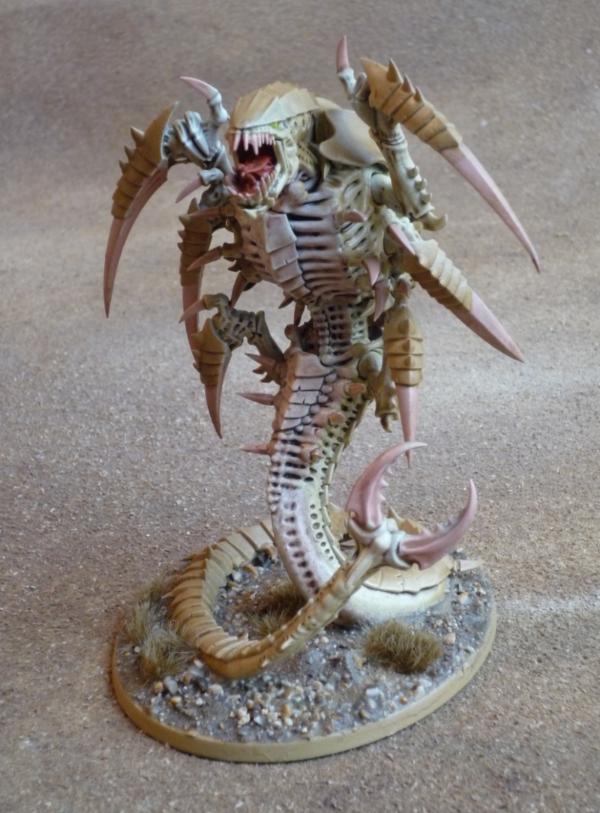
I use beach sand illegally stolen from the beaches in Dorset. It has a mixture of grain sizes and colours, and includes many small chips of stone and pebbles of different colours.
Here is a pic of Mr Snuggles, one of my Trygons, based using natural beach sand (darkened by glue and varnish) and "Highland Tuft" from Army Painter.
|
|
|
|
|
|
2014/03/21 18:06:43
Subject: Tutorial Request: Basing for historical miniatures (Samurai)
|
|
Incorporating Wet-Blending
Wales: Where the Men are Men and the sheep are Scared.
|
Here is the base I did based on some of the advice here. Its not perfect but its getting there.

|
|
This message was edited 1 time. Last update was at 2014/03/21 18:07:28
|
|
|
|
|
2014/03/21 19:06:37
Subject: Re:Tutorial Request: Basing for historical miniatures (Samurai)
|
|
Esteemed Veteran Space Marine
|
Well, in my opinion, your base looks great. Considering you have 'poorer' flock in your own terms, it's not come out badly at all. From what I can see, it looks exactly the same as the ideal you described - the greener meadow giving way to darker earth as the battle progresses, with spots of russet tufts giving it an autumnal feel. Yeah it's not fancy, but at the same time, it's just one of your base units (Matchlock Ashigaru?). For your more advanced 'character' units you may want to make it a bit more fancy, a few rocks or discarded weaponry etc, but if you were to replicate this effect over a whole unit, then I can very well picture them coming out splendidly.
If you're looking for a little critique, my only one would be that some proper bases may not go amiss. Even GW's 25mm bases would be good - I only say that as, IMO, having used pennies myself once before, I always feel the rims look too thin. That said, I don't game, so I can't really comment too much as I don't know what base sizes would be convenient or legal.
|
|
|
|
|
|
2014/03/21 20:42:22
Subject: Tutorial Request: Basing for historical miniatures (Samurai)
|
|
Incorporating Wet-Blending
Wales: Where the Men are Men and the sheep are Scared.
|
Thanks for the critique, I do have larger GW bases but the smaller bases are intentional. I want to use these across a series of games including Skirmish games and Mass Battle games such as Kings of War.
By basing on pennies I can purchase movement trays that have cutouts allowing me to slot in the troops to make large regiments for Mass Battle games and just pull out the guys I need for Skirmish ones.
Personally I have always preferred lower profile bases, while I think I would prefer to have bases that are a little thicker than pennies they are the disadvantages are worth the advantages, especially when I factor in cost.
Yeah its a matchlock Ashigaru, he doesn't really go with the rest of my figures but is a decent test miniature.
|
|
This message was edited 1 time. Last update was at 2014/03/21 20:43:26
|
|
|
|
|
2014/03/21 20:56:08
Subject: Tutorial Request: Basing for historical miniatures (Samurai)
|
|
Lone Wolf Sentinel Pilot
|
This is how I did my bases and it was pretty inexpensive.:
PVA (white glue). 1$.
Sand (from the local playground). Free.
Flock (static grass and Tree tuffs). $4-5 depending on location and size.
Cork (1/4" from Walmart...optional). 2-3 dollars and you get a lot..
Paints (Brown wash, black wash, light grey, black). 1 dollar per bottle from craft stores... YMMV.
Primer (Black). $2 at Home Depot.
Matte Varnish (Spray can, Home Despot). $3.
An old small paintbrush. $2 for a pack of chap brushes at a craft store.
I've done dozens of bases and a display board and still have a ton of material left over.
1. (optional if you want a rock on the base) Tear off small chunk of cork and size to base with model . Once your satisfied with the size and location, glue down with PVA. Let dry completely.
2. Prime base black (including cork "rock").
3. Heavy Dry brush grey onto the rock. The goal is to get everything grey except the deepest crevices. Let dry.
4. Wash the rock with black to deepen the details.
5. Light dry brush the rock again to pick out highlites.
6. Glue completed model to base (some people like to build the model on the base..I don't. whatever). Let dry.
7. Use paintbrush to coat a thin layer of PVA on the plastic base.
8. put sand on the base. A lot. Let dry.
9. Once dry, tip base and let loose sand pour off. Tap base to get all loose the sand off.
10. Brush brown was onto sand. Use lots. Flood it. Let dry.
11. Dry brush grey to highlite the sand.
12. Use brush to cover some area of the sand with PVA. make it random on each base.
13. Cover PVA with static grass. Let dry completely.
14. Knock loose grass off.
15. (optional) Put small dab of PVA at base of rock or other area. Stick small tuft of tree flock on glue. Let dry.
16. Paint the rim of the base with black to give it a clean finish.
17. Spray entire assembly with matte varnish to lock everything down.
And you end up with this:
|
|
This message was edited 1 time. Last update was at 2014/03/21 20:58:44
Life isn't fair. But wouldn't it be worse if Life were fair, and all of the really terrible things that happen to us were because we deserved them?
M. Cole.
    |
|
|
|
|
2014/03/21 21:06:22
Subject: Tutorial Request: Basing for historical miniatures (Samurai)
|
|
Incorporating Wet-Blending
Wales: Where the Men are Men and the sheep are Scared.
|
These would go well with your models mate.
http://puppetswar.com/product.php?id_product=304 Automatically Appended Next Post: Thats not too dissimilar from what I ended up doing.\
First put glue on the base mixed with some water.
Then dip in medium sand, then some large rocks. Finally I use some thin brown flock (its almost a powder) that I had on hand and dip it in that, it fills the bits the other two missed.
Then I cover that with a thin layer of watered down glue to hold it in place.
Then paint brown, then dry brush (I suck at drybrushing.)
Then I added flock. Then I added foliage of various colours including green, orange and red.
Finally add a few rocks, attach miniature and seal with varnish.
|
|
This message was edited 1 time. Last update was at 2014/03/21 21:10:31
|
|
|
|
|
2014/03/31 13:04:38
Subject: Re:Tutorial Request: Basing for historical miniatures (Samurai)
|
|
Fresh-Faced New User
|
 Kilkrazy wrote: Kilkrazy wrote:I use beach sand illegally stolen from the beaches in Dorset. It has a mixture of grain sizes and colours, and includes many small chips of stone and pebbles of different colours.
You shouldn't steal.
Now if you're anything like me, when you go swimming I bring back half a beach in my swimmers. 
Another good alternative is kitty litter. Getthe really coarse stuff, and pound it to death. I heartily recommend using kitty litter that is new, NOT second hand kitty litter although you may end up with some really nice 'bonus pieces' but may lose some opponents as well... well, you can't have everything when you're on a budget
|
|
|
|
|
2014/05/17 03:10:29
Subject: Tutorial Request: Basing for historical miniatures (Samurai)
|
|
Fresh-Faced New User
|
carlos13th wrote:Here is the base I did based on some of the advice here. Its not perfect but its getting there.
Sorry, I've been away for a while. I think your base looks great. My only piece of advise is that (to me) it looks a little one dimensional. By that I mean there is ground cover at a similar level. I would try to get some stuff (backyards are great) to break it up a bit and to cause some highs and lows.
So, you might want to put in a twig that's poking up a little bit. If it were me, I would use some sponge type flocks to make shrubs and the like, but I know you're on a budget so possibly don't have access to that.
As I said, the base looks great so I don't want to criticize, I'm just trying to 'take it to the next level'.
In the end, I think you can't judge an army's flocking on one figure. You have to see how the army behaves together.
I don't play the type of game that you do. My figures are all together in a unit and so I can mix and match up the bases somewhat to form a kind of diorama, which will affect the way you do your final product.
You're doing great. Keep up the good work.
|
|
|
|
|
2014/05/17 08:45:45
Subject: Tutorial Request: Basing for historical miniatures (Samurai)
|
|
Incorporating Wet-Blending
Wales: Where the Men are Men and the sheep are Scared.
|
That criticism is great thank you, don't apologise at all. Of you check the link in my sig to my painting and modelling thread you will see a few guys based similarly. With the addition of some flowers on a few of them. If you could take a look and let me know what you think that would be great.
|
|
|
|
|
|
2014/09/19 05:23:49
Subject: Re:Tutorial Request: Basing for historical miniatures (Samurai)
|
|
Fresh-Faced New User
|
Hey mate,
Sorry, I feel quite slack as I've been away since May!!!
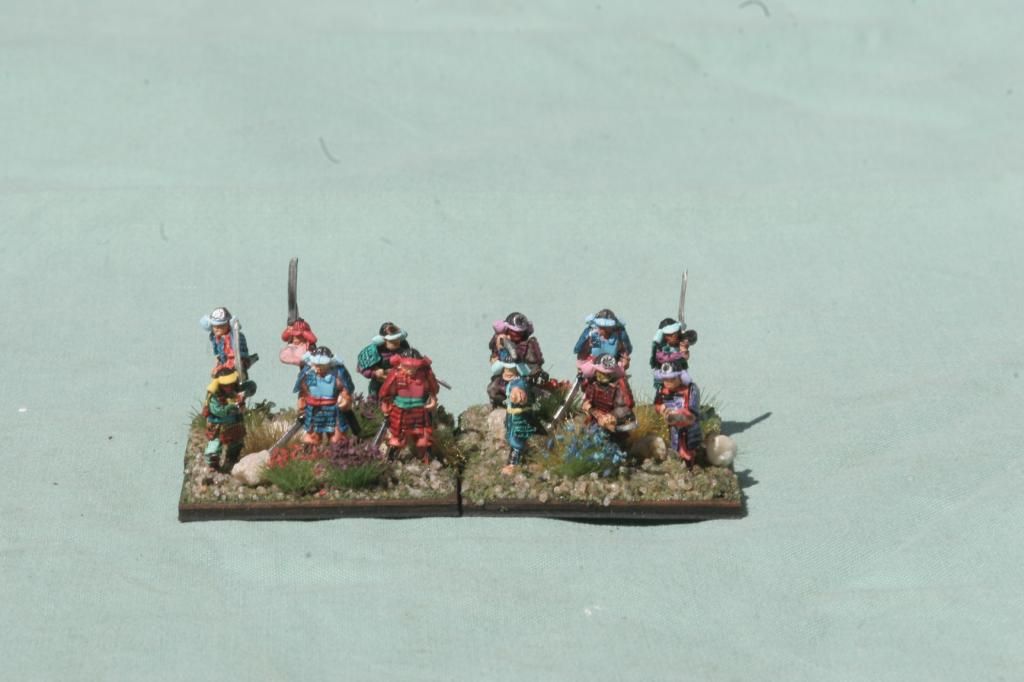
Anyway - I think your other pictures look great, and it looks like you got ahold of some of the flowers I was talking about??
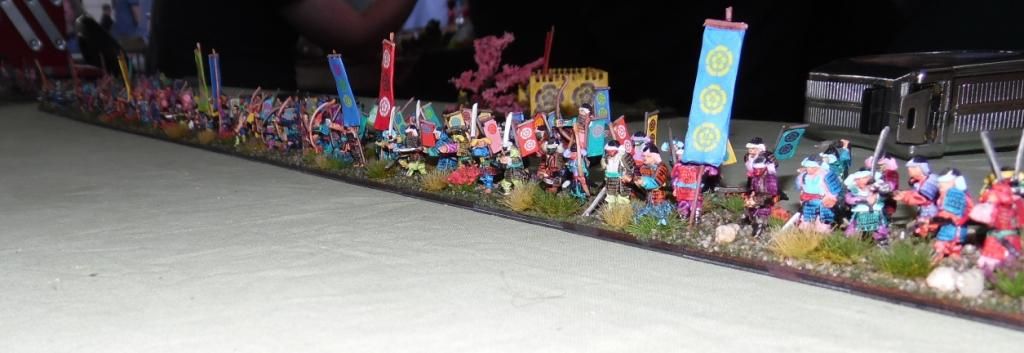
Anyway - here are some 15's I've just finished, and the post is just lifted from another forum:
Ok, after nearly seven months of mucking around, I'm finally on the downward spiral of finishing these guys off:
Here are the first finished unit.
Oda's Hatamoto are ready to take all comers:
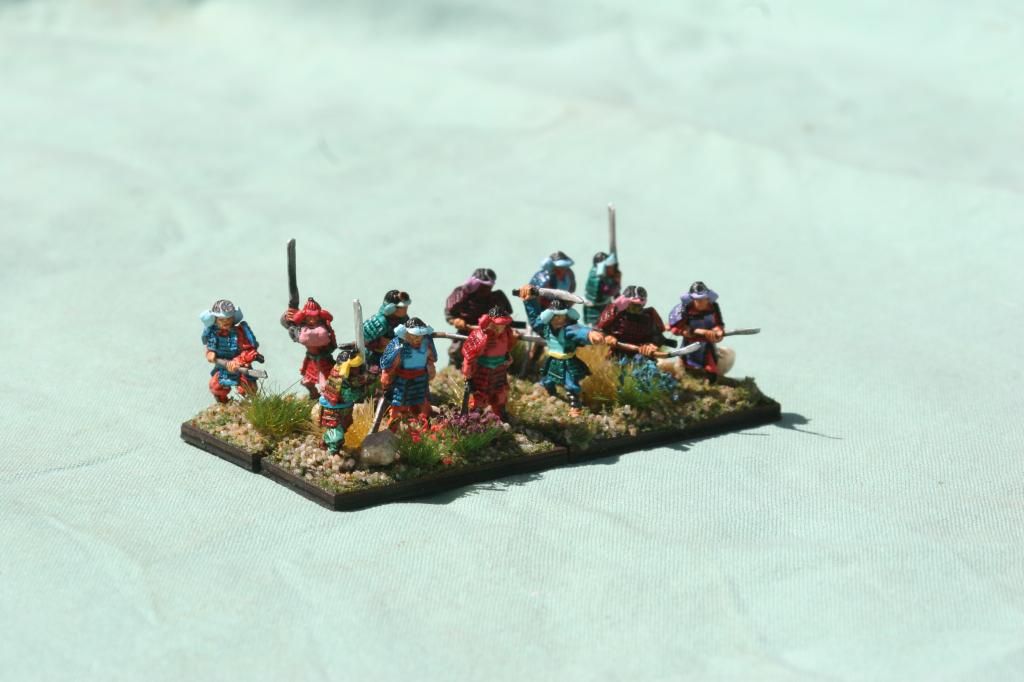
My theory on painting the armour on these guys is that the Tsuru Bashiri (Breastplate) and the Kabuto (Helmet) were often very heavily decorated:
So I have tried to 'blend' the colours in a way which would give the distant appearance of the decoration without going into the detail. For the most part this has meant going a very light shade of the main colour of the lacework on the armour, so if the lace was green, the decorative work would be light green or lime. I came into some problems with colours like red and the like which don't lighten down very easily (red becomes pink obviously), so in some cases I went pink, in other cases I just stayed red.
I haven't given these guys Sashimonos. There are three reasons for this:
Firstly, I need an easy way of distinguishing the Hatamoto from the rest of the army!,
Secondly, these guys are so tough that the don't need no stinking flag to frighten the enemy!!; and,
Thirdly, everyone knew who they were... they are the Hatamoto Guard for God's sake!!! They don't need any assistance in being identified!!!
For the most part the rest of the army have Sashimonos
They will be up in the next couple of weeks.
Hope you like them.
|
|
This message was edited 2 times. Last update was at 2015/01/27 02:15:10
|
|
|
|
|
2014/09/19 05:44:33
Subject: Tutorial Request: Basing for historical miniatures (Samurai)
|
|
Incorporating Wet-Blending
Wales: Where the Men are Men and the sheep are Scared.
|
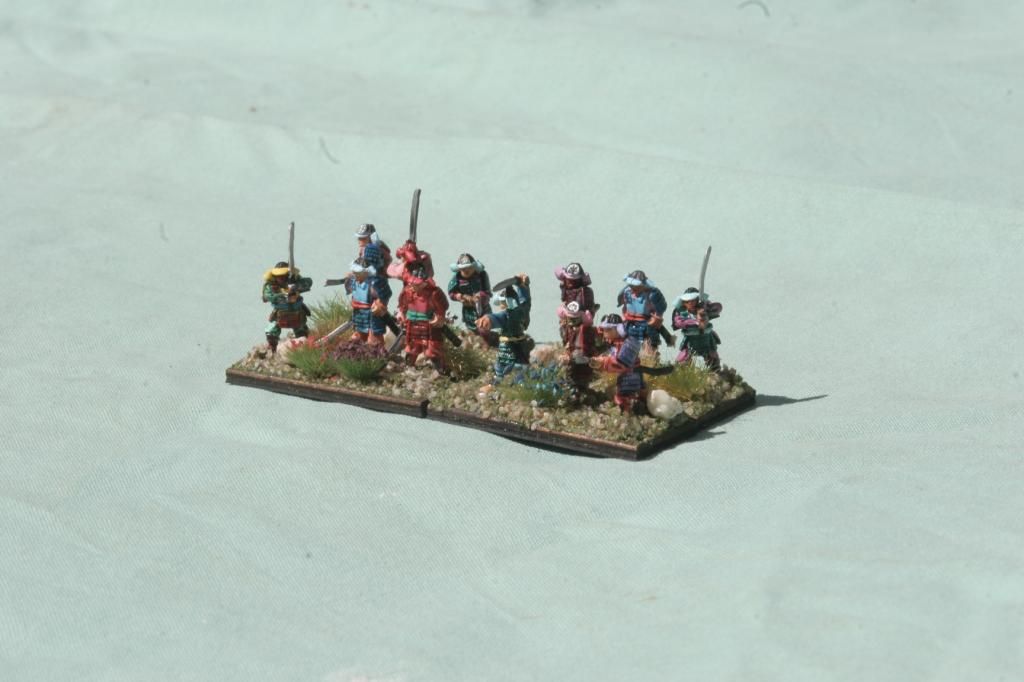
They look good. Are they sengoku or earlier samurai?
They look earlier to me but it's harder to tell at 15mm
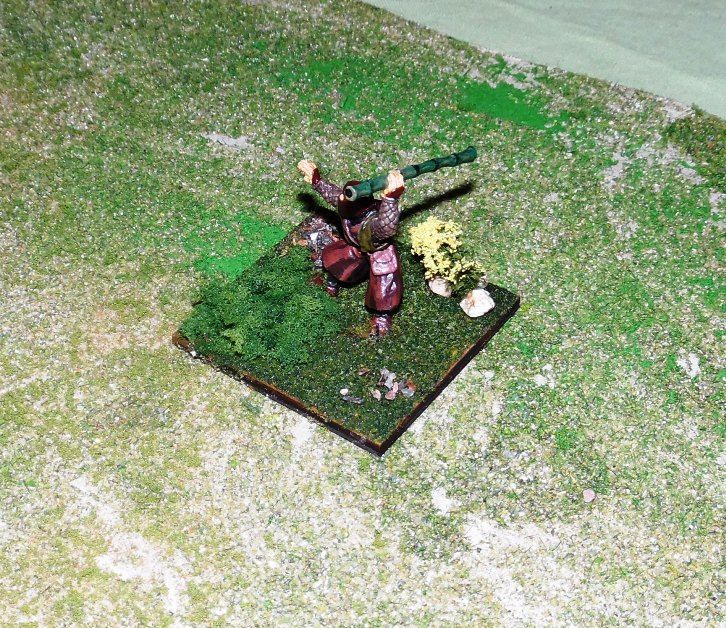
Here is now my first full unit turned out


|
|
|
|
|
|
2014/09/19 06:12:38
Subject: Re:Tutorial Request: Basing for historical miniatures (Samurai)
|
|
Fresh-Faced New User
|
Hi,
Very nicely done!
If I'm honest, I think the range covers a period from the rise of the Samurai until the end of the Sengoku period, but I prefer to have variety in poses more than I object to the anachronism of armour. For instance many of the 'ashigaru' I have in the army are not wearing a Jingasa and are from a much earlier period, but I look at things somewhat differently:
1 - I got the figures really really cheap from a mate and couldn't really afford (or justify) purchasing a whole bunch of stuff and have unpainted lead;
2 - The army I designed was around 1525 and the Jingasa is kind of first specifically mentioned (so far as I can tell) at Nagashino, 50 years later;
3 - I like variety (as previously mentioned) and think that there would be a certain amount of 'hand me down' armour... perhaps not for 100 years, but styles are a little different anyway; and (lastly, and certainly a bit embarrassingly so);
4 - Few people will have a clue 
Anyway - I like your paint job. 25's are so much nicer to paint, but you can't hide your errors as easily either, so well done!
I've done some cheats on mine because they are a 'wargames army' and painted to as high a 'wargames standard' as I can do. I can do better, but I have taken 7 months painting up the army as it stands and am going stircrazy as it sits... no way I'm going to go to a higher standard just to show off to myself 
Have a good one
|
|
|
|
|
2014/09/19 06:17:17
Subject: Tutorial Request: Basing for historical miniatures (Samurai)
|
|
Incorporating Wet-Blending
Wales: Where the Men are Men and the sheep are Scared.
|
The important thing is you like your army. Doesn't matter about Era's accuracy or anything else as long as you like them. For the record I like them too.
|
|
|
|
|
|
2014/09/19 07:12:28
Subject: Re:Tutorial Request: Basing for historical miniatures (Samurai)
|
|
Fresh-Faced New User
|
You're right.
My history goes back to Napoleonic Wargaming. There is a culture in Napoleonic Wargaming which is 'degrade your opponent's knowledge of history by pointing out that the "3rd Chasseurs didn't use pink facings, they used rose, which is slightly darker in colour than what you have on your figures... oh, and the 5th Hussars didn't use BRASS buttons, they had gold *scoff*".
I personally don't understand this kind of mentality, and go with the 'never let the facts get in the way of a good paintjob' kind of mentality.
Now, I wouldn't go so far as paint Fallschirmjäger's with pink smocks (unless as a joke) but there is a gray area that you can muck around with.
The other thing is, that I think games like 40K etc have such a huge following because you can do whatever... although no doubt there are snobs in 40K as well, but less so.
Thanks for your kind comments on the troops. I'll endeavor to get the rest up once they are flocked and based... two weeks I hope
|
|
This message was edited 1 time. Last update was at 2014/09/19 07:13:05
|
|
|
|
|
2014/09/19 07:29:56
Subject: Tutorial Request: Basing for historical miniatures (Samurai)
|
|
Incorporating Wet-Blending
Wales: Where the Men are Men and the sheep are Scared.
|
I understand if someone wants a historically accurate paint job. For some people accuracy is some of the fun but they shouldn't criticise or mock others for not caring as much as they do.
Make a post in the painting and modeling section of the website if you like. Please link the rest of your stuff to me if you do as I would love to see more.
With my Samurai I am going for Historical ish rather than perfect historical accuracy. The names and some characters are real but everything else is based on whatever looks good to me.
I would be hard pressed to claim historical accuracy considering I am currently painting up Oni which are over in the painting and modelling blog in my signature.
|
|
This message was edited 1 time. Last update was at 2014/09/19 07:30:40
|
|
|
|
|
2014/09/19 08:48:43
Subject: Re:Tutorial Request: Basing for historical miniatures (Samurai)
|
|

Grey Knight Purgator firing around corners
|
Just my 2¢ on cheap basing materials:
- at building sites asking for a "cup" of sand may provide a good amount at the best price (aka free)
- for dark flocking, just cut open a handful of teabags (red, black, green and white tea may provide different tones)
|
 2270 (1725 painted) 2270 (1725 painted)
 1978 (180 painted) 1978 (180 painted)
 329 (280ish) 329 (280ish)
 705 (0) 705 (0)
 193 (0) 193 (0)
 165 (0) 165 (0)
:assassins: 855 (540) |
|
|
|
|
2015/01/21 07:23:44
Subject: Re:Tutorial Request: Basing for historical miniatures (Samurai)
|
|
Fresh-Faced New User
|
THEY'RE FINISHED!!!!
Oh My God, it has seriously been the longest project I have ever undertaken.
Anyway - unfortunately I can't get the pictures up at the moment as I'm packed up ready for CanCon (Australias biggest wargame convention) but I'll certainly take some pics at the con and post them when I get back.
I'm very pleased to have this done.
|
|
|
|
|
2015/01/21 11:07:12
Subject: Re:Tutorial Request: Basing for historical miniatures (Samurai)
|
|
Posts with Authority
|
 darefsky wrote: darefsky wrote:You could always go with resin bases.....
This is the Asian Garden stuff from Secret Weapons Miniatures.
'Cos every Asian conflict takes place in a dry-landscape garden. 
Anyway, looking good Carlos. But have you got any image software with crop and resize functions...?
|
|
This message was edited 1 time. Last update was at 2015/01/21 11:11:09
|
|
|
|
|
2015/01/25 11:03:18
Subject: Re:Tutorial Request: Basing for historical miniatures (Samurai)
|
|
Fresh-Faced New User
|
|
|
This message was edited 2 times. Last update was at 2015/01/25 11:13:15
|
|
|
|
|
|
|