Forum adverts like this one are shown to any user who is not logged in. Join us by filling out a tiny 3 field form and you will get your own, free, dakka user account which gives a good range of benefits to you:
No adverts like this in the forums anymore.
Times and dates in your local timezone.
Full tracking of what you have read so you can skip to your first unread post, easily see what has changed since you last logged in, and easily see what is new at a glance.
Email notifications for threads you want to watch closely.
Being a part of the oldest wargaming community on the net.
If you are already a member then feel free to login now.
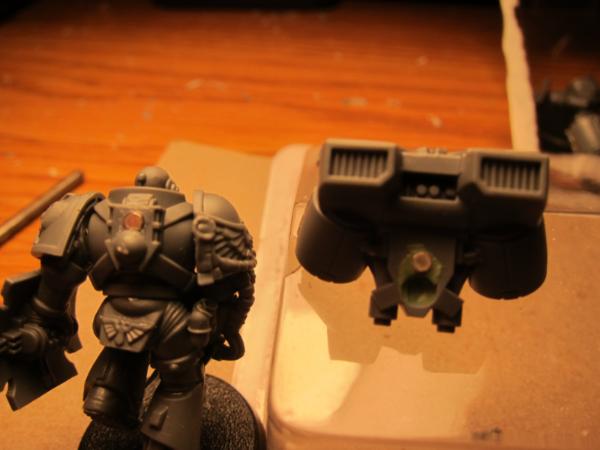
I keep hearing all this stuff about magnets and how they are the bees knees, how easy is this, where do you get them, do you cut out areas for them to go or just glue them in? What kind of glue works... Basically HELP!!!
Thanks battle brothers you all rock!
This message was edited 1 time. Last update was at 2014/05/02 05:39:42
I get mine on amazon. Usually I just get the corresponding drill bit and make a perfect sized hole and glue. The difficultly usually differs from model to model, so hard to say.
Rare earth magnets are the most common type, with the size used determined by the model you are using them with. Installing them is rather easy and requires little more that a pin vice to drill the hole they sit in and glue to hold it in place. I mainly use it for the armament of my tanks, though recently I have taken to magnetizing the arms of my guardsmen that carry their special weapons.
One thing of note is make sure you have the polarities correct, nothing worse than magnetizing thing only to find out you accidentally flipped them around and now they wont hold!
Vorradis 75th "Crimson Cavaliers" 8.7k
The enemies of Mankind may employ dark sciences or alien weapons beyond Humanity's ken, but such deviance comes to naught in the face of honest human intolerance back by a sufficient number of guns.
Also, magnetising can be either 'easy' or 'very difficult', depending on what you're magnetising. Try it on easier things to get a swing of it first is my recommendation.
This message was edited 1 time. Last update was at 2014/05/02 05:57:51
WAAAGH Sparky! 1400 (ish) - On the rebound!
Kommander Sparks DKoK 1000 (ish) - Now on the backburner
- Men, you're lucky men. Soon, you'll all be fighting for your planet. Many of you will be dying for your planet. A few of you will be put through a fine mesh screen for your planet. They will be the luckiest of all.
1.) There are lots of good sites to get magnets from. You can get them from K&J Magnetics, Amazing Magnets, or Magcraft. They are all more or less the same quality so get whatever is cheaper shipped. One of those sites used to and (may still) give freebies, and you might want to go with Magcraft even if they're a little more at first because they come in really sweet storage containers.
2.) For magnetizing infantry arms, I like 1/8" x 1/16th" magnets. They'll work up to Killa Kan size arms but they might droop a little if the arms are that big. I've found that the 1/16th" diameter can sort of work for really small infantry like Scouts but they don't really have enough pull to prevent them from drooping.
3.) I use superglue for magnets. Any superglue will work.
4.) You don't need a Dremel tool with a 1/8th bit - you can technically use a pin vise with a 1/8th bit - but you really will want a Dremel tool.
5.) My technique is to glue the magnet into the larger part of the magnet first (like a Killa Kan) and kick it. I wait a second or two for the kicker to cure the glue, then put the second magnet atop it and mark it with a magnet. I pick off the magnet, and glue it in so that the shiny side faces out, with the glue going onto the marked side. I usually mutter "shiny side out" under my breath while doing it.
lord_blackfang wrote: Respect to the guy who subscribed just to post a massive ASCII dong in the chat and immediately get banned.
Flinty wrote: The benefit of slate is that its.actually a.rock with rock like properties. The downside is that it's a rock
Magnets are fantastic for any model with very large parts that is otherwise difficult to transport where you can use the magnets to let you break it into more easily transported chunks; its also great for any model that has variable weapon options as you can swap the arms/weapons around as needed*
Start simple and work your way up - typically I drill a small slot into the arm mount and into the ball mount; gluing each magnet into those slots using normal superglue.
The only time you need to consider doing much more is if you have parts that start to rotate around the magnet once fitted; normally that is solved by a small greenstuff tab being fitted (modelled so that it fits and suits the model) so that it can't turn around the joint.
Another is when you've an elongated or larger part attached; something like the wing of a large bird or a very large arm. In that case its often beneficial to drill into the main body of the model and into the arm and fix a metal rod. This is just like pinning the model, only you tend to use a thicker rod and you only glue it to one part. That way the rod takes some of the strain of the joint on itself and lets the magnet act like a simple lock holding the parts together instead of trying to hold up one part.
*this is really essential considering that with new codexs and rules guns will come and go from the game. Last thing you want is expensive models with gun options that suddenly are no longer in the codex or are illegal to use
I’ve been using a lot of 2mm magnets for my space marines lately. They are a tight fit for wrist mounts, but are very easy to put in arms, shoulders, and backpacks.
Magnets aren't much easier/harder than general kit assembly, some people struggle with, others don't. We use superglue for ours, and generally there's no problem.
Thanks guys! All of that helps a LOT! Every single thing I was thinking was addressed and more, I'll keep you guys posted as I get into it. Using the magnets for a space marine army and am going to start with back packs and weapons. Hopefully at the wrist but I may be dreaming, I'll see how easy it goes for me.
I use a regular drill and have no problem with it. When I'm gluing magnets in I will scratch up or score the side thats getting glued in so the glue will hold better. This is important for bigger magnets as they are very powerful and over time can pull out of the glue. I get my magnets on ebay but I'm sure amazon is just as good.
Like stated about, some times you may have to cut a bigger hole to get magnets in and may need to put greenstuff in there. And there are time that you may want to put the magnets in while building the model. Carnifexes for example. Its easier to put some greenstuff inside the body and put a magnet in then put the body together instead of putting the body together then trying to magnetize.
You can find tutorials on this site, other sites, and even youtube if you wanted to see how it's done on specific models. Search for things like "magnetizing carnifex" or "magnetizing leman russ".
Here’s an excerpt from my blog, from when I was putting together my vanguard vets.
There is space in the pack for a 2mm magnet and some greenstuff. Just put a little ball in the bottom of the top half, set the magnet in, and push more into the gaps with something pointy and non-magnetic (I used a spare bit of sprue I had on hand, toothpicks might be better) When the magnet is where it needs to be, just push the jump pack onto the back section to get the rounded nub on the torso to make itself a socket. That will help keep everything aligned when in use.
Some of the arms had to be done the same way. They are not solid, so I just packed the space with greenstuff and squished a magnet in there.
One trick for greenstuff is to wet your fingers/tools. This will keep things from sticking.
One thing I do to help track polarity is to keep a baseline model (one I’ve already done) on hand. What you can then do is take a stack of magnets and put it on the base, and then put the one on the end of the stack into the target. I think I’m making it sound more complicated then it is. If I wanted to put a magnet into the back of a marine, I’d take a backpack I’ve previously done, and stack a dozen magnets onto the one set into it. Then drill the hole in the marine, put a drop of super glue in there, and then the top magnet from the stack.
[backpack]mmmmmmmmmm[marine]
Because all the magnets are facing the same way, it all works. Plus you can go down the squad and do them all at once.
Vash108 wrote: I get mine on amazon. Usually I just get the corresponding drill bit and make a perfect sized hole and glue. The difficultly usually differs from model to model, so hard to say.
Automatically Appended Next Post: Great thanks for the tips, tricks, links and pictures! This is all good stuff. I will be revisiting this page multiple times I'm sure!
This message was edited 1 time. Last update was at 2014/05/02 23:56:24
Virtus wrote: Is there a general rule of thumb to go by in determining when you would want to use galvanized metal sheeting as opposed to two magnets?
If it’s not deep enough to sink a magnet, and is a light bit. While not quite the same, I’ve cut the heads off of small nails and filed them down to make little disks. These can be glued onto guns and the like. Not the best technique, and one I’ve not used in a bit. But it can work.
I find 3x1mm magnets useful for all that I needed to magnetize for now. I have SoB and Necrons. Also, N35 strength seems enough for me, so I never got the more expensive N51. And there are lots of cheap magnets from eBay sellers.
Also, I find a hand drill easier to control but YMMV. I started using it because I didn't want to spend the money on a Dremel. I use a screwdriver (with an interchangeable head) and a 3mm sized drill bit which fits onto the screwdriver. It couples by use of magnets within the screwdriver.
DS:70+S+G+M-B--IPw40k94-D+++A++/wWD380R+T(D)DM+
Avatar scene by artist Nicholas Kay. Give credit where it's due!
Virtus wrote: Is there a general rule of thumb to go by in determining when you would want to use galvanized metal sheeting as opposed to two magnets?
If it’s not deep enough to sink a magnet, and is a light bit. While not quite the same, I’ve cut the heads off of small nails and filed them down to make little disks. These can be glued onto guns and the like. Not the best technique, and one I’ve not used in a bit. But it can work.
I routinely use 0.5mm thick magnets for all sorts of things, so you don't need to go to the lengths of cutting out bits of steel when you can get nice pre-formed thin magnets.
Please excuse any spelling errors. I use a tablet frequently and software keyboards are a pain!
Pro-tip, magnets are super awesome for jetbikes. Instead of gluing them to the stand, or dealing with them falling off their stands all the time, you can magnetize those fools. Works great.
I paint the north pole of each magnet with a dab of black paint. This is very important, otherwise you will lose track of your magnets and probably end up gluing something wrong.
Let the glue attaching the magnet dry completely before testing them. Nothing like carefully placing a magnet and getting glue everywhere, only to undo it by testing it with another magnet too soon and seeing the magnet fly off.
Use some small plastic or wooden tweezers to place the magnet. The magnets these days are super strong for their size, and I found it hard to place them with my fingers sometimes. Two toothpicks work great, like chopsticks to place/adjust the magnet.
This message was edited 1 time. Last update was at 2014/05/07 03:50:18
"Bringer of death, speak your name, For you are my life, and the foe's death." - Litany of the Lasgun
Showtimebrad wrote: I keep hearing all this stuff about magnets and how they are the bees knees, how easy is this, where do you get them, do you cut out areas for them to go or just glue them in? What kind of glue works... Basically HELP!!!
Thanks battle brothers you all rock!
the only thing more annoying than installing magnets is painting extra options
kb305 wrote: The only thing more annoying than installing magnets is painting extra options
This is the truth! I go through the effort of magnetizing things, paint up the primary option that I’m most likely to use, and the toss the other options in my “to-do eventually” pile. I really want to get them done, but something else always grabs my attention.
It’s nice to have options though. This week’s painting project is to get a powerfist done for a game Saturday. The model it’s for has been done for months, but I want a new weapon for him, the last one was not cutting it on the table. Because I thought ahead and put a magnet in the shoulder, it’s a simple job, and reversible if I don’t like the way it plays.
Depends, depends, and depends some more. Magnets take some getting used to in order to apply correctly and not botch up the model or make it look obvious its there.
Usually i get my magnets from http://www.kjmagnetics.com/ as theyre a good price if you know what youre after and how many you might need. Some of the sizes cost more than you'd think because theyre more "standard" so i find ways to use the unusual ones.
Simply applying one magnet, of any size, means drilling a hole or greenstuff-sculpting a socket for the magnet to sit in. Sometimes you dont have to do this depending on the piece/location, but usually its a must. Main difficulty here: Keeping your polarities correct so you dont accidentally have a repelling gun barrel instead of an attracted gun barrel.
Multiple magnets such as for ones too small to hold any weight on their own, prevent spinning, or in odd areas that require more than 1 or it simply wont work is when it starts getting difficult. This is rare though, i technically dont have to do this for my Tau crisis suits but i do it anyway because i dont like my Fusion Blasters free spinning in their sockets lol. What i do here is i drill the holes needed for the two magnets side-by-side. Then i fold the "rod" of magnets in half so i have two different facings straight up (trust me, its easier this way). I glue it in and pull off most of the remainders, but leaving ~5-10 depending on how easily they come off without ripping the glue off. Once that dries enough so i can handle it i level off the other end WHILE STILL ATTACHED and glue that to the part im trying to magnetize. This way the polarities arent jacked up, you can do it faster since you dont have to wait for the glue to full dry before removing excess magnets, and theres no pain in the ass with magnets repelling each other sidebyside lol.
I cant give you in-progress pictures atm but i can show you illustrations of what i meant, let me get some pics real quick and i'll edit this post. My commander in question isnt painted yet, so theres nothing covered up.
EDIT: In spoilers.
Spoiler:
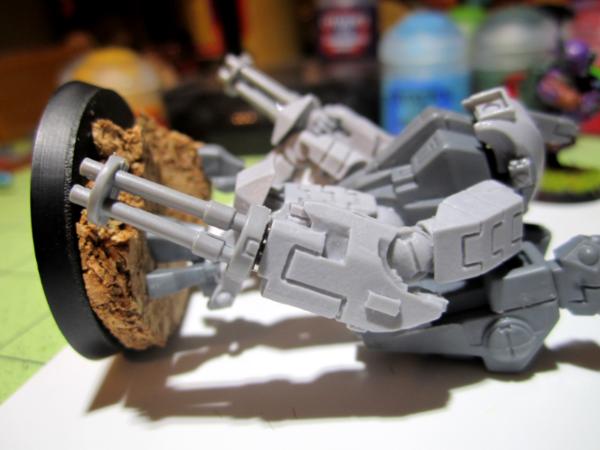
This is the Commander in question, both his Burst Cannons are magnetized and will not free spin.
In this particular case, i did not need to drill any holes as the indent of the model's own sculpting hid the magnets. All i did was clip off and smoothen the gun side so i could put the magnets on there cleanly. This is an example of when you dont need to drill a hole. The gap is so tiny, who cares lol.
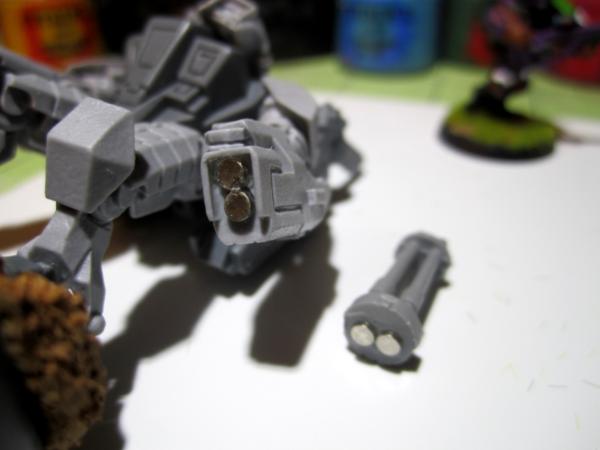
Here you can see how the magnets were laid out. It twisted slightly since i didnt have anything hard to press against to make sure it was straight, but its very subtle and i actually didnt notice until i took this pic lol.
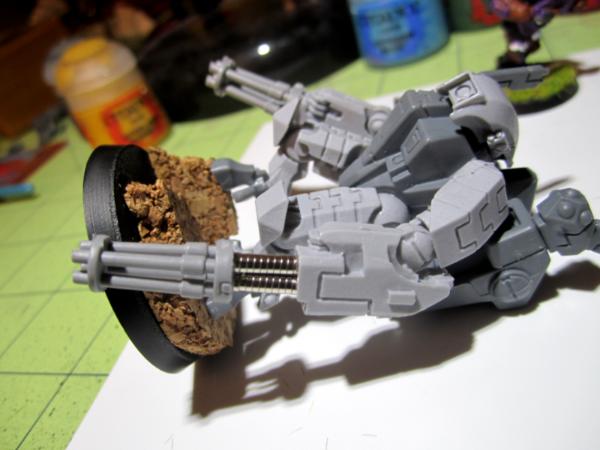
And here is what i meant by leaving the magnets on the part youre trying to magnetize. Imagine this arm isnt attached so it isnt supporting its weight on the wet glue (since this one is already done). By doing this you make 100% sure you dont flip the polarities or the spacings/angle of the magnets on the piece being attached. And personally i just find it to be way faster and easier than one tiny magnet at a time lol.
Your application may vary slightly, but i use this same idea almost every time i do magnets....even when its just a single one. Only time i dont is when i use larger magnets for the torso of my Riptides since those are big enough to not get mixed up as easy.
This message was edited 2 times. Last update was at 2014/05/07 20:28:02
An ork with an idea tends to end with a bang.
14000pts Big 'n Bad Orkz
6000pts Admech/Knights
7500pts Necron Goldboys


 Vorradis 75th "Crimson Cavaliers" 8.7k

 1400 (ish) - On the rebound!
 1000 (ish) - Now on the backburner

 Ultramarines, 3rd Co. and friends, 16k+
  4k
4k  4k Points
 Competition Index

 Cadre Coronal Afterglow w1;d0;l0
  2500 points
 1250 points
 1000 points
  I go through the effort of magnetizing things, paint up the primary option that I’m most likely to use, and the toss the other options in my “to-do eventually” pile. I really want to get them done, but something else always grabs my attention.
 4500
4500 


 An ork with an idea tends to end with a bang.
 14000pts Big 'n Bad Orkz
 6000pts Admech/Knights
 7500pts Necron Goldboys