| Author |
Message |
 |
|
|
|
|
Advert
|
Forum adverts like this one are shown to any user who is not logged in. Join us by filling out a tiny 3 field form and you will get your own, free, dakka user account which gives a good range of benefits to you:
- No adverts like this in the forums anymore.
- Times and dates in your local timezone.
- Full tracking of what you have read so you can skip to your first unread post, easily see what has changed since you last logged in, and easily see what is new at a glance.
- Email notifications for threads you want to watch closely.
- Being a part of the oldest wargaming community on the net.
If you are already a member then feel free to login now. |
|
 |
2010/01/17 02:04:58
Subject: [Guide] Airbrushing at the mini scale (long)
|
|

Focused Fire Warrior
|
Kanluwen wrote:Atropos, have you considered sending in these tutorials to a modelling magazine?
I know that Fine Scale Modeler has just started acknowledging that Airbrushing is something that really needs to be taught for modelers(of all shapes and kit varieties  )--and they might be willing to set it up so that they're hosted for free as a professionally compiled PDF with you credited.
Just food for thought.
Ive played with the idea but figured most wouldn't be interested as im too small time.
Also, Ive finally gotten around to setting up the website under the new url
http://thirdfatecreations.com/
Ill have pictures of my latest up soon(1 week? its been a tough one)
|
|
|
|
 |
|
2010/01/18 00:38:32
Subject: [Guide] Airbrushing at the mini scale (long)
|
|

Snord
|
mine wont turn out right D:
|
 
 Kreig - 2850 pts Kreig - 2850 pts
 Skaven - 3450 pts Skaven - 3450 pts
 Orks - 1950 (pro painted) Orks - 1950 (pro painted)
|
|
|
|
|
2010/01/18 01:38:23
Subject: [Guide] Airbrushing at the mini scale (long)
|
|
Shadowy Grot Kommittee Memba
The Great State of New Jersey
|
Would it be possible for you to do a "glow" tutorial?
Basically, I mean a gradient from the top of a miniature down to the bottom of a miniature. More specifically, a gradient using multiple shades/colors. What I'm trying to achieve is the fire/heat look on my eldar. I want them to be black near their feat and start transitioning to red, then orange, then yellow and then white in such a manner to give the impression that they are radiating heat from their upper bodies.
|
|
|
|
|
|
2010/01/19 19:03:53
Subject: [Guide] Airbrushing at the mini scale (long)
|
|
Focused Fire Warrior
|
-=Scar=- wrote:mine wont turn out right D:
Umm without more information im not sure how I can help. What wont turn out right. Do you have a link to a blog showing said difficulty?
chaos0xomega wrote:Would it be possible for you to do a "glow" tutorial?
Basically, I mean a gradient from the top of a miniature down to the bottom of a miniature. More specifically, a gradient using multiple shades/colors. What I'm trying to achieve is the fire/heat look on my eldar. I want them to be black near their feat and start transitioning to red, then orange, then yellow and then white in such a manner to give the impression that they are radiating heat from their upper bodies.
I have been considering doing this for a while on a GW avatar but other projects keep bumping it in priority. I was planning on doing something like this, either fire or ice, for the avatar. I will attempt to remember to take pictures at every step as I have a bad habit of just painting and then taking one picture at the end of the night. Thanks for the request!
My Fire warriors show a bit of OSL with lava below them, shown previously in this tutorial but it was a very basic lighting from below. The avatar will be more complicated by far. I hate painting troops
|
|
|
|
|
|
2010/01/21 20:27:02
Subject: [Guide] Airbrushing at the mini scale (long)
|
|

Bounding Assault Marine
|
Wow that is awesome... it shows how much I needed to learn on the subject... I think this will be my airbrushing bible... I was wondering what you use to clean out your airbrush? I usually use water or thinners and occasionally nail polish remover. Is this good? Also I am currently painting a land raider (most of the basecoat is airbrushed) it’s very basic stuff compared to yours. I’m currently doing a blog on the subject so if you have time feel free to have a look and maybe give some tips... after seeing your fire warriors I think I may have an experiment with some marines. You can find my blog at: http://www.dakkadakka.com/dakkaforum/posts/list/274891.page
And again many thanks for such an awe inspiring tutorial
|
|
|
|
|
|
2010/01/22 02:28:34
Subject: [Guide] Airbrushing at the mini scale (long)
|
|
Longtime Dakkanaut
|
So long as your airbrush is newer than 5 years old it should have solvent proof O-rings so you can use anything short of acid to clean it without worry.
So long as you spray acrylics water works good. Windex is good for an "end of session" cleaning as well and fairly cheap.
Best way to get into airbrushing is start simple. I've seen lots of threads where people get discouraged and threaten to sell their stuff because they can't make their stuff look like the pro's. If airbrushing like a pro was as simple as picking up an airbrush we'd all be getting paid $1000's of dollars for a couple days worth of work. It takes lots of practice and years of experience to be good enough to make $60+ dollars an hour or $3-5K per car/motorcycle/SUV.
Airbrushes make 40k painting and life so simple. I can basecoat 12 stealers in under 5 minutes. Could never do that with the old "hairy stick".
|
--The whole concept of government granted and government regulated 'permits' and the accompanying government mandate for government approved firearms 'training' prior to being blessed by government with the privilege to carry arms in a government approved and regulated manner, flies directly in the face of the fundamental right to keep and bear arms.
“The Constitution is not an instrument for the government to restrain the people, it is an instrument for the people to restrain the government.”
|
|
|
|
|
2010/01/25 20:05:17
Subject: Re:[Guide] Airbrushing at the mini scale (long)
|
|
Focused Fire Warrior
|
Fateweaver's response is only partially true as Ive just recently learned.
While most modern AB's have solvent proof rings the ring isn't the only thing you have to worry about.
I have been doing some heavy painting lately on a variety of projects and have been experimenting with cleaning as well. Every time Im done I typically clean out with water a few times while scrubbing with a Qtip or soft brush made to clean out these parts. Sometimes I put a bit of solvent on the cleaning brush.
As mentioned before, Windex with ammonia will slowly attack chrome.(learned that one too late) but thankfully it only caused a bit of cosmetic damage on my brush. I still use Windex but much more sparingly when I need to base and want to spray some cheap GW paint through my brush. So there is gotcha #1
I often use Testors Airbrush cleaner or acetone to clean my nozzle, just a quick dip though I have tried overnight baths. Some airbrush cleaners come with an "overnight" bath you are to put your nozzle and maybe one or two other sensitive pieces in to help break up any buildup. Here is gotcha #2 Ive found that several of these cleaners seem to increase the rate of corrosion on my brass and steel bits. I found this out by accidentally leaving them in a bath for 3 days straight and then noticed the corrosion.
I believe alcohol will also slightly increase the corrosion rate on any metals prone to it, but wont attack chrome.
So long story short, While I would recommend using whatever cleaners are made for your paints, or sparingly windex and a stronger solvent. Know that many solvents may have unforeseen consequences.
I only use windex when working on projects like the one attached in which I don't care that much about it and want to slap some cheaper paints over a larger area.
![[Thumb - TauResearchStation_small.JPG]](/s/i/at/2010/1/25/f4dd2ef55c07625379bbd1e24774eea9_18662.jpg__thumb)
|
|
|
|
|
|
|
2010/01/25 20:36:48
Subject: [Guide] Airbrushing at the mini scale (long)
|
|
Longtime Dakkanaut
|
Hmm. Guess it depends on airbrush.
My Iwata still looks as new though my Badger Velocity does show signs of finish being worn off because of what I presume to be ammonia attacking the finish.
I have a homebrewed reducer that consists of windex and some other stuff that I wash through in between colors. Lately I've been using 91% rubbing alcohol for after painting sessions. Cleans well and so far has shown no sign of harming my newest airbrush (Badger 105 Patriot).
|
--The whole concept of government granted and government regulated 'permits' and the accompanying government mandate for government approved firearms 'training' prior to being blessed by government with the privilege to carry arms in a government approved and regulated manner, flies directly in the face of the fundamental right to keep and bear arms.
“The Constitution is not an instrument for the government to restrain the people, it is an instrument for the people to restrain the government.”
|
|
|
|
|
2010/02/14 23:45:38
Subject: [Guide] Airbrushing at the mini scale (long)
|
|
Raging Ravener
Ohio
|
Great tutorial. I might have to get myself an airbrush after seeing that.
|
|
|
|
|
|
2010/02/17 23:49:44
Subject: [Guide] Airbrushing at the mini scale (long)
|
|
Longtime Dakkanaut
|
I highly recommend anyone wanting to learn to airbrush to check out the various forums listed on atropos97's website.
Youtube is also a great source of airbrush vids. Check out vids by jaime rodriguez of his script lettering. He is one of the best freehand letters in the airbrushing world. He can do nice looking free hand lettering with ain aribrush as fast as most people can sign their own name.
|
--The whole concept of government granted and government regulated 'permits' and the accompanying government mandate for government approved firearms 'training' prior to being blessed by government with the privilege to carry arms in a government approved and regulated manner, flies directly in the face of the fundamental right to keep and bear arms.
“The Constitution is not an instrument for the government to restrain the people, it is an instrument for the people to restrain the government.”
|
|
|
|
|
2010/02/18 22:37:43
Subject: Re:[Guide] Airbrushing at the mini scale (long)
|
|
Excellent Exalted Champion of Chaos
Lake Forest, California, South Orange County
|
So I ordered a Paasche Talon airbrush yesterday. I found a little 3 gallon 100 psi shop compressor in my mothers garage the other day.
The regulator that it came with had a gauge for tank pressure, a quick release and a regulator. That broke at the top thread of the air tank, so I had a shop drill it out and re thread the tank.
I then went to Home Depot, bought a new regulator and fittings. So now, when I leave the valve open it hits it's 100 psi. The problem I'm having is that if I open the air on my brush, and adjust the regulator to 30psi, when I stop it goes back up to like 80 and when I start the brush I get a large burst of air at 80psi until it comes down to 30. If I turn the regulator all the way down to 30 and then turn on the brush, the psi drops to 0 and doesn't go back up unless I open up the regulator.
What am I doing wrong?
Should I just start the brush, wait for the pressure to drop to 30 and then open the paint flow?
I'm doing this to avoid having to shell out $70+ for some harbor freight compressor which is about all I could afford at this point.
|
"Bryan always said that if the studio ever had to mix with the manufacturing and sales part of the business it would destroy the studio. And I have to say – he wasn’t wrong there! ... It’s become the promotions department of a toy company." -- Rick Priestly
 |
|
|
|
|
2010/02/18 23:07:42
Subject: [Guide] Airbrushing at the mini scale (long)
|
|
Longtime Dakkanaut
|
Sounds to me something is fishy with the regulator.
When you adjust the regulator with the airbush open like you are supposed to do, as soon as you shut off the air flow (release the trigger) pressure WILL rise as obviously the air is no longer flowing from the tank. It SHOULDN'T be spurting at 80 and then going down. It might LOOK like it's spurting at 80 since the needle jumps that high but it really IS only spraying at whatever you set it at when you adjusted the pressure.
Also, like with priming you never want to start paint flow with the airbrush directed at your work. Always start off to one side, start paint flow and bring airbrush across and then finish off outside of the project.
So, I think your regulator is doing it's job. I just think you see "OMG THE NEEDLE IS AT 80 SO IT'S SPRAYING AT 80 FOR A FEW SECONDS".
How long before the needle dips to 30? Mine dips to whatever the pressure I set it at the very split second I pull the trigger. If on yours the needle isn't moving for a few seconds down to 30 you might have a stuck valve in the regulator.
|
--The whole concept of government granted and government regulated 'permits' and the accompanying government mandate for government approved firearms 'training' prior to being blessed by government with the privilege to carry arms in a government approved and regulated manner, flies directly in the face of the fundamental right to keep and bear arms.
“The Constitution is not an instrument for the government to restrain the people, it is an instrument for the people to restrain the government.”
|
|
|
|
|
2010/02/18 23:27:19
Subject: [Guide] Airbrushing at the mini scale (long)
|
|
Excellent Exalted Champion of Chaos
Lake Forest, California, South Orange County
|
It's a 1/2 second burst at the higher psi while it falls down to 30.
I managed to put the stock regulator on it(had just enough thread left on it to hold tight and not leak below 100psi) and the problem went away. Perhaps the regulator that I bought is just uber cheap and doesn't work the way I need it to.
The stock regulator shows tank pressure and then has a setting for output pressure which only dips about 5psi when the brush is open. The stock regulator is also alot more sensitive with where you can set it, whereas the other one goes from 0 to 80 psi in all of a 5 degree turn of the knob.
Problem fixed for now I think. I'll find out for sure when my Talon arrives. Right now I was just testing it with a Harbor Freight dual action that cost $15 just to make sure the compressor worked right.
|
"Bryan always said that if the studio ever had to mix with the manufacturing and sales part of the business it would destroy the studio. And I have to say – he wasn’t wrong there! ... It’s become the promotions department of a toy company." -- Rick Priestly
|
|
|
|
|
2010/02/19 00:36:04
Subject: [Guide] Airbrushing at the mini scale (long)
|
|
Longtime Dakkanaut
|
Yeah, that or a bad regulator.
At least it appears you have it fixed.
|
--The whole concept of government granted and government regulated 'permits' and the accompanying government mandate for government approved firearms 'training' prior to being blessed by government with the privilege to carry arms in a government approved and regulated manner, flies directly in the face of the fundamental right to keep and bear arms.
“The Constitution is not an instrument for the government to restrain the people, it is an instrument for the people to restrain the government.”
|
|
|
|
|
2010/02/19 03:30:39
Subject: [Guide] Airbrushing at the mini scale (long)
|
|
Focused Fire Warrior
|
Fateweaver wrote:Sounds to me something is fishy with the regulator.
When you adjust the regulator with the airbush open like you are supposed to do, as soon as you shut off the air flow (release the trigger) pressure WILL rise as obviously the air is no longer flowing from the tank. It SHOULDN'T be spurting at 80 and then going down. It might LOOK like it's spurting at 80 since the needle jumps that high but it really IS only spraying at whatever you set it at when you adjusted the pressure.
A simple way to test this is to use another meter. Cheaper regulators may poorly regulate and allow for bursts. Mine is mid range in quality and exhibits the following behavior.
1. A slight turn will cause a larger air pressure change than Id like, which is why I recommend an air regulator on the brush, made for the brush. I am adjusting this thing constantly based on what im doing. The compressor regulator generally wont be precise enough unless you paid a LOT for it.
2. It does not jump but rather follows an exponential decay leveling out just below the set point, this is more normal for decent regulators. But I suspect your needle is jumping but that this is not due to the brush actually seeing a huge burst at the beginning, however you may be able to tell by simply feeling the airflow or listening to the noise it generates.
Fateweaver wrote:
Also, like with priming you never want to start paint flow with the airbrush directed at your work. Always start off to one side, start paint flow and bring airbrush across and then finish off outside of the project.
Not true. for fine detail you generally want to start air flow, then start paint flow while pointed at your work. This is one of the fundamentals of daggers. What I believe Fateweaver is addressing is one of the "quirks" of acrylics. They suck but people like me deal with it because I prefer non toxic. Acrylics like to dry on the needle a bit and so its often safer to start your spray on a freehand mask then move onto the work. But this is a quirk. many professionals who use professional uro's dont do this because their paint is good and toxic, but flows oh so nicely. About half of the time I start airflow and paint pointed directly at the work.
aerethan wrote:It's a 1/2 second burst at the higher psi while it falls down to 30.
I managed to put the stock regulator on it(had just enough thread left on it to hold tight and not leak below 100psi) and the problem went away. Perhaps the regulator that I bought is just uber cheap and doesn't work the way I need it to.
be VERY careful screwing with the fittings on your tank, especially drilling and re threading. nothing like a bullet driven by a 100PSI + tank.
Otherwise it sounds like your problem is fixed. Happy painting. Please share.
Speaking of sharing for those not aware of my blog here are a couple things Ive done lately
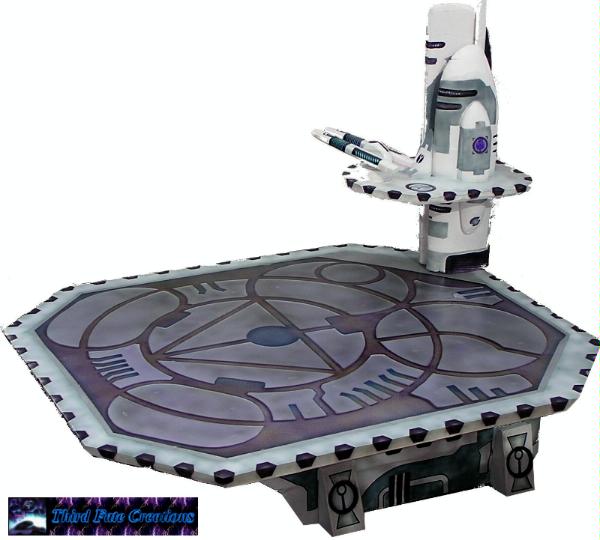
First a landing pad. Made of styrofam and paper mache, as usual. Then making a "high tech" grid on top of the pad. The fluff is this thing has a tractor beam array built into the pad that can capture and land a manta. Took about 5 hrs to paint. I used hex and square meshes for the grid pattern and cut out a very big stencil for the armor plates that act as actual landing pad positions.
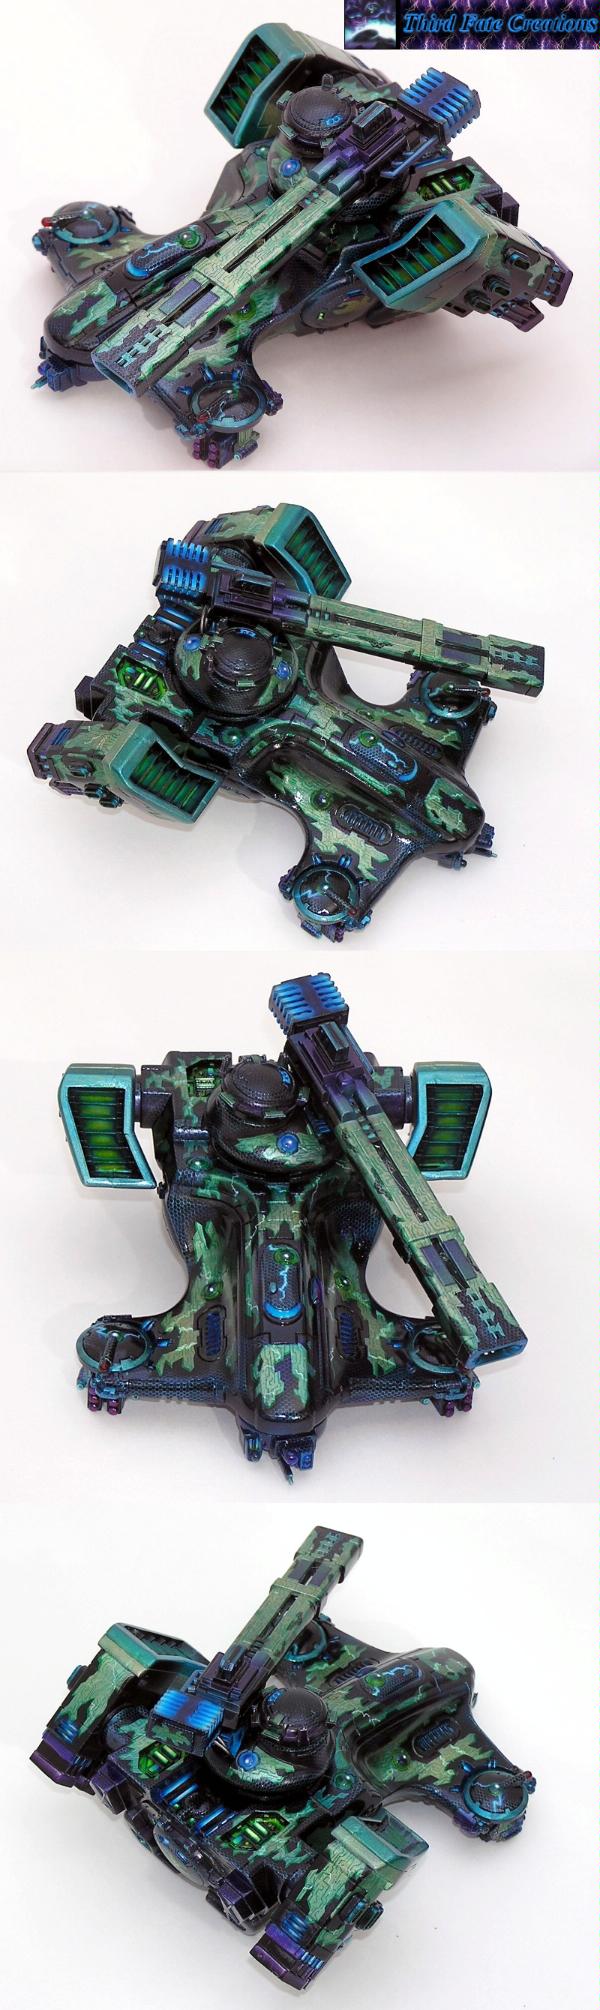
This hammerhead was 1 year in the making. I had to wait until I had the patience to do the soldering for the lights inside, and for my skill and patience to get to the point I could pull off the armor and hex patterns with the edge highlighting and shading. I wanted it to look high tech, vs the rest of my tau that just look flashy. Just for something different. It took a hex netting mask and about 40-50 individual masks for the armor plates. This took a long time and a lot of patience, but hey, it took first and gold at Genghis con so yeay!
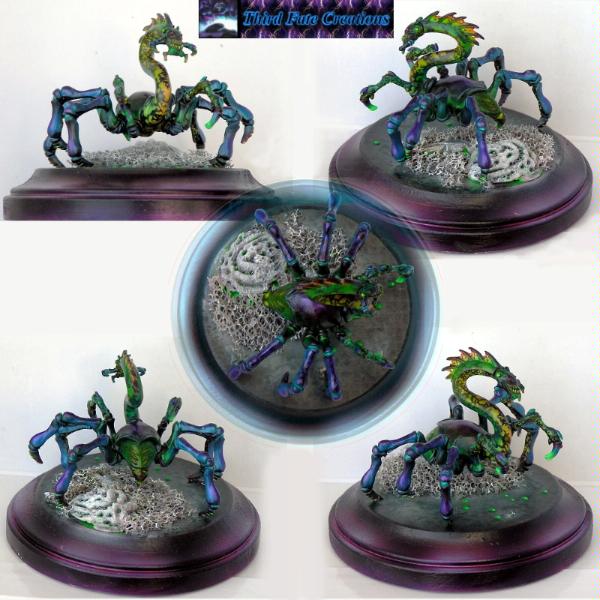
Finally My first commission
A Slassan from Iron Winds Miniatures. This is the lower limit in size of what Im willing to commission but I took it because I wanted to try these effects. The beetle shell armor with a very subtle under texture, and the bright symmetric belly texture with a slightly translucent greener back flesh. Then just bright green drops using translucent water effects and paint.
I really like it and will have a hard time giving it up. This also took first and gold at Genghis con.
If interested in what wierd things I did recently I update my blog more frequently than this as I wish this to be mainly airbrush problems and showcasing of just my best airbrush work when I try new techniques.
Blog at
http://www.dakkadakka.com/dakkaforum/posts/list/265995.page
Keep painting and asking questions!
|
|
|
|
|
|
2010/02/19 06:44:46
Subject: [Guide] Airbrushing at the mini scale (long)
|
|
Longtime Dakkanaut
|
Wow, loving that Hammerhead. Nice hexwork.
I'd love to do more with Urethanes but Mn winter means AB'ing indoors. Urethans indoors means death to the cat and dog. :(
|
--The whole concept of government granted and government regulated 'permits' and the accompanying government mandate for government approved firearms 'training' prior to being blessed by government with the privilege to carry arms in a government approved and regulated manner, flies directly in the face of the fundamental right to keep and bear arms.
“The Constitution is not an instrument for the government to restrain the people, it is an instrument for the people to restrain the government.”
|
|
|
|
|
2010/02/19 06:46:06
Subject: [Guide] Airbrushing at the mini scale (long)
|
|
Excellent Exalted Champion of Chaos
Lake Forest, California, South Orange County
|
I had a professional machine shop tap and rethread my tank, no backyard job. I also leak checked the stock regulator every 20 psi to make sure it would hold up. I don't plan on pumping it past 80 psi ever really, as most of my painting will be at about 30 and during my dry testing today it lasted a decent while on a single pump. It's a 3 gallon tank, takes about 3-5 minutes to fill. I'll take a picture of it tomorrow to show what I did. I also never noticed how expensive brass fittings are!!! $2 for a male to male socket and the same for female to female!!!
My next purchase for it will be 1/8" quick disconnects and a cleaning pot. I was considering a standard brush holder, but for $10 I'd rather just use the one supplied with the brush and drill it onto one of my work shelves.
|
"Bryan always said that if the studio ever had to mix with the manufacturing and sales part of the business it would destroy the studio. And I have to say – he wasn’t wrong there! ... It’s become the promotions department of a toy company." -- Rick Priestly
|
|
|
|
|
2010/02/23 02:07:36
Subject: Re:[Guide] Airbrushing at the mini scale (long)
|
|
Long-Range Ultramarine Land Speeder Pilot
|
Astropos, this is a fantastic guide! Thank you! I just recently purchased a Badger anthem 155 and a 3 gallon compressor but I have a question about safety. You mention the need for a respirator, but exactly what sort do I need to get?
I plan to spray GW acrylics mixed with water in my carport (once the weather warms up a bit). Do I need something as serious as this: Medium Paint Spray/pesticide Respirator Assembly or can i get by with something like this?
|
|
|
|
|
|
2010/02/23 03:56:24
Subject: [Guide] Airbrushing at the mini scale (long)
|
|
Excellent Exalted Champion of Chaos
Lake Forest, California, South Orange County
|
You only need a respirator if you are painting with solvent based paints like Tamiya or testors.
Water based acrylics are non toxic.
|
"Bryan always said that if the studio ever had to mix with the manufacturing and sales part of the business it would destroy the studio. And I have to say – he wasn’t wrong there! ... It’s become the promotions department of a toy company." -- Rick Priestly
|
|
|
|
|
2010/02/23 04:20:19
Subject: Re:[Guide] Airbrushing at the mini scale (long)
|
|
Flower Picking Eldar Youth
Maryville, TN
|
Neat, I have a Iwata eclipse, and im trying to get more practice out of it.
|
|
|
|
|
|
2010/02/23 04:58:59
Subject: [Guide] Airbrushing at the mini scale (long)
|
|
Long-Range Ultramarine Land Speeder Pilot
|
aerethan wrote:You only need a respirator if you are painting with solvent based paints like Tamiya or testors.
Water based acrylics are non toxic.
But in the first post, Astropos seemed to imply that you need some sort of breathing filter regardless. Even if GW paints are non-toxic to eat... I can't imagine they would be good to breathe, right?
|
|
|
|
|
|
2010/02/23 05:07:05
Subject: [Guide] Airbrushing at the mini scale (long)
|
|
Excellent Exalted Champion of Chaos
Lake Forest, California, South Orange County
|
A cheap dust mask would do just fine if you are worried about acrylic spray.
|
"Bryan always said that if the studio ever had to mix with the manufacturing and sales part of the business it would destroy the studio. And I have to say – he wasn’t wrong there! ... It’s become the promotions department of a toy company." -- Rick Priestly
|
|
|
|
|
2010/02/23 21:49:54
Subject: [Guide] Airbrushing at the mini scale (long)
|
|
Focused Fire Warrior
|
Kolath wrote:aerethan wrote:You only need a respirator if you are painting with solvent based paints like Tamiya or testors.
Water based acrylics are non toxic.
But in the first post, Astropos seemed to imply that you need some sort of breathing filter regardless. Even if GW paints are non-toxic to eat... I can't imagine they would be good to breathe, right?
You had better be wearing a filter or respirator. This crap gets into your lungs its there for life. Too bad I didn't save a couple safety articles I found about people who developed medical conditions from years of breathing acrylics. They scared me straight. General rule, more safe is better.
You may play warhammer or whatever for the next 2-10 years of your life. You don't want to be cursing your stupidity 20+ years from now.
While you may not need a respirator that can handle VOC's you had better make sure that particulates are kept out of your lungs. And at some time in the future you may say, Oh I want to paint something with Organic solvents, and without thinking you use a simple paper mask. Personally, I would rather pay a little extra to replace my cartridges and be sure I filtered as much as possible than to skimp on health.
Side note.
Its ATROPOS. the third fate in greek mythology, or the crone who cuts the thread. not astro...
Paint safely!
|
|
|
|
|
|
2010/02/23 22:29:56
Subject: [Guide] Airbrushing at the mini scale (long)
|
|
Long-Range Ultramarine Land Speeder Pilot
|
Ah, sorry, Atropos! That'll teach me to read more carefully. I guess all I'm saying is I want to get the cheapest mask that will still provide protection. It sounds like a dust mask won't cut it, but I probably don't need an $80 professional mask for doing highly toxic paints either.
Do you know of any links to articles that say what buzz words to look for on respirator packaging? Like, "must filter particles of at least x microns" or some such.
Thanks again for the help!
|
|
|
|
|
|
2010/02/24 19:41:43
Subject: Re:[Guide] Airbrushing at the mini scale (long)
|
|
Focused Fire Warrior
|
First, I made another tutorial on the basics of using GIMP or other image programs to help your painting. Its not meant to be complete, just to help those like me a few months ago get started with using such programs. They are great when you want to stitch togther web images to plan out your paint job and play with colors of say fire or of the entire project before or half way through your painting.
http://sites.google.com/site/thirdfatecreations/tutorials-1
Next respirators
the following is blatantly stolen from
http://safetyrealworldchallenges.blogspot.com/2008/02/respirator-ratings.html
The rating
* N = Not resistant to oil
* R = Resistant to oil
* P = Oil Proof
* 95 = Filters 95% of particles 0.3 microns in diameter or larger
* 99 = Filters 99% of particles 0.3 microns or larger
* 100 = Filters 99.97% of particles 0.3 microns or larger
for example I usually use a P95 organic vapor cartridges which is a common fairly cheap respirator but it has a rubber seal around the face that I checked in the store was comfortable but still sealed. A problem with the paper masks is even for P95's if they arent fitted well, say from many uses, then your breathing around the mask.
The P95 cartridges cost about 10 depending, while the P100's cost around 30.
Change them every 3 months or so as directed.
Read the instructions on your masks and follow their safety guidelines.
|
|
|
|
|
|
2010/02/24 23:54:58
Subject: Re:[Guide] Airbrushing at the mini scale (long)
|
|
Regular Dakkanaut
|
i would accuse your models of being computer work only because thier so perfect. excelent work. you must be a master painter.
|
|
|
|
|
2010/02/28 05:44:07
Subject: [Guide] Airbrushing at the mini scale (long)
|
|
Fresh-Faced New User
|
I just started using my airbrush and was wondering about setting the pressure to have it run at. I'm guessing it varies from AB to AB and depending on the paint being used and what type of material you're painting on.
My compressor has a regulator on it but I don't have one at the end of the hose with the AB. Although the AB does have a little screw below the nozzle that is to fine adjust the pressure but I'm not sure how effective it is really yet.
What am I looking for as I play around with the pressure? Am I trying to get the lowest pressure possible that will shoot the paint I'm using? Do I want lower pressure for when I'm painting smaller areas and have to be very close with the AB so the air doesn't blow the paint around too quickly? Higher pressure when I'm applying more paint from a slightly larger distance and broader area?
I know it will vary depending on a lot of things but just some general guidelines or things you are looking for when you're playing with the pressure. I'll dig through those links you provided too. I'm sure there's plenty of info there. Thanks for sharing your work here.
|
|
|
|
|
2010/02/28 23:41:16
Subject: [Guide] Airbrushing at the mini scale (long)
|
|
Focused Fire Warrior
|
Scherdy wrote:I just started using my airbrush and was wondering about setting the pressure to have it run at. I'm guessing it varies from AB to AB and depending on the paint being used and what type of material you're painting on.
My compressor has a regulator on it but I don't have one at the end of the hose with the AB. Although the AB does have a little screw below the nozzle that is to fine adjust the pressure but I'm not sure how effective it is really yet.
What am I looking for as I play around with the pressure? Am I trying to get the lowest pressure possible that will shoot the paint I'm using? Do I want lower pressure for when I'm painting smaller areas and have to be very close with the AB so the air doesn't blow the paint around too quickly? Higher pressure when I'm applying more paint from a slightly larger distance and broader area?
I know it will vary depending on a lot of things but just some general guidelines or things you are looking for when you're playing with the pressure. I'll dig through those links you provided too. I'm sure there's plenty of info there. Thanks for sharing your work here.
First bit of advice, just play. you seem to have the basic idea and it will depend a lot on what paints and mixing ratios your using.
For me I regulate as follows.
Hose is set to about 30-40PSI, or around what the brush says it should be set for depending on your nozzle size.
That little nob on the brush is generally quite useful for fine air control and I would recommend spraying fine little lines on a piece of paper while playing with that knob to get a feel for it. Its mainly good for fine detial adjustment.
you need enough airflow so that your brush isnt splattering/sputtering (airflow improves venturi effect and sucks paint out) and a proper balance has good atomization. but too much airflow and you start splattering because it blows the paint around before it tries(too high pressure or too much thinning typically). You also start splattering if you open the paint up too much. Usually if you want fine detial you thin the paint more and lower the pressure. Not always true but mostly true.
Also, something I often forget to mention is it will depend on color. IE black and especially White typicaly have more pigment and need a different thinning and or airflow recipe. But it sounds like your reasoning skills and expectations are in the right place. Its frusterating at first but just practice. And seriously, dagger strokes, and spots are very valuable for learning how the stupid thing works.
Paint and share!
|
|
|
|
|
|
2010/03/11 19:57:08
Subject: [Guide] Airbrushing at the mini scale (long)
|
|
Long-Range Ultramarine Land Speeder Pilot
|
Thanks again for this thread, Atropos! Since the weather has finally improved, I've gotten a chance to try out my airbrush (I am doing it outside for safety). And I am thrilled with the coverage it provides and amazed by the fine detail it can do. An airbrush is definitely a welcome addition to my painting repertoire. Thanks again for the tutorials and for answering my questions on filters!
|
|
|
|
|
|
2010/03/17 20:24:30
Subject: Re:[Guide] Airbrushing at the mini scale (long)
|
|
Dakka Veteran
|
Slightly off the main point of the thread, but the subject of compressors has come up, so:
I have an Iwata Sprint Jet which I'd say is only a passably useable compressor.
I also have a decent Ridgid compressor with a tank which is used for nail guns, etc.
Is it possible to use some sort of adapter (and possibly some sort of intermediate pressure relief/control) to use the Ridgid for sustained work?
If so, where would I obtain one?
Simon
|
DR:60-S+GM+B+IPw40k96#-D++A+/fWD001R++T(M)DM+++
 |
|
|
|
|
|
|
 THE EMPEROR PROTECTS

 6,000
6,000 