| Author |
Message |
 |
|
|
|
|
Advert
|
Forum adverts like this one are shown to any user who is not logged in. Join us by filling out a tiny 3 field form and you will get your own, free, dakka user account which gives a good range of benefits to you:
- No adverts like this in the forums anymore.
- Times and dates in your local timezone.
- Full tracking of what you have read so you can skip to your first unread post, easily see what has changed since you last logged in, and easily see what is new at a glance.
- Email notifications for threads you want to watch closely.
- Being a part of the oldest wargaming community on the net.
If you are already a member then feel free to login now. |
|
 |
2009/09/02 18:13:42
Subject: Re:[Guide] Airbrushing at the mini scale (long)
|
|

Focused Fire Warrior
|
Been away a while scratching models rather than painting.
here is some progress on my tau armada.
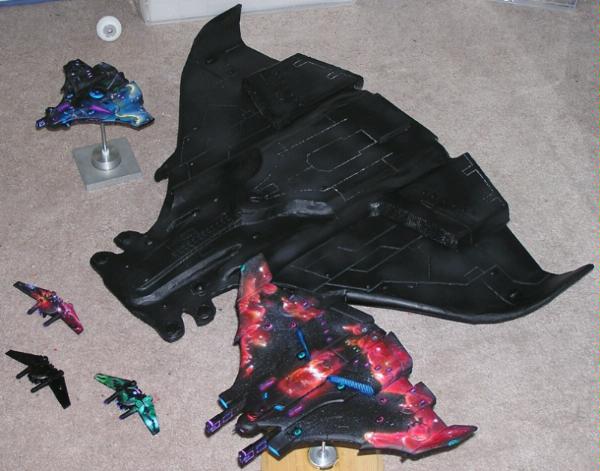
I went to the hubble site and got some deep field images and other nice shots, and finally decided on nebulas after some experimenting.
I then printed off some nebulas, to scale, and then cut out the most notable features. Gently airbrushed these as reference markers and then went crazy freehanding with a few random stencils for assist.
[To be inserted later]
Stars:
Stars are done in two ways.
Far off, weak stars are done by the following steps
1. changing the consistency of the paint based on the size stars you want.
2. using a double action airbrush pull the needle back a certain distance a couple times to "wet" the needle. more pulls equals more paint on needle. further back gives larger globules faster.
3. Mask off areas you dont want to get stars with freehand stencils or paper.
4. holding the AB 10-30cm (depending on dispersion desired) gently depress the air action to speckle the model.
Stronger diffusive and diffracting stars
1. make dots just as they teach you in AB 101. get close and apply air then pull paint action back as you pull the airbrush away.
2. use a mask and do the same to get your nice sharp diffraction spikes. (see monolith and skyray for examples)
[End insertion]
Now for the monumental task of painting the manta. Suggestions always welcome in imagery colors theme etc.
|
|
|
|
 |
|
2009/09/02 22:40:05
Subject: [Guide] Airbrushing at the mini scale (long)
|
|
Khorne Rhino Driver with Destroyer
|
That looks AMAZING, I like the way they have a camouflage for space look with the red Nebula and stars you have on it.
|
Redbeard wrote:Yes, I can see it now. How do you select which Marines get to be Terminators? Is it due to experience? Capability? Prowess? Nope, it's just if you're tall...
fraz wrote:(zombie Reagan) You've ticked us off. As we speak the elite 102,103,and 103 air divisons comprised of lawyers with briefcases (the Fightin' Bloodsuckers) are dropping as we speak.
EDIT: I am not saying it would be a fight, but no one, and I mean no one, can withstand the might of 45,000 US lawyers on a legal rampage...
|
|
|
|
|
2009/09/04 04:52:39
Subject: [Guide] Airbrushing at the mini scale (long)
|
|
Longtime Dakkanaut
|
Look forward to the big one getting done.
I'm still waiting on my doors for my LR and found out I need to order the sponson assembly sprue for the LRR/ LRC as the sponson weapon mounts for the regular LR won't work without some butchery and I'm not gonna butcher a model I intend to make a showcase out of, just need to order the sprues next week when I have money. Hope in 2 weeks to have pics of the completed LRR done in the airbrushed style 
|
--The whole concept of government granted and government regulated 'permits' and the accompanying government mandate for government approved firearms 'training' prior to being blessed by government with the privilege to carry arms in a government approved and regulated manner, flies directly in the face of the fundamental right to keep and bear arms.
“The Constitution is not an instrument for the government to restrain the people, it is an instrument for the people to restrain the government.”
|
|
|
|
|
2009/10/19 21:42:14
Subject: Re:[Guide] Airbrushing at the mini scale (long)
|
|
Focused Fire Warrior
|
I realized some of the more updated pictures of the spacecraft were not inserted in here.
And I figured Id take this opportunity to discuss a couple of the techniques used, again for later insertion.
The manta got painted after a great deal of work, and is still not done.
I first traced it out on paper, a lot of paper was taped together to get an area big enough.
Then I drew in the largest features on the paper for cutting out and reference using mainly a ruler.
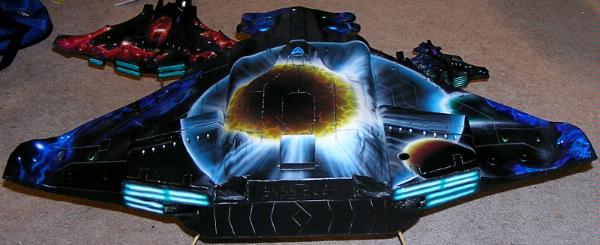
I then drew in what I wanted to paint, which in this case was a nova whose shock wave is hitting several terrestrial bodies(unrealistically close together) and the point of view is behind one of the planets as the shock wave hits it.
I then pondered a lot over the order of operations and then cut out planets, shock wave etc as individual masks, bot positive and negative. making sure to number each and alignment markers so that adjacent masks can be set next to each other again and fit properly. I used tape to hold the masks together and to the models very gently adhering them so I wouldn't remove paint or destroy the paper mask.
=="bright white lines" or explosive streaks
Are done simply by streaking from the center of the explosion out. The planet was masked and the outer ring of the explosion and beyond was masked to contain the streaks.
==Planets
I negatively masked the planets so that paint would only hit the planet then worked with gradients from the brightest to darkest being sure to transition through a couple colors rather than going straight from bright white to 1 color to black.
==Planet cracks
Are free handed just like lightning with freehand stencils for selective edges.
==nebulae
I either drew or printed nebulae to scale and then again agonized over which were the most notable or highest contrast features and then cut them out again numbering and drawing alignment markers. Then I would work my way from darkest features to brightest features in multiple layers and colors frequently using multiple stencil pieces to mask the desired areas.
==stars
were then inserted as mentioned before using select masks to protect planets and other objects that should not have stars in their foreground.
|
|
|
|
|
|
2009/10/19 22:06:18
Subject: [Guide] Airbrushing at the mini scale (long)
|
|

Longtime Dakkanaut
|
I think that I know what you're getting at. I'm sure that this would come into great use for hard-core airbrush painters. But hey... It looks fantastic!
My favourite area on the model is where the supernova and larger planet are facing eachother. The blending cold/hot colours look unimaginably realistic. Well done! Imagine what an imperial navy pilot might say...
*Notices something outside the front windows*
"Cap'n, we're doomed!"
"What is it Jenkins?"
"The supernova blast will kill us all"
"What 'supernova blast'... We haven't even left for orbit yet! Oh, hehe, that..."
*Faints*
|
|
|
|
|
|
2009/10/22 11:06:10
Subject: [Guide] Airbrushing at the mini scale (long)
|
|
Freelance Soldier
Bristol, UK
|
Thanks for some awesome work on these tutorials. I bought an Iwata airbrush and compressor kit a while ago that I haven't used for much but I'm definitely going to get practising now.
|
Can I suggest skipping forward 10 years to the age where you don't really care about what people say on the internet. Studies show that it decreases your anger about life in general by 37%. - Flashman |
|
|
|
|
2009/11/17 18:44:20
Subject: [Guide] Airbrushing at the mini scale (long)
|
|
Boosting Black Templar Biker
|
Very good tutorial! Sharing information and techniques is what makes this hobby different from all the others. And once again thanks for the comments on my tank.
|
DS:80S++G++M+B++I+Pw40k01#+++D++A+++/fWD255R+++T(Pic)DM+
 6500 pts 6500 pts
 8500+ and counting 8500+ and counting
 3300 3300 |
|
|
|
|
2009/11/17 21:10:41
Subject: Re:[Guide] Airbrushing at the mini scale (long)
|
|
Focused Fire Warrior
|
As I don't have my tutorial file on me I'm just adding notes for later in this post after having answered another post on this topic.
***begin insertion
<<over thinned paint/ runny paint/ too heavy coating/ ahh crap my airbrush just exploded on my work.>>
Yea this #$ks and it happens when you really don't want it to.
Solutions:
1 Back off on the thinner. Thicker paint will adhere better, assuming your coats aren't too thick.
2 spray multiple finer coats. As with brush painting multiple finer coats leads to a much better looking finish.
3 After spraying and saying "ah @#$" pull the brush further from the work and depress the air only to accelerate drying without pushing the watery stuff around.
if your fast and the paint isn't drying very quickly you can
4a have a very lightly damp cloth(very soft so as not to scratch paint unnecessarily) to wipe up the wet paint and just have to repaint that small area again.
4b stop flowing paint but increase the flow of air to blow that wet stuff to the underside of the model or some place where it will collect and you can wipe it up.
I do A fairly often with a wet Qtip and b if there is a region right next door that doesn't have its final coat yet.
<<Wet Paint effects>>
Wet paint can be very useful for some effects. Ive been playing with water drops, simulated corrosion, dirt splatter etc by using intentionally over thinned paint and spraying too much on the object.
***End insertion
Im also looking back at trying some Camo's. I generally avoid them on principle(boring) but lately looking at Tekk's post and then doing a lot of camo research Ive found a few that may interest me that I may be able to get away with adding my typical "flair" to
Though my favorite, and least likely to implement, camo idea is a land crusader with orcs painted on it saying, "nodt tis waih! Shuut De Oter Waih Rokk Brain" and "Deyr Rit B'Hynd YUUU!!!"
|
|
|
|
|
|
2009/11/29 06:31:17
Subject: [Guide] Airbrushing at the mini scale (long)
|
|
Blood Angel Terminator with Lightning Claws
|
I was looking for some good tips on starting airbrushing, thanks! Can't wait to start.
|
|
|
|
|
|
2009/12/05 03:02:18
Subject: Re:[Guide] Airbrushing at the mini scale (long)
|
|
Focused Fire Warrior
|
I thought Id use my tempaltes as practice pieces.

Skulls.
Skulls are easy depending on the level of detail you want. very basic. just cut it out as a stencil and spray.
See the top skull as an example
level 2.
gently spray the edges of the stencil as a guide
Then set the airbrush to a fine line and paint in ridges of the head, brow, jaw etc with dark or light colors depending.
See green skulls, especially right most as an example.
Level 3
repeat level 2 then use fine stencils to add fine detail to the skull as necessary
I have practiced this on paper but did not put it on anything of value yet.
|
|
|
|
|
|
2009/12/05 05:13:48
Subject: [Guide] Airbrushing at the mini scale (long)
|
|
Automated Rubric Marine of Tzeentch
|
Amazing air brush work man.
|
|
|
|
|
|
2009/12/05 07:10:57
Subject: [Guide] Airbrushing at the mini scale (long)
|
|
Yellin' Yoof
|
Damn I need to spend some money on a good air brush
|
|
|
|
|
2009/12/05 08:37:02
Subject: [Guide] Airbrushing at the mini scale (long)
|
|
Blood Angel Terminator with Lightning Claws
|
I really like that true flame, how do you do that?
|
|
|
|
|
|
2009/12/05 15:41:02
Subject: Re:[Guide] Airbrushing at the mini scale (long)
|
|
Focused Fire Warrior
|
I haven't and probably wont bother to do a Fire tutorial as they are so incredibly abundant online. The techniques are almost exactly the same as the videos Ive found. You just probably have to clean your tip more frequently given the low airflow and use of acrylics.
Youtube has a lot of good basic tutorials. using a subset of the set {airbrush, true, fire, real*, water drop, torn metal, skulls, lightning, etc etc etc}
|
|
|
|
|
|
2009/12/09 02:18:59
Subject: [Guide] Airbrushing at the mini scale (long)
|
|
Longtime Dakkanaut
|
Google search for a man named Mike Lavalee; he makes the best looking flames on Earth; he in fact coined the phrase "true fire". His flames look like they'd actually burn you.
Best paints for making bright, realistic flames are Eurathanes but they are very toxic and a lot harder to clean up than acrylics so only spray them outside, not in your house/apartment. House of Kolor are the most popular eurathane paint.
No landraider guys, it got sold to a friend and I was too lazy to paint it. In fact I'm bout to order up a 2nd airbrush with a larger nozzle. A max line of .5" is good for some things but not tanks. (though still faster and better looking than basecoating by hand).
I might try to find something to airbrush when I get my new one, just not sure yet. My Tau I'm starting are going to be painted up like M.A.S.H units...OD Green, red and black. Nothing exciting. My 'Nids I might airbrush but so far even the MC's haven't been too horrible with just a normal brush.
|
--The whole concept of government granted and government regulated 'permits' and the accompanying government mandate for government approved firearms 'training' prior to being blessed by government with the privilege to carry arms in a government approved and regulated manner, flies directly in the face of the fundamental right to keep and bear arms.
“The Constitution is not an instrument for the government to restrain the people, it is an instrument for the people to restrain the government.”
|
|
|
|
|
2009/12/09 03:06:28
Subject: [Guide] Airbrushing at the mini scale (long)
|
|
Ollanius Pius - Savior of the Emperor
Gathering the Informations.
|
Honestly Fate, you should just grab the GW spraybrush and an adapter to hook it up to your compressor.
Best $45ish I spent.
|
|
|
|
|
2009/12/12 21:28:35
Subject: [Guide] Airbrushing at the mini scale (long)
|
|
Longtime Dakkanaut
|
I prefer real airbrushes. Spray gun seems too gimicky and for a little bit more I can get a dual action airbrush that can go from hairline to 2" spray (and for 40k vehicles that still allows a LR to be base coated in around 5 minutes).
For $50 I can go to Home Depot and get a spray gun that I can hook to my bro's 120G compressor and do a spray pattern up to a foot wide (though even a Reaver doesn't need that much paint).
I love my Badger, it just paints too narrow of a line to effectively basecoat with it.
Mayhaps I'll hit up one of my Trygons or something with the airbrush. Soon as I get something going I'll put up pics and start a new thread.
|
|
This message was edited 1 time. Last update was at 2009/12/12 21:29:21
--The whole concept of government granted and government regulated 'permits' and the accompanying government mandate for government approved firearms 'training' prior to being blessed by government with the privilege to carry arms in a government approved and regulated manner, flies directly in the face of the fundamental right to keep and bear arms.
“The Constitution is not an instrument for the government to restrain the people, it is an instrument for the people to restrain the government.”
|
|
|
|
|
2009/12/14 01:10:49
Subject: [Guide] Airbrushing at the mini scale (long)
|
|
Focused Fire Warrior
|
Fateweaver wrote:I prefer real airbrushes. Spray gun seems too gimicky and for a little bit more I can get a dual action airbrush that can go from hairline to 2" spray (and for 40k vehicles that still allows a LR to be base coated in around 5 minutes).
For $50 I can go to Home Depot and get a spray gun that I can hook to my bro's 120G compressor and do a spray pattern up to a foot wide (though even a Reaver doesn't need that much paint).
I love my Badger, it just paints too narrow of a line to effectively basecoat with it.
Mayhaps I'll hit up one of my Trygons or something with the airbrush. Soon as I get something going I'll put up pics and start a new thread.
A few things
Sprayguns have their uses and if you just want a base coater Id say buy a sparygun( GW). . Or if your brush allows buy a tip, nozzle, and needle for your current brush. I currently have several sets. I like the infinities many nozzle sizes .15 to .5.
Buying another airbrush may be wise for the scale you want to paint but Id consider if its better to get a larger more expensive airbrush, get a needle set, or just buy a cheap spraygun for basecoats.
I basecoat with a .15 needle It just takes a while but its a nice smooth coat that takes many fine layers. I have absolute controll as long as I have the patience. When I dont I use a larger nozzle.
Automatically Appended Next Post: Given the number of questions ive had about Camo patterns I figured I should try some again.
But I hate camo as I feel its fairly boring and unimaginative. I figured Id try some Camo's as its one of the more common requests for mass painting commissions. But they are so painfully easy that I would suggest anyone wanting them just do it themself.
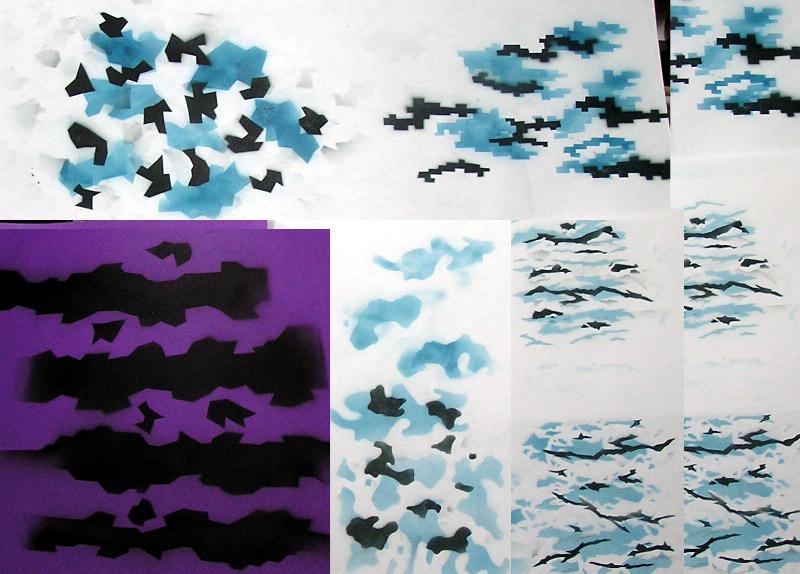
Its messy as I did it in under 5 minutes to see how things turned out, hence the blue(transparent) is not uniform and there are some slight burrs from overspray. If I were to Camo something Id use opaques rather than trans parents, then paint light to dark or dark to light. but opaques seem necessary to cover the previous layer and get uniform patches. I just used trans parents as they were easily on hand while I was working on another project.
For scale reference, the total width of this image is about 8 inches.
Again for a specific tutorial search the net for {airbrush, camo, kamo, etc) While some like to point to a particular artist I would say don't limit yourself and look at all artists who post such youtube tutorials. You can always learn something if your willing to try. Even from the less spectacular artists. I
I may paint one of these on something but frankly every model I see I see things more interesting than camo to put on it. Camo is practical, but if your really wanting to make cammo for the most likely table top game you will primarily use colors seen on the table top. IE olive, greyish black, ash grey, and a bit of light beige or off white. Although I found a better camo scheme is to paint the fire magnets really bright and big but leave things like the stealth suits or the more underestimated units darker and closer to table colors so your opponent notices them less often.
The types of camo tried here are Left side, 2 Tau inspired schemes. I would scale the smaller patches up a bit next time.
Top right- Digital, Next time I would take the time to ensure proper horizontal and vertical alignment of stencils.
Bottom right- Winter camo. I like this one best of all but probably because it is closest to Dazzle and lightning which are both more interesting to my eye.
Suggestions, comments, and questions for the tutorial are always encouraged. Thanks everyone.
|
|
This message was edited 1 time. Last update was at 2009/12/14 01:28:17
|
|
|
|
|
2009/12/14 07:17:24
Subject: [Guide] Airbrushing at the mini scale (long)
|
|
Longtime Dakkanaut
|
GW spray gun seems too gimmicky. I find most of their stuff is like buying a Cadillac auto. Overpriced due to name but not made any better than a Ford or Chevy.
I'm going to try again to use my fine line airbrush. In case anyone is interested Createx now has their wicked line in 2oz bottles (down from the 16oz minimum) and have detail colors which dry flat and have a few shades that are more natural (like ochre yellow and 2 different umber shades and some greys).
I might order up the Ochre yellow. I hope my damn RP order gets here soon. I hate not painting due to 2 week long orders (yeah, postal strike in the UK right now is fething up shipping).
|
--The whole concept of government granted and government regulated 'permits' and the accompanying government mandate for government approved firearms 'training' prior to being blessed by government with the privilege to carry arms in a government approved and regulated manner, flies directly in the face of the fundamental right to keep and bear arms.
“The Constitution is not an instrument for the government to restrain the people, it is an instrument for the people to restrain the government.”
|
|
|
|
|
2009/12/16 03:42:19
Subject: Re:[Guide] Airbrushing at the mini scale (long)
|
|
Focused Fire Warrior
|
Ok,
This time I spent a little time on some camo. Unfortunately I dont have camo colors so I had to mix all but three of these colors hence the colors may be a little off of "traditional"
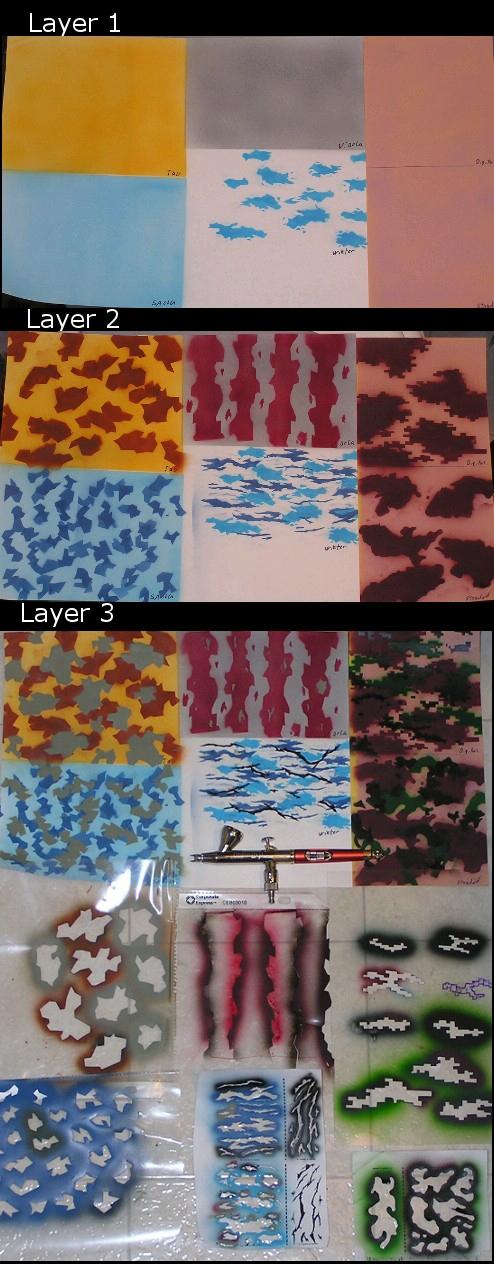
The basic premise is simple.
Spray the base coat, the most dominant color, and often the lightest color.
This is so that as you spray darker colors on top they hide any overlap, or at least make it less noticeable. This will be a function of your planning and of the opacity/number of layers you apply for each color.
Next spray one of your larger patterns being sure to not overspray, let the stencil lift up, etc. Masking tape helps here but will often remove paint. Thus low tack frisket is useful or hold that mask down well and spray light coats.
Next spray your smaller patterns, and so forth, going darker with each color so overlaps are hidden.
Yes these don't look great but, I sprayed it on paper and I did a single coat meaning some under spray occurred and the paper bled out some of the watered down colors. If I cared about the paint jobs I would have done at least three layers for each color to give a nice clean, uniform color.
As for stencils, find images online, print reduced, cut and spray. Paper wont last as long. Transparencies work ok but are harder to cut. plastic sheet protectors are easy to cut but aren't very rigid so allow for more under spraying and are harder to hold down( but conform more to surface features) The trade offs are up to you. Frisket is great but slightly expensive. Some of these I found online others I just made up. The stencils for each square is found in the corresponding square at the bottom of the picture under the airbrush(included for scale)
There are two basic techniques for this.
1. just lay the stencil and spray copying the pattern directly
2. lay the stencil, spray parts of it, move and spray again to get more randomized patterns
3. freehand roughly what you want and use the stencil to flesh it out. I tried all three in the various sets. The browns and yellows being this third set, as it shows since I was lazzy about confining my spray before stenciling.
Also, there are tricks to starting your spray on the stencil and angling toward the work so that the stencil is held down by the air flow rather than wanting to lift.
I got tired and lazzy when I started doing the browns and yellows so you can see how sloppy those got. Take your time and have fun!
|
|
|
|
|
|
2009/12/16 04:30:34
Subject: [Guide] Airbrushing at the mini scale (long)
|
|
Longtime Dakkanaut
|
I just ordered up the Badger Patriot...it's gotten really great reviews.
It's basically a gravity-fed Anthem 155. Will go from penicl wide to 3" spray. Should arrive on my doorstep hopefully by Friday but thinking probably Monday.
|
--The whole concept of government granted and government regulated 'permits' and the accompanying government mandate for government approved firearms 'training' prior to being blessed by government with the privilege to carry arms in a government approved and regulated manner, flies directly in the face of the fundamental right to keep and bear arms.
“The Constitution is not an instrument for the government to restrain the people, it is an instrument for the people to restrain the government.”
|
|
|
|
|
2010/01/03 18:00:30
Subject: [Guide] Airbrushing at the mini scale (long)
|
|
Fresh-Faced New User
|
wow
|
|
|
|
|
2010/01/04 21:49:37
Subject: Re:[Guide] Airbrushing at the mini scale (long)
|
|
Focused Fire Warrior
|
I figured I should put a note in here
Ive begun cleaning up and compiling the tutorial on my website
http://sites.google.com/site/thirdfatecreations/tutorials-1
I will still check here for suggestions and questions and will eventually post an article on the dakka site covering the same thing, when I get around to it.
Just so i am not limited to the topic of aribrush tutorials Ive transferred most of my activity to my blog dakka.
Thanks for all your suggestions. Keep them coming if you come up with more.
I have a few simple video tutorials ready to post that are waiting on me to just buy the stupid software so the watermark will disappear from the first minute of the vid.
|
|
This message was edited 1 time. Last update was at 2010/01/04 21:51:41
|
|
|
|
|
2010/01/05 02:32:39
Subject: [Guide] Airbrushing at the mini scale (long)
|
|
Blood Angel Terminator with Lightning Claws
|
Awesome, thanks for the contribution!
|
|
|
|
|
|
2010/01/05 18:24:09
Subject: Re:[Guide] Airbrushing at the mini scale (long)
|
|
Focused Fire Warrior
|
I just uploaded a Pdf tutorial on gems
I hope you like it.
http://sites.google.com/site/thirdfatecreations/tutorials-1
Consider ThirdFateCreations for your titan painting "needs"
|
|
|
|
|
|
2010/01/05 18:37:59
Subject: [Guide] Airbrushing at the mini scale (long)
|
|
Longtime Dakkanaut
|
Great tutorial.
I find urethane candy colors excellent for blending. Just use them in a well ventilated area unless you like to be high as a kite while airbrushing (not recommended as the headache it causes is killer).
|
--The whole concept of government granted and government regulated 'permits' and the accompanying government mandate for government approved firearms 'training' prior to being blessed by government with the privilege to carry arms in a government approved and regulated manner, flies directly in the face of the fundamental right to keep and bear arms.
“The Constitution is not an instrument for the government to restrain the people, it is an instrument for the people to restrain the government.”
|
|
|
|
|
2010/01/05 21:14:37
Subject: Re:[Guide] Airbrushing at the mini scale (long)
|
|
Focused Fire Warrior
|
Sigh,
Fateweaver stands proud to all those out there as a reminder.
SPRAY SAFELY (ok that sounds a little wrong)
Always wear your respirator even with acrylics.
If using uro's then be very very safe and very well ventillated. Organic solvents are not good for you.
Automatically Appended Next Post: And now the lightning article is up.
http://sites.google.com/site/thirdfatecreations/tutorials-1
|
|
This message was edited 1 time. Last update was at 2010/01/05 22:08:36
|
|
|
|
|
2010/01/05 22:45:47
Subject: [Guide] Airbrushing at the mini scale (long)
|
|
Blood Angel Terminator with Lightning Claws
|
Excelent, can't wait to paint my Reaver.
|
|
|
|
|
|
2010/01/05 23:22:44
Subject: [Guide] Airbrushing at the mini scale (long)
|
|
Ollanius Pius - Savior of the Emperor
Gathering the Informations.
|
Atropos, have you considered sending in these tutorials to a modelling magazine?
I know that Fine Scale Modeler has just started acknowledging that Airbrushing is something that really needs to be taught for modelers(of all shapes and kit varieties  )--and they might be willing to set it up so that they're hosted for free as a professionally compiled PDF with you credited.
Just food for thought.
|
|
|
|
|
2010/01/05 23:59:36
Subject: [Guide] Airbrushing at the mini scale (long)
|
|
Longtime Dakkanaut
|
I only did it once Astro. Next time around I'll learn to obey the directions on the bottle.
It also actually requires a breeze blowing to have more of an effect than just opening the side and main garage door. I thought it'd be enough, 15 minutes later I couldn't feel my face.
|
--The whole concept of government granted and government regulated 'permits' and the accompanying government mandate for government approved firearms 'training' prior to being blessed by government with the privilege to carry arms in a government approved and regulated manner, flies directly in the face of the fundamental right to keep and bear arms.
“The Constitution is not an instrument for the government to restrain the people, it is an instrument for the people to restrain the government.”
|
|
|
|
|
|
|