| Author |
Message |
 |
|
|
|
|
Advert
|
Forum adverts like this one are shown to any user who is not logged in. Join us by filling out a tiny 3 field form and you will get your own, free, dakka user account which gives a good range of benefits to you:
- No adverts like this in the forums anymore.
- Times and dates in your local timezone.
- Full tracking of what you have read so you can skip to your first unread post, easily see what has changed since you last logged in, and easily see what is new at a glance.
- Email notifications for threads you want to watch closely.
- Being a part of the oldest wargaming community on the net.
If you are already a member then feel free to login now. |
|
 |
2014/02/16 19:30:07
Subject: Re:Philmorgan75's workshop blog - Legion of the Dead
|
|

Regular Dakkanaut
|
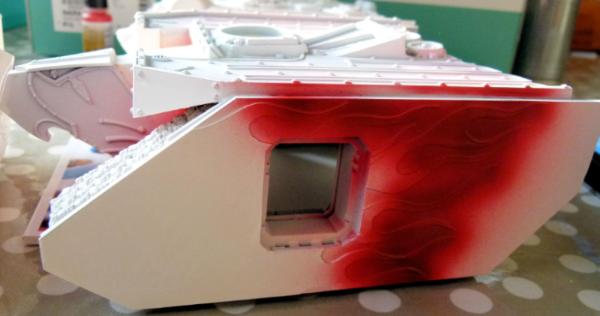
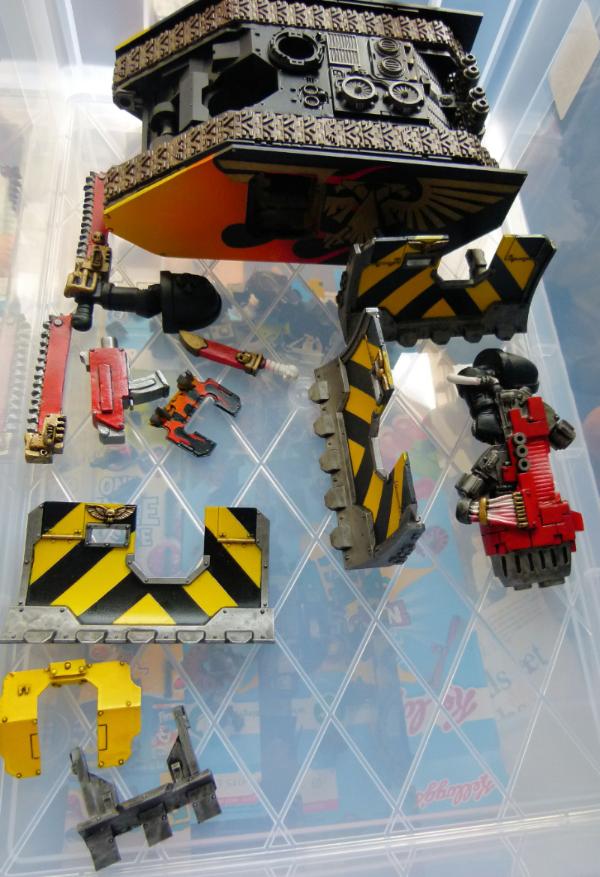
An update on a piece of terrain I started a few years ago now - My Fortress of the Damned.........
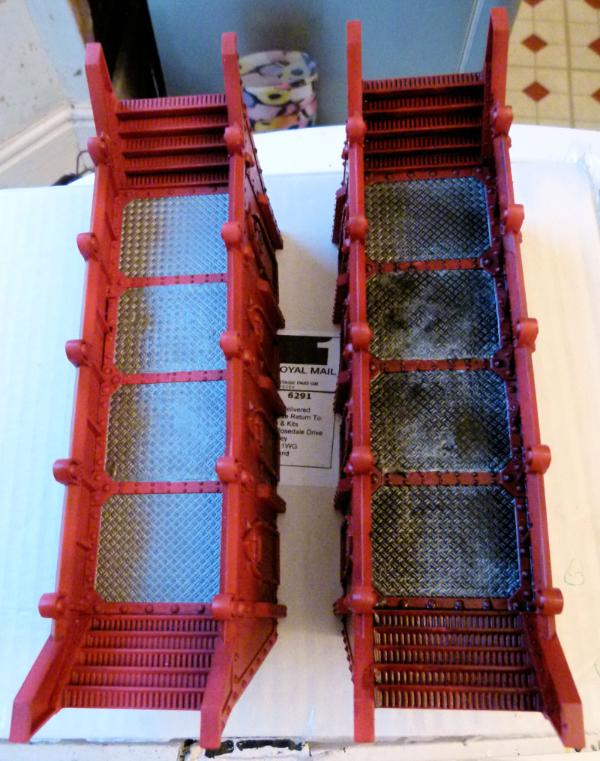
I base coated the side walkways with some VMA Fire Red and painted the tread part of the walkways with Army Painter Gun Metal. The one on the right has had a black oil wash added. I need to dry brush some more gun metal over the treads and then start some weathering of sponged gun metal and rust.

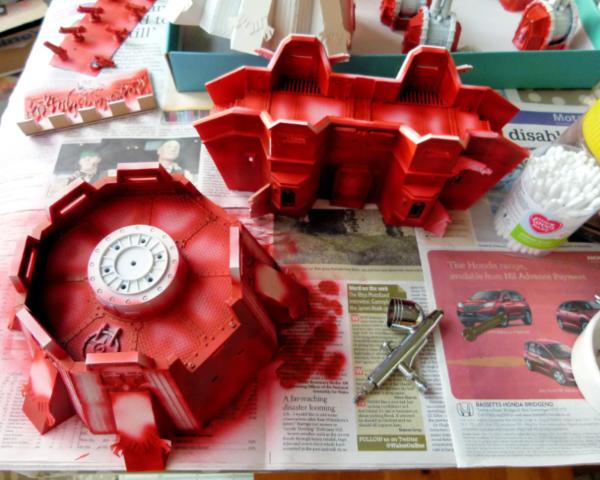
A shot of my kitchen table this afternoon!! As I was using my airbrush, I tried to paint as many things as I could with the same VMA Fire Red.
You can see on the left all of the Heavy Bolters that need to be painted. You can see 2 of the corner sections undercoated red, with the last one still needing to be completed. The fourth one has already be done and can be seen shortly. Some of my Land Raider conversions can also be seen in the bottom right and top right in the box.
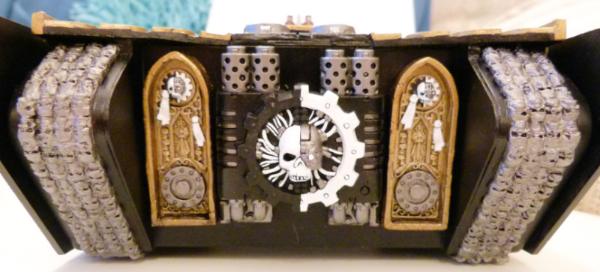
Here's a close up of the base coated corner section and front gate section.
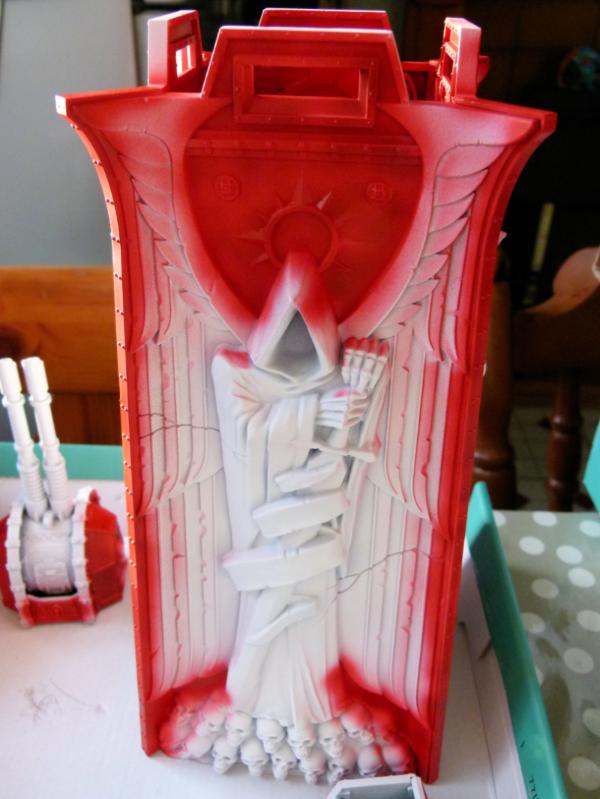
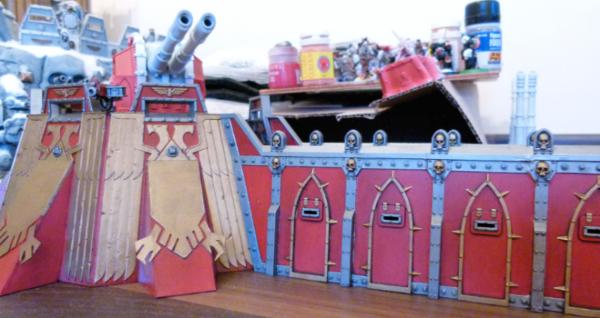
The base coated tower. I want to paint the winged Dark Angel similar to Gunzhard I showed earlier in this thread - a cream marble like paint job.
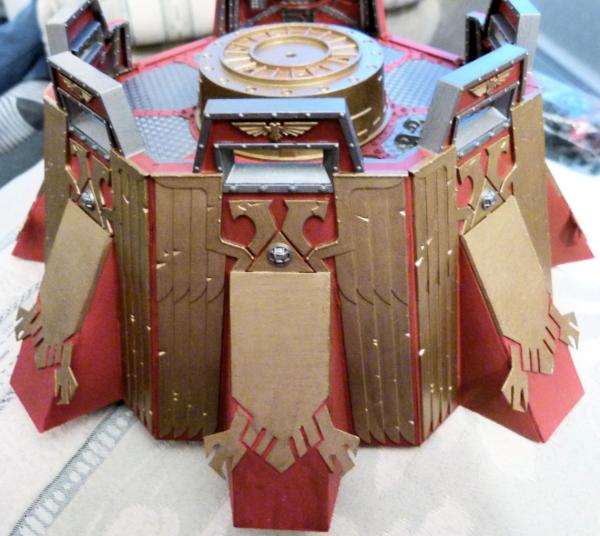
This is the completed base coated corner section. I need to airbrush some matt varnish over it and then add a black oil wash over the whole of the model. Once dry, a sponging of gun metal and rust (and maybe a small amount of dust along the bottom with some pigments). The light on the eagles chest will have an airbrush blob of light blue to simulate a "plasma" glow, which I think will contrast nicely with the other colours.

This corner section is the only one with a doorway entrance to get into the interior of the fortress corridors. The Inquisition logo and large SM Helmet will also need to be completed on this corner section.
Land Raider Conversions
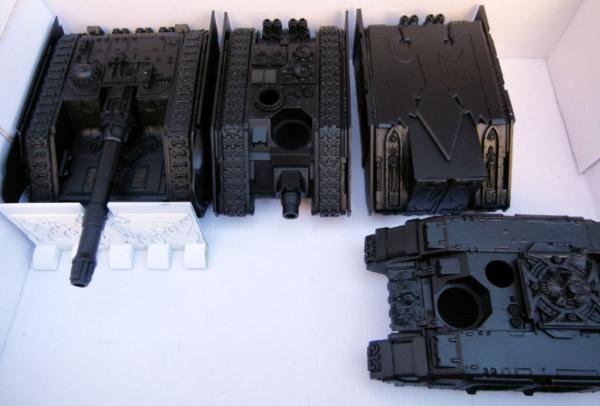
I bought some undercoat from Halfords today, so I thought I'd finally start painting some of my Land Raider Conversions. From the left:
Land Raider Tank Destroyer, Ares, Prometheus and at the front, a normal Land Raider.
As I start painting them, I'll add some more views.

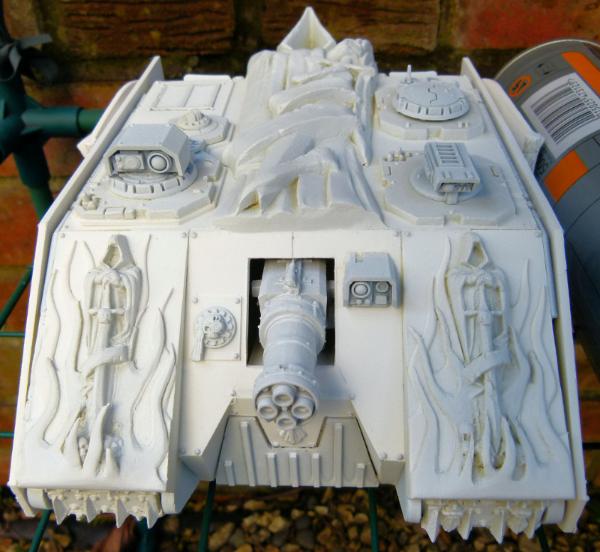
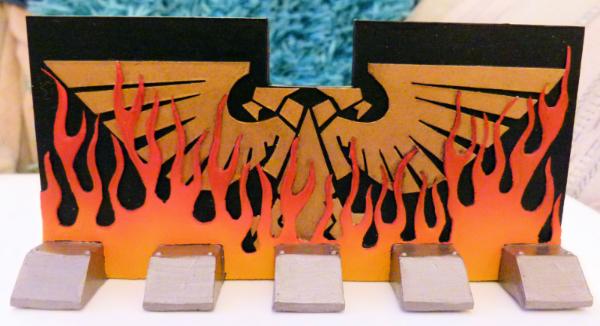
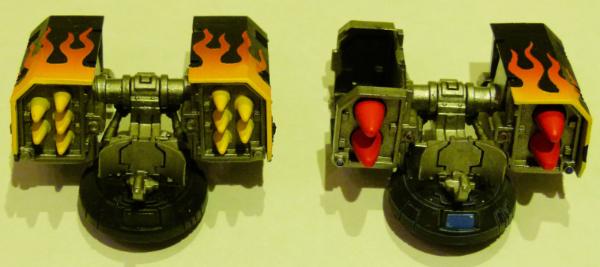
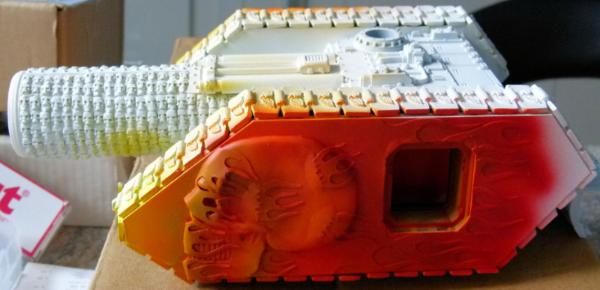
Here's a WIP of the Tank Destroyers shield. This was made from plasticard, milliput for the flames and a lego part for the teeth. The flames have had an airbrush of VMA Fire Red. I normally try and paint a number of flames at the same time, so I haven't progressed this any further yet.

This is my "Skull" Land Raider. Does any one have a good recipe for painting skulls?
Here's my take of a Land Raider Achilles....
...and finally, my Land Raider Ram.
So many projects, not enough time!
Comments and crits welcome.
Regards, Phil.
|
|
|
|
 |
|
2014/03/09 21:33:31
Subject: Re:Philmorgan75's workshop blog - Legion of the Dead
|
|
Regular Dakkanaut
|
I've made some progress on a couple of projects:
Land Raider Achilles
I've laid down all the base layers. The flames were airbrushed on as per my usual mix of VMA paints. The Angels on the mudguard will be painted to resemble (hopefully!!!) marble.
I need to sponge some "metal" and "rust" weathering over the edges and then some AK Interactive Track wash over the treads to finish this view.

This is a slightly higher view of the front.
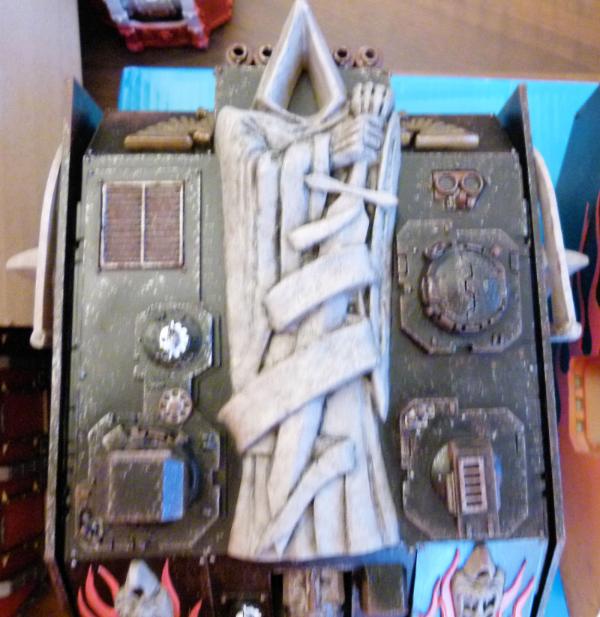
This shows the plan view. Again, the large Angel will be painted "marble" like and the normal weathering effects.
This is the right side. The flames were quite time consuming. After spraying the flames at the rear, I varnished everything. Once dry, I used blu- tac to mask the rear flames and then went onto complete the flames in the front. After removing the blu- tac, I gave it another coat of varnish. I really like how this has turned out.
This is the left side.......
... and finally, the rear. The Adeptus Mechanicus logo needs a couple of wires painted red and blue for this to be finished. The exhausts will have a layer of purple and blue inks to mimic heat. Metal and rust weathering and the tracks need to be completed on this view.
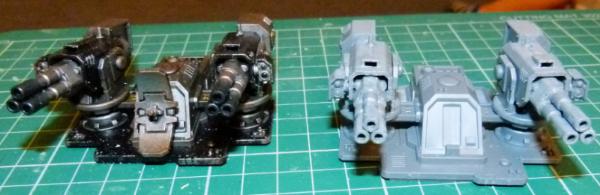
Here's the quad multi melta sponson almost finished. I used 2 lots of Storm Raven nose weapons, some plasticard and milliput to make these. I just need to paint some blue and purple ink on the exhausts and then airbrush some black to imitate smoke deposits. Metal weathering will be added to finish this sponson.
...and if I want a different sponson, here's my completed Twin Frag Cannon's. 2 Dreadnought Frag Cannons were chopped and shaped to fit onto an old metal hurricane bolter frame and a bit of milliput to tidy up some of the gaps to make this.
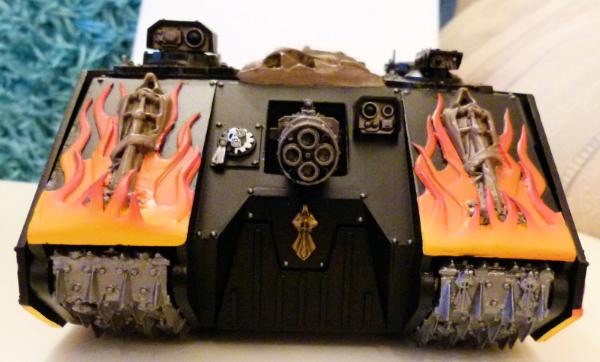
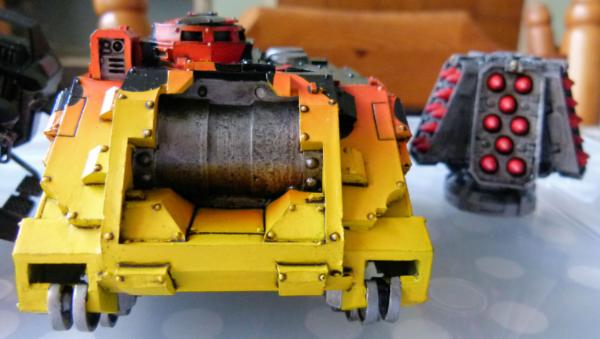
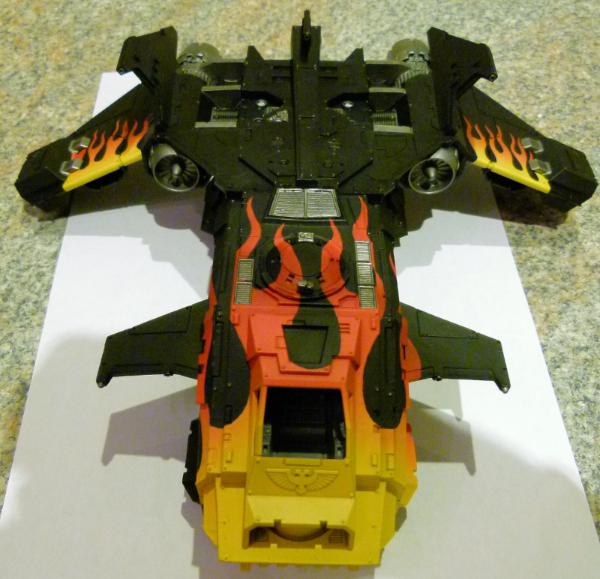
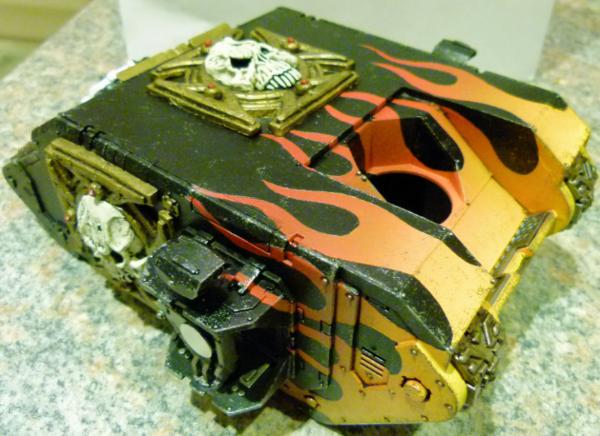
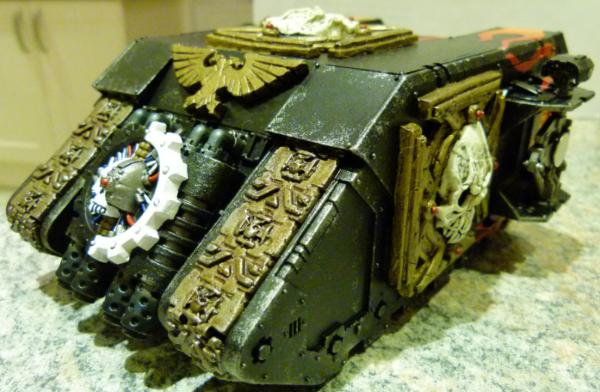
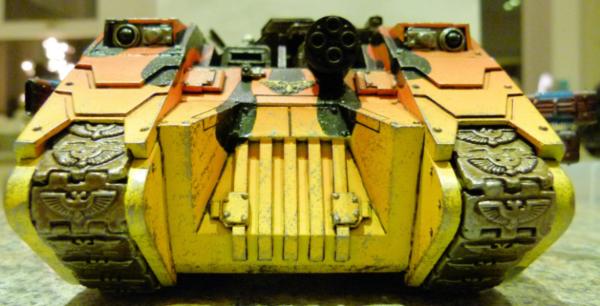
Assault Ram Land Raider
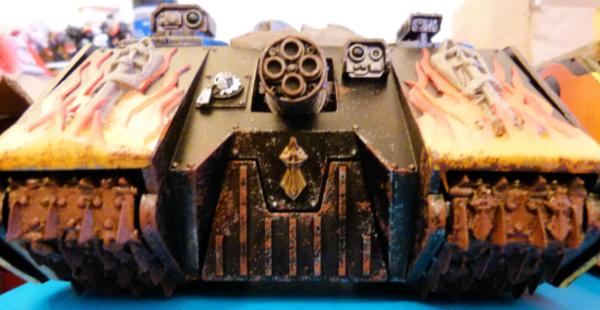
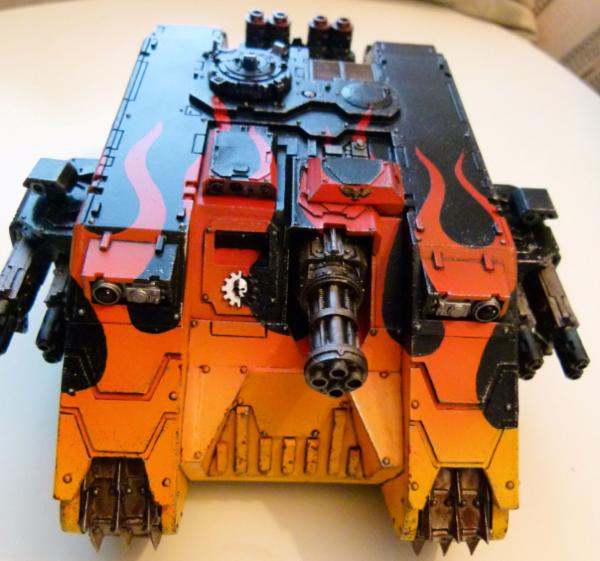
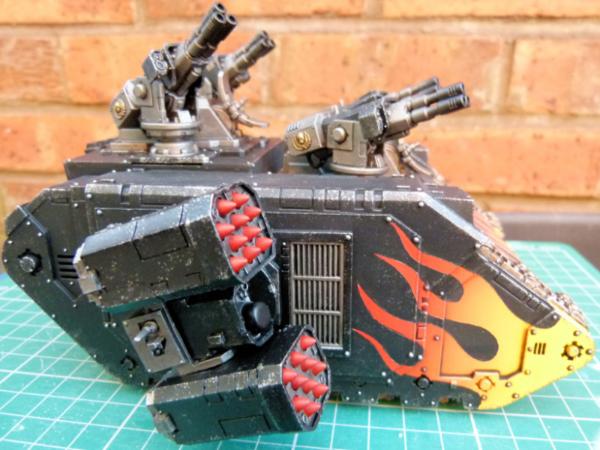
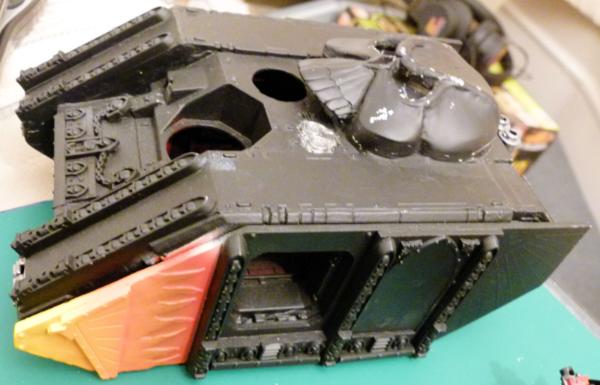
When I get the airbrush out, I like to start a number of projects so when I get bored of one or am waiting for ink/washes to dry, I can move onto another project. This is how far I have got on my Assault Ram Land Raider.
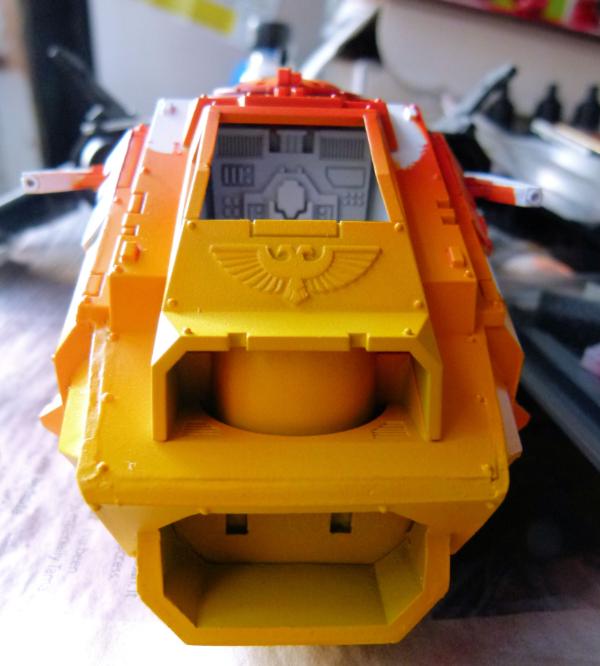
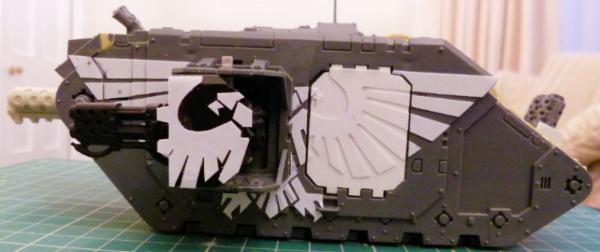
I imagine the reinforced eagles head would be used to ram into fortifications and once a breach has been made, a small reverse by the Land Raider and both front ramps would be dropped and a squad of Space Marines would disembark to take the objective.
The usual weathering needs to be done as well as the track wash. I also want to airbrush some VMA green to give the eagle's eye a bit of a glow!!!

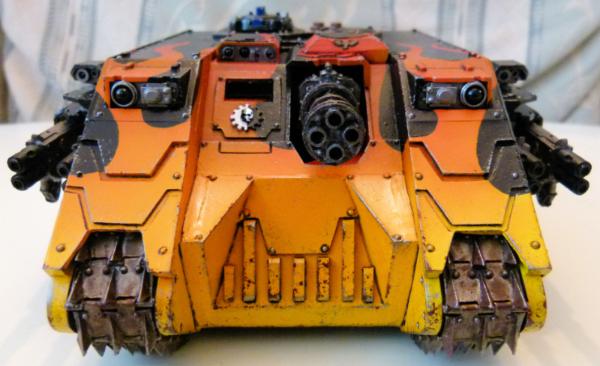
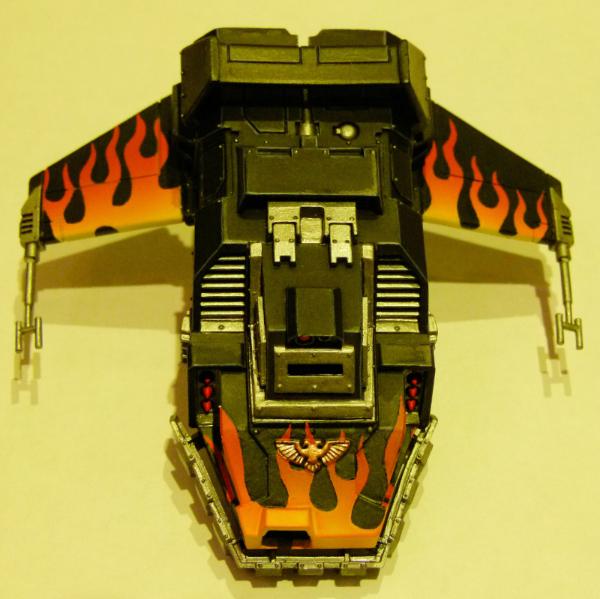
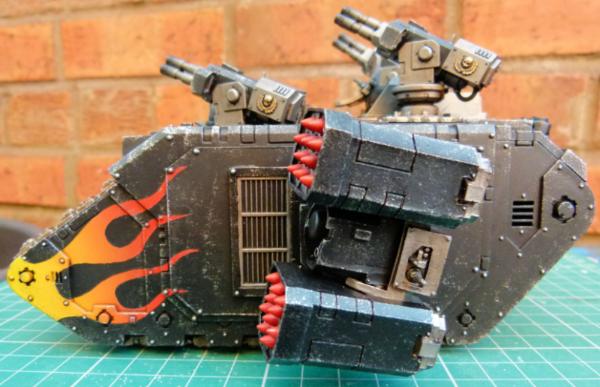
Here's a shot of the front......
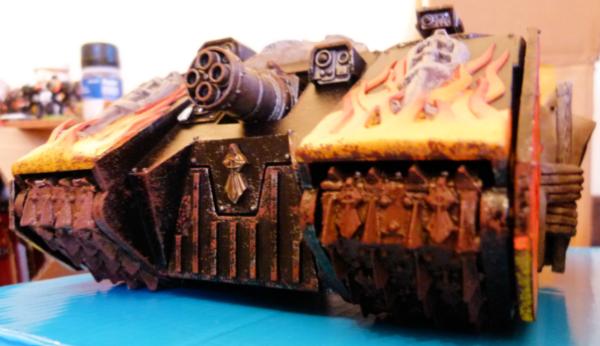
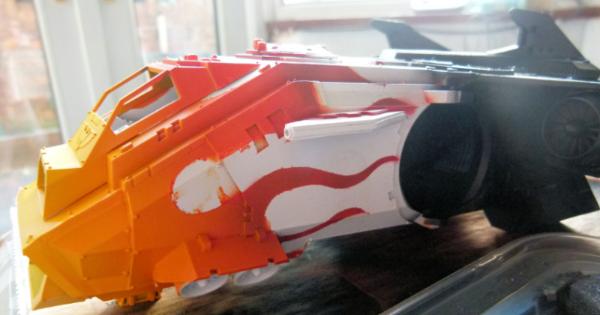
... and because I didn't think there was enough flames on the front, I did some up the sides as well!!!!

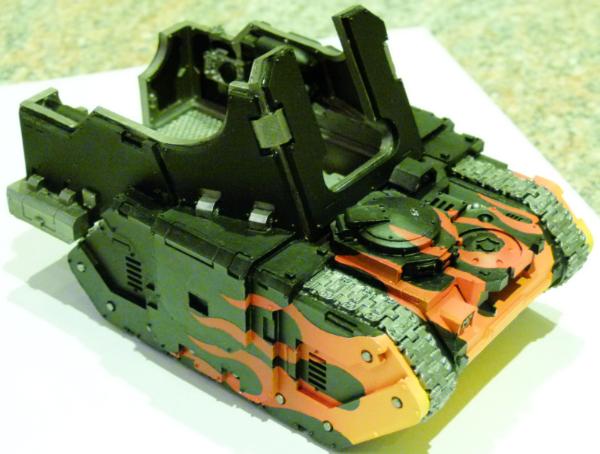
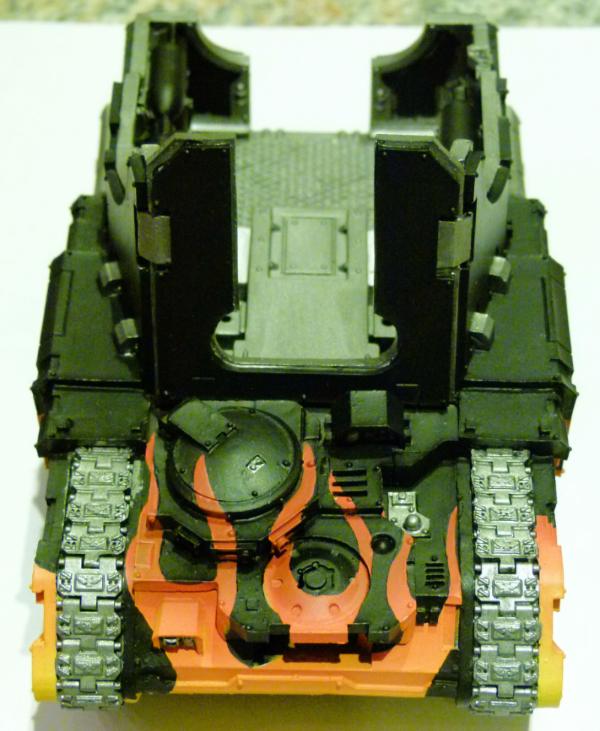
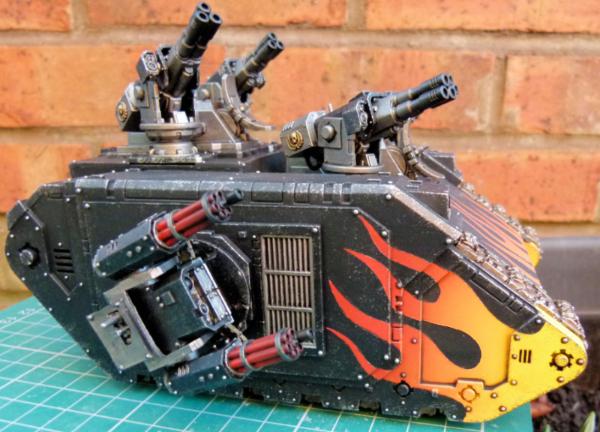
This shows the almost completed top view .....
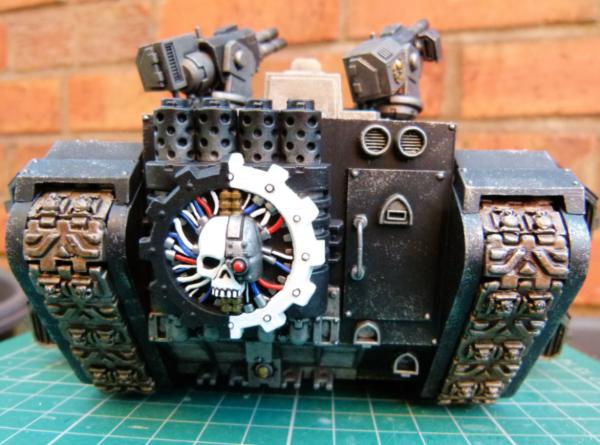
... and finally, the rear. Again, the Adeptus Mechanicus logo needs a couple of wires painted red and blue for this to be finished. I need to finish the purity seals and the exhausts will have a layer of purple and blue inks to mimic heat. Metal and rust weathering and the tracks need to be completed on this view.
I'll post more shots of these completed Land Raider's when I finish them.
Finally, a WIP shot of a Land Raider shield I'm working on....
Comments and critiques as always welcome... I don't bite!!
Phil.
|
|
|
|
|
|
2014/03/22 21:16:25
Subject: Re:Philmorgan75's workshop blog - Legion of the Dead
|
|
Regular Dakkanaut
|
Big update time!!!
My birthday money has been wisely spent on lots of models!!! So without further ado, update time ....
Achilles Land Raider
My 2 Land Raiders are approx. 95% completed. These would have been finished by now, but I got side-tracked by birthday goodies (more to follow!).
I've sponged on some metal and then some rust on the edges for the weathering. I'm waiting for the varnish to dry before I give a final drybrush of metal over the raised parts of the track treads. The purity seal will need to be finished and then some gloss varnish on the lenses of the sensors and this view will be finished.
Another view.
Apologies for the slightly blurred picture. Here's the top. Just need to paint the periscopes on the turret and this view will be finished.
The exhausts need a light airbrush of black to represent soot and exhaust fumes. The tracks need a light metal drybrushing and the Adeptus Mechanicus symbol need a few of the wires painted red and blue for this view to be finished.
And finally for my birthday, I got a FW version of the Achilles!!
I've washed the resin and cleaned up all the parts. Just need to find some time to build another Achilles!
Assault Ram Land Raider
Again, metal and rust have been sponged on and the varnish is slowly drying. I need to airbrush some light green to give the Eagle's eyes a glow and a light metal drybrushing of the tank treads and this view will be finished.
This shows the left hand side after weathering. I tried to add a rust streak from a few rivets as an experiment - Not 100% happy, but I feel without experimenting, you cannot push and improve your painting technique. This is the finished view.

The rear is at the same stage as the Achilles - again the exhausts need a light airbrush of black to represent soot and exhaust fumes. The tracks need a light metal drybrushing, the purity seals need to have the was painted red and the Adeptus Mechanicus symbol need a few of the wires painted red and blue for this view to be finished.
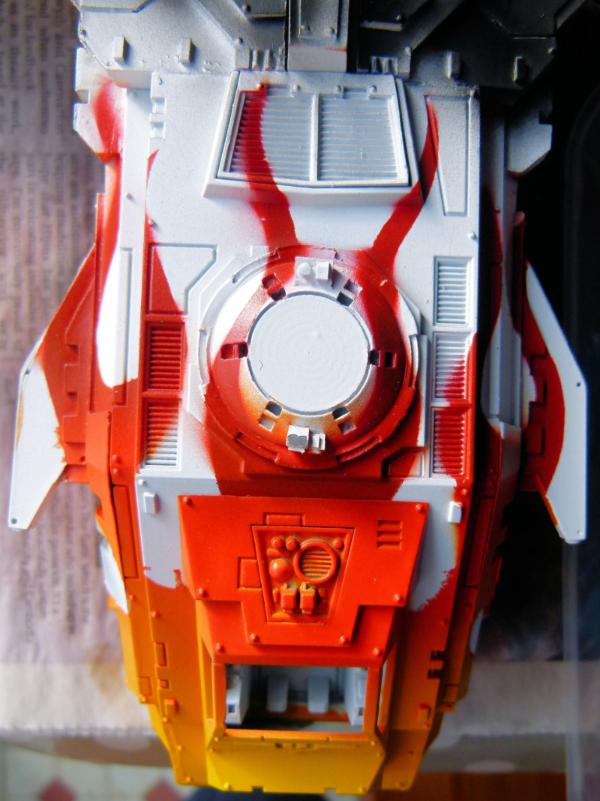
Fortress of the Damned
I keep on putting off this project, but I have made a small amount of progress:
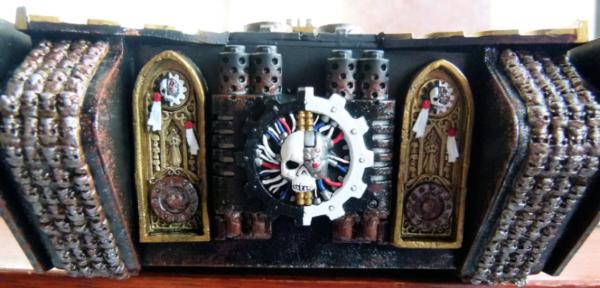
This shows one of the bunkers and one of the corridors. All the base layers have been painted and then black oil washed. I now need metal and rust to be sponged on for weathering, a few wires need to be painted on the inside of the bunker, the exterior lights need a light green blast from the airbrush to give a "glow"as well as the large lascannon on top for these to be completed. Only 3 more corridors and bunkers to go and then the tower!!!!!!!!!!!!!
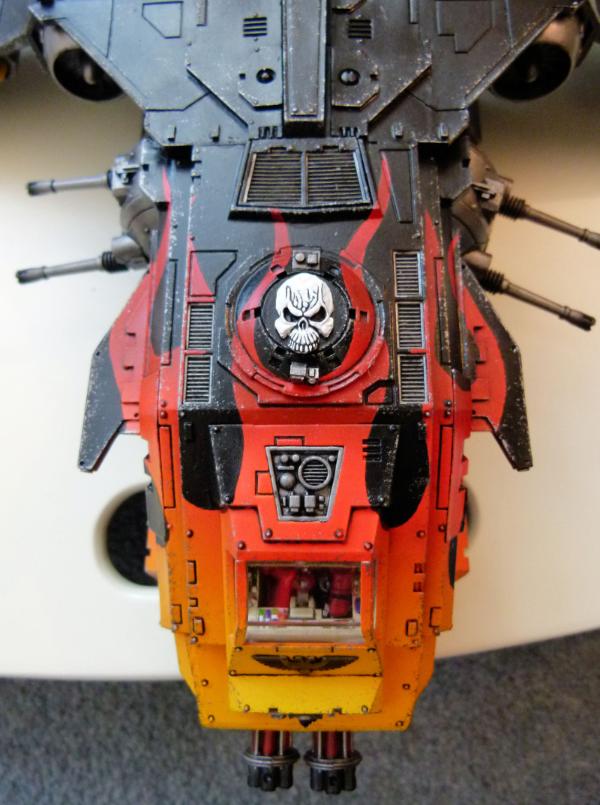
Fire Raptor
Here's another of my birthday pressies - a Fire Raptor:
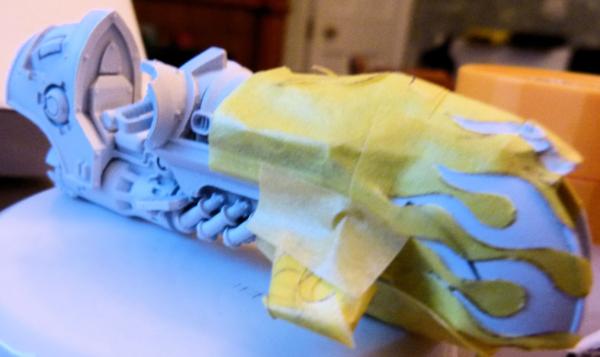
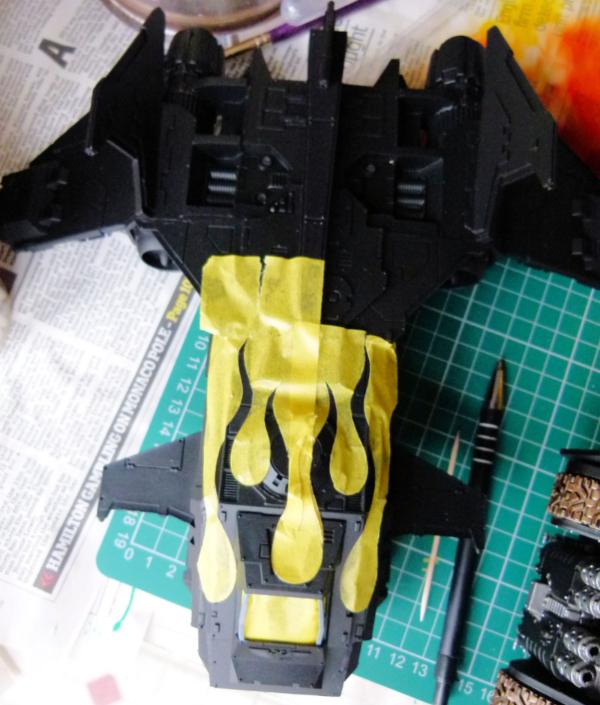
I had great fun building this. There was lots of resin that needed to have mould lines removed, even more filing to ensure all the bits fitted and then a lot of superglue and a small amount of milliput to make sure the gaps were filled. I undercoated this beast this morning (before taking my boys to play football for the local team) and once back in my house, I made out of Tamiya masking tape a flame template. As it was getting late (and dark) I thought I'd update my blog instead of breaking out the airbrush (that's tomorrow's bit of fun!).
I plan on airbrushing flames over the front third of the Fire Raptor. Once dry, I may run another line of flames at the front to give a more 3D realistic effect.
I have a Storm Eagle on order and can't wait to get the Fire Raptor finished before the Storm Eagle arrives. No pressure then....!!!!
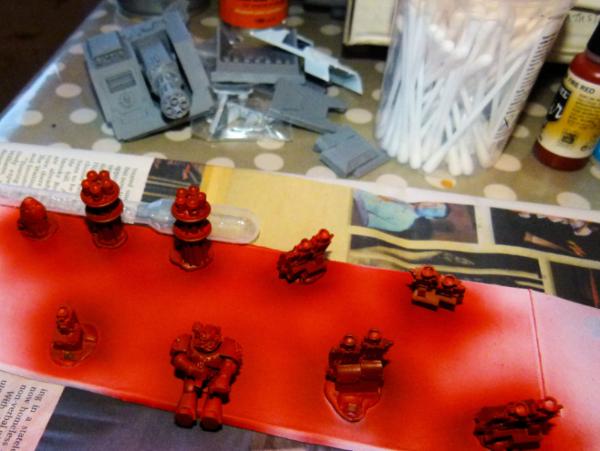
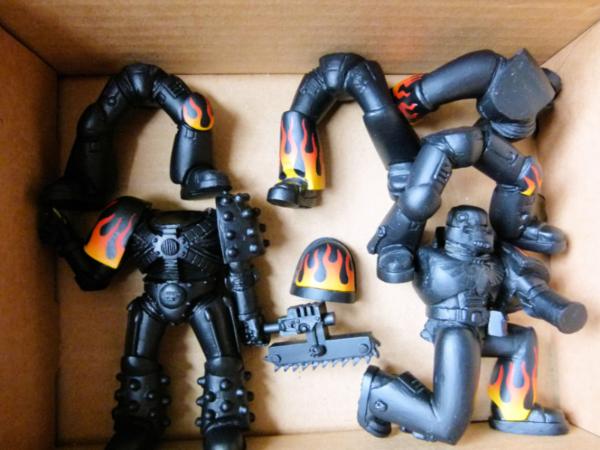
I did manage to use the airbrush this morning as well. All the things that needed to be painted red have had their basecoat. Everything will have a black oil wash to darken and to black line the details.
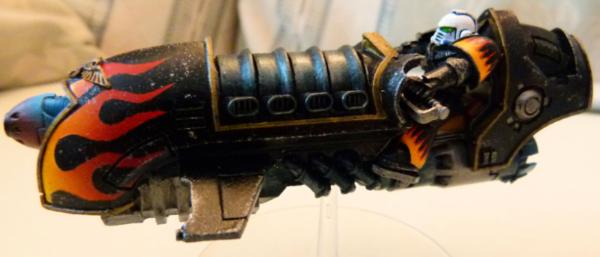
Scimatar Jetbike
Another little pressie I had fun making. I thought that a small amount of flames on the front would look cool. I'll post some updates hopefully tomorrow.
Finally, my last birthday present:
A FW Laser Destroyer Rapier.
Too many projects, so little time!!
Till next time, Phil.
|
|
This message was edited 1 time. Last update was at 2014/03/22 21:52:38
|
|
|
|
|
2014/03/23 19:54:36
Subject: Re:Philmorgan75's workshop blog - Legion of the Dead
|
|
Regular Dakkanaut
|
I finished another 2 Land Raider Variants:
Achilles Land Raider
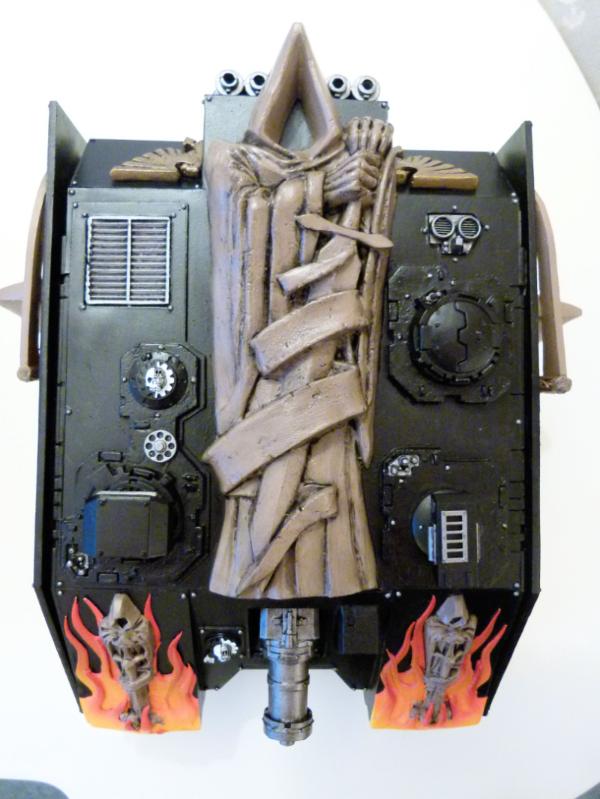
When FW released their LR Achilles, I liked the payload and decided to convert and make my own. Without further ado....
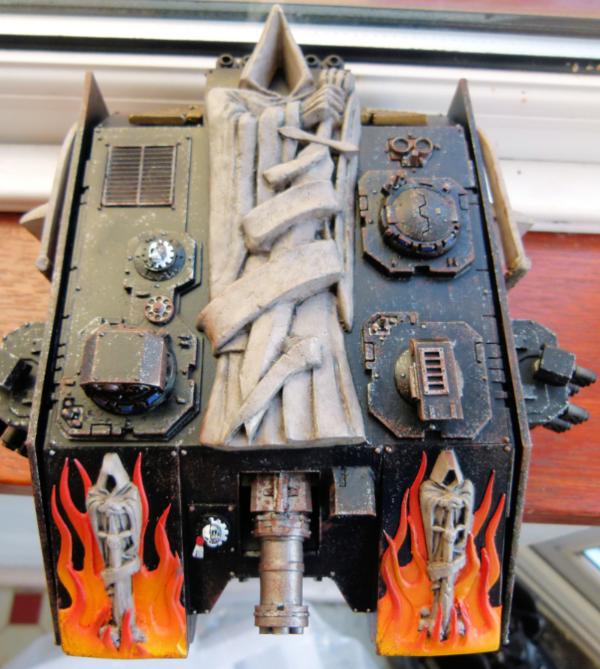
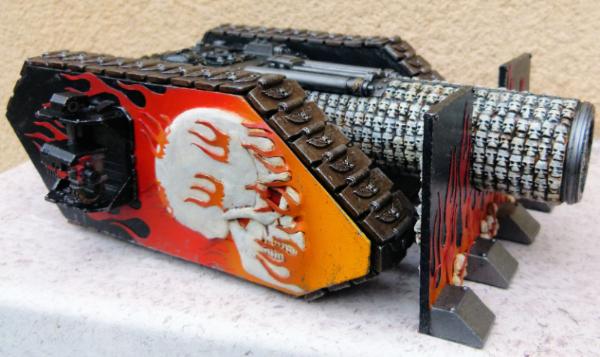
I chopped up a Fortress of Redemption to make the statue and then decided to run with this theme all over the Land Raider. I was going to give the statue a "marble" paint job, but in the end, I painted it to resemble stone. I used 2 of the inserts from the Fortress of Redemption as front trackguards and then sculpted some flames out of milliput. I used an airbrush to paint the rear flames. Once dry, I used blutac to mask off the rear flames and then airbrushed the front flames.
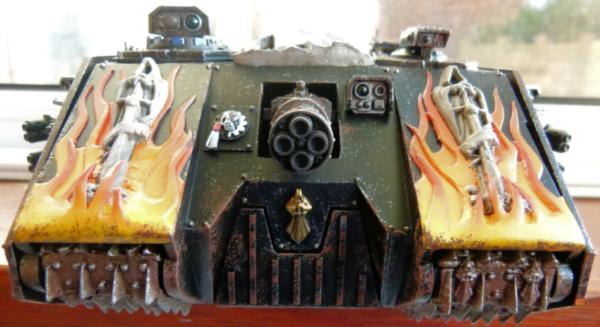
I got the Thunderfire Cannon from a bits site and then made the front armour out of plasticard and a cut down front ramp from the Land Raider. Apocalypse Command sprue, Storm Lord Mega Bolter and Valkyrie sensors were added as well as some tichytrain rivets to add a bit more realism. Dark Angel icons were added on every other track tread (from Machinator at Blood and Skulls Industry). I added a bit of metal and rust weathering to hopefully look realistic.
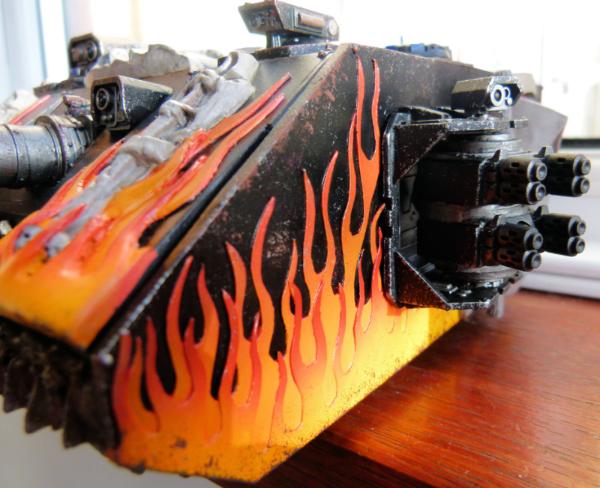
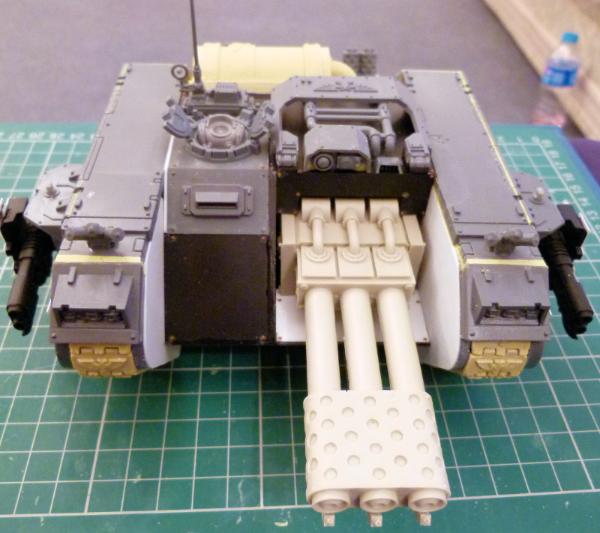
This shows the front left quadrant and the Quad Multi melta sponsons. The sponsons were made from 2 Storm Raven front weapons, some plasticard and milliput. The sensor was from a Vindicator. The flames were originally cut out of and made from thin plasticard. After airbrushing the rear flames, I again masked the rear flames with blutac and then airbrushed the front flames.
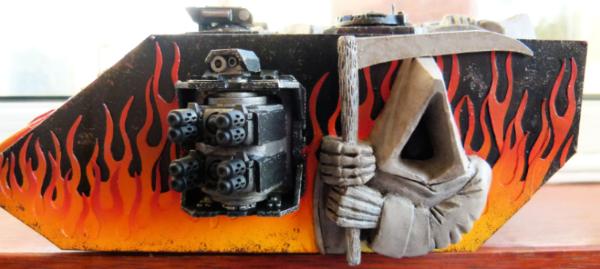
Here's a shot of the whole of the left side. The Dark Angel was sculpted from milliput with a plasticard scythe.
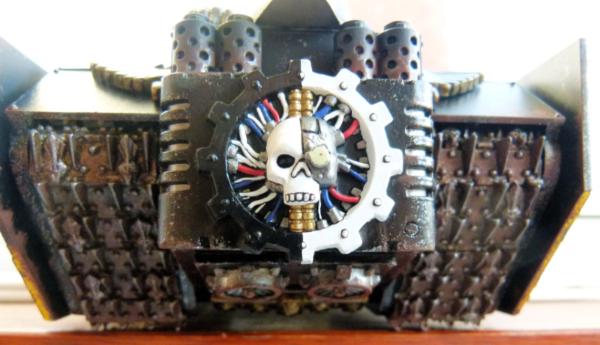
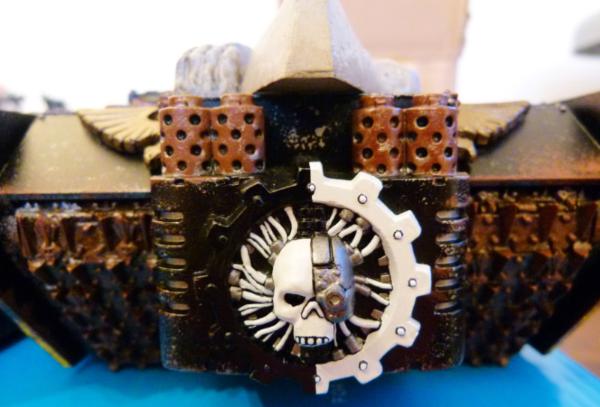
Parts from the Cities of Death (Adeptus Mechanicus logo) and vindicator fans were used here.
I made this model around 4 years ago and I am glad to have finally finished it!
Assault Ram
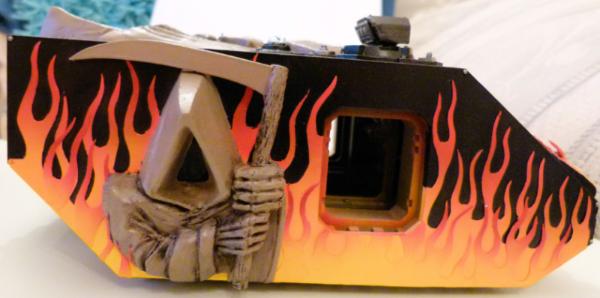
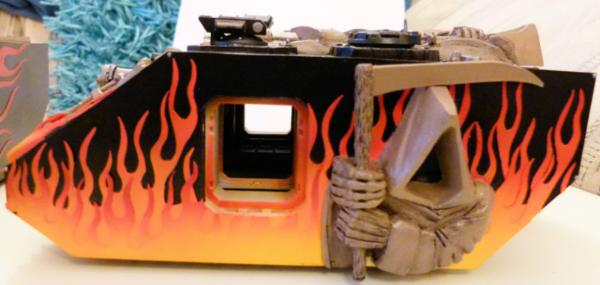
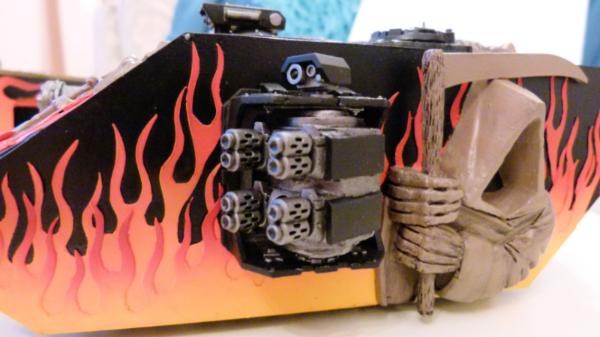
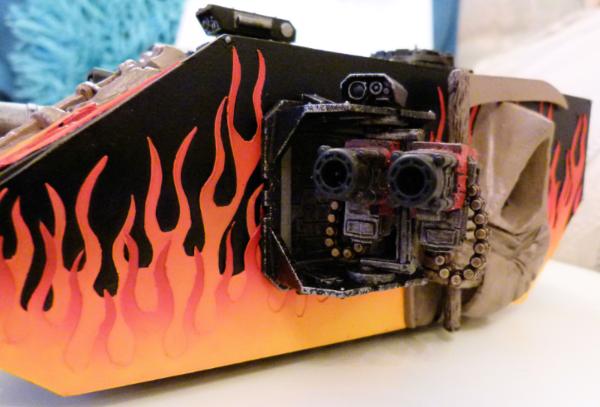
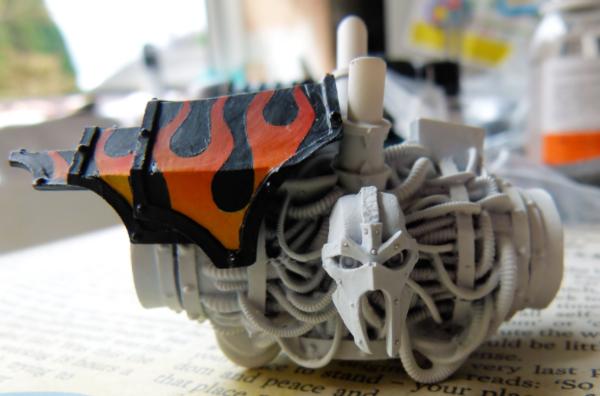
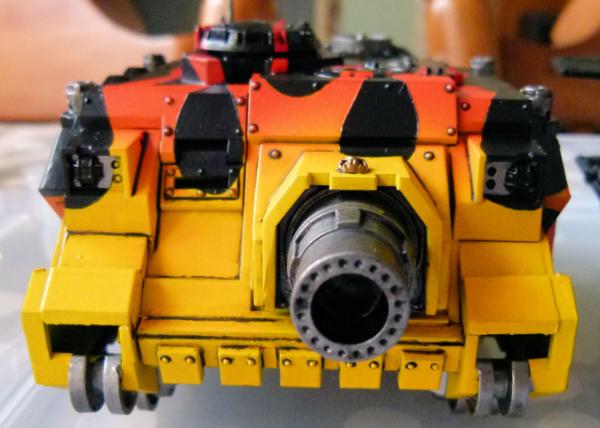
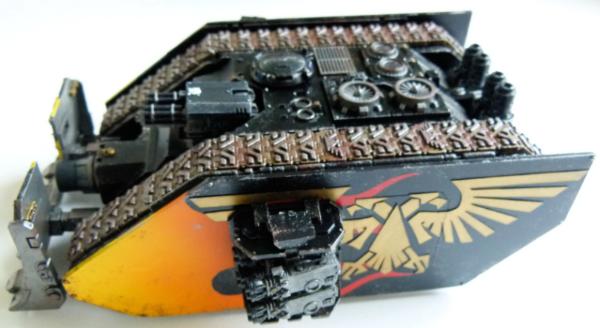
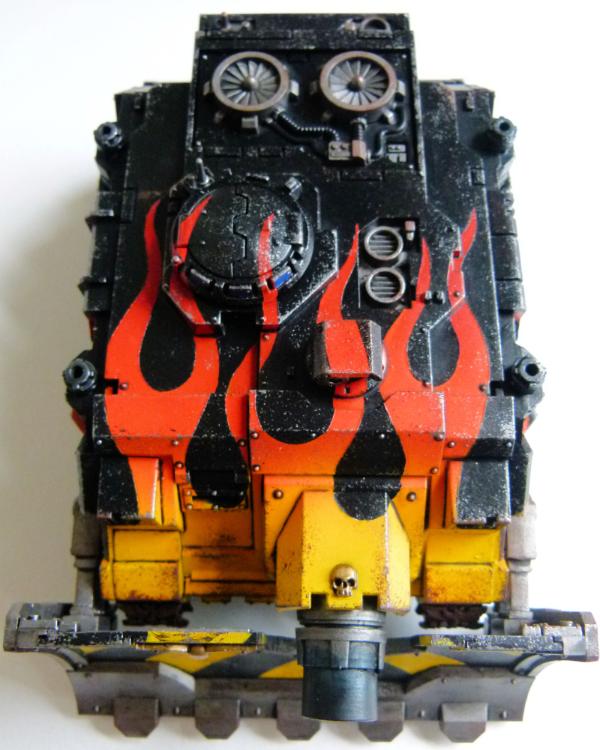
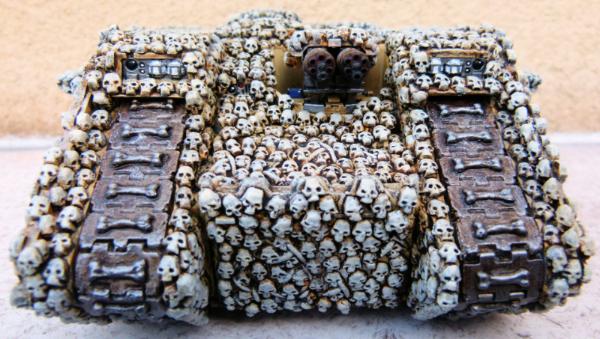
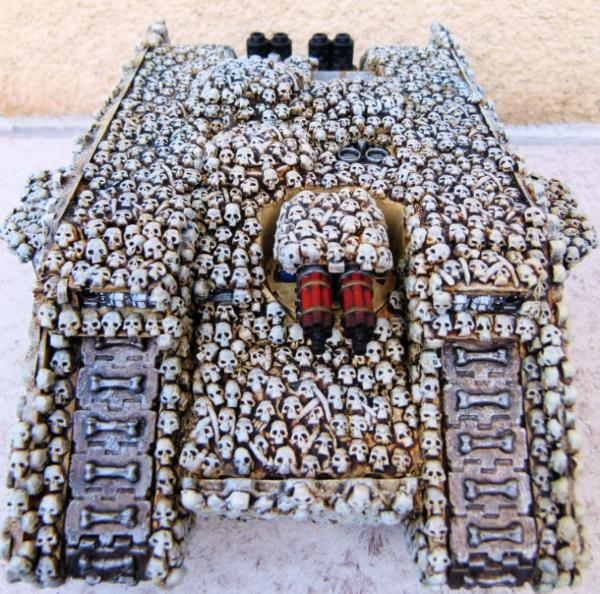
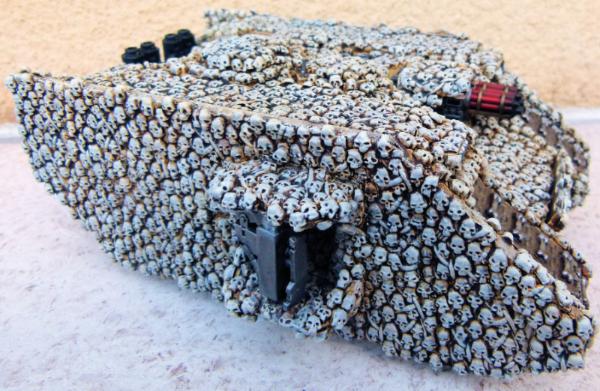
When the Caestus Ram was released, I liked the idea of it crashing into vessels and allowing the Space Marines within to be released unharmed directly into the space ship. With that in mind, I wanted to try and make something similar using the Land Raider and the Shrine of Aquilla as a base. Without any further ado, I give you the "Assault Ram".....
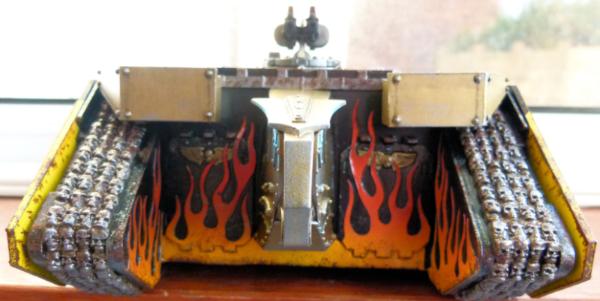
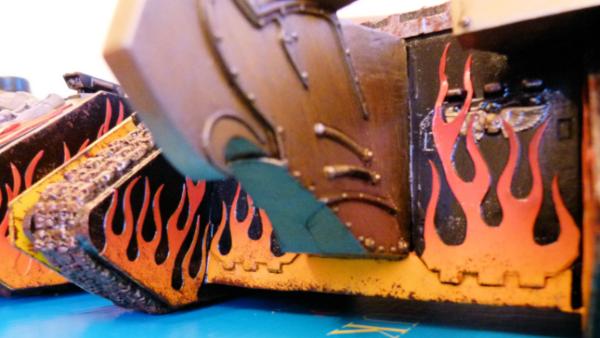
I widened the LR by using plasticard. I spaced the LR hatches either side of the Eagles head. Thin plasticard was used to make the flames which were then airbrushed. The tracks were made from lots of skulls and was a pain to make!! The Twin Heavy Bolter was converted from the Sisters of Battle Immolator.
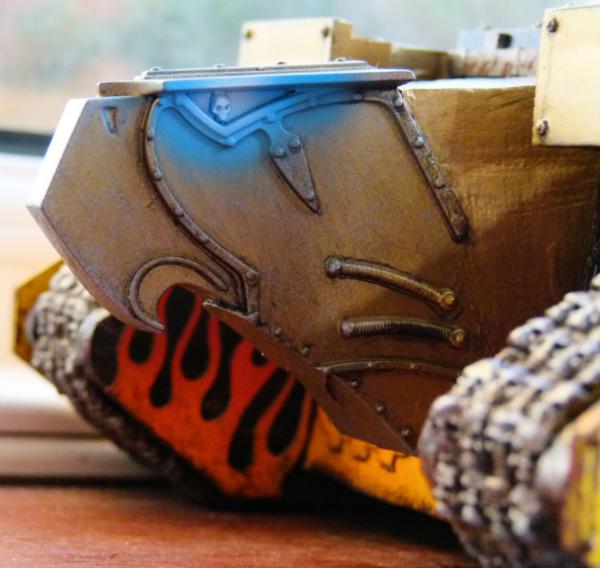
I decided to give the Eagle a plasma glow effect to the eyes. The head was converted to look forward, rather than the usual "look to the skies" with milliput.
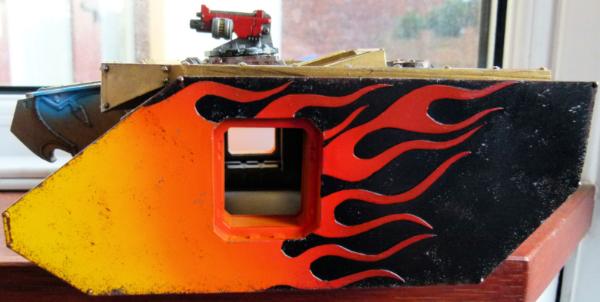
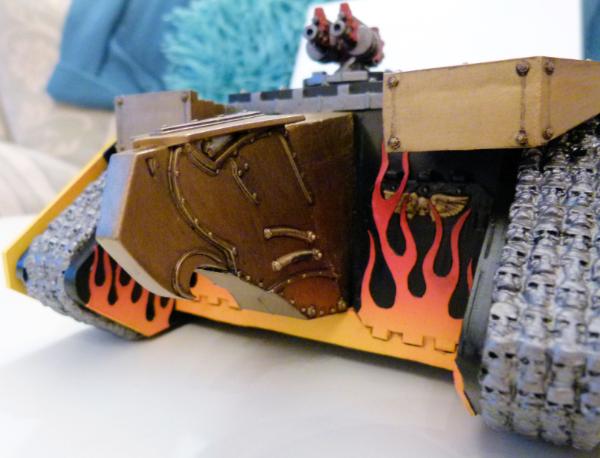
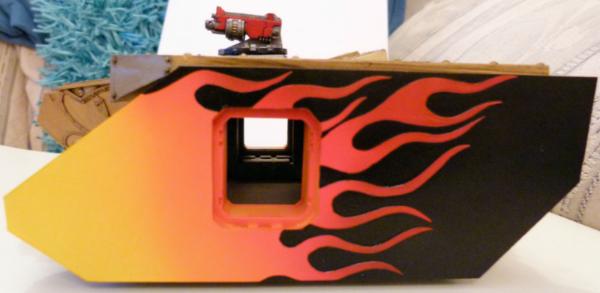
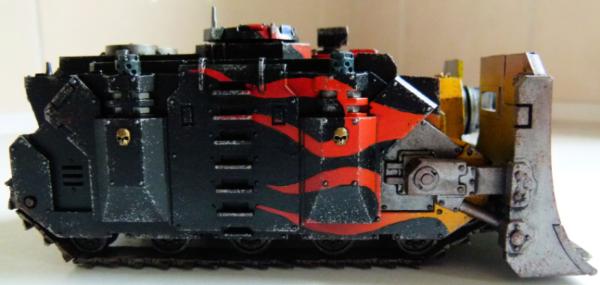
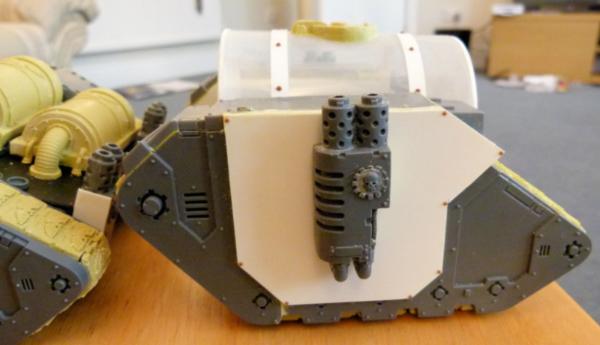
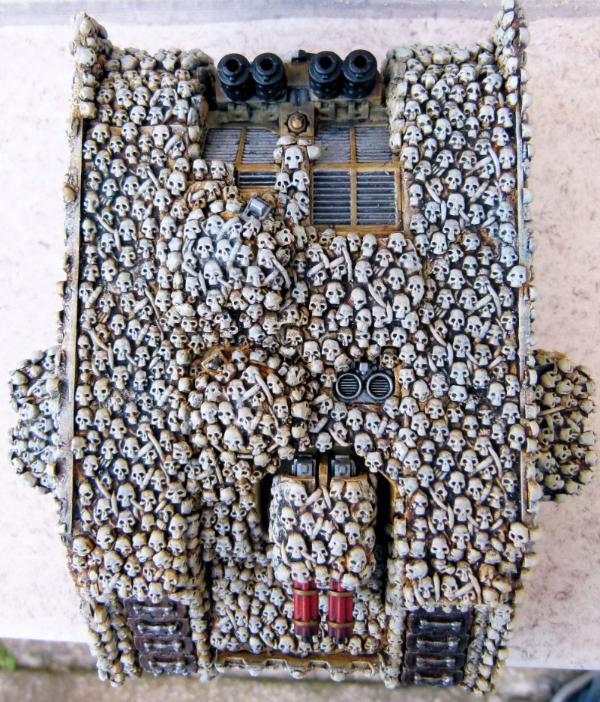
I made the side armour out of thick plasticard and then made the flames out of thin plasticard. The flames were airbrushed as usual. The only thing I haven't decided upon is the sponsons. Peoples thoughts?
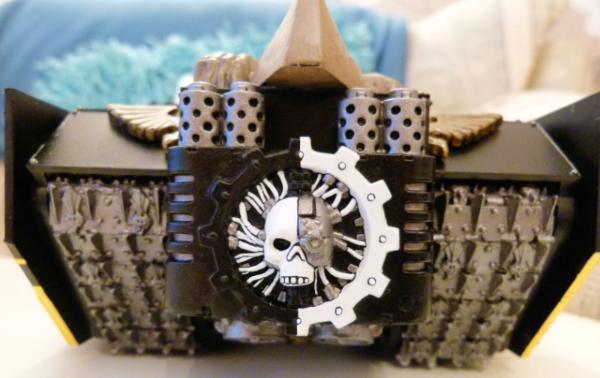
This shows the Shrine of Aquilla that I had to convert to fit. The vindicator fans were added at the rear.
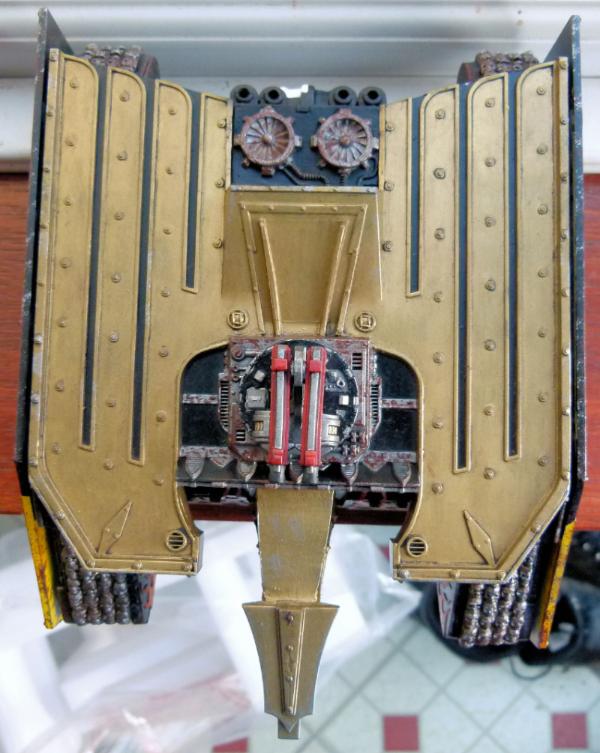
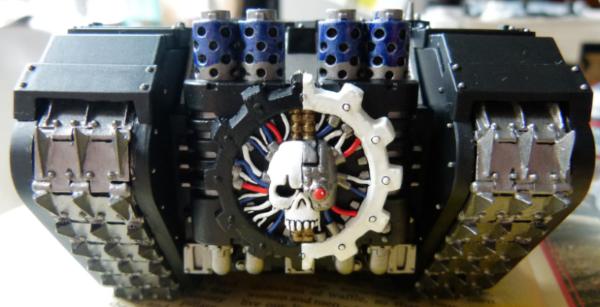
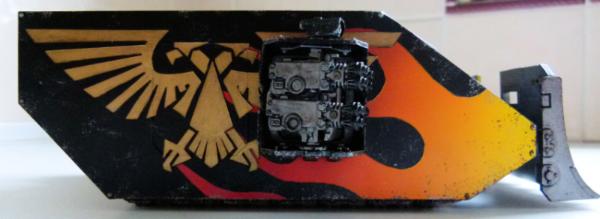
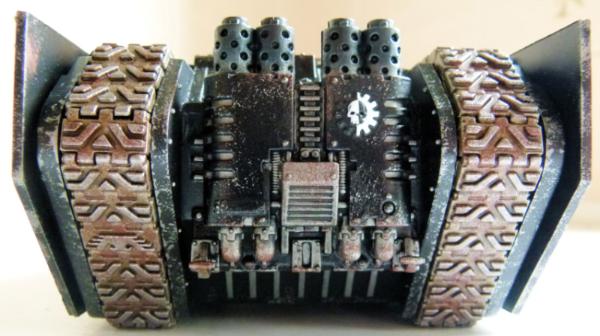
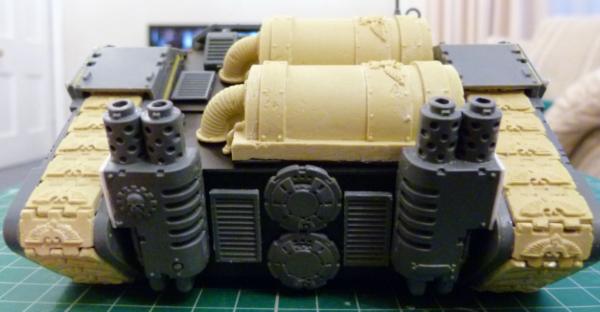
And finally, the rear. The engine was made from the usual Adeptus Mechanicus logo and 2 Baneblade engine pieces.
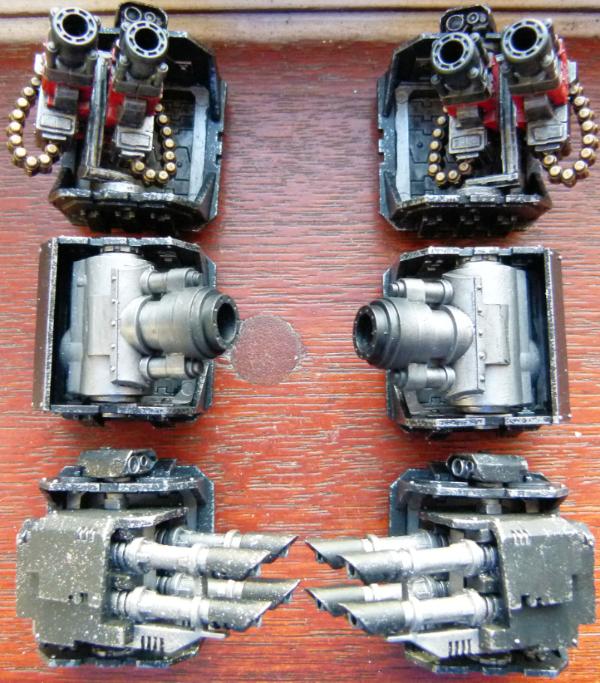
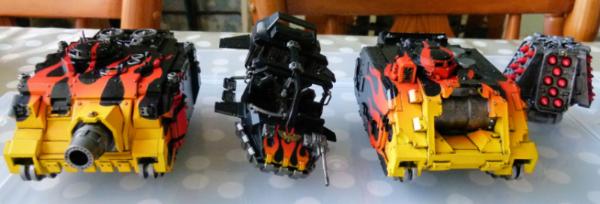
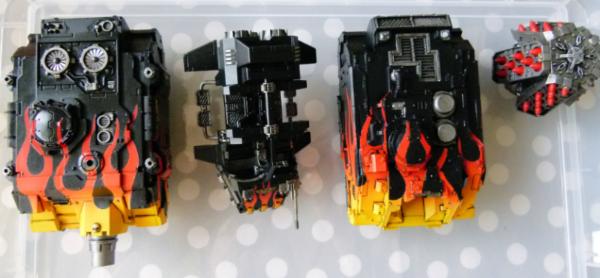
These are the sponsons I have made so far:
Twin Frag Cannons, Demolisher Cannon and Quad Las Cannon sponsons.
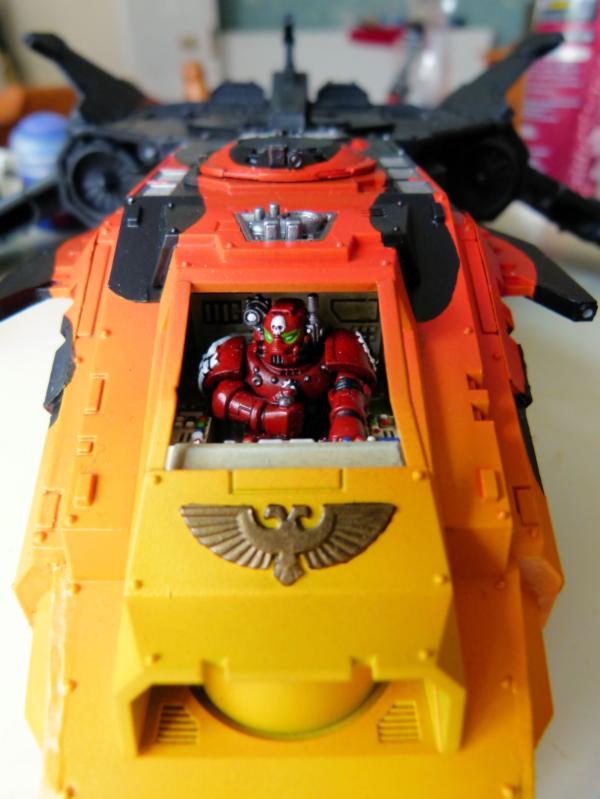
Fire Raptor
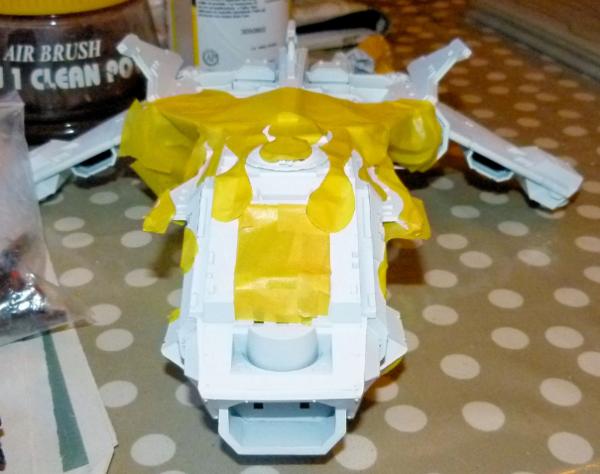
Broke out my airbrush today...........
A very yellow looking Fire Raptor!! I've given it a coat of varnish and once dry, I'll black oil wash the recesses and rivets. Once dry, I'll clean up the excess and then varnish it again. A bit of metallic weathering and she'll be done.

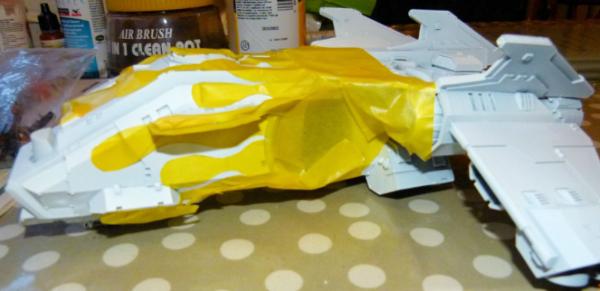
This shows the right side after I removed the masking tape. As you can see, there was a small amount of paint bleed under the masking tape which can easily be remedied with a bit of black paint. I've decided not to do another layer of flames as the risk of paint bleed will ruin the effect I want.
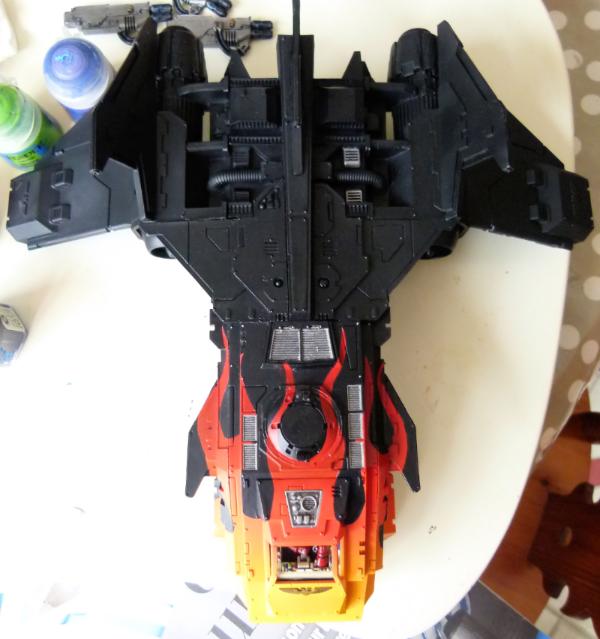
This shows the left side. I painted the rear quickly with the airbrush. The rest of the bird (currently white) will need to be painted by hand.
This shows the top view. Once the varnish is dry tomorrow, I'll paint the black around the flames and this will make a huge difference to the look of the Fire Raptor. I'm getting excited about how she's going to turn out!!!
Scimater Jetbike
Bit of paint bleed, but again, a bit of black paint and this will look cool!
This hot rod is going to turn out brilliant!
Comments and Critiques are always welcome.
Regards, Phil.
|
|
This message was edited 1 time. Last update was at 2014/03/23 21:25:10
|
|
|
|
|
2014/04/27 20:15:24
Subject: Re:Philmorgan75's workshop blog - Legion of the Dead
|
|
Regular Dakkanaut
|
Update time:
Scimatar Jet Bike
I've done some light weathering and a bit of metallic blue weathering powder over the parts of the metal that would be hot. The Plasma gun has had a quick blast from the airbrush to give the necessary glow.
This shows the almost completed left side. Just need to paint the seat and screens as well as the rider and this will be finished.
I also added a blast of "Plasma glow" to the after burner as well. I just need to buy another 2 for this squadron to be completed!
Fire Raptor
I've made a little progress on my Fire Raptor. Here's what the front currently looks like. I need to paint all the metallic first and I'll then give everything a blast of varnish before I start a bit of black oil wash to dirty up the metals and to make the seams and rivets "pop".
This is what the top view looks like. As you can see, there's a lot of metal that will need to be painted before the varnish and the oil wash gets applied!!
This shows the left side of the Fire Raptor. I varnished the model after painting the flames, which has meant it has taken multiple coats of black before it's got to this stage. Lesson learnt! I hope to finish the metallics over the next couple of days (hopefully before the Storm Eagle arrives and this project grinds to a halt!). I've already finished all the extra parts, so only the fuselage is needed to be finished now!
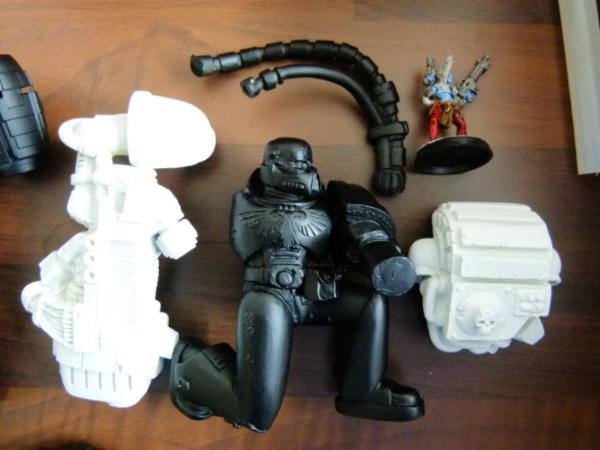
Large Space Marines
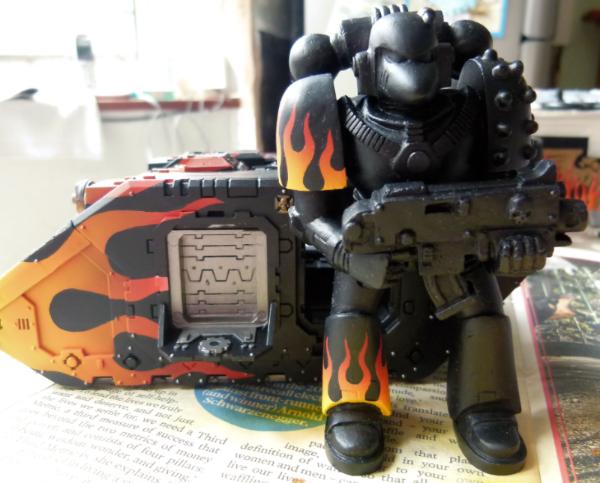
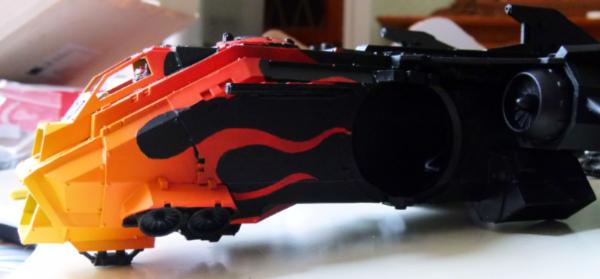
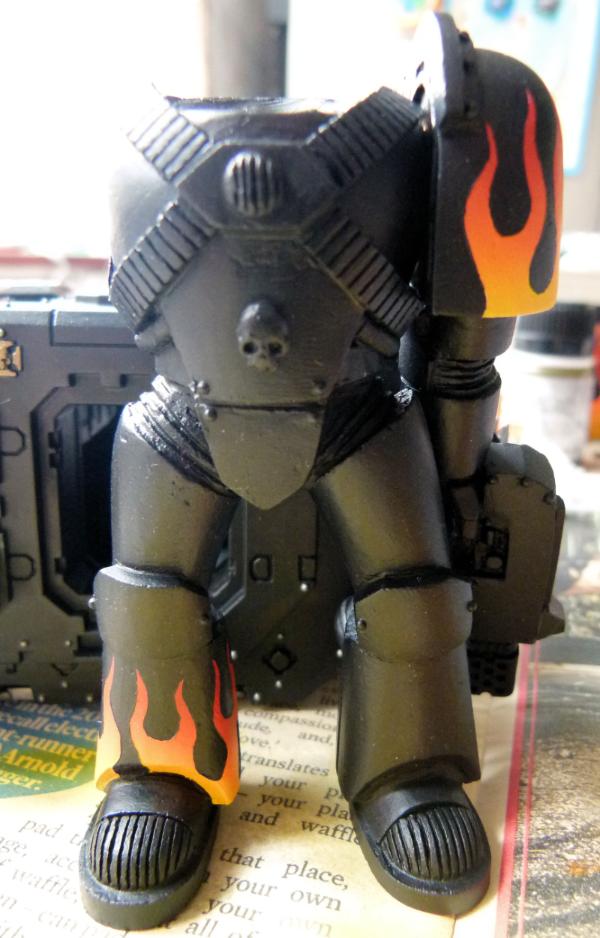
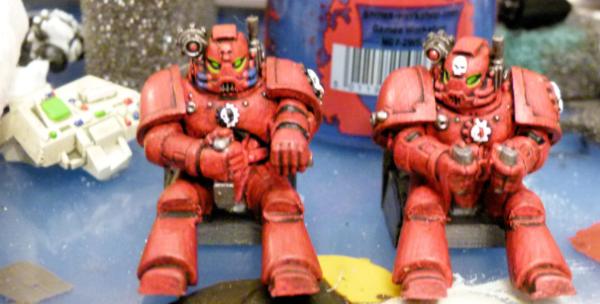
I thought as I had my airbrush out making the flames on the Land Raider Achilles, I may as well start painting some of the Large Space Marines I made a few years ago. This shows the Mark 6 'Corvus' Armour variant. You can see the size of the SM next to my newest FW Land Raider Achilles.
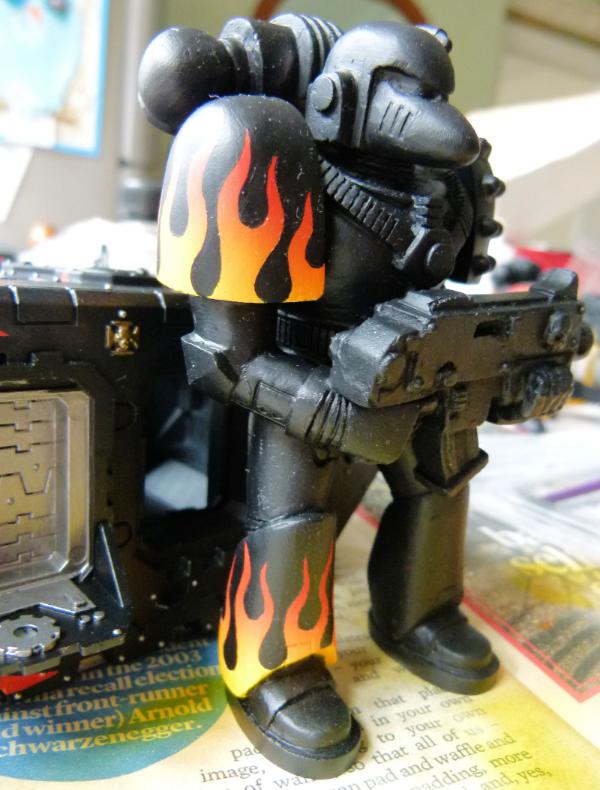
This photo shows that I'll need to dust the shoulder pad before I varnish it! I really like the pose of this SM and I'll probably make another one in the future and make it into a statue.
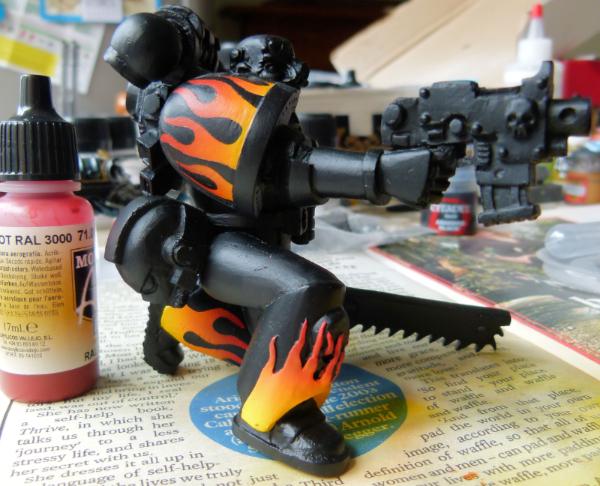
Here's the WIP Sergeant....
..... and a Mark 4 Assault Marine (with Hand Flamer).
FW Land Raider Achilles
I've made a lot of progress on my second Achilles. All of the main colours have been painted. I'm waiting for the Fire Raptor metals to be finished before I varnish this tank. A quick black oil wash and the rivets and seams will again "pop". The treads will be washed with AK Interactive Track wash and then the usual weathering of sponged metal and rust to finish.
This top view shows how I've tried to wrap the flames around the different parts of the tank.
This shows the right side awaiting its varnish and black oil wash.
.. and finally, the rear view. The exhausts have had a blue wash added to mimic heat. The exhausts will need to have some rust sponged on and then a quick blast of black from the airbrush to mimic smoke.
Imperial Decimator
I like to have a lot of projects on the go at the same time and this is another project I've started. I removed all of the chaos iconography using a scalpel and lots of filing and a bit of milliput to cover any holes. I wanted to have a dreadnought that stands out from the rest. The armour plates will have the usual flames airbrushed on them and then gold/bronze frame around them. I'm really looking forward to how this one turns out.
Critiques welcome as always...... Phil.
|
|
|
|
|
|
2014/05/09 21:47:11
Subject: Re:Philmorgan75's workshop blog - Legion of the Dead
|
|
Regular Dakkanaut
|
Update time:
Finished another Land Raider Variant today:
FW Land Raider Achilles
Front showing my usual airbrushed flames and rust and metal sponged weathering.
Slightly higher view.
Top plan view.
Right side.

Left side....
... and finally, the rear. I've since added a small amount of black airbrushed over the top of the exhausts to simulate soot.
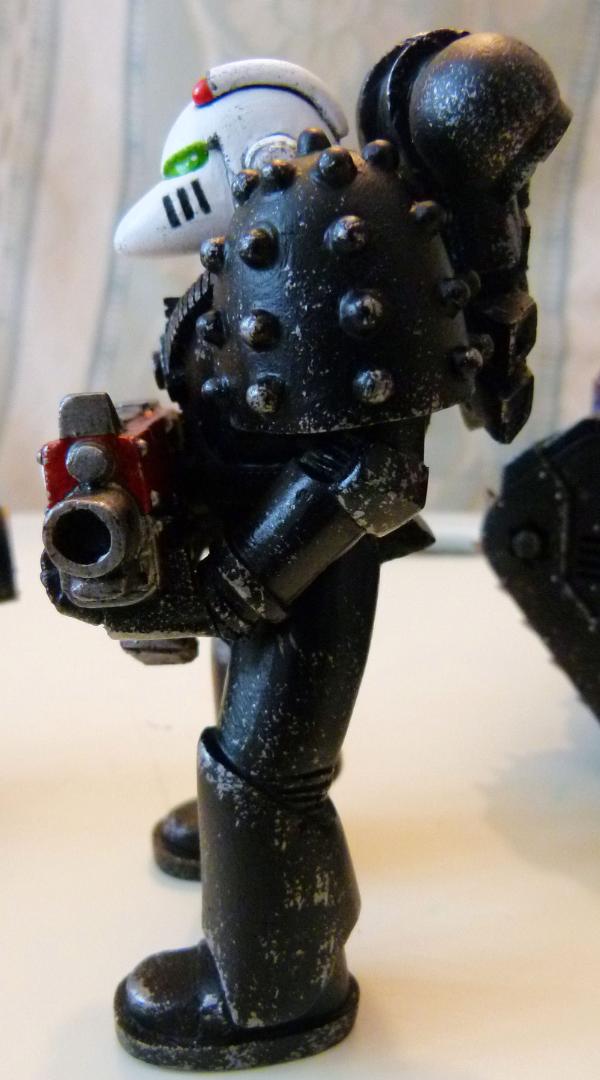
10cm Large Scale Mk6 Corvus Armour Space Marine
I finished my second Large Scale Space Marine also today. This shows the front view.
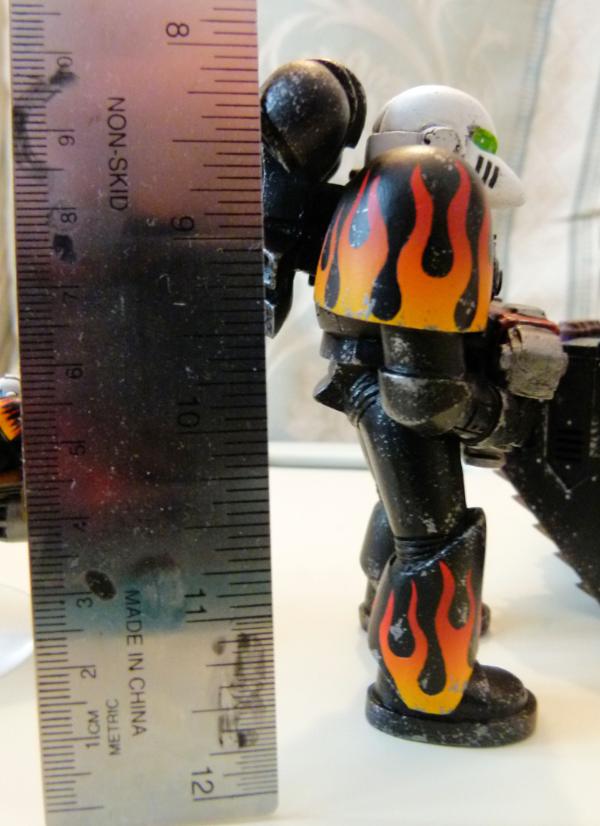
This shows the right side and a ruler to prove size.
Left side...
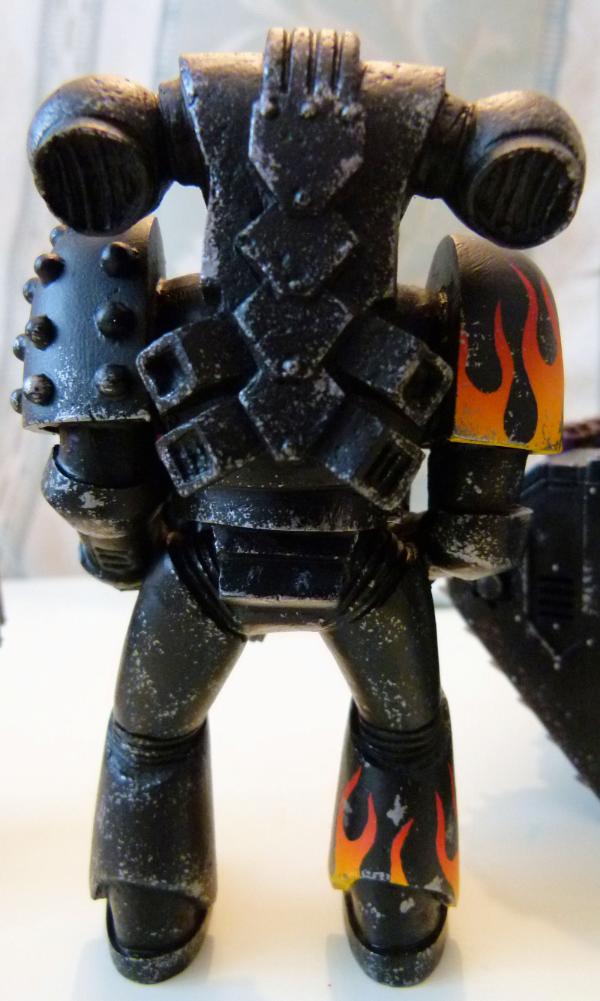
.... and the rear. I have a couple more Large Scale Space Marines in various WIP stages. I'll post some more over the next couple of days.
Scimater Jet Bike
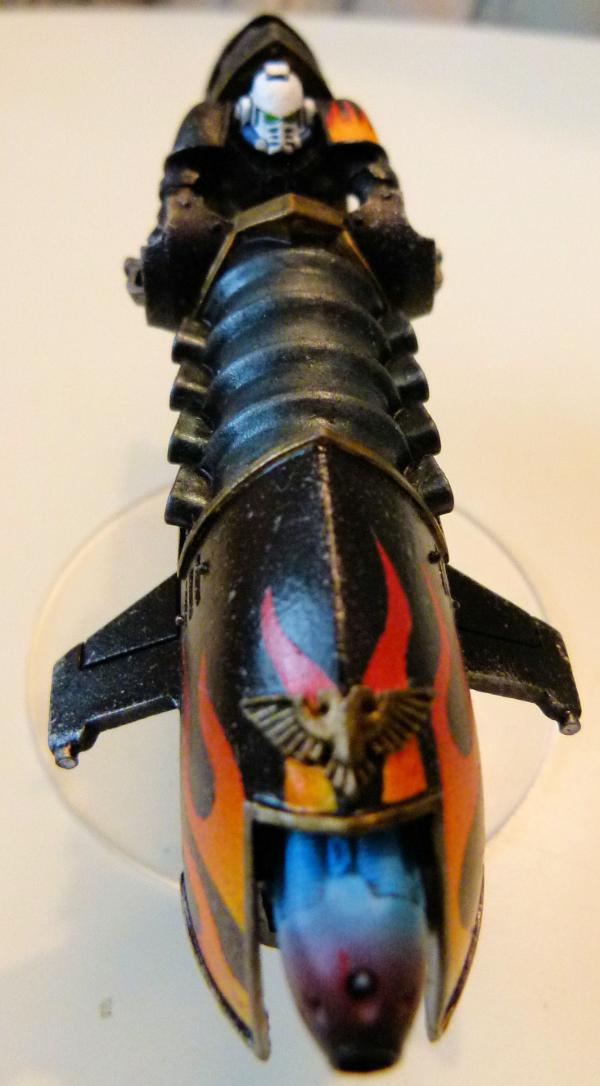
Finally finished painting the SM Rider today.
This shows the completed left side.....
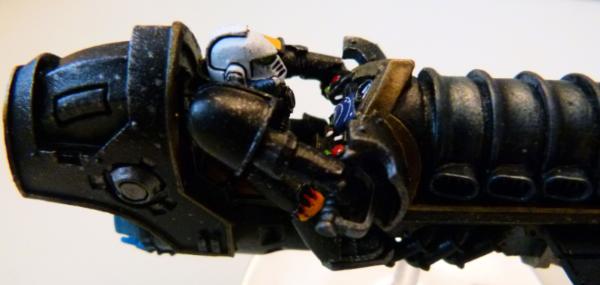
..... and right.
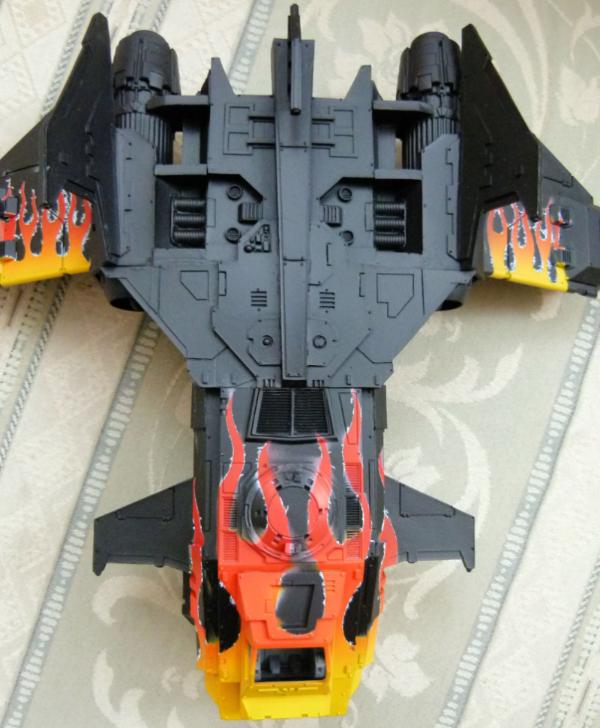
FW Fire Raptor
As planned, my Storm Eagle turned up today in the post, so it was imperative I finished the Fire Raptor. So without further ado.....
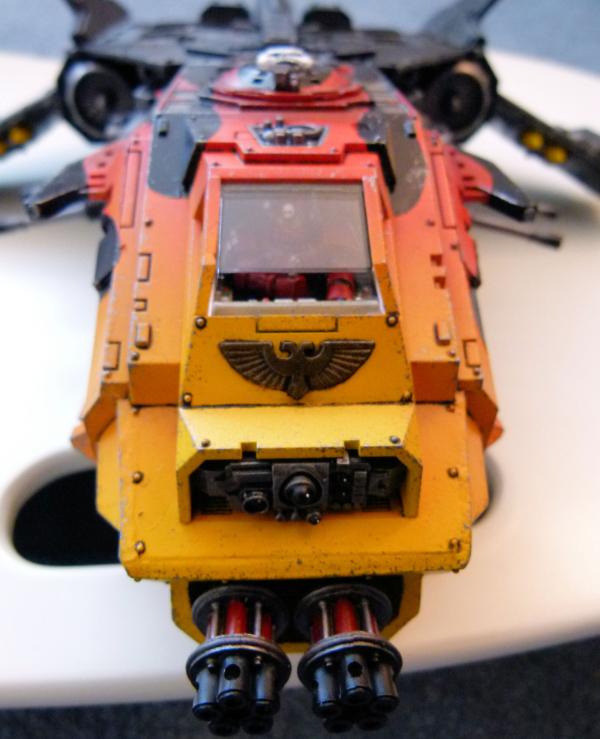
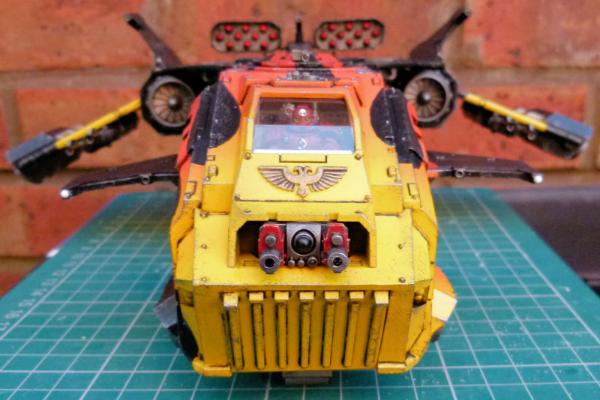
This shows the completed front.
This shows the completed flames over the front of the Fire Raptor. The weapons in the sides are magnetised so I can swop the auto cannons out with twin heavy bolters should I wish to.
Top rear. The exhausts had a blast of black from the airbrush.
Right Side.
Left Side.....
..... and underneath.
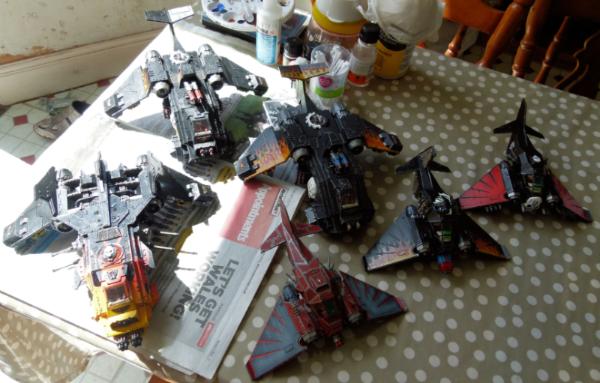
This shows a group shot of all of my completed SM Aircrafts.
Do I carry on painting or do I make my new Storm Eagle? Decisions, decisions!!!!
Till next time, Phil
Till next time, Phil.
|
|
|
|
|
|
2014/05/29 19:48:39
Subject: Re:Philmorgan75's workshop blog - Legion of the Dead
|
|
Regular Dakkanaut
|
I decided to make my Storm Eagle!

With a bit of hot water and a bit of bending, I managed to get it together quite quickly. All gaps were filled with milliput - a bit of paint and no one will see!!
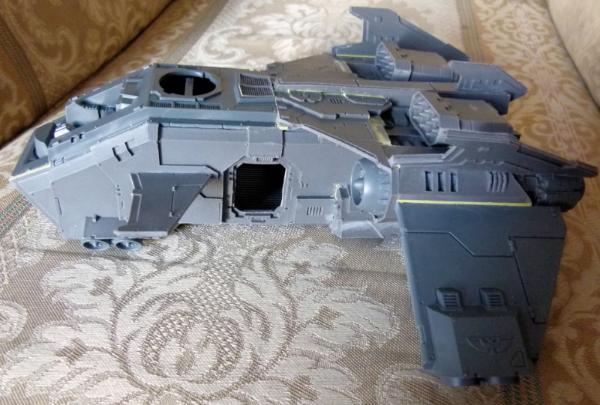
I love the shape of this aircraft compared to the usual brick of the Storm Raven! I've undercoated it since the photo and will take some more progress shots in the future.
Contemptor Dreadnoughts
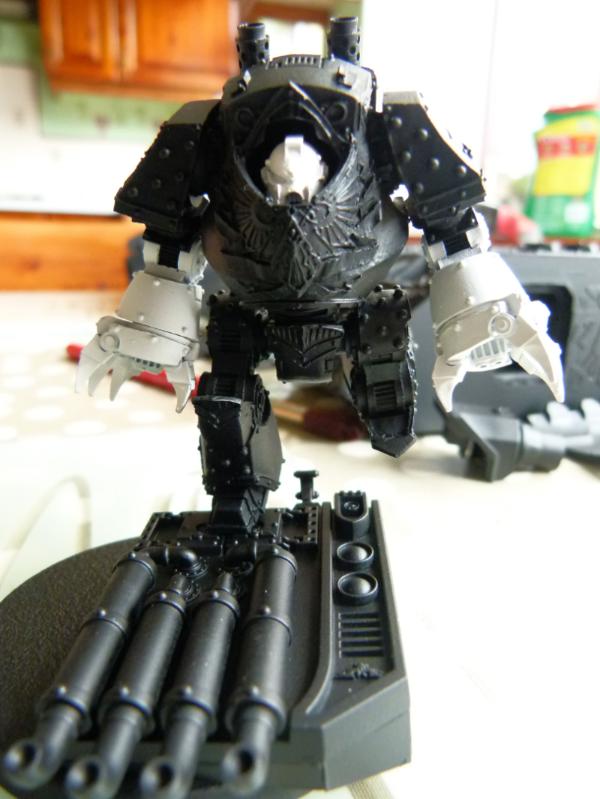
As I didn't know what weapon payload to arm my dreadnoughts with, I added a lot of magnets and can now swop all the FW variants. I removed all the Emperor's Children Iconography before I started to paint in my usual Legion of the Dead livery. The claws were undercoated white to give a brighter flame effect.
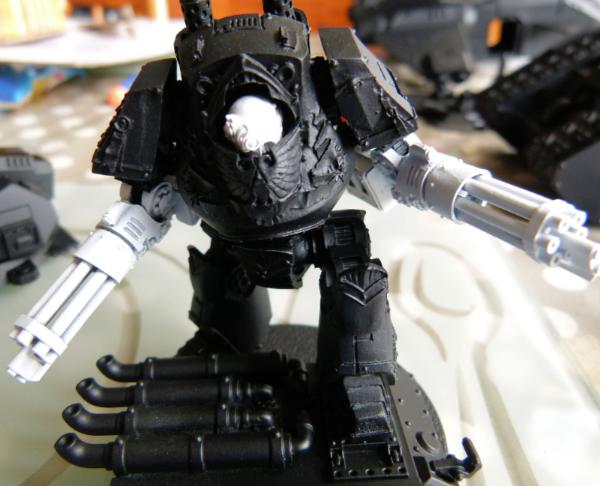
The second dreadnought has a magnetised midriff so I can move the pose around depending on what weapons I want it to have. The helmet can rotate as well as the shoulders, elbows and weapons.
I hope I can do a good paint job on them.
Large Space Marines
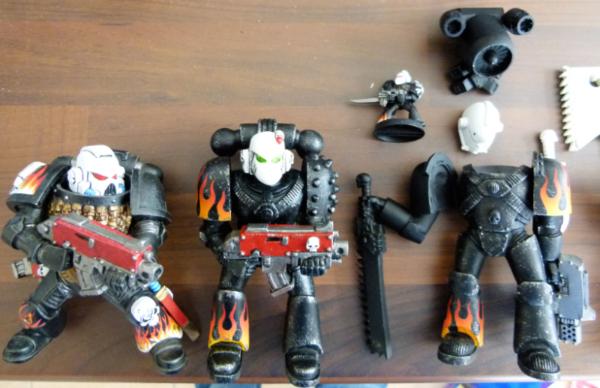
Thought I'd take a couple of shots of the WIP Large Space Marines.
From left to right:
Mk 8 Errant Armour: Thought this was finished but as I have now started to sponge on damage to my models, I'm going to have to go back and revisit this one. I'm also considering repainting the eyes.
Mk 6 Corvus Armour: Finished.
Mk 4 Maximus Armour: Right arm, Helmet and Jetpack undercoated. Need to finish hand flamer.
I threw in a normal Mk6 SM to show scale.
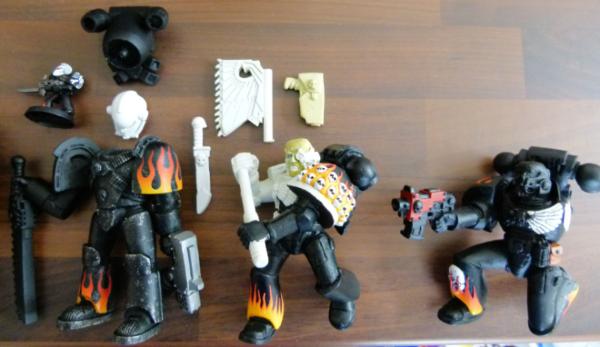
Middle:
Mk 6/7 Hybrid Armour: Chain axe, face, right arm and skulls on left shoulder pad to be completed as well as the usual weathering.
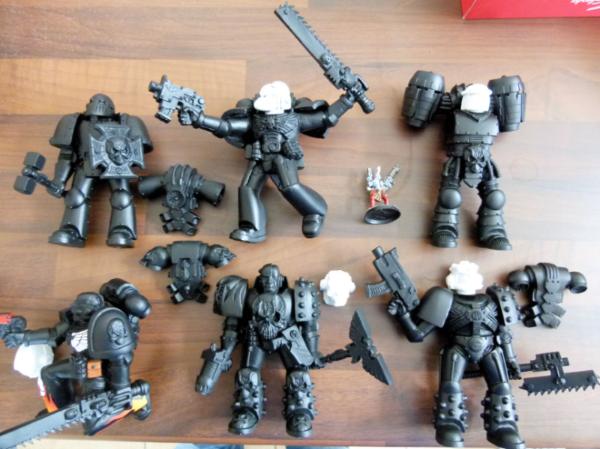
From Top left:
Mk 3 Iron Armour: Only undercoated.
Mk 6 Corvus Armour: Only undercoated.
Mk 2 Crusade Armour: Only undercoated.
Mk 6 Corvus Sergeant: Flames, bolt pistol and half of imperial eagle on chest completed.
Mk 5 Heresy Armour Chaplain: Only undercoated.
Mk 5 Heresy Armour: Only undercoated.
and finally... Mk 6/7 Plasma Cannon: Only undercoated.
I'm now spending time completing the laborious and monotonous task of masking off the templates to allow me to airbrush the flames.
Update soon, Phil.
|
|
|
|
|
|
2014/06/04 19:30:20
Subject: Re:Philmorgan75's workshop blog - Legion of the Dead
|
|
Regular Dakkanaut
|
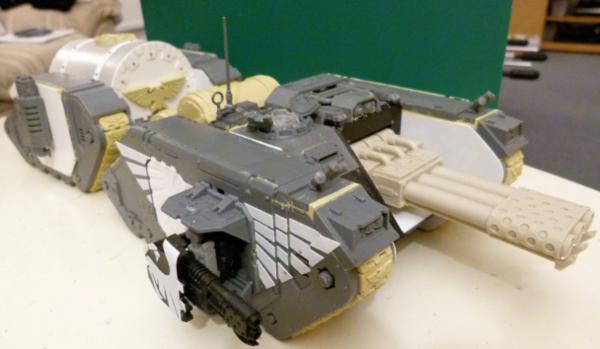
Land Raider Ares
I made this from one of my reclaimed Land Raiders from ebay a number of years ago when the Land Raider Ares first came out. I wanted to try out some wrap around tank treads as well. In this WIP, I've weathered the tracks with some AK Interactive Track Wash. Once dry, I'll give the whole model a blast of matt varnish before I move onto the black oil wash stage.
This slightly blurry photo shows the plan view. I added some Vindicator fans, LR vents and Baneblade hatches to assist removing the fumes after firing the Demolisher Cannon.
This shows the WIP of the right side. The Imperial Eagle was cut from plasticard. Using a knive, I gave the impression of the rear hatch cut through parts of the Eagle. The flames were done via the airbrush and Tamiya Masking tape. Once varnished, I'll give the Eagle and the rivets a Black Oil wash. Once dry, I'll give it the usual sponged on rust and metal.
This shows the WIP left side.
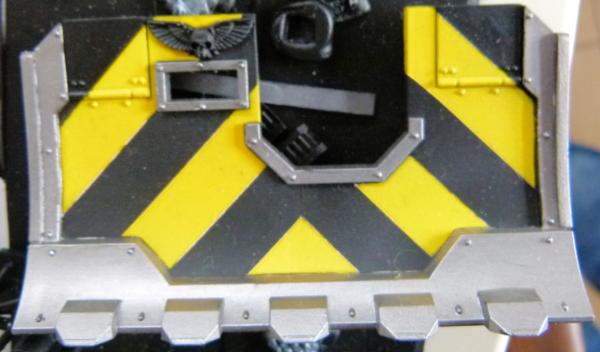
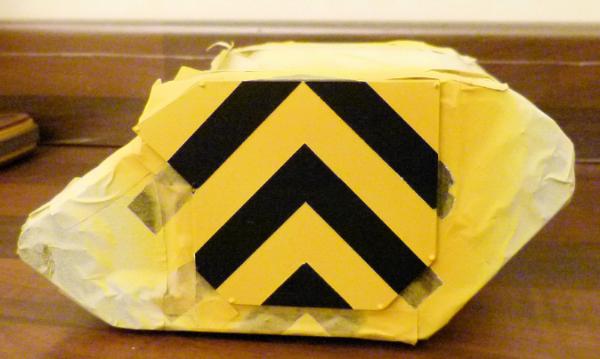
Finally, this is what I've decided to do with the Storm Shield - Hazard chevrons were airbrushed on (I love Tamiya Masking Tape!!). After a varnish, I'll weather the shield a lot harsher than the rest of the tank.
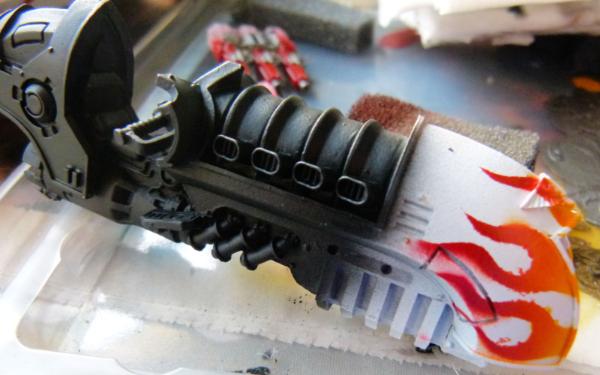
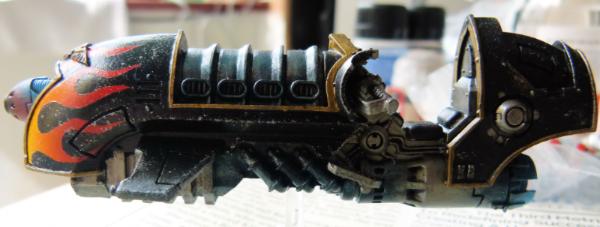
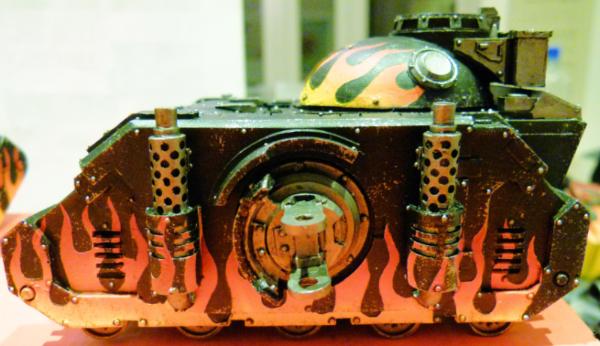
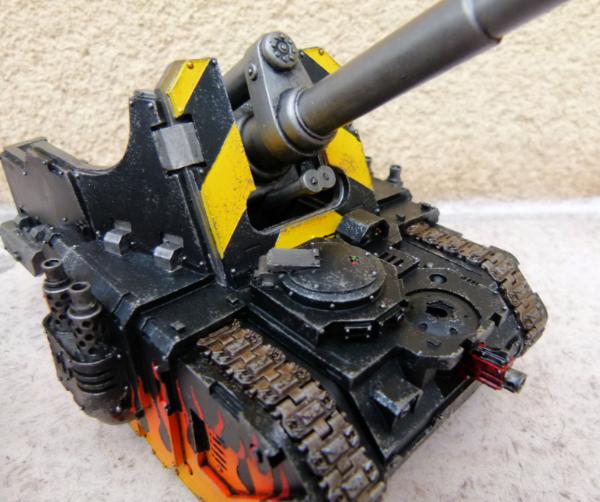
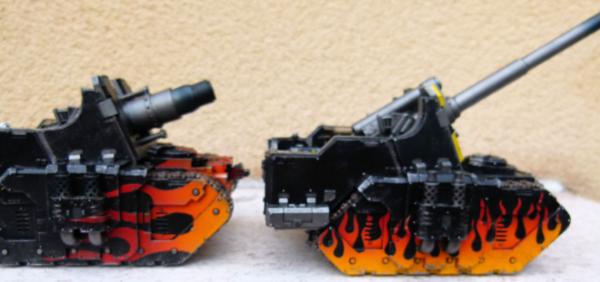
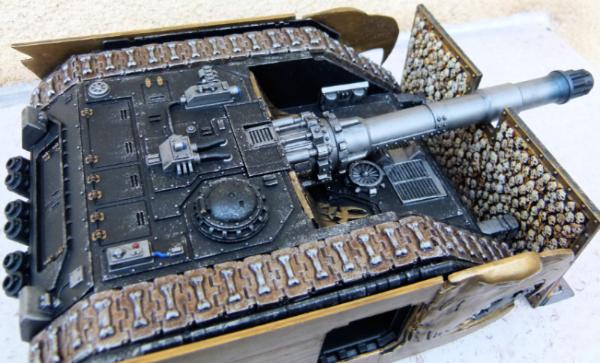
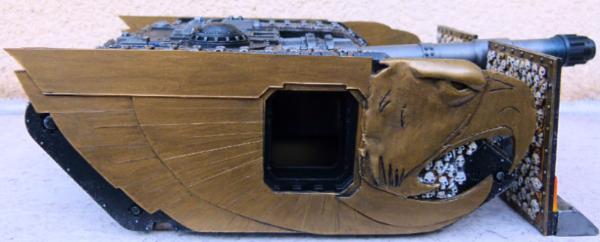
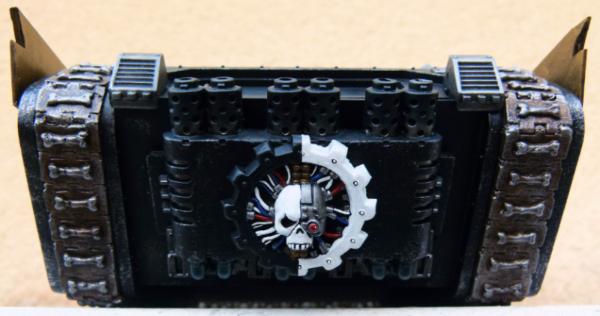
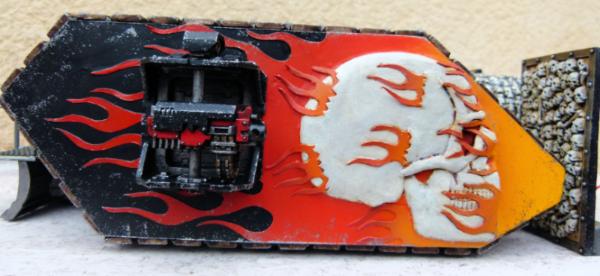
Land Raider Hellcannon
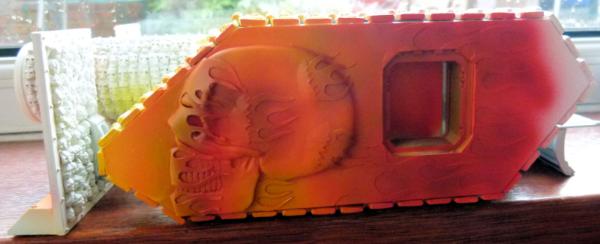
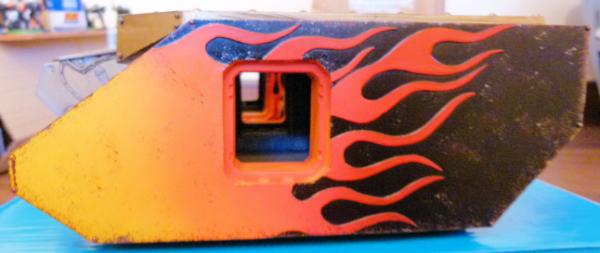
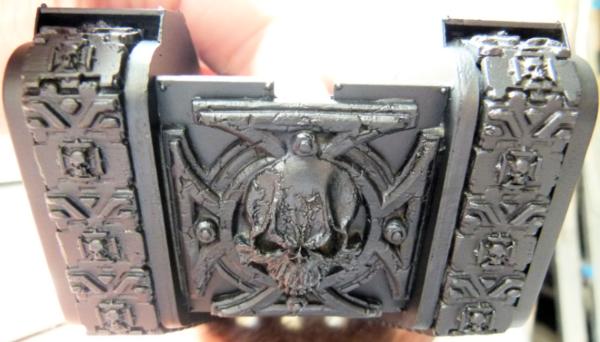
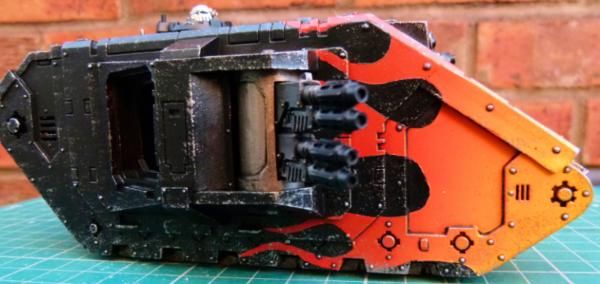
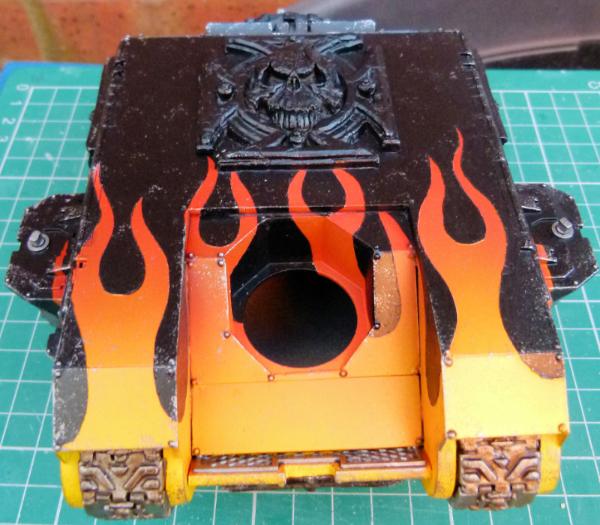
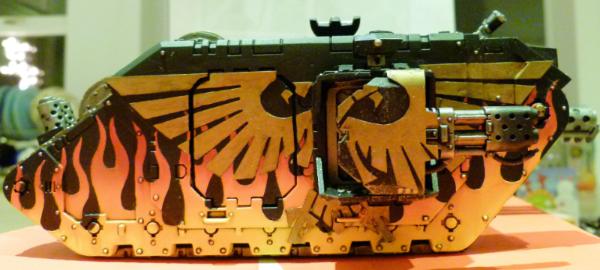
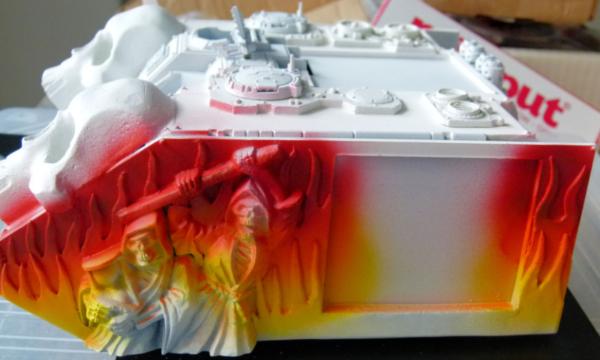
Whilst the airbrush was out, I decided to start on my Hellcannon conversion. Having airbrushed the rear flames, I now need to mask the rear flames off with blu- tac and masking tape to then be able to airbrush the flames at the front. Once this is done, I'll then paint the large skull. I have a lot of normal size skulls to paint on this and I'm still not happy with my previous attempts. Any assistance on the best recipe for painting skulls would be appreciated.
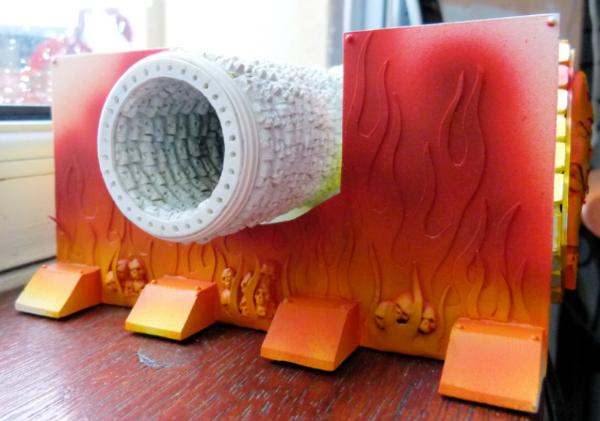
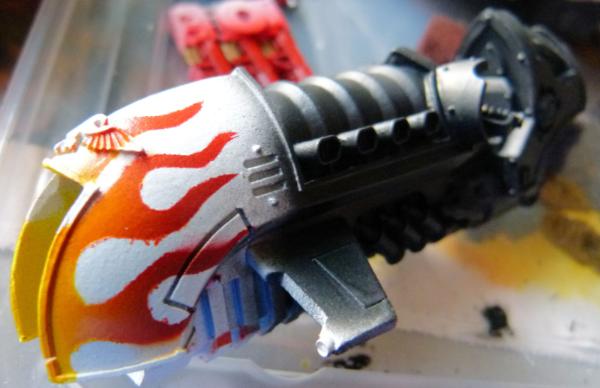
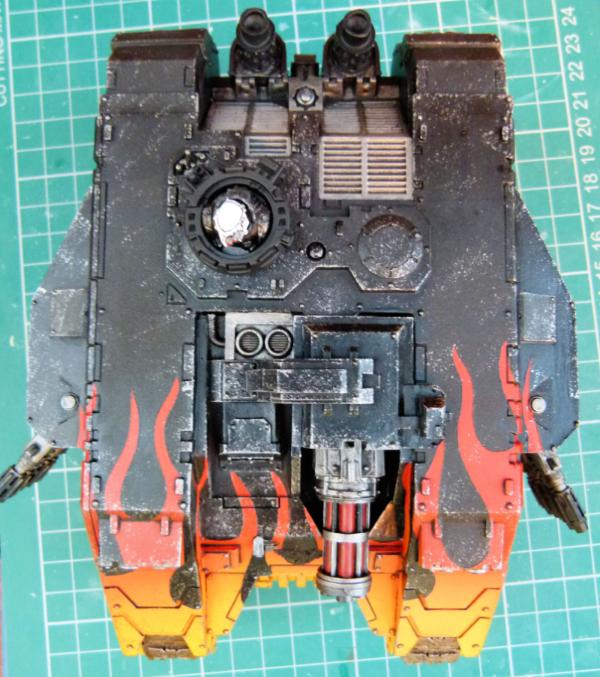
This shows the side front view. As with the side flames, I'm going to have to know mask the rear flames with blu- tac and masking tape and then airbrush the flames at the bottom. Painting the skulls inside the cannon is going to be fun!!!
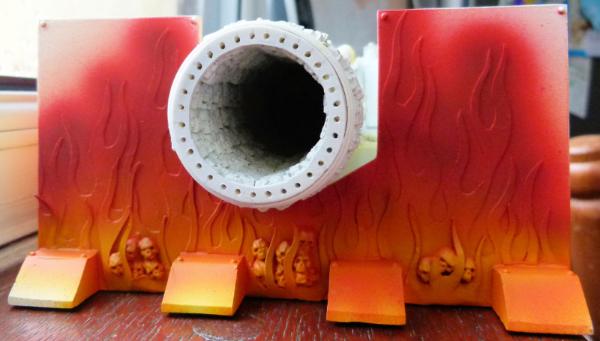
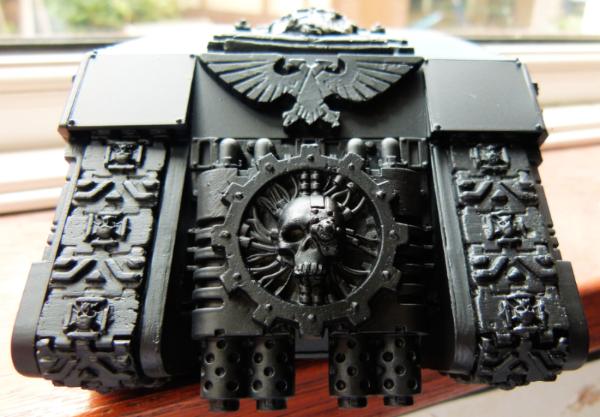
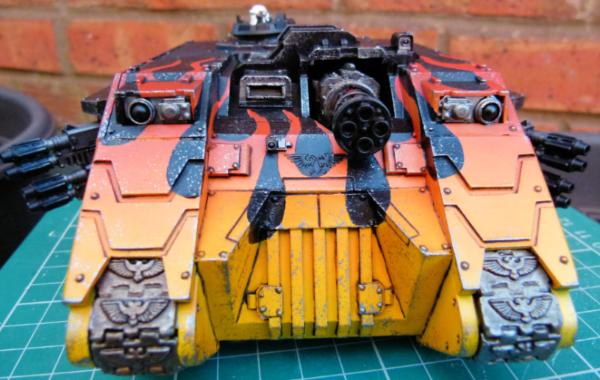
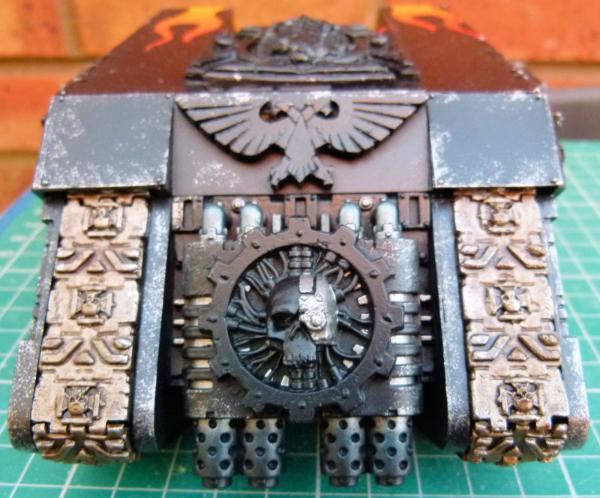
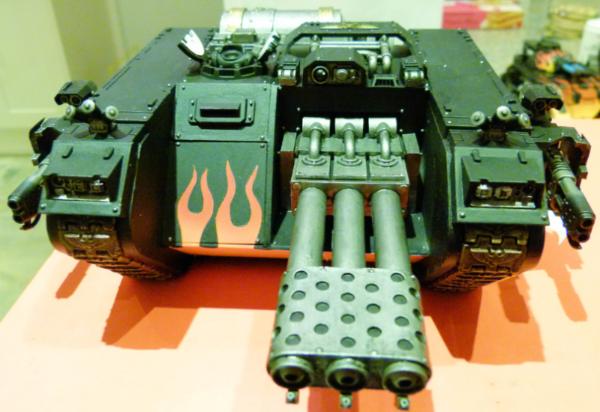
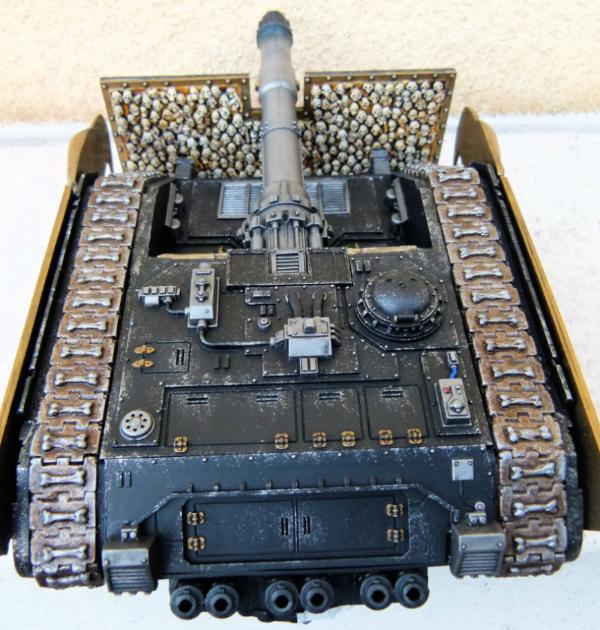
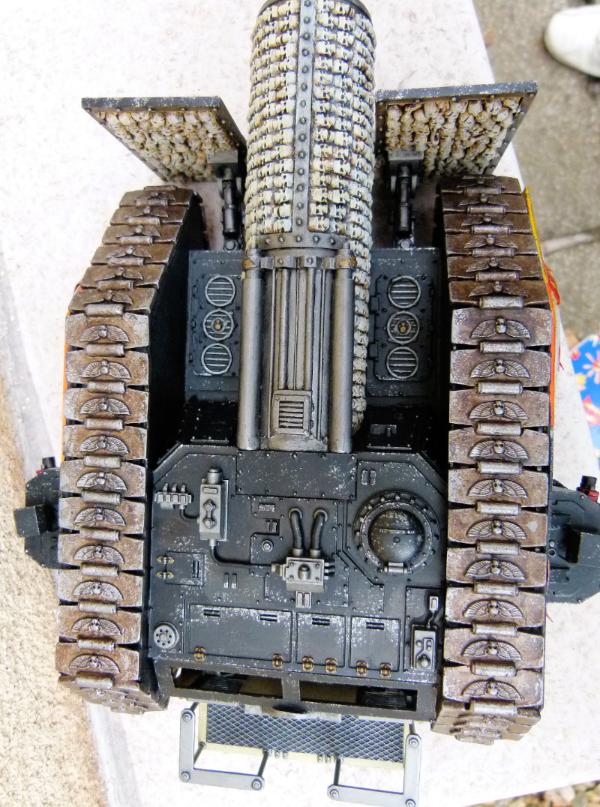
This shows the front view. I really had great fun making this. I hope I can do a decent paint job on it.
Can you guess what my next Land Raider/Fellblade conversions are going to be armed with?????
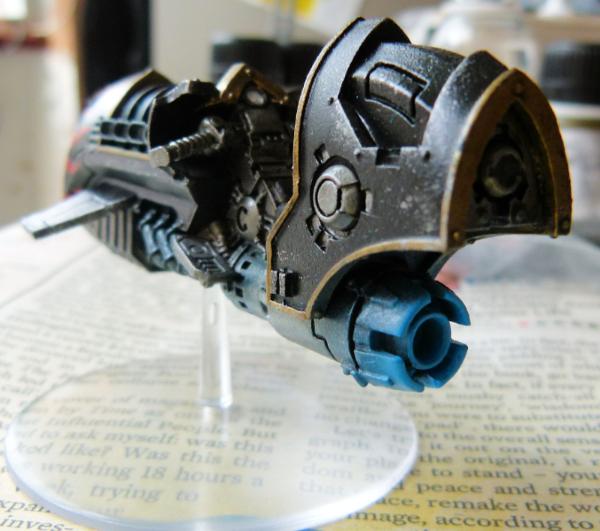
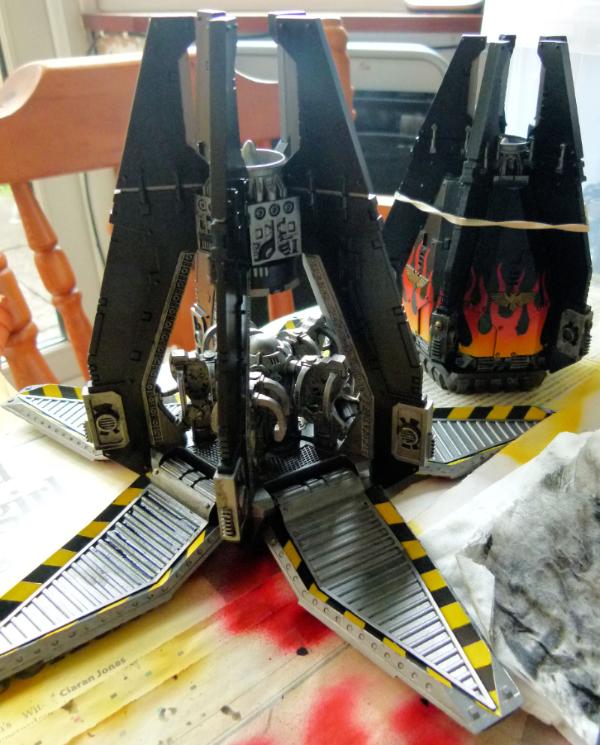
Storm Eagle
This is as far as I've gone on the Storm Eagle. I've undercoated it and have started to mask off the flames. Once fully masked, I'll use the airbrush to spray white to allow a good bright flame, followed by VMA Fire Red at the top of the flames, moving to VMA Orange in the middle and then finally VMA Medium Yellow at the bottom of the flames. Once cleaned up (using VMA Black), I'll varnish it and then add a black oil wash. After a turps clean up (and another varnish), a bit of weathering and this baby will be finished!!!!!!
Large Scale Space Marine Update
Completed all of the airbrushed flames and then tidied up the overspray with some VMA Black. I now have 4 sets of legs ready (1 running, 2 standing and 1 kneeling) for my next set of models. You can see the Mk5 Heresy Armour in the bottom left and the Plasma Cannon gunner in the bottom right.

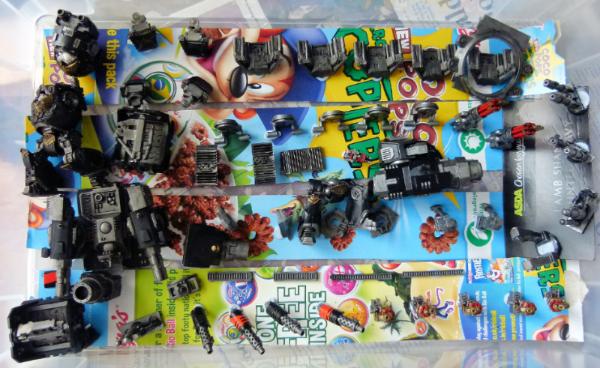
and finally.... my current paint station!!!
As you can see, I like to have a number of projects on the go. Working from the top left and working clockwise:
MK3 Iron Armour Large Scale SM
SM Stalker cannon
Large Scale SM Bolter and Chainswords
Contemptor Dreadnought Assault Cannons
MK6 Corvus Large Scale SM
Plasma Cannon Back Pack for the Large Scale SM
Plasma Cannon
Comments and critiques welcome as usual.
Regards, Phil.
|
|
This message was edited 1 time. Last update was at 2014/06/04 20:23:08
|
|
|
|
|
2014/07/01 21:17:07
Subject: Re:Philmorgan75's workshop blog - Legion of the Dead
|
|
Regular Dakkanaut
|
Update time:
Storm Eagle
Before I break out my airbrush, I try and get as many projects as I can to the same stage. Having cut out flame templates out of Tamiya Masking tape and then carefully placing them, I spray as many things as I can to stop having to clean the airbrush too often.
Here's what my Storm Eagle currently looks like:
Even when you press the masking tape down, a small amount of the white undercoat for the flames escapes. This is easy to clear up with a brush and some Vallejo Model Air Black. When I paint all the metal area with the Army Painter Gun Metal, I'll then varnish the whole model. This aids the oil black wash I put on the metal parts and to outline all the recess and rivets on the flames at the front and on the wings. I wanted this model's paint scheme to look slightly different from my Fire Raptor but to still look like it was built and painted at the same time. I added some smaller flames on the rear wings as well.
This shows the top view. I haven't gotten any further than this over the past week as I have been also working on other projects.........
I have slowly been painting up some of my older kits that I bought on different bits sites over a number of years and also some newer additions as well. You can see from left to right a mk2 Vindicator, a Land speeder Storm, a FW Legion Deimos Vindicator and a Deathstorm Drop Pod Missile Launchers.
This shows a top view of the WIP vehicles.
This shows the front of the GW mk2 Vindicator after a black oil wash and then cleaned up with odourless white spirit. You wouldn't want to be this close if it was firing!!!!
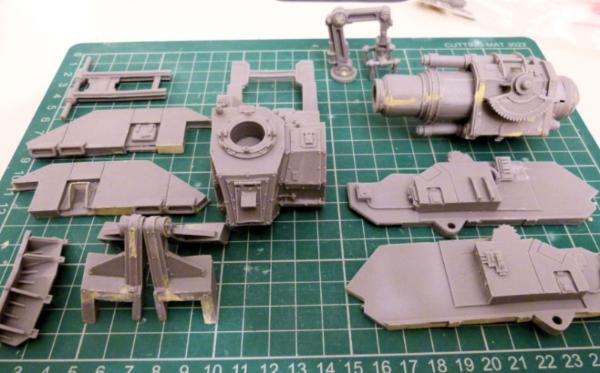
This FW Legion Deimos Vindicator was a lot of fun to put together. I've kept the Demolisher cannon, Storm Bolter, ram and gun mantle as sub assemblies to assist in painting. I've kept the tracks off and am in the process of converting them to create a more "loyalist" vehicle. I'll show some pictures in the future.
I want to paint the tips of each missile on the Deathstorm different colours to represent different munitions. What colours do you suggest?
This shows some more WIP shots of parts that have been black oil washed.
Working from the top, left to right:
Land Raider Ares
Large Scale chainswords, Bolter, knive and plasma cannon
Rapier Gun Shield
3 Vindicator Storm Shields with Hazard stripes.
Legion Deimos Gun Shield and ram
There's a lot of different project bits in this shot. Working from top left to right:
FW Relic Contemptor body, 4 Contemptor shoulder pads, some old Deathstorm drop pod Assault cannon bits.
FW Emperors Children Contemptor, Land Raider Ares sponson, Storm Eagle landing pads, more Deathstorm drop pod Assault cannon bits, SM Hunter cannon, 2 Kheres Contemptor Assault Cannons and 2 Storm Eagle Twin Lascannons.
SM Stalker cannons, LR Ares Demolisher cannon, Relic Contemptor legs, Vindicator Storm Shield bits.
LR Ares sponson, Legion Deimos Vindicator Demolisher cannon, Storm Eagle bits, Legion Deimos Vindicator exhausts and 5 Deathstorm drop pod Assault cannon.
As you can see, lots of projects on the go!!!
I've since cleaned up the black oil wash and have now matt varnished all of the bits. The next process is to begin the weathering process of sponging on silver and rust. The "hot" parts will have purple and blue washes followed by a blast of VMA black to create soot deposits.
A final project I'm working on as well.....
The front is a GW Drop Pod, whilst the one at the rear is a FW one.
I want to get all these models finished before my FW Legion Deimos Predator Executioner, Infernus, Legion Medusa and Anvillus Pattern Dread Claw arrive. Too many things and not enough time!
Regards, Phil
|
|
|
|
|
|
2014/07/05 06:18:52
Subject: Re:Philmorgan75's workshop blog - Legion of the Dead
|
|
Regular Dakkanaut
|
Update 5/7/2014:
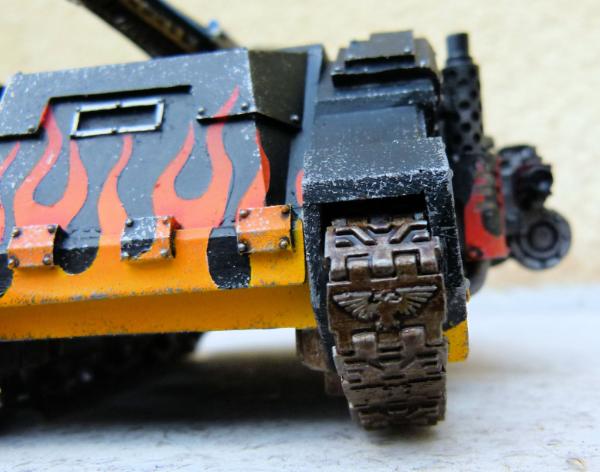
Thought I'd show you some of the enhancements I've made to the boring old Rhino tracks........
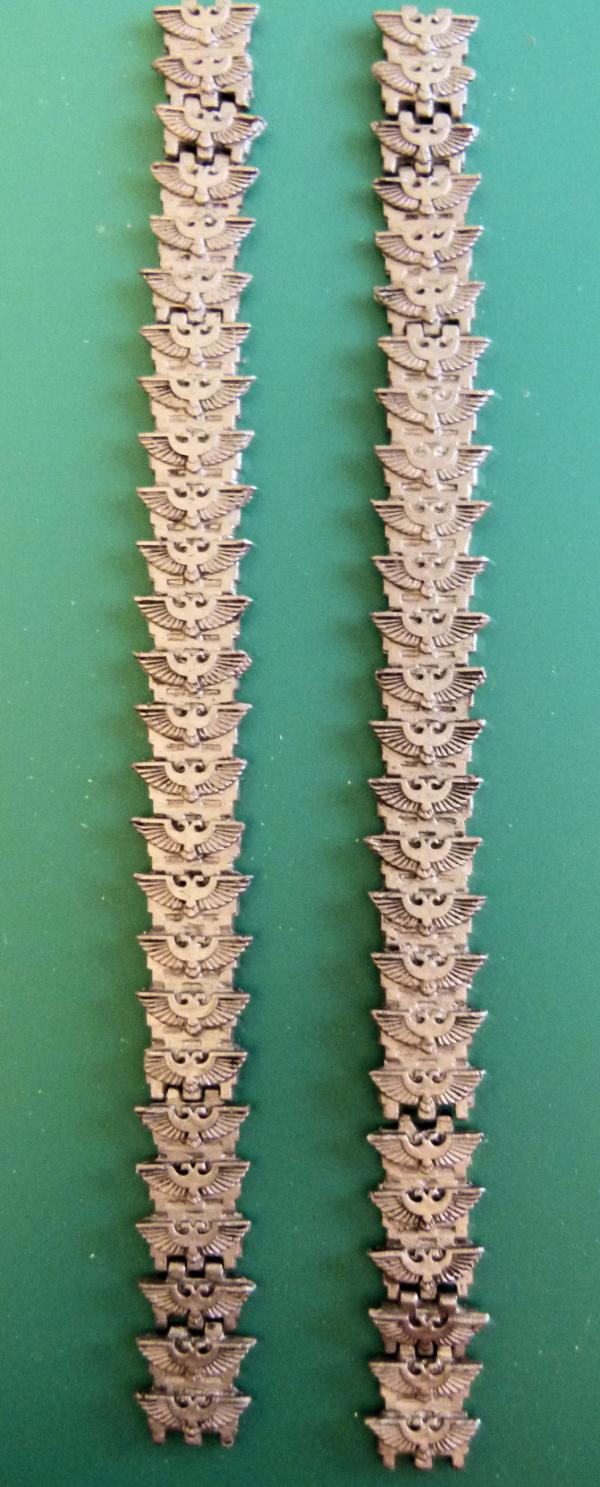
This has involved getting loads of Imperial Eagle Icons from Bitz suppliers from the Drop Pod and Storm Talon sets, filing off the existing tread and then sticking the eagles back on instead. I think they look cool and will really show all the xeno scum who has driven over their planet!!!
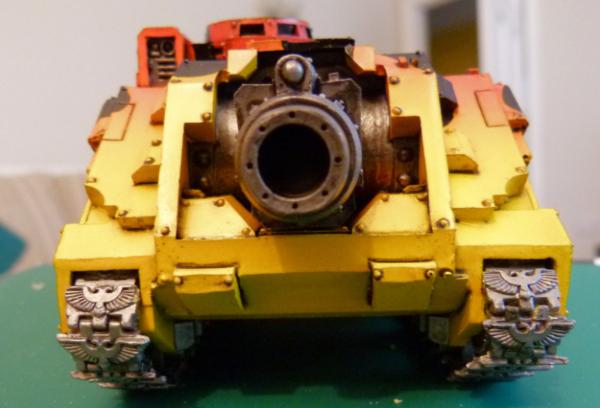
Here's what they look like fitted. I know they are impractical and there is no room for them to go around the wheels with the wings sticking out just a tad, but if you would just suspend your common sense for a moment, I think they look great.
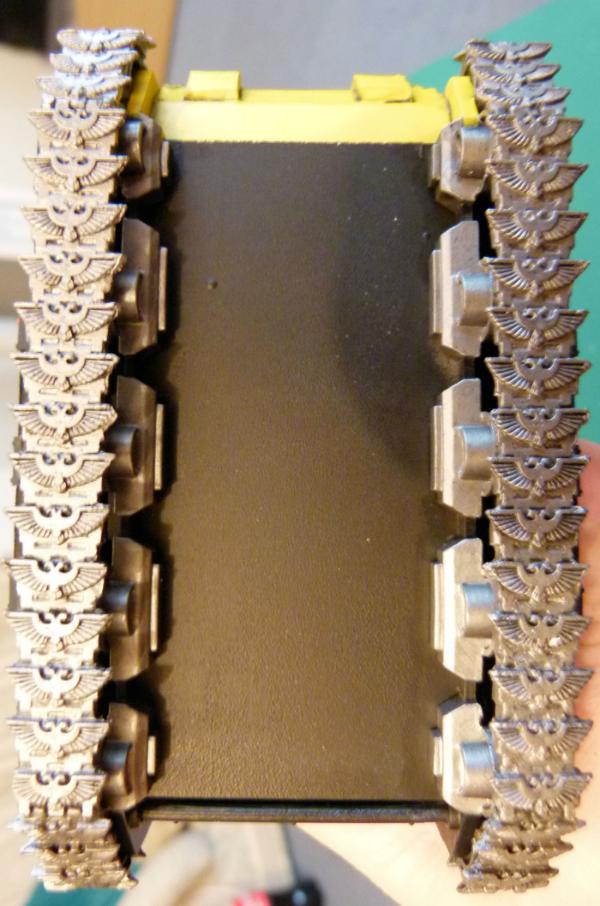
Here's a shot from the bottom. I'll put a Track Wash from AK Interactive over the whole tread, wheel and bogies and once dry, I'll varnish them before weathering them with sponged on gun metal and rust.
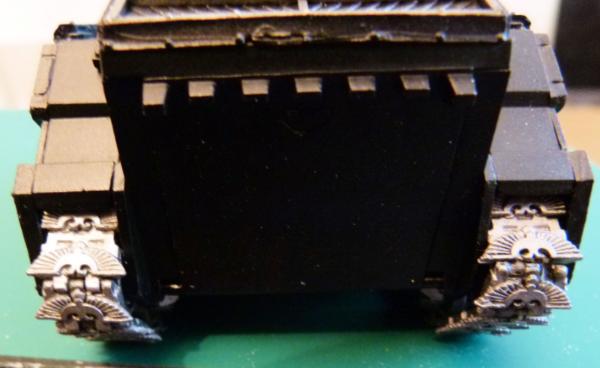
This shows the rear.
And finally........
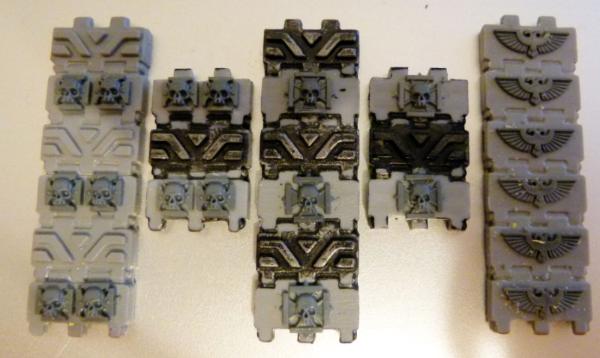
These are being made for my next 3 Land Raider Conversions. I'm just waiting on some more Imperial Eagles from Bitz suppliers to finish off the last couple of treads for the Imperial Eagles. I have some cool ideas for my next lot of conversions, one of which will be a Warhound Heavy Flamer to be fitted onto the Land Raider like the Malcador Infernus!!
Till next time.
Phil.
|
|
|
|
|
|
2014/07/10 20:40:18
Subject: Re:Philmorgan75's workshop blog - Legion of the Dead
|
|
Regular Dakkanaut
|
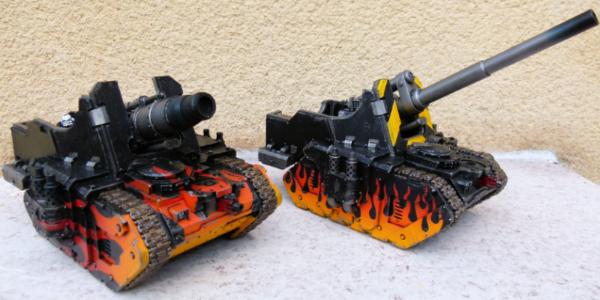
99% Finished my Demolisher Cannon Trio:
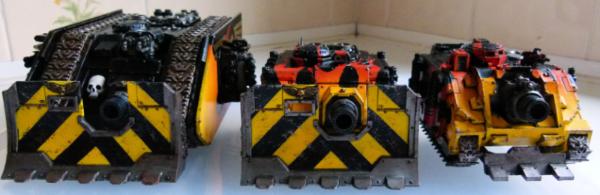
This is a group shot of my near completed Demolisher Cannon Trio: A Land Raider Ares, a Vindicator Mk2 and a FW Legion Vindicator. I love days like this. All the painting stages have almost been finished and I can start sticking all the parts together. The weathering was added last night with both rust and exposed metal sponged on. They were varnished this morning and now they are dry, I can take some pictures!
Land Raider Ares

When the Ares conversion was released a number of years ago now, I wanted to build one and rather than copying the design exactly, I wanted to create my own variant. I have always thought that the Land Raider looks very similar to the WW1 tanks and with that in mind, I wanted to see if I could have wrap around tank treads using only the GW version supplied from the box. I was torn between having my usual airbrushed flames over the shield or the Iron Warriors Hazard stripes. Having not tried the Hazard stripes before, I thought I'd give them a try. I think this has turned out really well. The Demolisher Cannon has been magnetised, allowing me to swap out weapons should I wish.
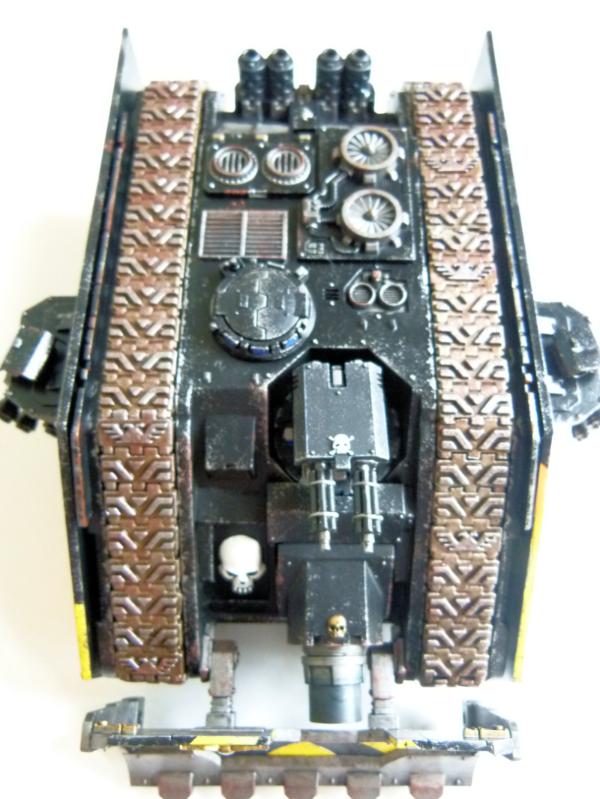
This slightly blurred shot shows the wrap around tracks to full effect. This was such an easy conversion involving minimum filing/sanding or cutting. To fill the top and to make it a bit more realistic, I added Vindicator and Baneblade engine parts/covers. The hatches are not glued as the plan is to get some Mk3 helmets and have a commander poking his head out of this monster! The assault cannons were recycled from another LR I made years ago. I normally have the barrels painted red, so a minor paint job will be done some time in the future.
I love the side views on this conversion: Imperial Eagle cloaked in flames!!! The Imperial Eagle was simple to make: find an Imperial Eagle image on the internet. Print off. Photocopy at different sizes e.g. 50% or 200% etc. Find an Imperial Eagle of the right size to fit the side of the Land Raider. Using sellotape, stick the paper on top of sheet of the right thickness plasticard. Using a scalpel, lightly trace the Imperial Eagle on the paper through to the plasticard. Remove the paper and there should be an outline that can then be cut out. Simple technique, but very effective.
The sponson has rectangle magnets mounted on them, which means the sponson weapons can be changed if required.
The rear shot. I decided to do both the heat and soot on the exhaust stacks out of pigments - I'm not 100% taken and may revert back to blue/purple ink and a quick blast of black from the airbrush.

Here's the left side.
and finally a shot that shows most of the conversion. I built this in 2009 and it took me 5 years to paint it. Not bad eh!!!
Vindicator Mk2
I've had 2 Vindicator Mk2 in their boxes for a couple of years and when I received my new FW Legion Vindicator, I thought it would be fun to make and paint both at the same time. I decided to go with the same Hazard stripes as the Land Raider Ares.
This shows the top view, with the flames covering the front part of the vehicle. I photocopied my airbrush flame template, increasing and decreasing it in size. I have then made a number of plasticard templates so depending on the size of the vehicles, I can have different size flames. Once I have chosen the template, I trace the flames onto some Tamiya Masking tape and once cut out, press onto the necessary parts ready for an airbrushing!!! As with the LR Ares, the Demolisher Cannon was magnetised. I want to be able to convert this into a Sabre Tank Destroyer in the future. I'm watching ebay to see if any FW Tank Hunters come up for sale.
This shows the completed right side. I wish I added the brackets for the Siege Shield before I painted the flames down the side. I only realised this morning when I was gluing the pieces together that the bracket goes right over the painted flames!!
This is the left side. I added a skull to the side. I can't have any vehicles of mine without at least one skull on it!!
I added a Rhino hatch fitted the wrong way around to the rear hatch. I felt that every time the cannon fired, there would be tonnes of gas that would need to be vented. The inside of the Rhino hatch looks perfect. The completed Imperial Eagles tank treads can also be seen in this shot.
Legion Vindicator
I've almost finished this Vindicator but cannot decide what to do with the Gun Mantle Shield. I currently have it painted all yellow to match the flames BUT I'm torn between leaving it like that or adding some Hazard stripes like on the Mk2 Vindicator and LR Ares.
This shows the top front. The top hatch hasn't been glued. Again, a Mk3 SM commander will be added some time in the future.
The right side flames were deliberately "flowed" over the exhausts.....
....as were the left.
These three vehicles were fun to put together, but now I can now start thinking about the next group of models I wish to paint.
Till next time, Phil.
|
|
This message was edited 1 time. Last update was at 2014/07/10 20:53:11
|
|
|
|
|
2014/08/04 21:34:38
Subject: Re:Philmorgan75's workshop blog - Legion of the Dead
|
|
Regular Dakkanaut
|
Quick update time:
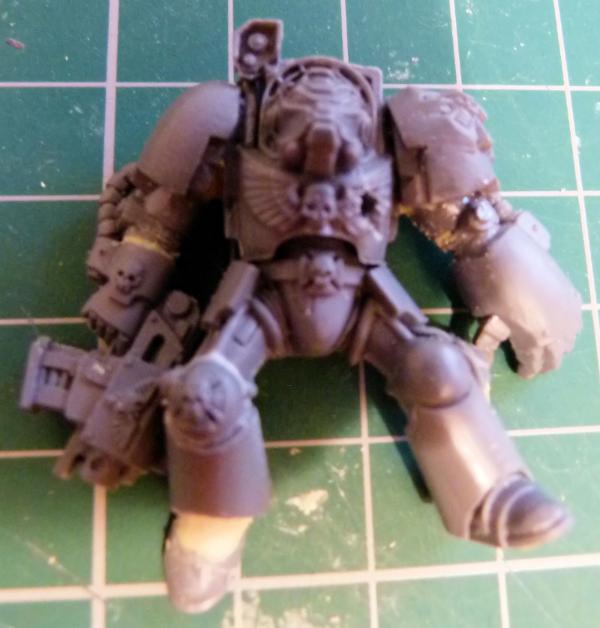
I finally got around to converting some dead Terminators from Assault on Black Reach that I had not built to go with the Tactical, Heavy Support, Assault and Scouts I've previously made:
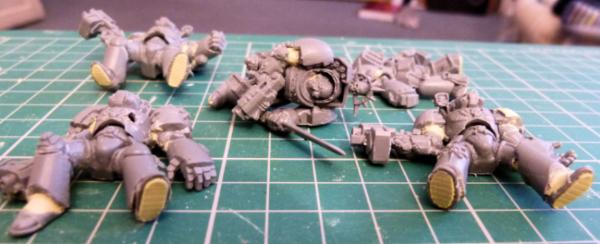
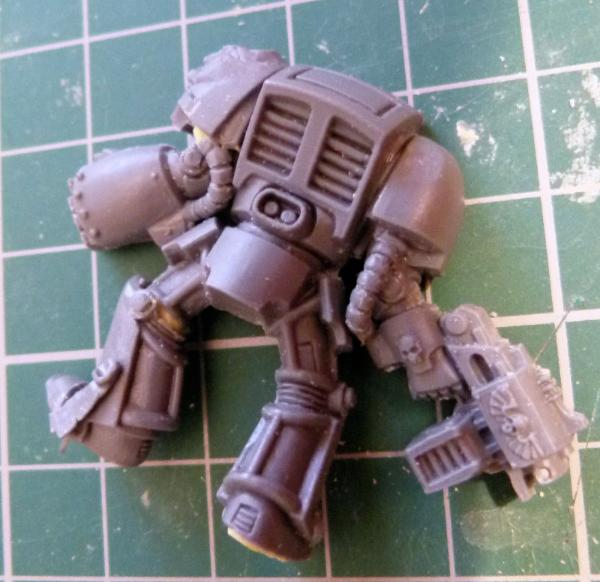
I had some fun chopping the back/front off torso's and moving legs and arms. I used a bit of milliput to hide any obvious cuts. The Terminator in the top left hand corner is supposed to be on the way down after being shot and not laying flat.
Here's a plan shot.

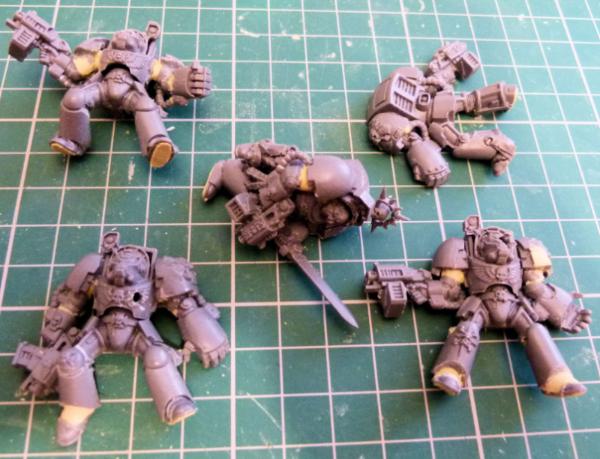
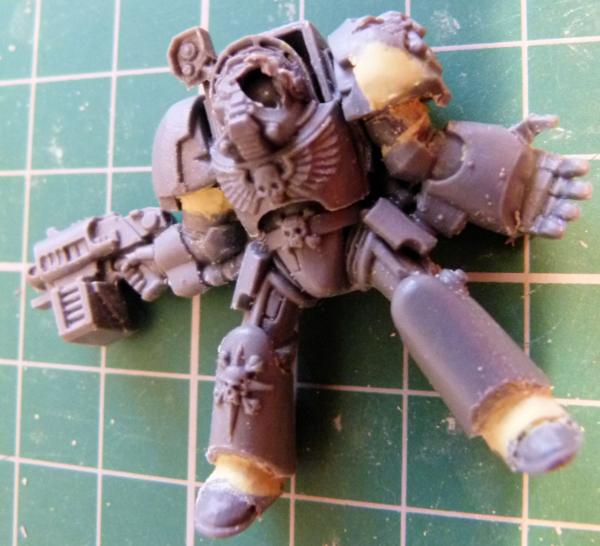
This Sergeant has been psychically killed with no signs of wounds. Bending the leather tassles dangling between his legs were a nightmare!
Lascannon shot to the primary heart.
Though it's difficult to see, I added a plastic skull into his mask.
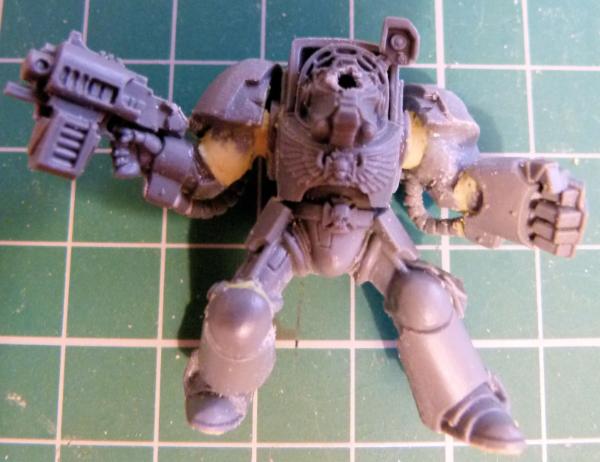
This head shot has just knocked him off his feet.
Face down in the dirt!
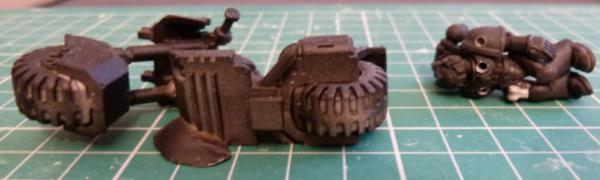
and finally, a dead biker.
It'll probably be a while before I get some paint on these boys! Till next time, Phil.
|
|
|
|
|
|
2014/08/05 20:48:51
Subject: Re:Philmorgan75's workshop blog - Legion of the Dead
|
|
Regular Dakkanaut
|
Couple of updates today........
Trike Attack Bikes
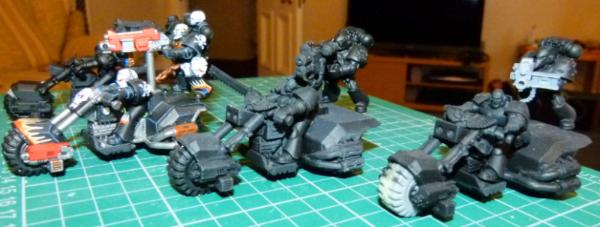
I was never happy with the GW Attack bike! So I thought Trikes were more practical. I made these a number of years ago and when I was tidying up some of my boxes of models, I came across them and thought I'd show them to you. As you can see, I've only painted the one so far. The rest will need to be added to my "to be painted" box!
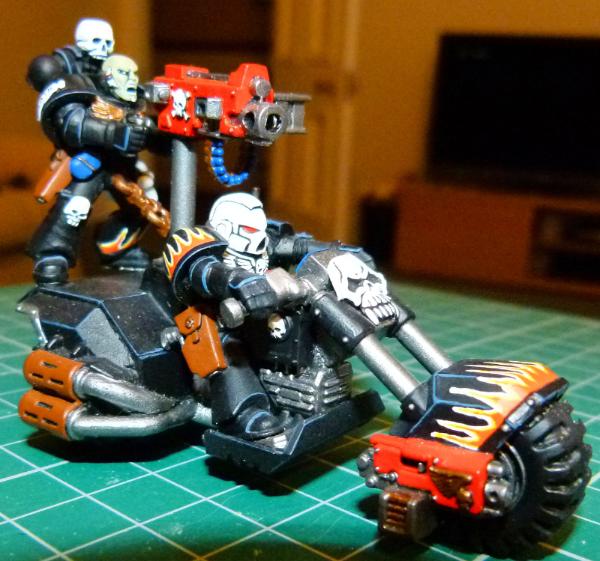
The paint job was done 5 years ago now so I need to add weathering effects and repaint the exhausts with my usual blue and purple ink followed by a light black airbrush for soot effects. All of the heavy bolters/multi melts are magnetised so they can be stopped depending on mission requirements.

I added a chain to ensure the Heavy Weapon operator doesn't fall off the back of the bike. I like the "Chopper" look and all my bikes have had their fronts lengthened.
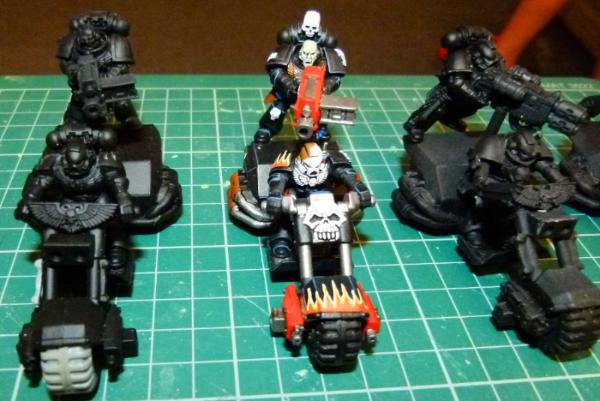
The 3 new ones have Imperial Eagles over the handlebars. I don't know if I will be able to make many more as I'm running out of Rhino Mk 1 headlights that I use on the front handlebar.
Legion Medusa/Basilisk
I love this model!!! I had to use a bit of milliput to repair some minor defects and to emphasise that my Space Marines are loyal I added a lot of FW Etched Brass Imperial Eagles to each individual track! Now they have had a layer of black undercoat, I'm not sure how easily you'll be able to see them. I haven't stuck the Siege Cannon at this stage as I want to be able to field it as a Basilisk as well.
Although the kit had some issues putting it together (some parts needed bending/straightening) and a small amount of milliput I think with the right amount of weathering that this will turn out to be one of my better paint jobs. I like it so much, I've ordered another!!!
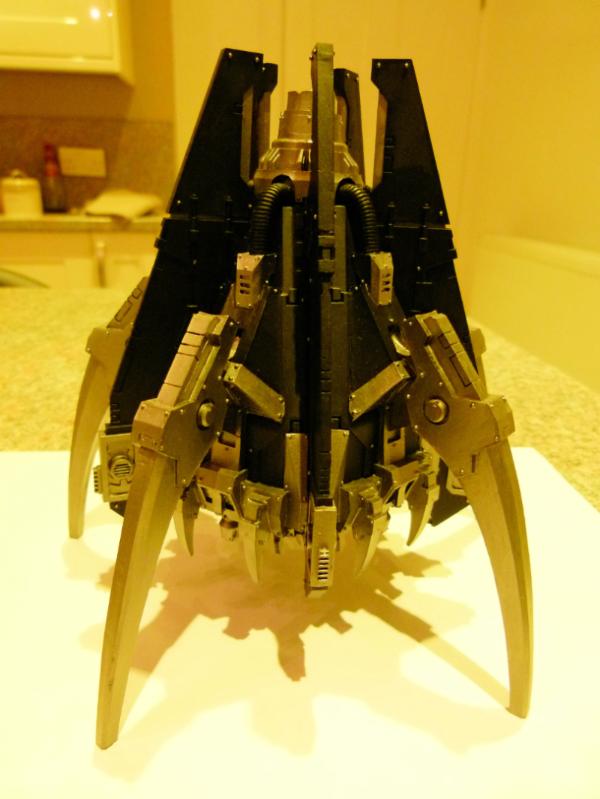
Anvillus Pattern Dreadclaw Drop Pod
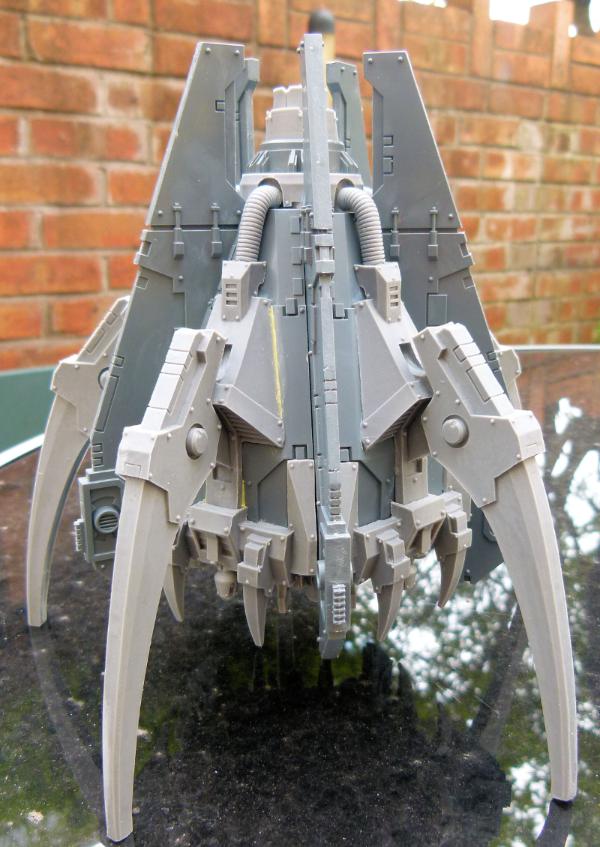
This model had again a small amount of corrective surgery to get it to this point but what a model! I think the model looks far superior to the normal GW version. I've since base coated it black and am now thinking about what paint scheme I'm going to do.
You don't want to see this coming at you! It reminds me of a face hugger from Alien for some reason! Milliput was needed to hide a few gaps between the resin and plastic hatches.
Land a Raider Crux
As with previous conversions, I have reversed the normal Land Raider (ie make the front the back and vice versa). Using plasticard, FW bits, titchytraingroup rivets and milliput, I have made this version.

This shows the plan view. I want the usual airbrushed flames to go all over the front and sides before a bit of weathering takes place.

This shows the right side. The front of the LR is on the right, with the rear on the left. I haven't added the sponson yet as I wish to magnetise it to ensure I can swop weapon payloads.
The rear has had the engine reversed with the usual Cities of Death Adeptus Mechanicus logo added. The Imperial Eagle is an old Bulldog Battlegear badge I had bought years ago.
And finally, something for the future - I want to make an Anti Aircraft LR. These Stalker weapons will be mounted on the top (one towards the back and one lowered slightly in the front). I'm also thinking of getting 2 FW Hyperios Whirlwind to use on the side sponsons. We'll see how this idea progresses in the future. I have also just finished undercoating a Lascannon Javelin and a Deimos Predator Executioner. So many projects, so little time!
Till next time, Phil.
|
|
|
|
|
|
2014/10/10 20:55:45
Subject: Re:Philmorgan75's workshop blog - Legion of the Dead
|
|
Regular Dakkanaut
|
Update time:

Here's a group shot of what I've been working on over the past few weeks. These are all at the stage now for a blast of matt varnish followed by a coat of black oil wash to start the weathering process.
I've decided to go with a plain black paint job on this one. I would prefer to have the usual flames airbrushed going up all of the walls but after the corrective milliput required to fill the gaps, it would be nigh on impossible to use the airbrush on this one. I still think this is a fantastic looking model BUT I'm really not sure where I am going to store this when I'm done as it's so damned HUGE!
I've finished painting the base colours on the Storm Eagle, painting all the over spray from the airbrush. This bird is going to look so cool when finished!
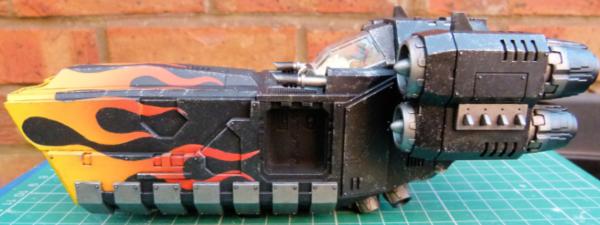
I originally painted this Tempest around 12 years ago. To make it match my current colour scheme, I masked some flames and again used the airbrush. Once its been matt varnished, I'll do a small amount of sponged on weathering and this one will be put to bed.
This Legion Medusa is going to look great when done. Airbrushing the flames over the front was a royal pain in the bum! Lots of blu tac was needed to mask the area for the flames over all the lumps and bumps.
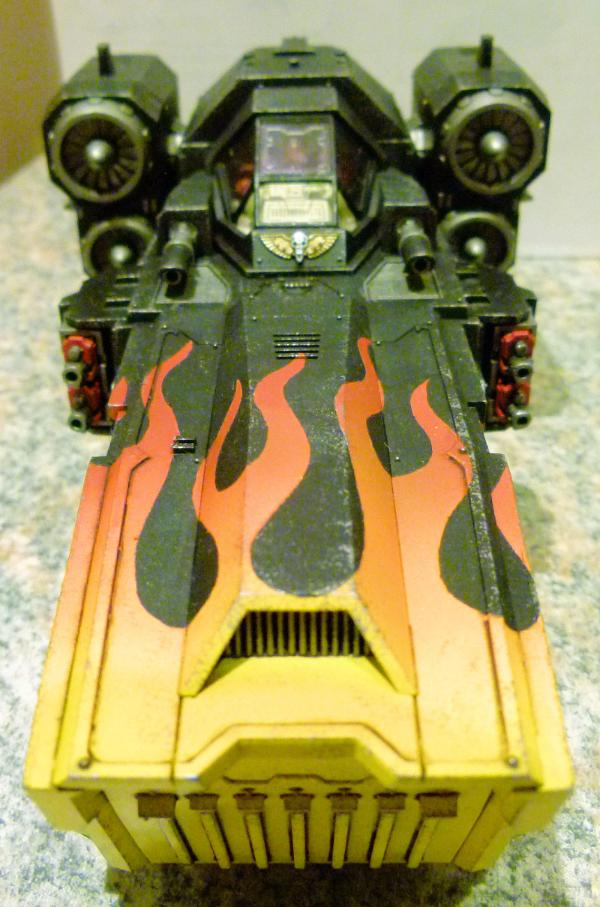
Here's what the front looks like.
This is the progress I've made on the Legion Javelin.
This shows what I've done with Alpha Achilles....
.... and my second Assault Land Raider.
I plan on magnetising all the weapons on this Deimos Predator so all payloads will be available when required.
This shows the work I've done on the different Whirlwind weapons. I have the old metal Whirlwind rockets to paint somewhere and plan on getting a Deimos Scorpius in the near future (funds permitting!!!)
.....and finally, here are all the other bits that have been base coated and awaiting matt varnishing followed by a black oil wash weathering. The drop pod parts will be used to make a Death Storm Missile Launcher Drop Pod.
So many projects to finish BUT as I am doing them all at the same time and they are all at the same stage, it means they all get finished at the same time - a huge reserve of troops for my Legion of the Dead!!!
Till next time, Phil.
|
|
|
|
|
|
2014/10/26 07:23:06
Subject: Re:Philmorgan75's workshop blog - Legion of the Dead
|
|
Regular Dakkanaut
|
Progress time:
I've oil washed all of the models in the previous updates, cleaned up the excess and allowed to dry for a number of days. The tanks have all had a track wash painted onto their tracks and again, allowed to dry for a couple of days. Once it stops raining, I'll give everything a coat of matt varnish before I move onto the sponging weathering effects I normally do.
In the meantime, I have joined Bolter and Chainswords Conversion Challenge "Treadheads and Fly boys" and have started work on 2 new Land Raider Variants to be constructed by 2/12/14.
I have a Flak Land Raider and a Land Raider Infernus:
Flak Land Raider
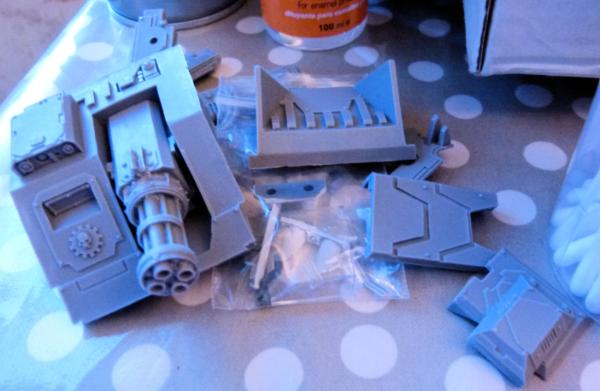
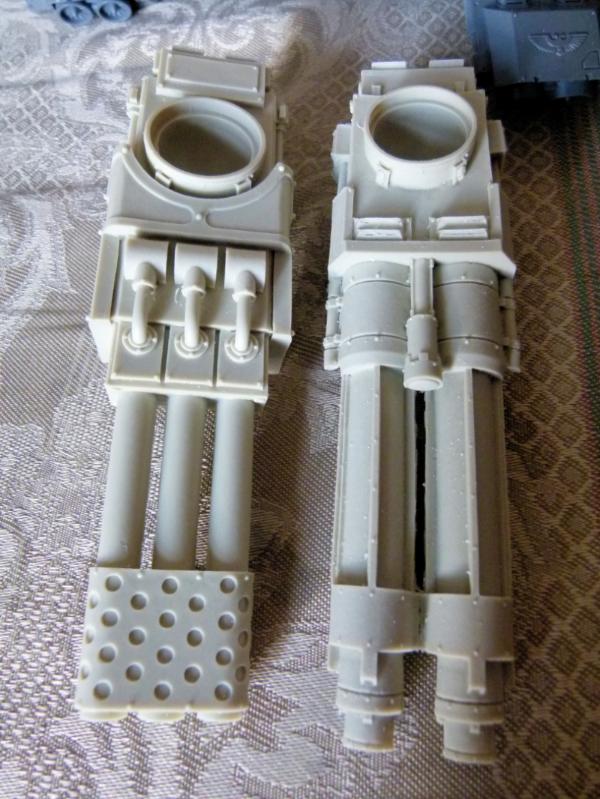
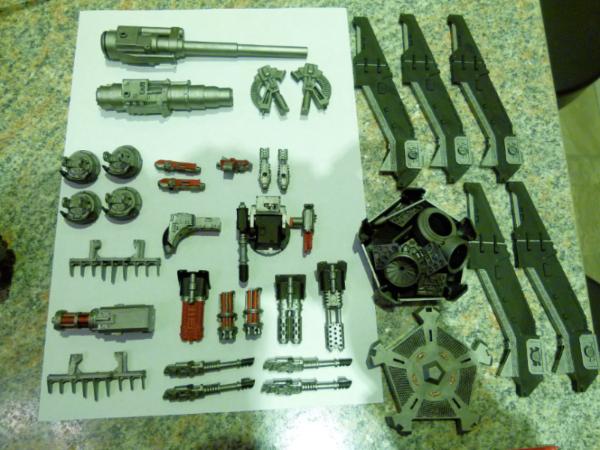
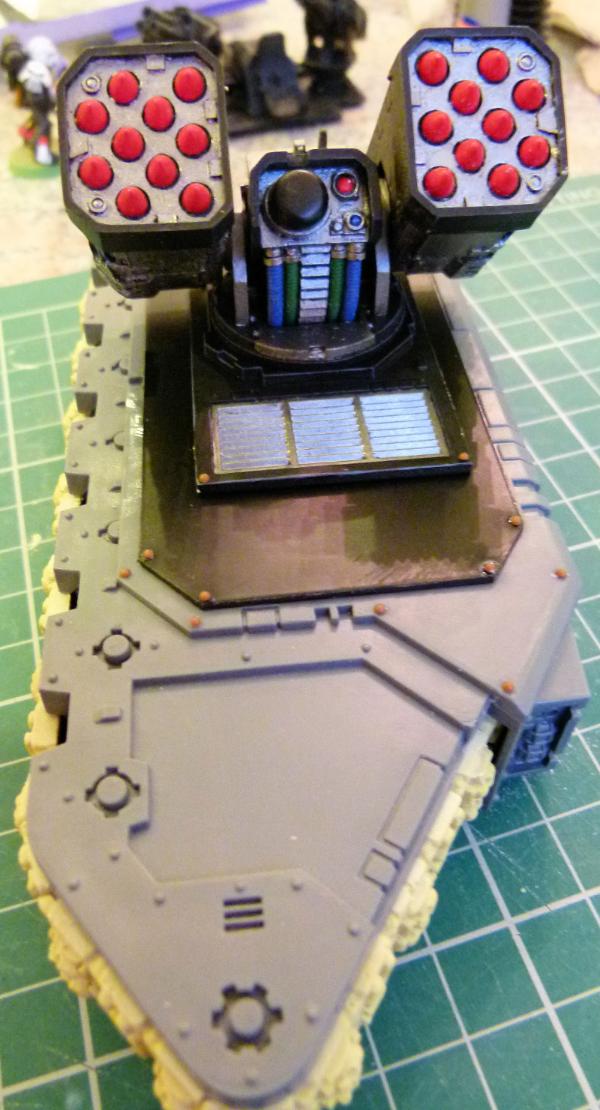
Here's a group shot of most of the parts that will be going onto my Flak Land Raider. I plan on having 2 sets of Stalker weapons on the top, 1 slightly higher than the other and for sponsons, I have 2 sets of Hyperios Missiles and (not in the picture) 2 sets of Razorback Assault Cannons. I'm undecided which to use, so I will magnetise them both! This Land Raider will be the usual shape and not the WW1 look I give some of my other variants.
Land Raider Infernus
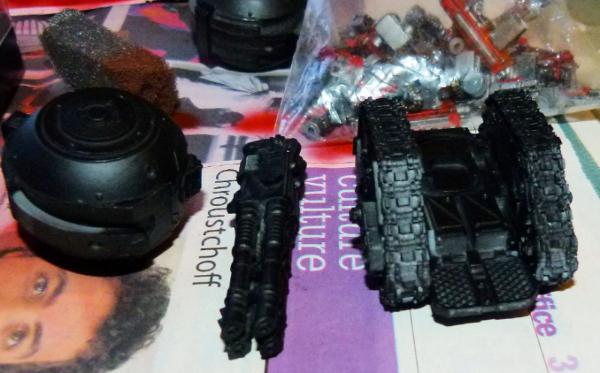
This will be based on the Malcador Infernus. I managed to get a Warhound Inferno cannon on ebay and have been planning this for ages. The Treadhead competition has given me the impetus to start this variant.
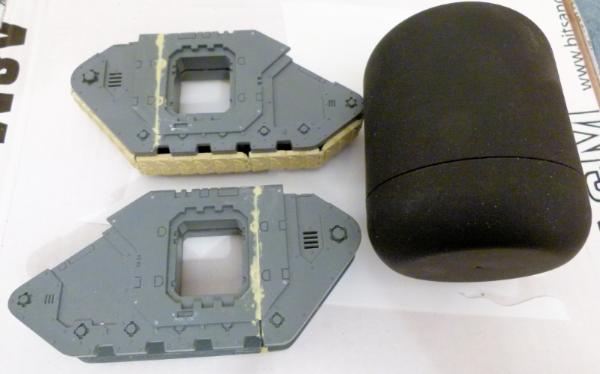
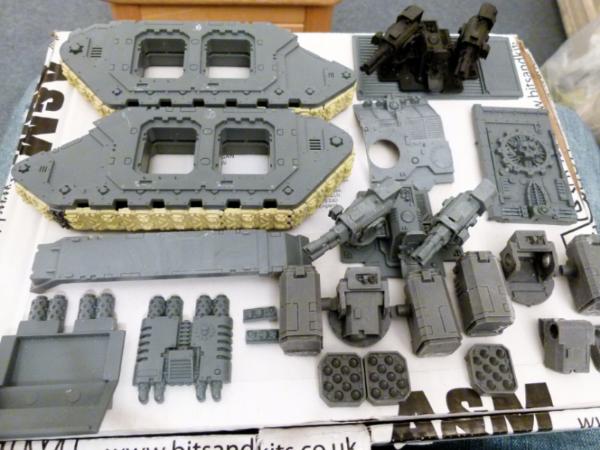
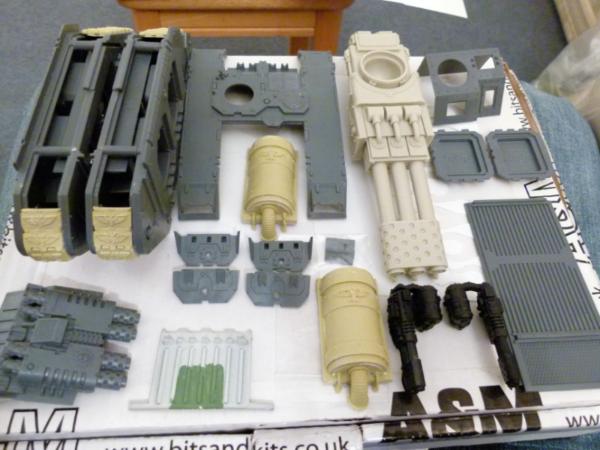
This is the Trailer containing the majority of the fuel. These were left overs of my Spartan conversion (which I still haven't finished!). I think the Tank looks to big, with the trailer being to wide compared to the Land Raider, so I plan on finding something smaller. I have my eye on a Q-Tip container and will pick one up later when I go shopping.
I'm really happy with the progress so far. I have a couple of days holiday for the next few days, so I hope to have both constructed by the end of the week.
Till next time, Phil.
|
|
|
|
|
|
2014/10/26 11:07:52
Subject: Philmorgan75's workshop blog - Legion of the Dead
|
|

Regular Dakkanaut
|
Awesome work on the tanks/vehicles 
Also like the large scale marines..did you built them from scratch?
Keep up the good work!
Grtz
Mark
|
|
|
|
|
2014/10/27 19:11:15
Subject: Re:Philmorgan75's workshop blog - Legion of the Dead
|
|
Regular Dakkanaut
|
I've made some progress on my Flak Land Raider:

I spent a couple of hours today completing both sides of the Land Raider. I added a rhino/predator/razorback part to allow all different turrets to be used if needed. I added rivets from tichytraingroup to give a more realistic look.
This is what it looks like in the correct upright position.
I added 3 neodynium magnets to the inside of the rhino/predator/razorback part to allow all different turrets to be fitted. You can see the 2 neodynium magnets I added to the bottom of the FW Whirlwind Hyperios part which will allow the part to rotate and still remain attached to the side of the Land Raider.
Here's a shot of a finished Whirlwind Hyperios mounted on the sponson.
This shows the start of the chassis construction. Plasticard has been used to allow the body to be slightly widened to allow the Stalker weapons to fit. The inside of the sides have had all the moulded on parts removed and a very thin layer of (white) plasticard was attached. At this stage I do not know where all the front armour and what angle they will be attached at, so blank white plasticard is useful to give a finished smooth armour look.
I want to add magnets to the stalker weapon systems so I'll have to give some thought of how to do that. I also am thinking about the direction of the rear stalker weapon systems - Should the radar dish be pointing backwards or like the front stalker weapon systems, pointing forward? What does anybody else think?
I've got the sides of the Land Raider Infernus finished as well, but I have put that on hold until I finish the Flak Land Raider.
Till next time, Phil.
|
|
This message was edited 1 time. Last update was at 2014/10/27 20:53:44
|
|
|
|
|
2014/10/31 08:34:35
Subject: Re:Philmorgan75's workshop blog - Legion of the Dead
|
|
Regular Dakkanaut
|
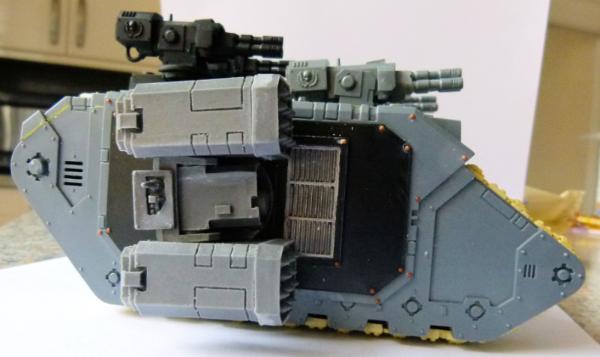
Flak Land Raider
I managed to finish my Flak Land Raider yesterday that I'm building for Grotsmasha's Vehicle competition over on Bolterandchainsword.....
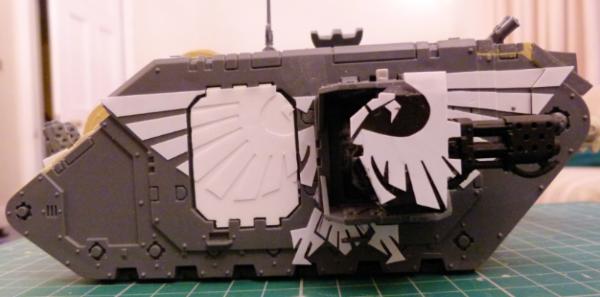
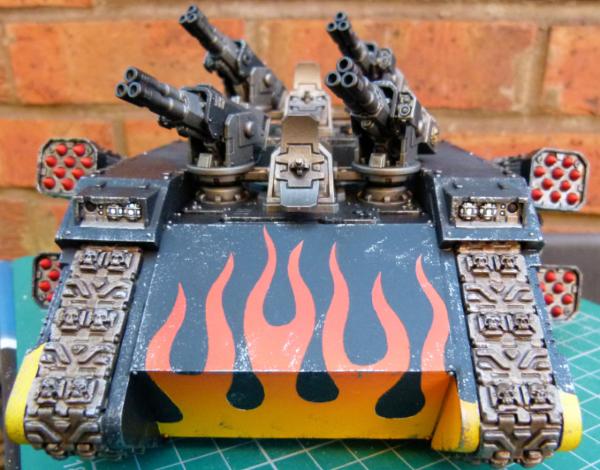
 Front
Front
To ensure air supremacy, a SM commander can request for a Flak Land Raider to accompany his troops on any mission (taking up 1 Heavy Support slot).
From the front, you can see the Twin Stalker Weapons mounted on top and the FW Whirlwind Hyperios sponsons to shoot any enemy threat out of the sky. I added magnets to all of the weapons to allow swopping but also to assist in storage.
The front has been left blank to assist with the airbrushed flames that will in the near future be covering it. Milliput has been used sparingly to fill any gaps and to smooth out any bumps/holes.
Left Side
You can see the different heights of the Stalker weapons in this shot. The front Stalker weapons were fitted lower to ensure enough clearance for the rear Stalker weapons to fire directly horizontal to the front. I also ensure enough clearance for the Hyperios Sponson to be able to swivel a full 360 degrees on magnets as well. Rivets were also added for more realism.
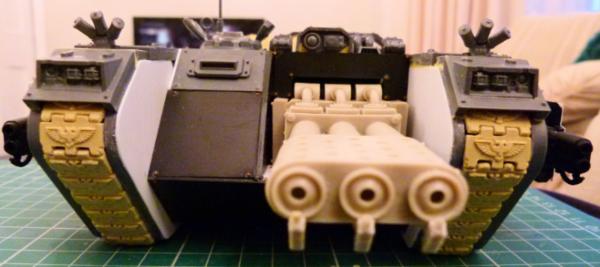
Rear
I shortened the width of the engines before sticking a Mechanicus symbol from the Cities of Death kit to show the close ties my "Legion of the Dead" have with their Martian friends. As I could not fit any hatches anywhere else on the model, I added one to the rear to allow crew etc to get into the vehicle. I added some feet holes as well to assist the crew in getting into the vehicle.
Right Side
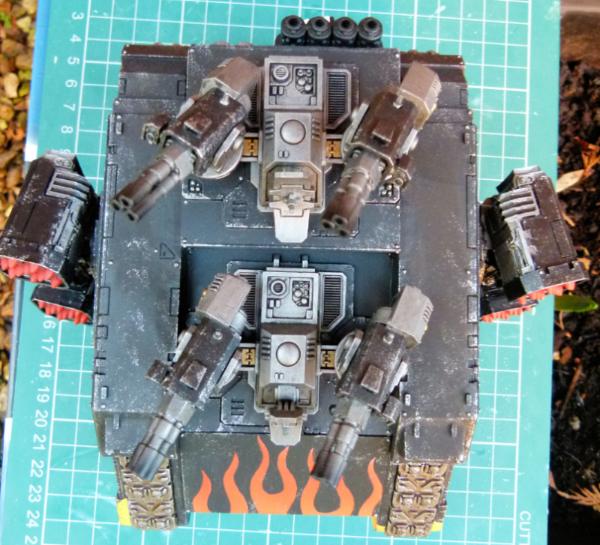
 Top
Top
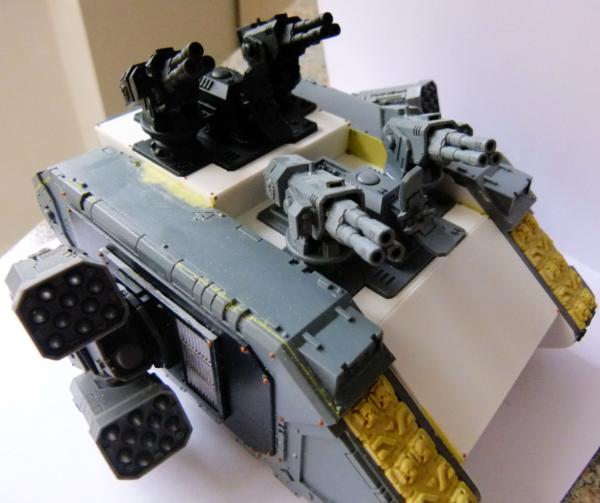
I really enjoyed making this model and it came together really quickly as I had everything I needed ready to go to build it. I keep a record of vehicle conversions I want to make in the future and then keep a record of parts I need to get to achieve it. I regularly keep an eye out for bits on different sites and overtime, buy all the parts for the new projects. Eventually, I can then go ahead and build my variants....

........ and to show another variant, FW Razorback Twin Assault Cannons. Think of the amount of bullets coming out of this vehicle!!!
I've washed all the resin parts and am waiting for some nice weather to be able to go outside and undercoat the whole of the model. I'll show some painted shots (hopefully) in the near future.
Land Raider Infernus
I'm well on the way to finish the structure of this vehicle and will post some pictures later.
Any questions, please feel to ask.
Regards, Phil.
|
|
This message was edited 1 time. Last update was at 2014/10/31 12:03:47
|
|
|
|
|
2014/11/02 16:43:37
Subject: Re:Philmorgan75's workshop blog - Legion of the Dead
|
|
Regular Dakkanaut
|
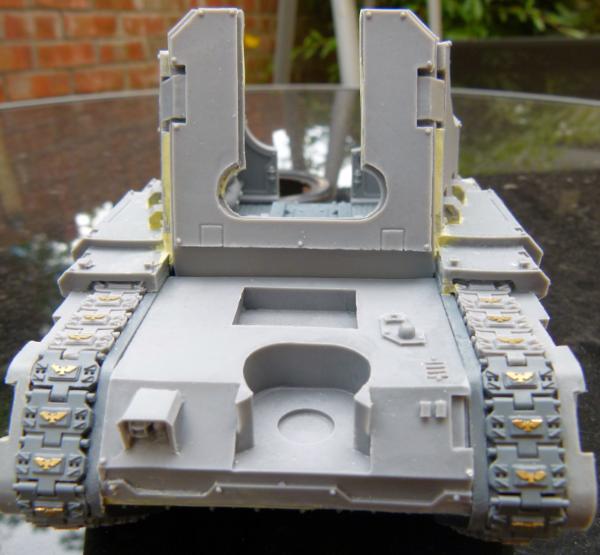
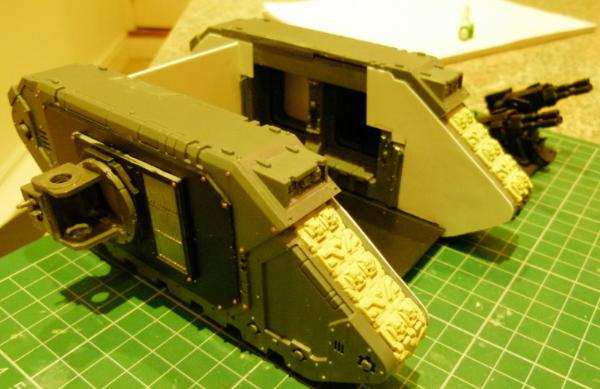
Land Raider Infernus
Thought I'd show the progress I've made on my Land Raider Infernus I'm building for the Treadheads and Flyers challenge on Bolterandchainsword:
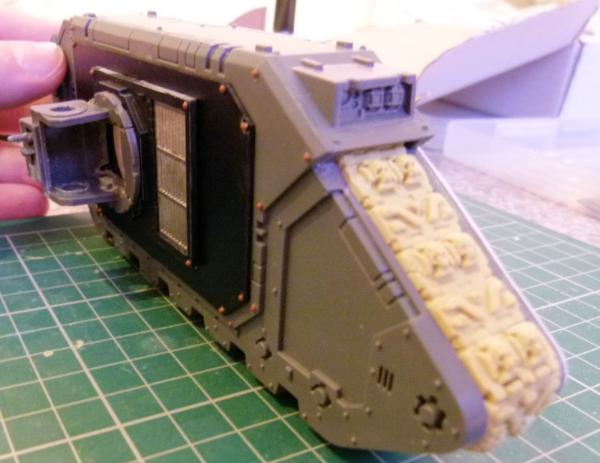
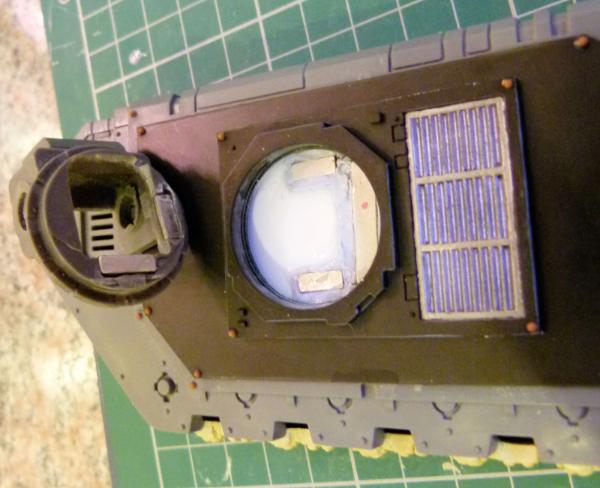
This shows the Top Front view. The tank commander is currently headless (not a carry over from halloween honest!!!) as I always paint my helmets white and when I undercoat the vehicle in black, it takes lots of coats of white to get the required finish I want.
I used bits from the IG Valkyrie, Hellhound and Baneblade on the top and front as well as lots of plasticard to make this look a practical vehicle. I'll add a large milliput skull in the space on the large black plasticard area under the tank commander after I've painted the vehicle.

This top view shows the original GW grey parts and the new converted bits. The antennae has been magnetised to aid in storing.
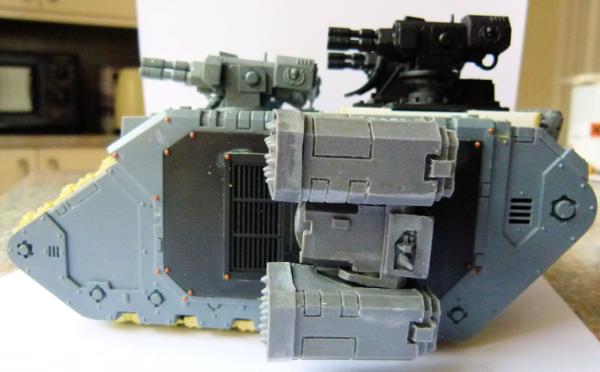
To show my Legion's loyalty, I added large plasticard Imperial Eagles over both sides. These were fun to make but very time consuming to attach to the vehicle. I've tried to carry the eagle over the sponson armour as well.
This shows the left side.
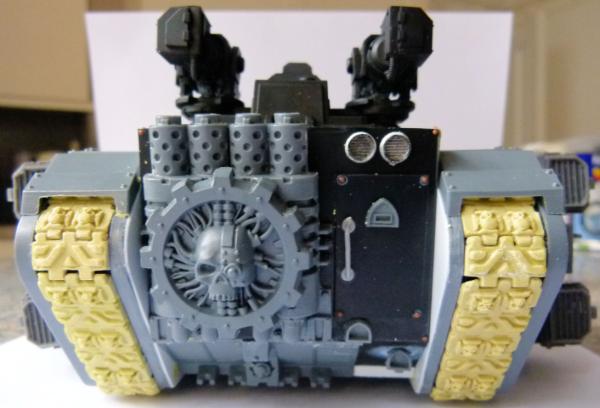
The rear was problematic. There needs to be engines and exhausts to power the vehicle, but I also want a large pipe connecting the large fuel tank trailer to the Infernus as well as another way of attaching the 2 vehicles together. I'll use the 2 converted turret hatches as the connection points for the 2 pipes and the 2 vehicles.
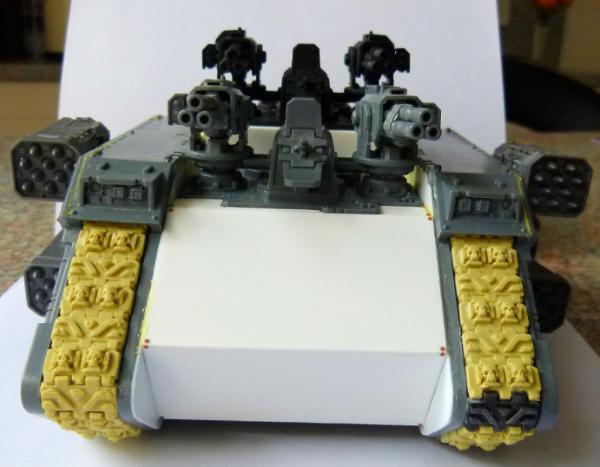
A final view of the top front. I need to add a small amount of milliput to a few gaps and the Infernus will be finished and ready for undercoat. I'll now move onto the Fuel Tank trailer. I plan on getting the Green Stuff Tentacle/pipe maker as well to use on this vehicle, I just hope that it doesn't take that long to arrive from Spain!
Till next time, Phil.
|
|
|
|
|
|
2014/11/02 18:14:42
Subject: Philmorgan75's workshop blog - Legion of the Dead
|
|

Ragin' Ork Dreadnought
Deep in the Outer Boroughs of NYC
|
That's quite a stunning conversion.
|
|
|
|
|
|
2014/11/09 09:34:59
Subject: Re:Philmorgan75's workshop blog - Legion of the Dead
|
|
Regular Dakkanaut
|
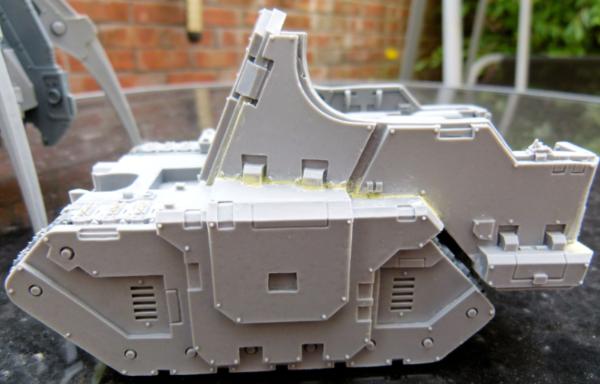
Almost finished my Land Raider Infernus:
Unlike the Malcador Infernus, I didn't want a wheeled fuel trailer and went for a shortened Land Raider Chassis instead. This was made from the remnants from my Spartan conversion (which I started 2 years ago and still haven't finished!!). The white plasticard was used to hide all the cut marks on the original Land Raider parts. The exhaust isn't stuck on yet as I want to paint yellow and black hazard stripes over the whole white plasticard area and painting around the exhausts would be difficult.
This top view shows what I did with the Q-tip container. I added 2 bands of thin plasticard and some spaced rivets to make it realistic. I also added a top viewing hatch to allow access to the promethium fuel in the tank. You can also see the milliput I used to fill the gaps between the top and sides as there were lots of different holes that needed to be smoothed out.
This is the rear. I tried to make some cogs to go around the edge of the tank to emphasise the legions strong links with the Adeptus Mechanicus. A couple of spare parts were added as well to fill some of the plain plasticard chassis. The lights are on the back of this vehicle to prevent anyone driving into the back of it!
This is the front. Again, I cut some cogs to go around the edge of the tank. Instead of the Adeptus Mechanisus logo, I added an Imperial Eagle instead.
This shows the right side. To finish the building of this vehicle, I'm waiting for a Greenstuff tube maker coming over from Spain to add a large fuel hose, linking the tank to the Land Raider. I also need to make a way of attaching the towed tank to the Land Raider. I've added a magnet into the recess on the connector.
I've undercoated the Flak Land Raider and masked off some flames to go over part of the front of the vehicle. I've managed to spray the flames with an undercoat of white paint but the weather has been terrible recently and I haven't been able to get my airbrush out to spray the usual flame effects. I'm stocking up lots of different projects, painted to differing stages. Once I get painting, I try and get a number of projects to the same stage, so I finish a few at a time, rather than one at a time.
Till my next update, Phil.
|
|
|
|
|
|
2014/11/21 07:45:34
Subject: Re:Philmorgan75's workshop blog - Legion of the Dead
|
|
Regular Dakkanaut
|
Land Raider Infernus
Finished my Land Raider Infernus at last. I received my Greenstuff pipe maker from Spain last week and have been playing with it. Here are the results:
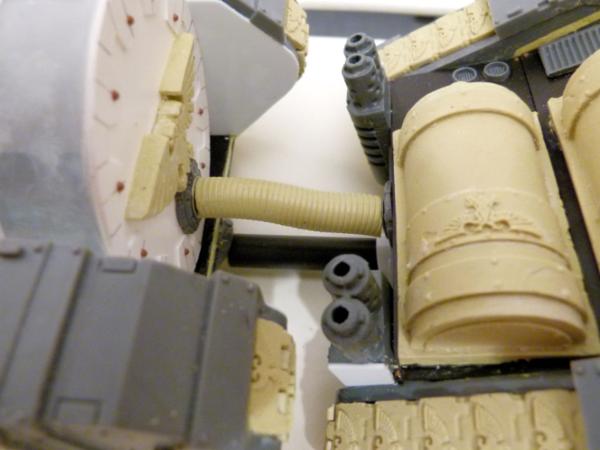
I rolled out a large piece of milliput into a tube and once it had hardened slightly, I used the Greenstuff pipe maker to make a fuel hose. Once it was still flexible enough I bent the hose to fit the tank and the Land Raider. I have added magnets to both ends to aid in storage. The connector between the Land Raider and the fuel trailer was made from a cut down pen and a small ball of milliput to make it look like a tow hitch. Again, this is magnetised. I may add thinner pipes between the 2 vehicles later down the line.
Without further ado, final shots before I undercoat and start painting it:
Front
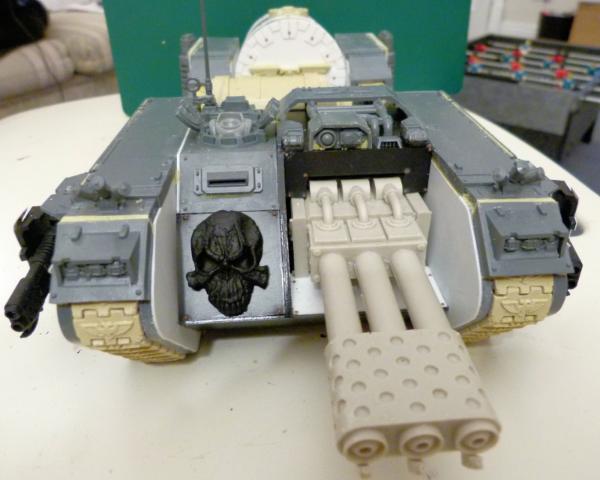
You can see I've added a skull to the front. This is temporarily stuck on with blu tack and will be removed whilst I paint it.
Left
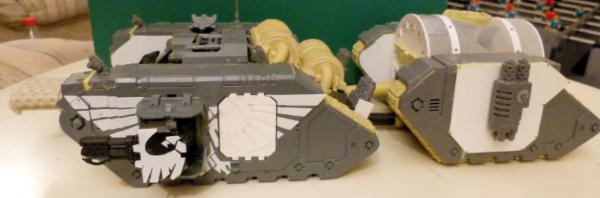 Rear
Rear
 Right
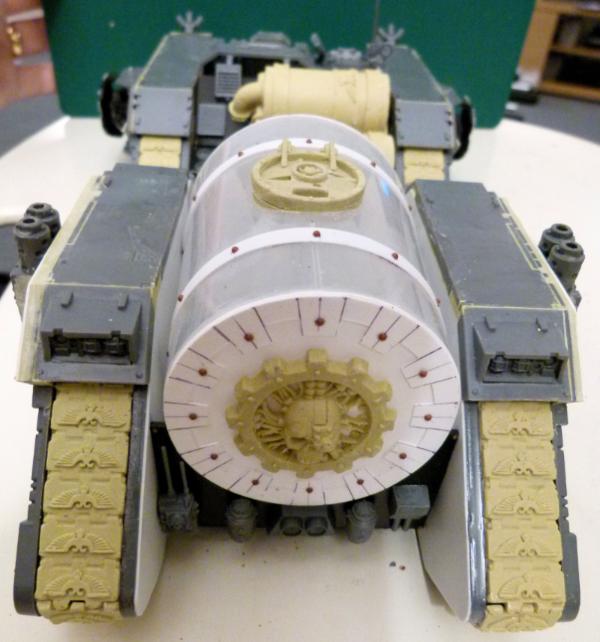
Top
Right
Top
This was fun to make. I'm waiting for a break in the weather and will get this undercoated asap. I'm making good progress on the Flak tank in that the flames have been painted and varnished and when I get the time, I will black oil wash the vehicle before starting to weather it.
Finally, a little taster of my next project.....
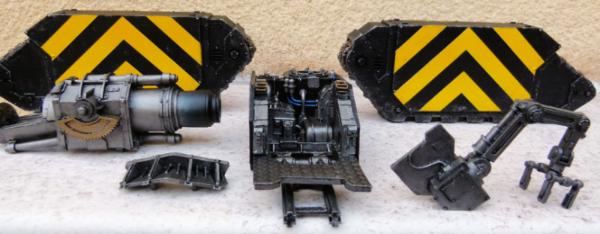
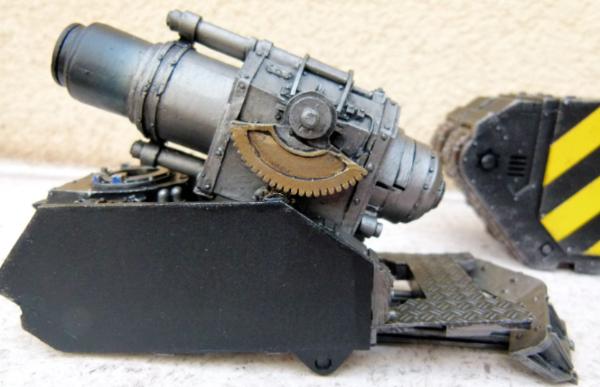
....A Land Raider Bombard!! I've cleaned up all the parts, repairing any mould slippage with milliput. The breech assembly has been completed as has a fully working hoist/crane. I've drilled pins into all of the moving areas of the crane and magnetised the claw parts to allow full articulation. So many projects, I think I need to give up work to have time to get them all done!
Till next time, Phil.
|
|
|
|
|
|
2014/11/30 20:26:48
Subject: Re:Philmorgan75's workshop blog - Legion of the Dead
|
|
Regular Dakkanaut
|
Big Update Time!!!
I have lots of projects being worked on at the same time - I spent 3 hours yesterday "sponging" silver over all of the models for some weathering! Without further ado......
Flak Land Raider
Finished my first vehicle for Grotsmasha's Vehicle Conversion Challenge:
I airbrushed all the flames as usual for my Legion of the Dead vehicles. Gun Metal was sponged on to add some weathering effects. The barrels of the Stalker weapons had an airbrush of black to imitate soot/carbon deposits. I didn't sponge on any rust as I would normally do as I wanted to finish and move on to other projects ( in order to clean the decks for new Christmas pressies!!)
This top view shows all the weapons that can be fired into the air to bring down enemy fliers. This vehicle would ensure no enemy would get air supremacy when this is on the table!
The Hyperios missiles are magnetised and can rotate easily on the side of the Land Raider.
The Adeptus Mechanicus logo was painted as per my normal paint scheme. MIG Blue steel pigment was added to the top of the exhaust stacks and once dry, a quick blast of black from the airbrush to again imitate soot/carbon deposits.
And finally, the left side.
As the Hyperios sponsons were magnetised, I can swop to any other turret weapons. The other variant I could see on the battlefield would have twin Assault Cannons.....
The amount of bullets this thing can fire into the air is phenomenal! Black was again airbrushed onto the end of the barrels to make them more realistic.
My second Grotsmasha Conversion entrant (Land Raider Infernus) has been undercoated black and I have started to mask the flames on the bottom edges. This will be airbrushed in the near future.
Alpha Achilles
I love Land Raider Achilles and this variant looks brilliant. I just need to paint the Imperial Eagle gold and then put a black oil wash over the eagle to finish this view.
The top view shows the weaponary off. I need to finish the commander's hatch and this view will be finished.

I think these exhausts should be on all of the standard Land Raiders. I tried to paint the exhaust stacks as realistic as possible with pigment and airbrush.
I've finished the Twin Multi Melta's and have almost finished the Twin Plasma Guns. Just the side hatches to be done and this will be finished.
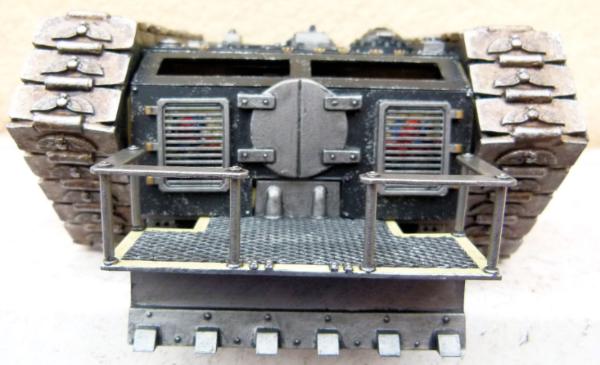
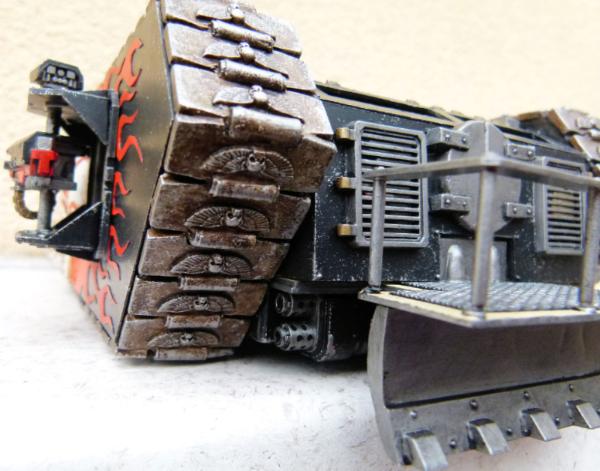
Assault Land Raider Version 2
The front has been weathered. I think the tracks really bling out this variant. I just need to paint the large Crux Terminus logo for this view to be finished.
This top view again shows only the Crux logo needs painting for this view to be finished.
I'm not a 100% sure on the flames on the side, but it's too late to go back now!
I'm really happy with how the rear on this one turned out. The usual Adeptus Mechanicus logo needs to be finished along with the Imperial Eagle and that will be another variant finished.
Storm Eagle
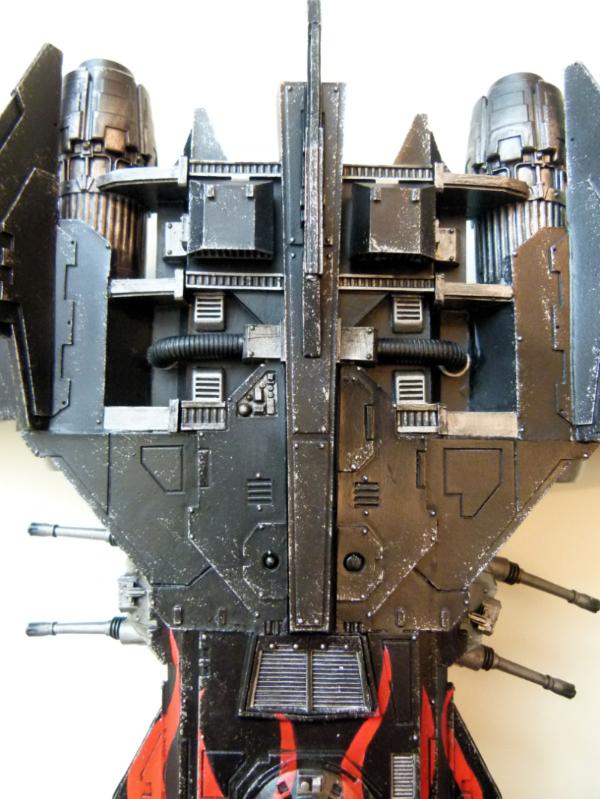
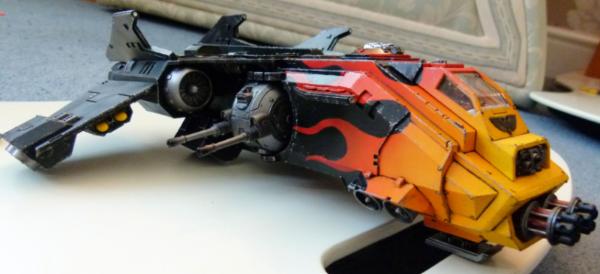
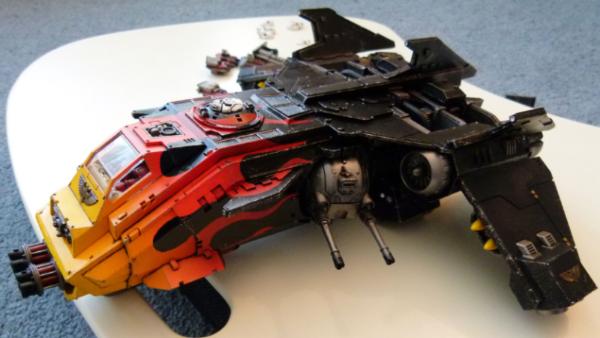
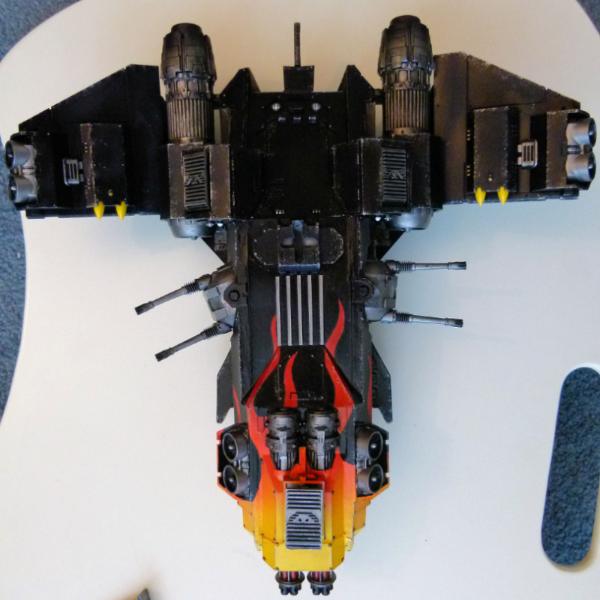
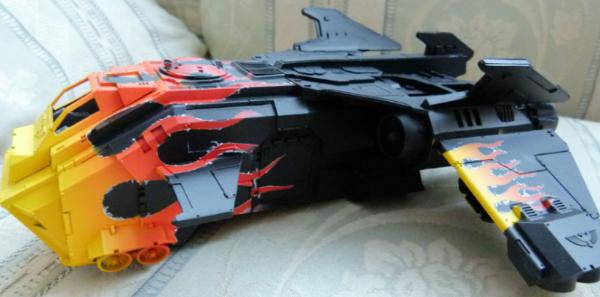
Finished my Storm Eagle!
I had great fun making and painting this aircraft. It was a pain to go together and there are a couple of places that are not 100% perfect BUT I'll be the only one that knows where the problems are. Anyway, this bird will look great with my finished Fire Raptor and my second (as yet) unpainted Fire Raptor.
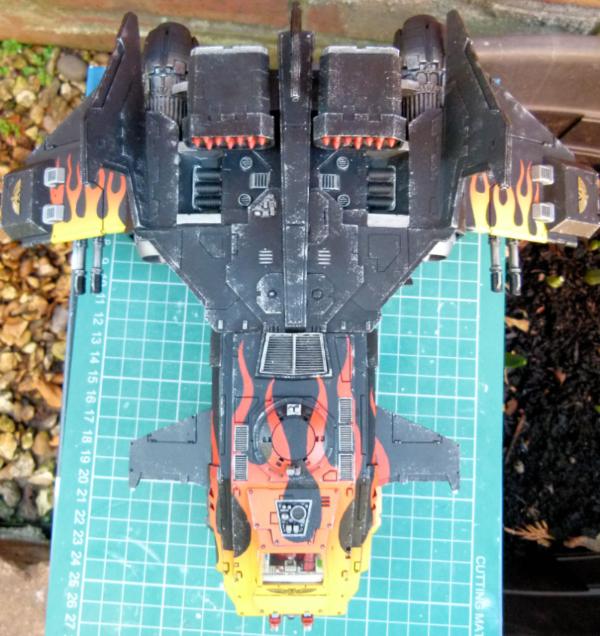
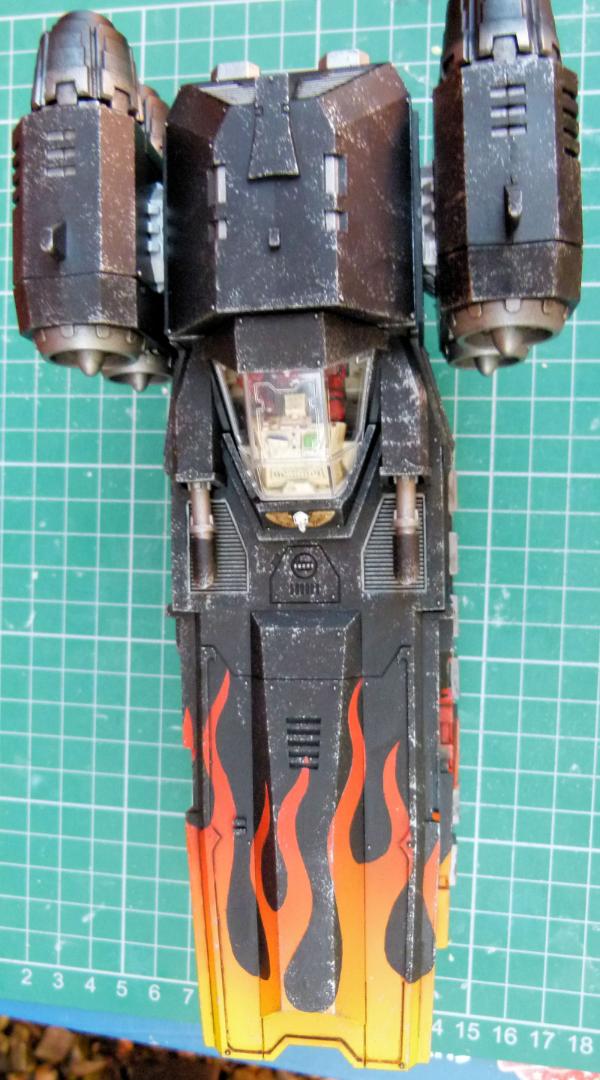
The top view shows the mandatory flames wrapping around the front and over the wings. This has taken weeks to finish, but I'm so happy it turned out the way it has!
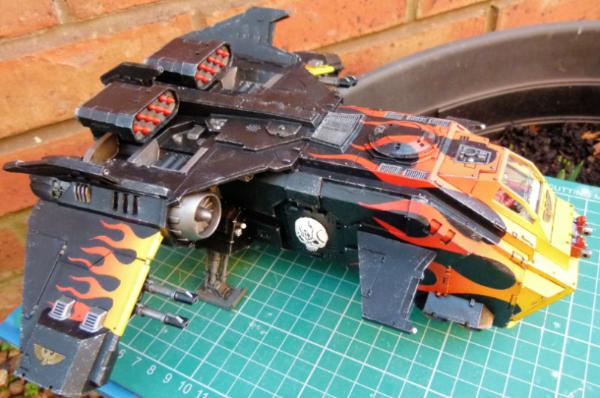
This front 3/4 shot shows the right side. I added a skull to the side hatch to show everyone which Chapter this aircraft was from.
Storm Fang
I know that rules say that only Space pups can have them, but when I saw the new kit, I wanted to have one ( I ended up getting another one as well!).
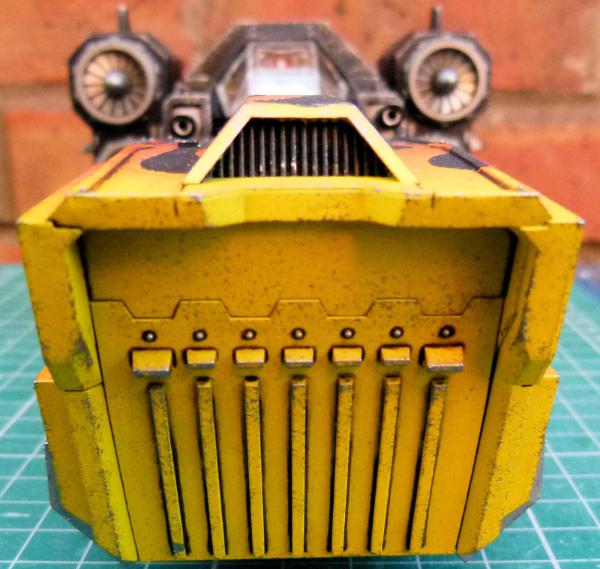
The front hatch has had the obligatory gun metal sponging to the edges to give a realistic worn effect.
You can see the flames wrapping around the front as normal. I need to paint the edges around the Perspex canopy and this view will be finished.
I think this model looks like a Colonial Viper from Battlestar Galactica. I need to magnetise the sponsons and I can then swop between Hurricane Bolters, Twin Heavy Bolters and Twin Multi Melta's.
I've also made some progress on my Javelin, Legion Basilisk/Medusa, Deimos Predators, Land Speeder Tempest and Storm and Whirlwind variants but I'll show you those in my next post.
Till next time, Phil.
|
|
This message was edited 1 time. Last update was at 2014/11/30 21:15:17
|
|
|
|
|
2014/12/20 14:59:24
Subject: Re:Philmorgan75's workshop blog - Legion of the Dead
|
|
Regular Dakkanaut
|
Update time:
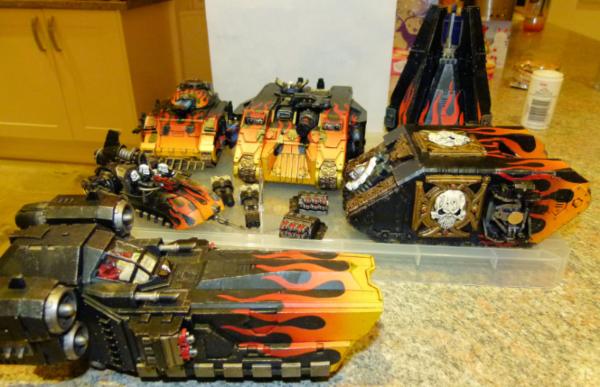
Here's a shot of all of the models I've finished recently.....
A Storm Fang painted in my Legions paint scheme. I've finished the Heavy Bolters and Hurricane Bolters sponson. The Twin Multi Melta needs a Blue Steel pigment brush and then a blast of black from the airbrush to finish the burnt look. The missiles need to have a few coats of yellow airbrushed and this will be completely finished.

Here's my Deathstorm Drop Pod. I bought the Assault Cannon parts years ago on ebay and painted them up. I tried fitting them on to both a GW and FW version of a drop pod but they didn't fit. I'll put them on to the back burner for now as I have lots of projects I've started and also want to start.

My Legion Javelin with Lascannons. I think this version of the Land Speeder looks much better than the normal GW version. I added some Mk III helmets rather than the usual Mk IV variants.
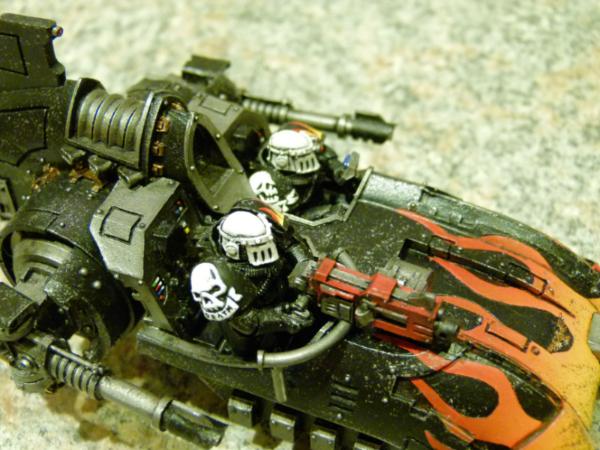
Here's a close up of the crew and their shoulder pads...
.. and the power cables for the Lascannon's.
This is the first of my Deimos Predator's. I magnetised the turret weapons, so this is my Magna Melta with Heavy Flamer sponsons....
.... Flamestorm Cannon....
.... and Plasma Executioner.
This is a WIP on my second Deimos Predator. I need to paint the tracks and this one will be finished.
This is my second Assault Land Raider. It has had the sponsons magnetised so different weapons can be used.

The front ramp shows one of the Crux Terminatus symbols I used.
The rear view.

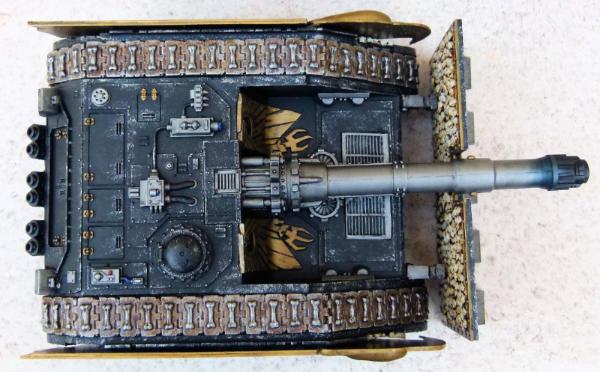
My first completed Achilles Alpha. I've decided that going forward I will use Mk III helmets on vehicle crew as I think they look cool!
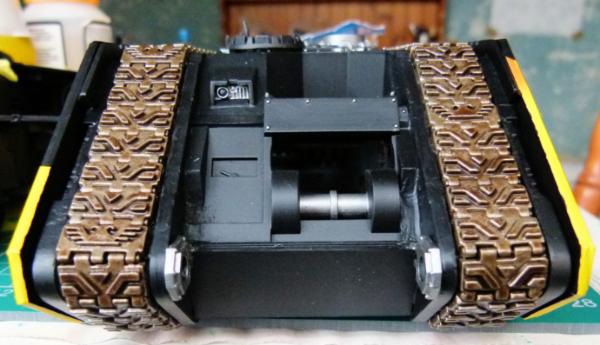
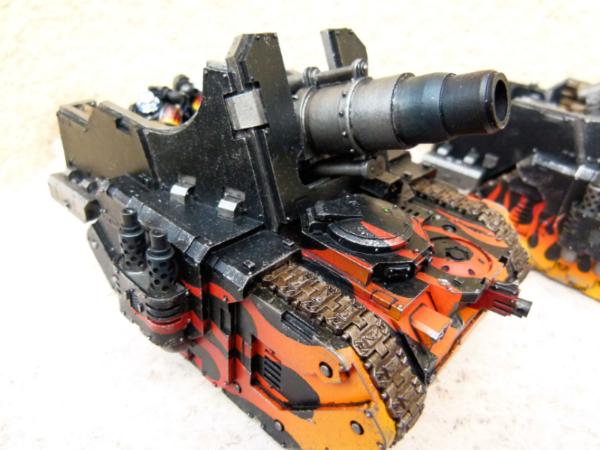
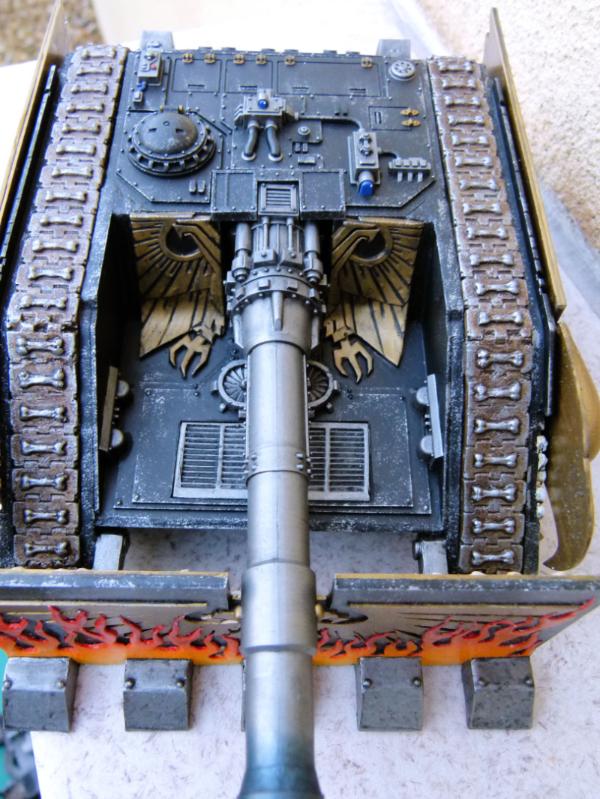
Looking down the business end of a Thunderfire Cannon!
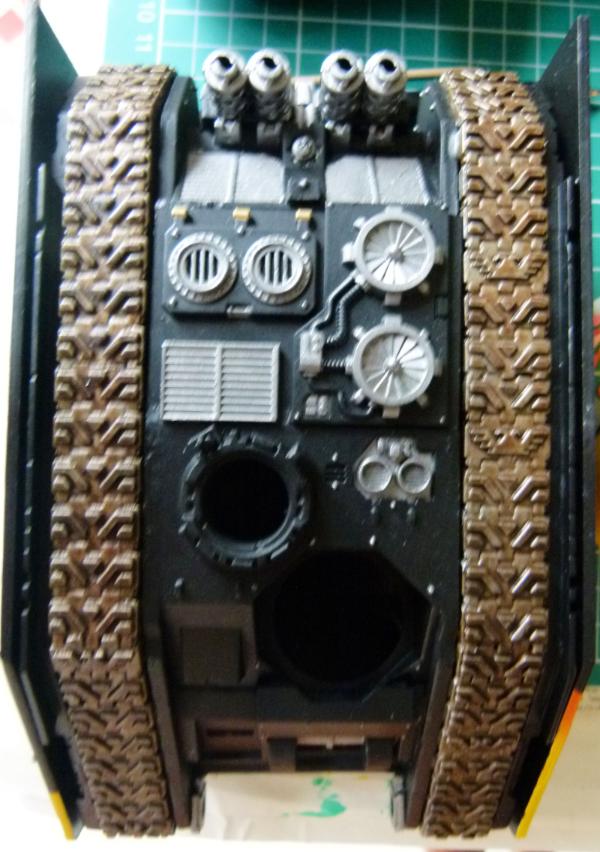
Land Raider Infernus WIP. Apart from the crew turret hatch on top, I have finished the base layers. I am waiting for the black oil wash and track wash to dry before I can start the sponged on weathering effects I normally do. Not much more to do and this variant will be finished.
This shows the almost finished right side. Sponged on weathering and this view will be finished.
The rear fuel tanks will have a small amount of rust sponged on for added realism!
And finally, some hazard stripes I've done on the fuel trailer. I now need to mask flames to match those on the bottom of the sides of the Land Raider Infernus and airbrush those on.
Lots of things done, but still load to do!!
Till next time, Phil.
|
|
|
|
|
|
2014/12/31 18:46:40
Subject: Re:Philmorgan75's workshop blog - Legion of the Dead
|
|
Regular Dakkanaut
|
Land Raider Infernus:
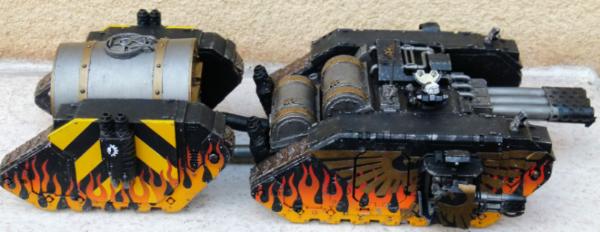
I finally finished my Land Raider Infernus conversion. It's based on the Malcador Infernus from FW which is based on the old WW2 "Crocodile". I got a Warhound Titan Heavy Flamer and built the rest of the armour out of plasticard. I didn't think the wheel based fuel trailer fitted in with my Space Marine Legion that is looked on favourably by the Adeptus Mechanicus, so I used the left overs from my LandRaider Spartan and made a tracked fuel tanker.
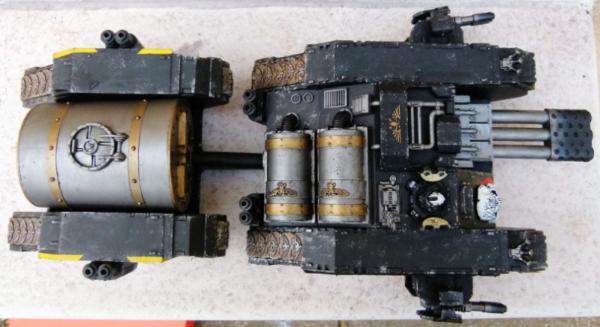
This Top view shows how big this vehicle is. I used the fuel tank that came with the titan Heavy Flamer on the back of the Land Raider as a reserve should the fuel in the trailer run dry. I originally planned to sponge on some rust to the fuel tanks, but I chickened out in the end!!
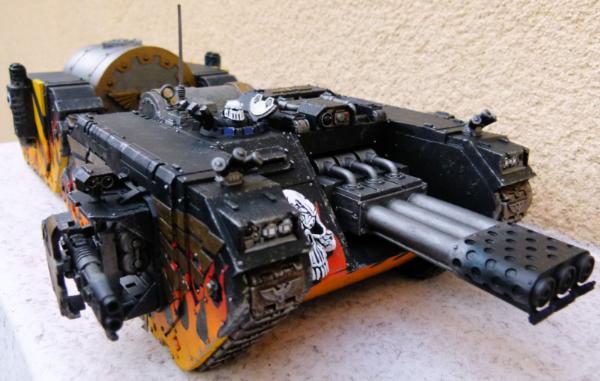
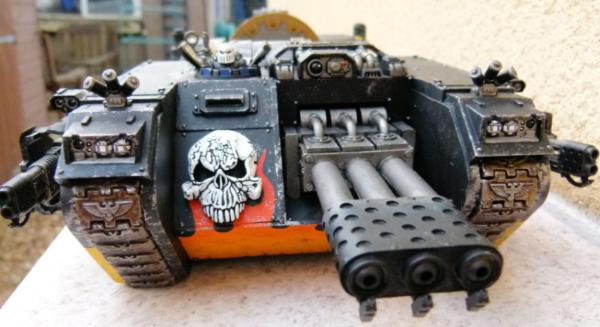
This is a front three quarter view of the Infernus. You can see the Mk III helmet on the Tank Commander in this shot.
The front tracks each have an Imperial Eagle on - showing my Legion of the Dead follow the Emperor and not one of the other "false" gods!!
This is the front of the fuel trailer....
... and this is the side. I decided to add hazard stripes to the sides. The masking of the flames didn't go 100% and I had to do some corrective paintwork over the seepage.
This shows the rear of the fuel trailer.
It was a fun build and I am glad to put this to bed. This has allowed me to move onto other projects......
Land Raider Bombard
I spent a couple of days building different tank tracks for my next couple of vehicles and this Land Raider has my Adeptus Mechanicus versions. Every other track has an Adeptus Mechanicus logo on them. I decided to paint the parts individually and will glue them at the final stage.
I have again added hazard stripes to the sides of the vehicle to show others that this is heavy ordanance. I have painted some Imperial Eagle wings that will be attached to the hazard stripes and will then attach a large Adeptus Mechanicus logo. The bombard has a moveable breech and the crane has been fully magnetised to allow full movement.
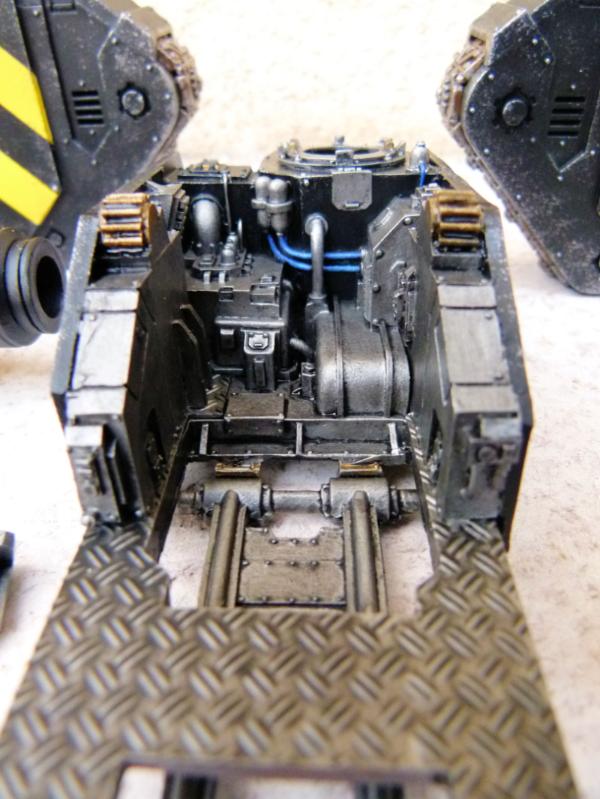
This is the interior. I decided to paint it before adding the Bombard as it obscures so much.....
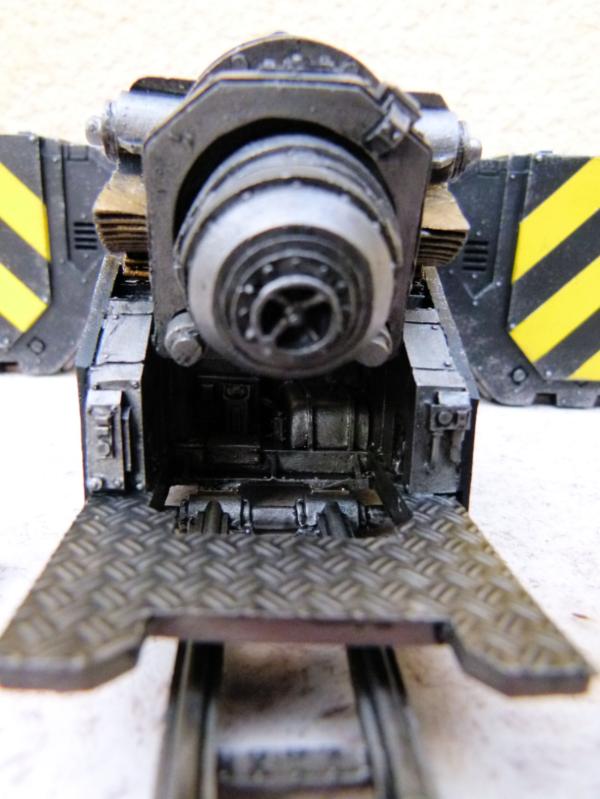
This final shot shows how much the Bombard stands proud. I still need to work out how high I want the Bombard sticking up. I hope to finish this project soon.
Deimos Predator
This is my second Deimos Predator. This shows magnetised heavy bolter sponsons and a magnetised conversion beamer. I still need to complete my third Deimos Predator with Autocannon and twin lascannon turret and my Whirlwind Scorpius (things to do in 2015!!).
This shows the FW etched brass Imperial Eagle I added to every other tank tread.
Legion Medusa and Basilisk
I loved building and painting these vehicles, so much so, I have just ordered the Solar Auxilia equivalents as well. You can never have to much artillery!!!!
This shows the completed Medusa. I used blue steel pigment and a blast of black from the airbrush to imitate soot/carbon deposits. Small FW etched brass Imperial Eagle were added to every tank tread.
The Basilisk is 99% finished. I just need to add blue steel pigment and airbrush some black onto the exhausts and the heavy bolter at the front to finish the vehicle.
This shows the different flames I did on the different vehicles......
..... and the magnetised crew!!
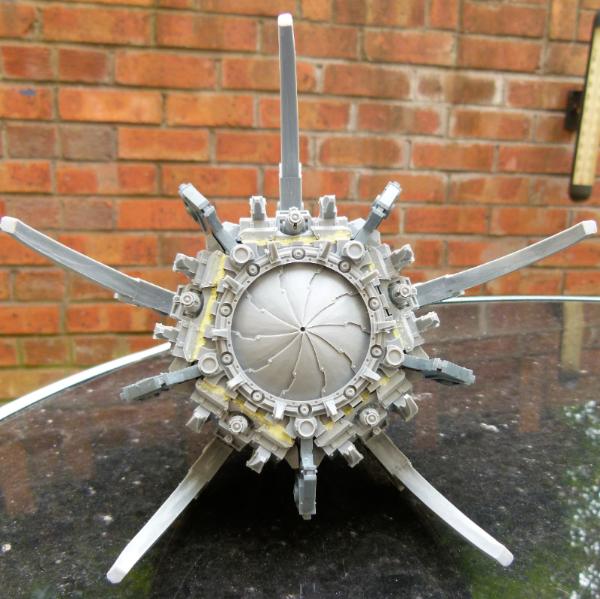
And finally, a little Christmas present I had....
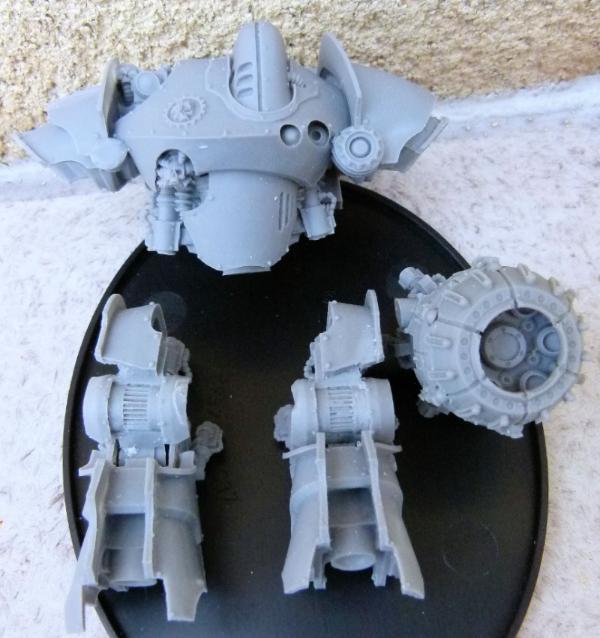
... a Thanatar!! I spent a number of hours cleaning up all the parts yesterday. It is fully poseable and I am struggling to find a pose I'm happy with. I want to have it striding with its left leg forward and the left arm housing the heavy bolters raised and guns a-blazing!!!! Moving the ammo feed will be a challenge but something to look forward to for 2015.
Hope you all have a fab 2015.
Regards, Phil.
|
|
|
|
|
|
2015/01/10 23:33:10
Subject: Re:Philmorgan75's workshop blog - Legion of the Dead
|
|
Regular Dakkanaut
|
I managed to finish a couple of Land Raiders today:
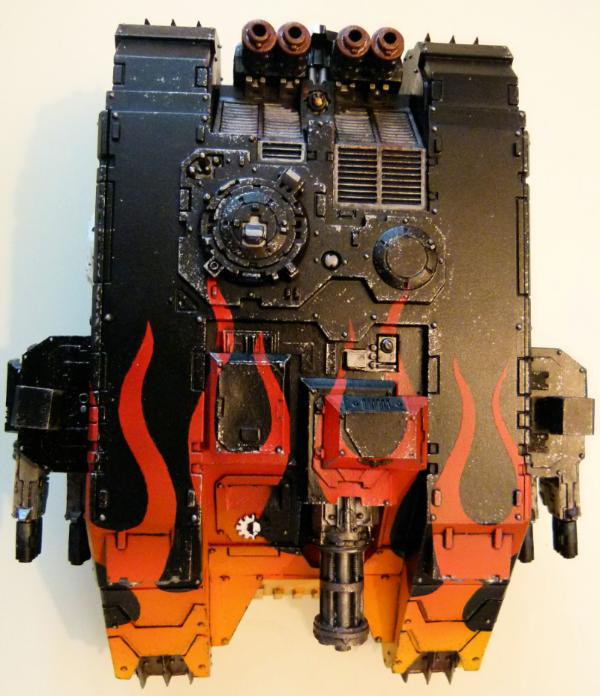
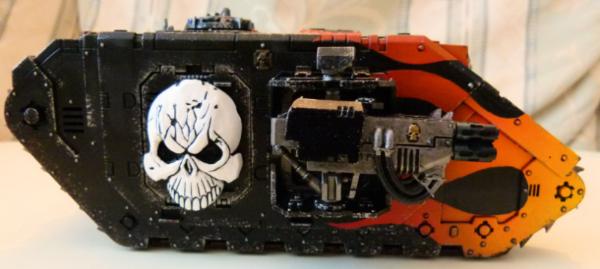
Skull Land Raider
I made this back in 2009 and it has spent the past 5 years under my bed until I felt comfortable in painting skulls. I found a recipe I was happy with when painting my Land Raider Shadowsword variant and thought I'd give it a bash! I'm really happy with how this turned out. I got the airbrush out this morning in a gale force wind (I had a new kitchen fitted this year and ever since, I have had to airbrush out side) as I needed to finish off lots of projects so I can put these models away and move onto new projects. I blasted some black onto the Assault Cannon barrels and the exhausts to finish this off.
This shows a slightly higher view of the front. I used the old Warhammer Fantasy crossbones that were used on shields and after some chopping and filing, added them onto every track to add some more icons of death!!
This shows the plan view. I spent hours and hours making the skulls and was glad to finish the construction of this one!
As with all of my Land Raiders, I magnetised the sponsons to allow different weapon payloads.
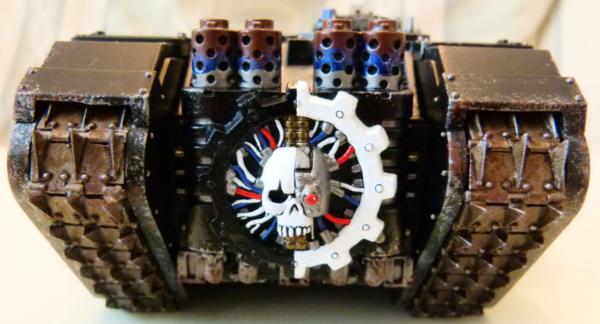
The usual Adeptus Mechanicus logo was added to the engine. In a change from the usual paint scheme, I went with a bone colour instead of the normal black.
Land Raider Shadowsword
Again, this variant was built years ago and I have been painting it on and off for the past few months. I finally plucked up the courage to try to paint skulls on this one and I was so pleased with the results, I painted the Skull Land Raider above in a couple of days.
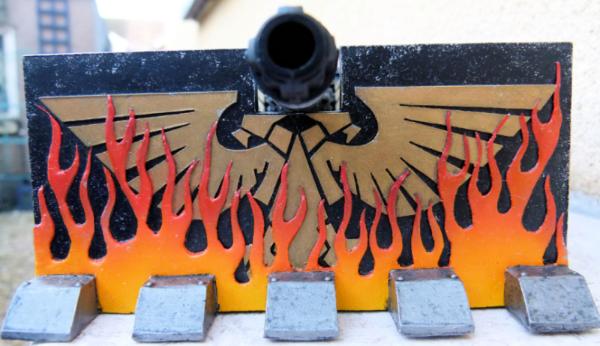
This stormshield was made from plasticard, as was the Imperial Eagle. The 3D flames were made from milliput and then airbrushed. The 5 "prongs" at the front were made from lego parts.
This shot over the storm shield shows the Imperial Eagle taken from the Cities of Death I made to fit. I used the same track design on this one as I did the Skull Land Raider.
This shows the plan view. The Storm Shield has been magnetised to allow it to be stored easier.
You can see the skulls on the rear of the Storm Shield on this one.
I have decided to stay away from rust at the moment, only weathering my variants with sponged on gun metal. I was finding the rust pigments I was using was making a hell of a mess and not letting me touch the model for a number of days - I dodn't feel comfortable handling the model even after a coat of matt varnish.
I made this side armour out of plasticard and then used milliput to sculpt an eagle's head. It has been magnetised so I can opt to not have the side armour on should I wish. I haven't decided what sponson to use, so I didn't attach any to the vehicle.
This shows the view from the top rear.
As I had widened the vehicle by adding the Shadowsword parts, I thought I would add an extra engine to cope with the extra weight and size better. I'm glad I painted this vehicle - without it, I would still be unhappy painting lots of skulls and would stick to my usual, pristine skull white.
Land Raider Bombard
I finished my Land Raider Bombard. This has taken me only 3 weeks to construct and paint - I usually take years between building and painting!! I am toying with getting a FW Minesweeper to attach to the front - we'll see.
I think the sides on this variant are some of the best I have done - hazard stripes and Imperial Eagle. I was thinking of airbrushing some flames at the bottom, but after it turned out to be a nightmare whilst doing it on the Land Raider Infernus fuel trailer, I decided not to.
The plan view......
... and the rear.
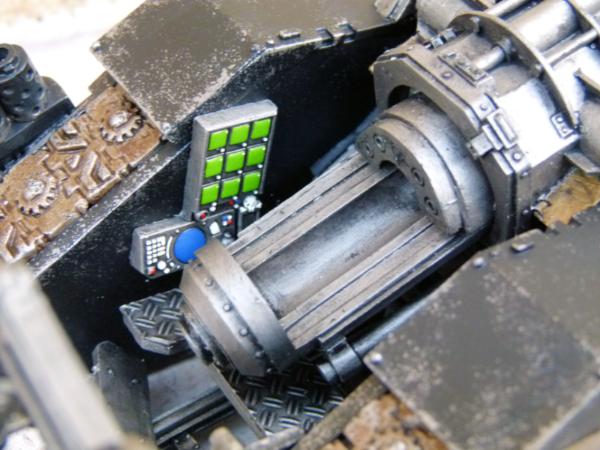
This shot shows the magnetised breech and the control panels I added.
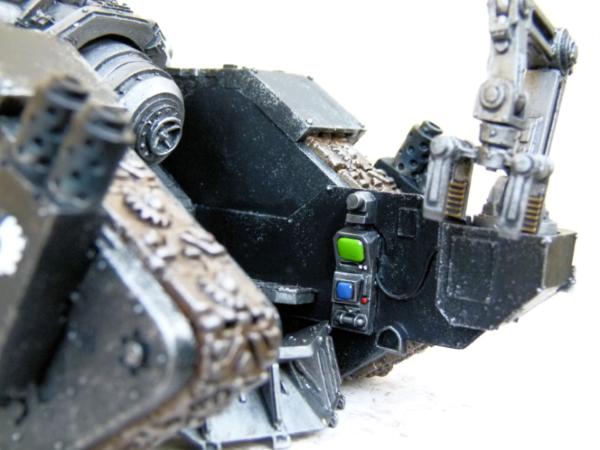
This shows a foot hole to assist the SM crew to be able to get to the computer consoles on the left. I also added some control panels to the right as well.
I've already moved onto my next few painting projects.....
This was made a few years ago and shelved whilst I worked out how to paint skulls. I've airbrushed the flames on the sides, but I now need to mask off the flames to the rear and then airbrush the flames at the front of the Land Raider.
Here's a WIP shot of the 2 Techmarines that control the hellcannon. Small things needed to finish these guys off.
Again, the top set of flames were airbrushed today. I now need to wait to ensure the paint is dry before I then use blu tack to mask the top flames and then airbrush the bottom flames. Lots of time consuming things to do.
and finally, my first Land Raider variant I made back in 2007. The flames were airbrushed today. I've painted all the gun metal parts and have started to paint the gold parts. Once done, a black oil wash will be used, followed by a black tidy up and then a gun metal sponging to weather it.
For 2015, I have made 3 lists:
1) All the different projects I have completed and need to paint.
2) All the parts I have bought and variants I want to construct.
3) All the pieces/models I want to get in 2015.
I want to paint as many of my old projects as I can this year.
Till next time, Phil.
|
|
|
|
|
|
2015/01/26 07:47:41
Subject: Re:Philmorgan75's workshop blog - Legion of the Dead
|
|
Regular Dakkanaut
|
Update time:-
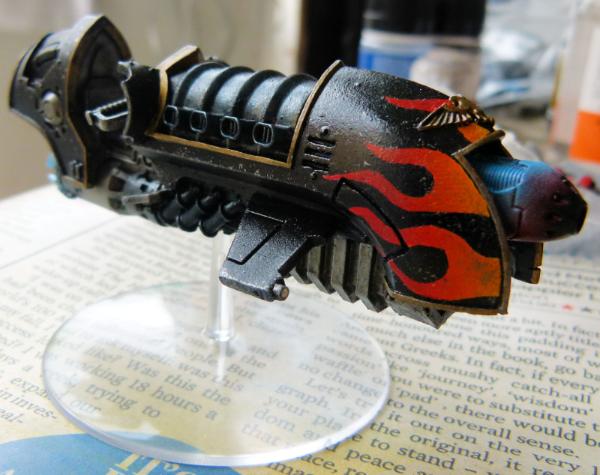
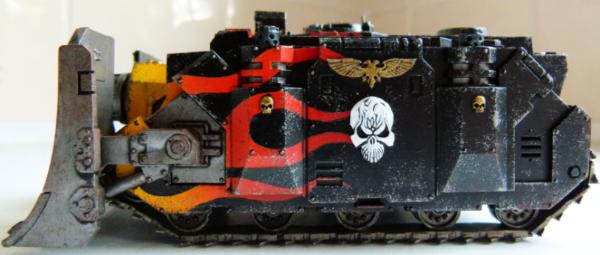
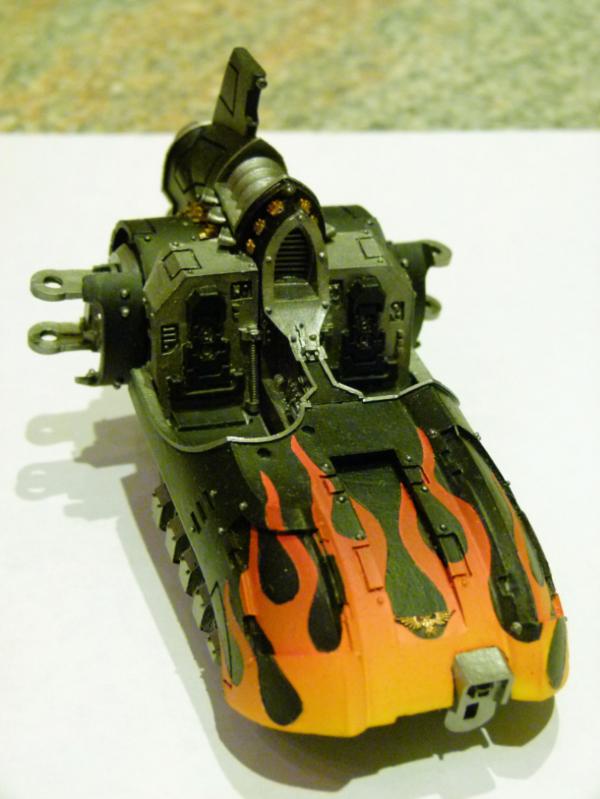
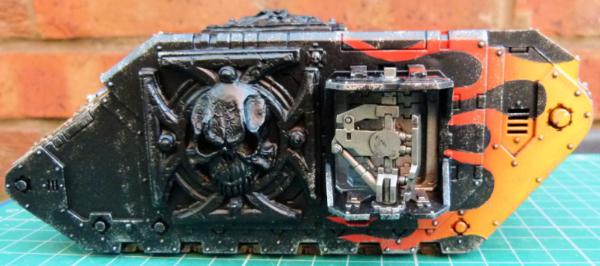
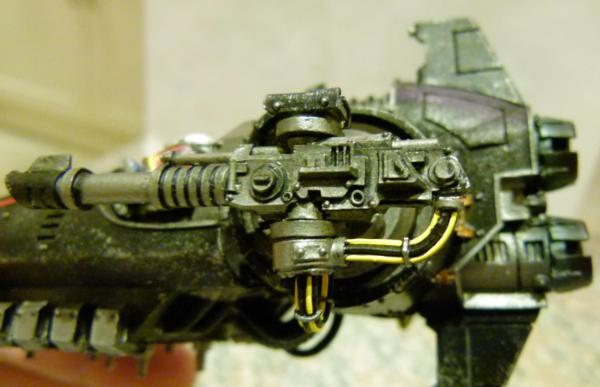
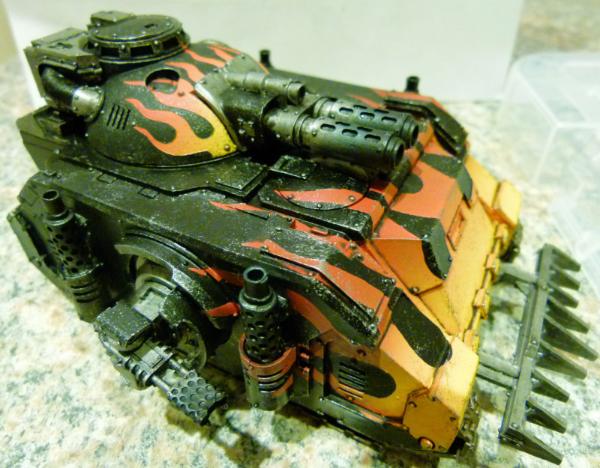
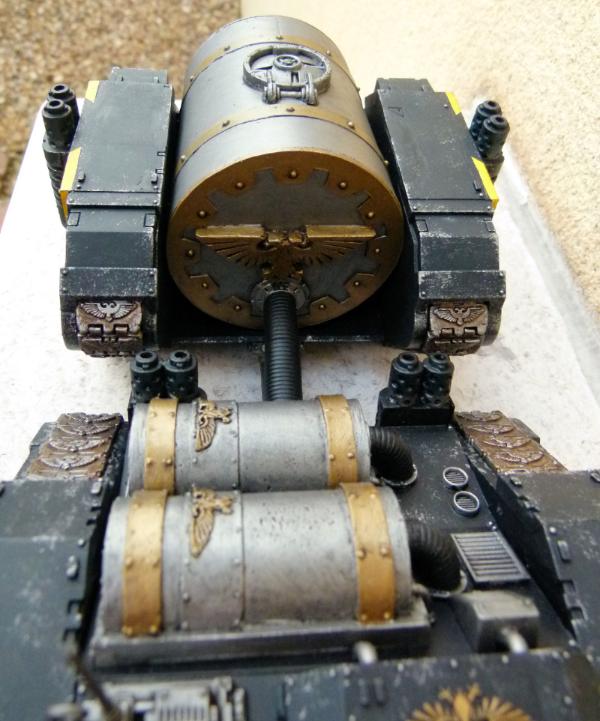
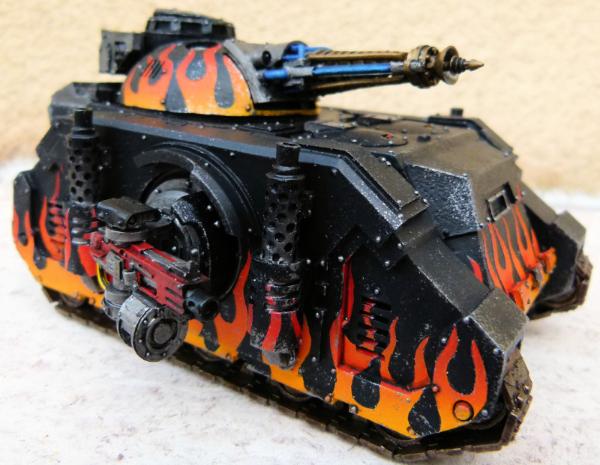
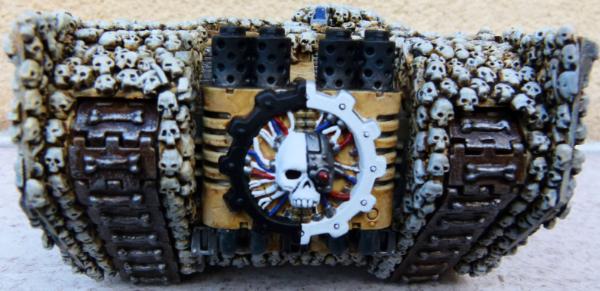
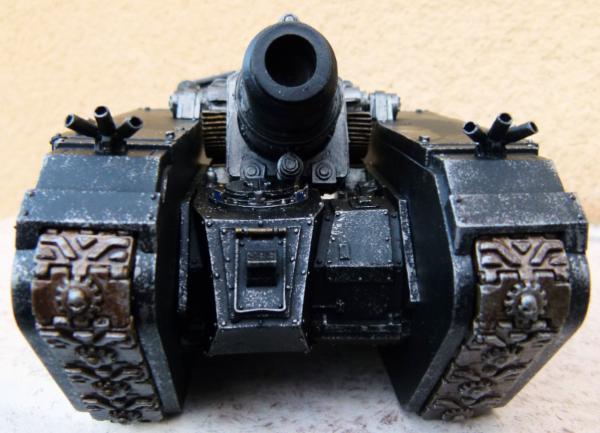
Land Raider Hellcannon
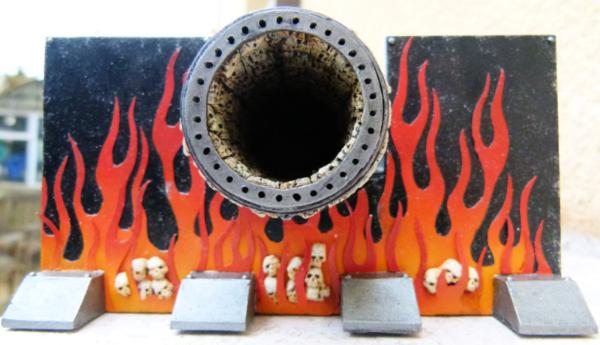
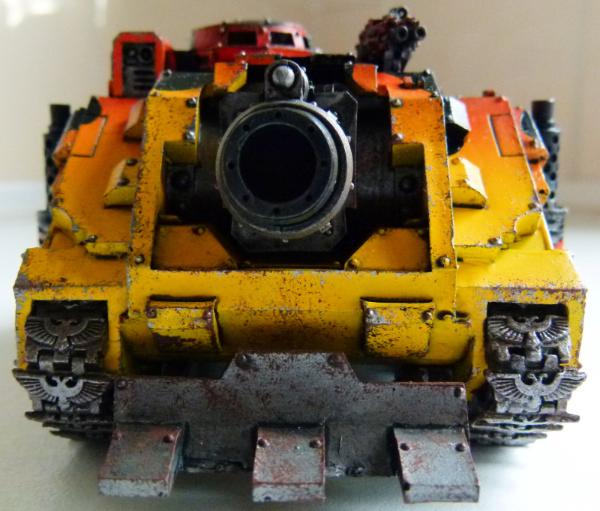
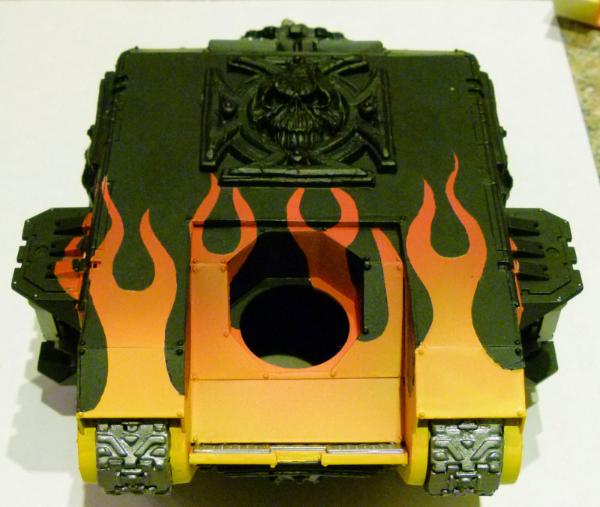
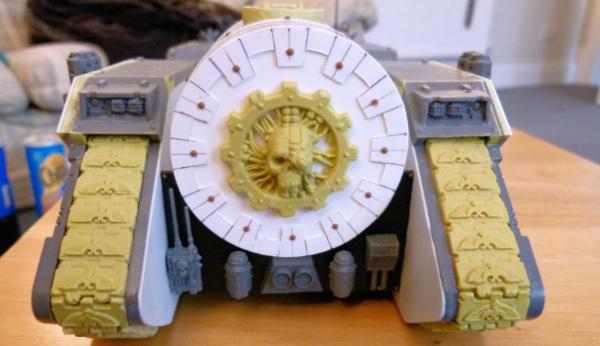
I finished my Hellcannon variant over the weekend (a number of years after building it!). This shows the front view with the large Stormshield. This was made from plasticard, with plasticard flames, a few skulls and some pieces of lego. I should sponge some rust onto it as well and use the airbrush to leave some soot around the mouth of the cannon, but it is to cold and wet to do outside at the moment, so it will have to wait.
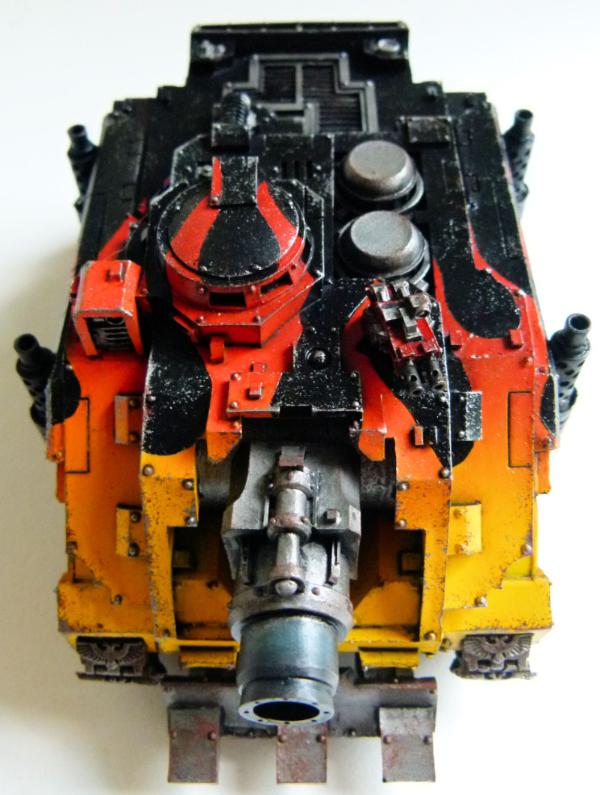
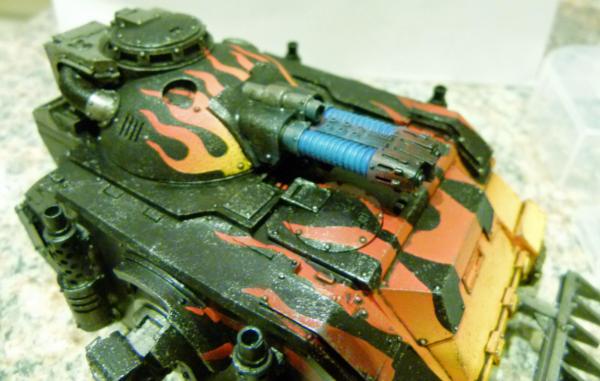
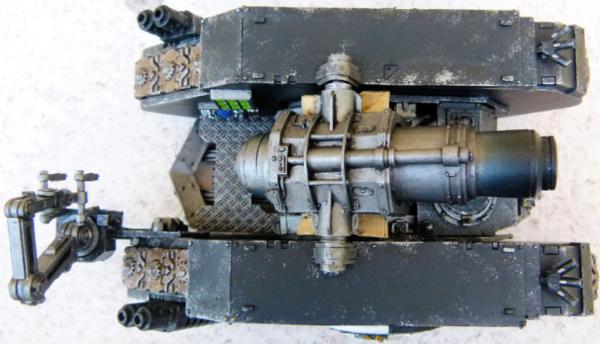
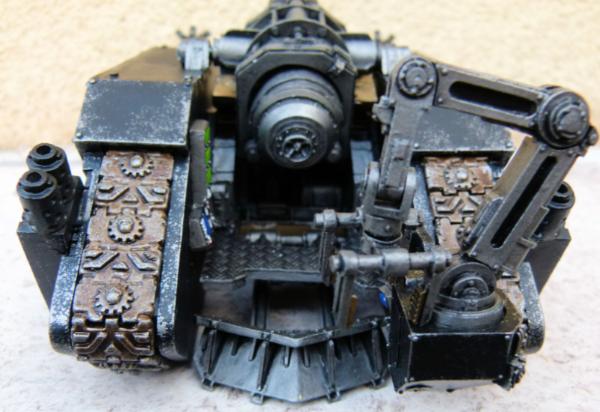
The cannon was made from some cut down plumbing tube and then covered in skulls inside and out. Extra tubing was used to assist with recoil as was some small FW etched Imperial Eagle's.
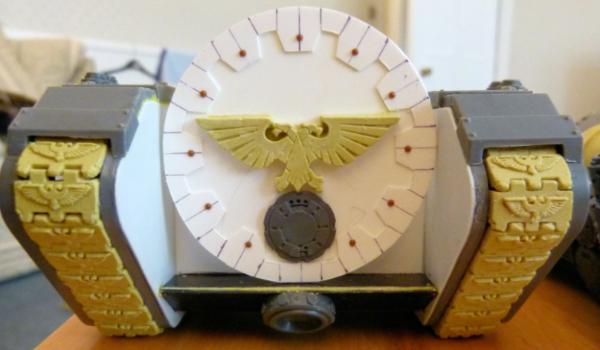
The large skull was sculpted out of milliput and thin plasticard flames were used to "flow" around the skull. I'm not 100% happy with the large skull, but I'll leave it as it is for now.
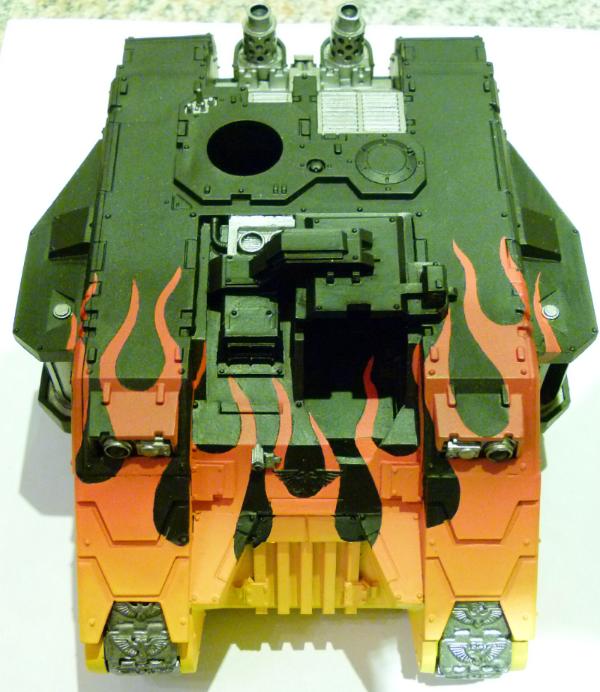
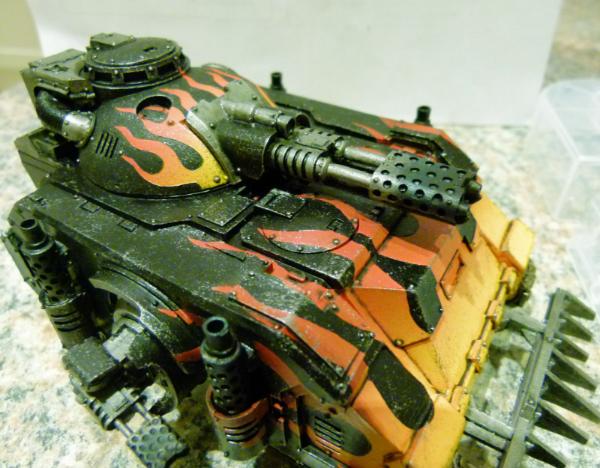
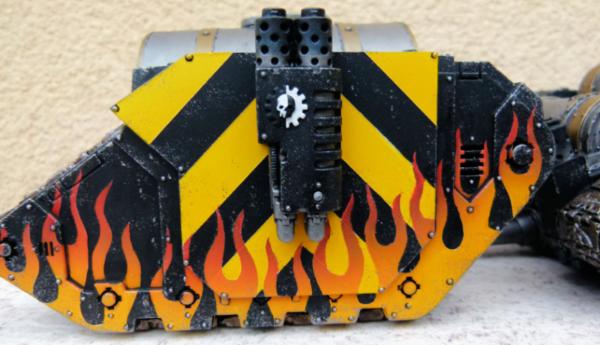
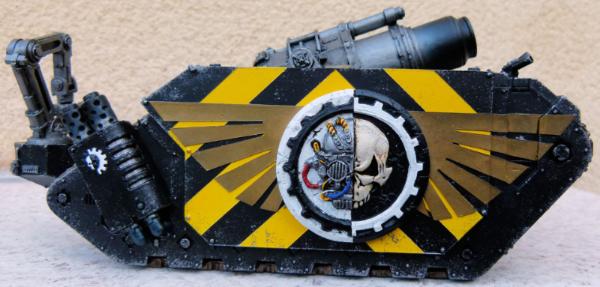
A Razorback Heavy Bolter sponson was used as the basis for the side armaments. In hindsight, some rivets around the edges would have made this look more realistic.
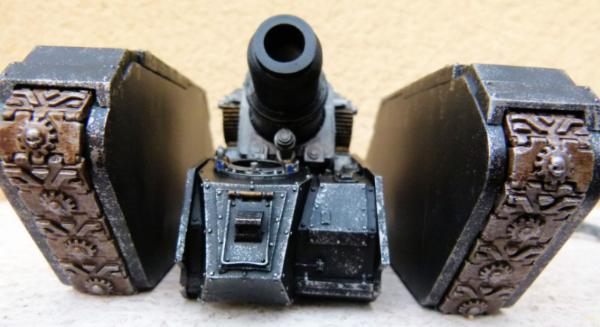
Shadowsword, Baneblade and Basilisk parts were used on this view.
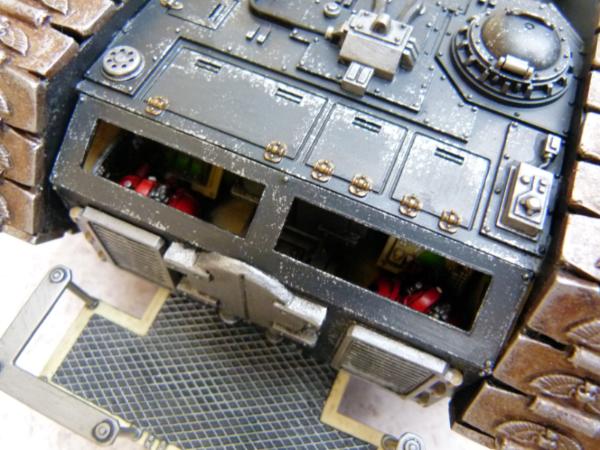
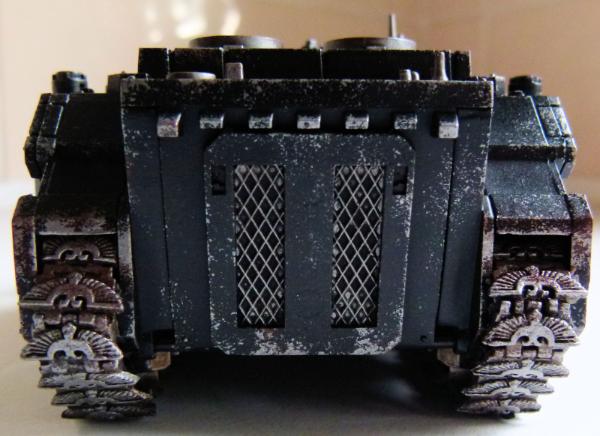
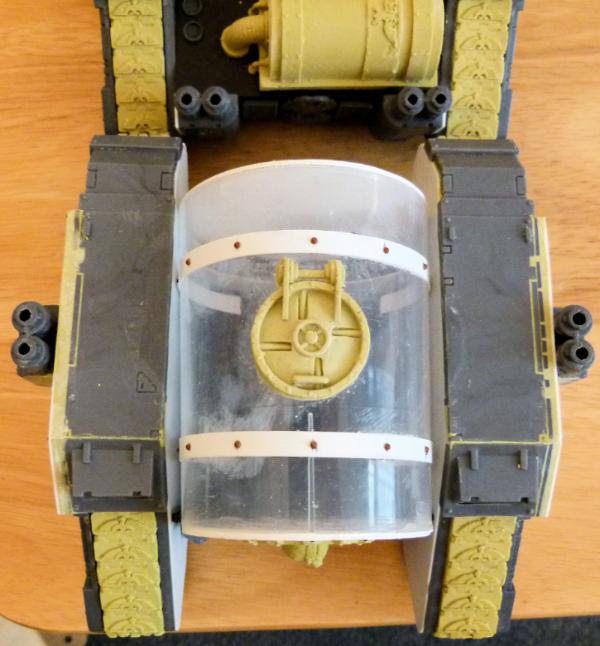
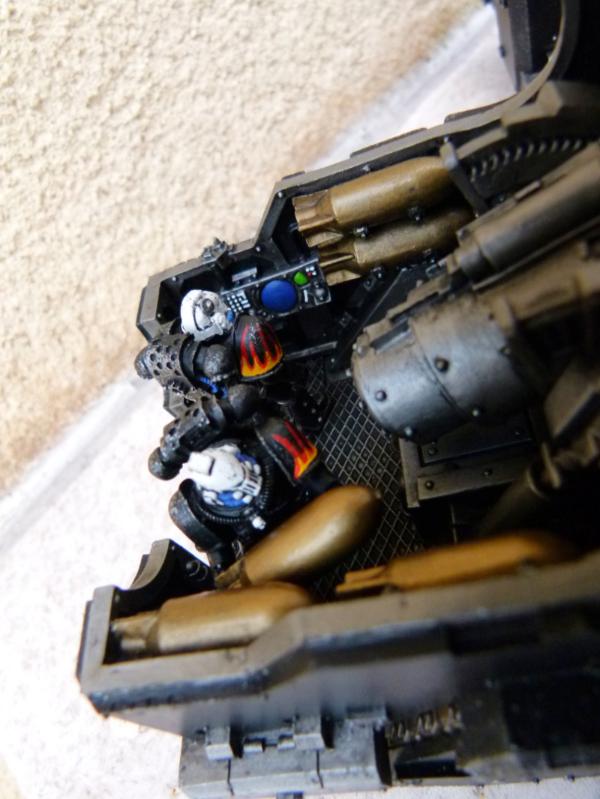
The rear crew compartment needs to have some clear Perspex added to allow the crew some natural light, but also to show off the painted interior as well!! I also added some Baneblade engine grills as doors, to again allow people to see inside.
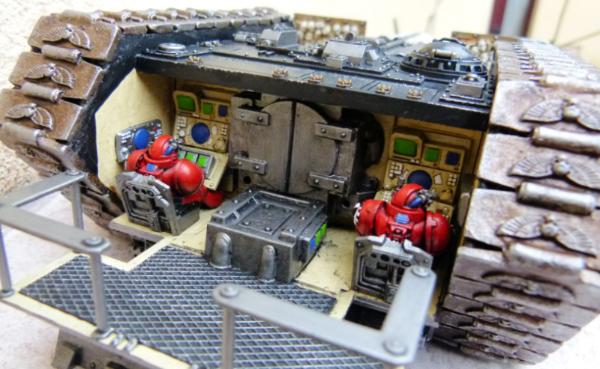
This is what the interior looks like with the rear armour removed. I have deliberately not glued the part to allow easy assess. Some Storm Raven pilots, Rhino Mk1 and Storm Raven computer screens were used here.
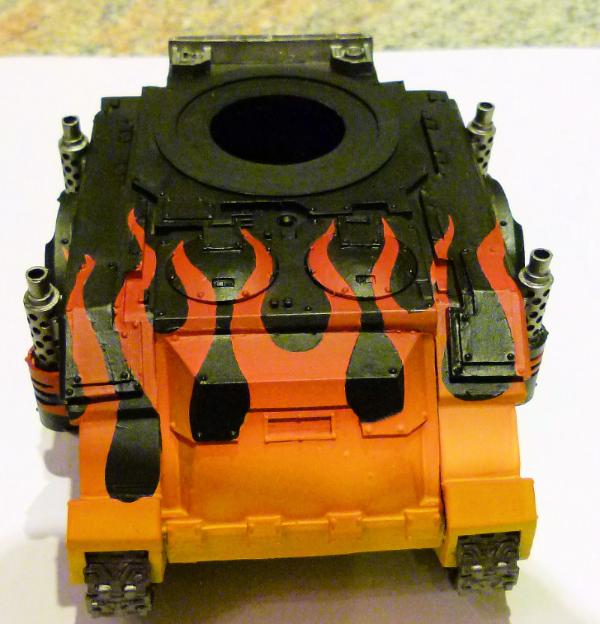
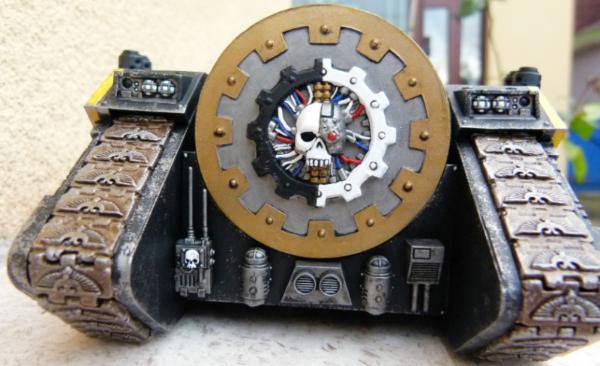
The rear view. An IG dozer was added at the back to prevent the huge recoil from pushing them to far back after each shot. Another Mk1 Rhino side door was used as a means of getting replacement shells into the cannon. I have a heavily converted sentinel that I made to reload the shells, but that will be a painting project in the future.
And finally, just to give a small amount of credibility, I added some Dreadnought exhausts to show this vehicle has got some engine in it somewhere!
As I try to paint multiple things at the same time, I have finished 3 other Land Raiders as well:
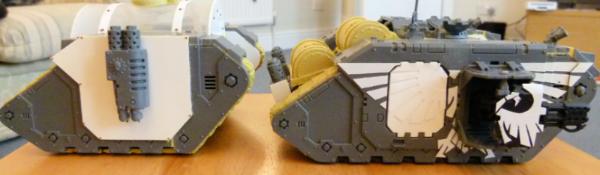
1) FW Reinforced Armour Land Raider:

This was the very first LR that I bought on ebay for a few pounds and tried to rescue it from a previous novice builder. I used some FW Imperial Eagle hatches, a FW Crux Terminator logo and Reinforced Armour that I had got. The front hatch has shrunk horribly as well as the previous owner not building the front part properly has left a small gap around the entrance. A minor annoyance, but something I can live with.
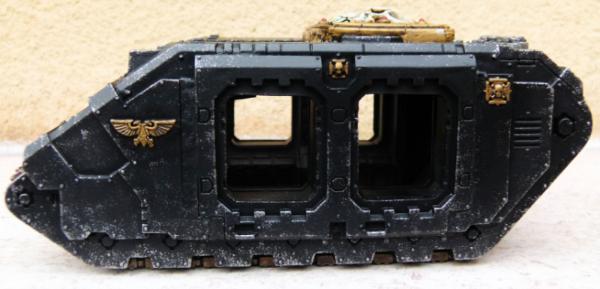
I liked the idea of the reinforced armour, but again, the resin parts had mould shrinkage and there were huges gaps between all the resin parts. I used some milliput to fill these holes but 7 years ago, I was not as competent with milliput as I am now. Again, a minor niggle.
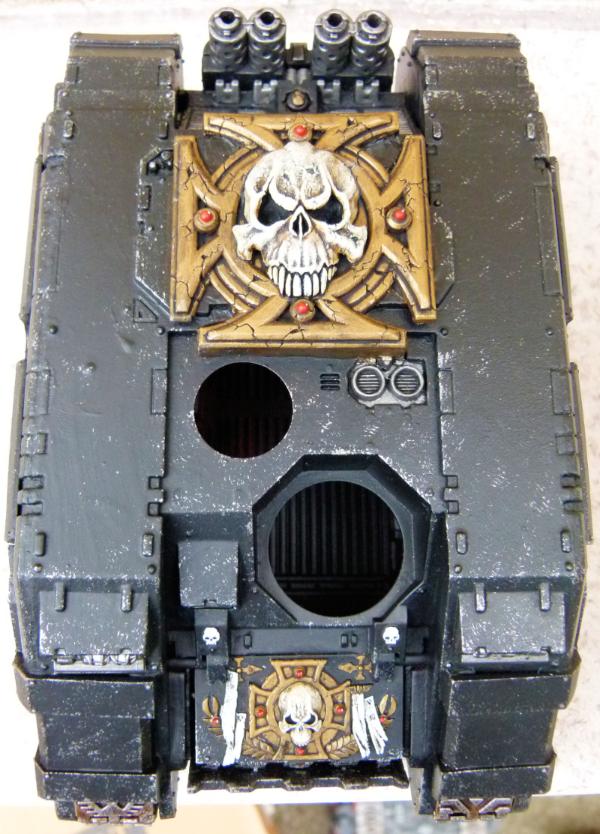
I love the Crux Terminator Logo and have added it to other models since. The gap on the front hatch is more noticeable in this shot. If I hadn't made this variant, I would never have got the creative buzz which allowed me to move onto a lot more variants........
2) Imperial Eagle Land Raider
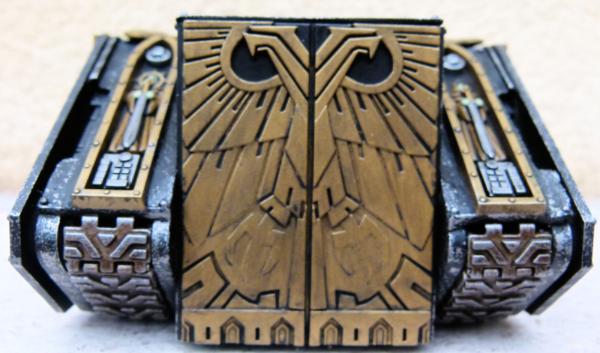
I used some Cities of Death doors on the front of this variant and more COD parts on the front mudguards. I am contemplating using this as a Prometheus as I only need to add the quad Heavy Bolters and this vehicle is good to go.
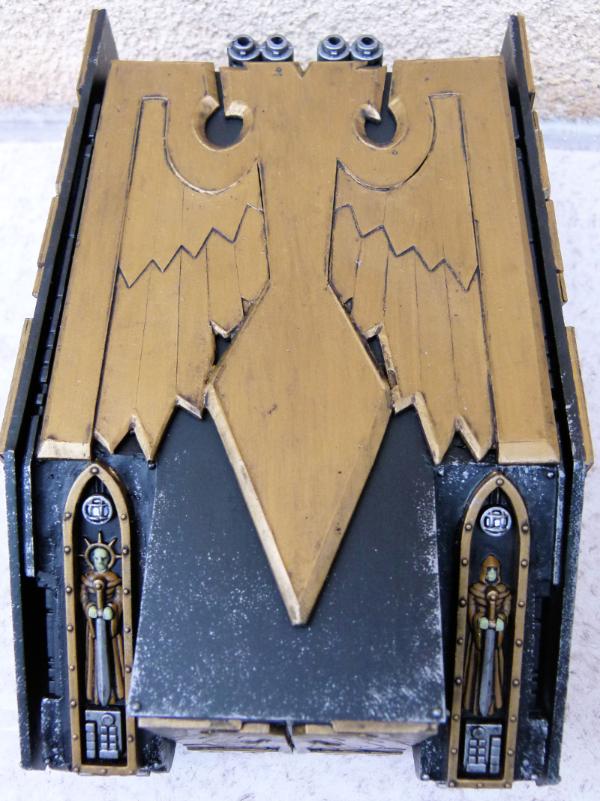
This shows the plan view. I used different thickness of plasticard to make the Imperial Eagle and a small amount of milliput to create a bevelled edge around the perimeter.
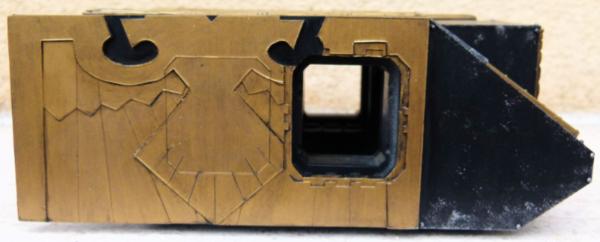
Some more plasticard was used to make the Imperial Eagle on the side armour as well. I'm not sure about the plain black armour at the front and will probably in the future add one of the large skulls I have to it.
3) Gothic Land Raider
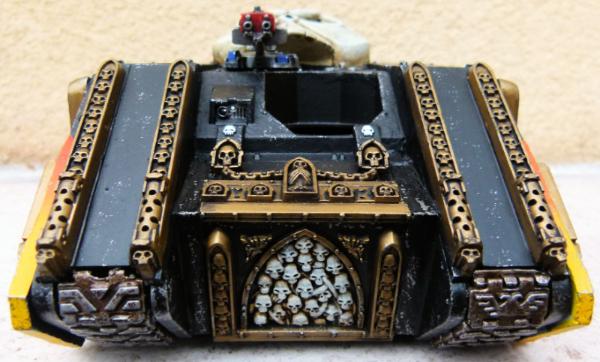
I used lots of Cities of Death parts on this variant.
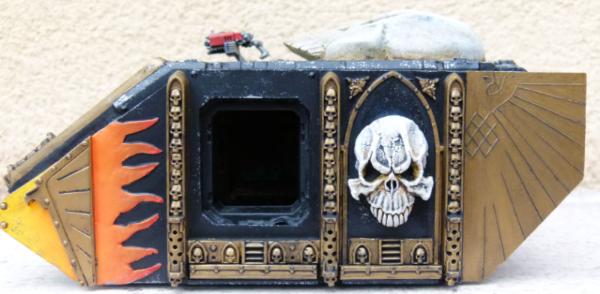
I'm not happy with the look of the milliput sculpted flames at the front of the side armour, but this was made 7 years ago and again, I think if I made this variant again today, I could have made the flames look a lot better. I do remember enjoying making the Imperial Eagle on the rear by cutting the plasticard with a scalpel.
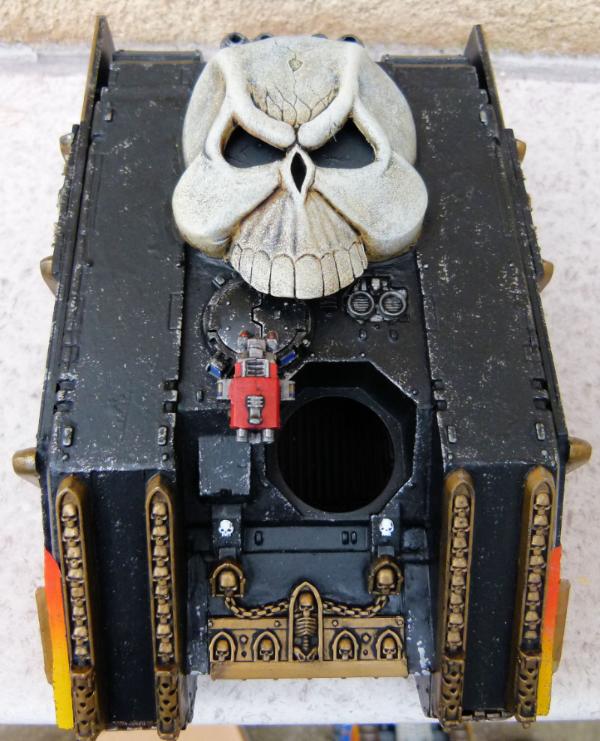
I added a Bulldog Battlegear belt buckle skull on the top of this variant to save me from attempting to sculpt one.
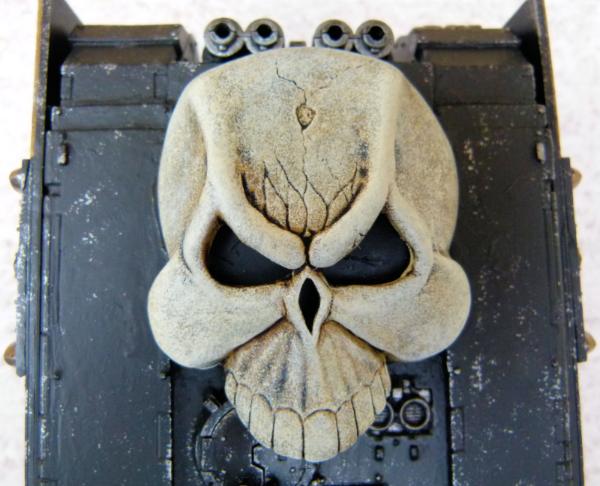
I'm really happy with how this skull turned out 
What's left?
I have one more manticore variant left to complete and that will be all my old variants completed. I have airbrushed all of the flames up the side armour and now need to paint the rest of the model. Pictures will follow soon. Once that is done, I have a lot more projects in different stages of completion that I want to get onto.
Till then, Phil.
PS Here are also some shots of my completed Landspeeder Storm:
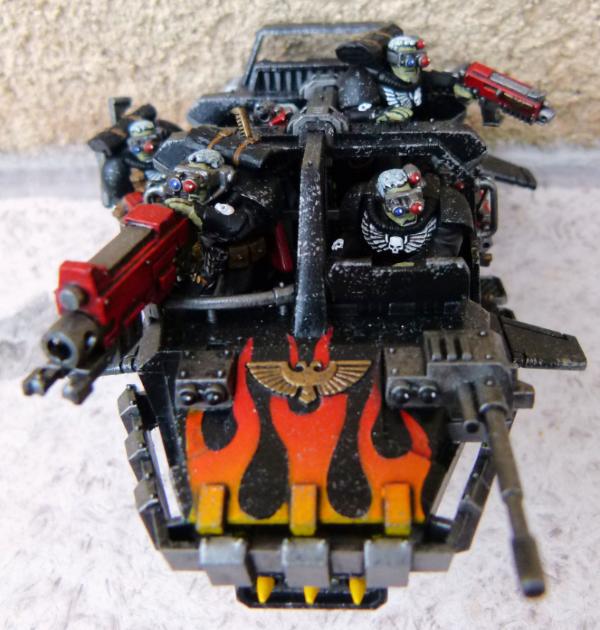
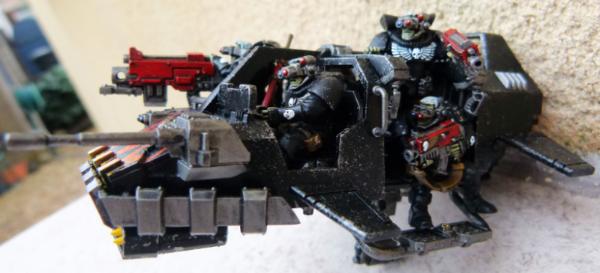
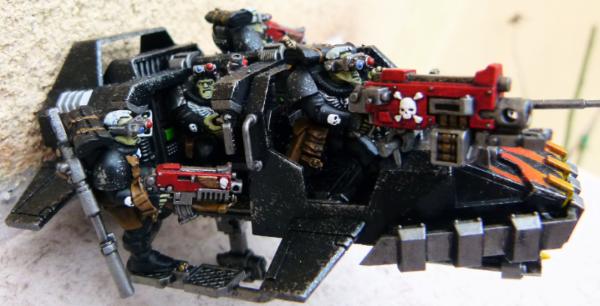
I will make another Landspeeder Storm in the future, but convert the scouts so that they have different poses.
|
|
|
|
|
|
2016/01/03 11:34:07
Subject: Re:Philmorgan75's workshop blog - Legion of the Dead
|
|
Regular Dakkanaut
|
And almost a year since my last update - I have been busy, just not blogging about it!
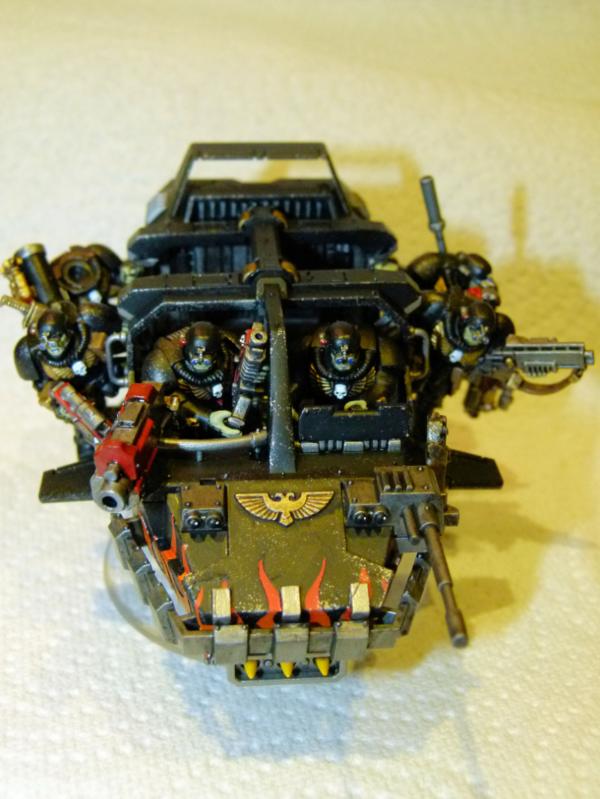
As promised, here's my second Land Speeder Storm. I wanted to go for more of a Special Forces look to the Scouts and purchased some suitable heads from Mad Robot Miniatures. Unfortunately, they only come in packs of 5 and there are 6 scouts on this vehicle! Another pack is on its way from the USA as I write this. Once received, I'll add a head on the Missile Launcher Scout to completely finish this model. I liked the look of the Night Vision Goggles and tried to go with a Blackhawk Down like hanging from the side of the Land Speeder.
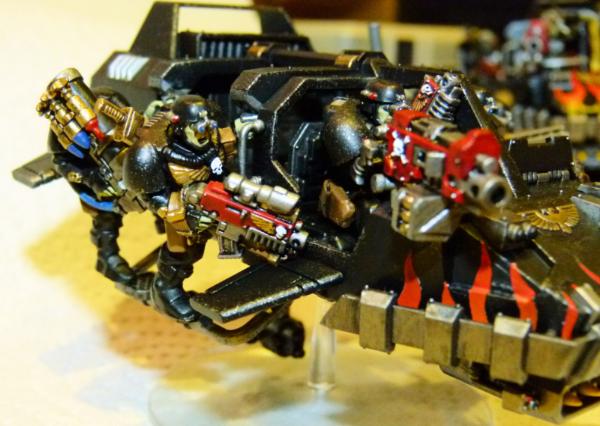
Each of the Scouts were converted to avoid the stock look that every other Land Speeder Storm has.
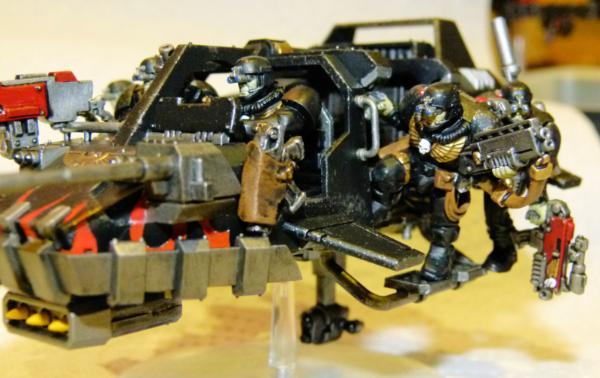
It was a lot of fun converting all of the scouts to have them hanging on and dangling over the skids.
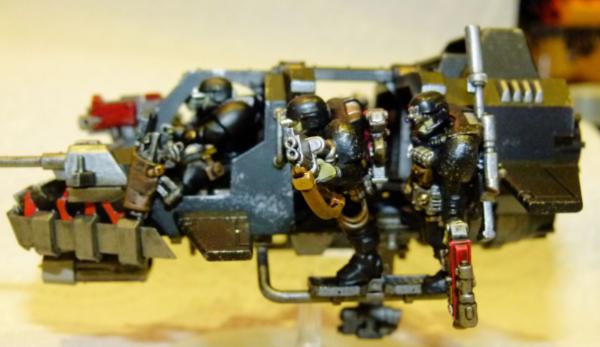
Unlike the first Land Speeder Storm, none of the figures were magnetised as there wasn't any suitable locations to hide the magnets.
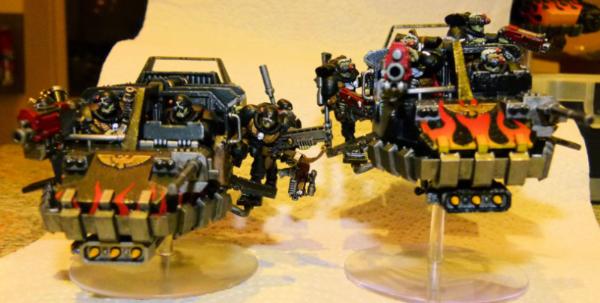
Here are the 2 versions together. I enjoyed the converting of the Scouts and will probably go back to make more Special Forces like Scouts in the future.
Land Speeder Vengeance
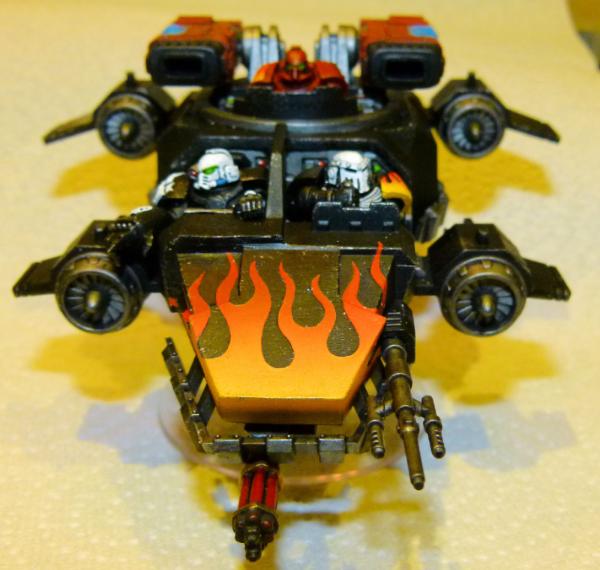
I never liked the DA version of the Vengeance as I felt the Assault Cannon turret at the front looked kind of stupid. After getting all of the bits from various sites, I converted the front with milliput to make it far more stream lined - I added an old under hanging metal Assault Cannon from an older variant of Land Speeder.
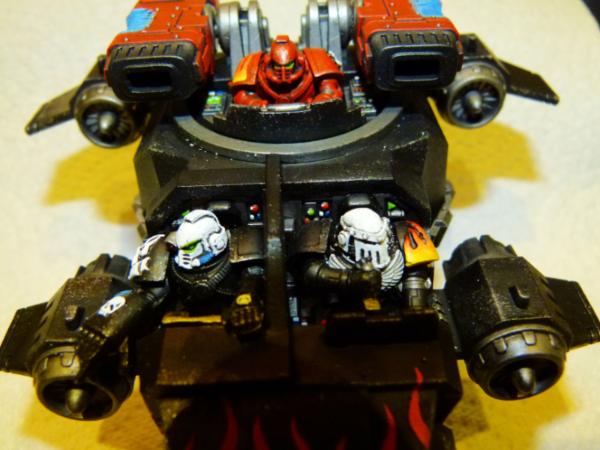
Here's a close up of the different variants of marines I used.
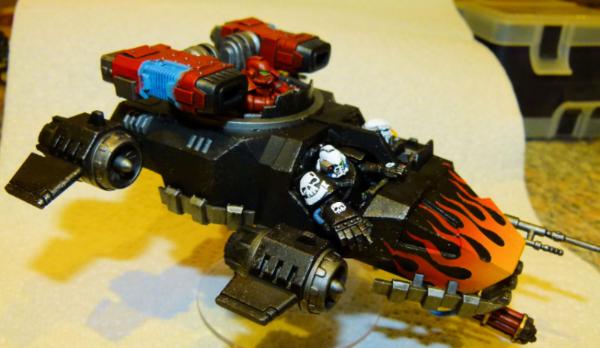
Here's a shot from the right side....
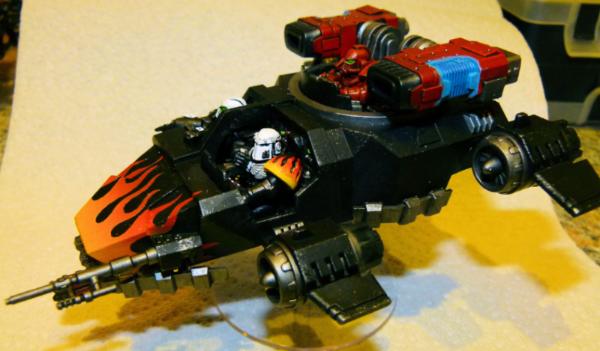
.... left side......
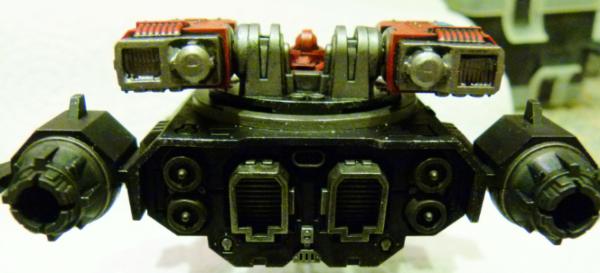
.. and rear.
I have a lot more projects running at the same time and I promise far more frequent updates in the future.
|
|
|
|
|
|
2016/01/06 22:12:55
Subject: Re:Philmorgan75's workshop blog - Legion of the Dead
|
|
Regular Dakkanaut
|
Update time. I've been working on numerous projects at the same time:
Dreadnought Drop Pod
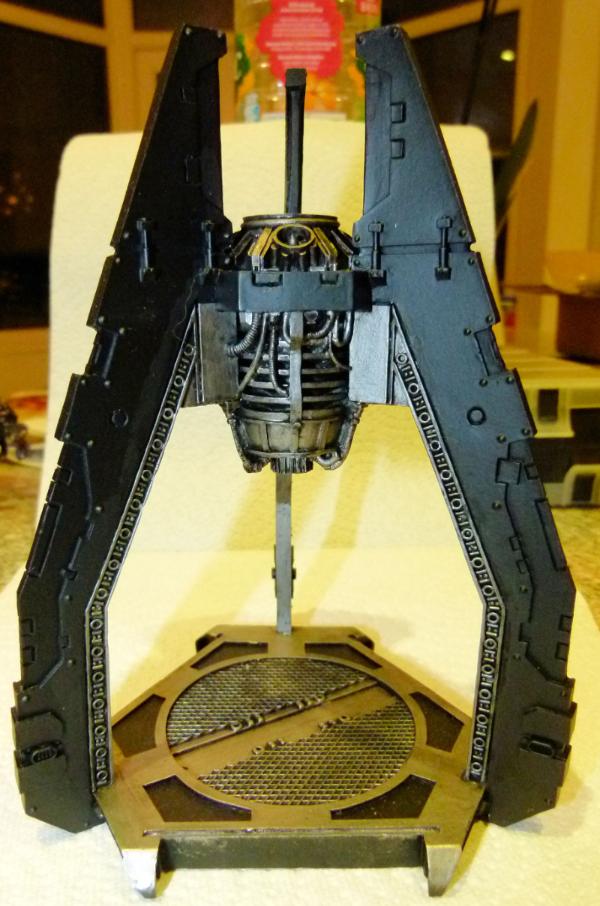
I've blocked the base colours in on my Dreadnought Drop Pod. The power cables need to be done before I move onto the 3 doors. They'll have the usual flames on the outside and hazard stripes on the inside edges. A gun metal sponging for weathering and it'll be finished.
Deimos Whirlwind Scorpius
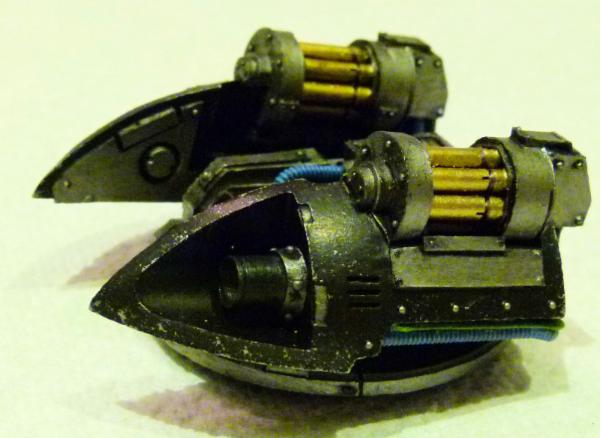
This FW design looks so much cooler than the GW version. The turret is finished, just the rest of the model to do!!!!
Thunderfire Cannons
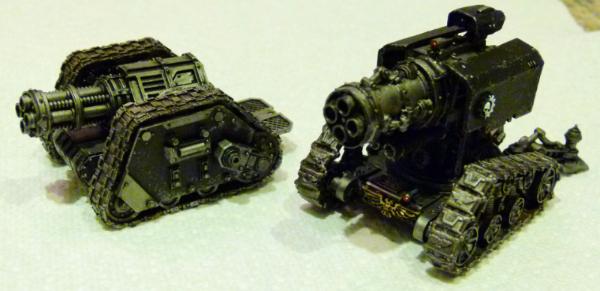
Here are the 2 different versions almost completed. The FW one on the left needs its mantle painted - not sure to go with flames or hazard stripes?
I added some FW etched brass imperial Eagles to the tracks to show how loyal my legion is. Still need to clean up the Techmarine and operators before I can put this one to bed.
Spartan Conversion
I've got the airbrush flames onto my conversion, I just need to clean up the over spray before I move onto the metallics.
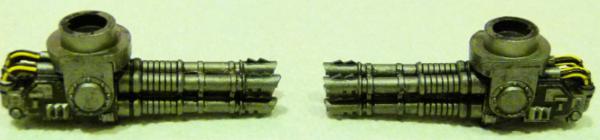
Managed to finish my converted sponson weapons though.
Leman Russ Incinerator
I love this model - who doesn't like a large plasma cannon. I know Space Marines can't have these vehicles BUT I follow the mantra that if it looks cool, I want it!
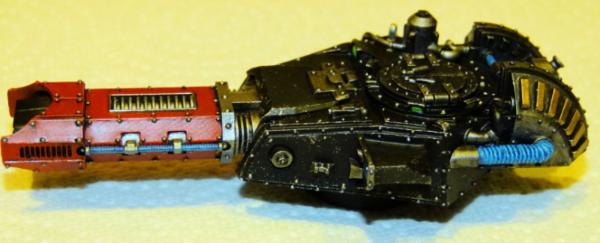 Vehicle weapons
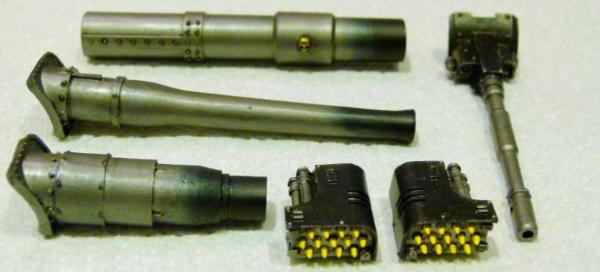
These are finished weapons waiting for the finished vehicles:
Sabre Tank Destroyer conversion
Solar Auxilia Basilisk
Solar Auxilia Medusa
Javelin Missile Launchers
Deimos Autocannon
Over Christmas I decided to mix it up - I tried to do all the little jobs that I normally do after I finished a vehicle (weapons, crew, hatches etc). See some of the things below:
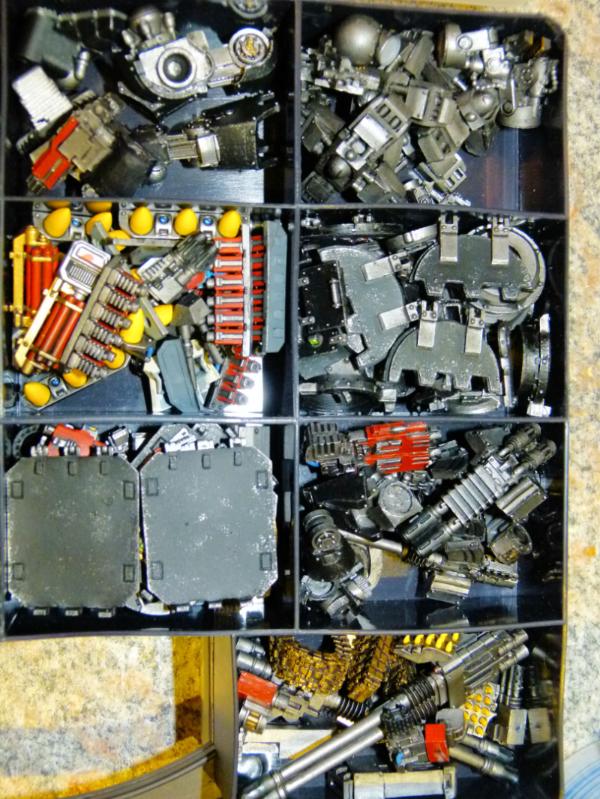
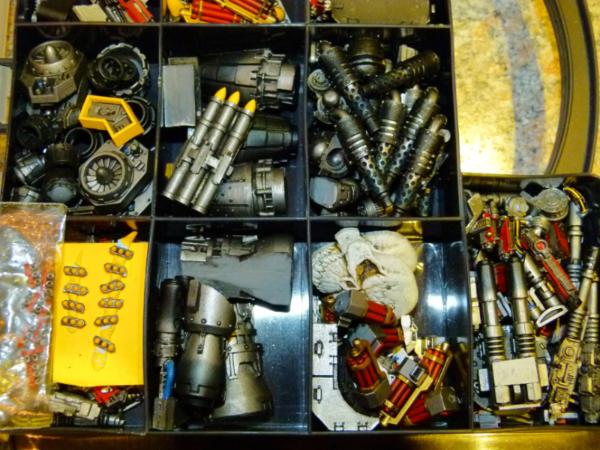
Who can name the most vehicle/model parts in the last 2 photos????
|
|
|
|
|
|
2016/01/17 21:32:26
Subject: Re:Philmorgan75's workshop blog - Legion of the Dead
|
|
Regular Dakkanaut
|
Update time:
Dead Space Marine Terminators

I managed to put the finishing touches to my dead/wounded Terminator Sergeant. I'm not happy with the writing on the chest, but I just wanted to finish this model to move onto other painting projects rather than finding a technical pen in town.
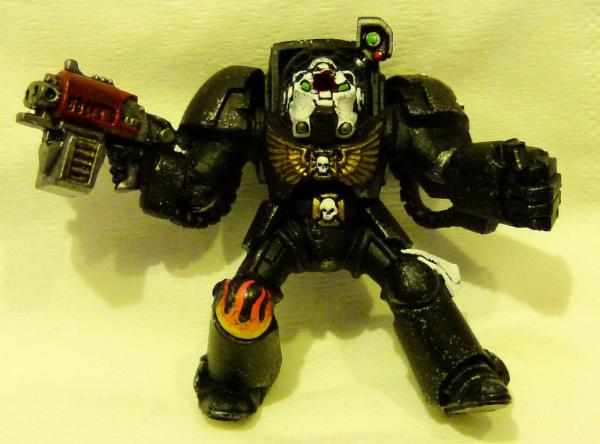
Wanted to try to pose a just been head shot terminator. I haven't decided what base to use at the moment. I've done grass and snow in the past but will probably try something different eventually on this one.
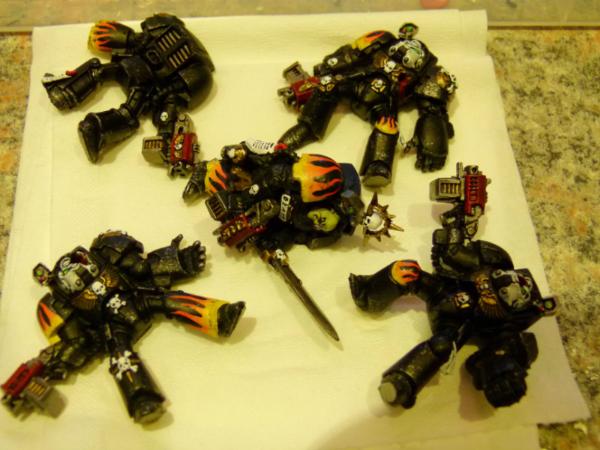
A finished group shot of the destroyed squad.
Legion of the Damned
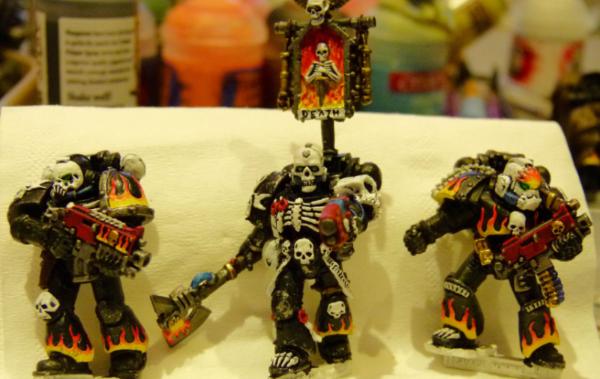
I based my Legion of the Dead off the original Legion of the Damned I saw back in WD99. I picked up a squad recently and have almost finished them - just need to base them (I've got some resin lava bases and am considering using them).
For a bit of variety, I used a FW Nightlord helmet on the trooper on the left and a FW Salamander helmet for the one on the right.
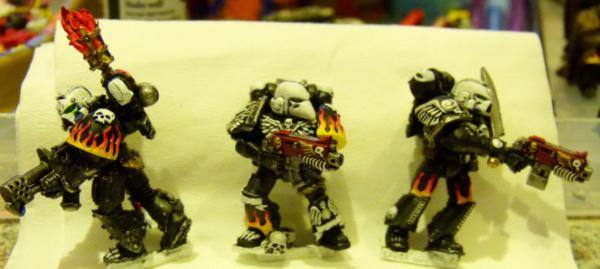
Three more completed troopers....
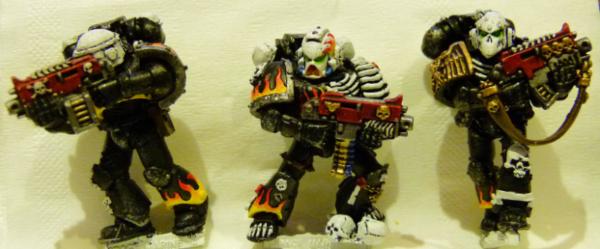
..and the final three.
Limited Edition figures
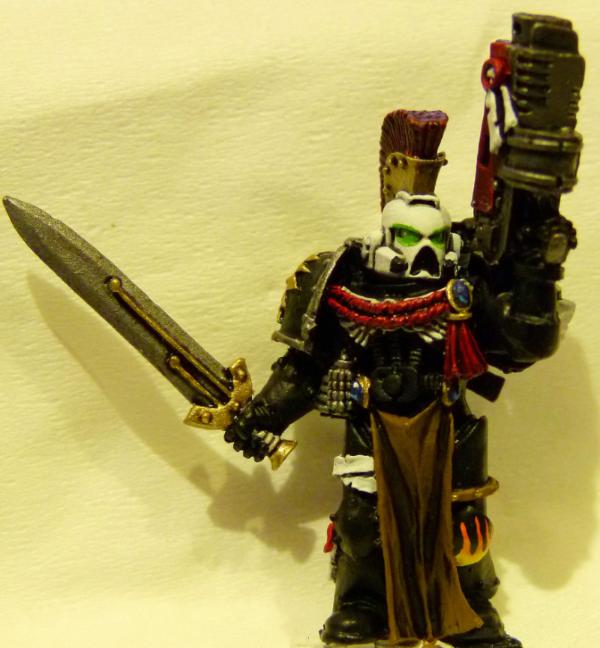
I bought this a few years ago and never plucked up the courage to paint. I came across it a few weeks ago and thought as I was painting lots of flames on other troopers, I may as well have a go. I'm fairly happy with it. I would prefer to use the airbrush to give his eyes a "glow" effect but I haven't got a steady enough hand for such a small area - a paintbrush will have to do!! A base and this figure will be finished.

I picked up a Sgt Centurius on ebay a few years ago and wanted to try something different - I plan on sawing a number of models in half and then sticking them to the side armour of a Land Raider to give a 3D effect. I have lots more projects to complete before I get around to it though, so this will go on the back burner. I enjoyed dabbing some blood on the chainsword!
Terminators
I picked up some FW Terminators last year and wanted to magnetise them to allow all different weapons to be carried....
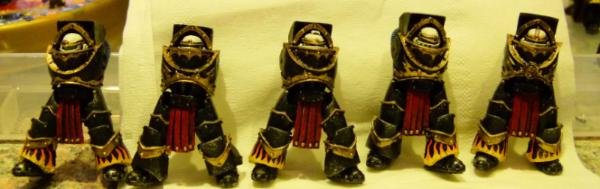
The chests were magnetised to allow different poses. These are completed but I still need to complete all of the chain axes, heavy weapons lightning claws.
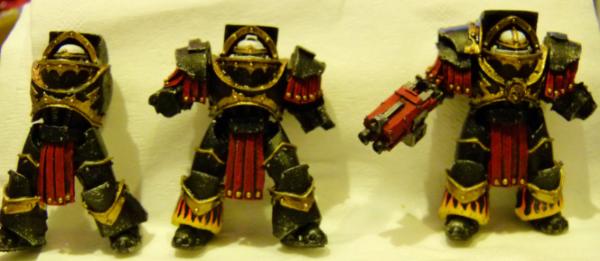
I need to get some top shoulder guard armour from ebay and bits sites to allow all the different arms to be used.
Work in Progress
Here are a couple of things I'm working on....

Some scout bikes. I'm still deciding if I'm going to add flames on the front fenders or not.
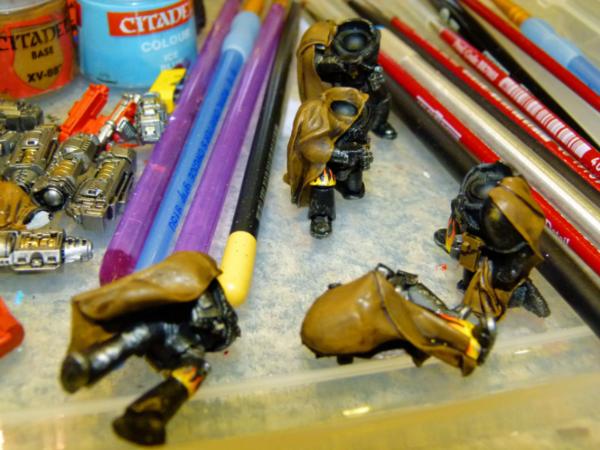 FW
FW Mk4 Recon Squad. These are lovely models but the clean up on the weapons was a nightmare!!
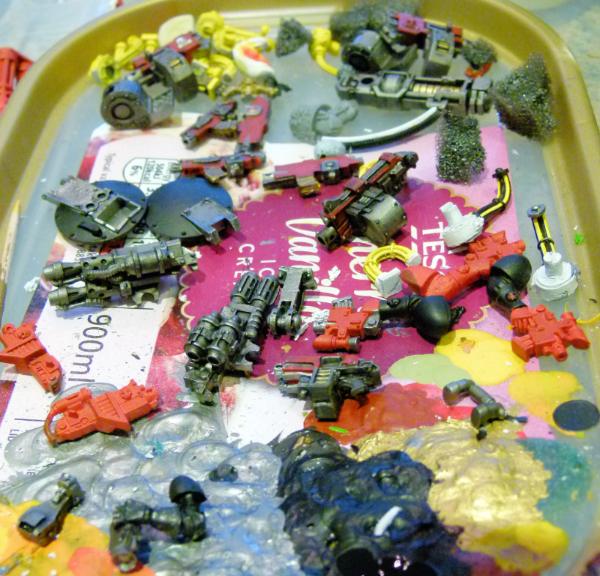
Lots of different small projects that whenever I have a bit of spare paint being used to complete another project, rather than letting it dry and be wasted, I have a lot of little things ready to be completed.
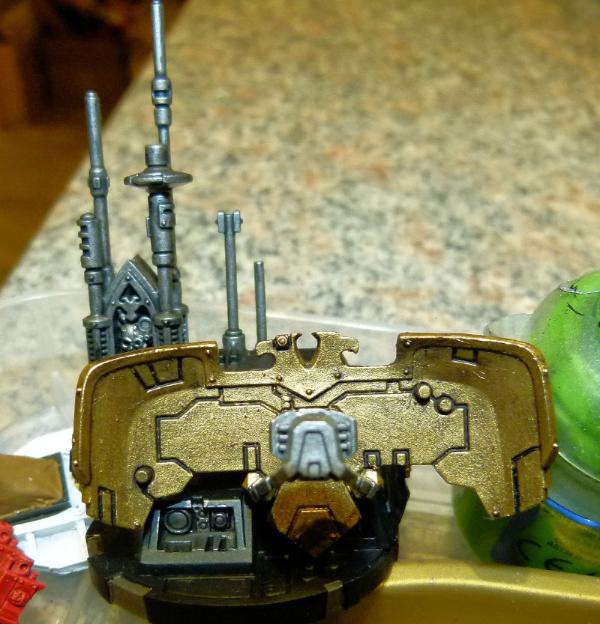
I had the pleasure of visiting Warhammer World last summer and picked up this Rhino Primaris and ...
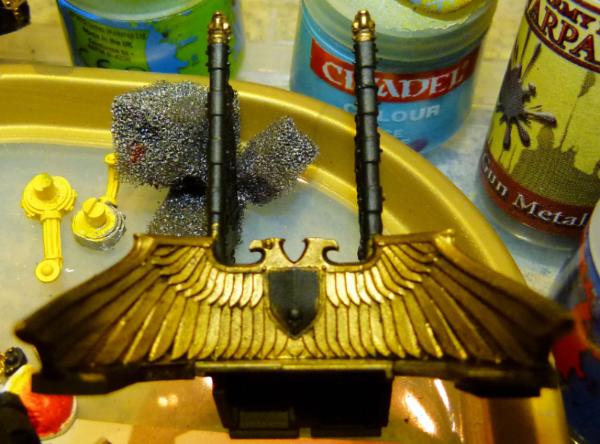
...a Land Raider Excelsior Command Tank. They were lovely kits to build and are on the list of the many vehicles that need to be masked and airbrushed flames over them.
Till next time - Phil.
|
|
|
|
|
|
|
|