| Author |
Message |
 |
|
|
|
|
Advert
|
Forum adverts like this one are shown to any user who is not logged in. Join us by filling out a tiny 3 field form and you will get your own, free, dakka user account which gives a good range of benefits to you:
- No adverts like this in the forums anymore.
- Times and dates in your local timezone.
- Full tracking of what you have read so you can skip to your first unread post, easily see what has changed since you last logged in, and easily see what is new at a glance.
- Email notifications for threads you want to watch closely.
- Being a part of the oldest wargaming community on the net.
If you are already a member then feel free to login now. |
|
 |
2021/05/10 13:25:14
Subject: From marines to Orks. The Waaaagh has started
|
|

Crushing Black Templar Crusader Pilot
|
Orks are looking good. You are right to try and limit your painting to 'nice contrast' rather than your best work, as you can end up completely burnt out.
But then, given your prodigious work on the ultras, it is clear you can work to such a high level across a whole army, so I would love to see such work! These guys are looking well on the way to looking on the much snazzier side for orks
Thanks for sharing
|
  
Relapse wrote:
Baron, don't forget to talk about the SEALs and Marines you habitually beat up on 2 and 3 at a time, as you PM'd me about.
|
|
|
 |
|
2021/05/10 20:22:37
Subject: Re:From marines to Orks. The Waaaagh has started
|
|

Regular Dakkanaut
|
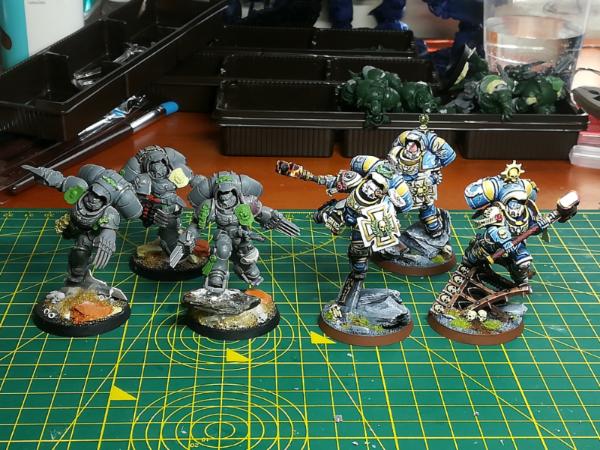
Commented this previously but finally got the "official" diploma on the 3rd place in a painting contest with some of my ultras, organized by Wargames Castellano, a spanish speaking Discord miniatures channel.
A lot of nice entries and fun pieces of work there, check them out if interested 
 Automatically Appended Next Post: Automatically Appended Next Post:  IGtR= wrote: IGtR= wrote:Orks are looking good. You are right to try and limit your painting to 'nice contrast' rather than your best work, as you can end up completely burnt out.
But then, given your prodigious work on the ultras, it is clear you can work to such a high level across a whole army, so I would love to see such work! These guys are looking well on the way to looking on the much snazzier side for orks
Thanks for sharing
Yeah, thanks!
My minimum bar for the orks is going to be the one I set with the flashkids. After the base coat and washes on the Boyz is time to make them look nice rather than just fill out the colors on the right places.
The center pieces of the army are going to be my main focus painting whise, and I have plans for some nice conversions everywhere. You might be able to spot some basic ones on those orks, half of them coming from fantasy miniatures.
Vehicles and some of the monsters are the ones I will focus the most on. I am a bit unexperienced with bigger models since my ultras are mostly infantry, but I will try to learn as I go. Thinking about getting an airbrush.
Any recomendations?
|
|
This message was edited 1 time. Last update was at 2021/05/10 20:27:14
Serve the Emperor today, for tomorrow you may be be dead.
Painting blog:
https://www.dakkadakka.com/dakkaforum/posts/list/793314.page
 |
|
|
|
|
2021/05/13 06:23:01
Subject: From marines to Orks. The Waaaagh has started
|
|
Storm Trooper with Maglight
|
this whole thread is bursting with all kinds of awesome!
thanks for putting me onto this.
your termies have so much energy in them. real action packed!
the stormcast hybrids are a thing of beauty. seamless conversions that look like official gw kits (well more like something fw would have designed.) I love that they have the knightly prescence of bladeguard but with the roman influences of ultramar!
painting it tip-top too!
more please 
|
|
This message was edited 1 time. Last update was at 2021/05/13 06:28:48
|
|
|
|
|
2021/05/14 14:17:28
Subject: From marines to Orks. The Waaaagh has started
|
|
Regular Dakkanaut
|
 osjclatchford wrote: osjclatchford wrote:this whole thread is bursting with all kinds of awesome!
thanks for putting me onto this.
your termies have so much energy in them. real action packed!
the stormcast hybrids are a thing of beauty. seamless conversions that look like official gw kits (well more like something fw would have designed.) I love that they have the knightly prescence of bladeguard but with the roman influences of ultramar!
painting it tip-top too!
more please
Thanks man, glad you enjoy it, and hope you don't mind if I take inspiration from your work on future projects as well
I am looking forward to keep working on a bunch of things when I go back to the UK in a couple of weeks. The new Ork Codex might decide where I start, although I also have some infantry units and vehicle projects coming for the marines.
|
Serve the Emperor today, for tomorrow you may be be dead.
Painting blog:
https://www.dakkadakka.com/dakkaforum/posts/list/793314.page
|
|
|
|
|
2021/05/30 19:17:02
Subject: Re:From marines to Orks. The Waaaagh has started
|
|
Regular Dakkanaut
|
Back to the Uk and exited to get planned and new projects going!
First of all, a big issue I had with my hobbie on my flat on the UK is that I did not have any dedicated space for it, although I was dedicating a ton of time for it. So, some re-structure of the furniture and now I got at least a table close to my working desk fully dedicated to building and painting models. I used for eating or sititng down and talking with friends before, but due to the current situation of the worl, that has not happened for a while so at least I make good use of the space.
If you look at all the early photos in this blog you can see how little space I had before, litteraly wrestling my computer screens and the edge of my working table to manage to get stuff done.
Is nothing fancy, but makes a big difference. I'll try to get some drawers and stands to keep my paints, tools and others organized and clean too.
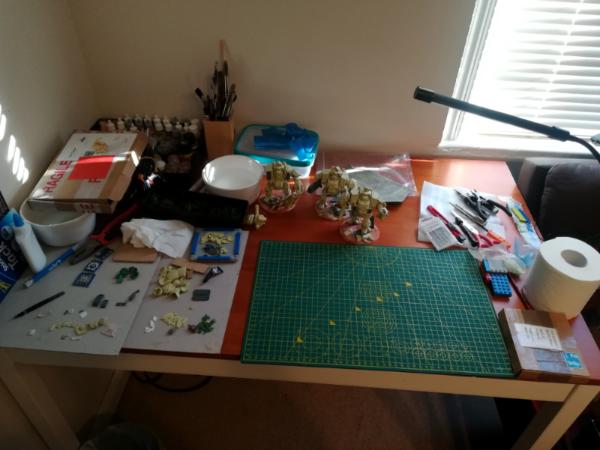
The second big thing is storage for my miniatures.
Cardboard boxes with bubble wrap is free and userfull, foam miniature carriers are great to transport your army safer, but none of them are practical to get your models accessible and stored in your house. Sometimes you just want to look at them, and if you have to spend 20 minutes looking for them and playing tetris to get everything back to what it was... its just so unpractical.
Thus, I ordered some plastic big boxes and magnets, and I'll be oranizing everything in a much neat way. I have seen a ton of recommendations for this method and It's probably exactly what I need, both for storage and accesibility for both WIP and finished minis.
Minewhile, though, I had to unpack everything from under the sofa and bed to start planning what will go where while the order arribes

Now for the miniatures! I took these photos and sit down to write this update because I literally run out of glue, I have no safe gloves for my putties, and the orders I need to keep doing storage stuff have not arrived.
I'll be doing a bunch of building after such a long time just painting minis.
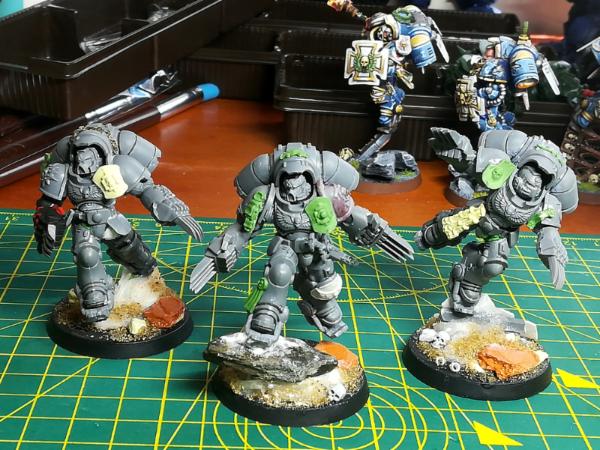
Quick update on my devastators, I builded some more getting up to 12 (10 new and 2 already painted).
I am particularly happy of this solution to mass infantry weapon specialist minis, since you'll rarely have that many of them at once at the table, but you want to have then for your list building.
Magnetizing at the hips opens up a lot of options, and if you need more, you can add more legs, or add more upper torsos to the mix.
By the way, the only acceptable way to build Hellblasters is with the heavy version. I really dislike the dark imperium models where its just an intercessors with a different rifle. And apparently everyone uses these ugly ones. Give them some love, please!
On a last note.. it's me or gluing devastator weapons is the most fustrating thing ever? It looks so simple, but unless you leave them to dry for a while, the glue keeps failing over and over untill you have both arms, torso and backpack on place. The conversions here are super basic to stay in line with my "everything have primaris bodies now" marines, I'll probably add some minor details later.
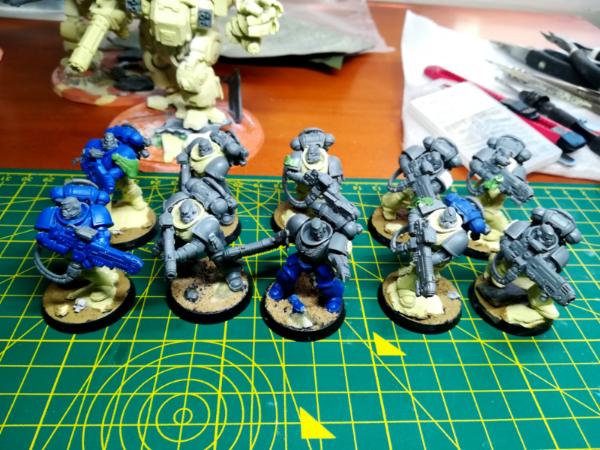 
 
A little more marines come from my vanguard veterans. Some of you might remember me converting some inceptors, and now I will be finishing at least one squad... or maybe two, depending on how fun of the basic inceptors I am. Barely worked on this due to running out of glue, but I hope the news are exiting XD

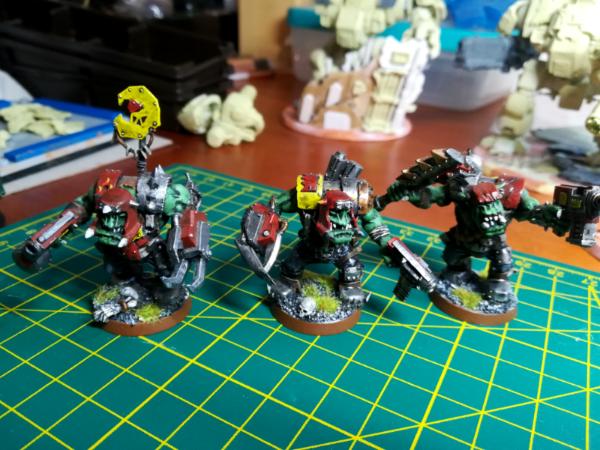
On some more exiting news, blood bowl models look awesome!
I have played the PC game 1 and 2 a bit, and I was looking at the black orc miniatures.. and they look like they would be awesome nob conversions. They look chunky af, and with some 40k bits they might be some of the coolest of the boyz.
I have not seen conversions using these models before, if anyone has seen them please send some links to check them out.
You can see here a comparison with some of my really old nob models. The nob box is great due to most of the bits being awesome, except for the bodies, which are as borring as they could be. The dynamic poses and proportions of the BB black orks is really tempting me to buy 30 of them xD
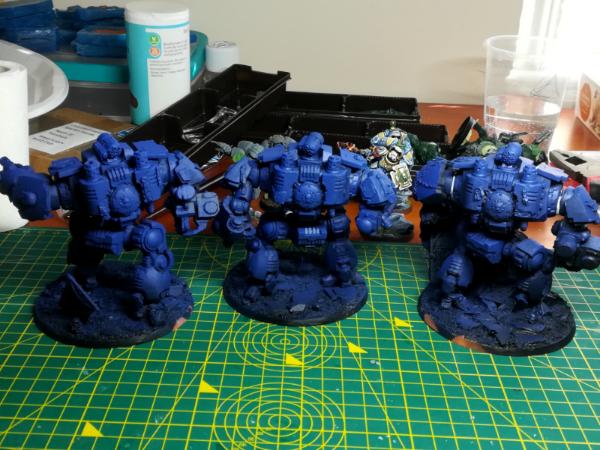
Now the elephant in the room. Well, the 3 of them!
What you can see creeping into the previous pics are 3 home made redemptor dreadnoughts. Those come from a tabletop simulator list that I played for fun with a friend, which ended up being really fun and powerfull to play. I've been making the bits for a couple months and now in the UK I have builded the models, now just lacking decoration and basing.
Due to the structure, weight and massive size I have drilled holes on the legs and added steal rods to reinforce them, and now they seem rock solid. Having 3 of them also allows me to get some variation on the poses, and different decorations to each one. I dislike the vanilla version since its so basic on terms of detail and posing, and wanted to do something a bit different.
Maybe in the future I make a character-like one with a more impressive and over-the-top pose and decoration.

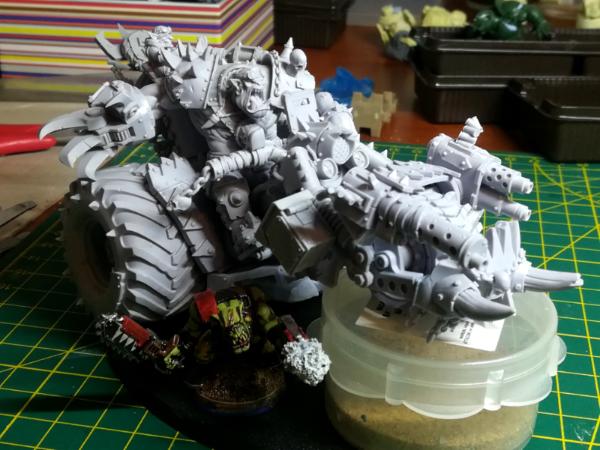
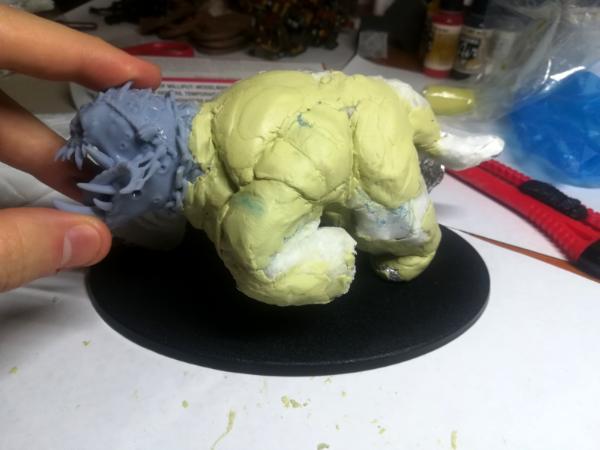
And finally, talking about big home-made minis coming from random tabletop games, here is a whild one: 2 squiggoths on the making!
I am trying to wait on doing any ork stuff since I first want to see what the new ork codex brigns, but these 2 seem like amazing building projects. I made a list using 2 squiggoth carrying flaskids (another of my favorite units in the ork roster), and it was both fun and exiting.

The big issue is that the GW models have great detail, but the pose is as boring as it could be. 3rd parties or ForgeWorld not necesarely offer a better solution. And all of them are expensive af. Looking at the models , I though to myself... Ez, I can do that myself!
So I managed to get 2 3D printed gigant squig heads that will be the start of the miniature, and from there I will model the underbody and legs, and build the castle on top, with as much orkyness as I can.
This is not going to be a fast to complete project (I have not even starting ordering the bases for the finished mini, the milliput or all the plasticard), but I just wanted to announce it so you keep checking the updates on it
I have a lot of ideas and it will need a lot of exerimentation, but hopefully it will be well worth!

As a final note, I also have space marine tank magnetization and conversions, ork vehicle scratch building and ork infantry standarization projects ,but those will come on a later date.
|
Serve the Emperor today, for tomorrow you may be be dead.
Painting blog:
https://www.dakkadakka.com/dakkaforum/posts/list/793314.page
|
|
|
|
|
2021/05/30 19:51:23
Subject: From marines to Orks. The Waaaagh has started
|
|
[DCM]
Librarian with Freaky Familiar
|
Looks like you have plenty to keep yourself busy. Did you bring back all of the stuff you painted in Spain? The Squigoth builds sound cool, what sort of pose do you plan to give them?
|
Goberts Gubbins - P&M Blog, started with Oldhammer, often Blackstone Fortress and Void Panther Marines, with side projects along the way |
|
|
|
|
2021/05/30 20:33:51
Subject: From marines to Orks. The Waaaagh has started
|
|
Regular Dakkanaut
|
 gobert wrote: gobert wrote:Looks like you have plenty to keep yourself busy. Did you bring back all of the stuff you painted in Spain? The Squigoth builds sound cool, what sort of pose do you plan to give them?
Yeah, got everything with me. I'll be doing some whole army photos and show the progress from last year to now, as well as an "inventory" of what I've got with marines and orks to organize myself moving foward. I got a bunch of ideas for both, although marines are going to be more aimed to completing the army, while orks will depend more on the up-comming codex.
For the squiggoth poses I will try to do a couple of drawings to visualize it better. (or maybe 3D poses if I find a good skeleton for to represent the right proportions), but basically the one with the mouth open will be widely charging forward, fast and furious style, with a bunch of orks excited for the impact on top of him. The other one will be walking foward, with the crew having a hard time making him follow instructions, or doing repairs on the armour. Some orks shooting guns and looking thought holes on the weapon ports, maybe a fun mini-scene here and there.
Automatically Appended Next Post:
Quick first sketch idea of the charging Squiggoth. I am not the best artist, but I belive it gives an idea of what I am going for. I'll do another one for the 2nd squiggoth tomorrow.
Details and scale may vary when I make the actual model. I want to keep the size of the model relatively accurate to the official one and I depend a bit on the bits and my ability actually pull it off. I have never donr a model like that, so this will be a fun experiment. What are your thoughts?

|
|
This message was edited 3 times. Last update was at 2021/05/31 14:04:45
Serve the Emperor today, for tomorrow you may be be dead.
Painting blog:
https://www.dakkadakka.com/dakkaforum/posts/list/793314.page
|
|
|
|
|
2021/05/31 08:57:50
Subject: From marines to Orks. The Waaaagh has started
|
|
[DCM]
Librarian with Freaky Familiar
|
Wow! That looks really cool, hopefully you manage to pull it off ok. It certainly looks a lot more dynamic than the bought squiggoths
|
Goberts Gubbins - P&M Blog, started with Oldhammer, often Blackstone Fortress and Void Panther Marines, with side projects along the way |
|
|
|
|
2021/05/31 14:11:28
Subject: Re:From marines to Orks. The Waaaagh has started
|
|
Regular Dakkanaut
|
First sketch concept idea of the squiggoths done.
One is going to be charging wildly into the enemy, with a bunch of orks exited for the imapact. Focus on the energy and dynamic pose.
The second one will be walking forward with a more annoyed attitude, with 3 or 4 mini-scenes hapening around the model. More artillery and a more creactive design to the castle on top of the creature.
I will aim to hit a similar size to the GW model. The overall proportions might need to change from the drawing to the actual model, and a lot of the detail will depend on what bits I got and how well I can model it.
  Automatically Appended Next Post: Automatically Appended Next Post: Had some free time and expanded a little bit on the squiggoth sketches.
I have a bunch of ideas and my google image search is crazy right now, but my main concern is getting the size right. It does not matter how good the ideas are if they cant fit, are too big or too small, or the proportions are all wrong.
So, I took some measurements and applied them in a scale image referencing some bits, and the drawings I did.
I am happy to see that the drawins could fit quite well inside of the size of the miniature. By eye I got the size of the head in comparison with the body roughly right, only the walking squiggoth having a head a bit too big in the drawing. I will probably add armor pieces, so the character of the proportions will remain the same as in the drawing.
The big issue is the castle and the crew. In my sketches I made them supper tiny, and will need adjustments when I get to make the miniature. I could swap the orks for grots in a lot of places, but what is clear is that castle is much smaller than I though.
This is admitedly some of the boring aspect of a project like this, but as the saying says "if you have an hour to cut down a tree, spend 45 minutes sharpening your axe".
Now that I have a base of the mesurements and a way to reference my ideas and the bits I will be using, I can make separate pieces here and there and try out ideas without completely starting to make the model itself.
If anyone is interested, the base size will be a 170x105mm oval base, and the size of the miniature is around 6' long, 3,5' wide and 4,5' tall, according to reddit. These mesurements seem right, a bit larger than a rhino.
  Automatically Appended Next Post: Automatically Appended Next Post: Started shaping some of the pose with Aluminium Foil... until I ran out of it. again. Respecting quarentine is leaving me like angry Pingu's meme XD
I had it in my kitchen unused since the dawn of time, so I put it to use somehow.
I have no idea of what I am doing, basically adding parts to get the shape I want. Now waiting for some paper glue to hardern to keep the thing together a bit more.
My plan is to get to a decent shape, and then add a layer of milliput on top of it, and then sculp on top of that base, basically reducing the amount of milliput and weight of the miniature.
I am also thinking of doing something with Papier-mâché. I remember just mixing paper glue and water, soaking newspaper sheets and letting them rest to get a hardened result by the end, and that worked quite well for the scale I need of the base before sculping any details.
I have not done this before, so anyone that could give me some tips or reference videos would help a lot
Got some pics to show. I am using my drawings as a reference and I got them in real size in my screen, so that should be roughtly correct to the overall size of the miniature.
Charging one got to a decent state.
 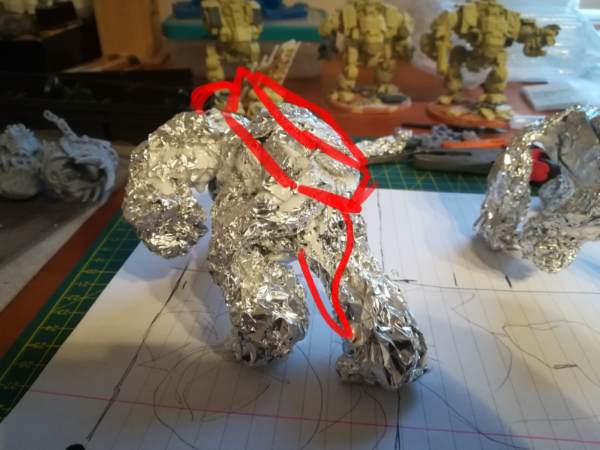
 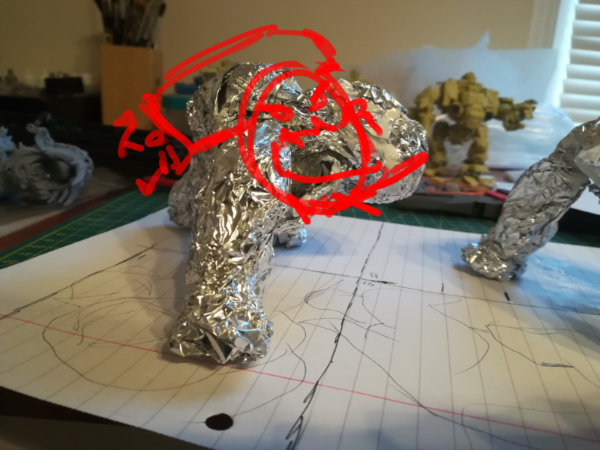
Walking one run out of foil, so it's much thinner for now, but I will bulk it up once I get more material to work with.
  
|
|
This message was edited 2 times. Last update was at 2021/05/31 19:56:22
Serve the Emperor today, for tomorrow you may be be dead.
Painting blog:
https://www.dakkadakka.com/dakkaforum/posts/list/793314.page
|
|
|
|
|
2021/06/01 20:11:48
Subject: Re:From marines to Orks. The Waaaagh has started
|
|
Regular Dakkanaut
|
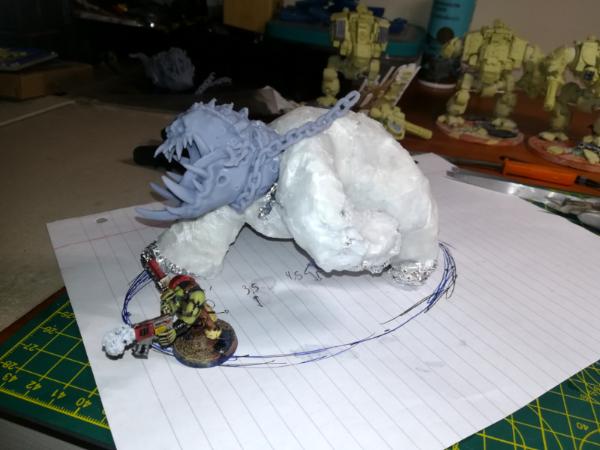
Its working!
I've been watching some videos of sculping and I bought some sculping clay that hardens in the oven.
In the mine time, though, I got my superglue back and tried a trick I have used a lot on my modeling: Toilet paper + superglue = awesome
Placing a piece of toilet paper and then soaking it with with drops of superglue, once harden, results on a really thin plastic layer that is both light an really strong. Surprisingly strong.
I have use that in the past to fill gaps, create irregular terrain, make some cloth or banners. I would not recommend leave it raw since the texture of the toilet paper does not look good at all in most cases, and it can be really easy to tell what material you used, breaking the illusion. Careful with doing it close to your nose, since inhaling a lot of superglue vapors can be a problem.
It is a great base to later add texture or mill put on top, which is what I am planning to do.
Thus, I covered the "skin" of the squiggoth with the most aluminum foil with this recipe and worked really well. The foil underneath is barely compressed, so currently I have a super light yet strong base to work with and sculp on top. I got the basic pose of the miniature relatively right, and the head can be separated from the body for adjustments. Without the head it weights as much as a single plastic ork, and can hold around 2 killos of weight without bending. I will add some steel rod reinforcements later on, but so far looks promising.
Proportions and head are really close to my drawings, so I am pretty happy where this is heading.
Next step will be adding the clay and make the most basic anatomy on and skin folds, trying to get the right shapes before adding any details. The castle on top will be build with plasticard, and I will cut a flat secction of the top of the creature to start from a well leveled shape, magnetizing the connection point both for transport and for easy of work.
   Automatically Appended Next Post: Automatically Appended Next Post: Since my main plan is to use the sculpting clay that will need to go into the oven to harden, I need to do a miniature test with the materials used so far to see if they will melt, be set on fire or ruined by this process. If it does not work I will need to use milliput or some other modeling material instead
|
|
This message was edited 2 times. Last update was at 2021/06/01 20:16:30
Serve the Emperor today, for tomorrow you may be be dead.
Painting blog:
https://www.dakkadakka.com/dakkaforum/posts/list/793314.page
|
|
|
|
|
2021/06/04 19:21:04
Subject: From marines to Orks. The Waaaagh has started
|
|
[DCM]
Librarian with Freaky Familiar
|
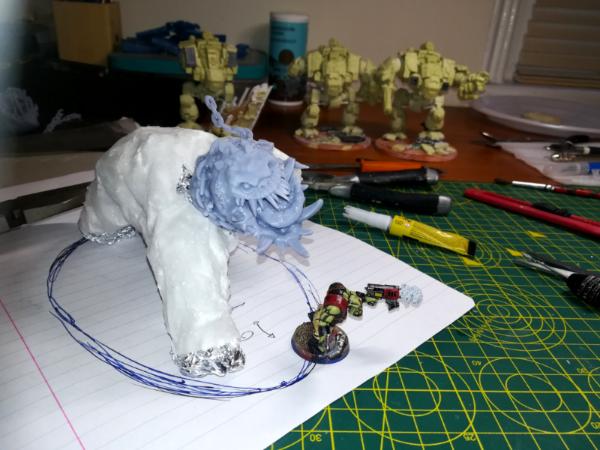
Looking good Killatores, you seem to have captured the pose of the sketches really well. I’ve seen good results come from tinfoil frames before, check out theCrowe for how he did it. I think he might’ve used tp papier-mâché to bulk up armatures too. Good luck with the rest of it
|
|
This message was edited 1 time. Last update was at 2021/06/05 19:10:09
Goberts Gubbins - P&M Blog, started with Oldhammer, often Blackstone Fortress and Void Panther Marines, with side projects along the way |
|
|
|
|
2021/06/04 21:03:56
Subject: From marines to Orks. The Waaaagh has started
|
|
Regular Dakkanaut
|
gobert wrote:Looking good Killatores, you seem to have captured the pose of the sketches really well. I’ve seen good results come from tinfoil frames before, check out [url=https://www.dakkadakka.com/dakkaforum/user/profile/95087.page] theCrowe[\url] for how he did it. I think he might’ve used tp papier-mâché to bulk up armatures too. Good luck with the rest of it
Queers, I'll check it out. I will take a white lo finish them, but I hope to have a couple of really impressive monsters for my games Automatically Appended Next Post: Talking about impressive montser...
I've been looking for inspiration for ork miniatures for a long time. I have been specially looking for warbosses on bike models and conversions, since GW unexplicable does not sell one, and the forge world one is a bit ... meeeh. There this webpage that 3D prints and designs minis that have some really owstanding ork models: WArtel. Do yourself a favor and check them out. The ork warboss on bike is just insane.
https://artelw.com/Iron-Rider-p243003339
After some back and forward I decided to pick some HQs for my ork army, expecting them to arrive in a couple of months (postage from Russia). By then I expected to get most of my current projects close to done, and thus having the time to dive into them. Today though, much earlier than expected, something arrived on the mail today, and couldnt stop myself from building it.
These are the best miniatures I have handled. Some sites show render images of the models since their actual miniatures dont look as good, but these look as good in your hand as they do on the screen. Extremely clean detail, no printing errors, perfect fit and almost no cleaning required (ni mold lines to be seen anywhere). The design and detail is GW-like but a bit less cartoony on proportions, almost like HD version.
I will wait to actually paint them after I have experimented a bit with my ork painting scheme, since I want these to really shine. The biker will be painted in 20 separate parts, since it just has that much detail on it that you cant reach everything comfortably otherwhise.
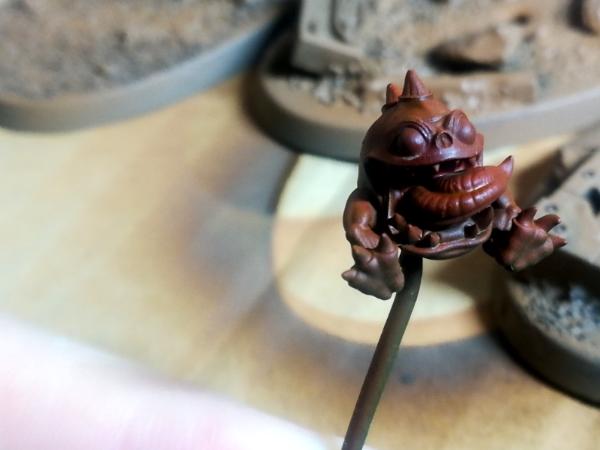
I need to see if pet stores sell squigs, because seeing this one just makes me want to hug one. Looks so happy!
Automatically Appended Next Post: Other supplies arrived which allowed me to magnetize all the bases for my marines, and make safe boxes to keep them in.
Stora has become a problem. Until now I was mostly using carboard boxes with bubblewarp, and a Foam case.
Both of those are really safe both for transport and storage, but are really annoying for practical storage. If you want to see one of your minis, either to work on it, reference or just look at it to get some inspiration, you need to spend 10 minutes looking and upacking half of your boxes, to then use the mini for 2 minutes and pack up everything again.
Ihave seen this plastic box + magnets solution recomended a lot online, and I gave it a shot. Results? Quite good.
I needed a significant amount of magnets, but once everything is in place, it holds one really well, the space is used efficiently, and the models are really accesible. Only downsides are that metal and tall miniatures need more magnets, either to keep the miniature on place due to weight, or due to putting in on the side of the trail.
Maybe the A4 magnet sheets I am using are too weak since I ended up needing 2 magnets per miniature. I have ordered more from element games and see if that helps out.
It has been a bit of work to blue magnets to over 100 miniatures, but from now one it should be a "do as you go" thing. Still have a bunch to magnetize, but that mostly my orks and space marine Terminators, since I run out of magnets.
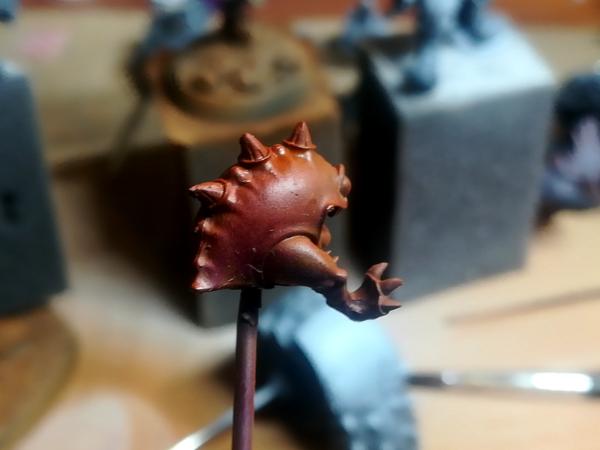
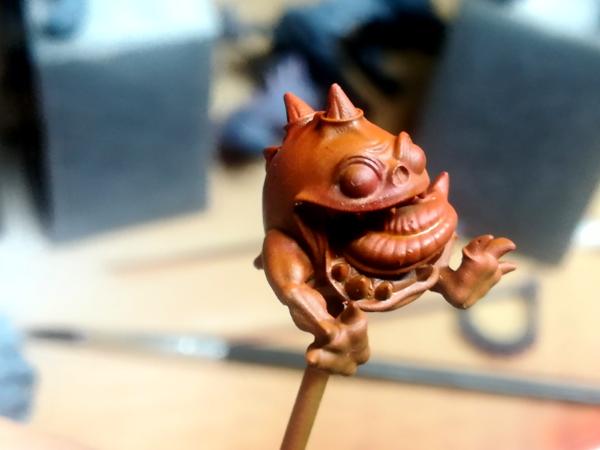
  Automatically Appended Next Post: Automatically Appended Next Post: Since I was looking ork models as a reference, I stumbled onto Blood bowl back ork models, and I could not stop myself from picking up some.
I have not seen anyone converting them into 40k nobs, and they just look like a perfect fit. They are not that much bigger, but so much chunkier in every way.
Dont get me wrong: I love the ork nob box, and its one of my favorite units... although they are quite bad on the tabletop (Lets see what the codex does for them), but although they come with really cool bits for the most part, the bodies are just terrible. Really , REALLY static poses, barely bigger than a regular ork. This blood bowl guys come to the rescue.
This is a first exploration, I'll be doing some more on soon.

PD: For the longest time I have only concived of ork nobs to use a claw and a pistol, but after seeing many dawn of war 2 competitive matches, the big choppa feels so much more attractive.
|
|
This message was edited 3 times. Last update was at 2021/06/04 21:31:24
Serve the Emperor today, for tomorrow you may be be dead.
Painting blog:
https://www.dakkadakka.com/dakkaforum/posts/list/793314.page
|
|
|
|
|
2021/06/06 18:26:45
Subject: Re:From marines to Orks. The Waaaagh has started
|
|
Regular Dakkanaut
|
More updates... I run out of glue AGAIN.
When I came back I ordered 2 brands of glue. The second one is just terrible. Super thin and runny, got everywhere and it run out at a nerve-wracking phase. I believe I just did a single 3 man unit with the same amout of glue I used for magnetizing all the bases of my marines, + building 3 dreadnoughts and about 10 other minis. And it was more expensive as well.
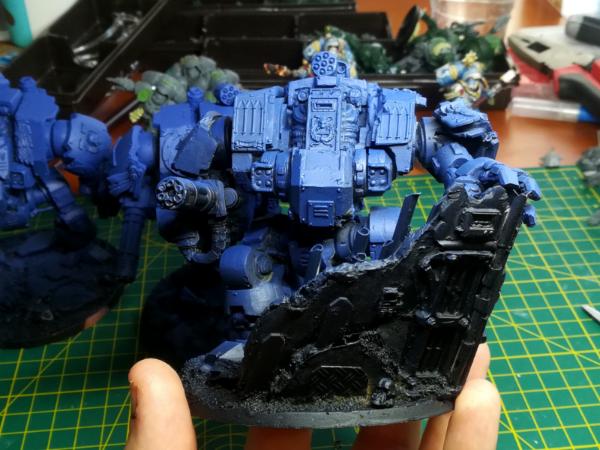
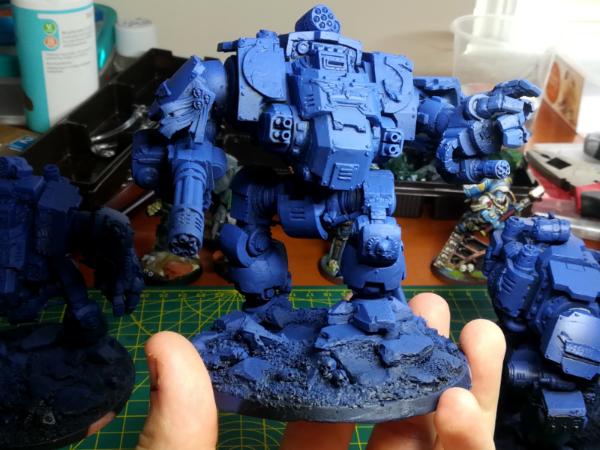
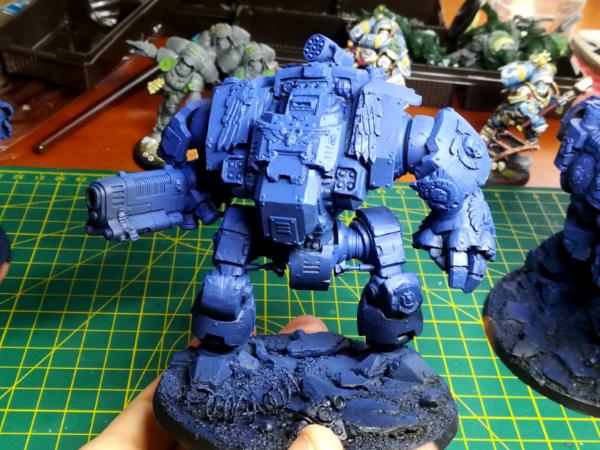
On a more positive note, I primed some miniatures, today the dreadnoughts and some of the orks.
Since I still have some blue primer, I did a gradient on top of a base layer of black primer, and the blend although subtle o nthe pics is quite nice. I will be getting an airbrush soon and this little exercice really got me exited, since I got some big projects comming up and it would be a great tool to have.
Although these miniatures are quite heavy, I drilled steel reinforcements through the legs and sealed them with green stuff. The arm connections might be a weak point, but they are big enought that the glue should hold them correctly.
I managed to decorate them to a point where they do not look completely vanila, and some of the poses are distinct enough that you should be able to tell them appart on a battle. The pointing one was inspired by the stratagem that gives Captain/luitenant auras to a dreadnought, making him look like giving orders and tips to get sweet headshots to his brothers.
   Automatically Appended Next Post:
 Got to finish my Vanguard veterans.
These are conversions from inceptors, similar to the ones I already did some months ago. The base poses of the miniatures are quite bad, so making them more dynamic and getting rid of the flying stands can be a bit of a fun challenge. Since I already had 3 with thunder hammers, I made 3 with lighting claws I saved for the ocasion.
The plan is to run them as a 5-man squad, and a captain, probably the one with the 2 handed thunder hammer.
I bought by mistake 6 more easy to build inceptors on eBay, and since I got the bits from the stand-alone box, I made them so 3 of them use the bolters, and 3 of them the plasmas. I run out of glue, so no pics yet since these guys are not connected to their bases yet. If I wanted to more than 2 inceptor squads, I could probably get my vanguard veterans to play as the sargents, probably without anyone complaining about it XD.
|
|
This message was edited 1 time. Last update was at 2021/06/06 18:34:29
Serve the Emperor today, for tomorrow you may be be dead.
Painting blog:
https://www.dakkadakka.com/dakkaforum/posts/list/793314.page
|
|
|
|
|
2021/06/06 21:43:07
Subject: From marines to Orks. The Waaaagh has started
|
|
Crushing Black Templar Crusader Pilot
|
Great job on this latest three: they are so much better without the ridiculous flying stands!
Thanks for sharing
|
Relapse wrote:
Baron, don't forget to talk about the SEALs and Marines you habitually beat up on 2 and 3 at a time, as you PM'd me about.
|
|
|
|
|
2021/06/07 20:22:06
Subject: From marines to Orks. The Waaaagh has started
|
|
Regular Dakkanaut
|
IGtR= wrote:Great job on this latest three: they are so much better without the ridiculous flying stands!
Thanks for sharing
Thanks
It is quite fun to build them, although making them sturdy enough is a bit tricky, drilling the right angles and such for pinning. Automatically Appended Next Post: Since glue is not yet arriving, started some painting experiments.
I had the change to get some new paints back in spain to try with my orks, taking notes from different youtube guides. My method of painting has improved quite a lot since I started, but I always follow the same recipe and method. I wanted to try something a bit different.
Here you can see the same mini in different stages of painting: Metals, baselayer of color, and washes+Stippling. It is still WIP, but I am quite happy with where this is going. This is obviously a painting method that works well for orks but wouldnt for marines, but is a lot of fun to tests stuff.

  
|
|
This message was edited 1 time. Last update was at 2021/06/07 20:27:29
Serve the Emperor today, for tomorrow you may be be dead.
Painting blog:
https://www.dakkadakka.com/dakkaforum/posts/list/793314.page
|
|
|
|
|
2021/06/08 11:42:24
Subject: Re:From marines to Orks. The Waaaagh has started
|
|
Regular Dakkanaut
|
Since I really want to crack on with the squiggoth models, I did a quick test.
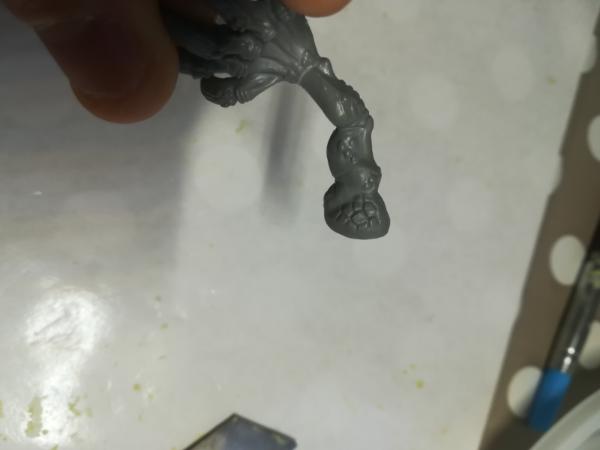
I have bought a clay that hardens on the oven, but I am worried about the temperature ruining the 3D printed heads.
The test shows that 3D printed resin parts, under high temperatures show cracks all over the model. Those do not necesarely break the model or make it significantly weaker, but they obviously show on the surface. leaving some clearly visible lines all over the place. And with bigger parts, the cracks are so wide that become a serious issue.
 
I have glued the heads to the body and they are ready for a sculping pass. I could cut them out, do the base anathomy first with clay, then put it in the oven, and glue the heads back again... but to be honest is a bit too much back and foward. thus I might end up using milliput for everything instead. I believe I am alergic to it, that's why I have been looking for alternatives, but wearing protection and being carefull I can get through it wihtout too much issues.
|
Serve the Emperor today, for tomorrow you may be be dead.
Painting blog:
https://www.dakkadakka.com/dakkaforum/posts/list/793314.page
|
|
|
|
|
2021/06/08 13:11:52
Subject: From marines to Orks. The Waaaagh has started
|
|
[DCM]
Librarian with Freaky Familiar
|
That is a cool method! Did you wash the metals on the final step as well or just the colours?
|
Goberts Gubbins - P&M Blog, started with Oldhammer, often Blackstone Fortress and Void Panther Marines, with side projects along the way |
|
|
|
|
2021/06/08 13:17:26
Subject: From marines to Orks. The Waaaagh has started
|
|
Regular Dakkanaut
|
gobert wrote:That is a cool method! Did you wash the metals on the final step as well or just the colours?
Cheers!
A bit of both. First I applied a lighter tone, then a wash (brown, purple or black, depending of the base color), , then higher tones, particularly on the reds, almost to an orange. I finished with a yellow ink, which color grades certain areas with a smooth blend. I am still working and trying stuff out on this stage, expect some better results as I keep working on it.
After that, edge highlights and other finishing touches will come.
For the base of the miniature I basically followed this guy's method. Glorious ork scratch building.
https://www.youtube.com/watch?v=wHwnUn4GvwM&ab_channel=ianwyatt
|
|
This message was edited 1 time. Last update was at 2021/06/08 13:18:28
Serve the Emperor today, for tomorrow you may be be dead.
Painting blog:
https://www.dakkadakka.com/dakkaforum/posts/list/793314.page
|
|
|
|
|
2021/06/12 20:47:26
Subject: Re:From marines to Orks. The Waaaagh has started
|
|
Regular Dakkanaut
|
Quick recap!
I got back to the hobbie thanks to a scalation tournament with my workmates that startet november 2019, got me motivated to sart painting more seriously and more importantly, gave good deadlines to get units done to use them on the tableto. A combination of christmas and Covid disolved that friendly competition, but the seed was planted.
Since then I have been working on an off on my collection, trying to get batches of units done when I had the change to do it, and playing online when I could not.
This is a recap of the progress so far.
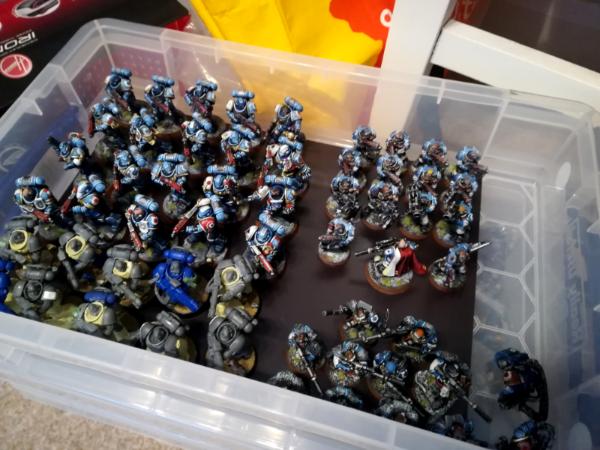
ULTRAMARINES
This is how the army looked by the start of last year, when I was on the middle of the tournament.
My troops where scouts, and most of the models came from giveaways from work, as well as my chilhood minis. Some purchases on ebay from the shiny 8th edition.
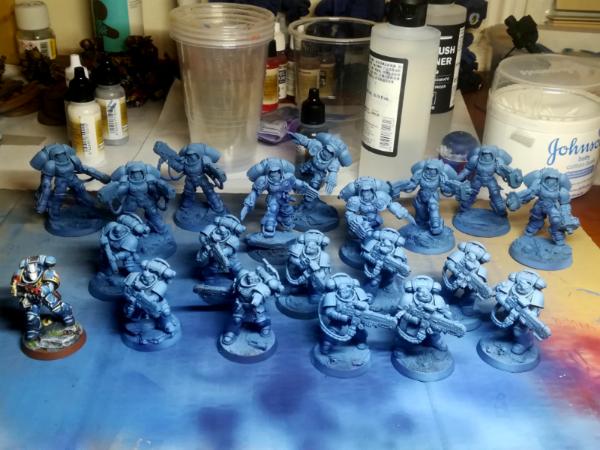
And this is the state of the army today (sorry for the pic quality, I'll try to get better ones.)
A lot of work done and most of the army is painted to a decent level. I Recently I of almost all mini marines and made conversions for my veteran units.
The next big project here is to finish my vehicles, both on conversions, magnetization and painting, followed by the hellblasters/devastators, and some jumpack/assault units.

After that I would consider the army mostly done, with ocasional adittions for some creative list-building, interesting models or just conversion fun.
List of units:
HQ
- Marcellus calgar (old mini, probably will be getting the new one for a conversion at some point)
- Telion
- 2 Chaplains (terminator and jumpack)
- 1 Librarian (terminator)
- 5 luitenants (2 mini-marines, 2 primaris, 1 phobos)
- 2 Techmarines
- 5 captains (Gravis, Terminator, Primaris, jumpack, Motorbike)
TROOPS
- 20 Intercessors/Tactical marines (5 with magnetized special weapons)
- 10 Incursor/infiltrator
ELITE
- 24 scouts (half snipers, 4 with heavy weapons)
- 1 Apothecary
- 6 Bladeguard veternas
- 10 Sternguard veterans
- 5 Vanguard veterans
- 10 Terminators
- 10 Assault Terminators
- 6 Agressors
- 2 Venerable dreadnoughts
- 3 Redemptor dreadnoughts
FAST ATTACK
- 10 Assault intercessors/marines, with jumpack (being converted at some point.)
- 3 Land Speeders
- 8 Bikes, 2 of them magnetized to attack bikes
- 6 Inceptors
- 3 Supressors
HEAVY
- 10 Hellblasters/devastators
- 4 Rhino/razorback/predator
- 6 Eliminators
- 1 Land Raider
Aaaaand I think that's all I can count there. I feel that I am pretty close to finish this army, and I am looking foward for the final units Automatically Appended Next Post: And another quick one for my orks
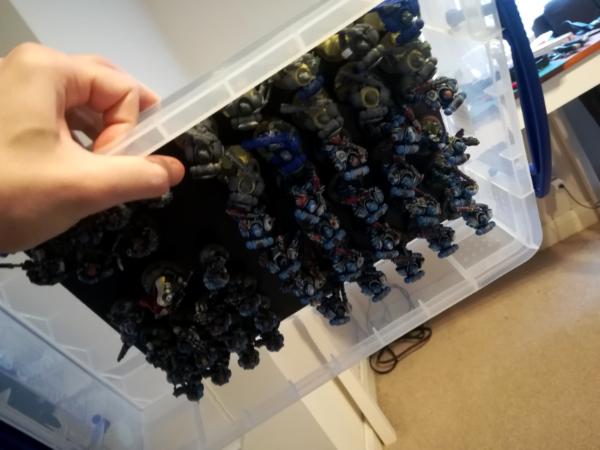
No finished painted models anywhere, and a lot of building, conversion and scracht models on the works.
Other than the squiggoths, Wartel models and kopptars I will wait for the new ork codex to see what I work on next

|
|
This message was edited 3 times. Last update was at 2021/06/12 21:07:28
Serve the Emperor today, for tomorrow you may be be dead.
Painting blog:
https://www.dakkadakka.com/dakkaforum/posts/list/793314.page
|
|
|
|
|
2021/06/14 20:12:56
Subject: Re:From marines to Orks. The Waaaagh has started
|
|
Regular Dakkanaut
|
Airbrush landed!
There are still a couple things missing, most of it is here.
I spent the evening setting it up, practicing cleaning and doing some exercises to get the hang of it. Is going to take some time, but I feel quite good about it on my first few hours.
I moved into some priming and zenitals to see how it works with miniatures, and after the first 3 I did a complete clean up of the airbrush.
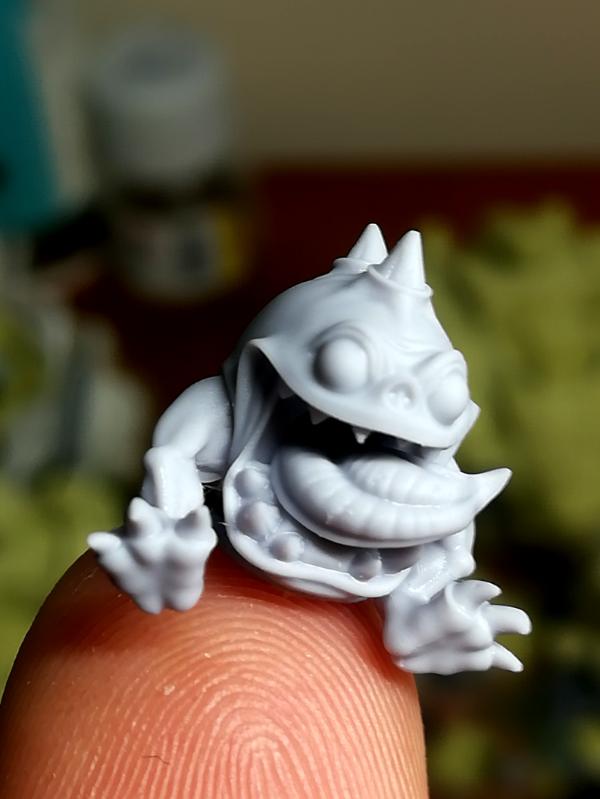
I couldnt let it rest until tomorrow, so I jumped back in doing more zenitals for other models I am planning to paint with the airbrush as much as I can. As far as I understand, zenitals are not too impactul after a coat of base color or two, but is still good practice for the first moments.

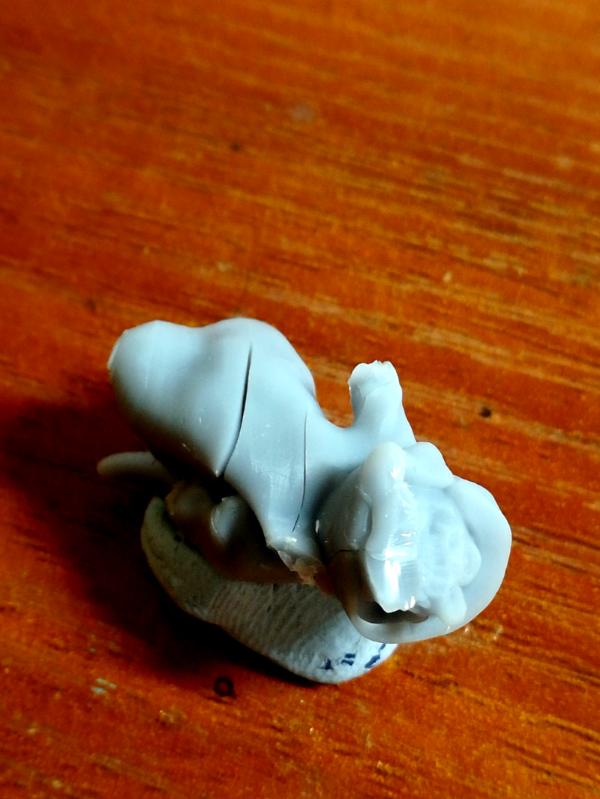
I jumped to paint a tiny squig with some colours and it was a fun experience. The blends do not behave as wet blending does, instead it first goes to white-dark and then picks up saturation, which is a bit extrange but I get used to it.
The macro on my phone is horrible XD
|
|
This message was edited 1 time. Last update was at 2021/06/14 22:25:09
Serve the Emperor today, for tomorrow you may be be dead.
Painting blog:
https://www.dakkadakka.com/dakkaforum/posts/list/793314.page
|
|
|
|
|
2021/06/16 18:55:37
Subject: Re:From marines to Orks. The Waaaagh has started
|
|
Regular Dakkanaut
|
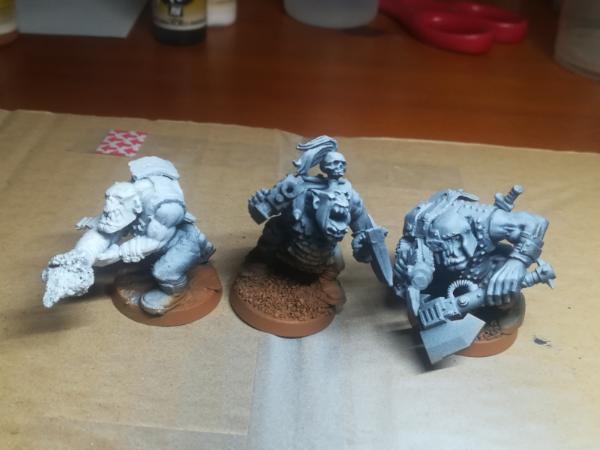
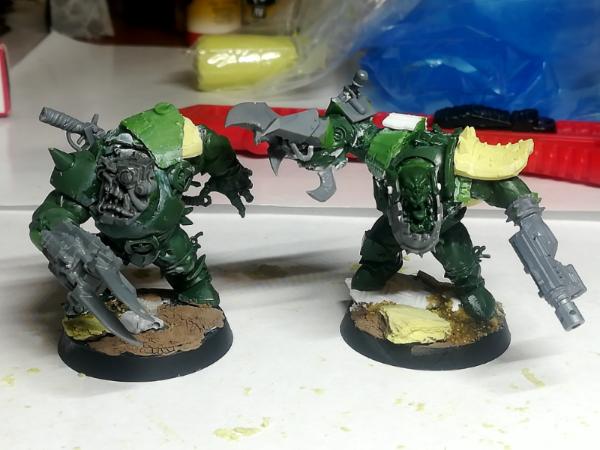
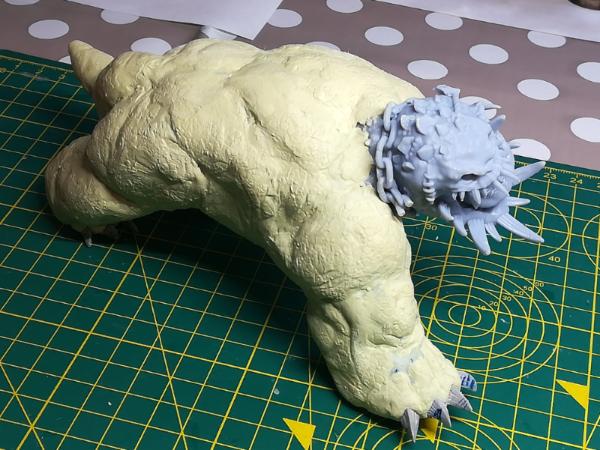
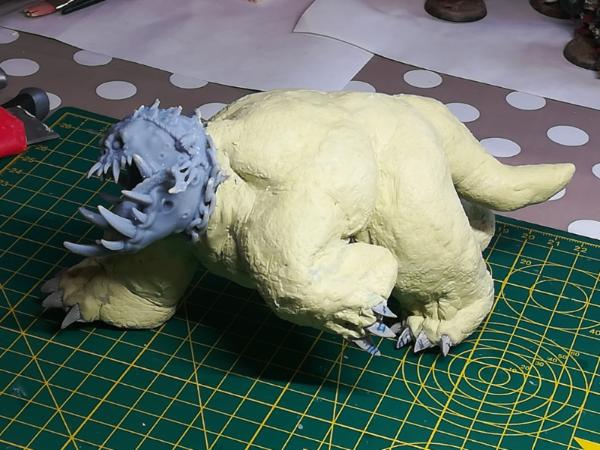
Quick modeling updates for orks.
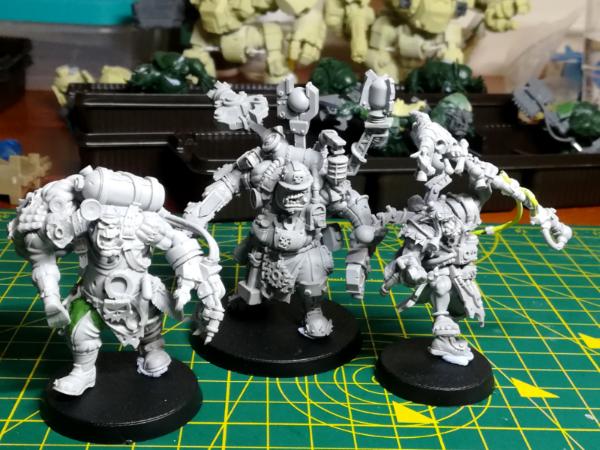
Got the first converted nobs finished, and I am loving them! These come from blood bowl black orks, which have good dinamic, bulky and strong bodies. I ended up cutting and almost reshaping all the arms, using some basic green stuff sculping to get everything looking as it should.
I have not seen this kind of conversions before, and I am exited to paint them.
Talking about never seen before, I did a quick anatomy pass on my squiggoths. Only one side to allow the milliput to cure correctly without deforming it in while doing the other side. I will probably finish the other half before going to bed today.
I barely know what I am doing, mostly following rhino anatomy images to ge the muscle grous roughly in the right places, althouhg I am probably making a mess on several places. If so, please shout!
After finishing the basic anathomy, My idea is to do a skin pass over this, smoothing the shapes and applying the scale texture somehow. I am not aiming to do a really pronounce dinosaur scale type texture, since I think I cant pull that off and I would ruin the model, but something much more suttle and just on certain areas of the miniature, similar to the big squigs in AoS.
The top part of the body will be cut flat to build the castle and scracth build armour on top, so that area does not concern me as much. I want to get the legs right, since it will be the most visible part of the model body once its finished. Having these 3D printed heads really makes the model so much easier to do!
Any feedback, tips or ideas are appreciated.
|
|
This message was edited 1 time. Last update was at 2021/06/16 18:57:27
Serve the Emperor today, for tomorrow you may be be dead.
Painting blog:
https://www.dakkadakka.com/dakkaforum/posts/list/793314.page
|
|
|
|
|
2021/06/18 23:26:08
Subject: Re:From marines to Orks. The Waaaagh has started
|
|
Regular Dakkanaut
|
Some airbrush blue!
The pics dont capture the color too well (I need to stop taking pictures late at night), but basically I got what would otherwhise be 3 weeks of wet blending in about 30 minutes of airbrush.
It is not perfect, I would probably touch some areas depending on how it all looks with the other base colors applied, but it definitely speeds up the process a lot.
I also did a test on one of my rhinos, and I believe it is a success. There are some improvements to make to the basic bluem but the use of masks and trying to get some panel lighting worked quite well. Any tutorials would be appreciate to take ideas on how to make it look better and practice for my other vehicles that will be coming soon.

|
Serve the Emperor today, for tomorrow you may be be dead.
Painting blog:
https://www.dakkadakka.com/dakkaforum/posts/list/793314.page
|
|
|
|
|
2021/06/20 21:33:27
Subject: Re:From marines to Orks. The Waaaagh has started
|
|
Regular Dakkanaut
|
Did the basecoat for my ork nobs conversions.
|
Serve the Emperor today, for tomorrow you may be be dead.
Painting blog:
https://www.dakkadakka.com/dakkaforum/posts/list/793314.page
|
|
|
|
|
2021/06/22 17:39:30
Subject: From marines to Orks. The Waaaagh has started
|
|
[DCM]
Librarian with Freaky Familiar
|
Wow, you’ve been busy killatores! The squigoths are looking pretty cool to me, mimicking rhinos musculature was a good move. The converted Nobs are fantastic, they have a real hulking presence imho and already look great all blocked out
|
Goberts Gubbins - P&M Blog, started with Oldhammer, often Blackstone Fortress and Void Panther Marines, with side projects along the way |
|
|
|
|
2021/06/24 09:49:27
Subject: From marines to Orks. The Waaaagh has started
|
|
Regular Dakkanaut
|
gobert wrote:Wow, you’ve been busy killatores! The squigoths are looking pretty cool to me, mimicking rhinos musculature was a good move. The converted Nobs are fantastic, they have a real hulking presence imho and already look great all blocked out
Ey, thanks man. I hope to get them finished soon, I am waiting to get some masking putty to use my airbrush on some sections without worrying about fking up the rest.
|
Serve the Emperor today, for tomorrow you may be be dead.
Painting blog:
https://www.dakkadakka.com/dakkaforum/posts/list/793314.page
|
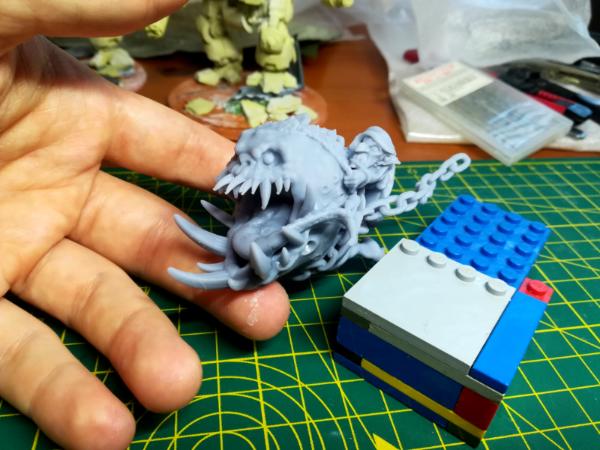
|
|
|
|
2021/06/24 10:16:26
Subject: Re:From marines to Orks. The Waaaagh has started
|
|
Regular Dakkanaut
|
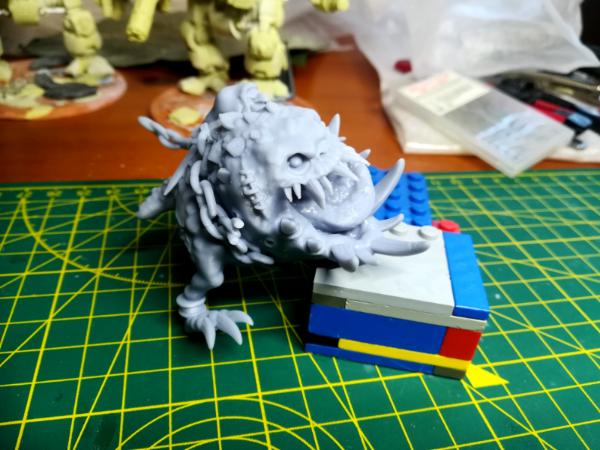
Squiggoths DONE!.... or at least the squigs themselves, not the whole miniature XD
I must say I was pretty nervous about the skin and scale texture pass of the miniature, since this was going to make or break the look of the whole thing, making the difference between a poor or a great model.
I had a couple of ideas that I wanted to try, hoping one of them to make the trick.
By watching sculping videos I saw that many people just hand-draw the scales on the miniature. This is quite a lot of work and I was not sure that I could pull it off, since the material I am working with and my skill is not there yet. I am not a complete stranger to the process, since I have done some 3D modeling in Zbrush using this same method, so I gave it a try. Cleverly, though, I did it in a non-visible area of the miniature, since this would be a hige pain to remove it if failed.
The results where not absolutely terrible, but that was not good enough. Making the whole miniature like this would not have looked alright, thus, I moved to method 2.
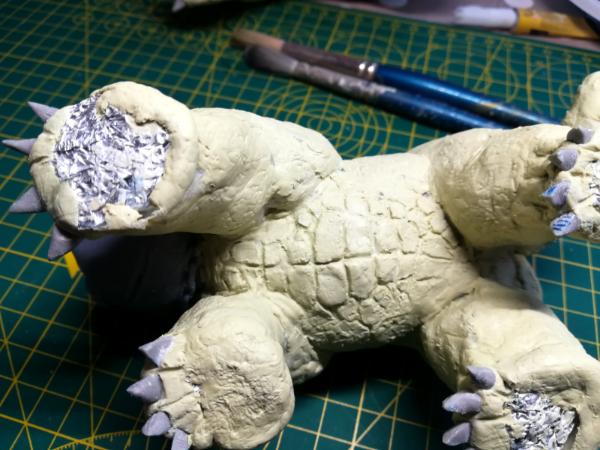 
I tried to use aluminum paper to create texture, since that worked relatively well in the previous step. It did not make any scale-looking texture, but was quite good to add roughtness and rinckles, and ended up using this methoudh in severa areas, specially on the bottom of the feet.
Finally I found the perfect solution. Again, comming from my Zbrush experience, we use a lot of textured brushes on the models, and I looked into my bits to find something scale-looking. Luckly for me I had a couple bits from old fantasy dragons, which had a couple small sections of scales, perfect for what I needed.
With my blue stuff I took some small molds and attached them to the end of brushes to create my texture tools.
I also took some molds of my elbow and finger skin and rincles, again, coming from a 3D experience, used to do this to create textures for my models.
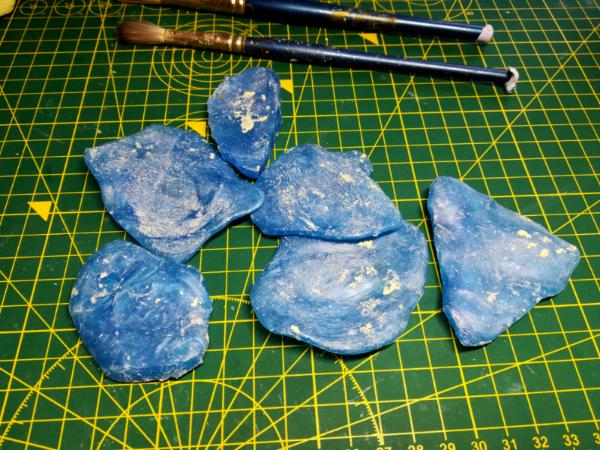  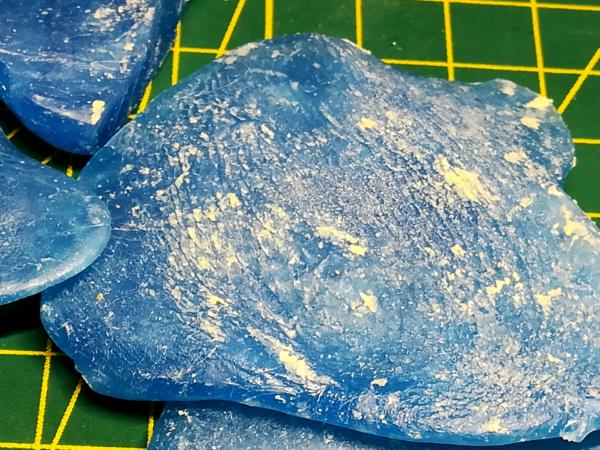
This provided me the tools I needed, and I jumped on making the skin of the squiggoths by sections, to not ruin the areas that where not yet hardened.
I am really happy with the results, and although some areas could be improved, the anatomy is not right in some places, and some of it will be covered by armour or the castle of the miniature, I would say this is a success. I am most proud of the charging squiggoth, due to the texture work and musculature showing quite well on one of the sides, and I will try to hide some of my mistakes or less interesting areas with the castle/other details comming up
For the feet I did some claws with clay (I initially wanted to model the whole squiggoth with this, but I did not want to ruin the heads with the heat of the oven to harden it).
First, I dshaped some cylinders into a triangle-looking claw. Then, hardened them in the oven. And last, a quick sanding pass to remove finger prints, and a couple of sanding file lines to give that GW claw look. The process was quite easy, but I had to do like a bunch of them to get enought for all the claws of the minis.

To add them to the miniature, first I scketched out the which claws I was going to use where with blue tack, and once I was happy with the look of it, I draw with a pen where the claws where located, and numbered them.
I used milliput to replace the bluetack, waited until it hardened, and then modeled and textured the foot around it. I had to glue the claws because they keep falling from the feet, but their location was pretty much set on stone by then.
The feet might need some more work on the texturing and shaping side of it, but I will leave that for when I do the base of the miniatures, to get a good contact with the ground.
|
|
This message was edited 1 time. Last update was at 2021/06/24 19:00:49
Serve the Emperor today, for tomorrow you may be be dead.
Painting blog:
https://www.dakkadakka.com/dakkaforum/posts/list/793314.page
|
|
|
|
|
2021/06/28 10:11:12
Subject: Re:From marines to Orks. The Waaaagh has started
|
|
Regular Dakkanaut
|
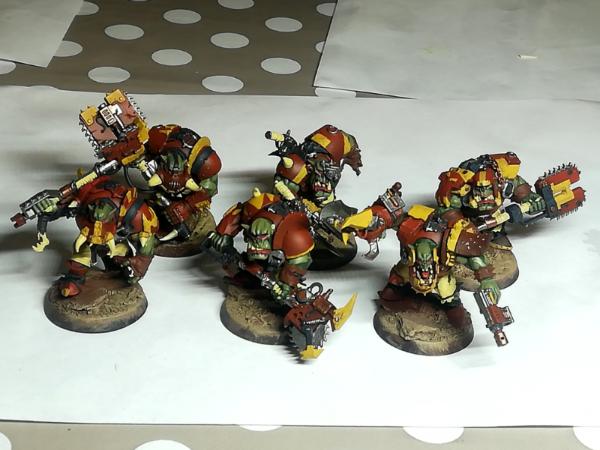
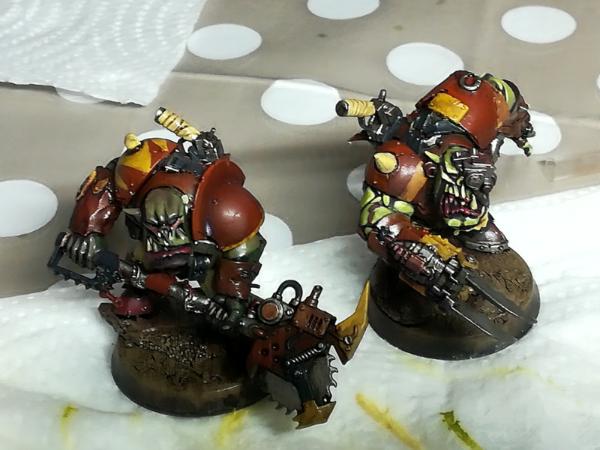
Quick updates from the nobs
Did the washes on them and they look pretty decent already, almost tempted to leave them as they are, but I wantet to get them to a nice standard since I love the look of them.
Started with the skin, going from a dark green, purple and brown mixture rom the previous step to a much lighter bone-like tone.
The touches on the more flesh and red areas will give the finishing touches to the skin itself, but so far I am pretty happy with the look. It took some time to go over each one of them, but highlighting those muscles really ads to the definition of the mini.
It's hard to see on the pictures, but I added a soft reddish glaze on the shadows that makes it look much more organic and have a 2color variation on the skin that really like. These guys are pretty much a preparation for when I get to my HQ and other big important minis, so this is as much as small project as it is a experiment to get better results on the future.
Right now the skin looks a bit too saturated and bright compared to the rest of the mini, but I'll pump it up as I go over all the colors of the minis
|
|
This message was edited 1 time. Last update was at 2021/06/28 10:12:02
Serve the Emperor today, for tomorrow you may be be dead.
Painting blog:
https://www.dakkadakka.com/dakkaforum/posts/list/793314.page
|
|
|
|
|
2021/06/28 11:59:15
Subject: From marines to Orks. The Waaaagh has started
|
|

Krazy Grot Kutta Driva
|
Thanks for the inspiration on the Ork nob. I've been thinking of picking up a box of the Blood Bowl Orks. I agree I like the poses better than the regular nobz. Your squiggoths look great. I love the texture and scales. Anytime you can base something for fantasy in reality it makes it more grounded. Using a living creature like the rhino is a great help.
|
|
|
|
|
|
2021/07/01 23:03:14
Subject: From marines to Orks. The Waaaagh has started
|
|
Regular Dakkanaut
|
Pointer5 wrote:Thanks for the inspiration on the Ork nob. I've been thinking of picking up a box of the Blood Bowl Orks. I agree I like the poses better than the regular nobz. Your squiggoths look great. I love the texture and scales. Anytime you can base something for fantasy in reality it makes it more grounded. Using a living creature like the rhino is a great help.
Glad you got inspired by those nob conversions. I must say they required a lot of modifications on the arms to get them into the right poses, although that is due to me being a bit specific with the exact pose I want, and to make them all look distinct.
Somethig to notice about the back ork blood bowl box is that there are only 3 different torsos, and you need to play a bit with the posing of the arms and head to not make them look like identical statues.
Personally I enjoy that part of the conversion, since it adds a bit of an extra challenge, your might end up a bit disappointed with the results if you end up with 3 pairs or really similar posed minis.
|
Serve the Emperor today, for tomorrow you may be be dead.
Painting blog:
https://www.dakkadakka.com/dakkaforum/posts/list/793314.page
|
|
|
|
|
2021/07/03 20:44:36
Subject: From marines to Orks. The Waaaagh has started
|
|
Krazy Grot Kutta Driva
|
Thanks for the information on the Blood bowl black orks. I will keep that in mind when I plan my conversions.
|
|
|
|
|
|
|
|
|


