| Author |
Message |
 |
|
|
|
|
Advert
|
Forum adverts like this one are shown to any user who is not logged in. Join us by filling out a tiny 3 field form and you will get your own, free, dakka user account which gives a good range of benefits to you:
- No adverts like this in the forums anymore.
- Times and dates in your local timezone.
- Full tracking of what you have read so you can skip to your first unread post, easily see what has changed since you last logged in, and easily see what is new at a glance.
- Email notifications for threads you want to watch closely.
- Being a part of the oldest wargaming community on the net.
If you are already a member then feel free to login now. |
|
 |
2021/07/05 13:09:46
Subject: Re:From marines to Orks. The Waaaagh has started
|
|

Regular Dakkanaut
|
|
Serve the Emperor today, for tomorrow you may be be dead.
Painting blog:
https://www.dakkadakka.com/dakkaforum/posts/list/793314.page
 |
|
|
 |
|
2021/07/05 16:34:27
Subject: Re:From marines to Orks. The Waaaagh has started
|
|

Stormin' Stompa
|
Nice to see some of those Artel Ork miniatures. They're great sculpts and it's nice too see them with some paint on them.
|
Ask yourself: have you rated a gallery image today? |
|
|
|
|
2021/07/11 20:22:09
Subject: Re:From marines to Orks. The Waaaagh has started
|
|
Regular Dakkanaut
|
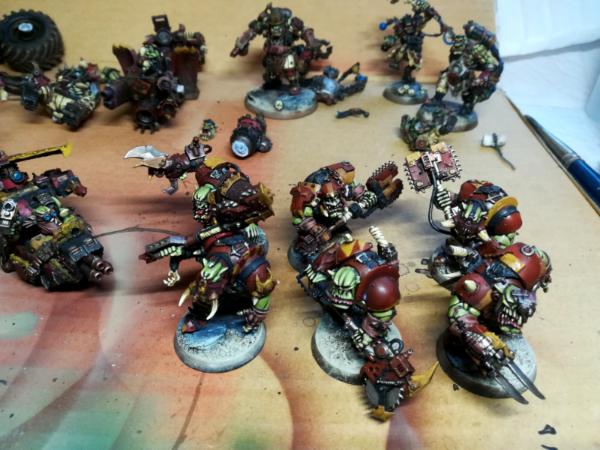
Barely any free time, but I managed to get something done at last.
First, the bases for my squiggoths and warboss on bike. I ended up painting them because I had fun with them (probably will touch them after everything is done) and I wanted to nail my base recipe for the orks, but the crucial part of building the bases was to finally get a definitive platform for the squiggoth to build from, since now that was not stablished.
I used milliput, bits and rocks to build them, aiming for a middle of the battlefield with some height variations. All the minis are not yet glued, but fit pretty much perfectly on their footprints.
    Automatically Appended Next Post:
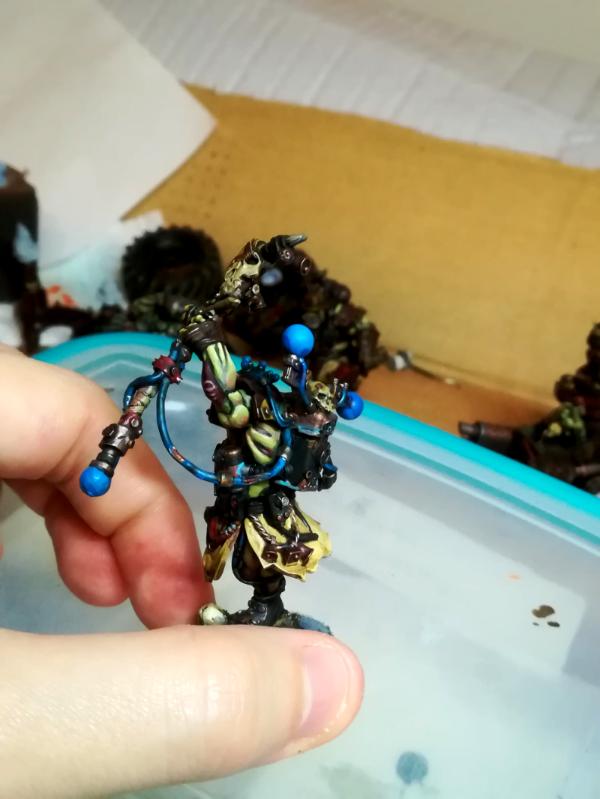
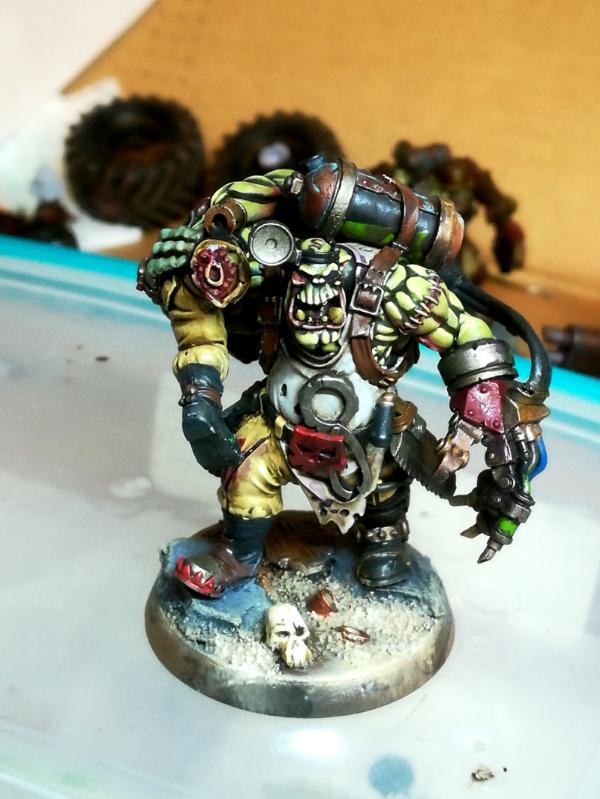
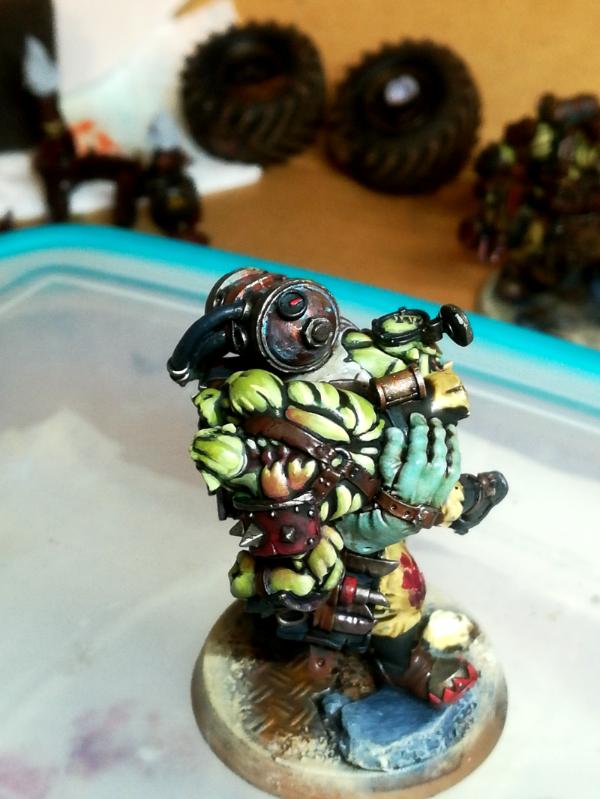
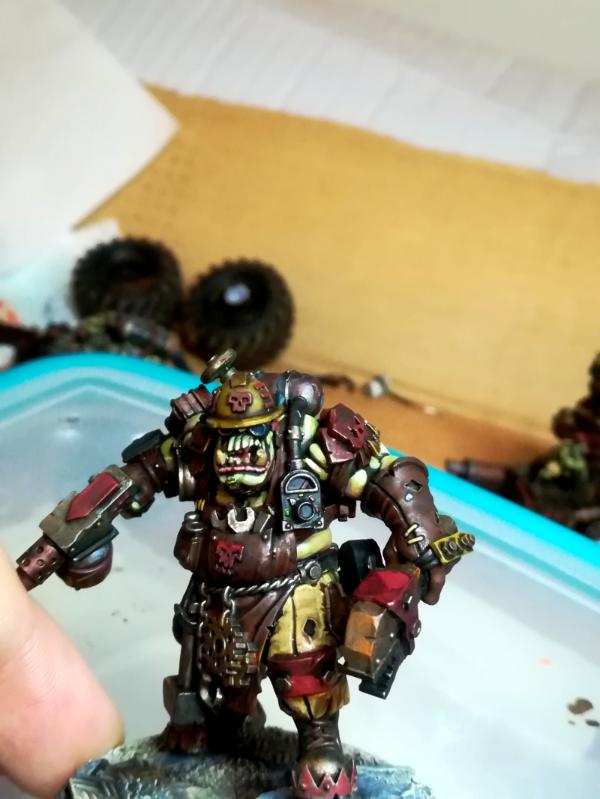
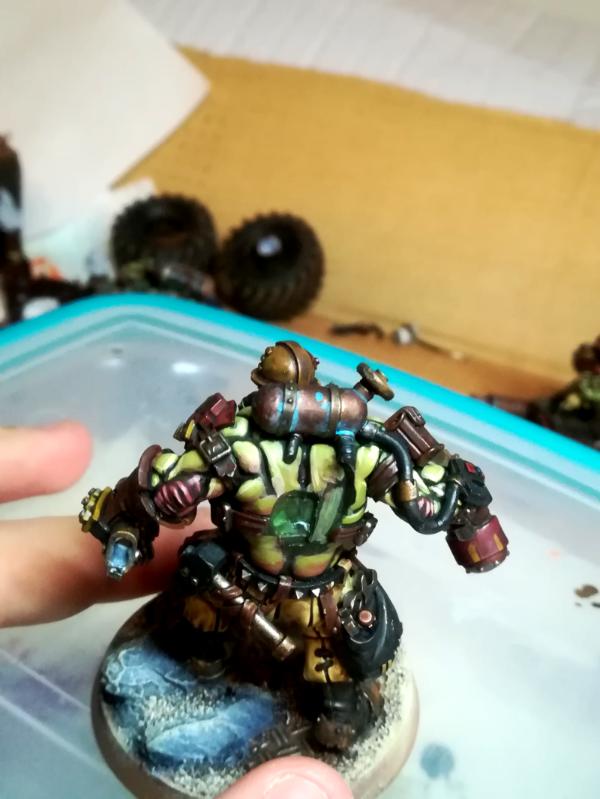
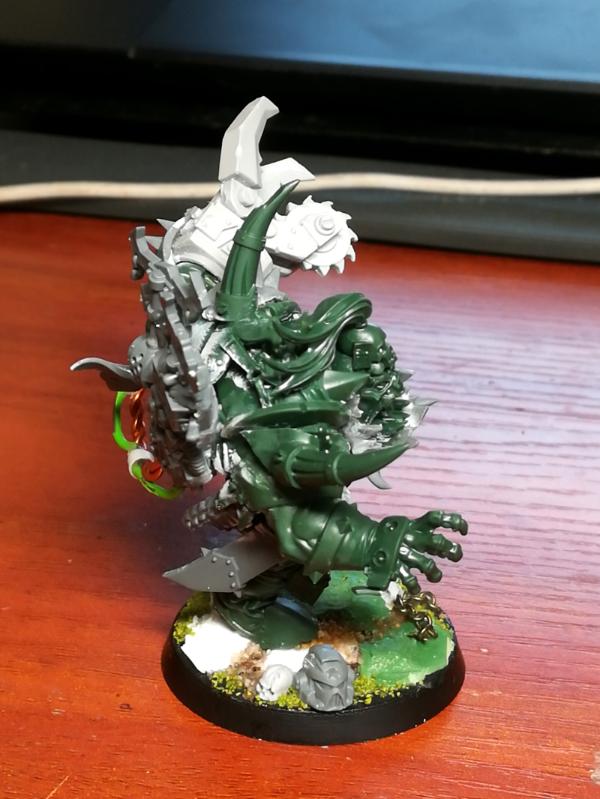
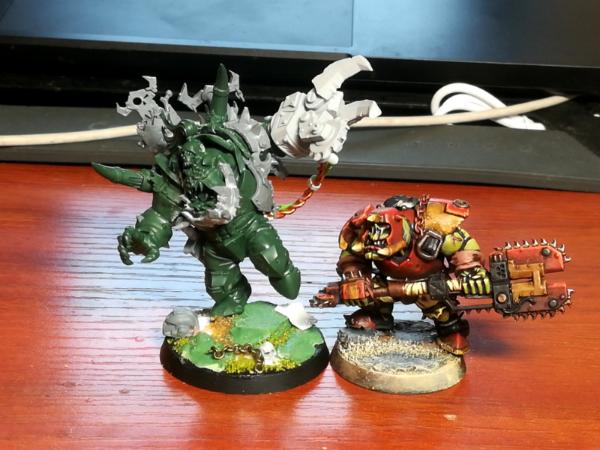
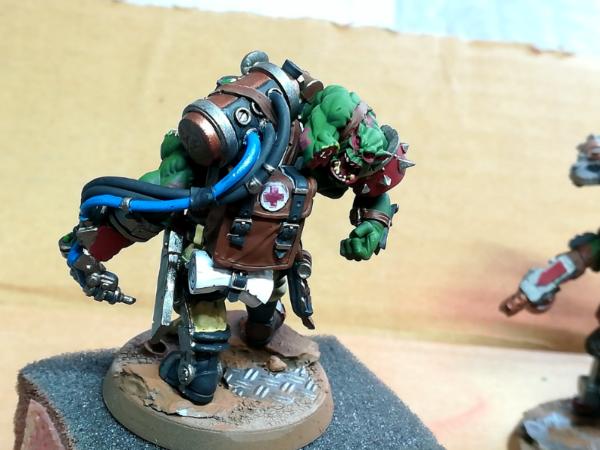
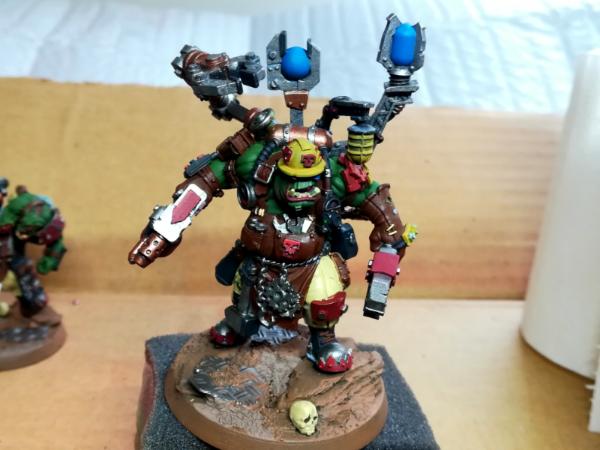
 On a more exciting note, I got my HQ's skins painted!
After the good results with the nobs I could not stop myself from applying the same method to the WArtel minis, ending with something I am pretty happy with.
I am still painting with most of the bits separated, though, so reaching the details is quite easy. This pic is from before finishing.
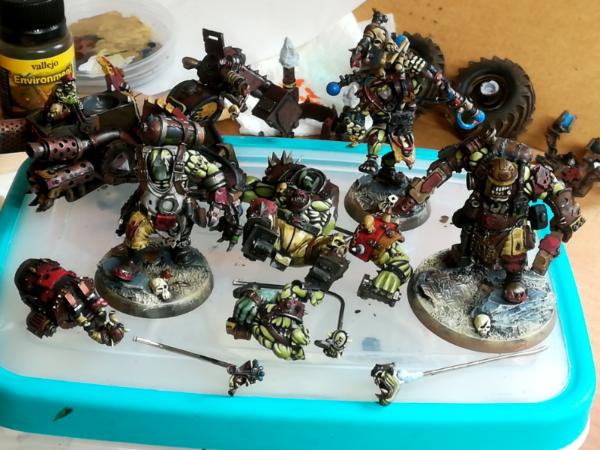
I basically used the same strategy, and I am really liking the red glaze at the end to emphasize shadows, the warm skin and a bit more of color interest to the mini. Something I really like is that at this point the minis already look quite good for tabletop, and now is a matter of keep working on them, adding the lighting on the different colors, trying first with the nobs and applying it to the HQs.
Sorry for the quality of the pics, my phone cant do better than this, specially with the smaller minis.
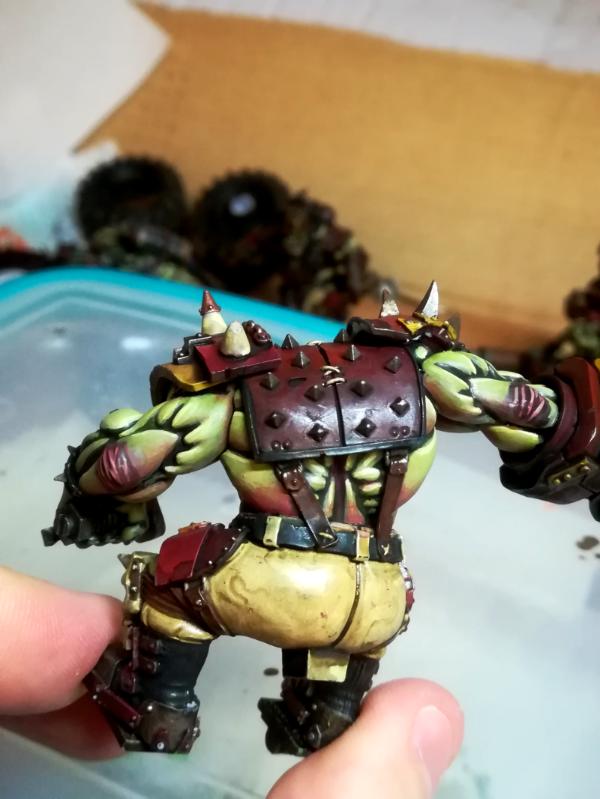
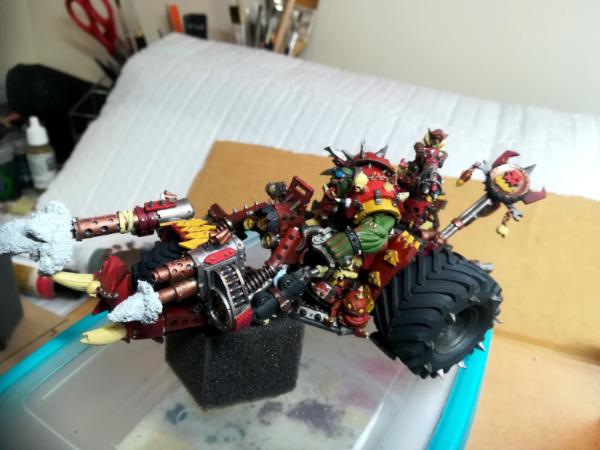
Warboss
Quite happy with the muscles, but sadly most of the back, as good as it looks, will be obscured by the bike itself. I really like the reds on the lower back, but I cant get everything to shine XD
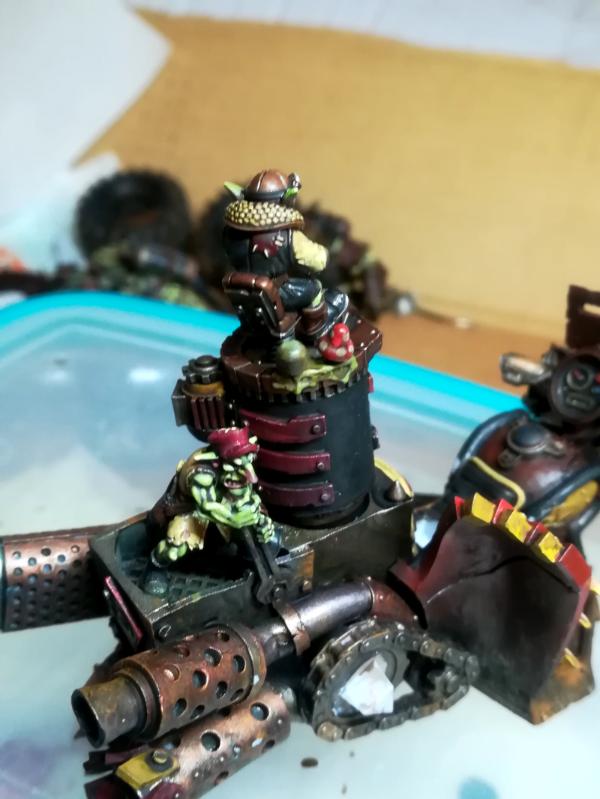
Gretching on the bike

Wierdboy
My plan is to have lighting green energy flowing through the skin, as if the veins of the ork where on fire, culminating on the head and staff of the wierdboy. I hope to get this effect looking decent, otherwhise it will just ruin the mini and I would need to start from 0 again.
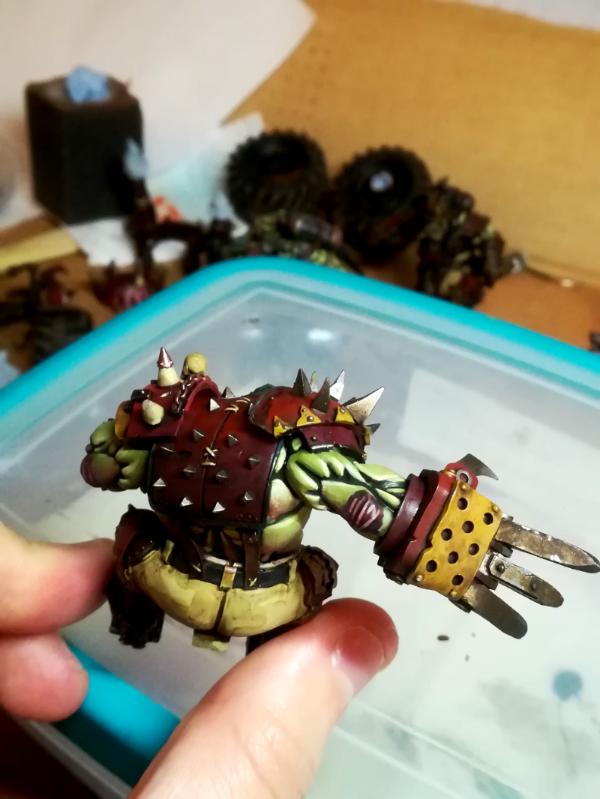
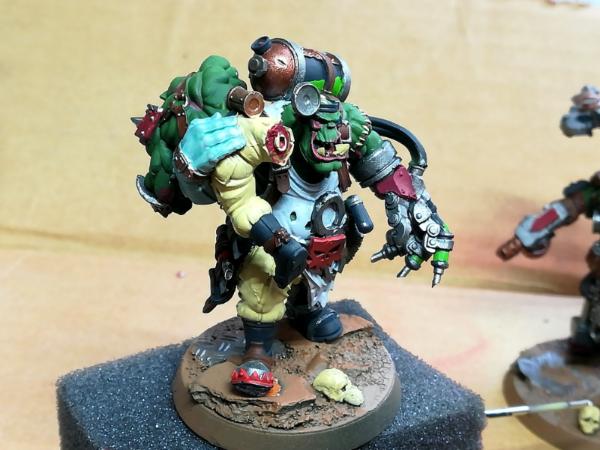
Paintboy
One of my favorite ones. A lot of the detail of the carried ork gets obscured, but is such a fun mini to work on.
 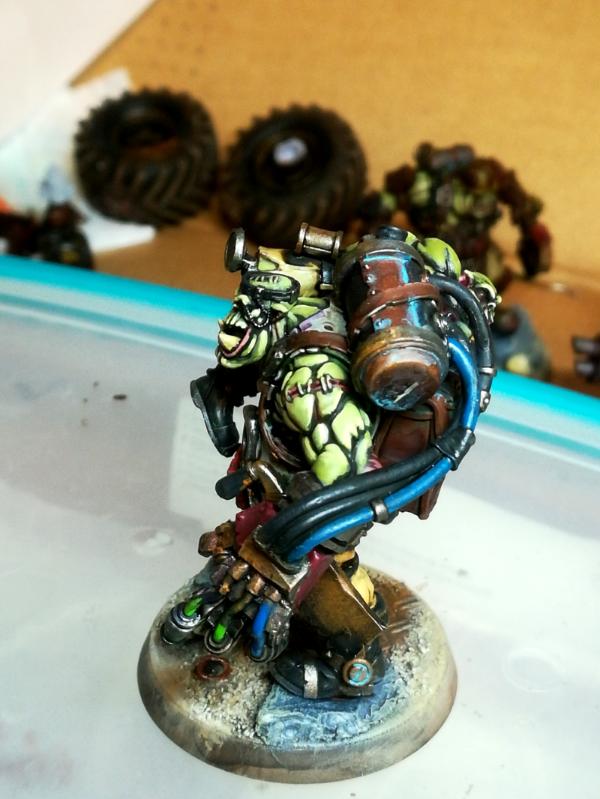   
Mek
Again, some nice reds on the back, but most of that area will be covered with the backpack.

|
|
This message was edited 1 time. Last update was at 2021/07/11 20:33:45
Serve the Emperor today, for tomorrow you may be be dead.
Painting blog:
https://www.dakkadakka.com/dakkaforum/posts/list/793314.page
|
|
|
|
|
2021/07/12 21:47:38
Subject: Re:From marines to Orks. The Waaaagh has started
|
|
Regular Dakkanaut
|
Not my video, but cant resist sharing it if you have any interest on the squiggoth sculping process I went through:
https://www.youtube.com/watch?v=325FSVjNDgs&ab_channel=NorthoftheBorder
This illustrates pretty much most of what I went through while sculpting the squiggoth. Shame it came put a couple days when I already did the whole process XD
The guy uses sculpting clay, which is so much easier to work with than milliput for the simple reason that it does not harden until you decide to cook it. I couldnt do that since tests show that high temperatures will destroy the 3D printed faces of the squiggoths, but otherwhise is a really similar process, including the texturing of the skin. I personally preffered to do a anoatomy pass first, and a skin/texture pass second, but as you see you can do them both at the same time and the result is great anyway.
|
|
This message was edited 1 time. Last update was at 2021/07/12 21:48:18
Serve the Emperor today, for tomorrow you may be be dead.
Painting blog:
https://www.dakkadakka.com/dakkaforum/posts/list/793314.page
|
|
|
|
|
2021/07/18 16:07:55
Subject: Re:From marines to Orks. The Waaaagh has started
|
|
Regular Dakkanaut
|
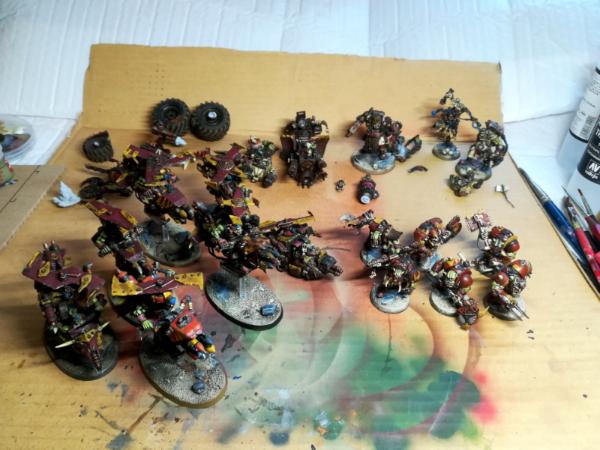
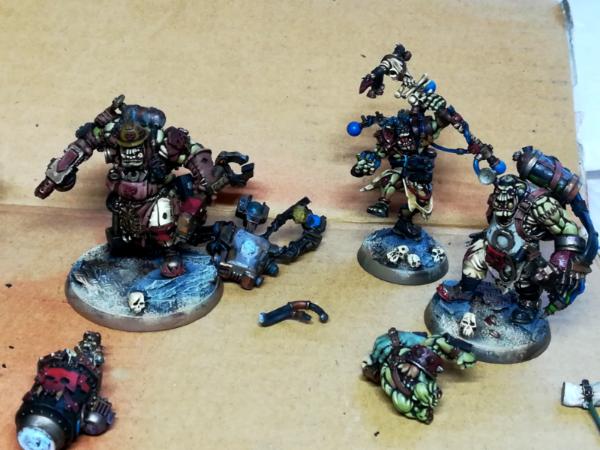
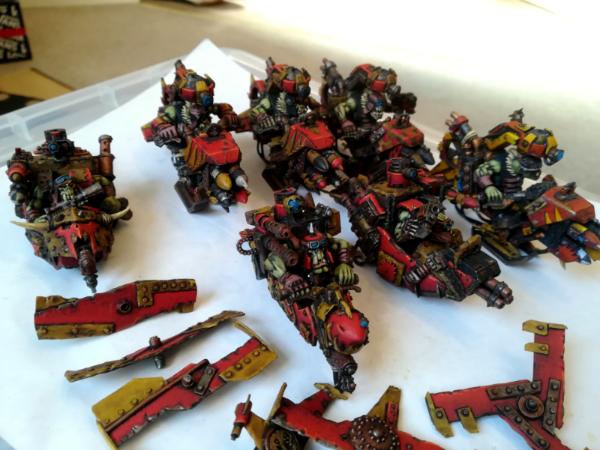
Some painting today!
I'm trying to get all the ork units I started putting color on to follow the same steps, specially to experiment in ones to get a better result in others.
My plan was not to batch paint these units together, but I find myself much more confortably working this way.
Got 7 koptars (I need one more base for these), 6 converted nobs and 4 characters minis.
Thus, I did the skin, leather,cloth and bases for all these units, and planning into moving into the reds and yellows next.
  Automatically Appended Next Post:
Moar work.
Reds on the koptars done. Basically layering and not too much blending between layers, giving the surface a bit of a textured rought paintjob which might be quite suiting. For more important modesl I would put more time on making smoother transitions, but for these guys I want a quicker result.
I am noticing that I ended up making them quite bright, which is somthing I will turn down a little for other models.
  Automatically Appended Next Post:
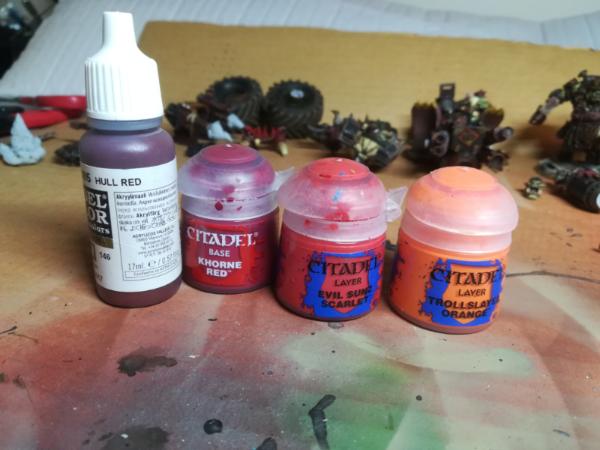
And reds done for my nobs too!
Here I changed the recipe a bit for the red, since these guys were airbrushed red with a brownish red and saturated red on top, and the color I was using from the koptas was not fitting. The nob red was more brownish, and the koptar red was more purplish. Both look quite good, but I think the brownish version feels more grounded and less cartoony. I also made the edge highlight more pronunced, leaving the brighters colors varely appoaching evil sunz.
Here you can see the colors used. For the brown version I used hull red, then mixes to evil sunz and trollslayer orange for the brightest highlights. For the purplish version just subsitute hull red by khorne red.
The nobs.
I need to STOP making pictures late at night. My phone really struggles to capture color with just my painting lamp.
As a comparison for the reds, you can see on the most right nob, the screen right shoulderpad uses the purple tone. Is subtle, but I believe you can tell the difference with all the other reds.
This is the best red in terms of color I've made so far, and the one I think would look great for the rest of the army. I keep experimenting and trying new things, but this one is quite solid.

|
|
This message was edited 4 times. Last update was at 2021/07/18 22:27:43
Serve the Emperor today, for tomorrow you may be be dead.
Painting blog:
https://www.dakkadakka.com/dakkaforum/posts/list/793314.page
|
|
|
|
|
2021/07/20 09:33:18
Subject: Re:The Waaaagh has started: Homemade Squiggoths have arrived!
|
|
Regular Dakkanaut
|
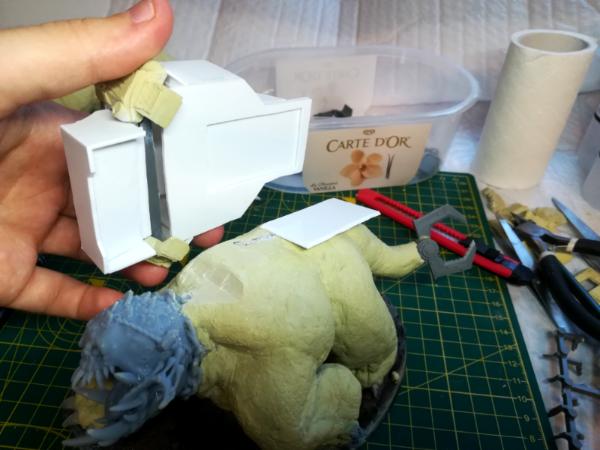
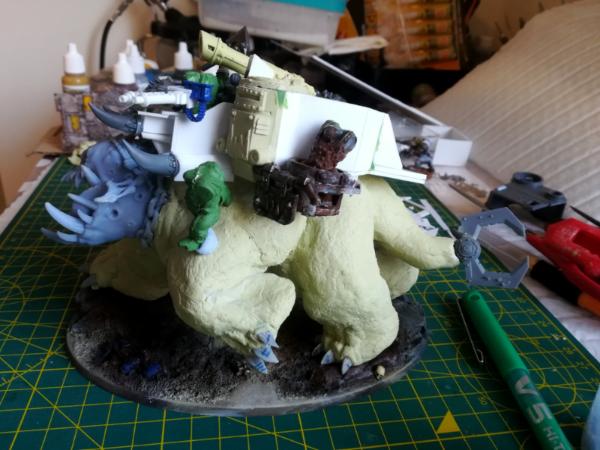
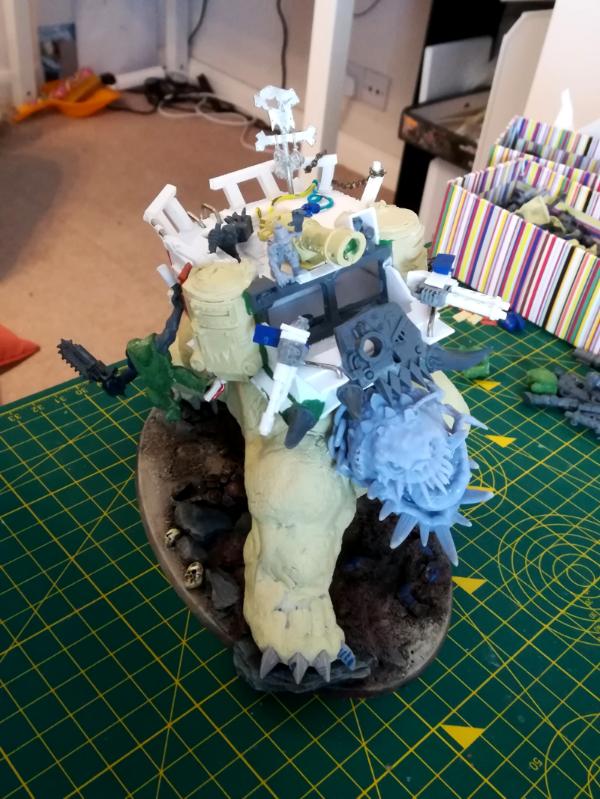
Started building the castle of the first squiggoth!
I started building one of the side turrets, trying to get the overall correct size for the castle. The very first steps of this process are really slow and shy, but I find myself building momentum as I work, flowing from one idea to another trying to get to the image I have in my head. Luckly for me I got the drawing concepts as a general guide, and some basic ideas on how to do certain areas.
Originally my idea was to cover a lot of the body in armour, hiding any issues with sculpt, since I had much more confidence on my scratch-building than on the sculping/ sking texturing. After finishing the sculping of the creature though, I was really pleased with the result, specially on the charging squiggoth. Thus I will be having less things covering it, and the castle will be a bit higher than originally planned. Looking at the recent ork reveals, lore-whise squiggs seems to be much tougher than I though, so not as much armor might be needed for the creature itself. Still will have bits and pieces here and there, but not anywhere near I had in mind.
I tried to stay away from a boring square shape, and ending up making quite a lot of variation withing the main body of the castle.
The claw at the end of the tail fitted quite nicely, and I will be adding cables and other mechanical things around the tail to sell the idea that this thing can be operated.
  
Although I will be trying to keep the castle and the beast really well integrated and connected, particularly with chains and armor, I want to be able to separate them for transport and storage purposes. My plan was to just use this to be able to align and keep the castle really consistent on position while building it, but its working much better than expected.
This is currently just a friction system, although I will move to magnets and pins after finishing the build. Atm is surprisingly sturdy even with such a simple attachment method.
Planning ahead I am getting ideas from the bitbox.
A small problem I found when moving from the drawing to the actual miniature is that I thought orks were a bit smaller compared to the squiggoth, thus finding difficult to fit the ones I want around the mini.
I am going to be fixing this by forcing the perspective a little bit, making the orks on top of the squiggoth smaller than actual orks. this is achieved by using the turret gunner of a truck, which is a bit smaller than a normal ork miniature.
The idea of this has 2 purposes: First, to fit as many orks as I initialy planned, and second, to make the squiggoth look bigger than it is, giving a distorted reference.
If you are interested on this, this is something you can see in amusement parks' decoration, were they make small building look much bigger by changing the size of the windows as they go up. From the ground you asume all the windows are the same size, thus giving the ilusion that a 4m wall is a 3 level building.
Translated to the squiggoth, people will assume that the orks on top of the squiggoth are the same size as orks on the ground, but since they are actually smaller they give the illusion that what surrounds them is bigger than it actually is.
 
To sell the idea that this thing is a transport that can be ussed by the orks on the ground, on this back leg I plan to have some sort of staircase, selling the idea that orks can climb it to get in the squiggoth at any time. I will also have a couple orks jumping out or hanging out the castle to show that they are ready to charge.

I will be working on it a lot on the following weeks, so stay tunned!
|
Serve the Emperor today, for tomorrow you may be be dead.
Painting blog:
https://www.dakkadakka.com/dakkaforum/posts/list/793314.page
|
|
|
|
|
2021/07/20 10:54:59
Subject: Re:The Waaaagh has started: Homemade Squiggoths have arrived!
|
|

Ambitious Space Wolves Initiate
|
fantastic ork work- I really appreciate the bloodbowl black orc conversions to nobz as I was eyeing them up just last night for such a project and like you said, found little info. For me, I'll wait till new codex- maybe they will be better ( plus I already have a bunch).
The ork skin really pops - especially on the Artel warboss trike (snap by the way, I have him , the three mega armour warboss equivalents and the ginormous boss).
ps the ultramarine army is also great (but orks are da best  ).
|
|
|
|
|
2021/07/20 13:06:30
Subject: The Waaaagh has started: Homemade Squiggoths have arrived!
|
|

Krazy Grot Kutta Driva
|
Your scratch building work on the Squiggoths are great! Can't wait to see the finished results.
|
|
|
|
|
|
2021/07/21 09:48:57
Subject: Re:The Waaaagh has started: Homemade Squiggoths have arrived!
|
|
Regular Dakkanaut
|
Thanks for your comments 
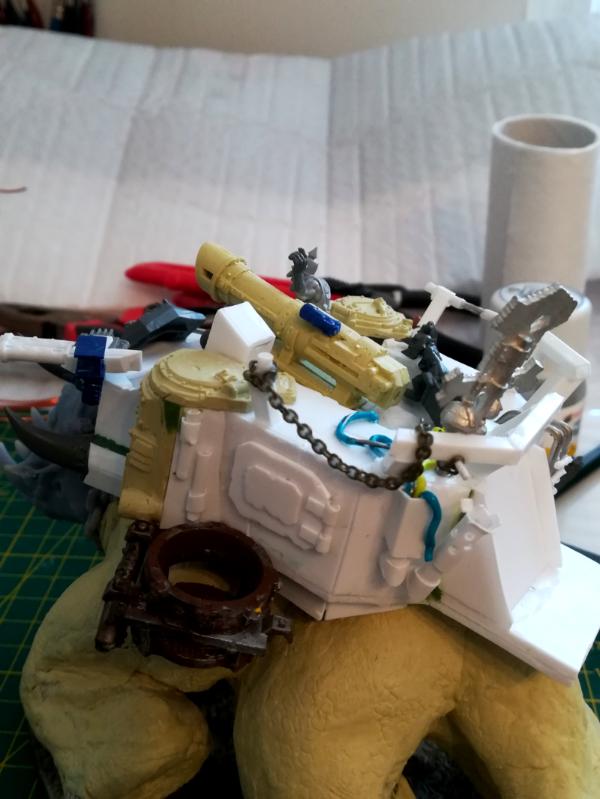
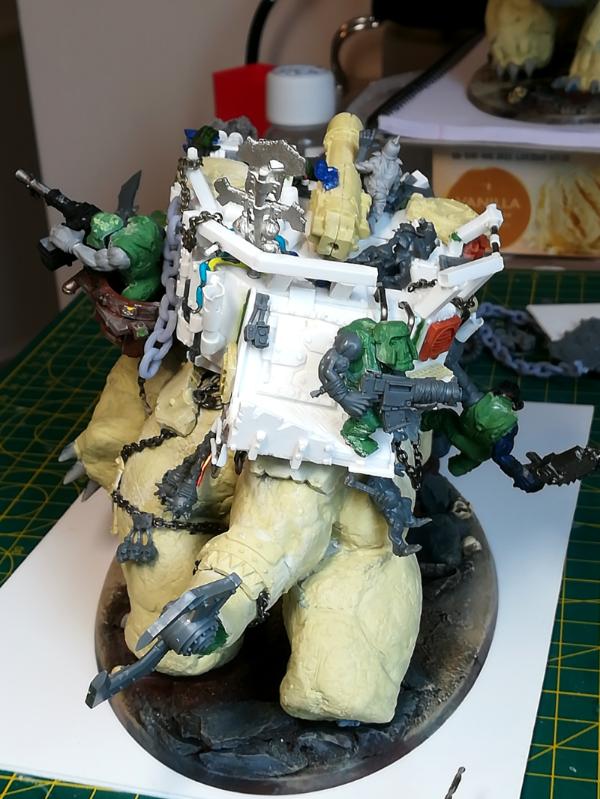
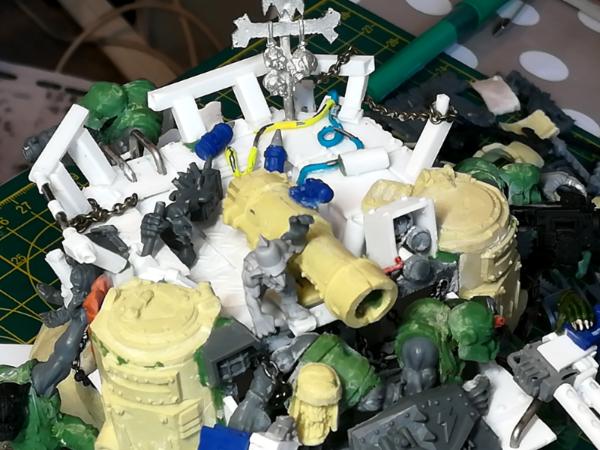
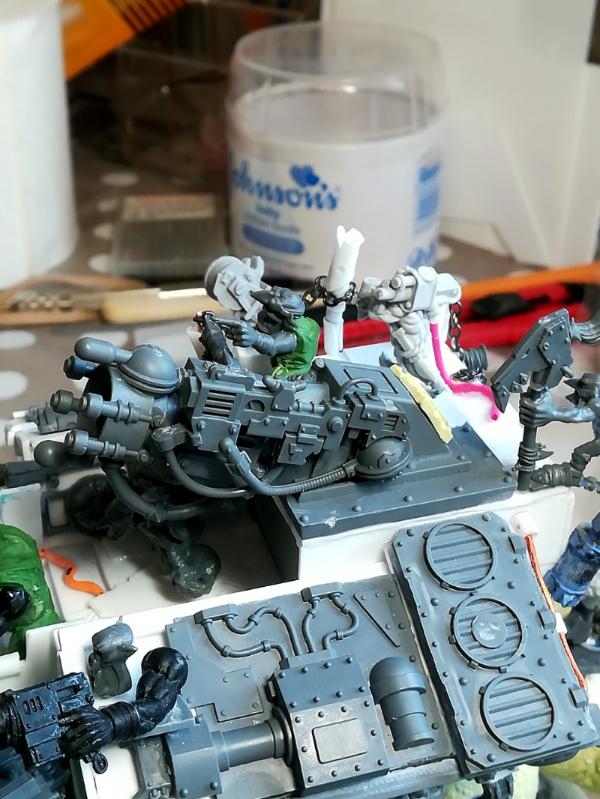
Continuing the squiggoth!
Ideas keep coming and I run out of time to get them done. Also, the lamp I use on my workstation broke and I can barely see anything pass a certain time on the day.
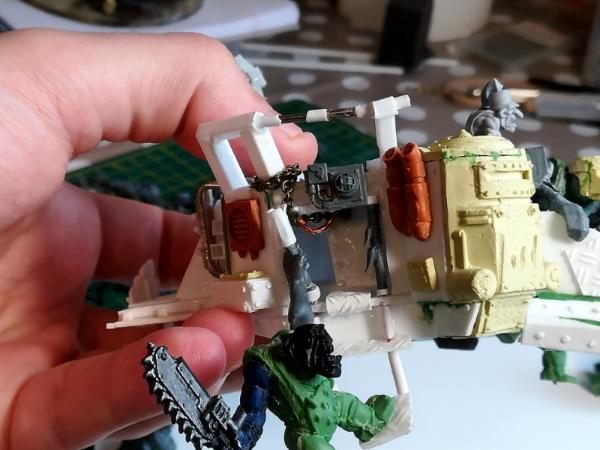
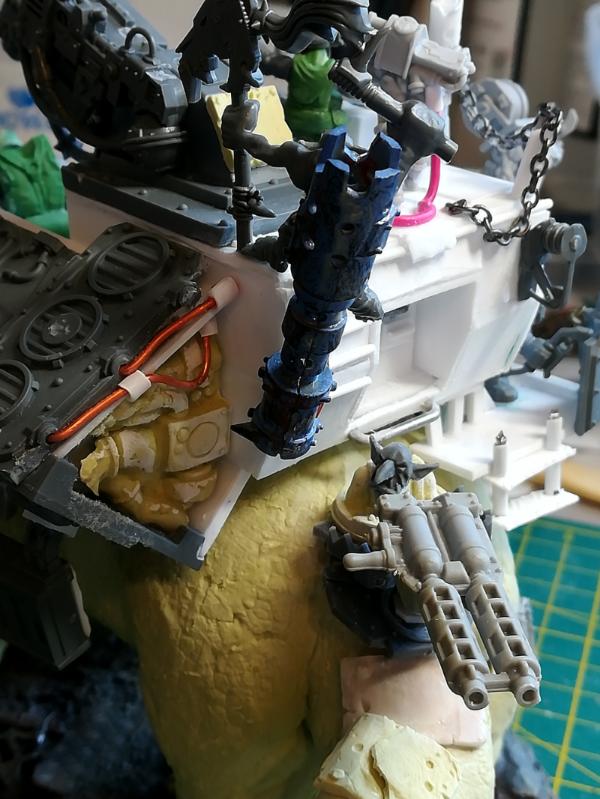
The main focus of yesterday's session was the front of the castle. First I made the boyz bodies I needed, which I think make the whole thing look much more energetic and alive, and then scratch built the front structure to add the 2 horns and the metal skull I had in mind. After seeing the results though, I added another 2 horns next to the skull, and used part of that same structure to add the holders for some guns, using the holder as part of the shape of the front too (these are not glued yet). I also added some lenses/lamps on the top, and I made the structure under the skull to look a bit better, making it look like a bit of a neck cover for the creature.
With the 4 horns and the skull the front of this castle looks quite brutal and primal, more suited for charges. This is emphasized by the boyz enthusiasm and the expression and pose of the squiggoth. For the other castle I will look for a more mechanical look to it, with pipes and engines parts everywhere, since that one will have some machined turrets manned from the inside. I am looking foward to make little grots fixing the castle all over it, hiding scenes and details everywhere I can.
There is still a lot of work on that front area, but so far I really like the look of it. I ended up making it look a bit like a truck front as well, which not only looks quite mad max, it also means I could put this same body on wheels and It would pass as a battlewagon, so I might end up having some nice flexibility there!
I also made the castle to have more height by adding some panels under the main body, which are going to also hide the transition between the castle and the squiggoth itself, alowing me to have hanging chains, armor or other bits without messing too much with the connection points. There is a turret added on the left side, which I added to balance the hanging guy on the right side. I find that asymmetretric details but and overall symetric shape help a lot with a good orky look. Also, the castle shape does not need to be that big if you add external details that bulk it up. An issue with this can be overfilling areas or not giving enought space to breath between sections of the model, though. I will keep experimenting with this since I think it really works. Tell me what your thoughts are one this!
Really exited to keep working on it, I will probably move to to work on the side /back area next, so I uniformly add passes of detail to the whole thing.
|
Serve the Emperor today, for tomorrow you may be be dead.
Painting blog:
https://www.dakkadakka.com/dakkaforum/posts/list/793314.page
|
|
|
|
|
2021/07/21 13:04:50
Subject: Re:The Waaaagh has started: Homemade Squiggoths have arrived!
|
|

Ork Boy Hangin' off a Trukk
|
Сквиггот просто великолепен! у меня такой не вышел. удачи в приручении зверей
|
|
|
|
|
|
2021/07/23 09:46:30
Subject: Re:The Waaaagh has started: Homemade Squiggoths have arrived!
|
|
Regular Dakkanaut
|
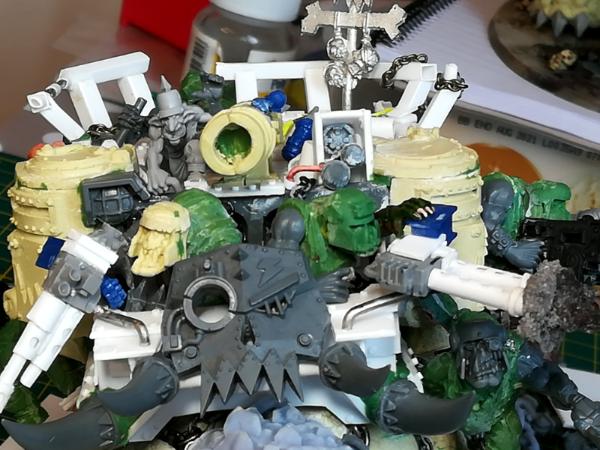
Moar updates!
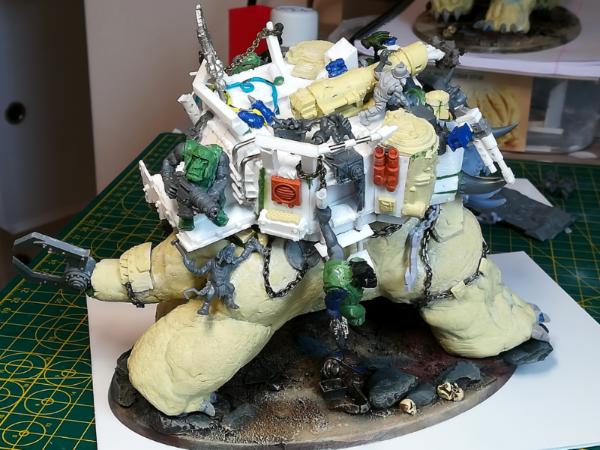
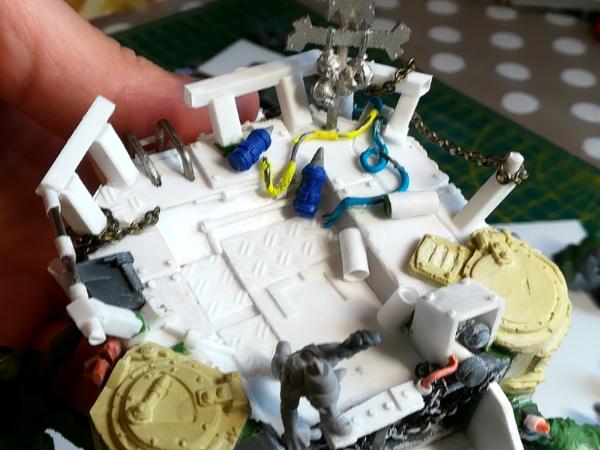
Getting some detail on the sides of the structure, as well as getting some of the guyz on the castle sorted. So far quite happy with the mid-level stage of the parts I am working on, trying to get a good balance of composition and orky energy. I am looking foward to add the hanging pieces, chains and other parts that would sell the movement of the charge so much more.
Big fan of the gretching next to the cannon. The idea behind this scene is that the aiming lenses on the cannon is broken, thus one of the grots loading the gun starts directing the aim and firing to the other grots working on the gun.
I started adding a bit more detail on some areas, but I want to finish up all the ork scenes and main shapes and important bits on the castle before adding more fine stuff.
Some of the details, such as the pipes or panels are though as breathing canals for the guys inside, to allow some air flow for what is probably a really crowded and smelly interior.
The structure has 2 open holes now, on the front and on the side, which I need to block off to avoid having to detail or paint it later. I will steal the idea of adding hanging chains as a separator curtain, which I saw in Mr Nobody's blog "Battlewagons: Exploring Your Inner Ork". If you are interested in great ork scratch building, check his blog too!
https://www.dakkadakka.com/dakkaforum/posts/list/30/794424.page
|
|
This message was edited 1 time. Last update was at 2021/07/23 09:51:38
Serve the Emperor today, for tomorrow you may be be dead.
Painting blog:
https://www.dakkadakka.com/dakkaforum/posts/list/793314.page
|
|
|
|
|
0021/07/14 22:41:40
Subject: The Waaaagh has started: Homemade Squiggoths have arrived!
|
|
Ancient Venerable Dreadnought
|
Hey Killatorres, great to see the progress on the Orks. They’re looking fantastic, and personally I love the mix of reds you’ve been playing with. I think it adds to the Orkiness.
The squigoths are also looking great. I love the idea of having lots of little scenes. The chap hanging off the side and the grot aiming the huge cannon are both great.
|
Goberts Gubbins - P&M Blog, started with Oldhammer, often Blackstone Fortress and Void Panther Marines, with side projects along the way |
|
|
|
|
2021/07/29 14:44:38
Subject: The Waaaagh has started: Homemade Squiggoths have arrived!
|
|
Regular Dakkanaut
|
 gobert wrote: gobert wrote:Hey Killatorres, great to see the progress on the Orks. They’re looking fantastic, and personally I love the mix of reds you’ve been playing with. I think it adds to the Orkiness.
The squigoths are also looking great. I love the idea of having lots of little scenes. The chap hanging off the side and the grot aiming the huge cannon are both great.
Ey, cheers!
I'm trying to get the painting and building of these units done quickly, but things keep comming up and I do not have a good evening to sit done and finish it. Automatically Appended Next Post: I've been running into some obstacles lately so I barely have free time to get my painting or big building rolling.
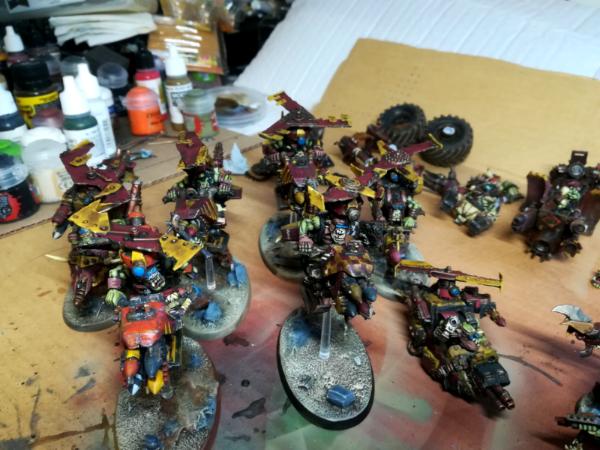
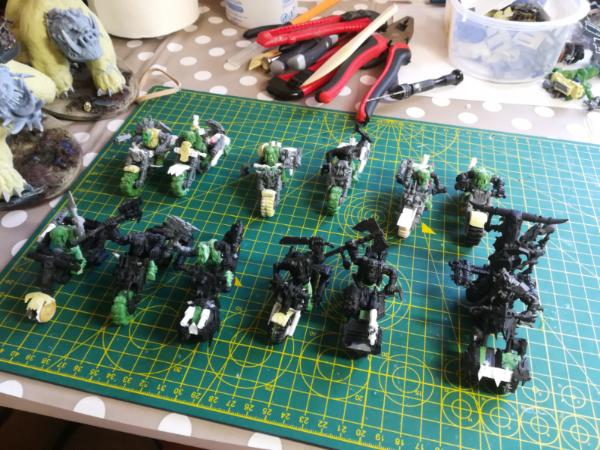
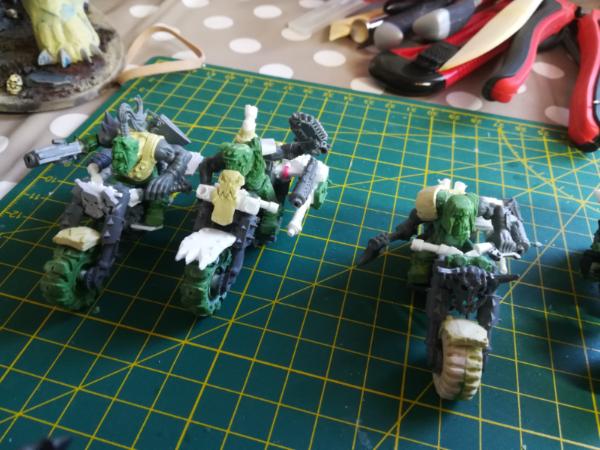
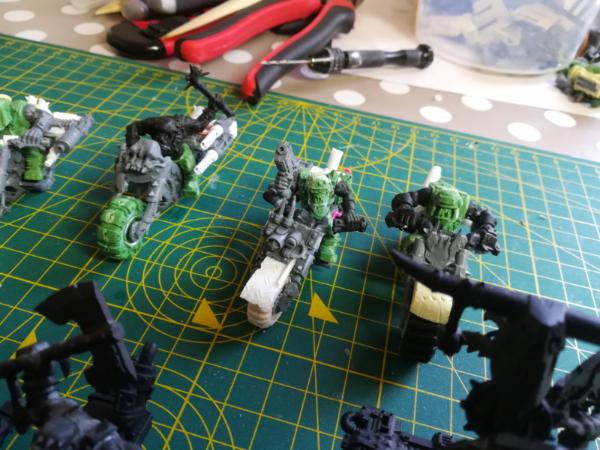
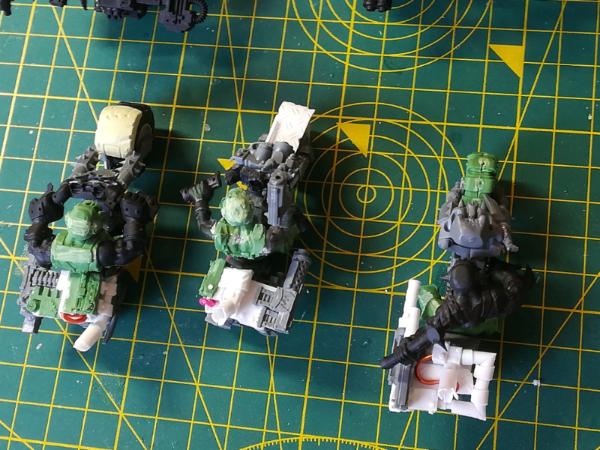
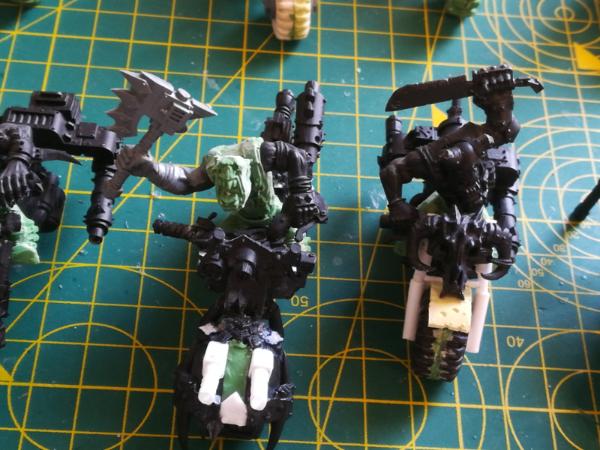
I've used an hour here and there to get my ork bikes done, which are a mix of restored old models and half scratch builded ones.
Long story short, I had 6 bikes from when I was younger, which where a mix of space marine and ork bikes ()getitng 6 bikes out of 3 ork and 3 marine bikes). This was actually one of the first kitbashes I did on the hobbie, and still does not look too bad. I did some tweaks and changes to it, re-made most of the drivers to make them look alright.
I also had ordered some bike body bits on ebay. Why? The full box is around 20-25 pounds, and you only get 3. The bits on ebay go for 1,5 pound each body, and if you know how to make drivers and build the rest of the bike yourself you save a ton on money on these. Plus, since there are only 3 models on the box, when you have more than 10 you can see the repeated parts everywhere, and if you want some variation you end up kitbashing and custom building part of them anyway.
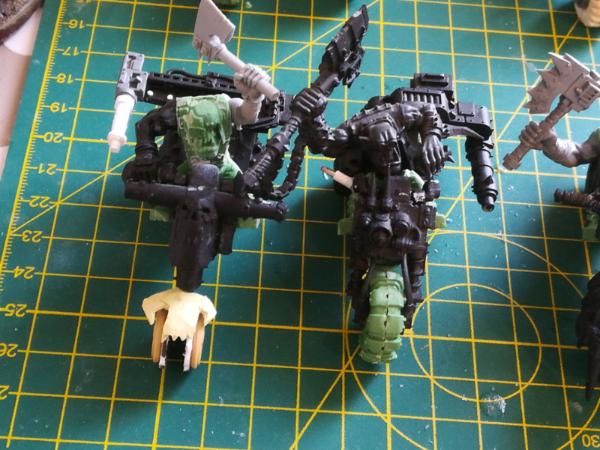
Thus, 6 restored bikes, 6 scratchbuilded starting from the main chasis bit, finishing up with 12 ork bikers, 1 of them a slightly bigger nob with a claw.
This is a project I had in mind for some time, and now with the bikers being a bit better on the codex it might be the right time to bring them to completion. I will paint them with the same method I used on the koptars, thus should be a relatively quick process. drivers are not yet glued to have an easier time painting.
I am unsure about the bases. The old bases arereally thin and really do not show the area of the mini, and the new bases are a bit too thick to my taste, although are the correct ones rule-whise.
  
|
|
This message was edited 1 time. Last update was at 2021/07/29 14:55:48
Serve the Emperor today, for tomorrow you may be be dead.
Painting blog:
https://www.dakkadakka.com/dakkaforum/posts/list/793314.page
|
|
|
|
|
2021/07/29 15:16:10
Subject: The Waaaagh has started: Homemade Squiggoths have arrived!
|
|
Utilizing Careful Highlighting
|
A lot of very nice sculpting and kitbashes there!
|
|
|
|
|
2021/07/30 01:00:57
Subject: The Waaaagh has started: Homemade Squiggoths have arrived!
|
|

Ragin' Ork Dreadnought
|
Very characterful - they should look great painted up.
|
|
|
|
|
|
2021/08/01 14:50:32
Subject: The Waaaagh has started: Homemade Squiggoths have arrived!
|
|
Ancient Venerable Dreadnought
|
Cool bikers! I have a few old skool Ork bikes and a few broken bits of SM bikes, I’ll have to study your pics and see what I can do. Maybe 3D print a couple of bits too
|
Goberts Gubbins - P&M Blog, started with Oldhammer, often Blackstone Fortress and Void Panther Marines, with side projects along the way |
|
|
|
|
2021/08/01 15:52:24
Subject: Re:The Waaaagh has started: Homemade Squiggoths have arrived!
|
|
Stormin' Stompa
|
Ingenious idea with the forced perspective. I'd be curious to see if anyone picks up on it. I'm enjoying the orks hanging off the sides of castle. It gives the feeling that the entire thing is violently heaving around and everyone is hanging on for dear life. I don't know how hard it would be to achieve, but I would love to see poorly secured bits of plating or cargo flying around. Really sell that ramshackle look.
|
Ask yourself: have you rated a gallery image today? |
|
|
|
|
2021/08/03 14:35:16
Subject: Re:The Waaaagh has started: Homemade Squiggoths have arrived!
|
|
Regular Dakkanaut
|
 Mr Nobody wrote: Mr Nobody wrote:Ingenious idea with the forced perspective. I'd be curious to see if anyone picks up on it. I'm enjoying the orks hanging off the sides of castle. It gives the feeling that the entire thing is violently heaving around and everyone is hanging on for dear life. I don't know how hard it would be to achieve, but I would love to see poorly secured bits of plating or cargo flying around. Really sell that ramshackle look.
Cheers!
Yeah, I am currently working on adding chains, armor bits and other hanging things around the structure to sell the movement and chaotic mess of metal that they are riding.
I hope to do an update on it soon, I have not been able to work on it that much lately.
|
Serve the Emperor today, for tomorrow you may be be dead.
Painting blog:
https://www.dakkadakka.com/dakkaforum/posts/list/793314.page
|
|
|
|
|
2009/04/24 03:28:05
Subject: Re:The Waaaagh has started: Homemade Squiggoths have arrived!
|
|
Regular Dakkanaut
|
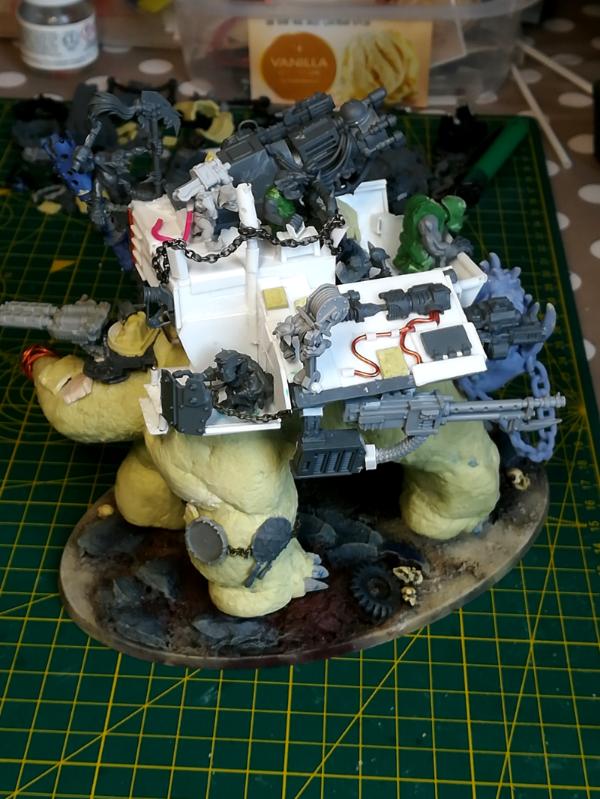
Thanks for your comments guys, really appreciate them
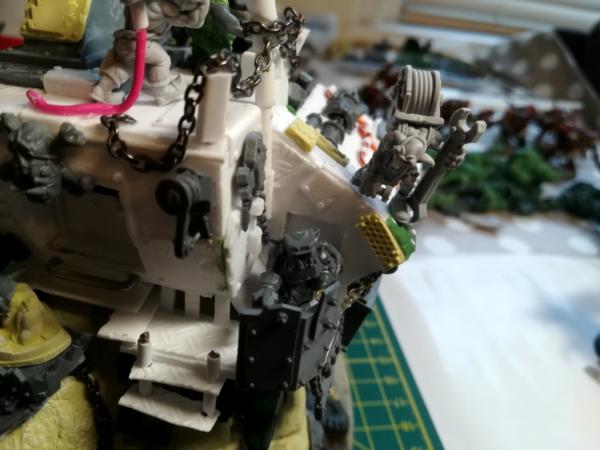
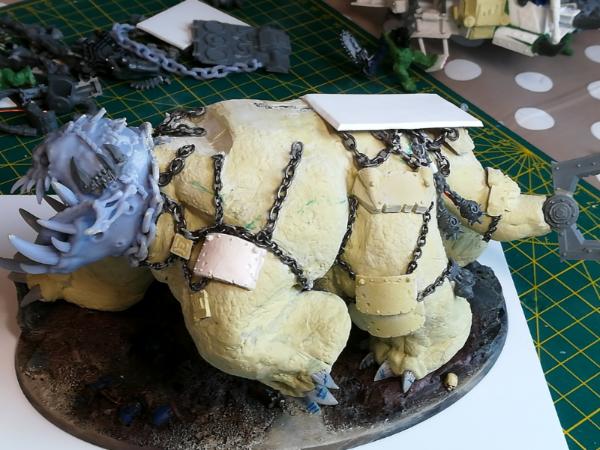
Just wanted to do a really quick update on the progress. I am adding some of the elements to the connection between the beast and the castle. Not done with it, but wanted to get it out there before I forget.
I did some work on the crew of the castle, getting the front gust sorted. I added chains and some armor plates around the legs, and aiming to add more metal bits to get everything looking nice.
The castle and the creature are still 2 separate parts, and I aim to keep them as such both for painting, storage and miniature flexibility, so I am trying to hide the connection as best as I can, both making it not obvious and making it detailed and interesting.
|
Serve the Emperor today, for tomorrow you may be be dead.
Painting blog:
https://www.dakkadakka.com/dakkaforum/posts/list/793314.page
|
|
|
|
|
2021/08/05 08:58:53
Subject: The Waaaagh has started: Homemade Squiggoths have arrived!
|
|
Ragin' Ork Dreadnought
Deep in the Outer Boroughs of NYC
|
Nice conversions, kitbashes, and scratchbuilds! You make this old Mek happy.
|
|
|
|
|
|
2021/08/06 10:43:05
Subject: Re:The Waaaagh has started: Homemade Squiggoths have arrived!
|
|
Regular Dakkanaut
|
Quick conversion update.
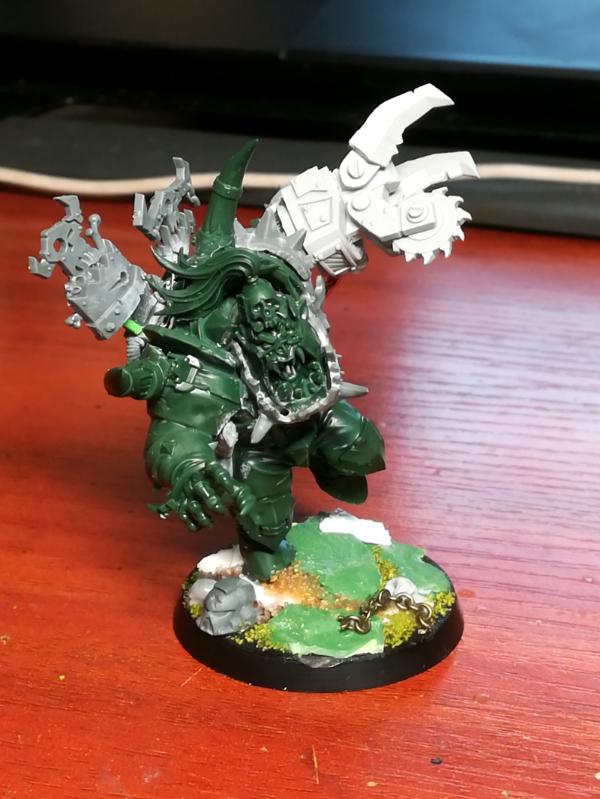
Since I had so much fun with the black ork/nob conversion. I ordered a bought a few more to continue the saga. I'll probably never field 20 nobs, but I really like how the miniatures look..
As a little addition I also got a "Varag ghoul chewer", a special character of blood bowl black ork team, with the intention of making a nob leader/warboss. I do have a warboss without mega-armour, but is a really old conversion, and the pose of Varag is really dynamic.
The conversion itself is not too spectacular, but the miniature already works well from vanilla. I exaggerated the charging pose by changing the angle of the floor, added a huge power klaw that I had from the remaining Artelw miniatures, and added a few bits of armor and accesories.
The most important part of the conversion was to bulk up the miniature and make it look bigger than it is. Compared to the black orks, this mini is pretty much the same size, just having a taller running pose, and it felt small for a warboss. Thus, I made him stand higher on a slightly bigger base, and changed the location of the horns from the jaw to the shoulders, making him more menacing. Also added some ork symbols as a boss pole, and the huge klaw also helps to make the miniature appear bigger than it actually is.

I really want to finish the first squiggoth and move to the second one, but as you see I have a hard time staying only in a single project and I keep doing small things on my free time gaps until I have a good evening to sit down with my bigger projects.
I really hope to finish the building of all these things soon so I can go back to painting.
List of on-going projects right now:
BUILDING
- 2 squiggoths castles(80% done the first one, still need to start the second one)
- 12 nob black ork conversions
- Muzzle flasshes for ork miniatures (a bunch of them, I'll need to keep doing these in small moments)
PAINTING
- 3 redemptor dreadnoughts +35 infantry models + 1 rhino
- Koptars, nobs and HQ artelw miniatures
|
|
This message was edited 1 time. Last update was at 2021/08/06 10:48:50
Serve the Emperor today, for tomorrow you may be be dead.
Painting blog:
https://www.dakkadakka.com/dakkaforum/posts/list/793314.page
|
|
|
|
|
2021/08/06 12:26:31
Subject: The Waaaagh has started: Homemade Squiggoths have arrived!
|
|
Master Engineer with a Brace of Pistols
|
Love the conversions mate, looks propa orky! Waaagh!
|
|
|
|
|
|
2021/08/06 19:19:27
Subject: The Waaaagh has started: Homemade Squiggoths have arrived!
|
|
Ancient Venerable Dreadnought
|
That’s a great conversion from the Black Ork. He really has a great dynamic pose, charging down those oomies.
|
Goberts Gubbins - P&M Blog, started with Oldhammer, often Blackstone Fortress and Void Panther Marines, with side projects along the way |
|
|
|
|
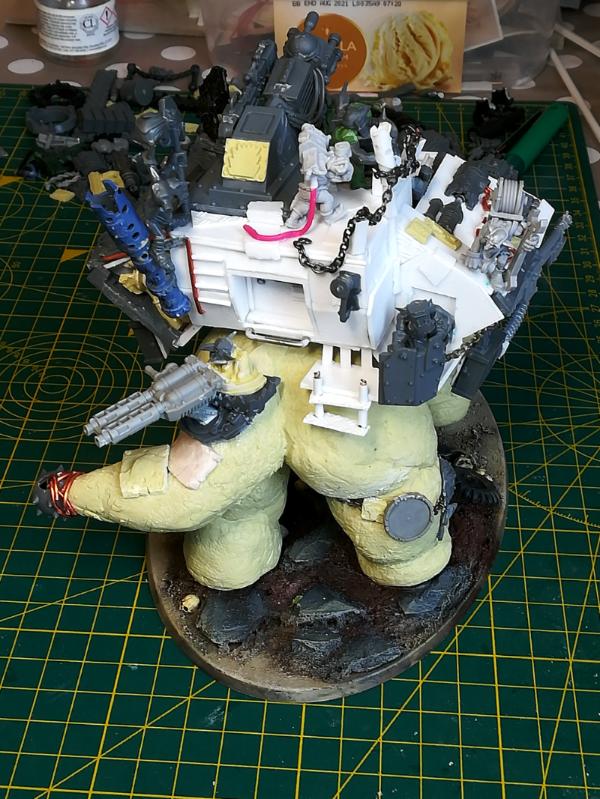
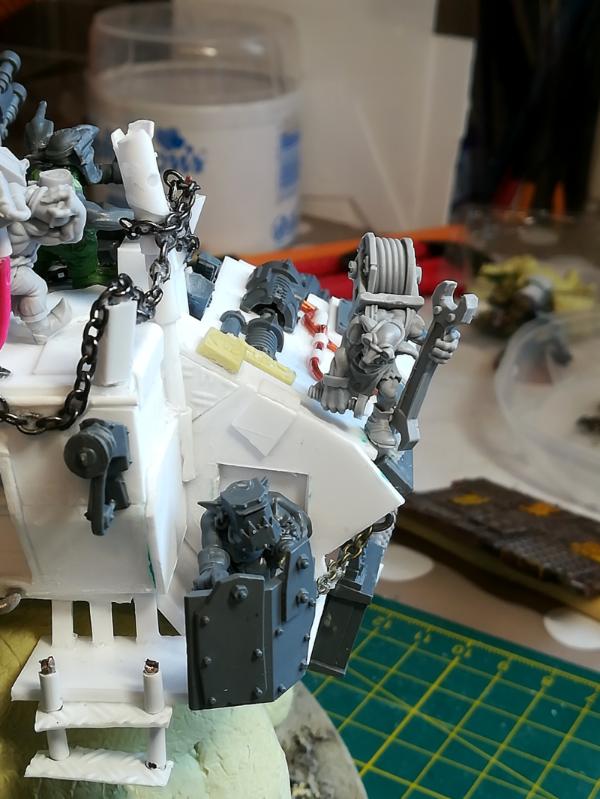
2021/08/08 09:22:05
Subject: Re:The Waaaagh has started: Homemade Squiggoths have arrived!
|
|
Regular Dakkanaut
|
Thanks for your comments, really appreciate the feedback and the support from the boyz!
Automatically Appended Next Post:
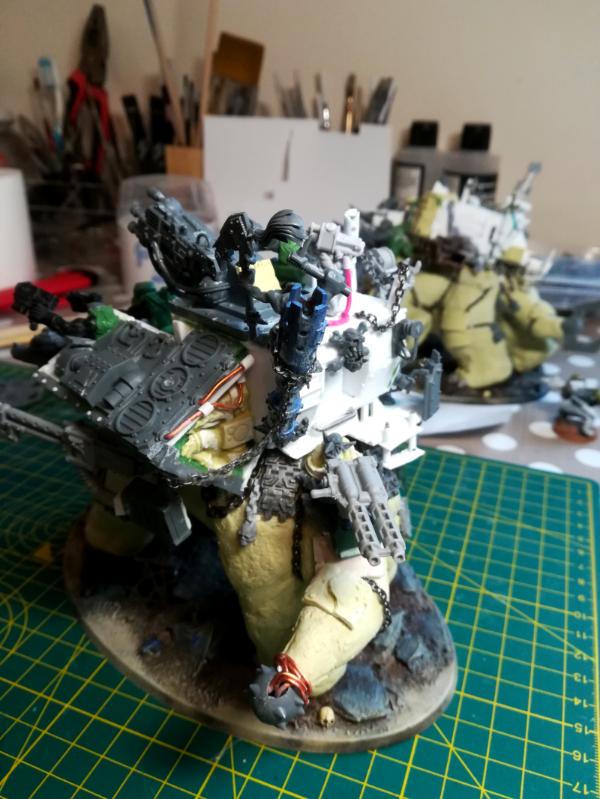
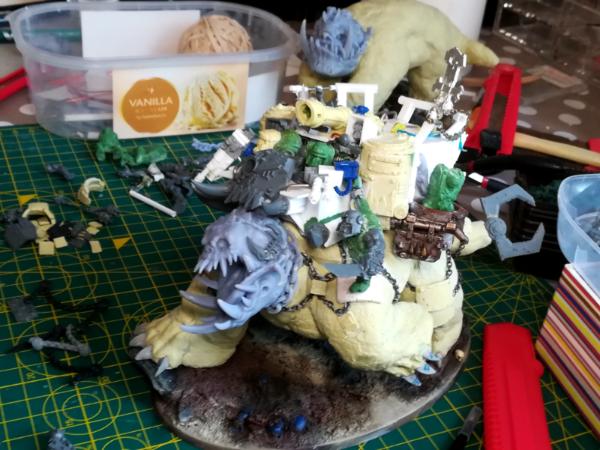
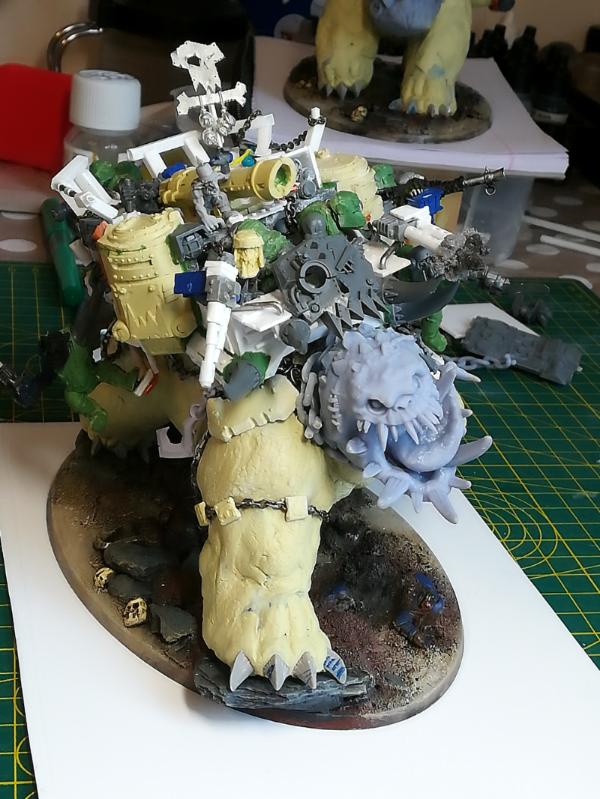
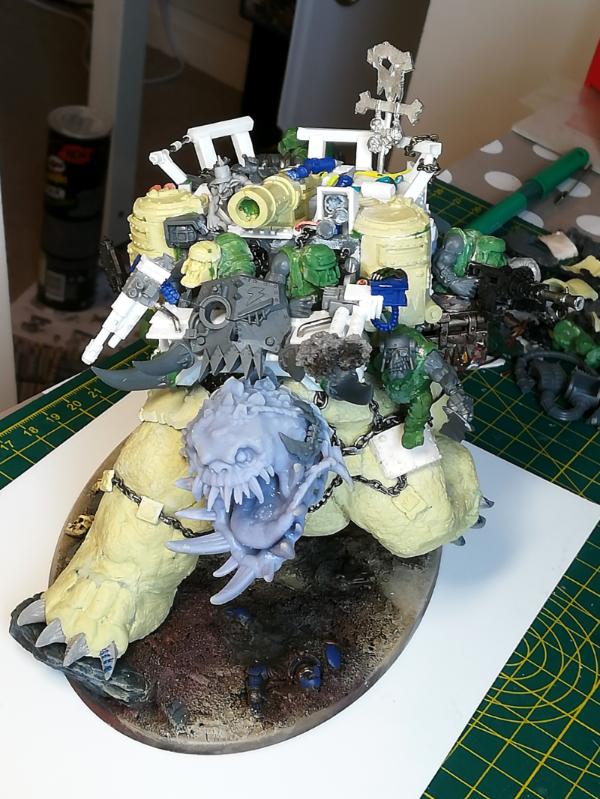
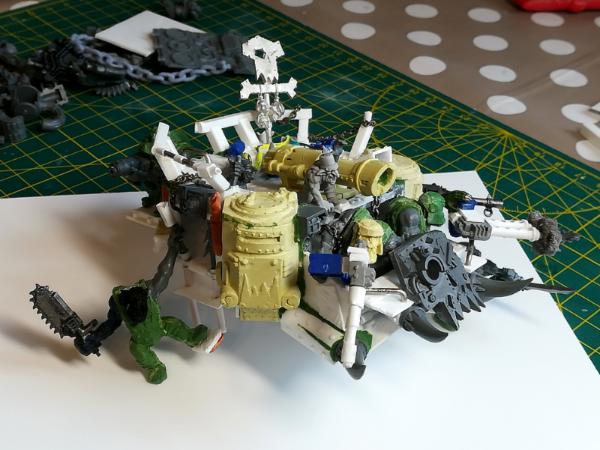
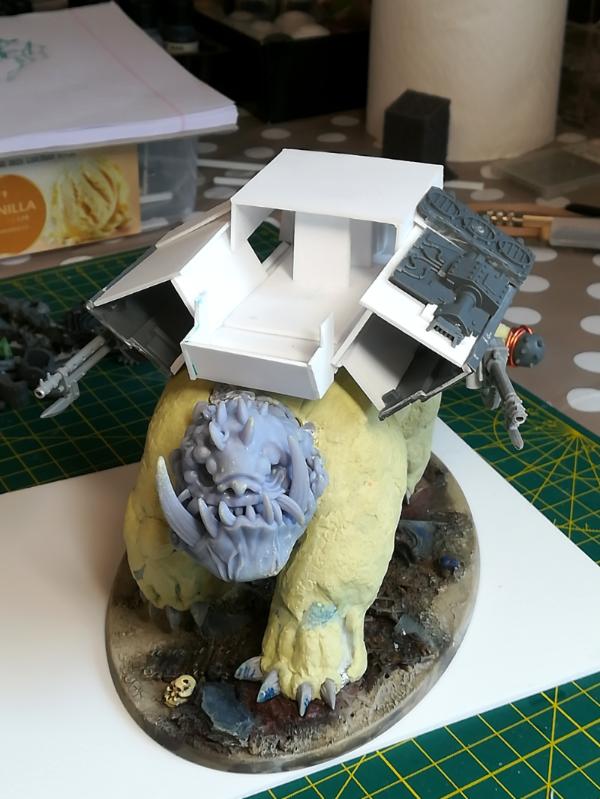
Squiggoth update!
Finished the first one, and started the base structure for the second one!
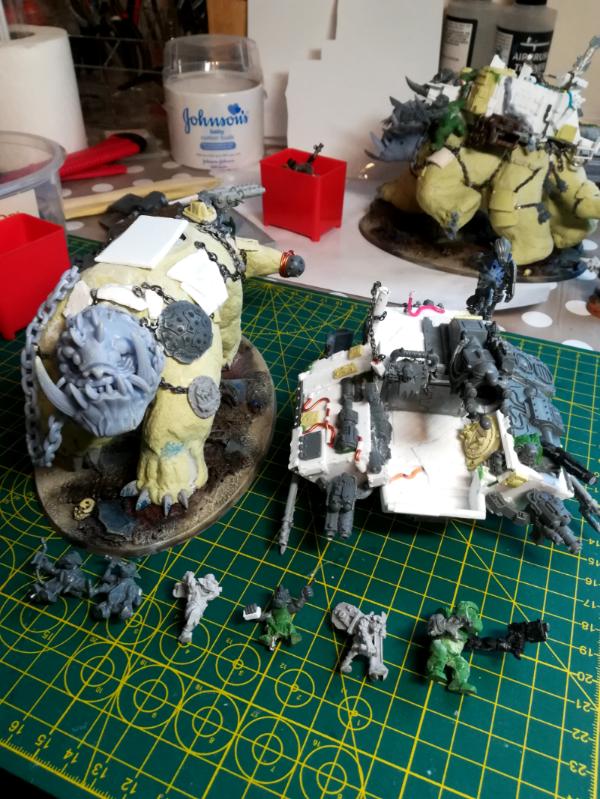
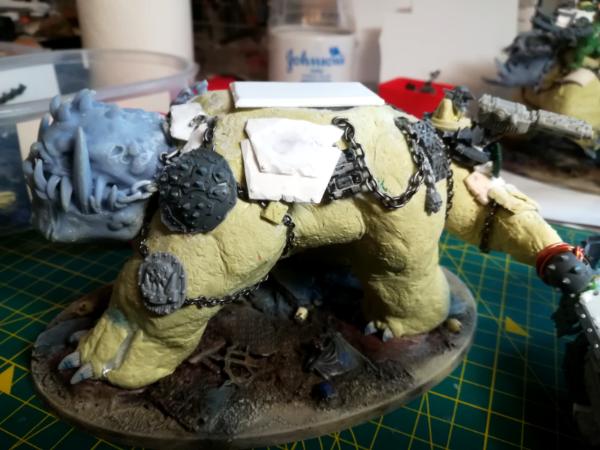
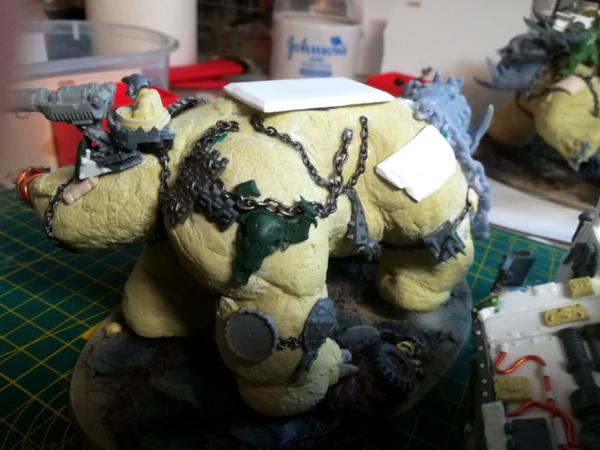
I must say I am really happy with the building of this first miniature. Managed to get it pretty close to my original idea, with some improvements along the way and nice details here and there. It does feel a bit crowded on the front, but that's part of the fun of it, having a lot of energy and keeping all the sections of the mini relatively readable. I kept some of the crew as separate pieces for painting, and the castle will be always detachable, maybe adding magnets before priming (does not feel completely necesary,it holds up really well, but it will serves as an extra security measure, specially when playing with it).
The connection between the castle and the creature is hidden in a way that does not looks like a hard visible cut, disguising the transition between one piece and the other.
I added a reasonably amount of detail in al the sections, both with bits and scrathbuilding, but I might keep doing tweaks here and there while I make the second squiggoth.
I'm really interested on your feedback, ideas and suggestions, so please comment on these
        Automatically Appended Next Post:
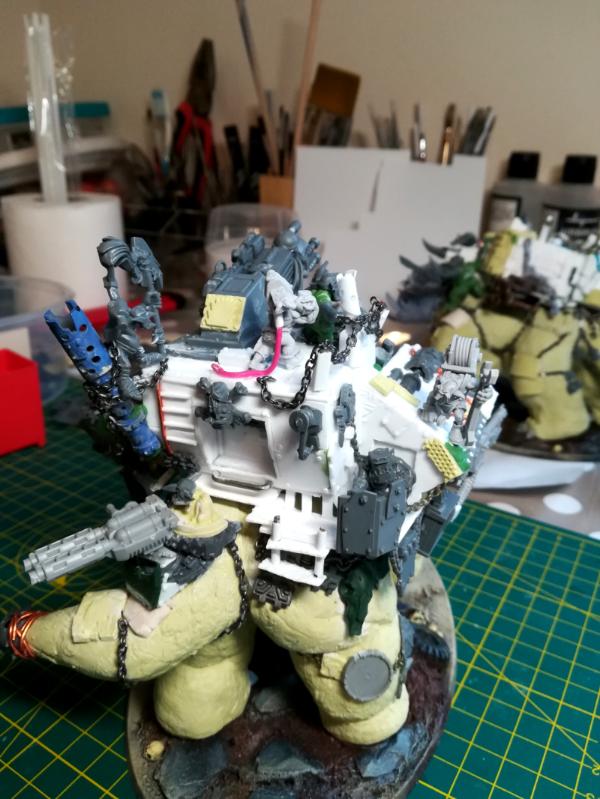
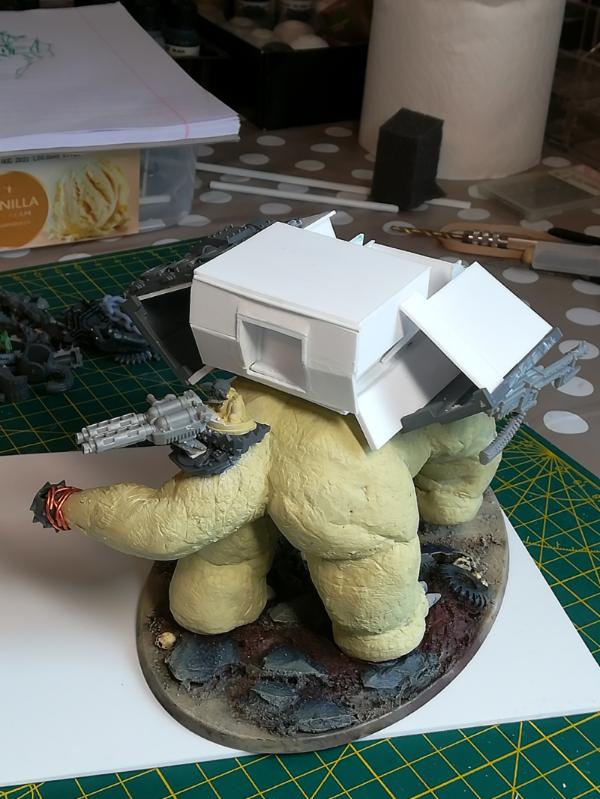
Second squiggoth started!
As for the second of these miniatures, I started the base structure. This one will have a more calmed energy behind it, be more mechanical and have a more dakka oriented feel to it. I might add a psychic looking cannon on the top in case I want to use this as the new kill rig, not sure yet. Sure it would give an interesting looking Object source lighting painting look to the top of the miniature!
I would like to have small scenes with grots repairing some structures, and maybe hiding some interesting details here and there.
This castle is also detachable from the creature using the same method as the first squiggoth.
As you see from the original idea, some of the elements are kept, but I have changed some of the main structure at the top and sides to make it a bit more interesting.

I will try to use more bits rather hand hand crafting most of the details, for 2 reasons: 1, I have a ton of good bits that I should be using by now. I always want to save then for future projects (specially for my future ork vehicles), but at this rate I keep stacking bits rather than using them as I should XD. Second and obvious reason is to make the process a bit faster. Making the detail yourself can be fun and really allows you to personalize the look you want, but using bits can also be really creative.
|
|
This message was edited 4 times. Last update was at 2021/08/08 09:44:37
Serve the Emperor today, for tomorrow you may be be dead.
Painting blog:
https://www.dakkadakka.com/dakkaforum/posts/list/793314.page
|
|
|
|
|
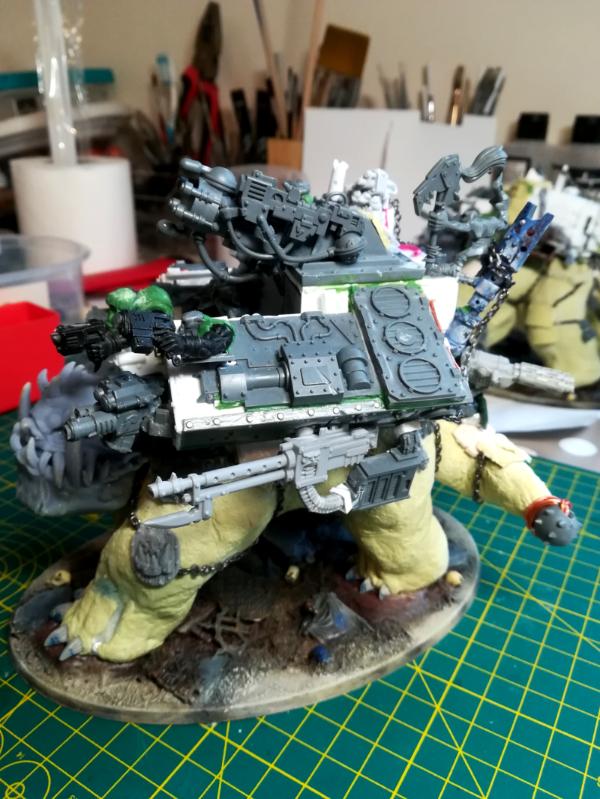
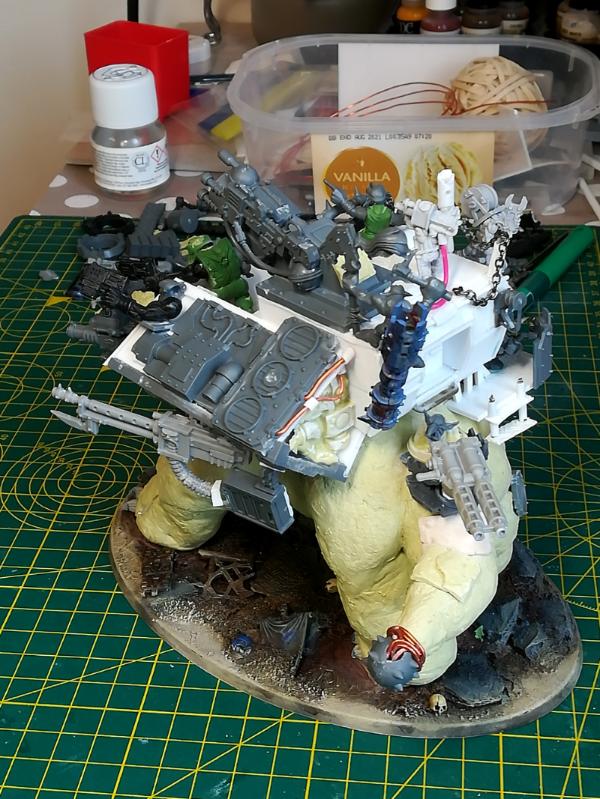
2021/08/09 09:22:20
Subject: Re:The Waaaagh has started: Homemade Squiggoths have arrived!
|
|
Regular Dakkanaut
|
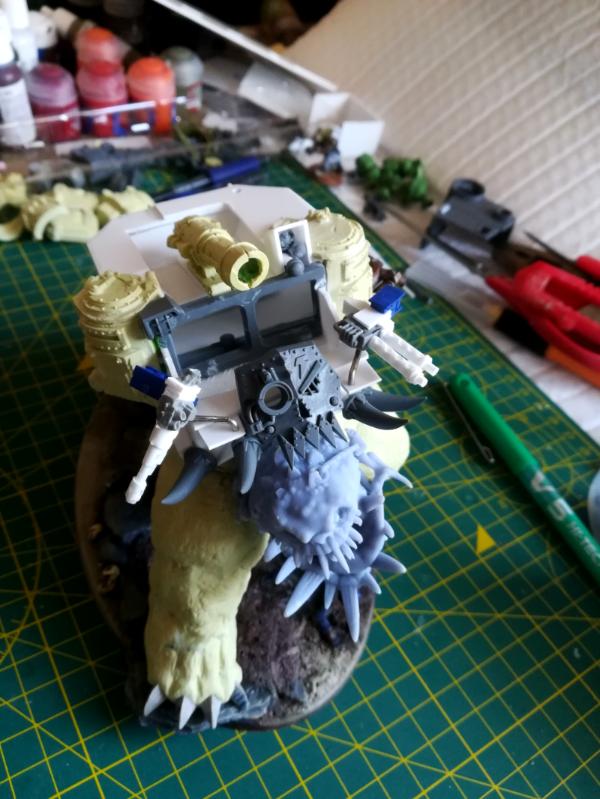
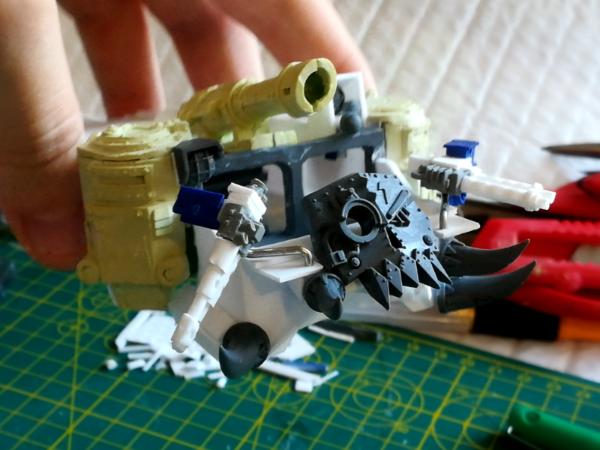
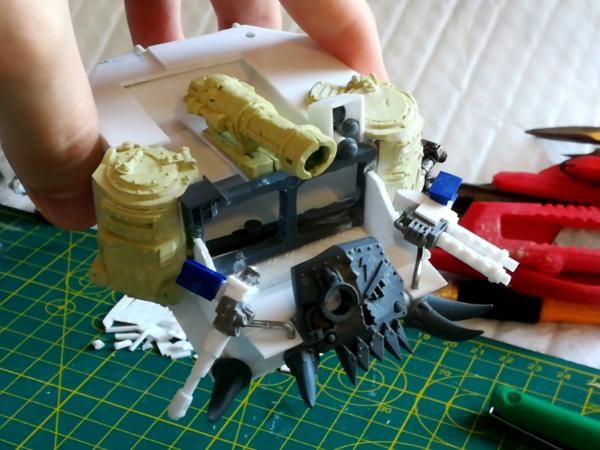
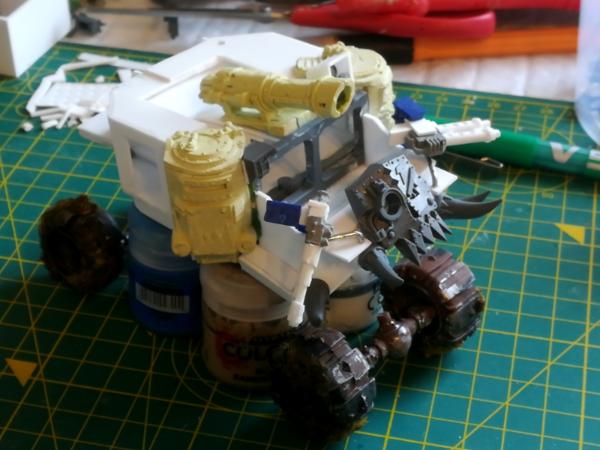
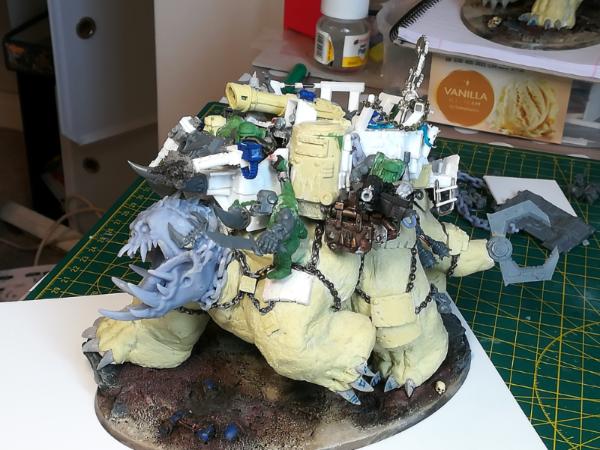
Moar update on the 2nd Squiggoth!
I basically had all weekend to work on this boy, and is getting done fast! Most of the castle overall shape and features are done, lacking some areas such as the front panels, the legs/creature pass and a fine detail pass adding screws and other small components.
My biggest concern with this second model was to create a base shape that was interesting to look at and that resembled some type of craft or looted vehicle.
I had really clear ideas for some of the components of the first squiggoth's castle (such as the killa kan bodies for the side, the skull on the front, overall shape...), but this one just had the idea of having a V shapped body with big turrets in each side.
I did some scketches in paper before starting the base shape to have a decent idea of what to do. I keeped the idea I had of the V boddy with turrets, but I made a big opening on the middle, and a small turret/higher area on the back where the artillery would be located. This gave me the base to work from, and the rest was pretty much just populating it, closing the gaps and finding where to place the small crew scenes I had in mind.
This one has been much faster since I did not had to build by hand most of the elements, and the crews is quite out of the box stuff with some minor modifications, saving a massive amount of time.
The castle size is noticeably bigger to the first squiggoth, but since it does not have any standing out/hanging crew members or extra turrets, the space it occupies is relatively similar. The pose being more calmed also helps with keeping everything under control.
The cannon on top is supposed to represent the psychic cannon from the kill rig, so if I want to use this model to represent it, it would make visual sense and with the painting it should be easy to spot from any point on the table.
The first on is definitely my favorite, but I would say this one has also some nice touches. I will take a look at what nice elements and small details I can add to add more story to it. to make it more interesting.
|
|
This message was edited 1 time. Last update was at 2021/08/09 09:28:25
Serve the Emperor today, for tomorrow you may be be dead.
Painting blog:
https://www.dakkadakka.com/dakkaforum/posts/list/793314.page
|
|
|
|
|
2021/08/10 18:06:01
Subject: The Waaaagh has started: Homemade Squiggoths have arrived!
|
|
Ancient Venerable Dreadnought
|
Woah! Great progress killatorres! The squiggoths are coming on great guns, all the details are fantastic. The uparmoured 2nd one is a cool comparison to the first, almost like a deffskull and a snakebite. For me though the rear left of the first one is a bit bare, and could do with a grot there, maybe the one on the right could switch sides?
|
Goberts Gubbins - P&M Blog, started with Oldhammer, often Blackstone Fortress and Void Panther Marines, with side projects along the way |
|
|
|
|
2021/08/10 22:54:14
Subject: The Waaaagh has started: Homemade Squiggoths have arrived!
|
|
Regular Dakkanaut
|
gobert wrote:Woah! Great progress killatorres! The squiggoths are coming on great guns, all the details are fantastic. The uparmoured 2nd one is a cool comparison to the first, almost like a deffskull and a snakebite. For me though the rear left of the first one is a bit bare, and could do with a grot there, maybe the one on the right could switch sides?
Cheers man!
Yeah, thats a fair point, I can try to get some other element on that back left leg area (I got the mines and a couple or armor pieces, which might not be enough to balance it out in terms of composition). I can experiment with moving the shoota boy to the other side and see how that looks, although at first glance I though that open area left some space to breath compared to the rest of the miniature, showing a bit of the pipe work and other minor details.
My original idea was to make some type of stair case from the leg to the castle on that leg, showing that that's where the orks generally climb on the beast, but I abandoned the idea in favor of others. Maybe I come back to that, was pretty promising when I did some tests before glueing stuff.
That grot falling is placed in the only space I found it fitted correctly considering both squiggoths, otherwhise the pose really does not flow well with the body of the creature, direction of the movement and contact points. I do not know where it comes from, but is a quite specific grot pose XD
|
Serve the Emperor today, for tomorrow you may be be dead.
Painting blog:
https://www.dakkadakka.com/dakkaforum/posts/list/793314.page
|
|
|
|
|
2021/08/11 09:05:21
Subject: The Waaaagh has started: Homemade Squiggoths have arrived!
|
|
Ancient Venerable Dreadnought
|
Yeah, the steps or maybe a ladder could work. I hadn’t considered it a spot to see more of the castles workings, so that would work well.
|
Goberts Gubbins - P&M Blog, started with Oldhammer, often Blackstone Fortress and Void Panther Marines, with side projects along the way |
|
|
|
|
2021/08/18 22:13:55
Subject: Re:The Waaaagh has started: Homemade Squiggoths have arrived!
|
|
Regular Dakkanaut
|
|
Serve the Emperor today, for tomorrow you may be be dead.
Painting blog:
https://www.dakkadakka.com/dakkaforum/posts/list/793314.page
|
|
|
|
|
2021/08/20 08:50:40
Subject: The Waaaagh has started: Homemade Squiggoths have arrived!
|
|
Ancient Venerable Dreadnought
|
No 2 looks pretty good to me! Can’t wait to see them with paint on
|
Goberts Gubbins - P&M Blog, started with Oldhammer, often Blackstone Fortress and Void Panther Marines, with side projects along the way |
|
|
|
|
|
|


 Imperial Knights: The Avengers Initiative
 Arakasi vs Infinity