| Author |
Message |
 |
|
|
|
|
Advert
|
Forum adverts like this one are shown to any user who is not logged in. Join us by filling out a tiny 3 field form and you will get your own, free, dakka user account which gives a good range of benefits to you:
- No adverts like this in the forums anymore.
- Times and dates in your local timezone.
- Full tracking of what you have read so you can skip to your first unread post, easily see what has changed since you last logged in, and easily see what is new at a glance.
- Email notifications for threads you want to watch closely.
- Being a part of the oldest wargaming community on the net.
If you are already a member then feel free to login now. |
|
 |
2015/06/15 05:03:10
Subject: Micro Beads for Models! So Many Studs!
|
|

Boosting Black Templar Biker
|
|
|
|
|
 |
|
2015/06/15 05:11:52
Subject: Re:Micro Beads for Models! So Many Studs!
|
|
Longtime Dakkanaut
|
You should be able to get beads as small as .01mm if you look for the stuff they put in facial scrubs (I cannot recall what the name of it is - Google "Facial Scrub beads" and you will get the name of it).
You have to buy the stuff in 5lb bags though (if you can find a company that sells it for boutique soap makers - it is used for soap), if you are lucky.... Otherwise it comes in 25kg and 50kg bags.
But the .6mm beads would be good.
I don't know why you need beads, though.
Get a brass rod, take a file or piece of sandpaper to round the end. And then cut off about 3mm of the end of the rod, drill a hole where you want the studs, and insert the rod to the depth needed.
That is how I learned to make rivets and studs from Richard Kerr, who used to work at Partha and for SJ Games.
MB
|
|
|
|
|
2015/06/15 05:48:36
Subject: Micro Beads for Models! So Many Studs!
|
|
Been Around the Block
|
To be honest, gluing some tiny beads sounds like a LOT less work than grinding down, chopping, and drilling holes for brass rod.
And at the scale we're talking about, the difference in the way it looks will be negligible.
If you're building a competition piece, then it's a different story.
|
|
|
|
|
2015/06/15 06:05:28
Subject: Micro Beads for Models! So Many Studs!
|
|

Frenzied Berserker Terminator
|
How exactly are you getting those beads on there?
It looks like you're making small holes to get them to sit flush. Just looking at the bead in your hand it seems almost too small to handle. How do you manage?
|
Gets along better with animals... Go figure. |
|
|
|
|
2015/06/15 06:52:53
Subject: Re:Micro Beads for Models! So Many Studs!
|
|
Boosting Black Templar Biker
|
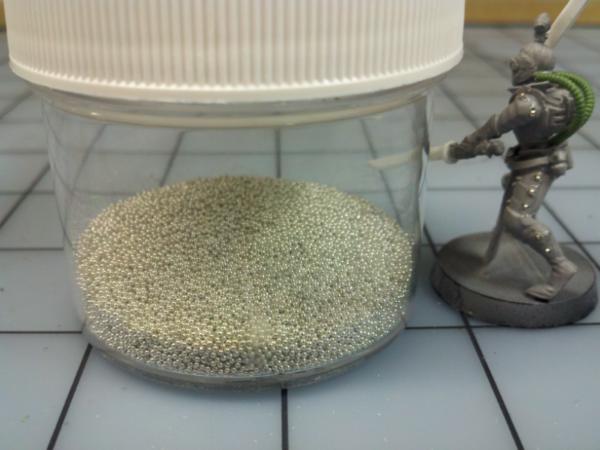
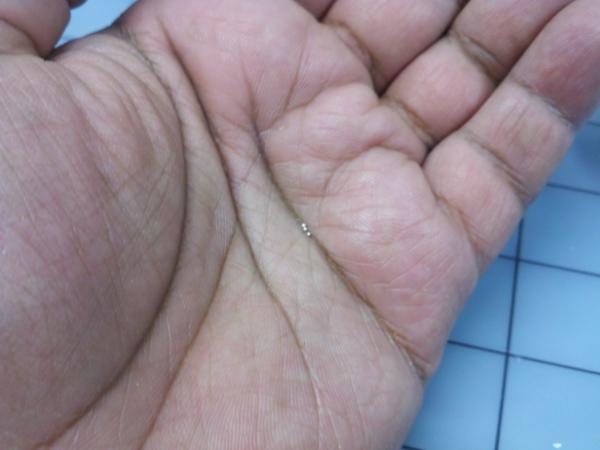
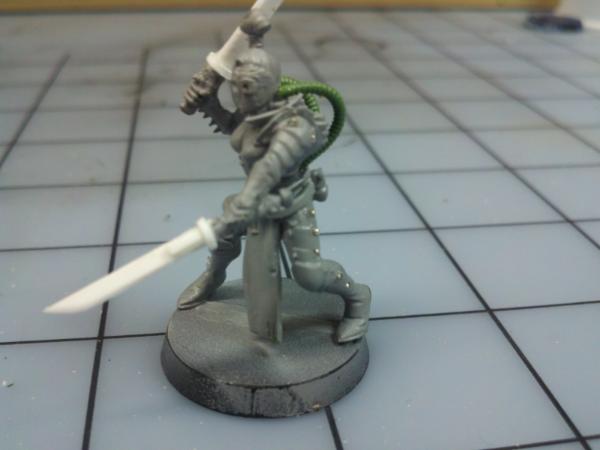
The glass beads are much easier to work with than brass wire and as you can see the .6mm size seems to be a very good scale for 40k models. I modded one model in about 2 minutes. You can also get these in many different colors so you probably can use them without painting them if you mount them on a painted model. And for the price $1.99 seems like a reasonable price.
As for mounting and handling, I drilled a small pilot hole first with a pin vise and small enough bit. I then used a toothpick to put a drop of super glue on the hole and then used either a pair of tweezers or the wet tip of a needle tool to place the bead. Pretty easy once you get the swing of it. Oh and a magnifying glass really helps.
|
|
This message was edited 1 time. Last update was at 2015/06/15 06:59:19
|
|
|
|
|
2015/06/15 07:28:43
Subject: Micro Beads for Models! So Many Studs!
|
|
Frenzied Berserker Terminator
|
Yeah I can imagine the magnifying glass would be almost essential.
Good idea. I should try this, seems easier than tracking down a punch and the right size card.
|
Gets along better with animals... Go figure. |
|
|
|
|
2015/06/16 11:14:57
Subject: Micro Beads for Models! So Many Studs!
|
|

Stealthy Grot Snipa
|
Love the idea 
Currently I use the nail art gems, they come pretty small and are flat one side. Good for rivets on Ork tanks, but not as nice as these round ones look on more stylish models/races.
|
Favourite Game: When your Warboss on bike wrecks 3 vehicles simply by HoW - especially when his bike is a custom monowheel.
|
|
|
|
|
2015/06/16 12:53:24
Subject: Re:Micro Beads for Models! So Many Studs!
|
|
Member of a Lodge? I Can't Say
|
Looks like a good idea....
as mentioned... the 1 & 2mm nail art beads are pretty good for vehivles and armour.... not used them on figures though....
http://www.dakkadakka.com/dakkaforum/posts/list/591094.page
That's the link to a post I did a while back.. there are some links to suppliers in there incase it comes in handy!
Anything to help advance the application of rivets can only be a good thing! 
|
|
|
|
|
|
2015/06/16 13:28:00
Subject: Re:Micro Beads for Models! So Many Studs!
|
|
Anointed Dark Priest of Chaos
|
I've been experimenting with these same size beads for the same purpose.
Why the hell would you want to cut and file rod when you could have a ready source of cheap and Uniform pieces? 
Question for the op: what is your method for making the setting holes? I use a drill bit, but feel I'm probably overlooking some method that is easier (some punch tool/method to make a tiny depression?)
As for working with them: work over a tray. When they drop they go into hyperspace and disappear. I find that if you press your finger down on one it life up with your finger and you can move and rip it into place with a steady/slow hand.
|
|
This message was edited 1 time. Last update was at 2015/06/16 13:28:50
|
|
|
|
|
2015/06/16 14:06:34
Subject: Re:Micro Beads for Models! So Many Studs!
|
|
Stealthy Grot Snipa
|
 CT GAMER wrote: CT GAMER wrote:I've been experimenting with these same size beads for the same purpose.
Why the hell would you want to cut and file rod when you could have a ready source of cheap and Uniform pieces?
Question for the op: what is your method for making the setting holes? I use a drill bit, but feel I'm probably overlooking some method that is easier (some punch tool/method to make a tiny depression?)
As for working with them: work over a tray. When they drop they go into hyperspace and disappear. I find that if you press your finger down on one it life up with your finger and you can move and rip it into place with a steady/slow hand.
well the only other depression tool I could think of would be a centre punch, either set very light or just pressed lightly if using a non-spring action one. But tbh, I think a drill bit is probably far more controlled.
|
Favourite Game: When your Warboss on bike wrecks 3 vehicles simply by HoW - especially when his bike is a custom monowheel.
|
|
|
|
|
|
|