| Author |
Message |
 |
|
|
|
|
Advert
|
Forum adverts like this one are shown to any user who is not logged in. Join us by filling out a tiny 3 field form and you will get your own, free, dakka user account which gives a good range of benefits to you:
- No adverts like this in the forums anymore.
- Times and dates in your local timezone.
- Full tracking of what you have read so you can skip to your first unread post, easily see what has changed since you last logged in, and easily see what is new at a glance.
- Email notifications for threads you want to watch closely.
- Being a part of the oldest wargaming community on the net.
If you are already a member then feel free to login now. |
|
 |
2016/05/21 20:57:57
Subject: Help needed fixing Smaug's wings.
|
|

Boom! Leman Russ Commander
|
Hey all,
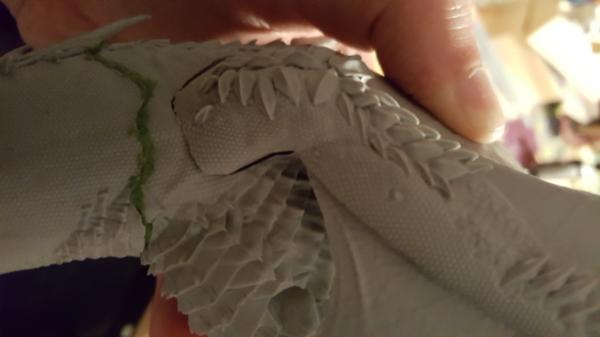
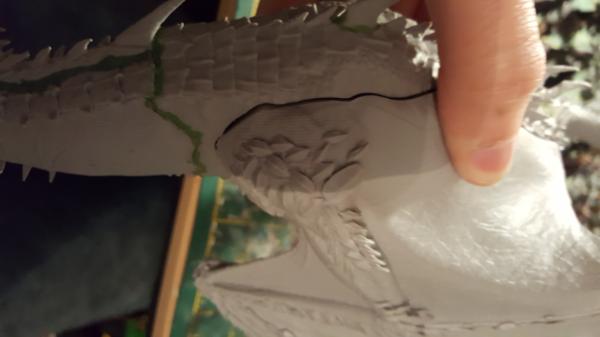
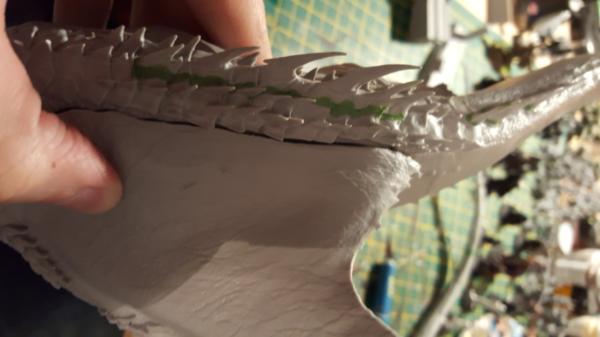
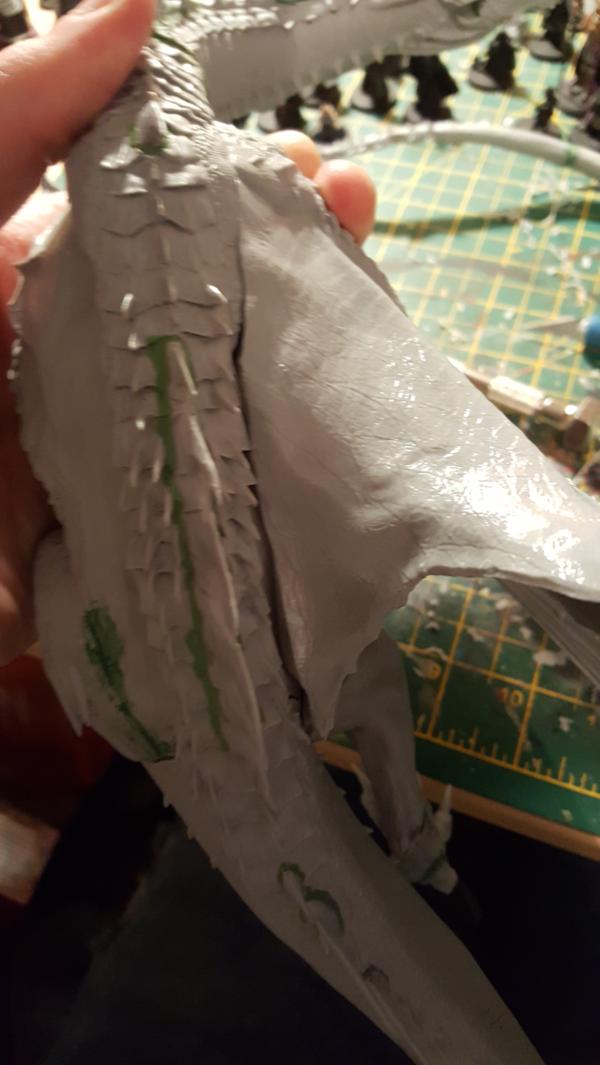
I am currently building my Smaug model and everything has gone alright so far, the parts haven't fit perfectly but nothing a small line of greenstuff hasn't fixed.
So his head, neck, body, legs and tail have all been put together however I have come to dry fit his wings and they barely fit at all, the right shoulder joint fits ok but the wing skin along his back is no where near to fitting right and his left shoulder and wing skin are not fitting right either and I'm kind of stuck as what I can do to make sure they will fit correctly ? ( I would like to point out i am leaving the wings off while I paint the model then I will be attaching them once painted)
I was considering emailing GW and asking for advice on what I could do to get them to fit properly but I wasn't sure if they would actually reply to that sort of question ?
I've Put some pictures in the spoiler below to show what I am talking about, if you can offer any advice that would be amazing !
Cheers
Wolf
|
|
|
|
 |
|
2016/05/21 21:01:25
Subject: Help needed fixing Smaug's wings.
|
|
Longtime Dakkanaut
|
Warm the part up in hot water prior to dry fitting it, it should flex enough to conform better, but regardless, you'll need to do some filler work.
|
|
|
|
|
|
2016/05/21 21:41:33
Subject: Help needed fixing Smaug's wings.
|
|
Boom! Leman Russ Commander
|
I know I'll have to do filler work regardless of how much i do to get it to fit I just want to reduce the gap I will have to fill 
So do I just dip the side of the wing that connects to the body into hot water for a few seconds and then press it onto the body ?
Would that essentially re-mold the connecting side into the actual shape it needs to be ? (it's my first time doing a large scale resin model like this, I understand the basics but not enough to tackle this much of a gap issue  )
|
|
|
|
|
|
2016/05/22 00:10:56
Subject: Help needed fixing Smaug's wings.
|
|

Fixture of Dakka
|
Might take more than a few seconds, but that's the idea.
|
CHAOS! PANIC! DISORDER!
My job here is done. |
|
|
|
|
2016/05/22 05:36:04
Subject: Help needed fixing Smaug's wings.
|
|

Grizzled Space Wolves Great Wolf
|
 Wolf wrote: Wolf wrote:So do I just dip the side of the wing that connects to the body into hot water for a few seconds and then press it onto the body ?
I'd probably dump the whole wing in hot water and see if I can get it to fit better. It may be internal stresses far away from that area that are causing the problem.
It's hard to tell from your pics, but it might be the body that's slightly warped (instead of OR in addition to the wings).
You could also email GW, but they'll probably tell you it's common working with resin to have to do this sort of stuff, but no harm in trying I guess.
In future when doing large resin kits, make sure you dry fit as much of the model as possible before you start gluing stuff to give yourself a better chance to fix warpage.
|
|
|
|
|
2016/05/22 08:54:13
Subject: Help needed fixing Smaug's wings.
|
|
Boom! Leman Russ Commander
|
Superb thanks for your help guys, I'll give both a try today and see if I can get it to fit better
I dry fitted everything but the wings and damn do I regret it haha
|
|
|
|
|
|
2016/05/22 09:13:35
Subject: Re:Help needed fixing Smaug's wings.
|
|
Annoyed Blood Angel Devastator
|
My Smaug kit has the same gaps in it, but I've left the wings off so it's easier to transport/store.
You could try rolling some Green Stuff into a thin strip, then squash it between the wing and body, then pull the two parts apart and leave it to dry.
|
 For the Emperor and Sanguinius! For the Emperor and Sanguinius! 
Boredom, a small kingdom in my mind, on the edge of the infinite |
|
|
|
|
2016/05/22 09:48:05
Subject: Help needed fixing Smaug's wings.
|
|
Grizzled Space Wolves Great Wolf
|
I was tempted to buy a Smaug and part of the reason I chose not to do so was even in the promotional pics on the GW site, the gaps looked quite large.
I'm not usually scared of filling gaps, but in the case of Smaug if you have to fill gap, you then have to resculpt the scales back on  I decided it'd be too much work and didn't buy him 
|
|
|
|
|
2016/05/22 11:00:53
Subject: Help needed fixing Smaug's wings.
|
|
Grim Dark Angels Interrogator-Chaplain
|
Wolf wrote:Superb thanks for your help guys, I'll give both a try today and see if I can get it to fit better
I dry fitted everything but the wings and damn do I regret it haha
Might be worth investing in a heat gun, or just use a hair dryer to soften it.
|
|
|
|
|
|
2016/05/22 12:24:04
Subject: Help needed fixing Smaug's wings.
|
|
Grizzled Space Wolves Great Wolf
|
 angelofvengeance wrote: angelofvengeance wrote: Wolf wrote:Superb thanks for your help guys, I'll give both a try today and see if I can get it to fit better
I dry fitted everything but the wings and damn do I regret it haha
Might be worth investing in a heat gun, or just use a hair dryer to soften it.
The good thing about hot water is that you can leave it in there so it can heat all the way through but you're also safe that it's not going to get too hot and get above the model's melting temperature while it's sitting in there (at most if you put it in boiling water it won't get over 100C, though I usually go slightly less than boiling water).
|
|
|
|
|
2016/05/22 14:48:34
Subject: Help needed fixing Smaug's wings.
|
|

Longtime Dakkanaut
|
You can use a hair dryer I use my wifes all the time to bend resin and plastic. Alot less boil time and heat on fingers aswell.
|
I need to go to work every day.
Millions of people on welfare depend on me. |
|
|
|
|
2016/05/22 14:55:05
Subject: Re:Help needed fixing Smaug's wings.
|
|
Boosting Space Marine Biker
|
Resin like this has a big tendency to contract when going through the initial cooling/curing process especially if you remove it from the mould earlier than recommended.
The easiest way to combat these results are for multiple baths in hot water to relax the tension in the whole piece, this will help prevent cracking and such as you work the piece later on. Once that's completexactly, you can begin to reheat via water and work and move the piece into desired position.
In the end though, remember that resin is rather elastic so keep in mind that this process will take several attempts until the material memory takes to the new shape.
|
|
This message was edited 1 time. Last update was at 2016/05/22 14:55:30
|
|
|
|
|
2016/05/22 22:54:53
Subject: Help needed fixing Smaug's wings.
|
|
Boom! Leman Russ Commander
|
Thanks to everyone who has given me some answers, they're certainly clearing things up for when I make my next big resin model whatever that may be.
The hot water bath did the trick in the end and now both wings fit a lot better than they did.
While I have your attention i have another question I wanted to ask, how should I go about securing him to his base ? There isn't many strong contact points to make me feel safe in just super gluing him.
I have thought of maybe using a screw from the bottom into the Base of his left foot but I'm not sure yet. Or just pinning it the old fashioned way.
Thanks again guys !
|
|
This message was edited 1 time. Last update was at 2016/05/22 22:55:21
|
|
|
|
|
|
|


 Legion: Dark Angels
 2500 (and growing)
  1850
1850