| Author |
Message |
 |
|
|
|
|
Advert
|
Forum adverts like this one are shown to any user who is not logged in. Join us by filling out a tiny 3 field form and you will get your own, free, dakka user account which gives a good range of benefits to you:
- No adverts like this in the forums anymore.
- Times and dates in your local timezone.
- Full tracking of what you have read so you can skip to your first unread post, easily see what has changed since you last logged in, and easily see what is new at a glance.
- Email notifications for threads you want to watch closely.
- Being a part of the oldest wargaming community on the net.
If you are already a member then feel free to login now. |
|
 |
2018/01/05 12:16:52
Subject: Necron Paint Scheme. How did this guy do this?
|
|

Norn Queen
|
http://musingsofametalmind.blogspot.com/2011/12/oh-ghost-ark-you-complete-me.html
I ran into this guys models when doing some searches. Anyone got any suggestions on how to replicate his color scheme? Colors and technique.
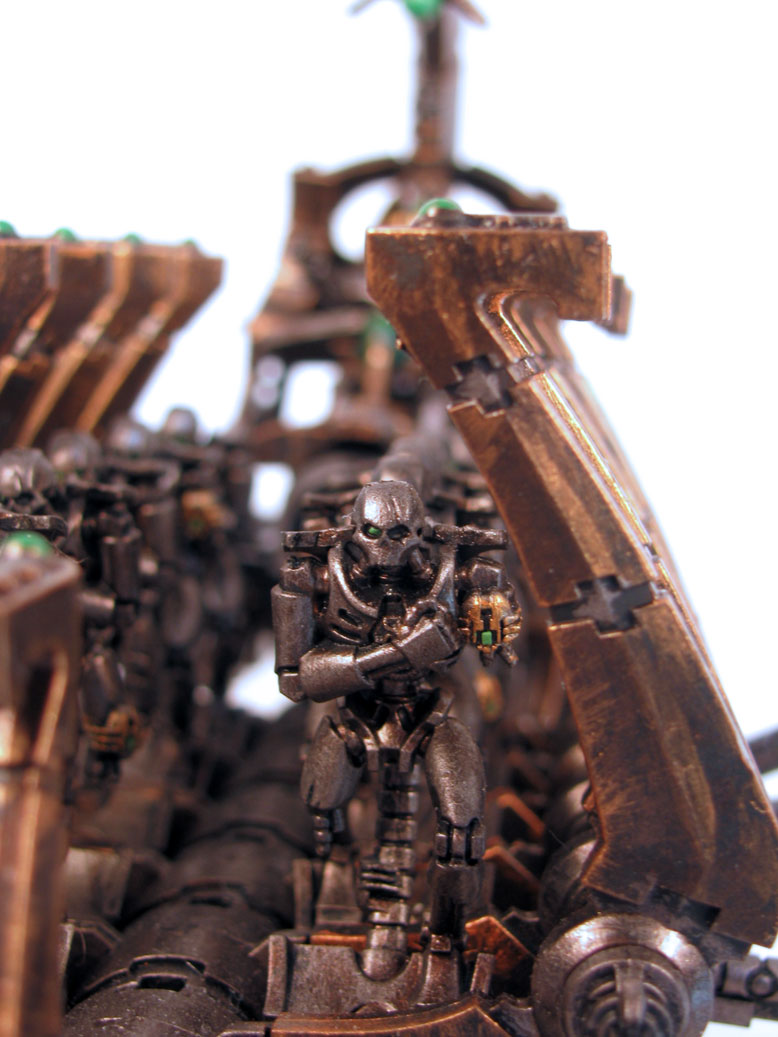
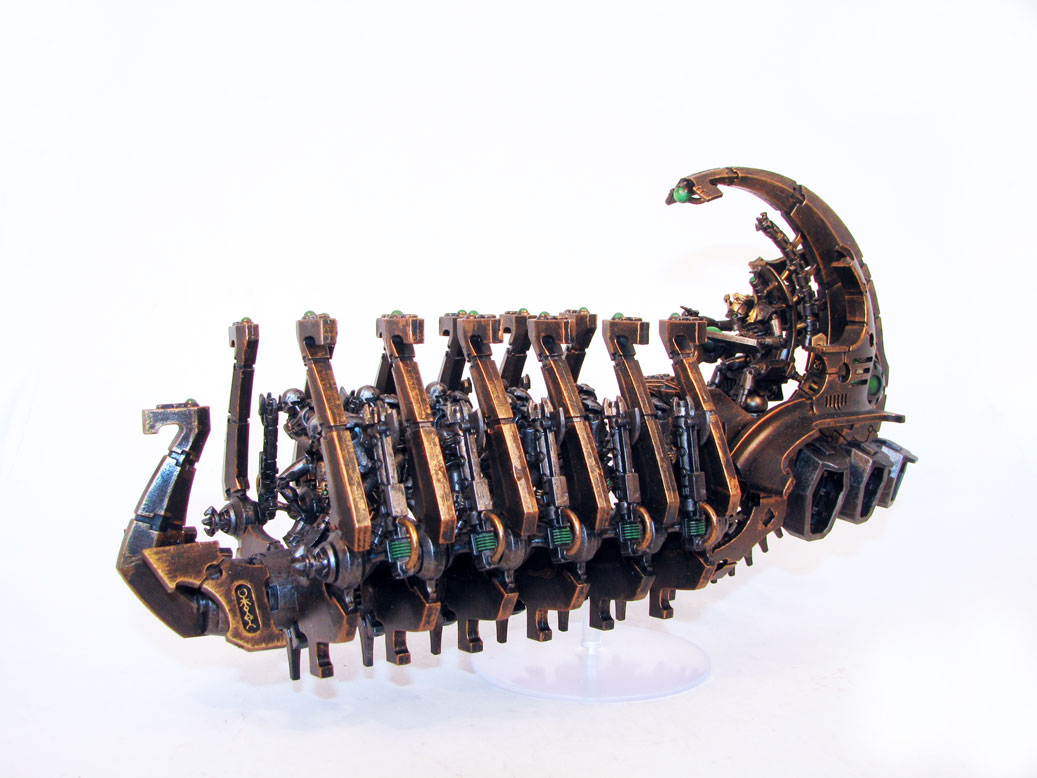
It looks like with some orange energy it could be a good scheme for Maynarkh Dynasty models.
|
These are my opinions. This is how I feel. Others may feel differently. This needs to be stated for some reason.
|
|
|
 |
|
2018/01/05 12:45:26
Subject: Necron Paint Scheme. How did this guy do this?
|
|

Longtime Dakkanaut
*Current meatspace coordinates redacted*
|
I think he's used a masking agent. Essentially you paint the lighter rust color first, apply the mask, then paint the darker color over top, and then peel the mask. A similar effect could also be painted on if you had patience and maybe some weathering powders to help out the overall effect.
|
He knows that I know and you know that he actually doesn't know the rules at all. |
|
|
|
|
2018/01/05 12:56:30
Subject: Necron Paint Scheme. How did this guy do this?
|
|

Death-Dealing Devastator
Melbourne,Vic
|
 Fenris-77 wrote: Fenris-77 wrote:I think he's used a masking agent. Essentially you paint the lighter rust color first, apply the mask, then paint the darker color over top, and then peel the mask. A similar effect could also be painted on if you had patience and maybe some weathering powders to help out the overall effect.
While that's probably going to work, I think that's a much more complicated approach than necessary. Put the dark colour down, then just be really sloppy (ie wetter brush than usual, and don't worry about staying right on the edge) when you drybrush the lighter colour over the top. I unintentionally had this same appearance on drop pod fins, before I learned how and wear to drybrush properly. If you look at the first pic, you can see brush strokes on the fin leading from the hard edge and across the face, and in the second pic you can see mould lines on the fins which have been picked out by drybrushing. The slightly cloudy appearance on the flat surfaces could be produced by sloppy drybrushing, giving the flat surfaces a dark wash without being too concerned about pooling, repeat the sloppy drybrush + wash as many times as desired.
If you use this method, you're going to want your dark colour to start lighter than it looks here, because the repeated dark washing is, of course, going to make it darker.
|
|
This message was edited 1 time. Last update was at 2018/01/05 12:57:56
|
|
|
|
|
2018/01/05 13:24:04
Subject: Necron Paint Scheme. How did this guy do this?
|
|
Powerful Phoenix Lord
|
Honestly? I think the entire model is primed black. The Necron Warriors are probably drybrushed with Boltgun Metal (or Lead whatever), and the ship itself is simply drybrushed with a copper or bronze colour. You can see the brush marks.
Very quick and pretty effective.
|
|
|
|
|
2018/01/05 14:46:48
Subject: Necron Paint Scheme. How did this guy do this?
|
|
Longtime Dakkanaut
*Current meatspace coordinates redacted*
|
skolirvarden wrote: Fenris-77 wrote:I think he's used a masking agent. Essentially you paint the lighter rust color first, apply the mask, then paint the darker color over top, and then peel the mask. A similar effect could also be painted on if you had patience and maybe some weathering powders to help out the overall effect.
While that's probably going to work, I think that's a much more complicated approach than necessary. Put the dark colour down, then just be really sloppy (ie wetter brush than usual, and don't worry about staying right on the edge) when you drybrush the lighter colour over the top. I unintentionally had this same appearance on drop pod fins, before I learned how and wear to drybrush properly. If you look at the first pic, you can see brush strokes on the fin leading from the hard edge and across the face, and in the second pic you can see mould lines on the fins which have been picked out by drybrushing. The slightly cloudy appearance on the flat surfaces could be produced by sloppy drybrushing, giving the flat surfaces a dark wash without being too concerned about pooling, repeat the sloppy drybrush + wash as many times as desired.
If you use this method, you're going to want your dark colour to start lighter than it looks here, because the repeated dark washing is, of course, going to make it darker.
What the drybrush approach won't get you (mostly) is the fine detail on the scratches and whatnot, not unless you're investing a lot of time in being super careful, which is I was suggesting when I said "painted on" in my first post. If you wanted to avoid the masking agent (which would be a pain in the ass on this much surface, I agree) you could:
1. Base with the rust colour, slightly darker than your planned edge scratched and highlights
2. Apply at least two mottled brown washes, one darker than the other to achieve the flat surface effect
3. "Wetbrush" the edges and scratches on, using two successively lighter rust colours
4. Apply weathering powder as needed to add corrosion and depth )optional)
5. I suspect we're advocating for a similar approach actually 
Looking at the larger picture, there are also some blues in spots to add colour and a steely look under all the rust. That could also be done with careful application of washes. Or blended on and then rusted over, depending on your comfort level with smooth blends over larger flat surfaces.
|
He knows that I know and you know that he actually doesn't know the rules at all. |
|
|
|
|
2018/01/05 20:30:36
Subject: Necron Paint Scheme. How did this guy do this?
|
|
Norn Queen
|
It doesn't look like black, but a vey dark brown used as that middle color. Any idea what that could be?
|
These are my opinions. This is how I feel. Others may feel differently. This needs to be stated for some reason.
|
|
|
|
|
2018/01/05 20:33:33
Subject: Necron Paint Scheme. How did this guy do this?
|
|
Legendary Master of the Chapter
|
Looks like dry brush and a ton of brown/black wash.
alternatively i guess it could be based scorched brown and darked up significantly with black washes.
|
 Unit1126PLL wrote: Unit1126PLL wrote: Scott-S6 wrote: Scott-S6 wrote:And yet another thread is hijacked for Unit to ask for the same advice, receive the same answers and make the same excuses.
Oh my god I'm becoming martel.
Send help!
|
|
|
|
|
2018/01/05 20:38:35
Subject: Necron Paint Scheme. How did this guy do this?
|
|
Liche Priest Hierophant
|
For the big orange parts I would prime it black.
Paint it all in a dark brown bronce colour. Your choise from the GW range. Drybrush the parts with a light orange metal colour. Mix forge worlds dark iron very lightly in a big solution of lathelam medium. Paint this into most of the model but stay away from the edges. Drubrush again with your orange colour.
Metal skeletons prime black. Paint with metal colour. Wash with GW's mud colour. Very lightly dryrbush with another metal colour, but not to shiny one.
Automatically Appended Next Post:
Do the same as the metal skeletons on the parts that are 'black' on the ship.
Colour contrast black and orange, and also orange and green.
|
|
This message was edited 1 time. Last update was at 2018/01/05 20:39:24
|
|
|
|
|
2018/01/05 21:02:59
Subject: Re:Necron Paint Scheme. How did this guy do this?
|
|
Ultramarine Librarian with Freaky Familiar
|
Prime black, drybrush Balthazar Gold, apply heavy Aggrax Earthshade/Nuln Oil, drybrush Balthazar gold and repeat as necessary. That would be my guess as how it was done.
Alternatively you could just ask the guy yourself if he has any contact details listed.
|
|
This message was edited 1 time. Last update was at 2018/01/05 21:06:47
Thought for the day: Hope is the first step on the road to disappointment.
30k Ultramarines: 2000 pts
Bolt Action Germans: ~1200 pts
AOS Stormcast: Just starting.
 The Empire : ~60-70 models. The Empire : ~60-70 models.
 1500 pts 1500 pts
 : My Salamanders painting blog 16 Infantry and 2 Vehicles done so far! : My Salamanders painting blog 16 Infantry and 2 Vehicles done so far! |
|
|
|
|
2018/01/05 23:28:04
Subject: Re:Necron Paint Scheme. How did this guy do this?
|
|
Utilizing Careful Highlighting
|
pretty much what Elbows and Customelime said, with lil variation
I would say it was primed black, leadbelcher on regular metal parts, warplock bronze on the center section (and possible some of the ribs but lil hard to tell), wash with nuln oil in the recesses & then maybe agrax on the bronzy bits. Use balthazar on the ribs, drybrushed over that with hashnut copper.
Anyway some combination of the above ideas will likely lead you to a close approximation
|
|
|
|
|
|
2018/01/06 00:22:34
Subject: Necron Paint Scheme. How did this guy do this?
|
|

Grizzled Space Wolves Great Wolf
|
Fenris-77 wrote:skolirvarden wrote: Fenris-77 wrote:I think he's used a masking agent. Essentially you paint the lighter rust color first, apply the mask, then paint the darker color over top, and then peel the mask. A similar effect could also be painted on if you had patience and maybe some weathering powders to help out the overall effect.
While that's probably going to work, I think that's a much more complicated approach than necessary. Put the dark colour down, then just be really sloppy (ie wetter brush than usual, and don't worry about staying right on the edge) when you drybrush the lighter colour over the top. I unintentionally had this same appearance on drop pod fins, before I learned how and wear to drybrush properly. If you look at the first pic, you can see brush strokes on the fin leading from the hard edge and across the face, and in the second pic you can see mould lines on the fins which have been picked out by drybrushing. The slightly cloudy appearance on the flat surfaces could be produced by sloppy drybrushing, giving the flat surfaces a dark wash without being too concerned about pooling, repeat the sloppy drybrush + wash as many times as desired. If you use this method, you're going to want your dark colour to start lighter than it looks here, because the repeated dark washing is, of course, going to make it darker.
What the drybrush approach won't get you (mostly) is the fine detail on the scratches and whatnot, not unless you're investing a lot of time in being super careful, which is I was suggesting when I said "painted on" in my first post.
Getting those fine scratches is way easier with a brush than it would be with any type of masking fluid or chipping agent or salt or whatnot. Creating fine scratches with masking is quite hard because paint doesn't like being pulled up in a way that leaves such fine lines, it tends to tear and come up in little chunks rather than a fine line, also most masking agents don't afford the level of control required to create such fine lines in the first place.
|
|
This message was edited 1 time. Last update was at 2018/01/06 00:24:38
|
|
|
|
|
2018/01/06 04:57:38
Subject: Necron Paint Scheme. How did this guy do this?
|
|
Vlad_the_Rotten
|
It kind of looks like he painted it all Warplock Bronze, then drybrushed with some dark gray metal, except the bronze parts, which are something like one of GW's overly bronzy golds, then drenched it all in a black wash.
Edit: You could probably also make this kind of thing look cool with a roughly torn sponge. Apply the brighter color(as long as it's pretty close to the color underneath so that it'll appear to blend) lightly with the sponge to create a "cloudy" look. I do that with a series of colors to create blood-caked weapons.
|
|
This message was edited 1 time. Last update was at 2018/01/06 04:59:46
|
|
|
|
|
|
|


