| Author |
Message |
 |
|
|
|
|
Advert
|
Forum adverts like this one are shown to any user who is not logged in. Join us by filling out a tiny 3 field form and you will get your own, free, dakka user account which gives a good range of benefits to you:
- No adverts like this in the forums anymore.
- Times and dates in your local timezone.
- Full tracking of what you have read so you can skip to your first unread post, easily see what has changed since you last logged in, and easily see what is new at a glance.
- Email notifications for threads you want to watch closely.
- Being a part of the oldest wargaming community on the net.
If you are already a member then feel free to login now. |
|
 |
2019/11/12 12:26:17
Subject: Scratch-building Banners???
|
|

Crushing Black Templar Crusader Pilot
|
Yo! So, I've been brushing up on my medieval (specifically French) history in preparation to head off the last of my Black Templars (along with lamenting how my Skitarii don't have banners at all, something I very much plan to change), and have particularly, beyond my usual love of banners in 40k, become a fan of the idea of emulating the French Oriflamme. However, I've yet to find a banner shape on an actual model that I find satisfying, and thus must resort to using mine own hands.
I think I'm just about getting there, vis-a-vis greenstuffing ability, and so was looking for a bit of guidance. I'm currently thinking of using plasticard as a kind of skeleton for the broader parts, styrene rods for the poles, and then for edges/other bendy bits, a sheet of the good ol' green, semi-cured, to bring it all together?
What do you think??? I'd love to hear from anyone with a bit more experience!
(also, as to why not just use paper - I feel like a thicker banner is more satisfying to the eye (don't ask me why, I don't know), and I wanna git gud at freehanding!)
Thanks for stopping by!!! 
|
|
|
 |
|
2019/11/12 12:41:43
Subject: Scratch-building Banners???
|
|

Longtime Dakkanaut
|
Aluminium drink can sheet works extremely well for banners. This said, it is very, very easy to get cut badly working with it.
If you're after thicker than that, then lead/pewter sheet will work too (but it's very heavy).
Greenstuff sheet (rolled flat) is actually remarkably difficult to achieve without some sort of tool to roll it.
Styrene sheet (plasticard) will need heat to form to shape (and it's easy to stretch). Can be used for forming, but it's not so easy.
|
|
|
|
|
|
2019/11/12 12:54:44
Subject: Scratch-building Banners???
|
|
Angry Chaos Agitator
|
IMO some thin brass sheeting is the way to go. Or aluminium as mentioned above, but I've not tried that.
Green stuff is an option, but it can be a little too flexible if you are going for something large; if you are doing something primaris ancient-scaled for example, I would steer clear of GS.
I've never rally had any success with heating and bending styrene; my impression is that you need slightly more specialist equipment (i.e. a vacuum former) to have any real success with that.
If it were me, I'd use brass rods to make the poles, brass sheet to make the banner itself, green stuff to make the little cloth loops to hold the banner to the pole and any other edges or details.
|
|
|
|
|
2019/11/12 12:59:41
Subject: Scratch-building Banners???
|
|
Longtime Dakkanaut
|
^ this sounds like a sensible plan.
|
|
|
|
|
|
2019/11/12 13:37:07
Subject: Scratch-building Banners???
|
|
Crushing Black Templar Crusader Pilot
|
Never properly worked with brass before, so prepare for some noob questions - how would I cut it, and ensure that it 1. wasn't sharp as all hell on the edges, and 2. wouldn't flex too much once I'd got everything painted? 3. Where do I even get brass sheet? Never seen it around hobby shops
For background, because this has been raised, I'm only using classic marines
|
|
|
|
|
2019/11/12 13:44:09
Subject: Scratch-building Banners???
|
|
Longtime Dakkanaut
|
Decent model shops should carry brass sheet.
It's easy enough to cut with heavy duty scissors or shears. File the edge with a fine metal file to remove the very edge. You can also scrap it back with a normal steel modelling knife - brass is pretty soft.
Generally, don't worry too much about it flexing when painted - the trailing ribbons from the purity seal are brass on this (the banners are folded and PVA-formed paper):
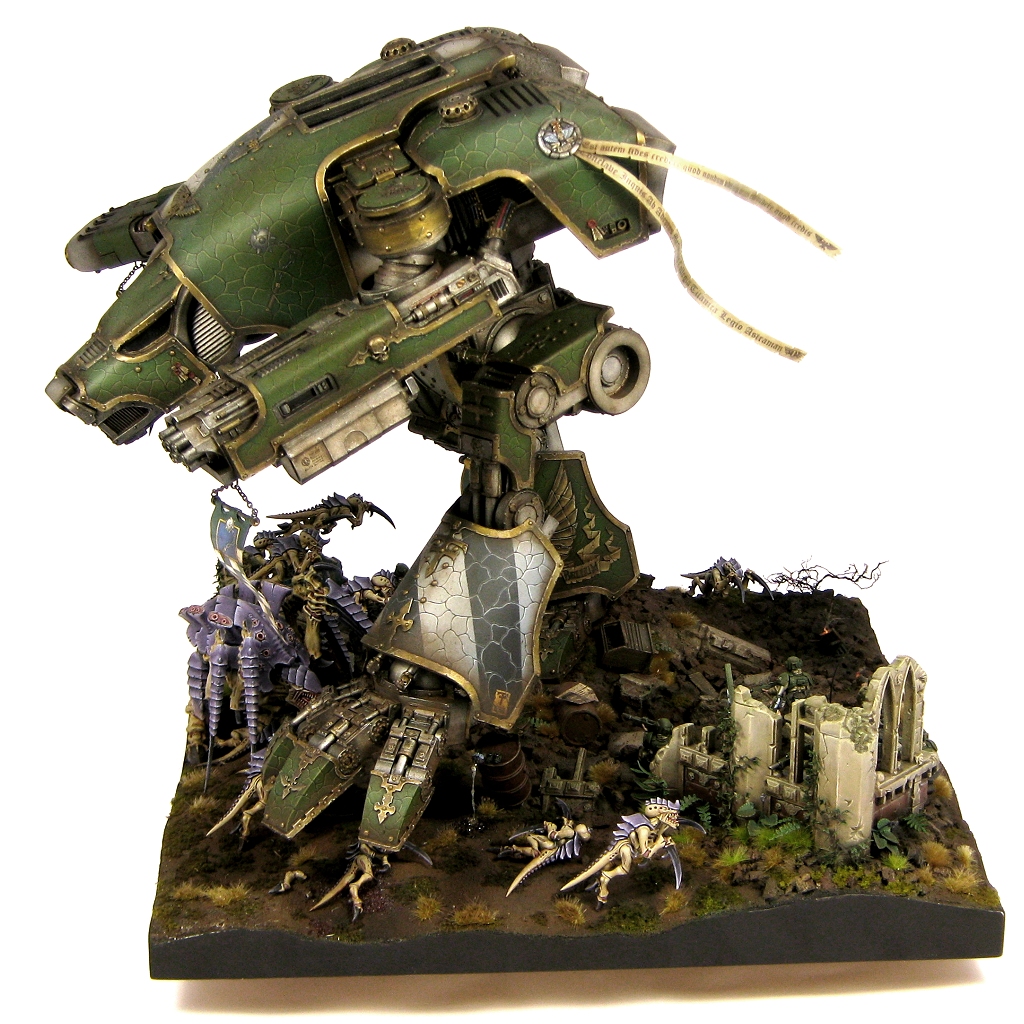
The key thing to avoid is creasing it - it's easy to put too much force when bending it, and this will put a kink in the sheet that you won't be able to get rid of. This is actually the main drawback of paper for large flowing curves, especially once you've got some weight on it from PVA for example. For a curve, find something round (a marker pen barrel etc) and pull the sheet over it to form it. Free-bending it isn't a great idea. Make many small adjustments with the pulling method rather than trying to rush. Expect to fail a couple of times while practicing. Do nicks and edge wear before bending to make life easier.
|
|
This message was edited 3 times. Last update was at 2019/11/12 13:54:17
|
|
|
|
|
2019/11/12 13:45:37
Subject: Scratch-building Banners???
|
|

Utilizing Careful Highlighting
|
IIRC, thin brass is cuttable with scissors, or tinsnips, haven't done it, so not sure. Check your local hardware store, for one, or a model train shop, I think I've seen it for sale a few times at those, though thats in the US.
|
|
|
|
|
2019/11/12 14:00:23
Subject: Scratch-building Banners???
|
|
Ship's Officer
|
when I was doing my Brets way way back, I had just use plain printing paper; cut out a double sided shape and band it around the banner pole to test fit, paint it while flat and add decals varnishes etc., then use white glue to glue around the pole, let dry then use the round brush handle to fold a bit to make it wavy, touch upon the paint if necessary.
|
|
|
|
|
2019/11/12 14:40:46
Subject: Scratch-building Banners???
|
|

Longtime Dakkanaut
|
Fine cotton cloth in combination with PVA glue is an option I used before. Obviously it needs to be supported while the PVA glue is drying, but the cloth can be arranged easily while the glue is wet.
My Vallejoy Airbrush primer sticks well to the PVA surface, both when applied via Airbrush or brush.
|
|
|
|
|
|
2019/11/12 17:26:43
Subject: Scratch-building Banners???
|
|
Regular Dakkanaut
|
For Flames of War Red Army banners I just used tiny pieces of masking tape, folded over on itself sticky-side to sticky-side. Having also used greenstuff to make an ork banner, I'd be very tempted to use tape for future 40k sized banners also. The masking tape can hold shape well enough to create folds or billows, and primer/varnish stiffens it up even more.
|
|
|
|
|
2019/11/13 03:20:27
Subject: Scratch-building Banners???
|
|
Crushing Black Templar Crusader Pilot
|
Big Mac wrote:when I was doing my Brets way way back, I had just use plain printing paper; cut out a double sided shape and band it around the banner pole to test fit, paint it while flat and add decals varnishes etc., then use white glue to glue around the pole, let dry then use the round brush handle to fold a bit to make it wavy, touch upon the paint if necessary.
White glue? Is that PVA? How fragile is it afterwards? And how thick can you make the paper? I kinda wanna match the usual size of warhammer plastic/resin banners.
Stephanius wrote:Fine cotton cloth in combination with PVA glue is an option I used before. Obviously it needs to be supported while the PVA glue is drying, but the cloth can be arranged easily while the glue is wet.
My Vallejoy Airbrush primer sticks well to the PVA surface, both when applied via Airbrush or brush.
Oooh, very interesting - out of curiosity, is there any technique to painting the cloth, or should I just go about it like plastic? I get the feeling it would be more absorbant, however, will this be offset by priming? Do I have to put more primer into cloth to get the right finish?
Hankovitch wrote:For Flames of War Red Army banners I just used tiny pieces of masking tape, folded over on itself sticky-side to sticky-side. Having also used greenstuff to make an ork banner, I'd be very tempted to use tape for future 40k sized banners also. The masking tape can hold shape well enough to create folds or billows, and primer/varnish stiffens it up even more.
Masking tape isn't one I've heard of before - any photos?
Thanks very much everyone, I hadn't thought of most of these techniques!
|
|
|
|
|
2019/11/13 04:11:19
Subject: Scratch-building Banners???
|
|
Ship's Officer
|
When I did my screaming banner for Vampire counts, I scaled down a photo copy and printed out, then use the image as a guide line and layer paint over it, use PVA glue to fold over the banner pole, let dry then fold a bit and did some weathering by doing some jagged cutting, sponge on some dry blood and dust.
Paper, metal such as brass nor fabric is not going to give you the plastic thickness you see on models, but its a more realistic thickness imo.
|
|
|
|
|
2019/11/13 16:20:17
Subject: Scratch-building Banners???
|
|
Regular Dakkanaut
|
https://www.dakkadakka.com/gallery/1034521-15mm%2C%20Flames%20Of%20War%2C%20Red%20Army%2C%20Russians%2C%20Soviet%2C%20T-34.html
That's one of the masking-tape banners I mentioned. Very simple, but refreshingly easy to do at a small scale.
I don't know how good the technique would look scaled up to Warhams size; but there's not really any cost to experimenting.
|
|
|
|
|
2019/11/14 15:13:34
Subject: Scratch-building Banners???
|
|
Longtime Dakkanaut
|
 posermcbogus wrote: posermcbogus wrote:...
Stephanius wrote:Fine cotton cloth in combination with PVA glue is an option I used before. Obviously it needs to be supported while the PVA glue is drying, but the cloth can be arranged easily while the glue is wet.
My Vallejoy Airbrush primer sticks well to the PVA surface, both when applied via Airbrush or brush.
Oooh, very interesting - out of curiosity, is there any technique to painting the cloth, or should I just go about it like plastic? I get the feeling it would be more absorbant, however, will this be offset by priming? Do I have to put more primer into cloth to get the right finish?
...
The cloth with the PVA/wood/white glue works simliar to gypsum bandages or paper-mache. One material component provies the shape or structure, the other component solidifies it.
Once the glue is dry and the banner primed, there will be some texture left, but you can paint it like primed plastic.
This deamonprince got an impossible robe made from a bit of an old t-shirt. For finer weaves, consider the washing/size/brand labels commonly found in clothing.
https://www.dakkadakka.com/gallery/1010194-Deamonprince%2C%20Impossible%20Robe%2C%20Tzeentch.html
|
|
|
|
|
|
|
|
