| Author |
Message |
 |
|
|
|
|
Advert
|
Forum adverts like this one are shown to any user who is not logged in. Join us by filling out a tiny 3 field form and you will get your own, free, dakka user account which gives a good range of benefits to you:
- No adverts like this in the forums anymore.
- Times and dates in your local timezone.
- Full tracking of what you have read so you can skip to your first unread post, easily see what has changed since you last logged in, and easily see what is new at a glance.
- Email notifications for threads you want to watch closely.
- Being a part of the oldest wargaming community on the net.
If you are already a member then feel free to login now. |
|
 |
2020/08/19 10:09:11
Subject: Question on photographing entire armies/groups of figures
|
|

Enginseer with a Wrench
|
Does anyone have any advice on this? There are lots of guide for shooting individual models, but none that I can easily find on getting good shots of squads or armies to best show off the whole collection.
How's best to arrange the figures and lighting? Are props/scenery generally a good idea?
|
|
|
|
 |
|
2020/08/19 11:36:52
Subject: Question on photographing entire armies/groups of figures
|
|

Longtime Dakkanaut
|
Photographing a whole army - that is half a table or a table full of minis - isn't that easy. When you take a picture, only a part of the things in the frame will be in focus, the rest will be more or less blurry. Luckyily, the small apertures of mobile phone cameras are good for pictures with a bigger range of sharpness, although that does mean more light is needed.
You can reasonably expect to take a picture of a game table sized army setup with a good mobile phone camera, but it will not be possible to have that be a giant zoom and scroll adventure and show all individual models in detail.
If you want to show up paintjob quality or individual features, you'll have to reduce the amount of stuff you photograph so the individual models share of the frame and thereby the detail available to show it increases.
So in a nutshell, you can take an army picture, but for more detail you'll have to take pictures of units or detachments. Max detail means individual models only.
I hope that helps a bit.
PS: I only clicked on your signature link after replying. It appears you have the detailed model photography well in hand =]
|
|
This message was edited 1 time. Last update was at 2020/08/19 11:38:40
|
|
|
|
|
2020/08/19 11:38:57
Subject: Question on photographing entire armies/groups of figures
|
|

The Marine Standing Behind Marneus Calgar
|
I’ve tried to do this a few times, not sure how well I’d call it a success.
As with all photos, a stable camera and lots of light are very helpful.
There is a whole bunch of stuff about F-Stops, depth of focus, and aperture that’s probably relevant to this conversation. I honestly don’t know it well enough to try to explain.
Unless you are going for a blurred in the back look, you want the depth of focus to cover the whole group of subjects. This probably means taking the pic from farther back, and using zoom and crop to get the figures in frame. When setting up the shot, you want to keep everyone as close to the same distance from the camera as you can.
Props and scenery can be very helpful to get the guys in the back row seen. If not, they are just going to blend into the crowd.
For squad level pics, I just use my lightbox and don’t change a whole lot from how I take pics of individual models. If you also want to showcase individuals models in the squad, consider a collage instead of or in addition to the group shot.
|
|
|
|
|
|
2020/08/19 12:18:04
Subject: Question on photographing entire armies/groups of figures
|
|
Longtime Dakkanaut
|
This is the picture with the most models that I have taken;
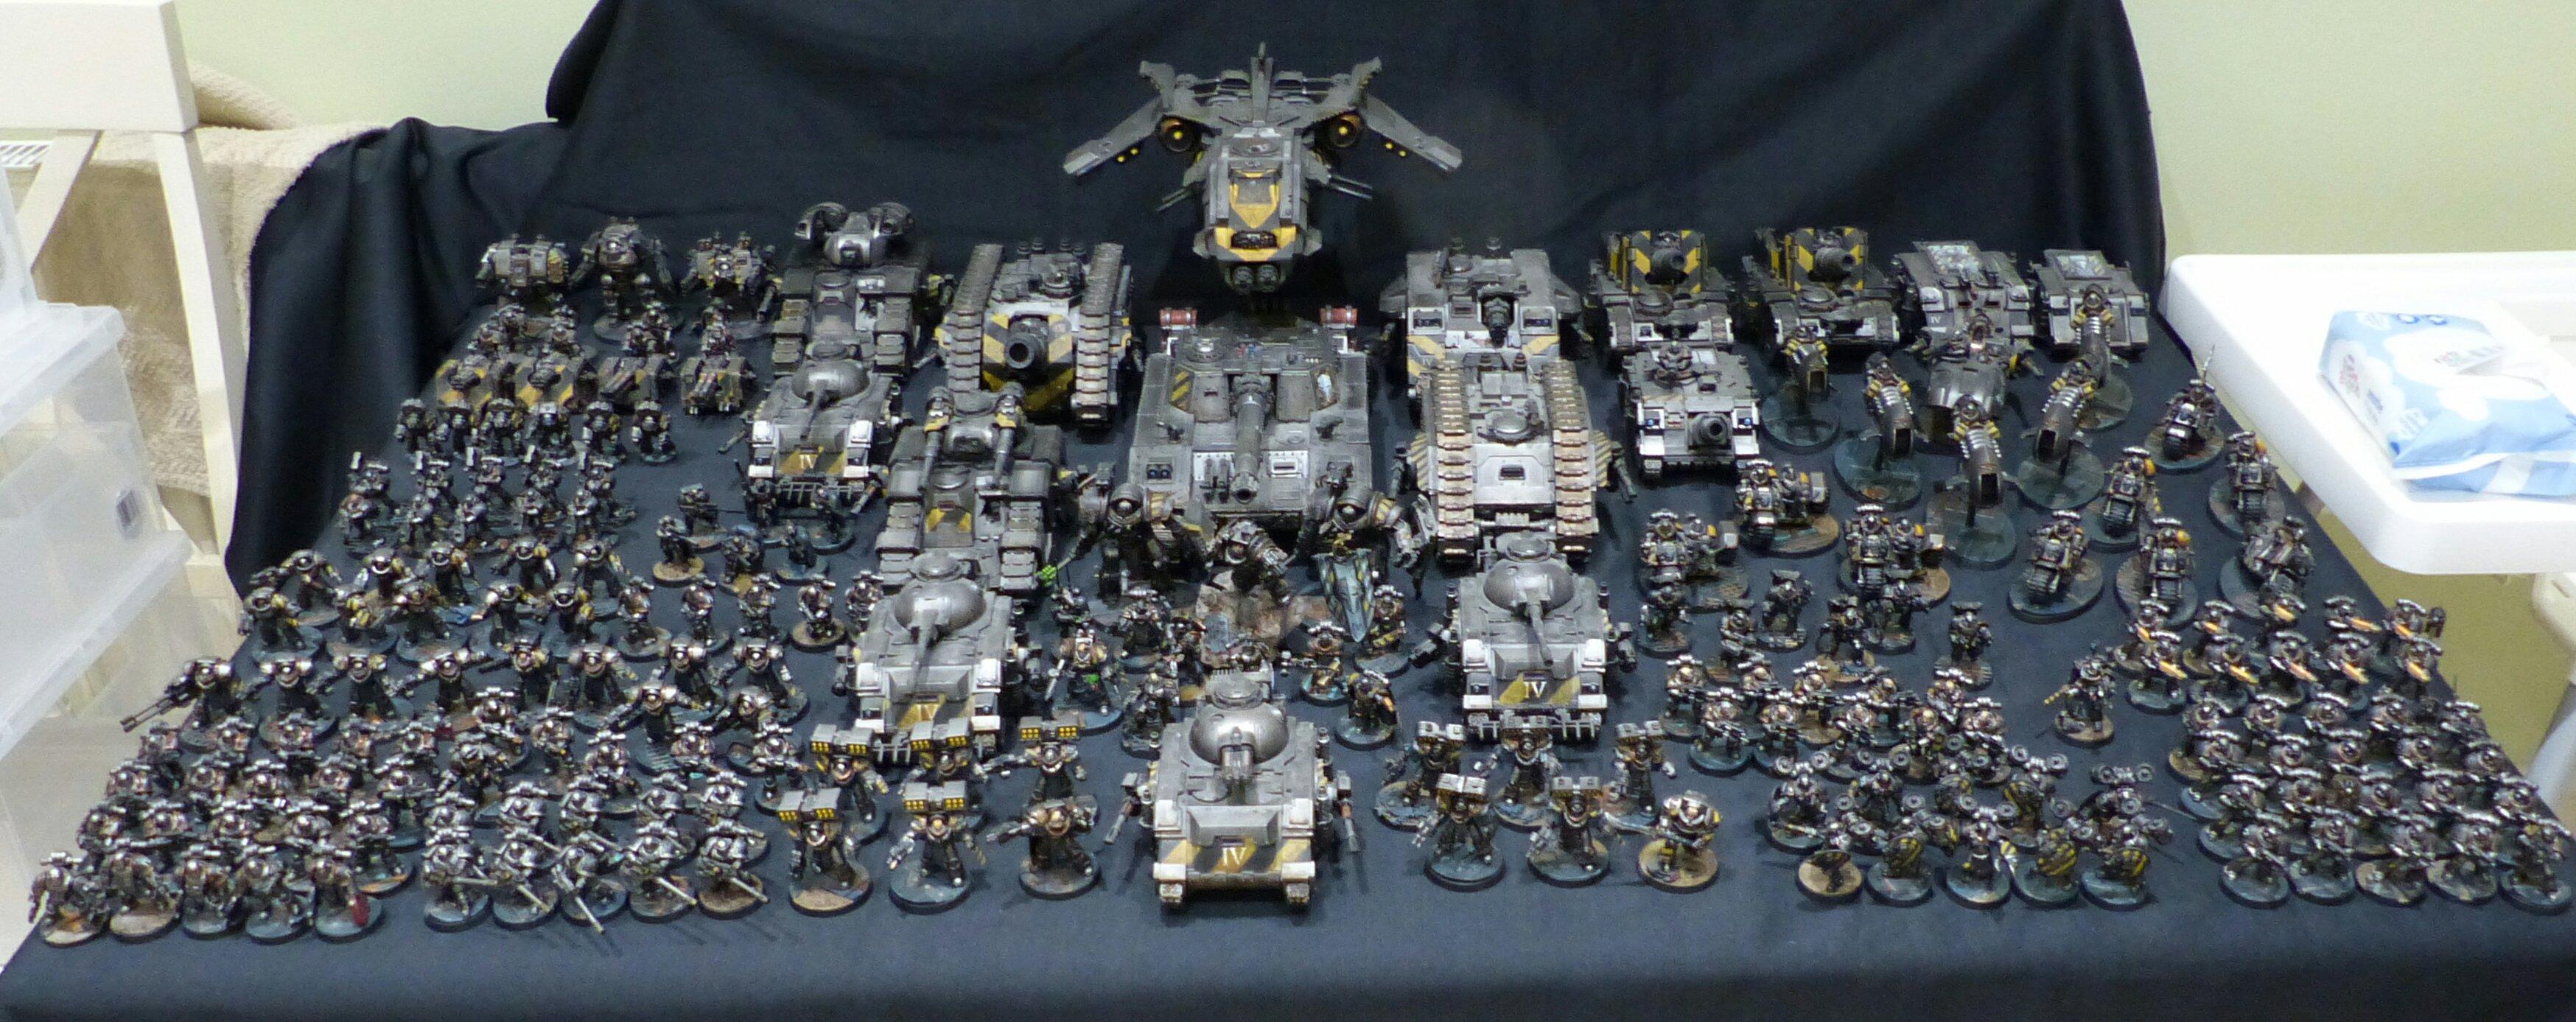
It's far from perfect composition wise. The army is too big to have been able to angle the sides to create a rectangle rather than a trapezoid shape to it, which would have let me crop out the top corners where you can see the surroundings. I just used the auto settings on a decent camera, and positioned the table beneath a bank of spot lights for lighting, with no additional light sources. You can see everything clear enough, imo anyway, for the size. I think terrain on something this size would clutter it, whereas on a smaller army it can add height and balance, especially if the models are all similar sizes.
Definitely looking forward to seeing whole army shots of your collection!
|
|
This message was edited 1 time. Last update was at 2020/08/19 12:19:14
|
|
|
|
|
2020/08/19 13:11:05
Subject: Question on photographing entire armies/groups of figures
|
|
Decrepit Dakkanaut
UK
|
Basically everything just "scales up" for an army wide shot compared to a single model. The properties of light and diffusion of light and such all remain the same. How you go about it might vary depending on what creative effect you want and also on what space, equipment and how many models you want in it etc...
In general the more complex a scene the more your lighting can equally get complex, but at its core you can still work with two light sources either side at a slight angle to illuminate the scene. Now you might find table lamps aren't the best for this and since you are outside of your softbox/studio box that you use for single models; you might well have to modify up some sort of diffusion setup. A simple white sheet hung infront of the light could be an easy starting point. If you use flashes then softbox/umbrella can be other options. If you've a flash you could also bounce the light off the walls of the room if you've large generally white walls.
You may also find that a light either side has light fall-off being an issue - sometimes a light above the scene can help fill in light in the middle region .
Aperture wise and depth of field wise you might find you have issues here. If you want a more blurred background, but want to retain depth of field over a larger body of models then you've a few options (some of which you might need even if you don't want a blurry background).
1) Move the background further from the models. Separation and increasing relative distances will help blur the background whilst keeping the models in focus. Might not be as easy to achieve in most home situations.
2) Focus Stacking/Depth of field stacking. This is where you use a larger aperture (smaller f number) and take a series of shots where you move the focus in very tiny amounts between each shot. You then have a series of shots where the depth of field steadily moves through the scene, a bit of overlap between each frame. Automatic software like Photoshop, Zerene Stacker, Helicon Focus or Combine ZP (legally free) can then be used to take the individual photos and stack them into a single composite where the depth of field covers the entire army, but you still have the sharpness and blurry background created from a small depth of field.
3) If you've the money (or rent) and use a DSLR then a "tilt shift" lens can also be used. In these its possible to shift the plane of focus so that it tilted instead of parallel to the sensor.
|
|
|
|
|
|
2020/08/21 08:57:28
Subject: Question on photographing entire armies/groups of figures
|
|
Enginseer with a Wrench
|
Thanks for the feedback and suggestions, everyone – I'll be better-placed to give it a go now. Lovely Iron Warriors, JamesY; and thanks for the kind words, Stephanius!
|
|
|
|
|
|
2020/08/21 12:24:10
Subject: Question on photographing entire armies/groups of figures
|
|
Leader of the Sept
|
Also don't forget you can have fun with it as well 

|
Please excuse any spelling errors. I use a tablet frequently and software keyboards are a pain!
 Terranwing - w3;d1;l1 Terranwing - w3;d1;l1
 51st Dunedinw2;d0;l0 51st Dunedinw2;d0;l0
 Cadre Coronal Afterglow w1;d0;l0 Cadre Coronal Afterglow w1;d0;l0 |
|
|
|
|
2020/08/21 13:05:32
Subject: Question on photographing entire armies/groups of figures
|
|
Courageous Questing Knight
|
If you can you want to close down the F stop and basically have your aperature open for as long as possible as that is how you get a larger depth of field so more things are in focus. However, this means you have to hold the cameras still longer so a tripod or stand is a must.
This is how you shoot those big, panoramic scenes where everything is in clear focus. Your aperature is only a tiny pinhole and it says open for a long time so everything in the frame is in focus. It is not suitable for action shots since everything needs to stay still during this time.
|
|
|
|
|
|
2020/08/21 15:17:59
Subject: Question on photographing entire armies/groups of figures
|
|
Decrepit Dakkanaut
UK
|
Be aware that the aperture (f number) doesn't just affect the depth of field, but also the sharpness of the shot.
As the aperture reduces (f number gets bigger) the sharpness will increase until diffraction starts to take effect at which point the sharpness will start to decrease. The point of swap-over, when the lens is at its sharpest varies depending on the lens and the camera, but its generally around f8-f10 or so on a standard DSLR.
Now sharpness will remain usable for a good while after the peak, so its not a limit point. On a standard DSLR around f16 or so the sharpness will start to be markedly softer and at f20 its starting to really get soft.
Of course resizing for web display and sharpening a photo will adjust those limits points and generally you can "get away" with softer. So there's a degree of what intended use the photo has and also the photographer's own standards/desires.
|
|
|
|
|
|
|
|
 Ultramarines, 3rd Co. and friends, 16k+
  4k
4k  4k Points
 Competition Index