| Author |
Message |
 |
|
|
|
|
Advert
|
Forum adverts like this one are shown to any user who is not logged in. Join us by filling out a tiny 3 field form and you will get your own, free, dakka user account which gives a good range of benefits to you:
- No adverts like this in the forums anymore.
- Times and dates in your local timezone.
- Full tracking of what you have read so you can skip to your first unread post, easily see what has changed since you last logged in, and easily see what is new at a glance.
- Email notifications for threads you want to watch closely.
- Being a part of the oldest wargaming community on the net.
If you are already a member then feel free to login now. |
|
 |
2021/01/31 12:02:15
Subject: Problems with plastic-sprue modelling. Advice please
|
|

Regular Dakkanaut
|
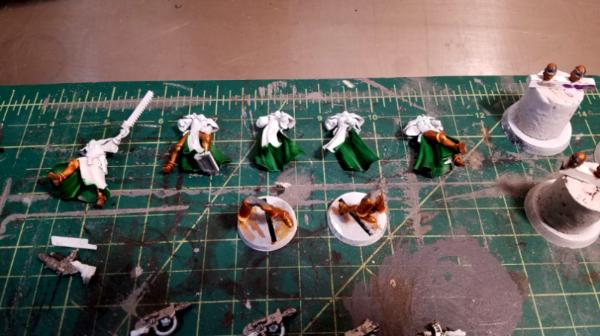
This is my progress after five hours of "modelling" (plus cut fingers not in the photograph).

For comparison's sake, that's more time than I spent on this model from start to finish.
Anyway, I'm determined to give this a proper chance, but I'll need some tips because I must be doing something wrong. These are the problems I'm having:
It was really difficult to get the bits to fit together properly as they must be rotated at various angles for the tubes and support hand, etc. to fit together. I had to snap various glue joins multiple times to get the bits glued together so everything fit together how it is supposed to.
After I'd done that, I realized that there's no chance I can paint the model properly due to various parts overlapping and making bits underneath almost impossible to access. So I snapped the arms joints again to get the guns out of the way, figuring that the only way to do this was to paint some parts separately and then re-assemble the model.
This is obviously all extremely fiddly and frustrating, I really worried about the mess and damage to the paint I'm going to make trying to go through that assembly & glue process again with actual painted bits.
I've heard people make the claim that these larger, highly detailed plastic models are "easier to paint" than old-school miniatures. Those people must be crazy.
I must be doing something wrong! Any tips and advice appreciated.
.
|
|
This message was edited 1 time. Last update was at 2021/01/31 12:06:10
|
|
|
 |
|
2021/01/31 12:27:27
Subject: Problems with plastic-sprue modelling. Advice please
|
|

Decrepit Dakkanaut
UK
|
A few thoughts
1) DRY FIT. Biggest thing I can say after having read your post is to dry fit things first. Get the parts together and just fit them together without applying any glue, not a drop. If you want put some blue tack into the join to hold things in place for a moment (remember to clean if fully off before applying any glue). This will let you get a physical look at the model and make sure all the parts are where they should be; give you an idea how it goes together and also let you see if there are any parts that obscure key areas.
2) Painting is a personal thing, some people build everything in separate parts, others build and paint after. Both can achieve high standards. It's really down to what you are used too; what you want to do and how you work. This is a judgment call only you can really make There are common tips like doing heads separate etc.... but otherwise its down to you.
I do recall one bit of advice though which was when you put a model together and you've primed it, paint any hard to reach areas black/dark. The theory is if they are very hard to reach most times they are going to be shadowed by the rest of the model anyway; so if they are already dark they blend into the shadowing easily without you having to do as much work or fiddle getting your brush in there.
3) If you dry fit and practice and assess the model before assembly then you should be able to avoid the need to keep breaking joins.
4) Check the instructions. I know you've got them in the photo, but do check it. Some of Gw's new multipart models only go together certain ways with certain parts to certain slots. So do doublecheck. You shouldn't have to be snapping joins and breaking parts off; the dry fit should help you double check before assembly.
5) Practice - yep can't avoid this one. The more you do the better you get.
6) If you paint in parts then use superglue (which you already are) not plastic glue since plastic glue works by melting the joins and then reforming the plastic; so if you do that with painted parts it can make a mess. Note that if you do paint remember to scrape the join area clean to the plastic so that when you apply the glue its sticking plastic-glue-plastic. You don't want paint getting into the join otherwise it will be a layer of weakness (glue bonding to paint and then paint into plastic)
I think dry fitting and practice as well as a good level of patience are key for you. Don't get in a rush; if you are building and painting to a high standard its going to take time. Let it take as long as it takes. The less you think and worry about rushing the faster you will steadily get with practice.
Meanwhile the more you worry about rushing and getting faster the more you'll slip up; make mistakes and end up having to break things apart and starting over (ego you're going to take longer)
|
|
|
|
|
|
2021/01/31 12:41:12
Subject: Problems with plastic-sprue modelling. Advice please
|
|
Thane of Dol Guldur
|
You're experiencing the frustrations of every modeller and painter, whether you're a painter or a gamer, they're always the same... Paint first? Assemble first? It's frustrating because everyone likes a nice assembled model before painting, but sometimes working in sub assemblies is the only option if you want to get every where covered.
As for the gluing and getting that right, it just comes with practice. The new gw minis and their fits are both good and bad in that they can give nice poses and often hide mold lines or gates, but they are also often sometimes difficult to get right before you realise.
|
  Heresy World Eaters/Emperors Children Heresy World Eaters/Emperors Children 
Instagram: nagrakali_love_songs |
|
|
|
|
2021/01/31 13:03:23
Subject: Problems with plastic-sprue modelling. Advice please
|
|
Regular Dakkanaut
|
 Overread wrote: Overread wrote:
1) DRY FIT. Biggest thing I can say after having read your post is to dry fit things first. Get the parts together and just fit them together without applying any glue, not a drop. If you want put some blue tack into the join to hold things in place for a moment (remember to clean if fully off before applying any glue). This will let you get a physical look at the model and make sure all the parts are where they should be; give you an idea how it goes together and also let you see if there are any parts that obscure key areas.
First of all, thankyou for taking the time to make a detailed and helpful reply. I appreciate that!
I don't see that dry-fitting solves my problem though. Sure it will give me a look at the model, but I'll still have to glue it together with various parts painted and I will still risk having to break it apart and glue it multiple times if those parts don't quit align with other parts that have yet to be glued on. For example, getting the hose connections to line up on one side and the supporting hand on the other side, is a real pain. I guess I'll just have to be inventive. I suppose it might work if I glue to the arms and gun together and then just attach that as one piece to both shoulders as once ...
fwiw, I can't dry-fit these without blue-tack and I'm not even sure it would work with blue-tack, some of the connections are very small! They're not snap-together, in fact it was hard to even glue some bits together.
I thought I'd be able to paint these fully built and just, as you mentioned further on, have the "unseen" bits just painted black. But after assembly it looked like that was just too optimistic. There's too many easily visible parts on the models that will be inaccessible (or at least extremely difficult) by brush.
Automatically Appended Next Post:  queen_annes_revenge wrote: queen_annes_revenge wrote:As for the gluing and getting that right, it just comes with practice. The new gw minis and their fits are both good and bad in that they can give nice poses and often hide mold lines or gates, but they are also often sometimes difficult to get right before you realise.
Thanks for your reply.
I spent a very long time cutting and filing off all the mold lines and sprue-connection stubs (is that what you mean by "gates"?). It was extremely annoying and I cut my fingers multiple times. 
Yeah it's really hard. I glue one arm on, and then glue the gun on, the other shoulder, then the other arm, but now the other arm don't align with supporting the gun! How is one supposed to know all the exact angles before gluing? I can't see how dry-fitting would help, it would give a rough idea, but there's still liable to be large gaps between parts unless they're all rotated at the exact correct angle.
|
|
This message was edited 1 time. Last update was at 2021/01/31 13:07:21
|
|
|
|
|
2021/01/31 13:09:30
Subject: Problems with plastic-sprue modelling. Advice please
|
|
Decrepit Dakkanaut
UK
|
Dry fitting is purely to see how the parts together. In theory once you've done that it should be a lot easier to see how to attach each part without having to rotate or snap parts off to refix them.
Also how are you applying the superglue? Are you applying lots or very little; are you scoring the join areas to improve grip which would help on the bigger areas in holding on firmly and not slipping as you attach them?
|
|
|
|
|
|
2021/01/31 13:14:10
Subject: Problems with plastic-sprue modelling. Advice please
|
|
Regular Dakkanaut
|
Overread wrote:Dry fitting is purely to see how the parts together. In theory once you've done that it should be a lot easier to see how to attach each part without having to rotate or snap parts off to refix them.
Also how are you applying the superglue? Are you applying lots or very little; are you scoring the join areas to improve grip which would help on the bigger areas in holding on firmly and not slipping as you attach them?
I'm applying a thin layer and scoring the joints.
Unfortunately after multiple glueings-and-snappings-and-re-glueings, it's built up a bit now in various places and I can't seem to remove it with my modeling knife. It's like concrete.
|
|
|
|
|
2021/01/31 13:15:47
Subject: Problems with plastic-sprue modelling. Advice please
|
|
Decrepit Dakkanaut
UK
|
 The Pig-Faced Orc wrote: The Pig-Faced Orc wrote:
I spent a very long time cutting and filing off all the mold lines and sprue-connection stubs (is that what you mean by "gates"?). It was extremely annoying and I cut my fingers multiple times. .
In the old days we bled upon spiked metal models as we held them together for dear life whilst waiting for the superglue to set
Today we slice our fingers upon blades as we clean off mould lines
The Blood God of Modelling must be honoured and sacrifice made!
Though I find with practice you get better at controlling the blade. Often focusing on cleaning shorter segments and smaller areas and small controlled movements helps a lot. It's another practice element that you get used too.
Also I personally find I don't use files on GW plastics. When I do use them it tends to be on curved areas and there I reach for diamond files in the 600 and 900 grit values (a lot of diamond files are rough and very low grit values and often don't state them). I've only found one place that stocks those kind of files https://www.eternaltools.com/small-diamond-files they've EU/USA/ UK sites to buy from (top right to change country/region). They are outstanding files and great for metals and plastics. They smooth over things and won't give you scrapes/cuts/jagged edges like some rougher files can on soft model materials.
Note diamond files also cut in any direction which is great for models - it means you can get the tip into small areas and move it in any direction and file away. Traditional toothed ones that you show in your photo above are good, but they only cut in one direction of motion.
Note diamond files do get clogged up with material; esp when working with high grits and soft materials. A regular hard pencil rubber/eraser works great at cleaning out the gunk. Just get one and rub the file over it back and forth and side to side and it will clean out all the gunk.
Note if you only get one a half-round is a great file for all situations; lets you deal with flat and curved areas and has a fine point to it for tight spots.
|
|
|
|
|
|
2021/01/31 13:50:11
Subject: Problems with plastic-sprue modelling. Advice please
|
|
Ridin' on a Snotling Pump Wagon
|
Looking at the pic, I think you’re using super glue.
To me, that’s a bit of a rookie error. If you can get your hands on Polycement, you’ll have a far easier time.
That’s because Polycement (aka plastic glue) melts the two parts together relatively slowly. This gives you time to basically slide the touching points around to get the right fit.
Between that and dry fitting, you should be on to a winner.
Tools wise? Get Clippers (aka side cutters) and a mould line scraper. These are easier to work with, safer to work with, and won’t ruin your plastic models. Needle files in particular are not suited to plastic models. Even a light going over can leave flattened area, rough up detail, or even gouge into it.
GW of course sell their own. They’re pricey, but they absolutely get the job done. Do however shop around, though I’d recommend sticking to wargame sites, as not all clippers are equal. Ones for electronics I find poorly suited to model making. They lack a fine point, and the blades can prove too deep and shallow to get close nips.
This design is a poor choice in my opinion, as the overall shape isn’t going to let you get to some of the more awkward or smaller parts very easily.
Compare to the ones GW branded and sell (possibly sold? Can’t find them on the store right now.These are slimmer, and have largely straight lines. This is what I use, and they’re just dandy. But as I said, other makes are available. What I’m promoting here is the design of the business end.
|
|
This message was edited 2 times. Last update was at 2021/01/31 15:59:57
|
|
|
|
|
2021/01/31 14:26:08
Subject: Re:Problems with plastic-sprue modelling. Advice please
|
|

Preacher of the Emperor
|
Plenty has been said on dry-fitting, so I'll just double-down on that. You should feel the part slide "home"... these digitally designed models do that, and once you get a feel and a muscle memory for that connection, you can replicate it with glue on the parts.
I think super glue is the way, and less of it that you'd think. Too much, and you'll find yourself waiting for it to set, and that's when that magic alignment can slip. Too little, and the join will be prone to cracking. Looking at your picture, I'd also say you should have both liquid and gel types... liquid for perfect joins, and gel for when there's a gap.
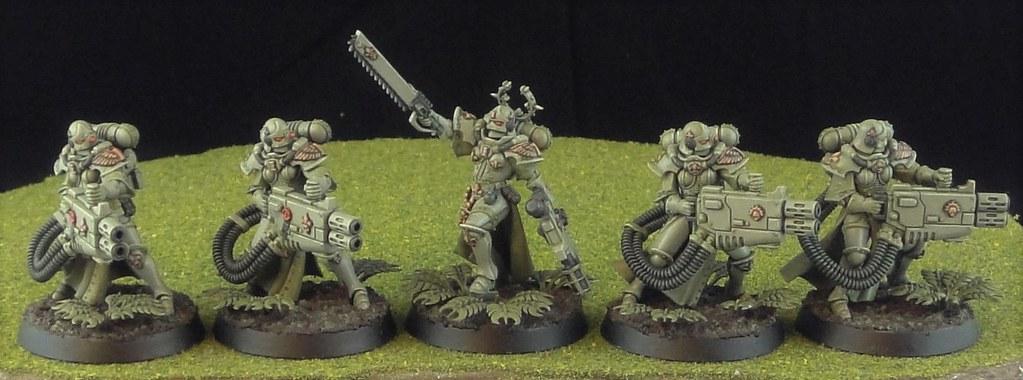
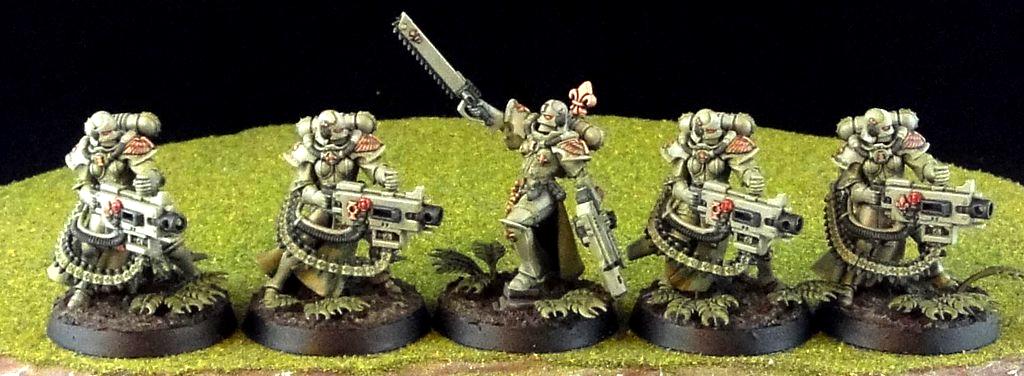
On painting pre-assembly, I tend to leave arms and heads off, but assemble the legs and torso. That lets me paint body details behind cradled guns. The paired arms you're dealing with do make that hard, but the good news it that shoulder joints can be prepainted and liquid super glue will penetrate the paint. Leaving the heads off until the model is painted and based lets me get the mini looking in a meaningful direction... right down the gunsights or pointed finger, and not at the ground. I mount a squad's worth of heads on a sprue and paint them together.
I wouldn't prepaint any long seams like those running across armor or robes or anything that will show an offset, like the seam down two halves of a gun... the paint can make it harder to find the sweet spot on the alignment. For hard-to-reach areas, I trust that if I can't reach it, I won't be able to see it. That said, when I feel like the torsos of my Sisters will just drop easily onto the legs (as opposed to sandwiching them or attaching to them), I'll prepaint the underside of the robes and legs separately. If there's a lot of underside detail I want to get at, I'll leave them off the base (or pop them off... again, just a dot of liquid super glue) to hit the underside, then mount them and finish them. I paint my bases separately in bulk, so minis get painted on a temporary base or cork.
Example:
|
|
|
|
|
|
2021/01/31 14:51:55
Subject: Re:Problems with plastic-sprue modelling. Advice please
|
|

Fireknife Shas'el
|
Using superglue on fiddly models is tough because it instantly bonds (some of the time!). As others have mentioned, plastic glues allow you time to reposition if the position isn't perfect.
That said, with guns that attach to a backpack, I generally follow this order:
Clean all relevant parts first, so you can assemble quickly while joins are soft
Glue gun to hose
Glue gun to arm
Blu- tac backpack to body
Dry fit gun arm to body and backpack, check fit of other arm as well*
Adjust backpack as needed
Glue gun arm to body
Remove blu- tac and glue backpack to body and hose
Glue other arm to body and gun.
*this is the stage where you find the most problems, generally a gap under the armpit if you have a bad angle.
Finally, if you need to clean off superglue, most paint stripping agents make it easier to remove with a decent soaking. I use Super Clean (Purple Power in some regions). Putting the model in the freezer can make it easier to remove as well.
As to pre-painting, it really depends on your basecoat and color scheme. If you choose low-contrast methods and, those hard to reach areas can be left with just basecoats and no one will notice. That's what I did for my Sisters of Battle Retributors, which have all the annoying hoses and ammo feeds. All these models were painted fully assembled. Most of the lower torso armor is simply basecoated and washed with contrast paints. Same with the inner thighs and parts of the robes you can't see without picking up the model and holding it upside-down.
Now if you want higher contrast schemes, then you just have to paint outwards from the recesses and be willing to clean up any problems as you go, or do sub-assemblies. I've done both, and often sub-assemblies are more work, though I do like painting the heads of Primaris Marines separately because of that darned collar armor. It really depends how OCD you want to get about detail that's fundamentally hidden from view 95% of the time and can't be seen at all without macro photography or eyeballing the mini from 8 inches away.
|
|
This message was edited 1 time. Last update was at 2021/01/31 15:09:28
|
|
|
|
|
2021/01/31 15:11:23
Subject: Problems with plastic-sprue modelling. Advice please
|
|
Martial Arts Fiday
|
Don't use superglue on plastics. Plastic glue has a better bond and longer working time.
|
"Holy Sh*&, you've opened my eyes and changed my mind about this topic, thanks Dakka OT!"
-Nobody Ever
Proverbs 18:2
"CHEESE!" is the battlecry of the ill-prepared.
 warboss wrote: warboss wrote:
GW didn't mean to hit your wallet and I know they love you, baby. I'm sure they won't do it again so it's ok to purchase and make up. 
Albatross wrote:I think SlaveToDorkness just became my new hero.
EmilCrane wrote:Finecast is the new Matt Ward.
Don't mess with the Blade and Bolter! |
|
|
|
|
2021/01/31 17:29:37
Subject: Re:Problems with plastic-sprue modelling. Advice please
|
|
Regular Dakkanaut
|
Thanks for all the tips everyone.
I've positioned things using a mixture of of super-glue and plastic-cement depending on which bit I was working with.
If I put the guns into position there is still some substantial gaps here and there but nothing outrageous.
My plan is to paint the main part, then base-colour the detached guns/arms, scrape away any paint from joins and super-glue them into place. Then I will go back with milliput and fill in any gaps. That means I'll get milliput on the painted areas at the joins and I'll have to go over and fix those bits up again. Annoying, but I can't think of any other way to do it.
What do you think?

What an absolute pain in the arse. Give me an old-school sculpted model any day! But I do believe those who say it will get easier with practice.
P.S. while you're all giving such great tips ... those little antennas are very fragile, it's a miracle I've haven't snapped one off yet. Anyone know some way to strengthen the join that's been weakened by me accidentally bending them and fixing them all the time?
.
|
|
This message was edited 4 times. Last update was at 2021/01/31 17:35:03
|
|
|
|
|
2021/01/31 17:46:50
Subject: Re:Problems with plastic-sprue modelling. Advice please
|
|
Decrepit Dakkanaut
UK
|
 The Pig-Faced Orc wrote: The Pig-Faced Orc wrote:
P.S. while you're all giving such great tips ... those little antennas are very fragile, it's a miracle I've haven't snapped one off yet. Anyone know some way to strengthen the join that's been weakened by me accidentally bending them and fixing them all the time?
Sometimes if you are very careful you can use a bit of plastic glue to fix that. Smear it over very thin (Tamyia extra thin) in the hope that the melt and reform leaves it stronger than bended and worn or even torn.
You can sometimes fix small tears/bends like that. Though its always a risk with thin plastic, just like it is with thin metals and resins. Snaps can happen.
If you are really worried or one does snap off you can likely shave it down to the connection point and then it a button/nub/blinking light or something. Or you can drill out and put a metal rod in to replace.
|
|
|
|
|
|
2021/01/31 20:45:05
Subject: Problems with plastic-sprue modelling. Advice please
|
|
Frenzied Berserker Terminator
|
Any reasonably recent plastic kits will fit together pretty well. Unless you're deviating substantially from the instructions you shouldn't be needing to fill gaps with milliput...
|
|
|
|
|
2021/01/31 20:54:55
Subject: Problems with plastic-sprue modelling. Advice please
|
|
Regular Dakkanaut
|
Overread wrote:If you are really worried or one does snap off you can likely shave it down to the connection point and then it a button/nub/blinking light or something. Or you can drill out and put a metal rod in to replace.
Yeah, you can't really see, but the little aiming-scope or whatever it is on their left shoulder snapped off the one second to the left. I drilled it out and used a small section of paperclip as it's new mounting "stem". Obv. at that moment I figured I could do the same with the antennas, but I'd rather just strengthen the ones that are there if it's possible.
Crispy78 wrote:Any reasonably recent plastic kits will fit together pretty well. Unless you're deviating substantially from the instructions you shouldn't be needing to fill gaps with milliput...
I must have fethed something up, because these were a nightmare.
Didn't help that at one stage I got the bits mixed up and ended up gluing down the wrong shoulder pad on one of them. Almost right, but not quite and was going mental trying to figure out why the gun & support hand wouldn't fit nicely. Got it "close enough" and wasn't until I found the fellah who belonged to that shoulder pad that wouldn't fit with his gun at all that I worked out something was wrong, went back and found the right piece, snapped it off again, blah blah blah.
There's a lot of gunk under some of the bits that have been glued and snapped and glued three or four times. That probably doesn't help the fit at all.
Anyway, I'll do my best with what I've got left and put it down to a learning experience. First time with these plastic sprues (I don't count the human blood-bowl team I bought as they were snap-together and nowhere near as complex and fiddly).
Automatically Appended Next Post:
 John Prins wrote: John Prins wrote:Using superglue on fiddly models is tough because it instantly bonds (some of the time!). As others have mentioned, plastic glues allow you time to reposition if the position isn't perfect.
That said, with guns that attach to a backpack, I generally follow this order:
Clean all relevant parts first, so you can assemble quickly while joins are soft
Glue gun to hose
Glue gun to arm
Blu- tac backpack to body
Dry fit gun arm to body and backpack, check fit of other arm as well*
Adjust backpack as needed
Glue gun arm to body
Remove blu- tac and glue backpack to body and hose
Glue other arm to body and gun.
Thanks for your tips. I will try the method you outlined next time (if there is a next time). Cheers! Automatically Appended Next Post:  MacPhail wrote: MacPhail wrote:but the good news it that shoulder joints can be prepainted and liquid super glue will penetrate the paint.
That is good news.
However, I have noted that when I super glue stuff, there's often a white film of something left all over the model around the glue afterwards. If the model is painted, it goes over the paint. Some kind of chemical reaction.
Any idea what that might be? I've had to repaint feet before after gluing a finished model to the base.
|
|
This message was edited 5 times. Last update was at 2021/01/31 21:38:38
|
|
|
|
|
2021/01/31 22:04:44
Subject: Problems with plastic-sprue modelling. Advice please
|
|
Decrepit Dakkanaut
UK
|
The white film after using superglue would be excess superglue that has seeped out of the join area. A sign that you're adding too much glue to the area. It can be scraped off carefully with a blade if you need too.
It might affect paint, but shouldn't be a problem. How are you priming the models prior to painting?
|
|
|
|
|
|
2021/02/01 04:40:56
Subject: Problems with plastic-sprue modelling. Advice please
|
|
Regular Dakkanaut
|
Overread wrote:The white film after using superglue would be excess superglue that has seeped out of the join area. A sign that you're adding too much glue to the area. It can be scraped off carefully with a blade if you need too.
It might affect paint, but shouldn't be a problem. How are you priming the models prior to painting?
I usually just use a can of miniature primer, either Citadel or Army Painter.
However for these I will use an air-brush.
|
|
|
|
|
2021/02/01 12:10:55
Subject: Problems with plastic-sprue modelling. Advice please
|
|
Decrepit Dakkanaut
UK
|
It shouldn't be bleeding over the primer. It might require a light second coat to fully cover clean, but it shouldn't be running over. That is unless you're spraying right after assembly.
Glues can go tacky and hold parts in a fairly quick span of time, but they can normally take hours to properly and fully set hard. Superglues especially. Typically you might leave a model a day to fully cure and be solid before moving on to spray and paint. There are tricks to speed up the glue curing process.
|
|
|
|
|
|
2021/02/01 12:31:10
Subject: Problems with plastic-sprue modelling. Advice please
|
|
Longtime Dakkanaut
|
GW kits don’t always fit together aswell as it appears on the box and it can be mega annoying. I’m pretty sure that the presentation images GW use on boxes have had more than just a glue and paint job, I bet the fill gaps with green stuff and so on. That’s why they sell green stuff but don’t explain it to new customers.
Most of the new kits I have assembled look pretty good but I agree with the drawback you have presented regarding painting. I have tried painting before assembly but this often means you can not glue things together properly aswell or when you do glue stuff together the paint is not aligned as it hasn’t gone together as you expected.
I think it’s probably all part of the fun though
|
|
|
|
|
2021/02/01 16:27:26
Subject: Problems with plastic-sprue modelling. Advice please
|
|
Courageous Questing Knight
|
I do not think there is a kit out there where you have to position various parts together (like two arms in proper position to hold a gun, etc.) and not drive your self a little crazy with positioning and assembly.
I fully concur w/ Mad Doc Grotsnik and the rest for polystyrene cement instead of super glue for styrene plastic models. It does let you manipulate the pieces for a while before it sets to get everything aligned. Keep in mind this glue will not work on any other material (resin, metal, pvc, etc.)
|
|
|
|
|
|
2021/02/01 18:03:24
Subject: Problems with plastic-sprue modelling. Advice please
|
|
Deathwing Terminator with Assault Cannon
|
Overread wrote:The white film after using superglue would be excess superglue that has seeped out of the join area. A sign that you're adding too much glue to the area. It can be scraped off carefully with a blade if you need too.
It might affect paint, but shouldn't be a problem. How are you priming the models prior to painting?
Actually, crazing occurs when there are too much moisture in the air/was directly exposed to water (try dabbing a bit of crazy glue and run it under water). Sure, careful, minimal application of super glue can help avoid crazing by virtue of not leaving any visible glue stains, but the primary cause is something else entirely.
|
|
|
|
|
2021/02/02 10:13:49
Subject: Problems with plastic-sprue modelling. Advice please
|
|
Regular Dakkanaut
|
I will say that of all the models I've built, the ones with the backpack ammo supply connected to hand weapons by cable/belt are the most finicky to get aligned.
|
|
|
|
|
2021/02/03 21:53:46
Subject: Problems with plastic-sprue modelling. Advice please
|
|
Regular Dakkanaut
|
Hankovitch wrote:I will say that of all the models I've built, the ones with the backpack ammo supply connected to hand weapons by cable/belt are the most finicky to get aligned.
They're also super fiddly to paint. There's gak in the way everywhere, even with the arms left off the model!
|
|
|
|
|
2021/02/03 22:23:25
Subject: Re:Problems with plastic-sprue modelling. Advice please
|
|
Rampaging Reaver Titan Princeps
|
Something I haven't seen said but I've always found excellent brush-on superglue. Far eaasier to control and get the right amount done.
|
"But me no buts! Our comrades get hurt. Our friends die. Falkenburg is a knight who swore an oath to serve the church and to defend the weak. He'd be the first to tell you to stop puling and start planning. Because what we are doing-at risk to ourselves-is what we have sworn to do. The West relies on us. It is a risk we take with pride. It is an oath we honour. Even when some soft southern burgher mutters about us, we know the reason he sleeps soft and comfortable, why his wife is able to complain about the price of cabbages as her most serious problem and why his children dare to throw dung and yell "Knot" when we pass. It's because we are what we are. For all our faults we stand for law and light.
Von Gherens This Rough Magic Lackey, Flint & Freer
Mekagorkalicious -Monkeytroll
2017 Model Count-71
|
|
|
|
|
2021/02/03 22:35:57
Subject: Problems with plastic-sprue modelling. Advice please
|
|
Longtime Dakkanaut
|
So scions are a pain to put together.
Some thigns to consider.
1. Each scion is a unique one, ie, it has a backpack and each backpack has a different height and position in three dimensions that the hotshot lasgun arm connects up to. Each lasgun, similarly, sits slightly differently. Mix the two by accident and you will spend a day going "is this my fault why they not line up?"
2. Your armament is an arch built out of multiple pieces to a centerpoint. The LEAST forgiving error is the center of that arch in the final product, so glue that first and then use the malleability of partially set glue to work back towards fitting the whole assembly onto the model itself.. I would use non-superglue to attach and let sit for a few seconds (more than just seconds, but maybe not a minute yet) the center pieces of the right distal arm/weapon, weapon/left arm, and right proximal arm. This 3 piece assembly is the hardest to correct later and the most damning if its off. Then stick noncrazy glue on the shoulder connections and slide the assembly on. The only connection you still need for it should be the one to the backpack's power cord.
The backpack you can hold in place while doing this with a device that pins it without glueing, like a https://www.misterart.com/crafts/model-making/tools/sid~83573~/proedge-plastic-slide-clamps.html?utm_source=bing&utm_medium=cpc&utm_campaign=BPA%20-%20Items%20-%20Crafts&utm_term=4579878249659875&utm_content=BPA%20Item%20-%20ProEdge%7CCrafts%7C0-5%7CC%3A60
I have one that has rubber tips on it, and is more firmly adjustable, which I brought in a store that has larger woodworking tools.
Anyway, you can pin the backpack on your scion with that, so that you have a sense where in the air your tube of powerline will project, and that gives you a backpack you can adjust later to make the arch in space -- which is again the most fiddly bit of the gun assembly.
I fear this answer fairly incoherent but hope it helps. I have glued an army of scions this way, more or less, and they are table ready even though painting them was a pain.
Crazy glue did not help.
Prepainted models tend to dissolve in non-crazy glue application so that was a non-starter. There is some fussy with brushes to get paint under the arm/gun/otherarm arch, onto the primed model, sure, but its not intolerable. Paint the gun last, of course.
|
Guard gaurd gAAAARDity Gaurd gaurd. |
|
|
|
|
2021/02/04 10:04:21
Subject: Re:Problems with plastic-sprue modelling. Advice please
|
|
Regular Dakkanaut
|
Thanks for those replies, good information but too late as I've already got them half put together and started base coating.
My god these things are colossal pain in the arse!!
I know I sound like a whinger, but man, I must say I'm not at all enjoying these ultra-detailed plastic sprue models. If a sculpter can't sculpt it in one piece, how on earth can anyone be expected to paint it? And I really don't think all the fiddly detail actually adds anything much to the models. You're looking at them mostly from a few feet away after all. Whatever it adds is not worth the hassle, it just makes them laborious and frustrating to work with. In the time that I've 1/5th finished this scion unit (and they look a mess right now) I reckon I could have painted an entire unit of old school sculplted models to a decently high quality.
|
|
|
|
|
2021/02/06 10:07:08
Subject: Re:Problems with plastic-sprue modelling. Advice please
|
|
Regular Dakkanaut
|
John Prins wrote:Using superglue on fiddly models is tough because it instantly bonds (some of the time!). As others have mentioned, plastic glues allow you time to reposition if the position isn't perfect.
That said, with guns that attach to a backpack, I generally follow this order:
Clean all relevant parts first, so you can assemble quickly while joins are soft
Glue gun to hose
Glue gun to arm
Blu- tac backpack to body
Dry fit gun arm to body and backpack, check fit of other arm as well*
Adjust backpack as needed
Glue gun arm to body
Remove blu- tac and glue backpack to body and hose
Glue other arm to body and gun.
*this is the stage where you find the most problems, generally a gap under the armpit if you have a bad angle.
Finally, if you need to clean off superglue, most paint stripping agents make it easier to remove with a decent soaking. I use Super Clean (Purple Power in some regions). Putting the model in the freezer can make it easier to remove as well.
As to pre-painting, it really depends on your basecoat and color scheme. If you choose low-contrast methods and, those hard to reach areas can be left with just basecoats and no one will notice. That's what I did for my Sisters of Battle Retributors, which have all the annoying hoses and ammo feeds. All these models were painted fully assembled. Most of the lower torso armor is simply basecoated and washed with contrast paints. Same with the inner thighs and parts of the robes you can't see without picking up the model and holding it upside-down.
Now if you want higher contrast schemes, then you just have to paint outwards from the recesses and be willing to clean up any problems as you go, or do sub-assemblies. I've done both, and often sub-assemblies are more work, though I do like painting the heads of Primaris Marines separately because of that darned collar armor. It really depends how OCD you want to get about detail that's fundamentally hidden from view 95% of the time and can't be seen at all without macro photography or eyeballing the mini from 8 inches away.
They look great btw. I have no idea how you did it. The space marines don't look too fiddly, but the other ones with the huge hoses ... you painted them assembled? Amazing.
I'm already one model down in my unit. :( I lost patience with it and threw it out. I am posting progress reports in the competition thread.
Do some painters actually paint every single piece unassembled and then glue it together? Is that a thing? I feel if that were actually possible, then it would save me a huge amount of frustration and laborious fiddling trying to get a brush into almost impossible nooks and crannies.
|
|
This message was edited 1 time. Last update was at 2021/02/06 10:10:04
|
|
|
|
|
2021/02/06 10:16:29
Subject: Problems with plastic-sprue modelling. Advice please
|
|
Insect-Infested Nurgle Chaos Lord
|
Super glue is fine, I use it all the time- however that specific one in the pic is a gel that you have to shake like a motherfether to activate and is terrible for our purposes.
|

Games Workshop Delenda Est.
Users on ignore- 53.
If you break apart my or anyone else's posts line by line I will not read them. |
|
|
|
|
|
|