| Author |
Message |
 |
|
|
|
|
Advert
|
Forum adverts like this one are shown to any user who is not logged in. Join us by filling out a tiny 3 field form and you will get your own, free, dakka user account which gives a good range of benefits to you:
- No adverts like this in the forums anymore.
- Times and dates in your local timezone.
- Full tracking of what you have read so you can skip to your first unread post, easily see what has changed since you last logged in, and easily see what is new at a glance.
- Email notifications for threads you want to watch closely.
- Being a part of the oldest wargaming community on the net.
If you are already a member then feel free to login now. |
|
 |
2021/03/07 16:19:37
Subject: Paul's Scrap Ork Stompa
|
|

Fresh-Faced New User
|
|
|
|
 |
|
2021/03/07 16:25:59
Subject: Paul's Scrap Ork Stompa
|
|

Indescriminate Explicator
|
Looking forward to see how this develops. Always enjoy seeing hobby from bits and junk!
|
|
|
|
|
2021/03/08 01:41:58
Subject: Paul's Scrap Ork Stompa
|
|

Ragin' Ork Dreadnought
Deep in the Outer Boroughs of NYC
|
That's a lot of good detail so far. I approve.
|
|
|
|
|
|
2021/03/08 18:58:49
Subject: Re:Paul's Scrap Ork Stompa
|
|
Fresh-Faced New User
|
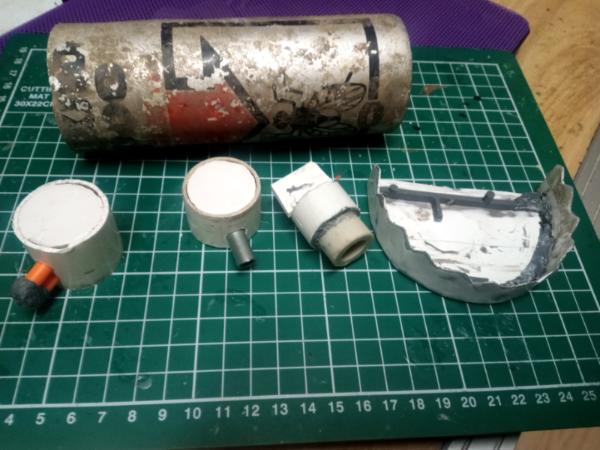
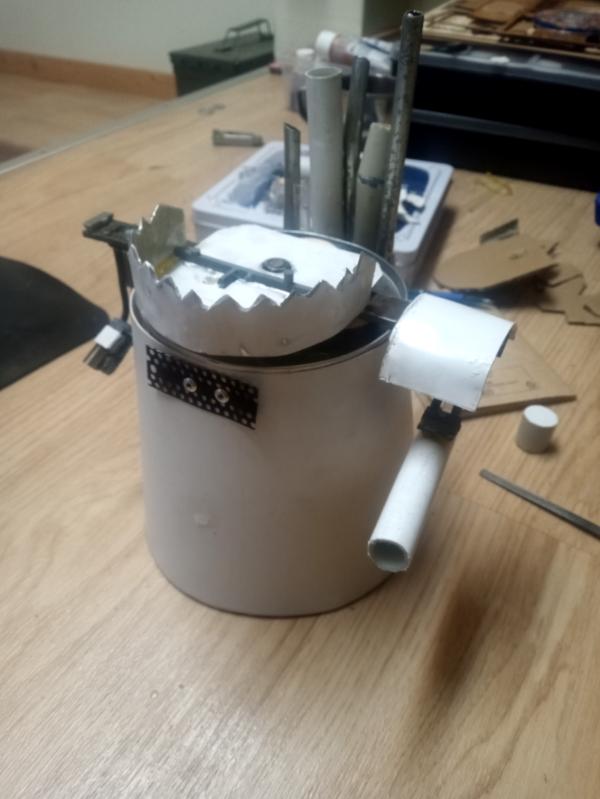
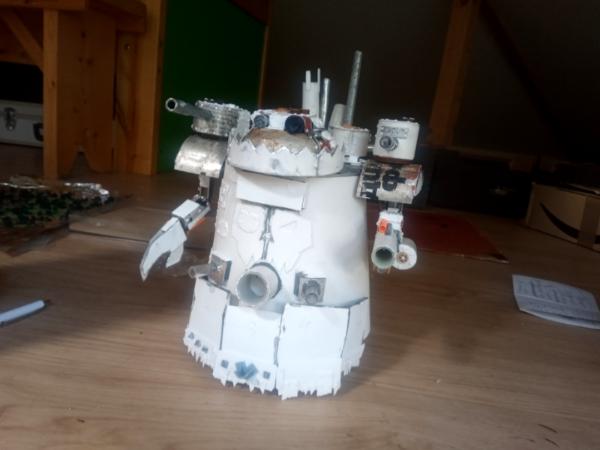
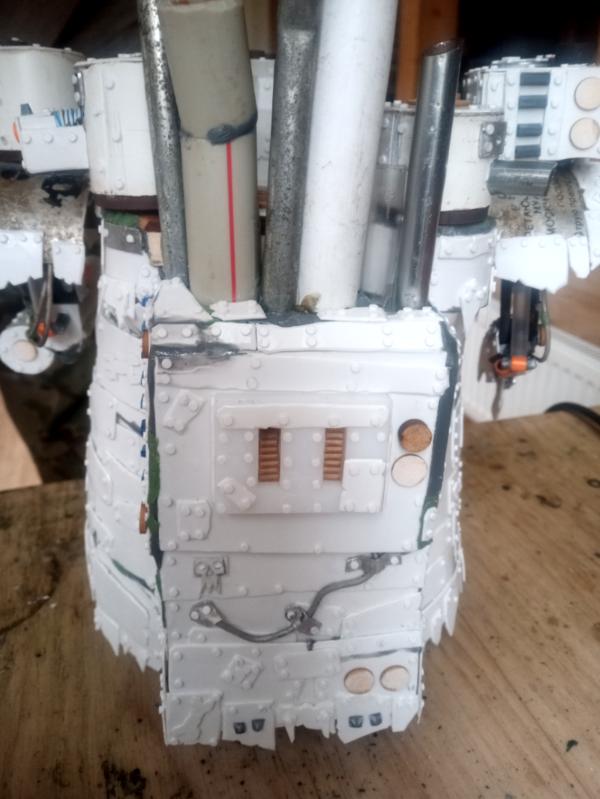
For today I had little progress testing some ideas, mainly basic shape of turrents, these two are ones I will probably finish but wanna do mroe different looking ones, as well as possibly making some basic cannons .
Also reduced size of the jaw since it was a bit too high for my liking (last time my stompa had too big of a head now making it flat and wide, but not tall).
Laslty with some help got my hands on an old anti bug sprayy that is probably some 40 or more years old, gonna use the can to make the pauldrons
|
|
|
|
|
2021/03/09 13:47:52
Subject: Re:Paul's Scrap Ork Stompa
|
|
Fresh-Faced New User
|
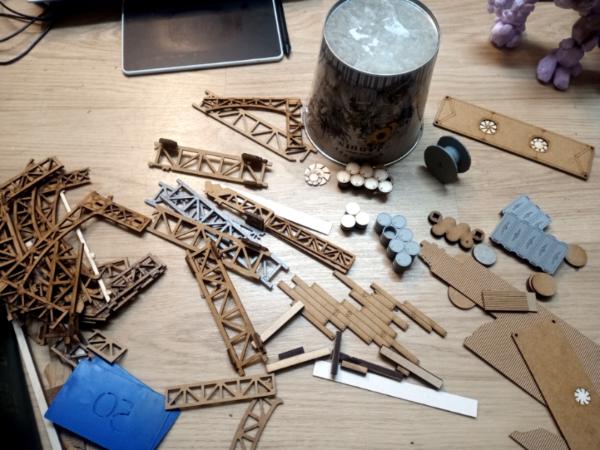
Cut apart the old can and got nice shoulders going, will be attaching them later, for now just putting everything together to see how it looks. So far I am rather happy with the result, next up will probably make few more "turrents" and afterwards start working on the head and back.
|
|
|
|
|
2021/03/11 20:40:28
Subject: Re:Paul's Scrap Ork Stompa
|
|
Fresh-Faced New User
|

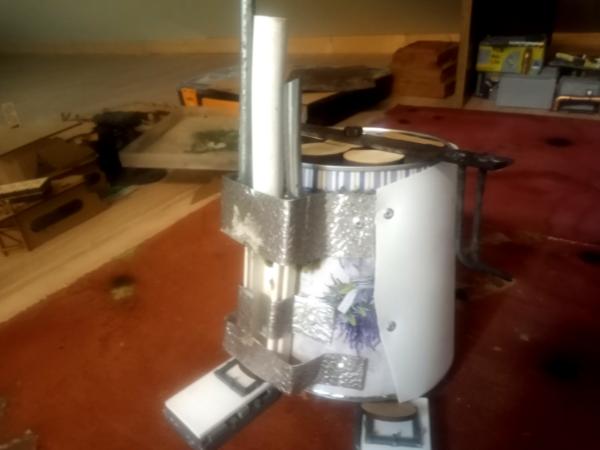
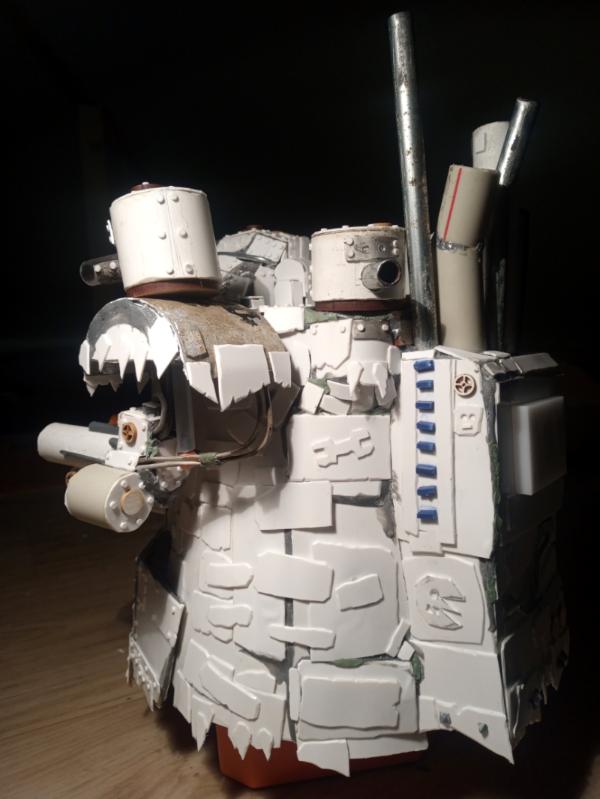
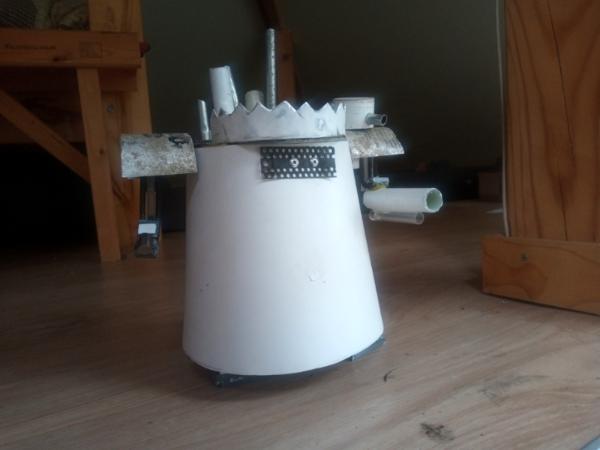
Got some more progress down, the head is taking shape I rather like, and I got couple of towers to be added later as well, now it's not much left, just to do the back itself with some decorations then I can start doing the small detail work.
|
|
|
|
|
2021/03/12 14:29:32
Subject: Re:Paul's Scrap Ork Stompa
|
|
Fresh-Faced New User
|
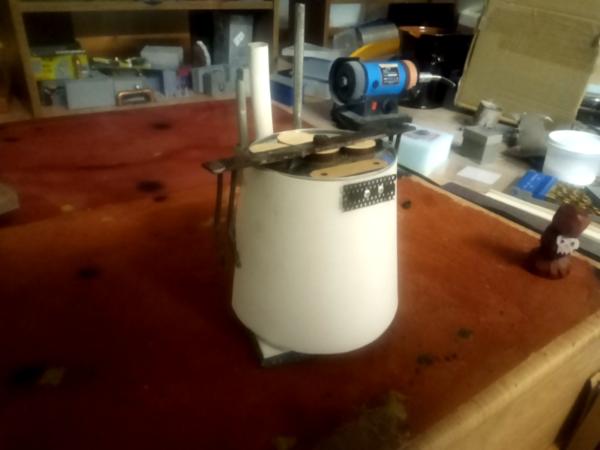
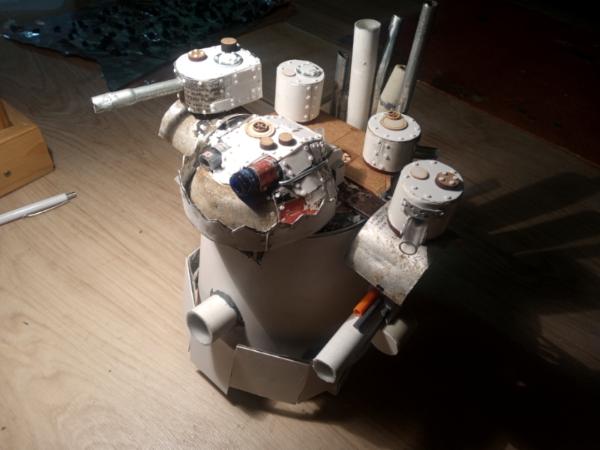
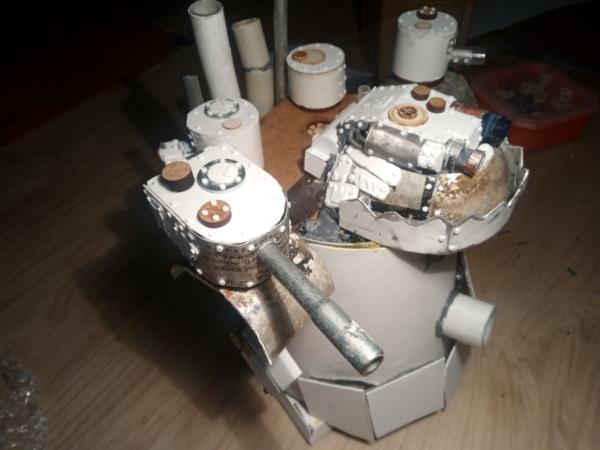
A little test set up of it with all the turrents, might add more and more belly cannons
|
|
|
|
|
2021/03/13 15:39:30
Subject: Re:Paul's Scrap Ork Stompa
|
|
Fresh-Faced New User
|
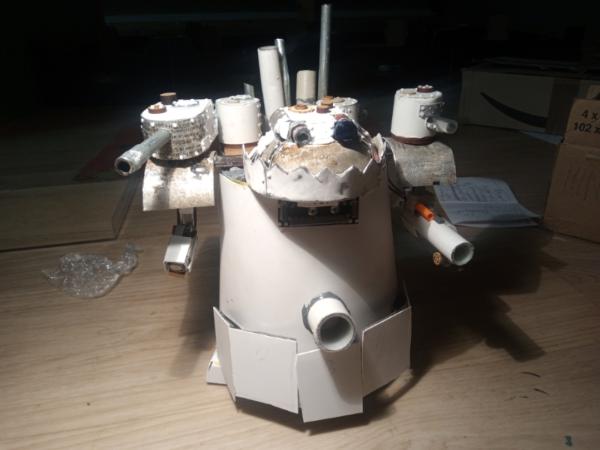
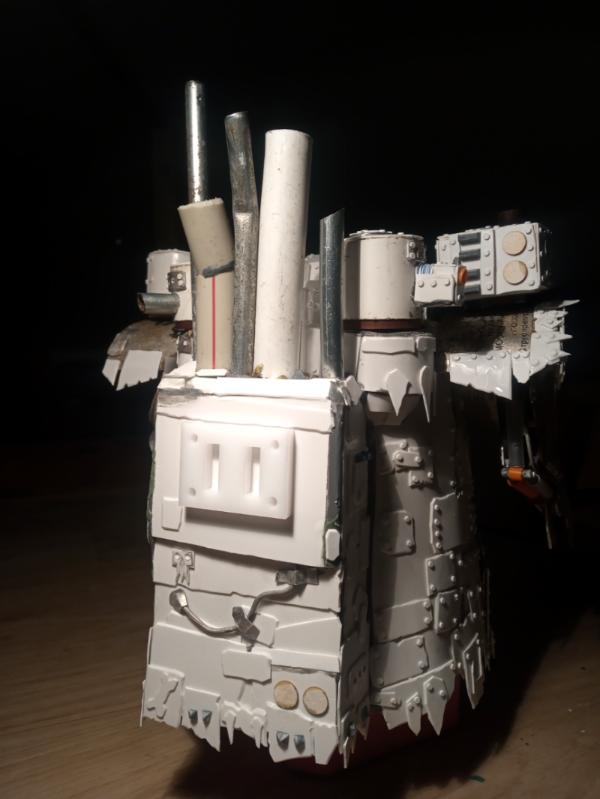
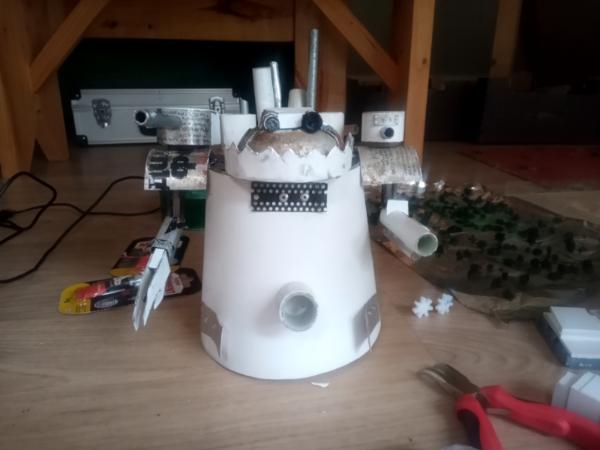
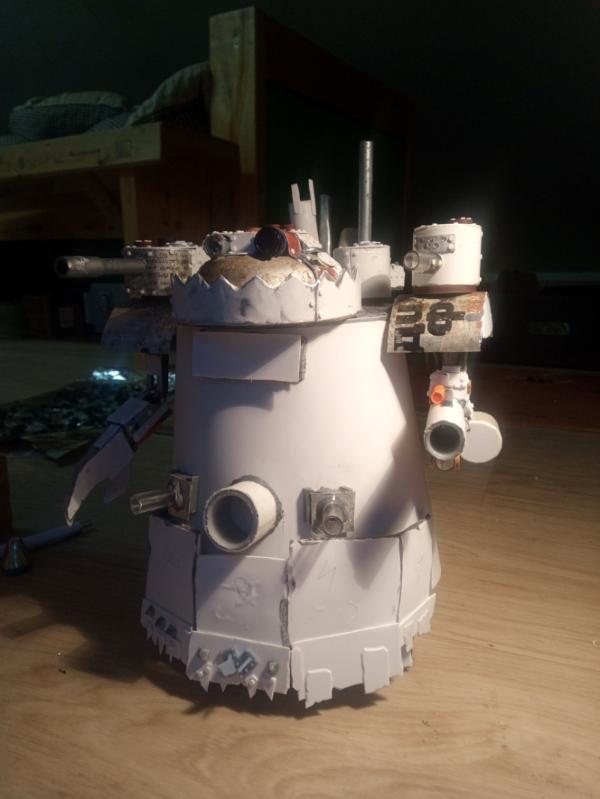
General silhouette I wanted, now I will be starting to fill in all the gaps and holes, and start patching progress to give it that orky feel, while also adding minor details all over the place. I all goes well I should be done in a month or two.
|
|
|
|
|
2021/03/13 15:49:47
Subject: Paul's Scrap Ork Stompa
|
|
Indescriminate Explicator
|
Lots of nice progress!
|
|
|
|
|
2021/03/14 18:14:35
Subject: Re:Paul's Scrap Ork Stompa
|
|
Fresh-Faced New User
|
|
|
|
|
|
2021/03/16 16:28:43
Subject: Re:Paul's Scrap Ork Stompa
|
|
Fresh-Faced New User
|
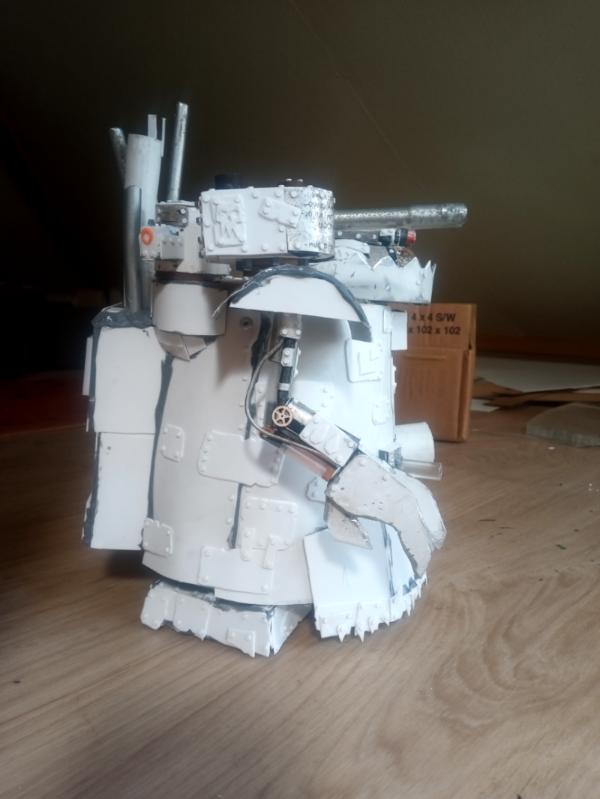
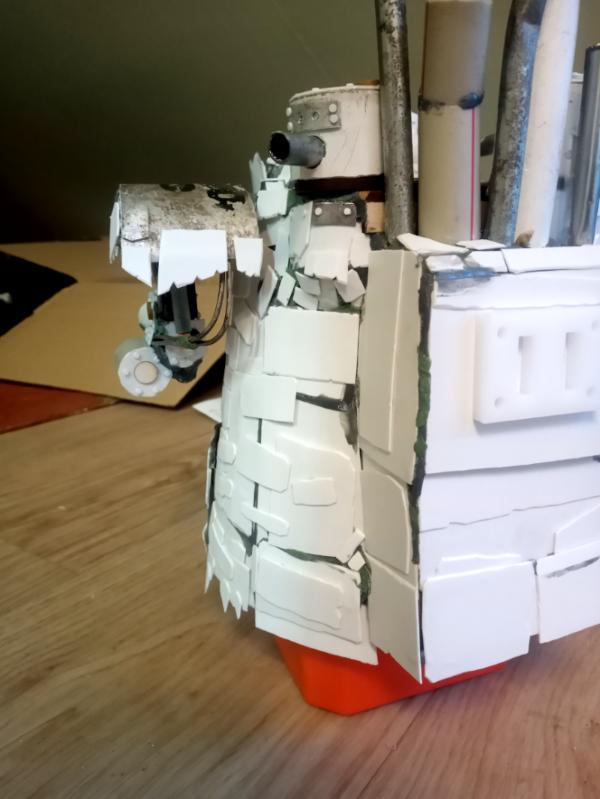
The end of plasticard is almost there, as I finish general structure work, now I can start gluing on various bits of plasticard bits and peaces.
|
|
|
|
|
2021/03/17 14:09:41
Subject: Re:Paul's Scrap Ork Stompa
|
|
Fresh-Faced New User
|
|
|
|
|
|
2021/03/18 19:55:56
Subject: Paul's Scrap Ork Stompa
|
|
Legendary Dogfighter
|
The build is developing really nicely, I would definitely add more layers to build it up more. Keep on hammering away, this is great to see grow!
|
|
|
|
|
|
2021/03/19 17:38:42
Subject: Re:Paul's Scrap Ork Stompa
|
|
Fresh-Faced New User
|
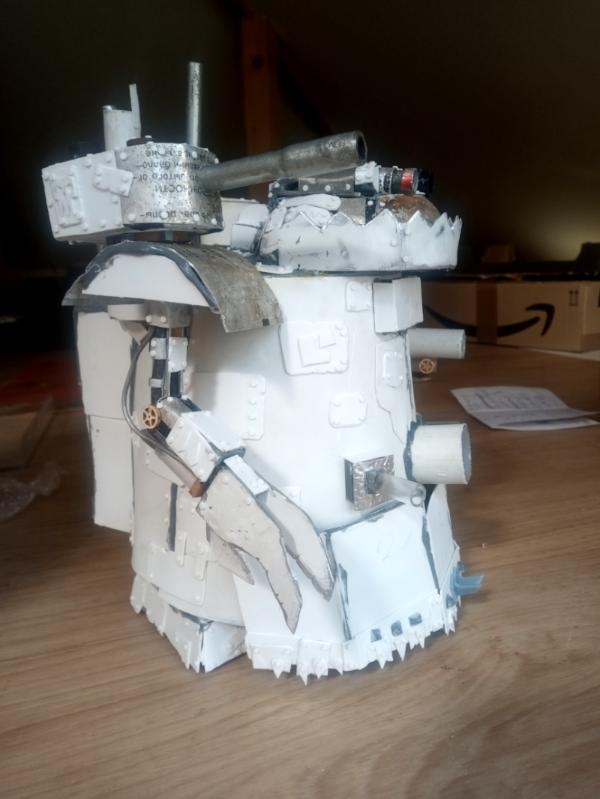
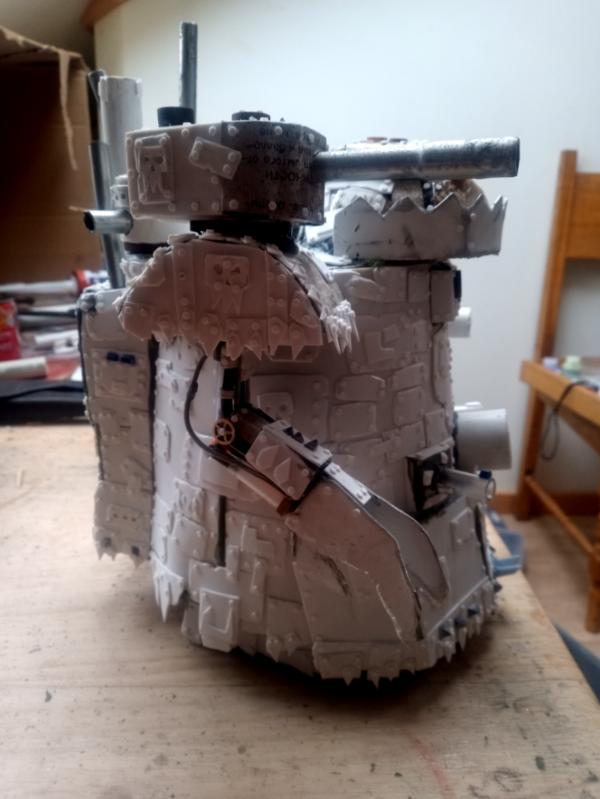
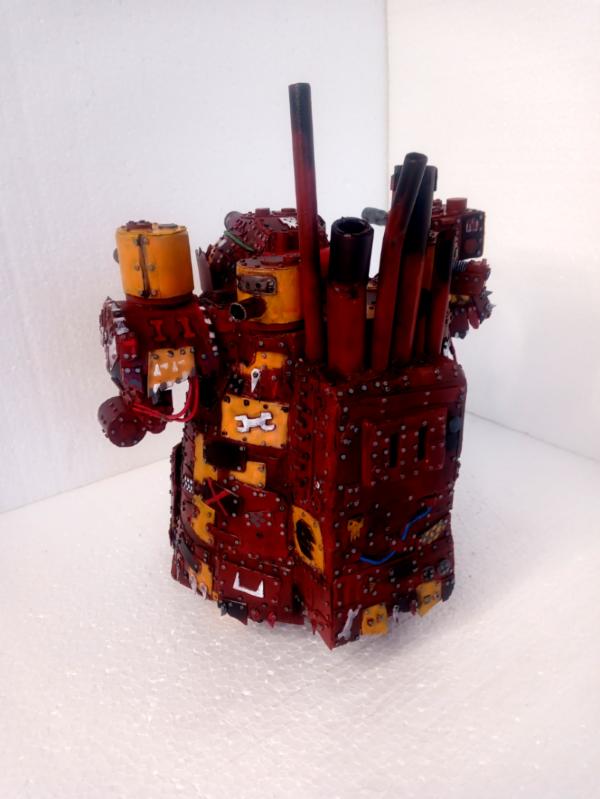
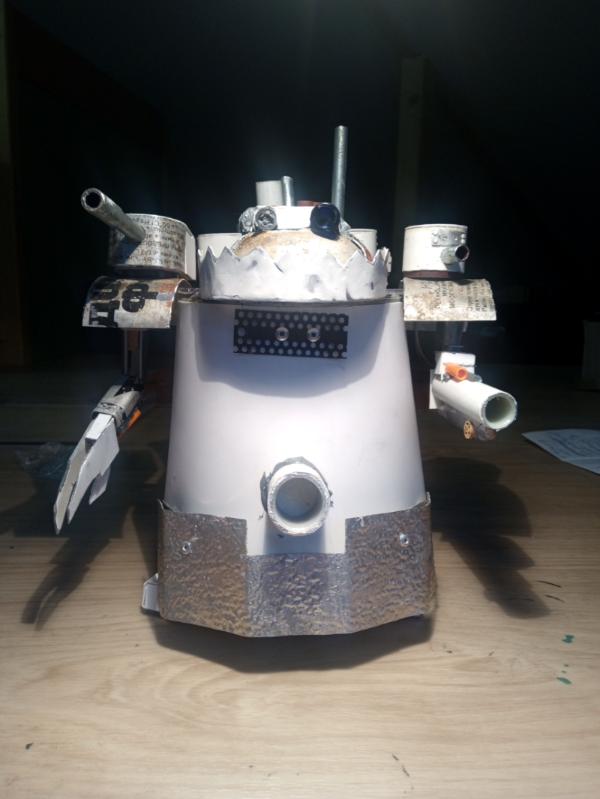
Progress after few days of gluing on patchwork
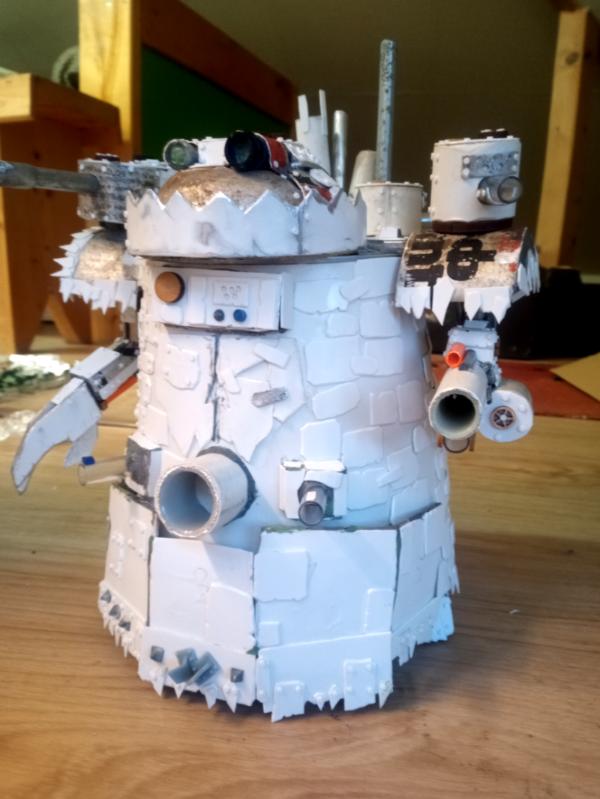
Not super happy with the gun side from the back, might just put on some filling on it and then go and put on some rust.

The claw arm has a lot of plasticard stuff done on it and I feel I should perhaps make a lot of plasticard glyphs to just cover the stompa with.
|
|
|
|
|
2021/03/21 10:23:34
Subject: Re:Paul's Scrap Ork Stompa
|
|

Sinewy Scourge
|
I like where this is going!
That will be a mean machine when it's done.
|
|
|
|
|
|
2021/03/21 18:50:53
Subject: Re:Paul's Scrap Ork Stompa
|
|
Fresh-Faced New User
|
|
|
|
|
|
2021/03/22 16:03:43
Subject: Re:Paul's Scrap Ork Stompa
|
|
Fresh-Faced New User
|
|
|
|
|
|
2021/03/24 18:11:07
Subject: Re:Paul's Scrap Ork Stompa
|
|
Fresh-Faced New User
|
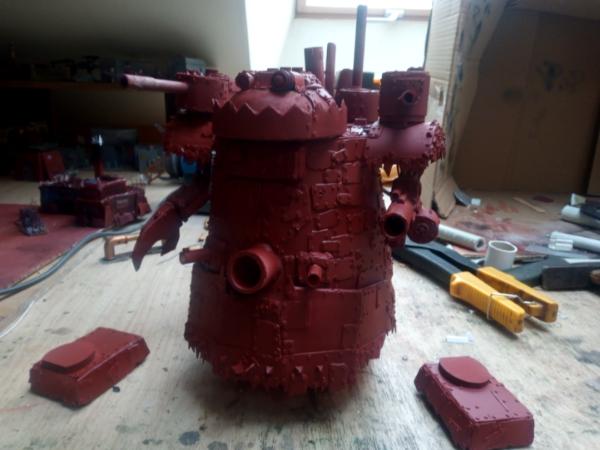
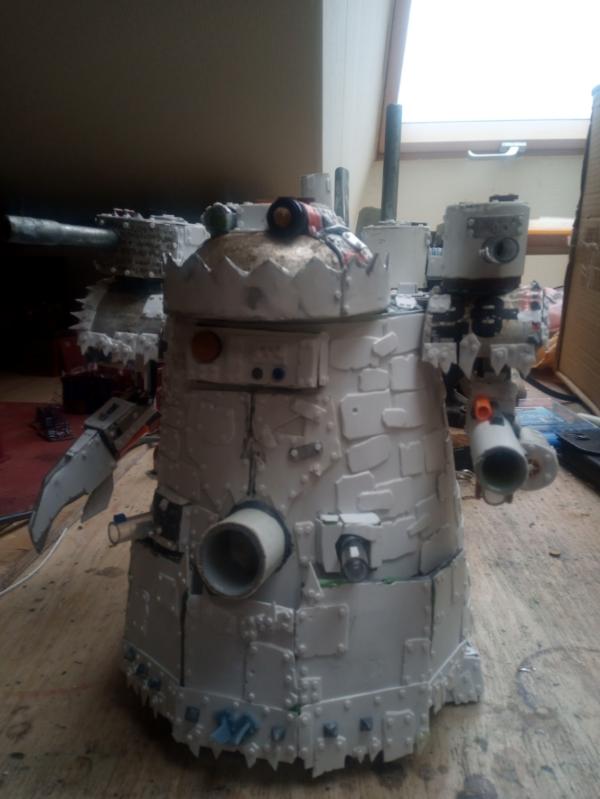
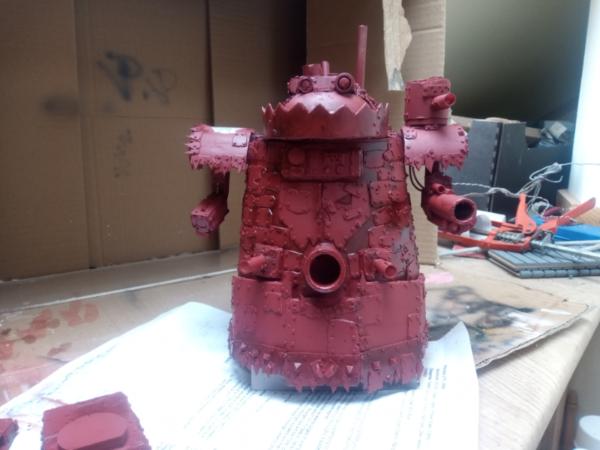
It is now primed, I will try working on the painting it, most likely starting with airbrushing of some browns and then looking for good patchwork armor colors.
|
|
|
|
|
2021/03/24 22:12:39
Subject: Re:Paul's Scrap Ork Stompa
|
|
Sinewy Scourge
|
This gets more exiting with each new development!
Looking forward to see it with more color.
|
|
|
|
|
|
2021/03/25 18:27:29
Subject: Re:Paul's Scrap Ork Stompa
|
|
Fresh-Faced New User
|
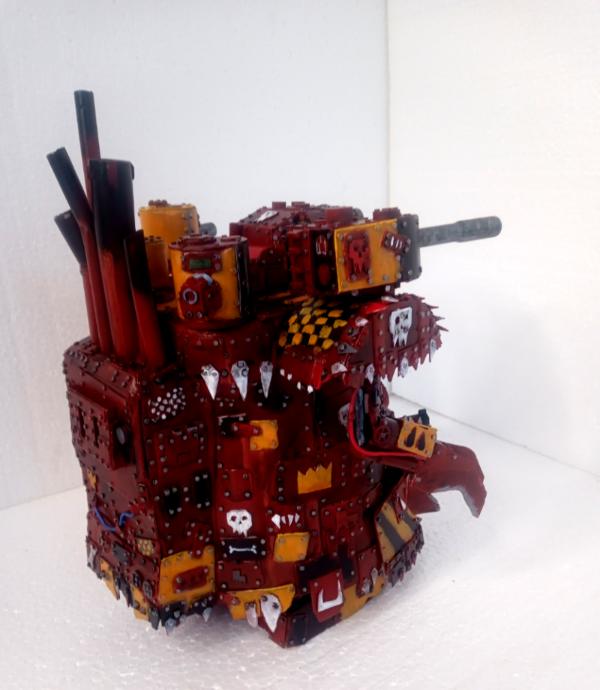
First, thin layer of brown, will add more, still working out the colors.
|
|
This message was edited 1 time. Last update was at 2021/03/25 18:31:03
|
|
|
|
|
2021/03/25 18:28:48
Subject: Paul's Scrap Ork Stompa
|
|
Humming Great Unclean One of Nurgle
|
Looking good! Lots of little details.
|
Clocks for the clockmaker! Cogs for the cog throne! |
|
|
|
|
2021/03/26 18:12:34
Subject: Re:Paul's Scrap Ork Stompa
|
|
Fresh-Faced New User
|
Not best at this still, but I will try to layer on some rust.
|
|
|
|
|
2021/03/26 19:04:52
Subject: Paul's Scrap Ork Stompa
|
|
Stealthy Grot Snipa
|
Loving this. Did something similar with a yoghurt pot a couple of years back, so I can feel your pain when it comes to the rivets!
|
|
|
|
|
|
2021/03/27 11:12:07
Subject: Paul's Scrap Ork Stompa
|
|
Legendary Dogfighter
|
Yes yeeees! Live! LIIIIIIVE!!! 
|
|
|
|
|
|
2021/03/27 15:37:33
Subject: Re:Paul's Scrap Ork Stompa
|
|
Fresh-Faced New User
|
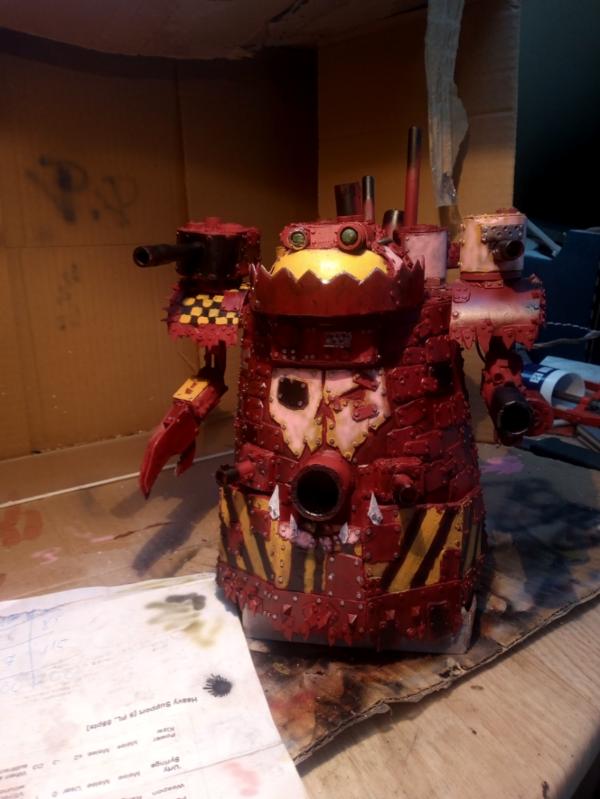
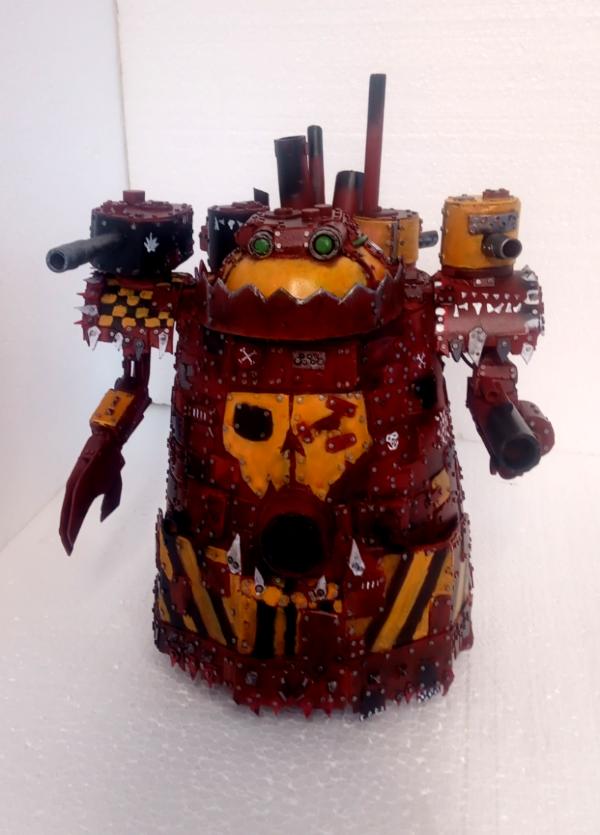
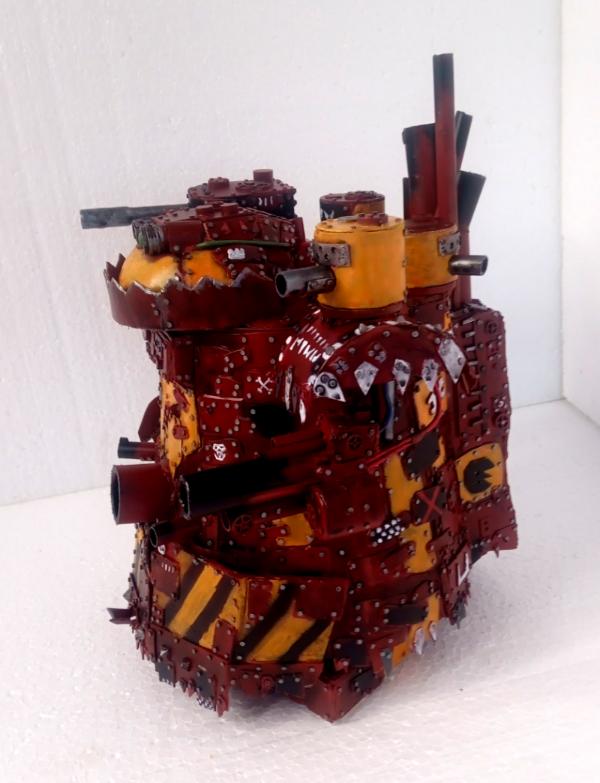
Here it is right now, using pink to give nice base layer for yellow, if all goes well tomorrow I should be done with most of yellow work, then I will go and start working on the grey parts and rusts and then metalic bits.
|
|
|
|
|
2021/03/29 14:53:44
Subject: Re:Paul's Scrap Ork Stompa
|
|
Fresh-Faced New User
|
|
|
|
|
|
2021/03/29 14:56:22
Subject: Paul's Scrap Ork Stompa
|
|
Humming Great Unclean One of Nurgle
|
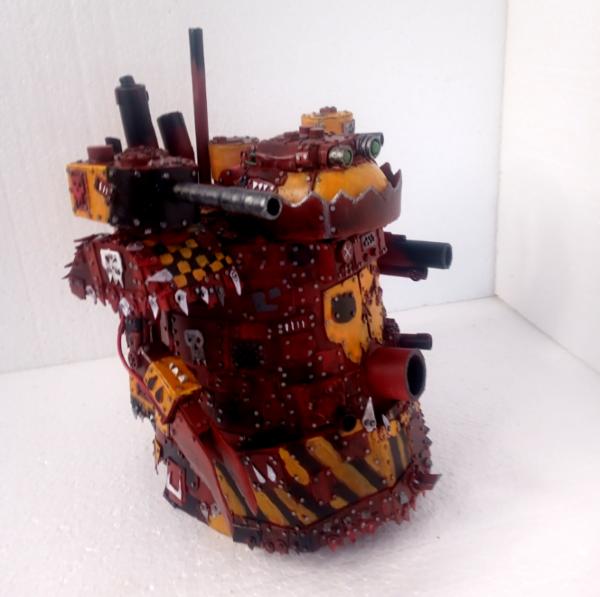
I'd be happy to face this bad boy on the opposite end of the table from me.
Well done, Paul! Much props, many accolades!
|
Clocks for the clockmaker! Cogs for the cog throne! |
|
|
|
|
2021/03/30 22:22:11
Subject: Paul's Scrap Ork Stompa
|
|
Legendary Dogfighter
|
Welll done sir! It’s a great effort!
|
|
|
|
|
|
2021/03/31 01:36:03
Subject: Paul's Scrap Ork Stompa
|
|
Angelic Adepta Sororitas
|
may a pic of it beside a normal one for comparison?
|
 1500pts 1500pts
 500pts 500pts
|
|
|
|
|
2021/03/31 02:03:37
Subject: Paul's Scrap Ork Stompa
|
|
Humming Great Unclean One of Nurgle
|
Or besides a Space Marine or Ork Boy or something. For scale. 
|
Clocks for the clockmaker! Cogs for the cog throne! |
|
|
|
|
|
|