| Author |
Message |
 |
|
|
|
|
Advert
|
Forum adverts like this one are shown to any user who is not logged in. Join us by filling out a tiny 3 field form and you will get your own, free, dakka user account which gives a good range of benefits to you:
- No adverts like this in the forums anymore.
- Times and dates in your local timezone.
- Full tracking of what you have read so you can skip to your first unread post, easily see what has changed since you last logged in, and easily see what is new at a glance.
- Email notifications for threads you want to watch closely.
- Being a part of the oldest wargaming community on the net.
If you are already a member then feel free to login now. |
|
 |
2021/03/10 10:35:51
Subject: Make your own decals
|
|

Longtime Dakkanaut
|
Is it possible to print decals onto transfer paper using a standard home printers???
Automatically Appended Next Post:
Decal sheets from hobby suppliers seem quite expensive
|
|
This message was edited 1 time. Last update was at 2021/03/10 10:36:20
|
|
|
 |
|
2021/03/10 10:55:30
Subject: Make your own decals
|
|
Frenzied Berserker Terminator
|
You can, yeah.
For example
Need to make sure you buy the right paper for your printer - inkjet or laser. You can get it clear or white, depending on what you want...
|
|
|
|
|
2021/03/10 10:57:09
Subject: Make your own decals
|
|
Longtime Dakkanaut
|
Amazing, is there anything I shoul know or is it that’s easy
|
|
|
|
|
2021/03/10 11:02:07
Subject: Make your own decals
|
|
Frenzied Berserker Terminator
|
Never actually tried it myself, but I've seen it come up here previously. No idea if that particular paper I've linked is the best or anything, just what came up first when I searched...
|
|
|
|
|
2021/03/10 11:05:17
Subject: Make your own decals
|
|
Leader of the Sept
|
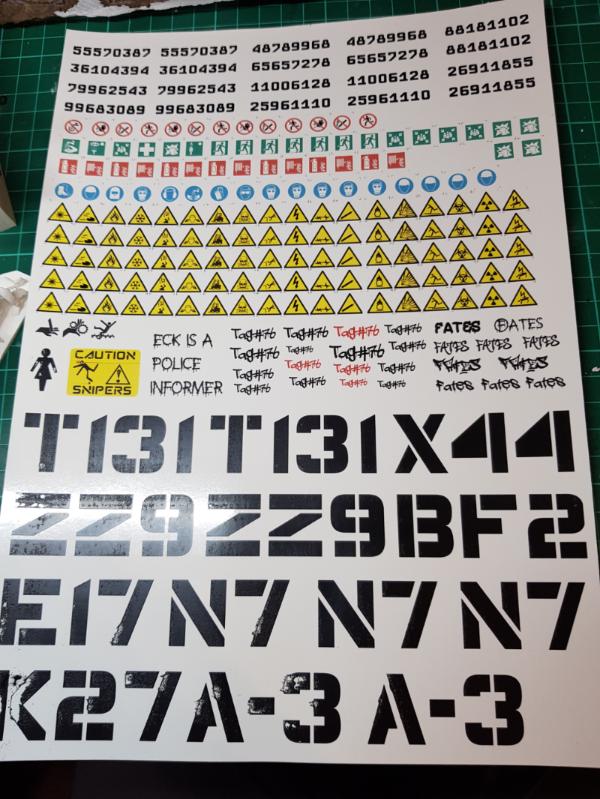
It's pretty much that easy.
Just be careful with big blocks of colour as it can be scraped off the transfer underlay relatively easily as you can see in the big letters below. However it does leave quite a nice worn effect, if that's what you are after. Noting that as soon as you put a layer of varnish over the top, the decal will be protected, so just need to be careful between printing and application.
|
|
This message was edited 1 time. Last update was at 2021/03/10 11:35:21
Please excuse any spelling errors. I use a tablet frequently and software keyboards are a pain!
 Terranwing - w3;d1;l1 Terranwing - w3;d1;l1
 51st Dunedinw2;d0;l0 51st Dunedinw2;d0;l0
 Cadre Coronal Afterglow w1;d0;l0 Cadre Coronal Afterglow w1;d0;l0 |
|
|
|
|
2021/03/10 21:35:53
Subject: Make your own decals
|
|

Killer Khymerae
|
If you need White in a decal it will likely be a problem unless you can adapt the design to print it on white decal paper.
Unless, lol you have a Alps printer
|
|
|
|
|
2021/03/10 22:58:49
Subject: Make your own decals
|
|

Anti-Armour Swiss Guard
|
You need to varnish inkjet ones AFTER printing and the ink has "dried" (as it remains water soluble and will wash off when you soak them to remove the backing film) and before you begin the application. The ink sits on the film.
Laser-printed ones do not have this issue (the laser fuses the toner to the film, so it won't "wash" off.).
The wrong type of film in your printer at best won't work (laser film in an inkjet printer) or may kill your printer at worst (film melts and sticks to inside of laserprinter).
The film for inkjet printing is not designed to handle the heat produced by a laser printer, but is slightly frosted to better hold the ink.
|
|
This message was edited 1 time. Last update was at 2021/03/10 22:59:23
I'm OVER 50 (and so far over everyone's BS, too).
Old enough to know better, young enough to not give a ****.
That is not dead which can eternal lie ...
... and yet, with strange aeons, even death may die.
|
|
|
|
|
2021/03/11 00:16:29
Subject: Make your own decals
|
|
Longtime Dakkanaut
|
thanks for the tips guys
|
|
|
|
|
2021/03/12 12:13:08
Subject: Re:Make your own decals
|
|
Furious Fire Dragon
|
I've printed my own decals. They weren't the best print quality (though that was down to the printer I used rather than the process), but they were certainly useable. As the other guys have said, there's a couple of choices to make for the paper - inkjet or laserjet, and clear or white.
I printed mine on an inkjet. You definitely need to varnish the sheet after you've printed it, because otherwise the ink will run when you put them in water for application. I found that to be a bit of a faff - not enough varnish and they won't be properly sealed, too much and they'll be stiff and reluctant to conform to curved surfaces. As I said it worked, but I couldn't help but think that it would have been much easier if I'd had a laserjet printer available. For those you can just print and go.
Next, clear vs white. A normal printer uses subtractive colour; i.e. it assumes it's printing on a white base and uses that to acheive the colours. It can't print pure white, instead it will just leave the space blank because the paper's already white. If you want a really pale/bright colour, it'll print a fairly sparse dot pattern and use the white showing through to achieve the 'lightness', and will print a denser ink pattern for dark colours. Clear decal paper is, as the name suggests, clear, and lacks that white base. This means that if you want to use clear decal paper, you need to either put the decals on a white (or near white) surface for the colours to look right, or make sure your decals only use densely-printed dark colours. i.e. if you want a white symbol to put on a black-painted mini, clear decal paper isn't going to cut it, but if you want a black symbol to put on a pale-painted mini, then clear is what you want. The advantage of clear paper is that the edges of the decal (where you didn't print anything) will be clear, so you've got less work to do to blend it with the mini.
If you use white decal paper the colours will be exactly what you want them to be. The downside is that the edges of the decal aren't clear. For example, if you print, say a space marine chapter badge, when you cut the decal out of the paper you won't cut perfectly around the outside of the badge, you'll have a bit of extra decal paper around the outside of it. And that paper is white. That means that when I've used white paper, I've printed a region of a close approximation of the model's colour around the edges of the symbol and then blended it in with paint after the decal has been applied. E.g. for a white symbol to go on a red mini, print the white symbol surrounded by an area of red. Cut through the red region when cutting the decal from the sheet, apply the decal to the mini, and then go back over the red with the paintbrush to blend it in. It's another step that you don't have to do with clear decals, but it's necessary if you want to have white/pale decals on a darker mini.
|
|
|
|
|
|
2021/03/12 14:59:09
Subject: Make your own decals
|
|
Courageous Questing Knight
|
Bellerophon is spot on. I have used both clear and white and laser and inkjet decal paper over the years and I always do prefer the clear so the edges can blend in, unless your design can have a white decal trimmed right up the the edges.
I will say that I have tried the varnish top coat and the actual Testors Decal finish to seal the print and have to say the Testors does work the best, but varnish will work in a pinch - it just seems to turn white areas a bit yellow.
Also, the highest resolution on your printer is not always best, especially if using an inkjet. I found on some designs if you have the printer on the highesr setting it oversaturates the decal and it is super easy to smudge. I suggest printing some to test along a bottom strip of the decal paper that you can trim off and try out, but still be able to use the rest of the sheet when you get the print, top coat and application techniques all down - nothing worse that having a whole sheet wasted.
Years ago I made some custom decals for a MH-60S Navy helicopter model (I was replicating the helicopter my son actually flies) and have to say the decals I made came out better and easier to apply than those that came in the kit - they were stiff and hard to set.
|
|
|
|
|
|
|
|
