Forum adverts like this one are shown to any user who is not logged in. Join us by filling out a tiny 3 field form and you will get your own, free, dakka user account which gives a good range of benefits to you:
No adverts like this in the forums anymore.
Times and dates in your local timezone.
Full tracking of what you have read so you can skip to your first unread post, easily see what has changed since you last logged in, and easily see what is new at a glance.
Email notifications for threads you want to watch closely.
Being a part of the oldest wargaming community on the net.
If you are already a member then feel free to login now.
After printing out my lighthouse I look forward to someone else printing a huge structure . Wish we lived close enough to get a game against each other on that table once its done.
LOL, Theo your mind is an amazing place, never change.-camkierhi 9/19/13
I cant believe theo is right.. damn. -comradepanda 9/26/13
None of the strange ideas we had about you involved your sexual orientation..........-Monkeytroll 12/10/13
I'd put you on ignore for that comment, if I could...Alpharius 2/11/14
That would be awesome! The Imperial Armies of the Emperor Shi Huang-di versus the hardy New Englanders under the command of Captain Everett- late of the whaling fields! And then the aliens come and .....
Automatically Appended Next Post: Huh- got two things done in one night- the Apocalypses must be upon us.
Did a lot of searching around on YouTube for methods to paint stone, and especially stone pavers or courtyards. I wanted something easy, because I have like 8 million of these buggers to do, but that looked somewhat realistic and good, because-frankly- I'm putting a lot of time in to print everything, so it really needs to be painted well to keep up the investment.
The fellow I found got really good results but used a lot more layers than I'm used to putting in, but we'll give it a whirl.
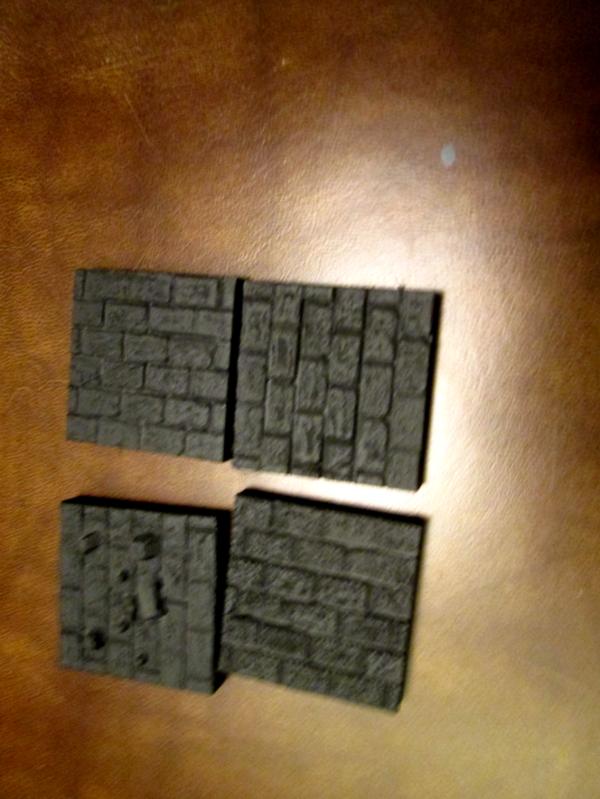
Tiles primered grey, but then basecoated flat black:
Then a heavy drybrush of tan:
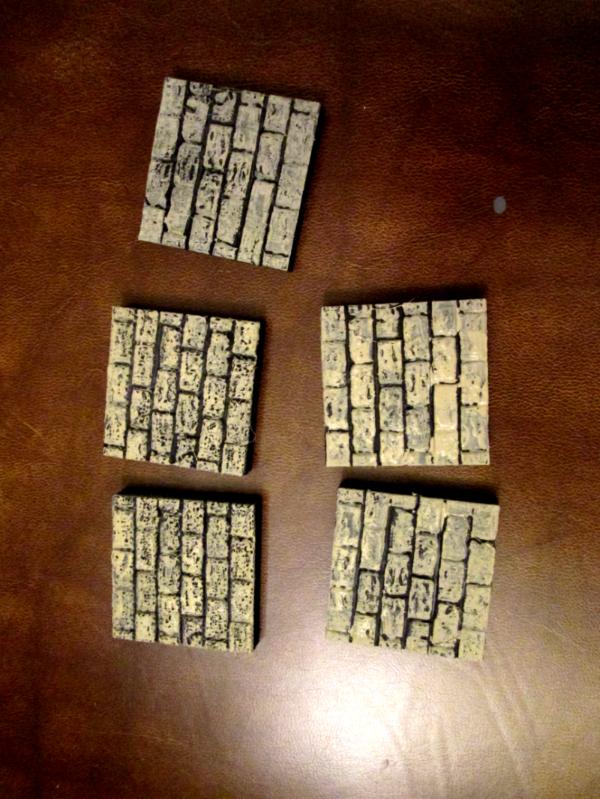
You can see easily that some of these printed more loosely than others- some are really going to need some 'body putty' in the form of extra layers of paint (unless everything is actually made of pumice, or pahoehoe lava, in which case we're okay) but yet to come are the stages of: picking out 50% of the stones in grey or golden brown (and I'll pick out the other half with a touch more tan) then drybrush suede (light) then white (lighter) then a wash of brown and finally a spot wash of green here and there for the lichen that grows on ever rock.
That's enough layers that I think even the roughest stones will come out nicely, and the washes will re-darken the mortar lines between where I've accidently slopped some paint with this first heavy drybrush.
In addition to all the courtyard tiles, I have to do the base of every wall section- they are fitted stone too! More follows soonest.
This message was edited 1 time. Last update was at 2020/09/14 23:56:09
"He fears his fate too much, or his desserts are small, who will not put it to a single touch; to win- or lose- it all."
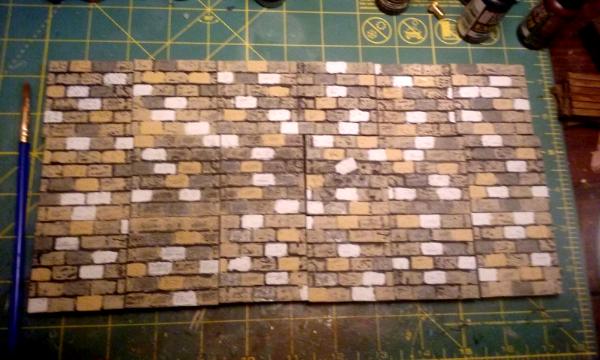
Here's the next step in painting these courtyard tiles- I picked out about 3-5 stones each in three new primary colors:
I'll go back tomorrow (hopefully) and touch everything up again with one more coat of paint, including the basecoat of tan; this should help even the rough spots out where the lines form the FDM printer show too much. Next time, I think I might try spraying them with a dilute white glue and water solution and see if that fills the gaps without eating away the PLA like the matte varnish did- or just see what two primer coats does.
I think before I hit them with the washes they are going to want to be glued down (and sorted to help keep the too-regular square edges from showing); the wash should help 'regularize' all the mortar lines- including the tile edges!
More follows soonest.
"He fears his fate too much, or his desserts are small, who will not put it to a single touch; to win- or lose- it all."
Meer_Cat wrote: Next time, I think I might try spraying them with a dilute white glue and water solution and see if that fills the gaps without eating away the PLA like the matte varnish did- or just see what two primer coats does.
Crap. Excuse me. Please.
The best filler for PLA would be Cyacrine (Cyanoacrylate, super-glue) mixed with wooden powder or baking soda or talc. PVA (white glue) usually does not adhere too well and, being affected by water or just humidity, can expand and thus lift itself and any paint coat in the vicinity off the plastic. UHU Hart and other "hard plastic" glues should work as well, but be careful not to apply too much, or it will be the same "eating away" story. Also - any two-component resin, like the 5-minute stuff sometimes sold for car body repairs, it can be applied thick and then excess can be wiped off before final curing.
Painting progress tracker:
2017: 50 of 50 planned; 2018: 80 of 60 planned; 2019: 75 of 75 planned
Thanks for the heads up, Wirecat! Hadn't really thought about white glue and plastic that's slippery, like PLA. Not sure I fancy trying to mess around with superglue and fillers on rough texture prints, though- for major gaps, sure, but smoothing print lines I suspect the emergency services would have to come get me unstuck from my chair!
Two component resins, maybe. Or just a second coat of primer and call it good. FDM is great for terrain, for finer things I can get away with some, but for figures resin printer will definitely be dedicated.
Automatically Appended Next Post: A little more progress tonight:
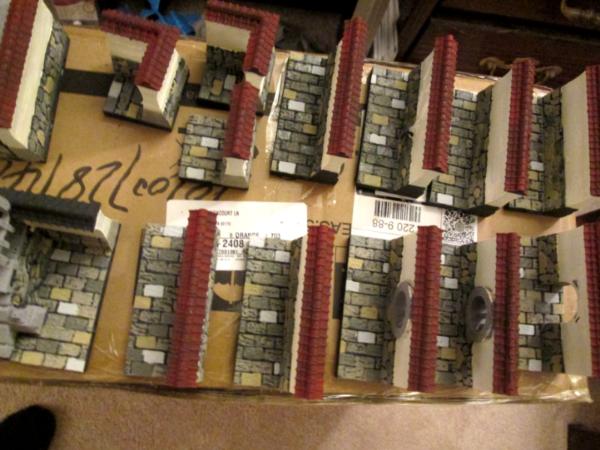
1) All the wall sections for Quad-1 are basecoated.
2) All the courtyard tiles for Quad-1 have a second (in some cases third) coat of primary color.
3) All the pieces for Quad-2 are printed and all the wall sections are primered.
4) About half the pieces for Quad-3 are printed (including the bear- the corner guard tower- 15 hour print, that).
More follows soonest. I'm excited to get all the pieces for Quad-1 primary color painted so I can glue them down and start messing about with washes, to see if/how those are going to tie things together.
This message was edited 1 time. Last update was at 2020/09/17 00:13:44
"He fears his fate too much, or his desserts are small, who will not put it to a single touch; to win- or lose- it all."
Nice start on the courtyard stones. A dry brush and a wash will blend them nicely.
LOL, Theo your mind is an amazing place, never change.-camkierhi 9/19/13
I cant believe theo is right.. damn. -comradepanda 9/26/13
None of the strange ideas we had about you involved your sexual orientation..........-Monkeytroll 12/10/13
I'd put you on ignore for that comment, if I could...Alpharius 2/11/14
Syro_ wrote: I'm digging the quads Meer_Cat. I like the ornate roof too. That pagoda sounds intense, good luck printing it if you go ahead with it.
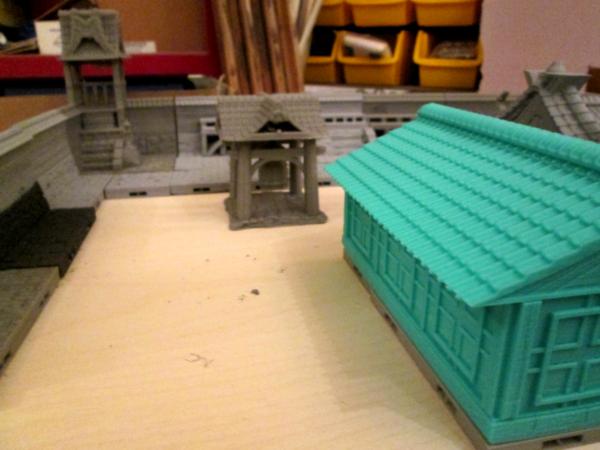
Thanks Syro! In the original kickstarter, all the ornate roofs and walls and things were for the hobgoblins- in the new Asian Adventures that just ended both styles are for humans. I saw no reason not to mix and match- the fancy roof here is for the important guy, and the step'n'fetchits live in the plain house, maybe. For sure, I'd like to print up a whole compound using the ornate walls and tower tops and everything. Seriously thinking about adding another MP10-Mini.....
The pagoda is definitely happening soon, though- it's too nice not to print. And the Asian castle- wow! Lot of hours, but a gorgeous structure.
Theophony wrote: Nice start on the courtyard stones. A dry brush and a wash will blend them nicely.
Thanks Theo! The same guy that did the video I'm following to paint the courtyard and wall foundation stones does one on making your own black wash. I'm going to need so much, I'm going to give it a try for once. His video is here:
Viterbi wrote: Nice work on the tiles and good to see you go the extra mile with some other colors thrown in. I probably would've been too lazy for that myself
Thanks Viterbi! It isn't so much having the patience, as something to do during the interminable printing process. It's amazing (back me on this Theo!) how easy it is to just sit and watch the print head moving back and forth. What are we watching for? The print head to do a trick? A mistake to happen? What, what, wat?! I'm actually getting to the point of working on other projects again, whilst the silly machine does its thing. I have to admit though, it is fething magic to someone my age- push some buttons, and presto! Out comes a thing! I've always suspected that McDonald's fast food is made this way- gallons of grey paste going in the back of the store, hamburgers, french fries and milkshakes coming out the front (I can't take credit for that idea, actually, that's from one of the Stainless Steel Rat books as voiced by Slippery Jim Digriz- great stories).
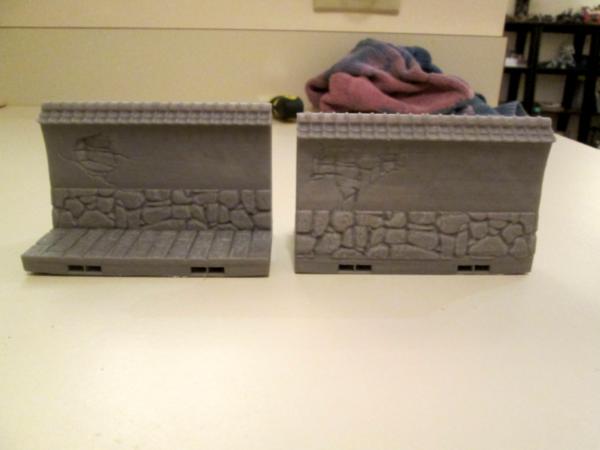
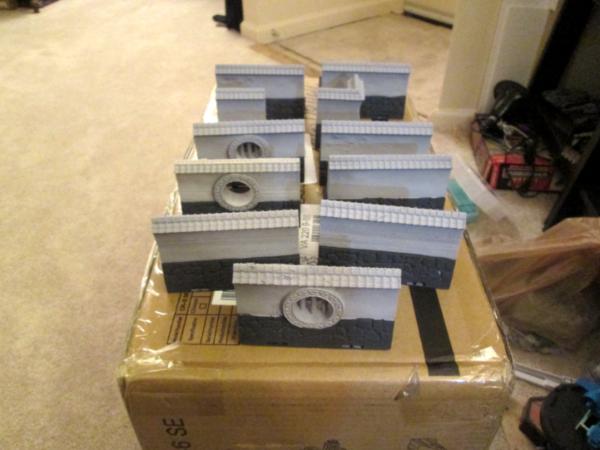
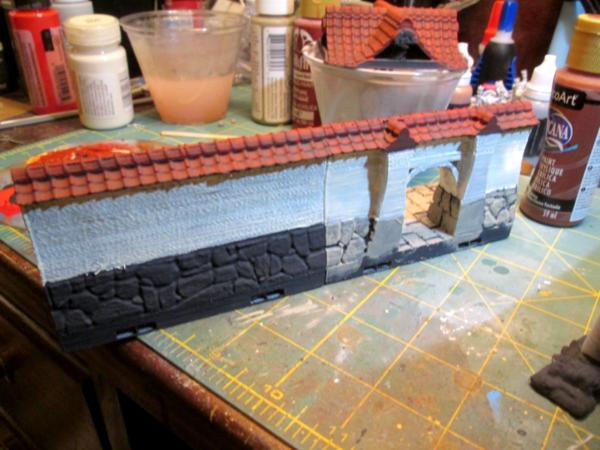
I have gotten a few things printed since Sunday night, when I got back and found my package from GigDigit waiting for me with new bowden tube couplers. First up, the 'chipped' wall section- it shows damage/weathering on both the front and the back:
Next another 'porthole' wall section, this time with the 'hole' filled in (there's one more, with bars across the port, I'll print that soon):
And finally two shots (these pieces I printed some time ago) of the wall steps and fighting platforms to go around your city or compound or whatever:
All of the pieces here are as they came of the printer, no cleaning yet or anything. And none of them required supports. You can see on the porthole wall section especially that the toe of the base is curled up slightly; this might mean my bed temperature is too high, I may need to try lowering it to 60 or even 55 degrees C. We'll see. For now, I don't mind a little curl because I'm going to be gluing everything down, probably with two part epoxy and it won't be seen and won't matter. But for stand alone pieces with their own bases, may need to try lower temp.
More follows soonest!
"He fears his fate too much, or his desserts are small, who will not put it to a single touch; to win- or lose- it all."
Montrose Toast
2020/09/22 00:24:07
Subject: Re:sCratchbuilding Customizing & Citbashing: 21 SEP 20 New prints
Ilove the black magic craft videos, it’s a saved link on my bookmark home page. Prints are coming out great, even a bit of a curl isn’t terrible, especially as you said if it’s for terrain.
LOL, Theo your mind is an amazing place, never change.-camkierhi 9/19/13
I cant believe theo is right.. damn. -comradepanda 9/26/13
None of the strange ideas we had about you involved your sexual orientation..........-Monkeytroll 12/10/13
I'd put you on ignore for that comment, if I could...Alpharius 2/11/14
2020/09/28 19:51:39
Subject: sCratchbuilding Customizing & Citbashing: 21 SEP 20 New prints
Actually, for terrain bottom curl is worse than for an occasional base. You get used to shaky-rocky people, but when Your entire city develops cracks and bends like a "Titanic"...
Cool stuff, as always, Meer_Cat, it was a great idea at Kickstarter and You'll do it right!
Painting progress tracker:
2017: 50 of 50 planned; 2018: 80 of 60 planned; 2019: 75 of 75 planned
Pledge 2020:
6 to sculpt, 75 to paint (2/57 done)
2020/10/01 01:28:58
Subject: Re:sCratchbuilding Customizing & Citbashing: 21 SEP 20 New prints
Wirecat wrote: Actually, for terrain bottom curl is worse than for an occasional base. You get used to shaky-rocky people, but when Your entire city develops cracks and bends like a "Titanic"...
Cool stuff, as always, Meer_Cat, it was a great idea at Kickstarter and You'll do it right!
Too true Wirecat! In this case, I'm planning to glue everything down to a base as a permanent gaming terrain, even though the pieces use the OpenLock system so you can rearrange them whenever you want. With the rounded feet on some of the base pieces, I'm going to use a light silicon caulk, so that hopefully it acts as a bit of a leveler, maintains some flexibility (doesn't get brittle and crack off) and continues to adhere.
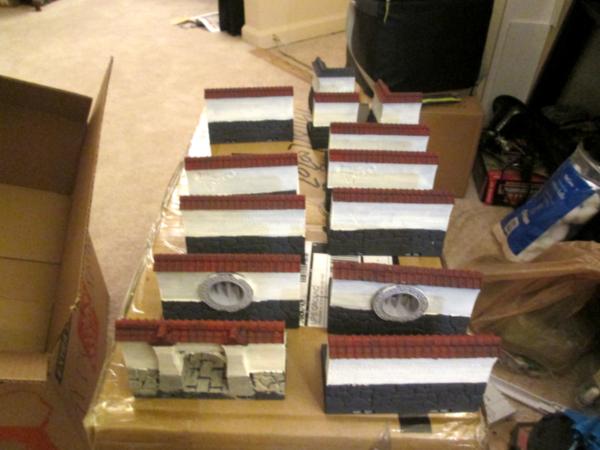
Here are some collective shots of what I have printed so far, and the little bit of paint that I've thrown at it and somehow it stuck:
I'm also trying Wirecat's idea of using cyano-acrylate glue (superglue) to smooth out the rough prints from trying to make the Ender-3 Pro work. I must admit, I generally use the gel form, and that's why I couldn't see initially how to spread it without making a massive mess. But I was at the dollar store today getting some dropper bottles for the wash I'll mix up and apply once I have the compound pieces glued down and saw a six pack of liquid superglue for a buck, so grabbed several and am trying them tonight. It might take several applications, as some of the printed pieces are more like honeycomb than smooth covered 20% infil applications, so it seems to be soaking in a fair bit. But, it saves seven hours of print time for each wall section I don't have to replace! (There are four pieces I need to fix.)
More follows soonest.
"He fears his fate too much, or his desserts are small, who will not put it to a single touch; to win- or lose- it all."
Tonight was just straight grunt work painting- I had a solid hour and a bit and I got some things done. It's been a while since I've just been able to sit and paint and listen to my eclectic music play in the background (everything from Tom Petty, Rick Astleey, Animotion, Kate Ryan, Dio, Hank Williams [Jr and Sr], Go Gos, Joan Jett, a bunch of others).
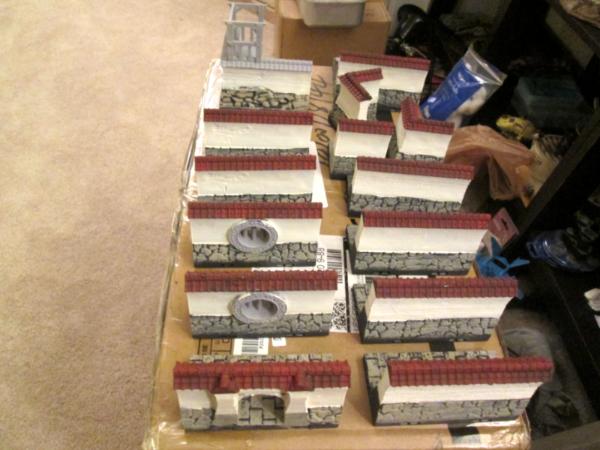
Got a bunch of wall stone bottoms primered/basecoated:
And then later the tile tops:
And I got started adding other basecoat colors on my 'experimental pieces' to see how the main wall color and the tile colors are going to go. Here's the walls with a craft Tole Paint called 'Egg' and another (50 cents a bottle) called Barnyard Red for the base color of the tiles:
The 'Egg' areas will get one or two or three more coats to smooth the rough layer lines (these are the best pieces I could get off the Ender-3 Pro) but I think they'll do alright in the end. Unfortunately, using superglue as a filler didn't work too well- the pieces are so porous that the glue woud up running out of the bottoms. The paint should clog it up pretty good, though. There is more black showing through than the picture shows, it's a little better in the bell shrine roof:
If the 'Egg' color will cover black, then I can just spray primer all the pieces black and be done with them faster. Have to try that out.
I think I'll try a heavy dry brush of orange on the tiles, then a wash of black/brown and see what happens.
More follows soonest!
"He fears his fate too much, or his desserts are small, who will not put it to a single touch; to win- or lose- it all."
Wow, that's a lot of progress on your tiles, nice Meer_Cat I also think it's great to have a playlist of only songs you like playing even if it seems unusual to a different listener. I'm the same way. Crazy about the super glue leaking right through the prints.
Walls are coming along nicely. Always a smart move using cheap craft paint on such a huge project.
LOL, Theo your mind is an amazing place, never change.-camkierhi 9/19/13
I cant believe theo is right.. damn. -comradepanda 9/26/13
None of the strange ideas we had about you involved your sexual orientation..........-Monkeytroll 12/10/13
I'd put you on ignore for that comment, if I could...Alpharius 2/11/14
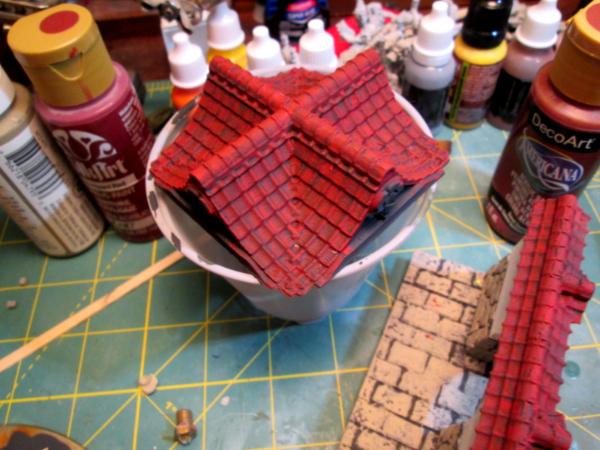
Bit more painting tonight- messing about with reds and blacks for the torii gate and the bell shrine, and trying to develop a speed painting technique to do all the tile roofs and wall tops and things that need to be done. So far, the best seems to be to use a1/4 inch flat brush about half loaded and draw it perpendicularly to the tile ridges. Three long strokes (reloading between each) from left to right along each row of tiles and the ridge cap, then reverse the piece and three long strokes from the other direction. A little dabbing to make sure there isn't too much black showing, and I think I'm good for this stage. Next will be using a dark orange, a light red or even a greyish white for light drybrush highlight color and then a wash.
Pics or it didn't happen!
And the group of walls is my thousand and first photo uploaded into my gallery (1001).
More follows soonest.
"He fears his fate too much, or his desserts are small, who will not put it to a single touch; to win- or lose- it all."
Thank you Syro! I've really focused on getting even a little painting time in each day this week- "Sculptember" motivated me even if I didn't sculpt anything!
Got some more basecoating in tonight- last chance I'll have until probably Monday. I'm getting close enough to getting the base colors done and being at the stage of gluing things down that I'm getting a bit excited- and that is what the hobby is all about, for me.
Here's the progress shot:
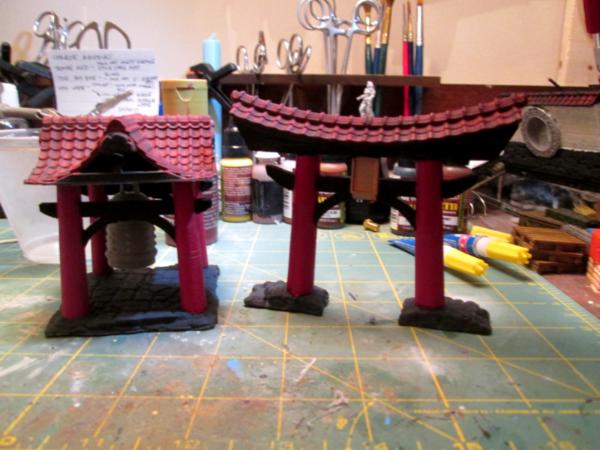
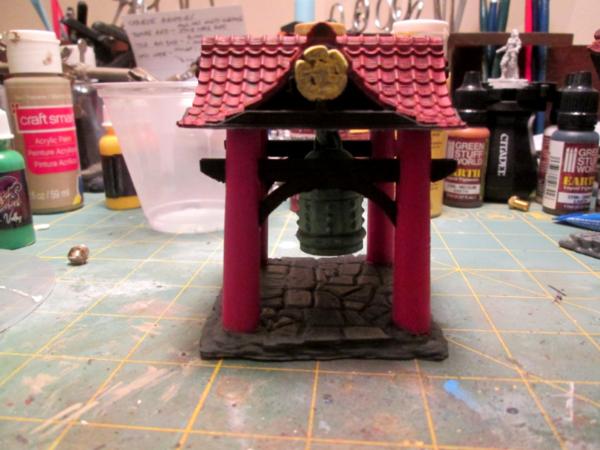
Did some touch up work on the torii gate and bell shrine- I'm just about at the stage to where the bell is the only big thing left to do. I'm going to poach shamelessly on the techniques I've seen you all use to do the green, glowing ghosts- I think it will make for an excellent verdigris patina for a bronze bell.
More follows soonest!
"He fears his fate too much, or his desserts are small, who will not put it to a single touch; to win- or lose- it all."
Meer_Cat wrote: Unfortunately, using superglue as a filler didn't work too well- the pieces are so porous that the glue woud up running out of the bottoms. The paint should clog it up pretty good, though.
This... was unforeseen and unfortunate. :( Never heard about this problem/feature, but then my eperience with 3D prints is limited to just one device that produced pretty solid stuff. Sorry for causing You problems, Meer_Cat. :(
Painting progress tracker:
2017: 50 of 50 planned; 2018: 80 of 60 planned; 2019: 75 of 75 planned
It didn't cause any problems at all, Wirecat- no worries! I anticipated there might be some leakage, so I had the piece tilted a little to keep the glue as much on the surface to be sealed as possible- very little mess, when all was said and done. It did make the piece smell a bit like poorly fried chicken, though- not sure what's up with that!
The largest flat sections I have are the off-white color of the middle section of the walls, and the latex wall paint sampler I'm trying is doing a very good job of sticking to the PLA and filling in the pores. Some pieces needed a couple of coats, one needed three. All of these 'defective' pieces were produced on the Ender-3 Pro printer, the MP10-Mini produced very solid, very smooth pieces, so no problem there. I just couldn't afford to toss out the ten or so wall sections I had that were 'sort of almost' good enough to use- 3d printing can be a really big time hog.
If I have to do something like this again, it occurs to me that good strategy might be to brush on powdered bicarbonate of soda- really work it into the interstices, and _then_ pour on the superglue. It sets up so fast, it's amazing. And especially if the pieces need to have some texture.
The point is largely moot, though, since I wasted a year on the Ender have since moved over to the Monoprice. When I get really tired of mostly printing what I set out to and having it work, I may try to debug the Ender again, but that won't be for awhile, as much as I'd love to have two machines running at once.
Thanks for the advice Wirecat- and keep it coming, I need all the help I can get!
"He fears his fate too much, or his desserts are small, who will not put it to a single touch; to win- or lose- it all."
Been awhile, had a number of things to take care of in addition to the really important work of painting!
Couple of WIP shots to show I'm still in the game:
The bell shrine is nearly done- I've added some very light white drybrush to the roof tiles (since this picture) and the bell may get a little more white also. Not sure how to weather the red pillars though- they are awfully bright. I'd like to give them a more realistic look, without making them look 'dirty'- as undoubtedly the monks that are responsible for the shrine would never allow that.
These are all the wall sections for Quadrant 1, nearly ready to glue down and see how the wash will tie them together. I used the same colors for the courtyard stones as the wall stones- but didn't use the lightest grey that is in the courtyard stones- to try to give a little bit of difference between the two (harmony without lockstep unity). The other thing I will do is add a light drybrush of white to the wall stones and hopefully with those two differences that will provide a very subtle contrast between the two.
More follows soonest.
"He fears his fate too much, or his desserts are small, who will not put it to a single touch; to win- or lose- it all."
Montrose Toast
2020/11/04 04:50:35
Subject: Re:sCratchbuilding Customizing & Citbashing: 03NOV- more printin' & paintin'
Looking good Meer! That is something tricky to figure out about weathering the pillars. You said the monks would be cleaning it regularly, but would they have access to paint? Maybe you could make some cracked paint to "age" them. Something that might work even better is to see if you can tint the pillar a lighter version of the main paint where they would be exposed to the sunlight regularly? You have an air brush, right? maybe cover the rest of the piece of and mix a lighter tint of the color you used and lightly spray onto areas of the pillars? Good luck with your build. I'm still curious how the 4th quadrant will look.
That's going to be quite an impressive setup. For the pillars, Japanese temples tend to be a little more orange, so you might think about fading the color a bit on the outward facing surfaces to indicate age.
Thank you for the feedback Viterbi and Josh! Sorry I'm so late getting back, I do value and appreciate all of you who take the time to stop in, look things over and especially provide your thoughts on proceeding forward.
Viterbi: Appreciate the comments, and a promise: I think I've shown enough WIP pics of roof tiles and stones, no more until I get things glued down and hit with a wash- something really progressed!
Josh: Excellent observation about the color of the pillars. I had more 'generic Chinese' in mind, but torii gates (and possibly this style of bell shrine, for all I know- I must do some research) are definitely Japanese. I'm thinking a may try to wash them in an orange color (I may try to make an actual glaze!) and then 'mist' them with a brownish-white to try to show aging and see what that does.
The nice thing about having a 3d printer (when I get the blasted thing running again- nothing serious, just need time) is I can print a single pillar to experiment on.
I hope to have some tangible results to show tomorrow. Here's hoping!
More follows soonest!
"He fears his fate too much, or his desserts are small, who will not put it to a single touch; to win- or lose- it all."
Montrose Toast
2020/12/12 00:35:15
Subject: Re:sCratchbuilding Customizing & Citbashing: 11DEC- STILL printin' & paintin'
This topic may have been covered earlier in this thread; if so- I apologize.
This topic may already be well-known to the printing community; in which case- why didn't you tell me?
BLUF: Some printers behave/print erratically if the SD card inserted has too much data stored on it, or if the SD card's storage capacity is beyond what the printer's micro-processor can handle.
Background: After many hours of successful prints on my Monoprice MP10-Mini, it began to behave erratically: the print head would move outside the perimeter of the object that it had- up until that point- been printing successfully (coloring outside the lines, as it were); it stopped extruding filament at a certain point (about 20mm up from the print bed); it shut off the bed heater and nozzle heater block at about the same time. And all this using gcode that had worked perfectly well before, many times.
Solution: I contacted the Monoprice help team by email as a start. They also offer online chat on their website, but I prefer to do some preliminary diagnostics first, to better shape my observations and questions if I have to go to the next level. I got a response within an hour with links to articles about filament grinding and other common 'failure to extrude' problems but also the observation that the MP10-Mini is designed to accept up to an 8Gb micro-SD card- and I had mentioned that I had purchased a new 64Gb card as part of my efforts to eliminate possible causes before asking for help (I had also resliced the original .stl file).
So I hied me hence to yon local store of electronic flummery and got a new 16Gb card- they didn't have anything as small as an 8, on the chance that the card that had shipped with the printer had gotten corrupted somehow (it came with a 16Gb card). I saved the newly resliced file onto the new card and ran it- and everything came out fine (a slight curling up of the corners, but I think that is because I have my print bed too hot- 65 degrees C- I'm going to try turning it down to 55 or even 50).
Apparently, I had been slicing various files and saving them all to the card and the amount of memory that the microprocessor for the printer could handle was exceeded and it went mad. I had tried SD cards that came with the other printers, but they were too big (64k), to full of files or both.
So, the MP10-Mini can handle a 16Gb card, just not one that exceeds 8Gb of stored files. Other printers may have similar limitations.
Something as simple as this took my printer out of action for two days. I'm going to have to rethink how I organize files I have sliced- probably store the gcode on my laptop and transfer over to the SD card just the files needed for the current project- or start an SD card for each project and keep an eye on how many files are building up. I suspect I'll use the former. For one thing, I'm frequently re-slicing .stl files because Cura keeps evolving, so there's no sense in getting a whole bunch of files in Cura 4.8 when 4.9 and 5.0 are really just around the corner.
I'm still printing and painting- will post an update with pics when there is some real change to show. Frankly, I'll be happy when this Walled Estate project is done; it's turned into a bigger bear than I first thought. As the printer(s) work more reliably, it is getting easier to start a print run and then paint, and ZZ Top covers the sound of the printer.
More follows soonest.
"He fears his fate too much, or his desserts are small, who will not put it to a single touch; to win- or lose- it all."
Montrose Toast
2020/12/12 06:45:38
Subject: sCratchbuilding Customizing & Citbashing: 03NOV- more printin' & paintin'
Interesting point. I've been considering 3D-printer, but all my friends that have them seem to send as much time cursing as using them - and they're more tech-savvy than me.
Camkhieri: "And another very cool thing, my phones predictive text actually gave me chicken as an option after typing robot, how cool is that."'
Meercat: "All eyes turned to the horizon and beheld, in lonely and menacing grandeur, the silhouette of a single Grot robot chicken; a portent of evil days to come."
From 'The Plucking of Gindoo Phlem'


 . Wish we lived close enough to get a game against each other on that table once its done.