Forum adverts like this one are shown to any user who is not logged in. Join us by filling out a tiny 3 field form and you will get your own, free, dakka user account which gives a good range of benefits to you:
No adverts like this in the forums anymore.
Times and dates in your local timezone.
Full tracking of what you have read so you can skip to your first unread post, easily see what has changed since you last logged in, and easily see what is new at a glance.
Email notifications for threads you want to watch closely.
Being a part of the oldest wargaming community on the net.
If you are already a member then feel free to login now.
More good work done tonight- these are still the easy stages and really, I'm avoiding putting together the wiring harness for all the lights I want. I also have the parts (PVC pipe bits mostly) to put together the stand or cradle to hold the beast horizontally and I really have to get that done- I'm really getting past the point where I can work vertically.
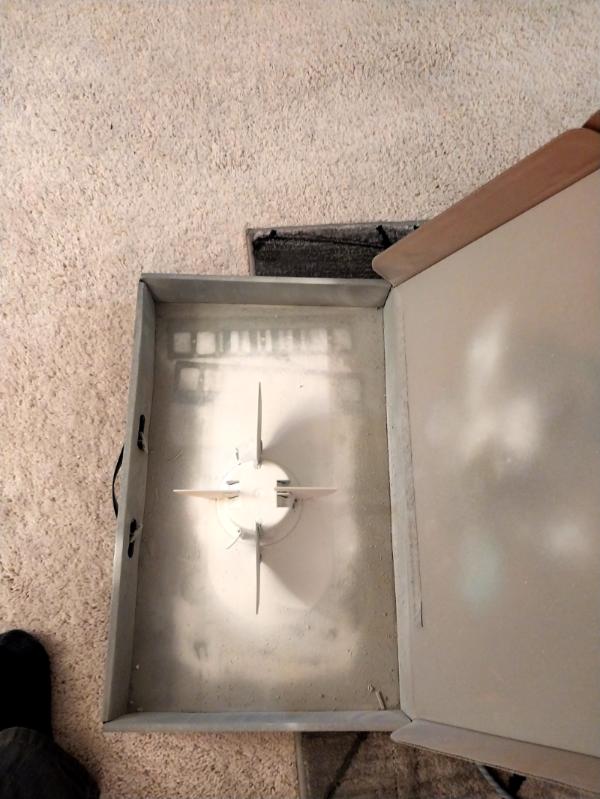
First of all, no streak test. I decided to use a different color- more grey than white- for the base color of the hull. So I've started respraying that and we'll see what looks good when that is uniformly coated and dry.
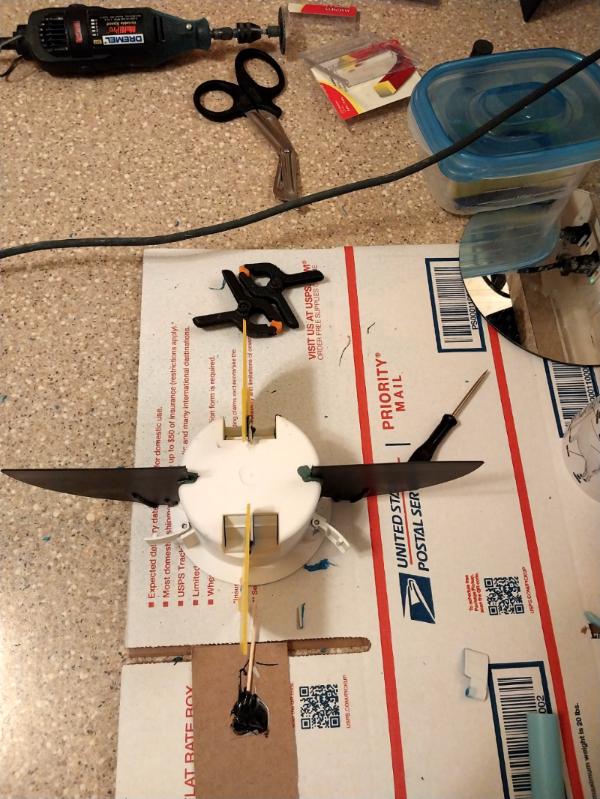
Next, I cut the bit in the way on the light receptacle and epoxied (JB Weld Kwik) the final vane in place. Which means now I can see clearly that its opposite is off kilter. So I'll try bending/warping it slightly, or will have to cut it free and reattach:
As a product review- the new (to me) Dremel cut off/grinding disks are sweet- they're like inch and a half angle cutter cut off wheels and work very well. I like the very thin carbide wheels also-they're much better for fine work. But the Kitty Hawk isn't exactly fine work, at least not yet.
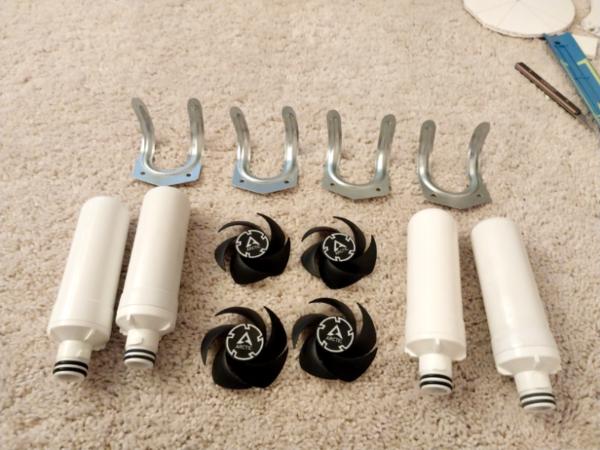
Next up was starting to shape and assemble the engine pods and struts. I figure to use these expended refrigerator filter canisters for the engine pods, and these cheap mop hangers from the dollar store for the struts:
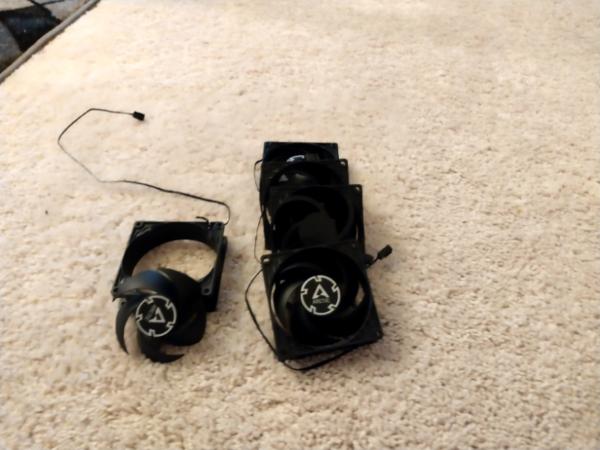
I also bought these cheap computer case fans from the local Crazy Eddie's Used Computer Emporium to act as the 'pusher' propellers:
Altogether they will shape up pretty good engines and props, I reckon:
I'll need to take the mop hangers to the farm to drill some holes for screws using my midget drill press- I may try here tomorrow and see if the noise isn't too great and if I can hold a hand drill steady enough, we'll see- the metal isn't exactly battleship steel so I might can manage.
I've also ordered in some cheap three-bladed props to mount as verticle props for helping the control surfaces aim the bow up or down more quickly, but they haven't arrived yet.
I've set a budget of US$75 for parts for this thing and am still well under (not counting stuff I already had- that doesn't count). I think I'll be able to bring it in under contract ceiling and so far the most expensive individual part has been the spray paint!
And shortly I'll be breaking out my hot glue gun, which I now refer to as my Syro Adductor, for his great work with hot glue, to start sticking things to things.
More follows soonest. Thank you for looking in.
"He fears his fate too much, or his desserts are small, who will not put it to a single touch; to win- or lose- it all."
1) Tail section: all vanes positioned correctly (as much as I'm agonna do) and started priming:
B) Nose/command deck section: nice start here and the 6 inch circle guide I cut out earlier to help position/shape the gondola sections when cut in half will be the deck sole; it's not glued in yet- for once I'm going to try to make things easier on myself and build it outside the plastic hemisphere and only install when it's finished. There will be crew figures permanently installed and the whole kit and kaboodle will (probably) be permanently epoxied in place once its wiring is run. Although it might be nice to be able to get at the wire leads from the nose end if the bulb ever goes out....dang it- decisions!
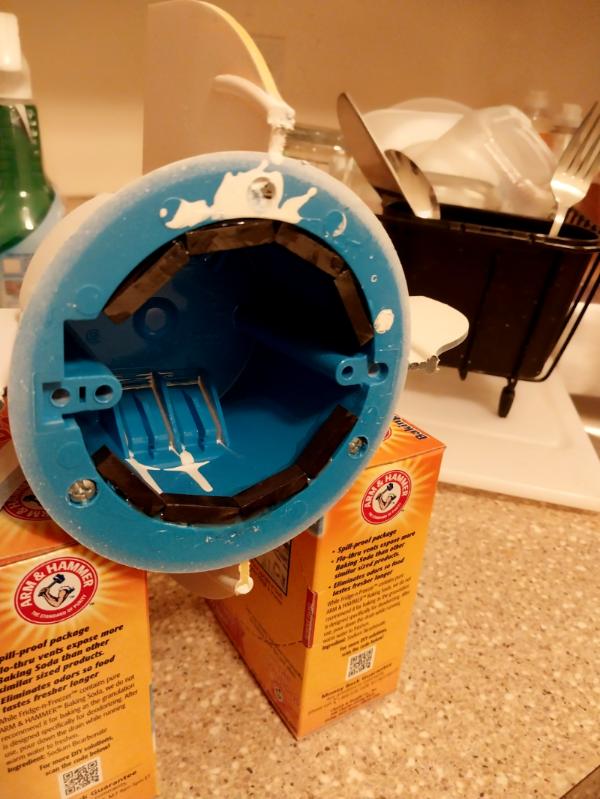
iii) Engine pods: I was able to drill the holes I needed easily with my hand drill- I'm glad I didn't wait and drag everything up to the farm, as I really must get the stand built and the rescue horses don't leave a lot of time for the hobby. I should have anticipated that these refrigerator water filters would be filled with charcoal, but I learned quickly and the screws that hold the filters to the struts actually plugged the holes enough that black powder isn't leaking every where. I won't paint the prop blades- they'll stay shiny black and labeled for Arctic:
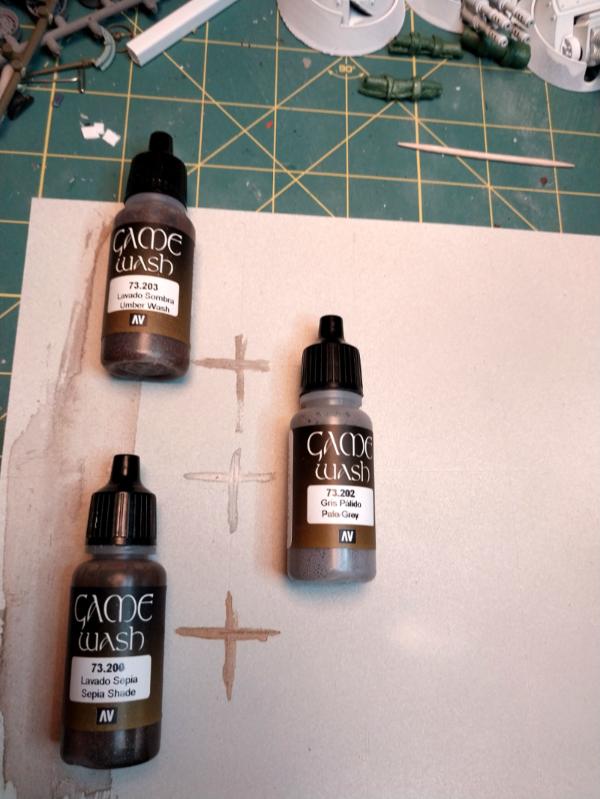
IV) Streak Test: Not really a streak test, as I'm going to go with the Vallejo Grey Wash (I was thinking about thinning my Umber Ink, as you know, but then I thought, at my rate of consumption my washes will last approximately until the heat death of the universe, so why not splurge and use them now?) so I tried thinning and broad brushing Burnt Umber Wash, Sepia Wash and Grey Wash- given the hull color now being a pale grey, I believe the grey wash used as a thick 'panel lining' is the look I want. I may actually go over top later with a very thin line of rust or Sepia. On the left you see what using a wide soft brush yielded- it would have just washed the whole hull a dirty brown- not what I wanted.
I am very definitely interested in all y'alls opinion as to what you like- just bear in mind that the scribed metal lines on the pipe are deeper and wider than the scratches I made on this piece of styrene:
That's it for tonight. Next up, I'll be priming everything that's already done, building out the weapons gondola, starting the Generator Gondola (which is where one of the battery boxes and switches for lights will go), finishing the tail section, building out the bridge deck and starting to think about how I'm going to rig the compartment and running lights on this beast. This weekend at the farm I'll try to get the stand built- really getting to need that.
In looking for something else I found my sheet of laser-jet printable water transfer decal paper- I will be able to custom print the ship's name (Kitty Hawk, in Gothic Script? I'm rewatching The Hindenburg at the moment) plus more bigglier Hello Kitty decals for the tail fins.
Thank you for looking in and your constructive criticism. More follows soonest.
"He fears his fate too much, or his desserts are small, who will not put it to a single touch; to win- or lose- it all."
Montrose Toast
2024/03/27 21:42:13
Subject: Re:sCratchBuilding CuStomiZing & CitbaShing: 12MAR: INAS Kitty Hawk- Streak Test and more
Wish I could have been working/posting more regularly, but life has most definitely gotten in the way. Two weeks back a number of events happened, that short of the loss of a human family member, have made for one of the most difficult weeks I can remember experiencing. I was going to write a list of everything but then realized that I come to Dakkadakka to get away from troubles, so refrained. I will limit myself to saying that we had to say good-bye to another of our rescue horses and that is never easy. I'll be showing you the shadow box for Chip Marshal down the road a piece.
So it isn't a loss of interest in the project that has kept me from showing more progress on the INAS Kitty Hawk, quite the opposite.
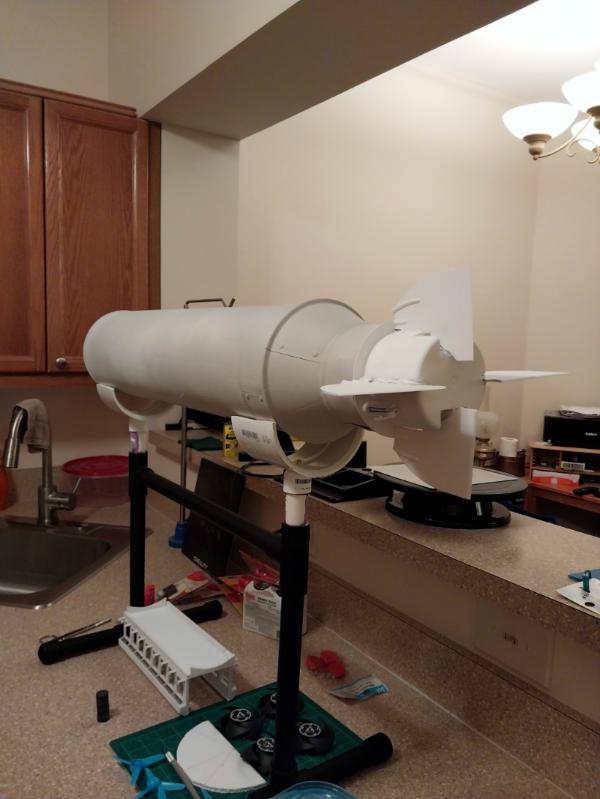
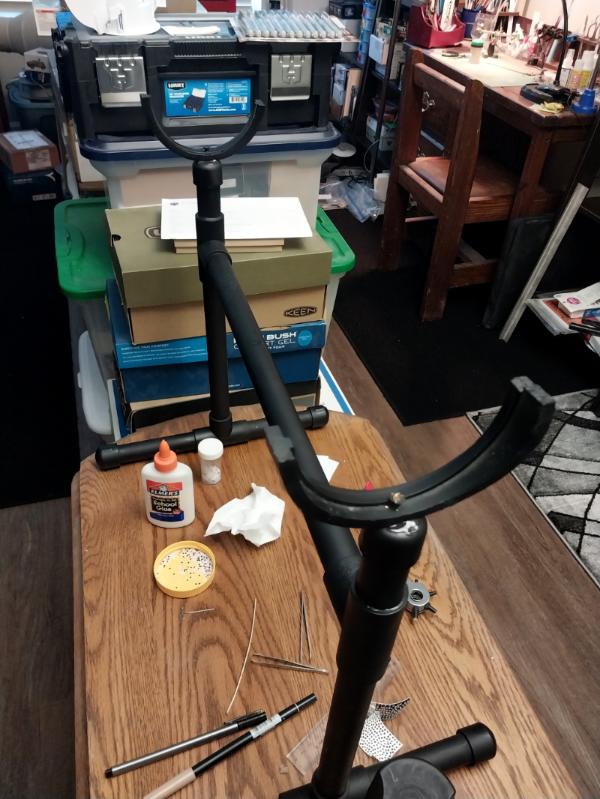
I have gotten the stand done (intermediate stage pics below, but it's done) and it is already making things easier for working on the hull:
The engine pods are primered and the next thing is to start adding a metric crap-ton of rivets to the hull. I was going to do the panel lines, but realized that the rivets aren't painted (I just used a leather hole punch to make a bagillion of them from an old yard sale sign) and I reckon it's going to be easier to spray another light coat on the whole hull with rivets than to try to spray them spread out in a box top or something. I hope to have photos showing something soon.
But probably not too soon. Another interference from real life is that the owner of the apartment that I've been renting for the past 9 years and 9 months is selling it and I have to move out by April 30th. To make this properly relevant to the spirit of these blog pages, my public service announcement is: our hobby is terrific- but put the time and energy into the things that must be dealt with first.
I've found a new place, arranged for utilities to be moved and started boxing things up in the current place. I'm blessed that I can afford to start the new place two weeks before I'm required to be out of the old place, so I can move myself (don't have too much of bulk in what is essentially a commuter apartment) and nothing gets broken (hopefully).
The biggest pain will be packing up the many figures, vehicles and terrain pieces we've built together for the past 8 years (I found Dakkadakka and stopped lurking in 2016).
More follows soonest. Thank you for looking in.
"He fears his fate too much, or his desserts are small, who will not put it to a single touch; to win- or lose- it all."
Montrose Toast
2024/03/29 00:36:32
Subject: Re:sCratchBuilding CuStomiZing & CitbaShing: 27MAR: all kinds of things happening
Thanks very much, Josh! It's the kind of project that would be perfect for the League of Extraordinary Riveters, except that even without having to move apartments and other things going on it would take too long to get it done in time.
It'll be fun to have done an airship, though. I've rewatched The Hindenburg with George C. Scott for inspiration, next up is Jan Michael Vincent in Zeppelin.
"He fears his fate too much, or his desserts are small, who will not put it to a single touch; to win- or lose- it all."
Montrose Toast
2024/03/31 15:13:06
Subject: Re:sCratchBuilding CuStomiZing & CitbaShing: 28MAR: Some more small progress
I'm sorry to hear about what you've been going through, Meer. I'm glad to see that you have a little time to take your mind off things and work on the zeppelin.
https://www.dakkadakka.com/dakkaforum/posts/list/0/766717.page A Mostly Renegades and Heretics blog.
GW:"Space marines got too many options to balance, therefore we decided to legends HH units." Players: "why?!? Now we finally got decent plastic kits and you cut them?" Chaos marines players: "Since when are Daemonengines 30k models and why do i have NO droppods now?" GW" MONEY.... erm i meant TOO MANY OPTIONS (to resell your army to you again by disalowing former units)! Do you want specific tyranid fighiting Primaris? Even a new sabotage lieutnant!" Chaos players: Guess i stop playing or go to HH.
2024/04/02 00:58:24
Subject: Re:sCratchBuilding CuStomiZing & CitbaShing: 28MAR: Some more small progress
Thanks very much all, for looking in and for your encouraging words.
No work tonight, but tomorrow I'm hoping to get an hour or so of boxing the completed miniatures and such up and then start in on the rivets. I'm actually looking forward to getting going- I think it will be very zen; just, instead of raking sand into perfect lines and patterns I'm gluing down tiny circlets of plastic, really- it's exactly the same thing!
"He fears his fate too much, or his desserts are small, who will not put it to a single touch; to win- or lose- it all."
Montrose Toast
2024/07/10 22:48:07
Subject: Re:sCratchBuilding CuStomiZing & CitbaShing: 10JUL: There and back again....
After 'way more absence than I thought there'd be and far more than I wanted, I'm sticking a toe back in the water and getting myself going in the world of miniatures; in other words:
It's been quite a ride since March: moved into the new apartment, took in a new rescue horse at the farm, traveled for work to Texas, Colorado, New Mexico and Arizona for 2-3 weeks here and there to hang out in the desert and contribute my language skills and in between tried to get everything unpacked and set up as nicely in the old place (ain't there yet, but I can't let the perfect be the enemy of the good).
As a reminder (for me as much as you'ns!) here's roughly where things stood with INS Kitty Hawk when last we tuned in:
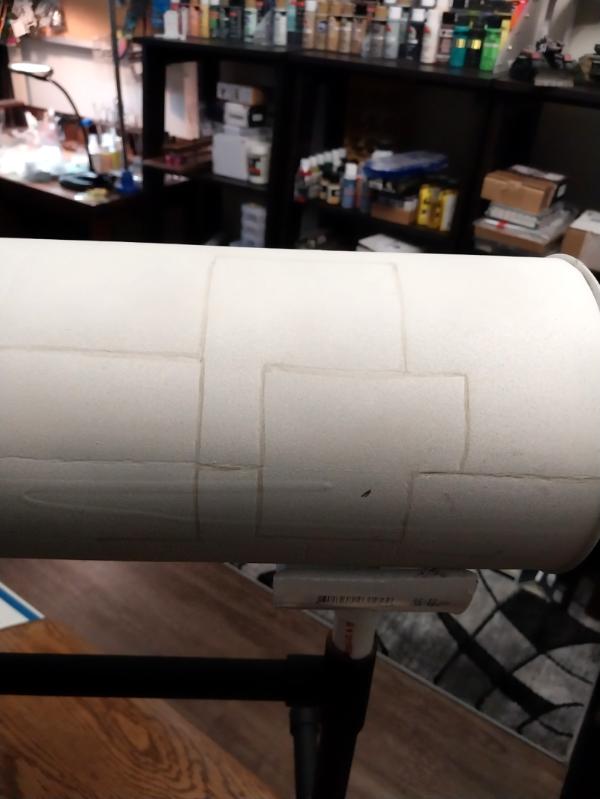
Now, I can't find everything I need, and some things got broken in the move, but I absolutely can't stand sitting around in our current 100 degree F heat and do nothing, so tonight I started the first step needed to finishing off the hull itself- and that's darkening the panel lines, preparatory to adding the rivets.
Looking at the hull with its off-white basecoat, I needed/wanted some contrast to make it more visually appealing- but didn't want to use a wash and maybe overdo the effect. So I bought a selection of 'paint pens' and Sharpie markers with an eye towards outlining all the hull panels, both to form a seam for the rivets to follow and to give the eye something to make sense of, instead of straining to see what the cryptic scratchings were all about.
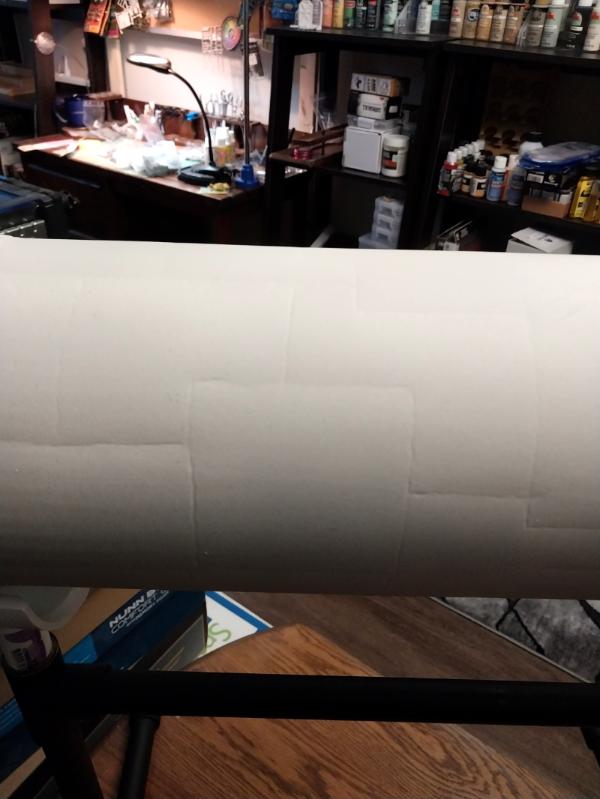
Here's a somewhat close up of what things looked like before:
And here's with the (not pin lining, or even high-lighting- smudge-lining?):
I wanted to fill the engraved lines I made with my angle grinder and feather them out a bit, maybe to look like aircraft dope sealing the seams. I looked at a metric crap-ton of old zeppelin and dirigible pictures trying to come up with something and this is what I've got.
After the rivets are added, I reckon to wide brush a very thin wash of rust over them and the panel seams to blend everything together and provide a sort of weathering.
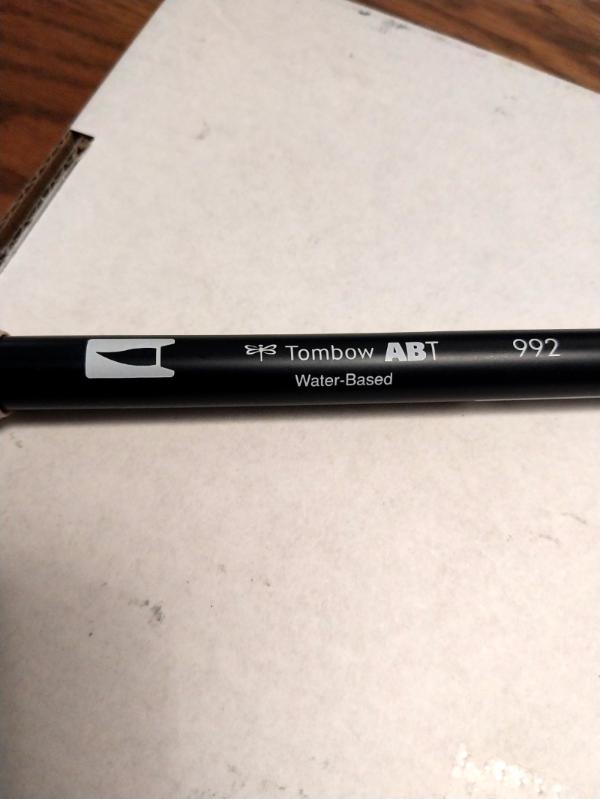
This is the paint pen I used:
I like it- the tip comes to a point, but is about 1/4 inch at the base and if you press down you can widen or lessen the thickness of the line. They come in almost 100 colors and for needing only one or two I found them affordable, and I'll certainly use them again for weathering on other projects- especially armor.
I want to get all the smudge lining done tonight, so that tomorrow I can stain/wash/color the rivers I already have punched out so we can gt going adding them and maybe get a feel for ho many more thousands I'll need.
So, thank you for looking in, as always I greatly appreciate your constructive criticism and especially encouragement. I've been keeping up with what many of you are doing and it is your example and imagination and enthusiasm that have me stirring my stumps again- many thanks.
More follows soonest.
"He fears his fate too much, or his desserts are small, who will not put it to a single touch; to win- or lose- it all."
Montrose Toast
2024/07/11 20:29:56
Subject: Re:sCratchBuilding CuStomiZing & CitbaShing: 10JUL: There and back again...
Thanks, Syro! I see from your blog that you've been a little busy too! I'm hoping to get caught up and into the swing of things again to start leaving comments on all the great work I see everywhere.
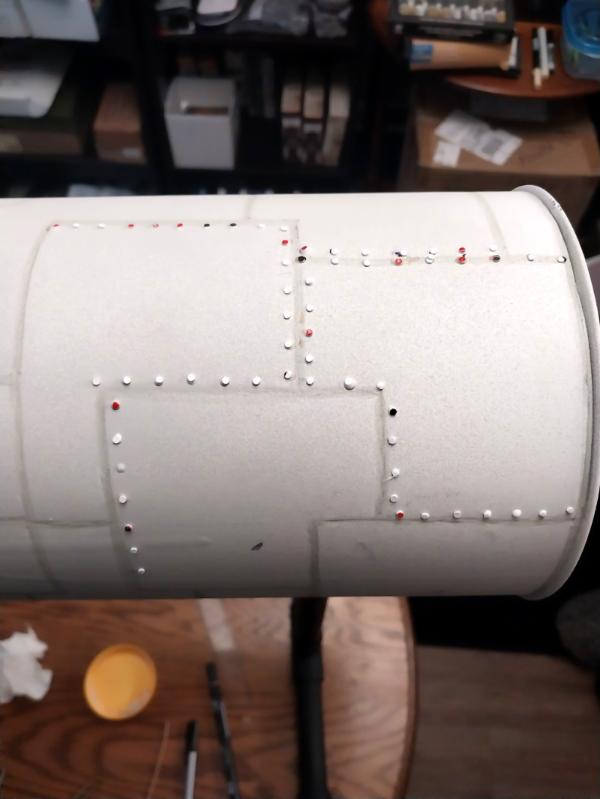
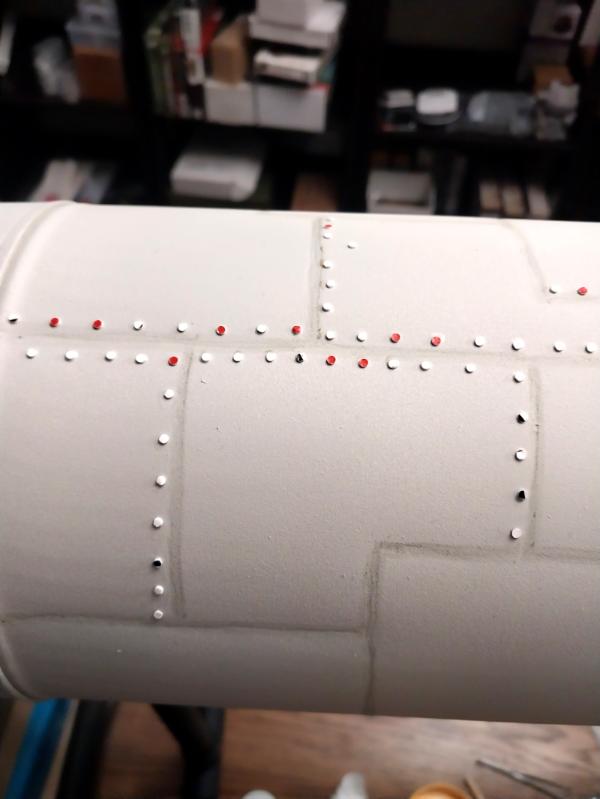
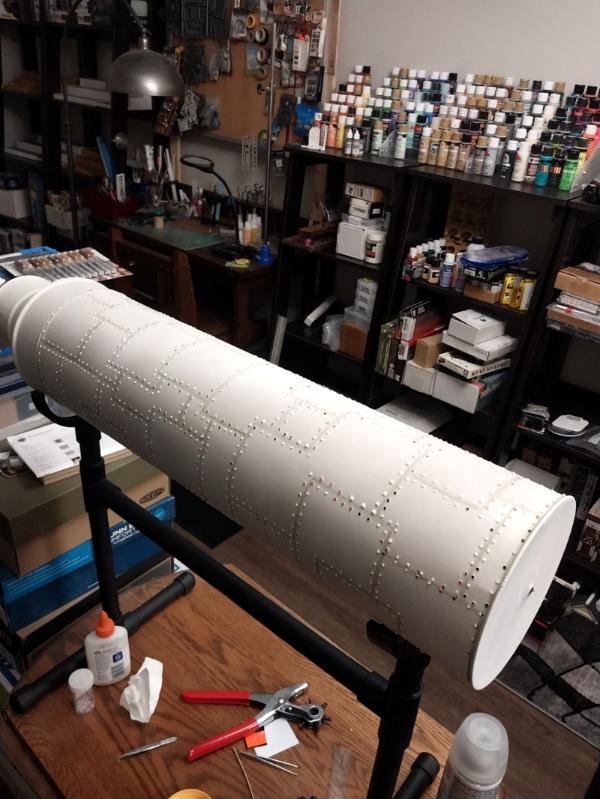
Dropping this photo just to how what the riveting process looks like:
Basically, I drip a tiny drop of white glue at about 1 cm intervals (I use a wooden coffee stirrer that is about the right width) and then tweezers to set a 1/16th inch rivet (used an adjustable leather punch to make) onto each drop. I like the look- but noticing one spot where I made the drip but didn't drop the rivet- it almost looks like I could have just used drops of white glue as rivets and gone a lot faster.
Once done (or when the glue dries and my hands need a break- them tweezers is small for an old guy like me) I'll touch each rivet with a dab of brown or silverish paint (clan or rusty rivets) and get ready for the light rust wash. There just wasn't a better way to paint them: if I paint the sheet of plastic (yard sale sign) the paint flakes off when I punch them out; if I try to paint them afterwards, a shaker can is the only really feasible way and they blow all over. I suppose I could fasten down a piece of painter's tape upside down and stick them to that and then spay- but that sounds like work.
As is, I like the bulkier, more 'robustlier' rivets using the plastic punch outs, so will keep going with them- it'll just take longer and y'all are going to get tired of pics for the next few days of "look what progress I've made today"
But it's a start. It'll be fun to get through this stage so I can start wiring the running lights and bolting things on like engines, guns and recon plane.
More follows soonest (possibly a "look what more I got done today" when I hit the rack).
Thank you for looking in.
Automatically Appended Next Post: Added a few more tonight:
This message was edited 2 times. Last update was at 2024/07/12 01:13:23
"He fears his fate too much, or his desserts are small, who will not put it to a single touch; to win- or lose- it all."
Mastodon: @DrH@dice.camp
The army- ~2295 points (built).
* -=]_,=-eague Spruemeister General. * A (sprue) Hut tutorial * Dsteingass - Dr. H..You are a role model for Internet Morality! // inmygravenimage - Dr H is a model to us all Theophony - Sprue for the spruemeister, plastic for his plastic throne! // Shasolenzabi - Toilets, more complex than folks take time to think about!
Thanks very much for looking in, Dr. H and Blockade! I have to admit, applying the rivets is going faster than I thought, maybe not 'weeks' of boring sitreps, but maybe only days....
"He fears his fate too much, or his desserts are small, who will not put it to a single touch; to win- or lose- it all."
Back from the farm- horses doing well with the heat: we rigged up a pool mister bar that they can activate themselves with a pressure switch from an old supermarket door so they get the benefit of evaporation's endothermic nature and all their shelters have fans. I took the cradle arms from the zeppelin stand with me and cut them to about 1/3 width on the radial arm saw.
For tonight, whilst paint was drying and two-part epoxy was setting, I punched out a couple hundred more rivets- just in case:
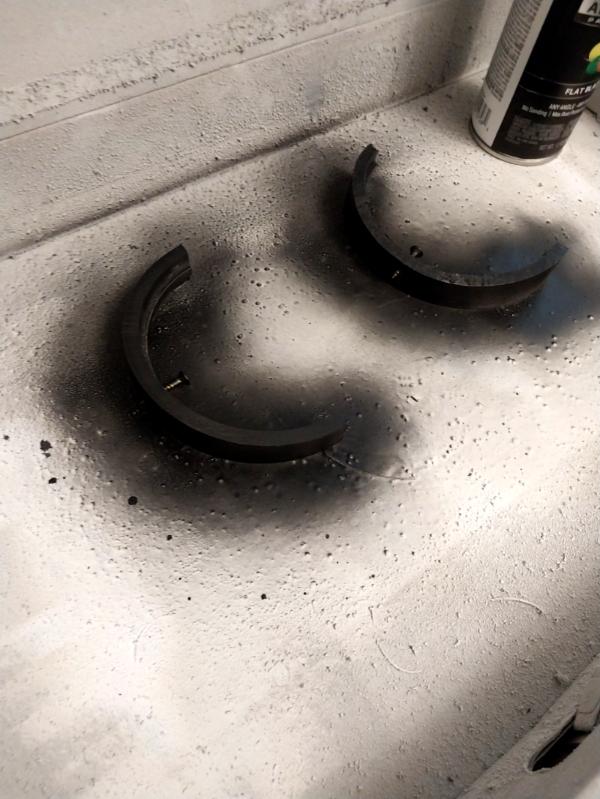
Spray painted the arms:
And fastened them back onto the stand with brass wood screws and JB Kwik Weld:
A few minutes more to let the epoxy set (JB Kwik Weld) and I can get back to pusshing rivets into place. I hope to update this post a little bit later.
More follows soonest.
"He fears his fate too much, or his desserts are small, who will not put it to a single touch; to win- or lose- it all."
Montrose Toast
2024/07/16 09:18:52
Subject: sCratchBuilding CuStomiZing & CitbaShing: 15JUL: The cradle _won't_ fall...
https://www.dakkadakka.com/dakkaforum/posts/list/0/766717.page A Mostly Renegades and Heretics blog.
GW:"Space marines got too many options to balance, therefore we decided to legends HH units." Players: "why?!? Now we finally got decent plastic kits and you cut them?" Chaos marines players: "Since when are Daemonengines 30k models and why do i have NO droppods now?" GW" MONEY.... erm i meant TOO MANY OPTIONS (to resell your army to you again by disalowing former units)! Do you want specific tyranid fighiting Primaris? Even a new sabotage lieutnant!" Chaos players: Guess i stop playing or go to HH.
2024/07/16 18:56:17
Subject: Re:sCratchBuilding CuStomiZing & CitbaShing: 15JUL: The cradle _won't_ fall...
Rivets looking great mate. One of those tedious things that will pay off in spades at the end. This has been a gorgeous build so far - really clever use of bits and bobs!
t z you are k
2024/07/17 00:53:33
Subject: Re:sCratchBuilding CuStomiZing & CitbaShing: 15JUL: The cradle _won't_ fall...
Thanks very much for looking in, tzurk! And it is taking awhile to get all of these bits in place, but I think you're right, that the overall effect in the end will be worth the effort!
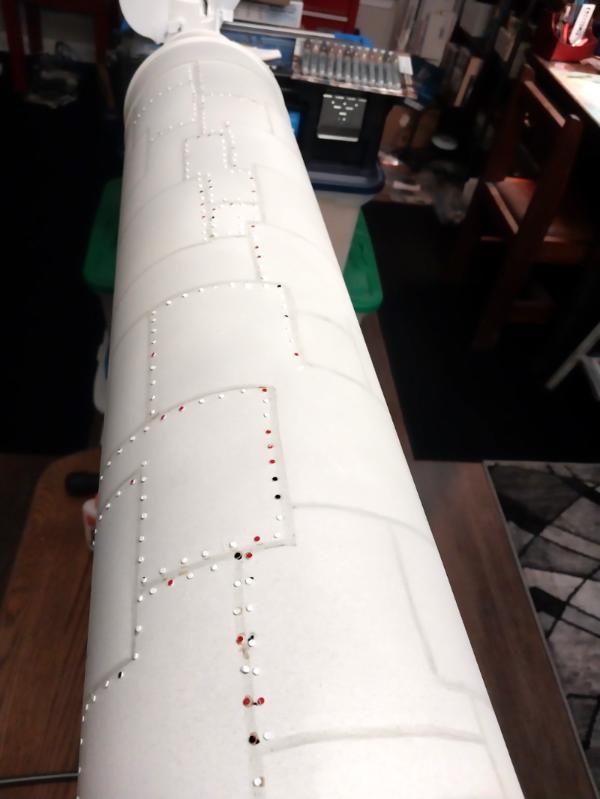
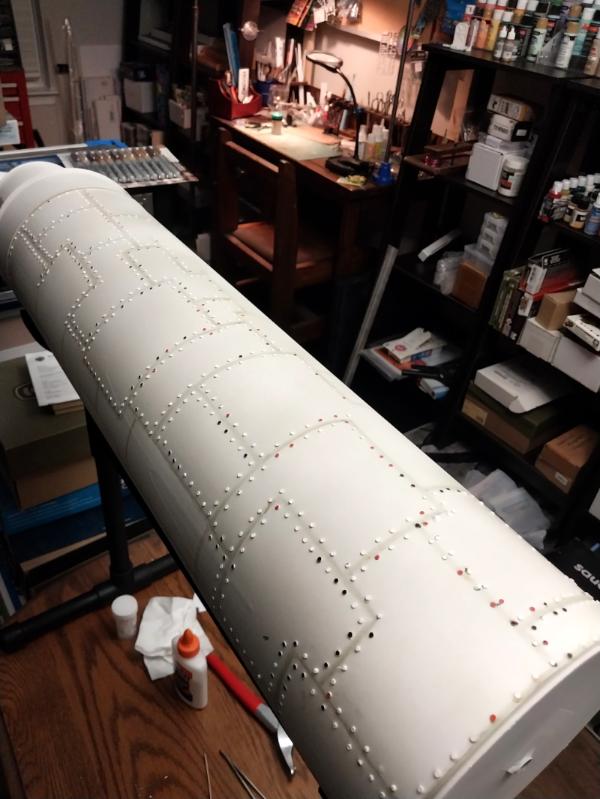
Got a fair amount done tonight (watching The Wild Geese whilst I work) and figure I'm at the 25% complete mark:
I dab down my little blobs of white glue to stick the rivets to, and then overcoat each section with flat matte urethane to help hold everything in place. I'll try to stay focused, a I'd really like to be complete with this stage this week and then move on to:
- Tail section
- engines
- dorsal gun turrets
- Weapons gondolas
- Command bridge in the nose
- Crewcats (Aero Pixies)
Hopefully in that order.
I do thank you all for your interest and encouragement. More follows soonest.
"He fears his fate too much, or his desserts are small, who will not put it to a single touch; to win- or lose- it all."
More riveting news tonight, but no picture; frankly, it would look a lot like the previous picture, so I'll leave it that I think I'm around 60-65% complete with this stage of work nd may be able to get it finished tomorrow evening. If not, surely by Monday evening.
I just need to hit the new sections with matte urethane overcoat and Imma call it a day.
More follows soonest.
"He fears his fate too much, or his desserts are small, who will not put it to a single touch; to win- or lose- it all."
Mastodon: @DrH@dice.camp
The army- ~2295 points (built).
* -=]_,=-eague Spruemeister General. * A (sprue) Hut tutorial * Dsteingass - Dr. H..You are a role model for Internet Morality! // inmygravenimage - Dr H is a model to us all Theophony - Sprue for the spruemeister, plastic for his plastic throne! // Shasolenzabi - Toilets, more complex than folks take time to think about!
Rivet-zen nearly achieved, Doc! Thank you for looking in and the encouragement.
The main hull is 100% complete. I got a bit out over my skies when I thought I was 'done' though- there is the whole aft section that the tail fins connect to remaining to do! That will keep until Monday and should be finished that evening. I didn't count every rivet, but I counted a 2" by 2" section and multiplied by the dimensions of the hull and it comes to a fairly close estimate of about 1000 rivets in all.
Next will be to daub some paint on them and apply a bit of weathering wash and then on to finishing the tail section- including wiring its navigation lights!
Thank you for your kind attention, more follows soonest.
"He fears his fate too much, or his desserts are small, who will not put it to a single touch; to win- or lose- it all."
Montrose Toast
2024/07/19 14:47:57
Subject: sCratchBuilding CuStomiZing & CitbaShing: 16JUL: Main hull 100% Riveted
Yep, listened to a lot of music, watched Zeppelin, The Beekeeper and season one of the 1965 American TV series Honey West (which was actually quite good, I thought). I've got the Kittyhawk on a small table on its cradle where I can see my little television and it is indeed a very zen activity- as Doc H mentioned- you just put the little dabs of glue on and then use the tweezers to grab the rivets and the next thing you know, the little dish is empty and you have to dump out more rivets.
I am going to have to make more rivets after this is over, I'm almost out.
More follows soonest.
"He fears his fate too much, or his desserts are small, who will not put it to a single touch; to win- or lose- it all."
Montrose Toast
2024/07/21 21:28:26
Subject: Re:sCratchBuilding CuStomiZing & CitbaShing: 16JUL: Main hull 100% Riveted
Thank you, Syro! Yep, tail section next, if for no other reason than a control fin got busted off in the move and I'm trying not to let 'repair jobs' linger any longer than necessary (I already have a Mountain of Plastic Shame, I don't want to add the Island of Misfit Minis to that). I'm thinking that the running lights aft will have their own battery box and switch in the tail cone, separate from the engine pod running lights and cabin/gondola lights.
It all goes as the spirit moves at the moment!
More follows soonest.
"He fears his fate too much, or his desserts are small, who will not put it to a single touch; to win- or lose- it all."