| Author |
Message |
 |
|
|
|
|
Advert
|
Forum adverts like this one are shown to any user who is not logged in. Join us by filling out a tiny 3 field form and you will get your own, free, dakka user account which gives a good range of benefits to you:
- No adverts like this in the forums anymore.
- Times and dates in your local timezone.
- Full tracking of what you have read so you can skip to your first unread post, easily see what has changed since you last logged in, and easily see what is new at a glance.
- Email notifications for threads you want to watch closely.
- Being a part of the oldest wargaming community on the net.
If you are already a member then feel free to login now. |
|
 |
2017/05/10 01:46:05
Subject: Re:Customizing, sCratchbuilding and Citbashing by Meer_Cat: Quick Product Review
|
|

[DCM]
Boom! Leman Russ Commander
|
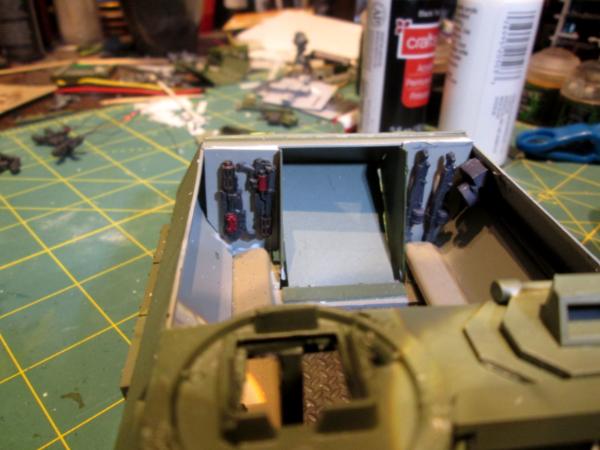
Some forward motion in completing the interior:
I finished up what I'm going to do as far as painting the driver goes. I knew the figure wasn't going to be very visible, but figured to put some modest effort into the eyes. As it turns out, the viewport is too small to see anything through, so really, the driver is a faceless shape huddled at the front of the fighting compartment. Here's a pic before the entombment:

And here are some views of the interior so far. The elevating rails are in place, the TC's seat is glued in, a comm center installed to the left and slightly behind the TC's seat and the troop benches installed. Everything needs to be weathered yet, and I have a ton of stowage to insert (need to fill up that too-wide fighting compartment with something- that something is going to be a heavy bolter and tripod for deploying in ground mount mode when the infantry squad is debarked):
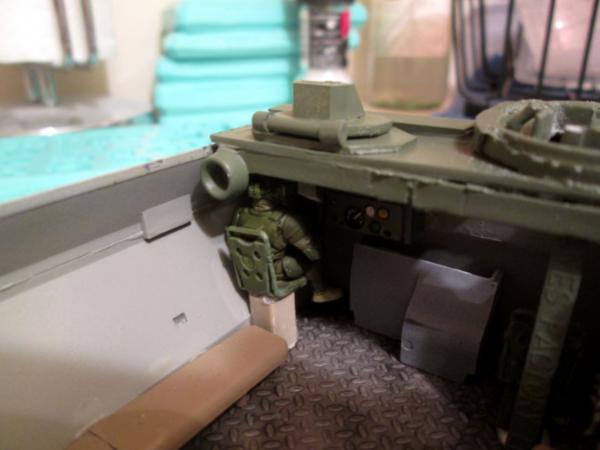

(Clearly, this elevating rail came from the Thames Factory, LLC!)

(The comm center to the right is a capacitor doo-hickey thing from the broken up sound card. The computer console I made was too big to fit into the vehicle, so it'll wait on my bench until another project comes that needs it.)
Once the interior is done I'm happy to move on to the exterior, adding a lot of exterior stowage, and finally the TC and the pintle mounted heavy bolter. As always, thank you for the opportunity to show off some of my work, and your comments, suggestions and constructive criticism is welcomed and, frankly, required if I'm to continue to improve.
More follows soonest.
|
"He fears his fate too much, or his desserts are small, who will not put it to a single touch; to win- or lose- it all."
Montrose Toast

|
|
|
 |
|
2017/05/10 17:26:31
Subject: Customizing, sCratchbuilding and Citbashing by Meer_Cat: Chimera conversion interior progress
|
|

Liberated Grot Land Raida
|
I like it. Interesting use of a broken computer card as well  .
|
A Squeaky Waaagh!!
Camkhieri: "And another very cool thing, my phones predictive text actually gave me chicken as an option after typing robot, how cool is that."'
Meercat: "All eyes turned to the horizon and beheld, in lonely and menacing grandeur, the silhouette of a single Grot robot chicken; a portent of evil days to come."
From 'The Plucking of Gindoo Phlem' |
|
|
|
|
2017/05/10 22:58:09
Subject: Re:Customizing, sCratchbuilding and Citbashing by Meer_Cat: Chimera conversion interior progress
|
|
[DCM]
Boom! Leman Russ Commander
|
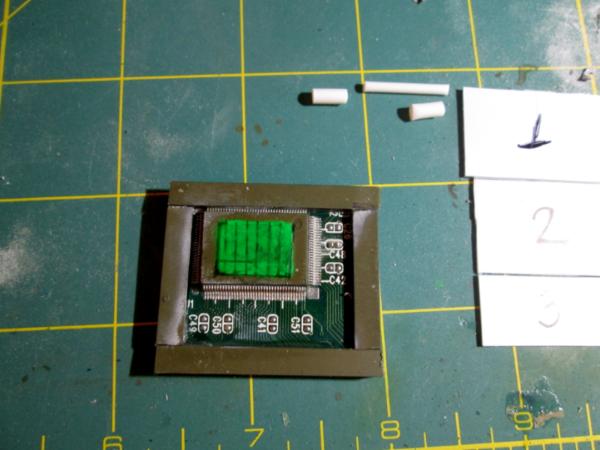
Thanks, CommissarKhaine! Here's the computer screen that was going to go into the TC's position, but there just isn't room. It's from another part of the sound card and I'm still in the process of painting it up. There are several projects on Dakka that I've seen where the modelers have really done a terrific job of painting the screens:
A bit of a slog, but another fairly productive evening and I've still got a bit more time to work: I've admired many of the projects here on Dakka where the modeler has built his or her own ramp hinges- some of you folks are extremely precise in your measurements and cuts! I've decided I'm going to try to make the rear troop ramp into the fighting compartment in three sections and try my hand at building my own hinges at the bottom. (I see much fiddly work in the future as I shave bits of sprue to act as spacers to keep the three ramp sections in the right angle relationship to one another, but that's for another day.)
Here's the main pieces laid out:

Here's the set of angles I'm trying to bridge (I'm cheating on the first section and covering the first angle with one piece):
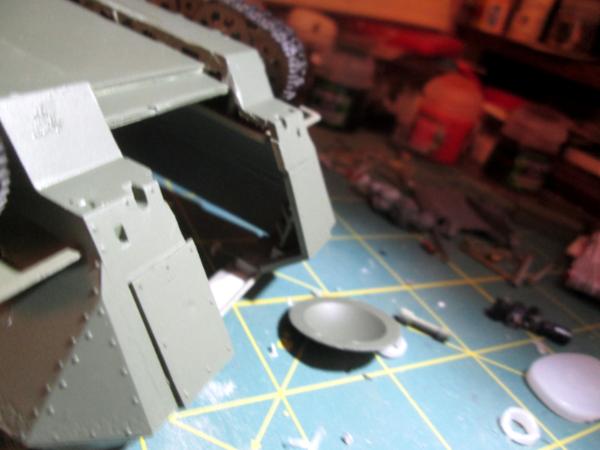
And here's the first half of the hinges glued/fused onto the hull. The other half is glued/fused onto the first ramp section. I wanted to get the hinges set before I attached the rest of the ramp, to keep things a bit easier to maneuver. I can't thank Camkhieri enough for the tip about bicarbonate of soda (baking soda) added to superglue/cyano-acrylite to act as an accelerant and hardener- to quote him 'it really works a treat'. These fiddly little bits would never stayed glued without it. Any excess baking soda that sticks on around the hinges just became the foundation for mud, when I get to weathering the underside. So far, most of the excess is easily brushed away:

Sorry that last pic is blurry, I'm still working with stand lamps and such (very 19th century) until management fix the track light. More follows soonest!
|
"He fears his fate too much, or his desserts are small, who will not put it to a single touch; to win- or lose- it all."
Montrose Toast
|
|
|
|
|
2017/05/11 20:23:35
Subject: Re:Customizing, sCratchbuilding and Citbashing by Meer_Cat: Chimera conversion interior progress
|
|

Gargantuan Great Squiggoth
|
Looking great. Nice work on the crew. The hinged door will be interesting, glad the tip is helping. I often leave the excess and paint it as rust, looks effective to me. Great work all round bud, look forward to seeing how you do with the door.
|
|
|
|
|
|
2017/05/11 22:41:12
Subject: Re:Customizing, sCratchbuilding and Citbashing by Meer_Cat: Chimera conversion interior progress
|
|
[DCM]
Boom! Leman Russ Commander
|
Thanks Cam! I've enjoyed/admired your work for awhile now, so your observations mean a lot. Ever since I saw your tutorial on making an entire Catachan jungle base/fighting tower using only the box and the sprues the infantry set came with I've closely followed your projects.
With the baking soda accelerant for superglue, the resulting weld looks a lot like a real armor weld on an actual fighting vehicle, So, like you, I plan to leave it rough in places and lightly wash as for rust- because that's how it looks in real life.
The scope of this project got completely away from me- originally I hadn't planned to make it a filled out interior with a working ramp or anything like that- just a buttoned up 'counts as' Chimera. But there were just too many opportunities to try things I've seen here on Dakka, so it's been a hoot.
I look forward to your observations and constructive suggestions!
|
"He fears his fate too much, or his desserts are small, who will not put it to a single touch; to win- or lose- it all."
Montrose Toast
|
|
|
|
|
2017/05/13 12:33:32
Subject: Re:Customizing, sCratchbuilding and Citbashing by Meer_Cat: Chimera conversion interior progress
|
|
[DCM]
Boom! Leman Russ Commander
|
A little bit of progress on the ramp before I get subsumed in pony-rescue ops for the weekend:
Here's a shot of the three panels glued up to form the ramp. I had to add the bit of round tube between to give them something to stick to, even using the baking soda/bicarbonate of soda accelerant. I used the bit of blue masking tape you see to help hold things at the correct angle whilst appIying the glue- it'll come off before painting (you Ork guys could maybe leave it on though- I think it looks suitably 'patchy' and ork-ish). reckon they'll look like additional hinged sections once painted up. The bottom section will stick up when the ramp is in the lowered position- the grunts will just have to jump a little as they run out the back. There is a bit of a gap between the edges of the ramp and the opening I've made in the back of the fighting compartment- I'll add a flange to either the ramp itself or the opening and that will take care of that.
You can see the second half of the hinge bits here on the ramp that will mate with the other half on the hull; a plastic tube used as a pin will join them together.
The opening itself was shaped and formed by gluing the original clamshell doors of the Hanomag in place- the space that left was pretty much perfect for the width I made the vehicle.


|
"He fears his fate too much, or his desserts are small, who will not put it to a single touch; to win- or lose- it all."
Montrose Toast
|
|
|
|
|
2017/05/16 02:08:22
Subject: Re:Customizing, sCratchbuilding and Citbashing by Meer_Cat: Chimera conversion interior progress
|
|
[DCM]
Boom! Leman Russ Commander
|
So, here's the ramp installation:
I set the hinge pins in the ramp cylinders and pushed them to the center, to allow the ramp to fit between the cylinders mounted on the hull:
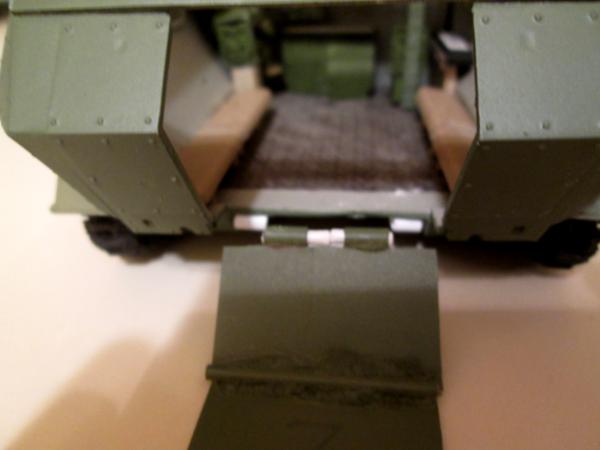
Then I fitted the ramp in place and pushed the pins outward, so that they engaged both the ramp and the hull cylinders- I can glue a small plug in place later to keep the pins from working back out:

Here's the ramp in the up position:
And down:

And having fiddled with it all evening, I don't think I'll keep it.
The upside is, it's proof of concept that my adaptation of the hinge idea I saw here on DakkaDakka works. The downside is, I just wasn't precise enough in the angles for this ramp to look good- too many angles that aren't _quite_ lining up. Tomorrow I may mess around with some trim and see what I can do, but really, I think it needs a single plane (much straighter, instead of three angled sections) ramp that fits the opening better. The bits of the hull that extend past the ramp on either side I can make into external fuel tanks, as in the upgraded M113's (the external tank is intended to blow out and away if hit, unlike the internal 90 gallon fuel tank- that armor is only an aluminum alloy, you know). We'll see.
I would be interested in all y'all's opinion: add trim to hide a multitude of sins, or redo the ramp as a straight, flat plane?
More follows soonest.
|
"He fears his fate too much, or his desserts are small, who will not put it to a single touch; to win- or lose- it all."
Montrose Toast
|
|
|
|
|
2017/05/16 03:47:06
Subject: Customizing, sCratchbuilding and Citbashing by Meer_Cat: Chimera conversion interior progress
|
|
Combat Jumping Rasyat
|
I think the singe piece ramp and fuel tanks is the way to go. I wasn't sure about the ramp turning back up in the first place.
|
|
|
|
|
2017/05/16 05:18:27
Subject: Customizing, sCratchbuilding and Citbashing by Meer_Cat: Chimera conversion interior progress
|
|
Pious Palatine
|
Man you've been busy. I like the idea of the command screen from an old sound card. Shame the hinge for the rear door didn't work out.
EDC
|
|
|
|
|
2017/05/16 06:11:02
Subject: Re:Customizing, sCratchbuilding and Citbashing by Meer_Cat: Chimera conversion interior progress
|
|
Gargantuan Great Squiggoth
|
Brilliant work on the hinge.
2 thoughts...
Keep it as is, trim it up, will look fine as it will look like it is armoured and structural. I originally thought you were going to hinge each section, which would be cool, but seeing it in place, it actually looks quite good as is, as the "lip" at the top of the door acts as a fighting screen once down, nice shield to hide behind whilst exiting the vehicle.
Single ramp sounds a better idea, add a slight trim at the top to act as a shelter for when the door is open, and you are golden.
Oh and just for being a pain, how about you do it as a split top and bottom, larger bottom becomes the ramp, top goes up and acts as shield. Nice chance to do some pistons.  
Don't be down on the efforts so far they are excellent and always a good learning experience. Even if you start from scratch on the rear door, nothing was wasted in the trying.
|
|
|
|
|
|
2017/05/16 20:46:16
Subject: Re:Customizing, sCratchbuilding and Citbashing by Meer_Cat: Chimera conversion interior progress
|
|
[DCM]
Boom! Leman Russ Commander
|
Thanks to all of you for the advice!
ChaoticMind: Agreed- I had my doubts about the last raised section of the ramp, didn't think it would be that steep. As a former grunt, the last thing I want to have to worry about is hurdling something at the end of my exit from what we fondly refer to as 'the moving big-a*sed target' at my highest rate of speed. But, it was worth trying just for the experience- this project is 'way different than I thought it would be at the beginning.
EDC: Glad you liked the 'command screen' idea. I actually saw a diorama of the interior of a space ship (must have been back in the early '90's, as I was fairly new to Warhammer 40k) in which the modeler used circuit boards for an entire wall of the venue- and had added peanut lights (pre-LEDs, of course); it was highly effective. As for the ramp, I got some great experience out of it so far, and have some great ideas to try next!
Cam: Thank you for all three ideas! I hadn't thought about hinging all three panels together- that would have been something to try (and I just might, on the next project that needs a ramp)! But I think I'm going to go with a combination of ChaoticMind's vote and your third idea and go with a split ramp. I've never tried to do pistons before, but have seen them done here on DakkaDakka.
So, tonight I'll get the old ramp off and try three variants:
1) Cut a piece of plasticard (actually a motel room card) to form a one piece, flat faced ramp that fills the whole opening or
2) Cut a piece of card that fills the bottom 2/3 of the opening and another piece that fills the top 1/3 and do the piston-driven split door thing or
3) Adapt the pieces I have already and do the 2/3 / 1/3 idea; looking at the model, the sections might be fitted in snugly with a little bit of trim if they were separated. This would give the bottom section a bit of angular curve to run down, with no high hurdles at the end
Thank you all again for your suggestions- I look forward to more. And more (pics) follow soonest.
|
"He fears his fate too much, or his desserts are small, who will not put it to a single touch; to win- or lose- it all."
Montrose Toast
|
|
|
|
|
2017/05/17 19:48:34
Subject: Re:Customizing, sCratchbuilding and Citbashing by Meer_Cat: Chimera conversion interior progress
|
|
[DCM]
Boom! Leman Russ Commander
|
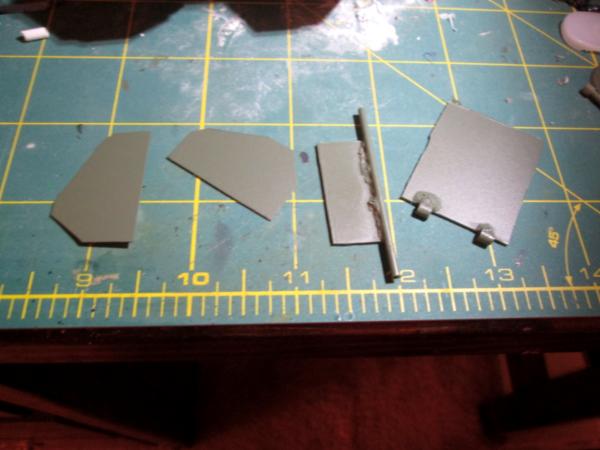
This is more like it!
Based on the advice from ChaoticMind, Evildoctorcheese and Camkieri, I went with a two panel, flat sloped ramp idea that came out looking much more like I wanted.
Cut the new ramp to size and glued the hinge cylinders on (the technique that seems to work best for me is to use Eileen's Tacky Glue to help temporarily hold the pieces the way I want them, then position baking soda exactly where I need and in the right depth/quantity and then drip superglue onto the bicarbonate of soda):

Here are the four pieces I needed to make the new approach work- the two wing pieces shape the entry way, the smaller flat panel is the upper ramp section that swings up and the lower ramp section that swings down. The upper ramp section only has one set of hinge cylinders that will fasten directly to the hull- the long hinge pin fastens to the ramp section and makes for a smoother, narrower join. You can also see where the baking soda/superglue mix welded the plastic pieces together; if done more neatly than I have here (although I'm getting better with practice) I think it will paint up looking like a real metal weld line:
Ramp sections in the closed position:

And ramp in the open position (from outside):

Here's the ramp in the open position looking from 'inside' the vehicle:
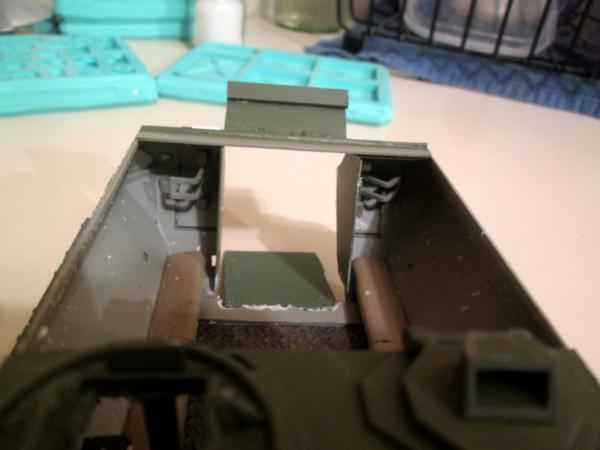
The chewed up lip you see right at the edge of the lower ramp section is where I had to grind out more room for the panel to swivel- the hinge line didn't quite line up. I've already painted a small trim piece to glue in on top of it and it looks fine. The cabinet spaces you see to either side of the ramp were going to be closed in, and from the outside fitted out to look like external fuel tanks. Seeing them as they are, I think instead they will become weapons lockers for meltaguns and flamers. The plastic bits in the upper area you see are the original kit's hinges for the clamshell doors on the Hanomag; I fitted them in with some idea of mounting special weapons (meltagun, flamer, grenade launcher) to them to fire out of the back to support the deploying infantry squad. They would have been controlled by the driver, who would be aiming them via a TV screen in his compartment, whilst the TC provided overwatch 360 from his station with the heavy bolter and/or the main gun.
I have yet to add some trim pieces to break up that flat, blank space and there are rivets- lots and lots of RIVETS that need to be added on, but I'm happy with how it's going now and can actually see the end in sight (sooner or later- as some say, "the destination is nothing, the journey is everything").
Thanks again all for the suggestions- I'm very interested to hear your opinion of how this came out. More follows soonest.
|
"He fears his fate too much, or his desserts are small, who will not put it to a single touch; to win- or lose- it all."
Montrose Toast
|
|
|
|
|
2017/05/17 20:25:53
Subject: Re:Customizing, sCratchbuilding and Citbashing by Meer_Cat: Chimera conversion interior progress
|
|
Combat Jumping Rasyat
|
Ah yes, the joy of 40K. Humans can't remember how to weld, therefore: ALL THE RIVETS!
One advantage in letting you do it first, I can learn from your mistakes. 
|
|
|
|
|
2017/05/17 21:02:47
Subject: Re:Customizing, sCratchbuilding and Citbashing by Meer_Cat: Chimera conversion interior progress
|
|
[DCM]
Boom! Leman Russ Commander
|
Rangers lead the way ChaoticMind! Just don't follow too close if all you see is pieces of a pair of boots- it means I found the landmine the hard way!
|
"He fears his fate too much, or his desserts are small, who will not put it to a single touch; to win- or lose- it all."
Montrose Toast
|
|
|
|
|
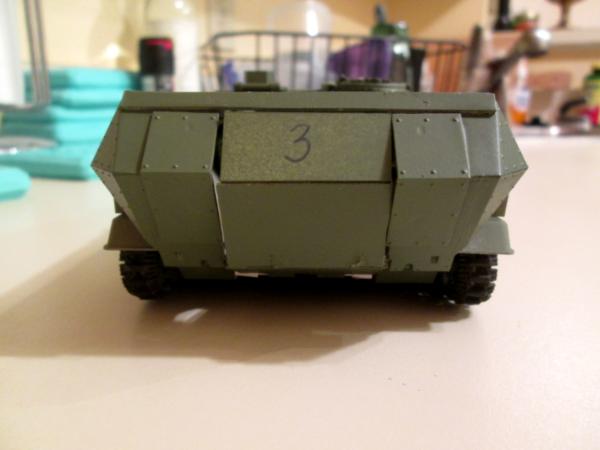
2017/05/18 10:03:49
Subject: Customizing, sCratchbuilding and Citbashing by Meer_Cat: Chimera conversion Ramp v2 fitted on
|
|
Gargantuan Great Squiggoth
|
Excellent work, looks perfect.
|
|
|
|
|
|
2017/05/18 13:07:09
Subject: Re:Customizing, sCratchbuilding and Citbashing by Meer_Cat: Chimera conversion Ramp v2 fitted on
|
|
[DCM]
Boom! Leman Russ Commander
|
Thanks Cam! Last night I needed a break from plasticard, so wound up mostly painting the stowage and other bits that will get attached to the hull last. But really, the next step is to fit the pistons to the two ramp sections. I'm having a ball with the plasticard tubes (round and square) that I got as a deal bundle on eBay- the sizes all nest inside one another, and the possibilities are _very_ interesting.
I'm also thinking that, since the footprint on this APC is the same width but longer than a Chimera, it needs a reason for being bigger. So if I make it a command and control vehicle, that explains the larger size (need room for extra radios and antennas and bling). Which means I can redesign the fighting compartment to include the computer screen, a workstation and several radios. Instead of being the transport for the panzerjaeger grenadier squad, it becomes the transport for a platoon or even company command squad.
I have another hanomag kit, I can apply a lot of what I've learned here in building it and would make it a slight bit narrower (I like the proportions on Inso's build) and a lot shorter. Frankly, I think if you shortened the nose a bit on a hanomag, you have something that looks a great deal like a Taurox.
Thanks for all the encouragement, and all the inspiration from your work! Automatically Appended Next Post: I needed smoke launchers for my Panzerjaeger APC and didn't have any in my bits box, so in addition to base painting some doo-dads last night I also scratchbuilt these. I took the offcuts from the axles for the drive wheels of the Hanomag (but you could use pieces of sprue or plasticard tubing as well):

Shaved the base end of the stem (on both sides for the middle launcher, on just one side for the end launchers):

Glued them together:
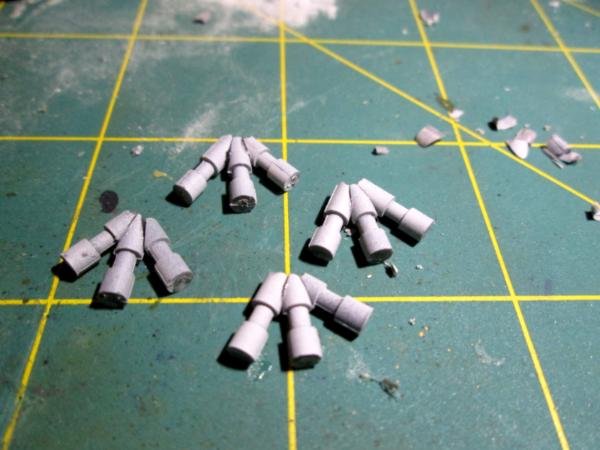
And added a rim made from plasticard tubing:
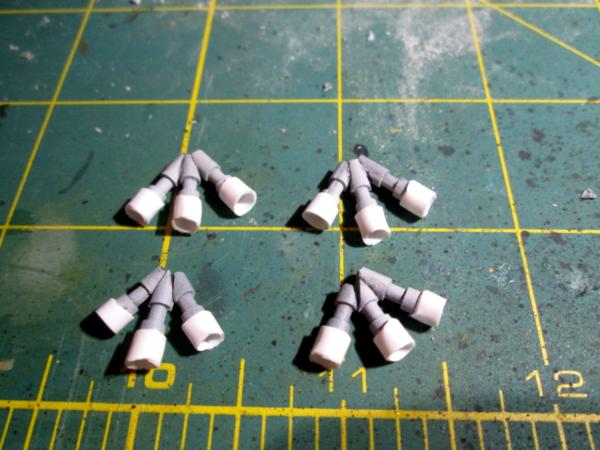
A small wedge of flat card under them to give them some elevation, primer, basecoat of Pavement Black, drybrush of Boltgun Metal, a little Nuln Oil and Bob's your uncle- smoke launchers.
I hope this comes in useful for someone, and thank you for the chance to show off some of my work. I look forward to your comments and constructive criticism.
More follows soonest.
|
|
This message was edited 1 time. Last update was at 2017/05/18 21:13:41
"He fears his fate too much, or his desserts are small, who will not put it to a single touch; to win- or lose- it all."
Montrose Toast
|
|
|
|
|
2017/05/24 00:25:05
Subject: Re:sCratchbuilding and Citbashing by Meer_Cat: Chimera conversion- scratchbuilt smoke launchers added
|
|
[DCM]
Boom! Leman Russ Commander
|
Lots of progress in many areas- not many worth photographing until they're slightly more assembled/installed.
What I can show here is a shot of the panels that close in the rear 'wings' of the fighting compartment that were created when the trim went in for the crew ramp. These are to represent weapons lockers, or racks:

And here they are installed (you can see the lower ramp section lowering mechanism in the upper right hand side- a better shot follows when the interior is finished, which is 'soon now'):
I've also gotten work done on finishing the smoke launchers (sure they were 'done' before, but now they're OVERDONE), plus the TC and the flag bearer.
Thanks for the chance to show off some of my work, and your comments, suggestions, constructive criticism are most welcome.
More follows soonest.
|
"He fears his fate too much, or his desserts are small, who will not put it to a single touch; to win- or lose- it all."
Montrose Toast
|
|
|
|
|
2017/05/24 01:33:51
Subject: sCratchbuilding and Citbashing by Meer_Cat: Chimera conversion- interior is gettin there
|
|
Ragin' Ork Dreadnought
Deep in the Outer Boroughs of NYC
|
Shouldn't those machine guns have trigger handles?
I really like the ramp fix you've done. And I like the details on the interior. Those triggerless guns are just nagging at me for some reason.
|
|
This message was edited 1 time. Last update was at 2017/05/24 01:35:14
|
|
|
|
|
2017/05/24 10:11:03
Subject: Re:sCratchbuilding and Citbashing by Meer_Cat: Chimera conversion- interior is gettin there
|
|
[DCM]
Boom! Leman Russ Commander
|
Hey Warboss! And thank you for the feedback. The machine guns actually do have triggers and guards, but the drum magazine obscures them in the pic from the angle I used to shoot from. This pair are from the DreamForge Panzerjaeger set, and the detailing on them is pretty fine. Is there a fix you could suggest that would make the pieces look more balanced?
|
"He fears his fate too much, or his desserts are small, who will not put it to a single touch; to win- or lose- it all."
Montrose Toast
|
|
|
|
|
2017/05/25 22:43:19
Subject: Re:sCratchbuilding and Citbashing by Meer_Cat: Chimera conversion- interior is gettin there
|
|
[DCM]
Boom! Leman Russ Commander
|
A small component finished off:
I think I mentioned very early in this thread that I have a tendency to overbuild things. For instance, this transport (Tamiya 1/35 scale Hanomag kit conversion) was supposed to be a closed-compartment, fairly straightforward job. But as I was busy cutting the hull sections apart the possibilities of kitting out the interior immediately leapt to mind, and the scope of the project got a lot bigger, a lot faster. Don't get me wrong, I'm having a blast nd learning a lot as I go, with the help of the advice, suggestions and constructive criticism of all you' ns Dakkanauts.
So, I wanted to add smoke launchers (as a Chimera would have), but didn't have any bits floating around, so I scratch built something that I think looks pretty good out of bits of sprue laying around on my desk. Naturally, that was okay at first, but after looking at them twice, I decided I could improve on the basic design (if it isn't Over-worked, it isn't worked enough, amirite?)
I found these Swarovski pearl beads for cheap on the clearance shelf at my local Michael's (these are 3mm):

Glued them into the launcher tubes (the empty cells had too much glue from adding the rims, so they are now either expended tubes needing reloading, or non-functioning units in need of repair or replacement):

I braided four 'wiring harnesses' out of 28 gauge wire. I don't know if I like the red, black and blue colors the wire came in, I may wind up painting it so the colors are more consistent with the matte of the rest of the vehicle- you'll be able to see a bit better in the last photo in this set. The armored vehicles I crewed on in the Army had smoke launchers, and their wiring ran right through the armored hull to complete the actuator circuit:

I drilled some 1/64th inch holes at the base of the tubes (these finger drills are from Micromark, and I've finally found something that I can control well enough to drill very small holes like this, and also drill out gun barrels, etc. I may do a product review later when I'm done with the Hanomag conversion):

I inserted the braided end of the harness into the small tube that elevates the smoke launcher unit, trimmed the free ends to shorter length, crimped a kink into the end, inserted them into their respective holes (one per launcher tube), dropped a small bead of superglue on to hold them and bob's your uncle- smoke launchers with the wiring actuators in place:

Two questions I'd like your advice on:
Should the wires be primed and painted because they're too glossy, or are they okay as is?
Should the smoke 'cartridges' be painted grey, green and or red, to indicate the color smoke they produce when discharged?
Thank you for the opportunity to show some of my work, and more follows soonest.
|
"He fears his fate too much, or his desserts are small, who will not put it to a single touch; to win- or lose- it all."
Montrose Toast
|
|
|
|
|
2017/05/25 22:54:37
Subject: sCratchbuilding and Citbashing by Meer_Cat: Chimera conversion- smoke launchers 'improved' 5/25
|
|
Ragin' Ork Dreadnought
Deep in the Outer Boroughs of NYC
|
To cut the gloss on the wires you could hit them with an acrylic wash (virtually any color watered down). I recommend painting the shell ends with some sort of color indicator if for no other reason than to add some color to the pieces.
As to the machine guns - virtually every weapon in the 40k universe has a pistol grip. If you add a shirt stick to the spot where the grip is or would be I think it would look better. But you also have the option of ignoring my input. I was feeling cranky when I made my comment and I took it out on your detail work. Sorry about that. They're a small detail amongst many that makes this build awesome and not adding a pistol grip to the dreamforge details you've added in isn't going to break the effect of the overall build.
|
|
|
|
|
|
2017/05/26 00:12:23
Subject: Re:sCratchbuilding and Citbashing by Meer_Cat: Chimera conversion- smoke launchers 'improved' 5/25
|
|
[DCM]
Boom! Leman Russ Commander
|
Hi Warboss!
I like your suggestions for the smoke launchers themselves- I was pretty sure those bright wires would need some dulling down and I can make a wash easily to handle that, and still have some of the underlying color show through.
Your observation on those machine guns is spot on! I looked them over when you made the comment (and cranky or not- I asked for input and as it turns out- you are right) and I saw the trigger housings, but couldn't put my finger on what wasn't 'quite right'.
Now that you call 'em out- of course the pistol grips are missing- it's very plain, I just couldn't see it before. They're made so you can attach them directly to a DreamForge figure's hand, so no grip is molded on. 'In the rack', as they are here, they need a grip added to look balanced. I'm going to do that- just have to figure out how to maneuver the pieces into that tight space to get it done.
But if I've taken the time to do the build well up to this point, it would be petty not to continue to do it 'right'. Otherwise, I might as well just glue the top armor on and not worry about it.
I appreciate your input and look forward to more!
More follows soonest.
|
"He fears his fate too much, or his desserts are small, who will not put it to a single touch; to win- or lose- it all."
Montrose Toast
|
|
|
|
|
2017/05/26 00:19:26
Subject: sCratchbuilding and Citbashing by Meer_Cat: Chimera conversion- smoke launchers 'improved' 5/25
|
|
Ragin' Ork Dreadnought
Deep in the Outer Boroughs of NYC
|
Those dreamforge minis are quite nice in that, when assembled, they actually look like they are carrying a firearm and not a ridiculously large pistol *cough* space marines *cough* bolters *cough*, but that also means that the guns on the sprue come sans grip.
|
|
This message was edited 1 time. Last update was at 2017/05/26 00:20:15
|
|
|
|
|
2017/05/26 01:20:50
Subject: Re:sCratchbuilding and Citbashing by Meer_Cat: Chimera conversion- smoke launchers 'improved' 5/25
|
|
[DCM]
Boom! Leman Russ Commander
|
|
"He fears his fate too much, or his desserts are small, who will not put it to a single touch; to win- or lose- it all."
Montrose Toast
|
|
|
|
|
2017/05/31 02:02:34
Subject: Re:sCratchbuilding and Citbashing by Meer_Cat: Chimera conversion- smoke launchers 'improved' 5/25
|
|
[DCM]
Boom! Leman Russ Commander
|
I had a good block of time to work tonight and got a major sub-assembly done: The remotely operated turret gun system.
I started with one of those document hanger clasp things that has pins to stick into the fabric of certain kinds of cubicle partitions and a couple more bits/gubbins from the sound card. I drilled a hole into the back of the sound card bits so as to use the pins to keep everything lined up overall. The short lengths of plasticard tubing were fitted onto the pins to act as spacers between the back of the clasp and the gubbin:

Next I fixed a bigger diameter piece of tubing into the face of the clasp (which will be the underside of the gun system) to act as a pivot. I started to go crazy making a bunch of complicated bits to allow for rotation of the turret and elevation of the guns, and then decided I actually wanted to get this conversion done sometime this decade and went with this simpler approach:

The guns themselves are tri-barrels (a' la Hammer's Slammers) but can represent gatlings, mini-guns or scatter lasers- whatever the gaming group will allow. These are built up using the sound card bit, three lengths of small diameter tubing and three (not two as pictured) retaining bands:

Here you see a partial basecoat of WWII US Bomber Green, but more importantly, the antenna bases for the all-important whip antennas. These were made by sawing off the bottoms of the rocket/missile units from one of my Robogear kits that also provided the drum magazines for my 'counts as Hydra' conversion earlier in this thread. I inserted short lengths of brass tubing to act as supports/guides for the piano wire that will form the HF whips:

Here's another angle of the (mostly) finished gun system. The base is a part from a novelty book-light gotten from the Dollar Tree:
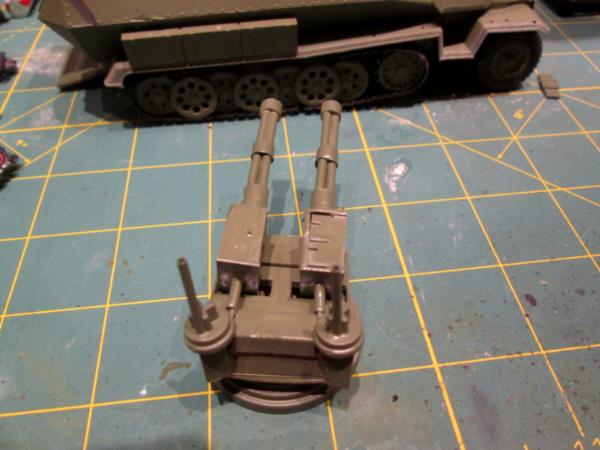
And here's a last shot with the gun system test fitted onto the top deck of the vehicle (going to have to think of a suitably heroic/mythological name for this beast). The idea is that it is operated from inside the fighting compartment, so I reckon I'm going to have to build a weapons station in. Fortunately, Camkierhi has shown the way on how to build good looking computer workstations and screens, so I'm going to be following his lead to make the weapons console:

There are still additional bits to add to everything (not just the weapon turret), but I can actually anticipate beginning properly painting and weathering things in the near future.
I'm very pleased with what I've gotten done, and hope to have more to show you soon. Thank you in advance for your constructive criticism, comments and suggestions.
|
"He fears his fate too much, or his desserts are small, who will not put it to a single touch; to win- or lose- it all."
Montrose Toast
|
|
|
|
|
2017/05/31 04:03:39
Subject: sCratchbuilding and Citbashing by Meer_Cat: Chimera conversion- turret guns built 5/30
|
|
Combat Jumping Rasyat
|
Looks really good. Wish I could offer more but all I can think of is fine detailing that would drag the build into eternity.
|
|
|
|
|
2017/05/31 08:45:36
Subject: sCratchbuilding and Citbashing by Meer_Cat: Chimera conversion- turret guns built 5/30
|
|
Gargantuan Great Squiggoth
|
Looks pretty darn brilliant to me bud. I would like to see some rivets but then again the whole vehicle is a smooth finish so it fits in well. Brilliant use of materials, excellent work.
|
|
|
|
|
|
2017/05/31 09:50:25
Subject: sCratchbuilding and Citbashing by Meer_Cat: Chimera conversion- turret guns built 5/30
|
|
[SWAP SHOP MOD]
Killer Klaivex
|
Your work is really very imaginative. Do you ever do entire scratchbuilds completely from plasticard?
|
|
|
|
|
|
2017/05/31 11:43:08
Subject: Re:sCratchbuilding and Citbashing by Meer_Cat: Chimera conversion- turret guns built 5/30
|
|
[DCM]
Boom! Leman Russ Commander
|
Thank you all for the comments and observations:
ChaoticMind- please make any suggestions for detailing you might have; if they don't get used on this piece, they're very likely to get used on another project. I have some more detailing I want to do- louvers on the engine cowls, hinges and handles on the access panels and a lot of personal gear slung around- not to mention a TC and possibly a flagbearer riding topside, so there is plenty of time to add other nice touches as well. And there is all the painting and weathering to do yet, also.
Camkierhi- thank you for the encouragement throughout this build! I've never spent so much time on a single model before and am quite enjoying the opportunity to try new things. I've seen guys like Klaus-Not Santa build gatlings in their blogs and was itching for a try myself. At the rate I'm going, I'll be giving OSL a try on this model, rather than one in the future. I was definitely planning rivets, LOTS of rivets. I made a bunch using a leather punch, but the smallest that it will produce is 1/16" and I'm not sure they would blend well with the ones that are molded onto the model already. The fix there is to just cover all the molded rivets with my punched rivets. I'm also thinking about a way to make my own 'rolling riveter' like the aircraft modelers use. To buy one is too much, but if I could simulate the look of the semi-recessed rivets that are already molded on, that would look best (as I see it now- that can always change). But there will be more rivets.
Hi Ketara! I haven't yet tried a total scratch build, but with the skills and competence I'm developing with these conversions, that day is coming closer all the time. I'm very impressed with a lot of the scratch builds I see here on Dakka, which is what got me messing about with major conversions to begin with. I like to think of it as being in Phase 2 on a scale of 3. Phase 1 was buying a kit and building it pretty much as the directions indicated. 1.5 was adding some bits of my own where they would fit. Phase 2 is making significant changes to something that already exists, either as a kit or something that looks like part of something else (like using the picture frame for the basis of the firebase). I may scratch build subassemblies- like the smoke launchers- but am still relying on something to give the basic look tot he piece. Eventually I'm sure I'll move into Phase 3, where I'll design/imagineer my own thing and build it from the wheels up from raw material.
There's just so many possibilities! When finished with this conversion, I'm not sure what to go onto next. I have several more vehicle kits- all awaiting conversion into something cool. Not to mention many figure sets waiting, like more Eisenkern troopers to fill out the Headquarters Platoon, or Wargames Factory Greatcoat Stormtroopers to build another line squad. Plus some Beyond the Gates of Antares troopers (I'm thinking about doing a Rough Rider squad built out of their jet-bike models- I can find them for quite good prices sometimes on eBay). But I've also got a WWII Soviet B4 203mm tracked howitzer kit that is just begging to made over into a Basilisk.....
|
|
This message was edited 2 times. Last update was at 2017/05/31 11:47:04
"He fears his fate too much, or his desserts are small, who will not put it to a single touch; to win- or lose- it all."
Montrose Toast
|
|
|
|
|
2017/05/31 16:25:51
Subject: Re:sCratchbuilding and Citbashing by Meer_Cat: Chimera conversion- turret guns built 5/30
|
|
Longtime Dakkanaut
|
Hey Meer, been lurking here for a bit. Have to say your conversion work is outstanding, I am always in awe of people who can scratch build. Looking forward to the finished project.
|
|
|
|
|
|
|


