| Author |
Message |
 |
|
|
|
|
Advert
|
Forum adverts like this one are shown to any user who is not logged in. Join us by filling out a tiny 3 field form and you will get your own, free, dakka user account which gives a good range of benefits to you:
- No adverts like this in the forums anymore.
- Times and dates in your local timezone.
- Full tracking of what you have read so you can skip to your first unread post, easily see what has changed since you last logged in, and easily see what is new at a glance.
- Email notifications for threads you want to watch closely.
- Being a part of the oldest wargaming community on the net.
If you are already a member then feel free to login now. |
|
 |
2017/02/09 02:42:48
Subject: sCratchBuilding CuStomiZing & CitbaShing: 20JAN: back baby! and more good work
|
|

Boom! Leman Russ Commander
|
 Hello all! I've been following DakkaDakka for more than a year now, and learned a lot and enjoyed the projects that you all are putting out. I've been impressed greatly by the encouragement and truly constructive criticism that so many of you have provided others and am encouraged to put some of my own work out there, with hopes of getting some constructive criticism and critiques myself.
I've been building model kits since I was 11 (more than 40 years ago!) but it wasn't until I got into Rogue Trader that I was really encouraged to start 'deviating from the instructions'. At that time, Games Workshop/Marauder Miniatures/Citadel just didn't have that many figures or vehicles. I built the deodorant stick landspeeder that was featured in the original rules book and also built my first Baneblade when the article came out in White Dwarf. I kitbashed/scratchbuilt a Space Marine (Kierkegaard Volunteer Rifles Chapter) before I knew what one was supposed to look like (the terminators that carry them hadn't been released yet). In retrospect, my kitbash didn't look very much like a storm bolter, but it was fun to build and it got used in games quite a bit; I still have the figure.
So, my blog/thread is focused mostly on things I've made to simulate something not yet released, or because it was cheaper or because I just could. I hope you find some of my things interesting and will share your opinion.
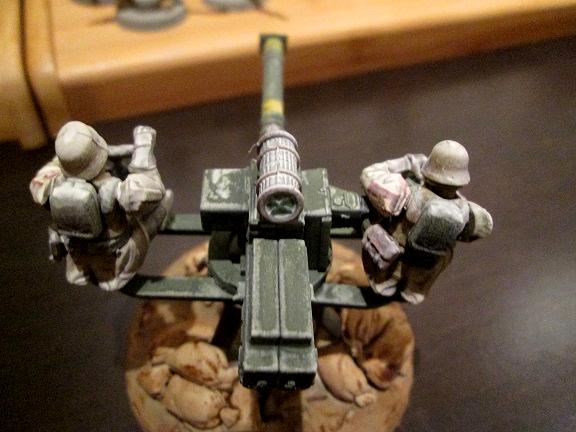
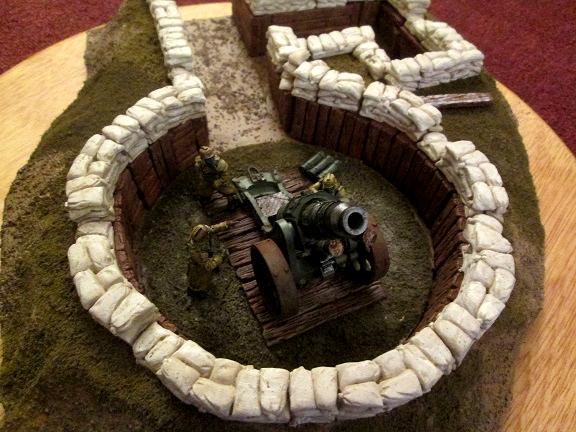
First up is an 'Aegis Line Autocannon & Crew'. This was built entirely with figures, weapons and sprue that came in the old Wargames Foundry Greatcoat Troopers Heavy Weapons kit. It is patterned after a WWII-era 40mm Bofors gun and was a lot of fun to put together. The gun is part of my Imperial Guard army and belongs to the 1st Battalion, 7th Infantry (The Lucky 7's). The legs of the gun mount that you can see here were made by making a pyramid of the three mortar tubes that came in the kit.
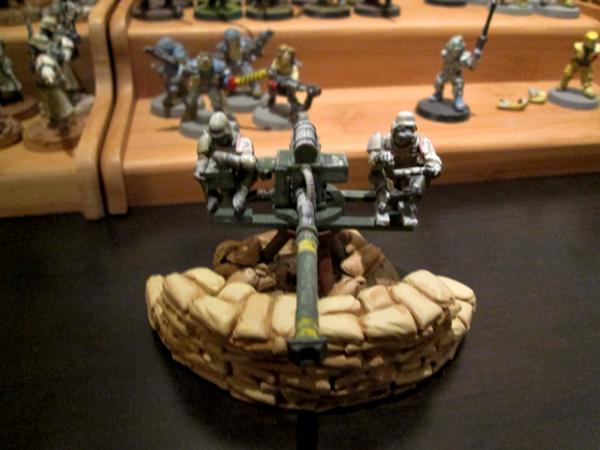
Here's a closer shot of the Gunner. His control box for aiming the autocannon is the power supply for the lascannon and the optics you see behind him are two of the drum magazines for the twin gatling gun glued together.
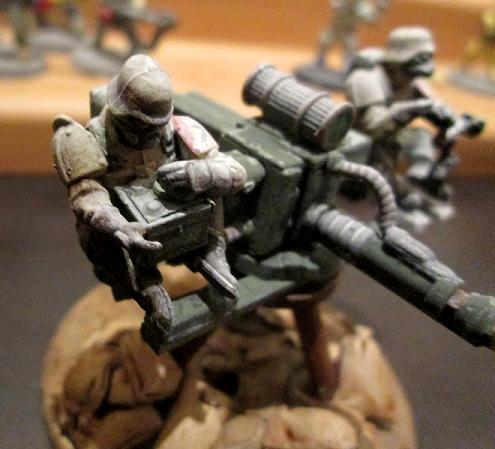
Next is the Trainer. He controls left and right movement of the gun and elevation. His controls are modified from the bipod for the mortar from the Wargames Foundry kit. You can see the pivot point for the gun system in the center of the picture- this was made from the circular boss that keeps the different sprue frames from crushing together in the box.

Finally, here's a shot looking over the Gunner and Trainer's shoulders. The autocannon is primarily made up of the receiver from the gatling gun, the body and barrel of the lascannon and a missile launcher, with some odd other bits from the same kit. The gun mount is entirely made from sprue pieces from the kit. The sandbags are made from Mold #340 by Hirst Arts.
I look forward to your comments and hope to put some more material up soon- I've several with actual WIP shots that might be more helpful and fun.
|
|
This message was edited 433 times. Last update was at 2026/01/22 01:05:00
"He fears his fate too much, or his desserts are small, who will not put it to a single touch; to win- or lose- it all."
Montrose Toast

|
|
|
 |
|
2017/02/09 23:11:47
Subject: Re:Customizing, sCratchbuilding and Citbashing by Meer_Cat
|
|
Boom! Leman Russ Commander
|
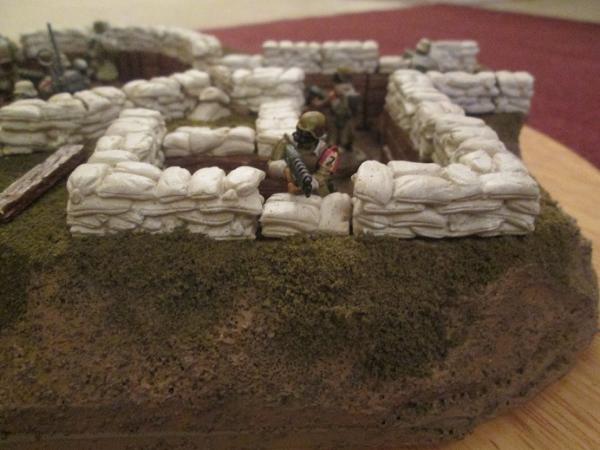
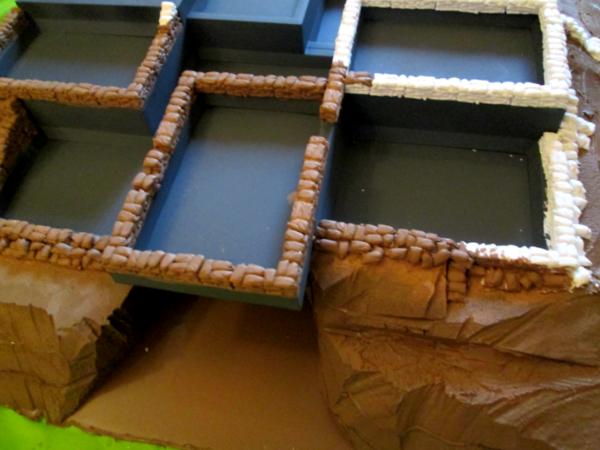
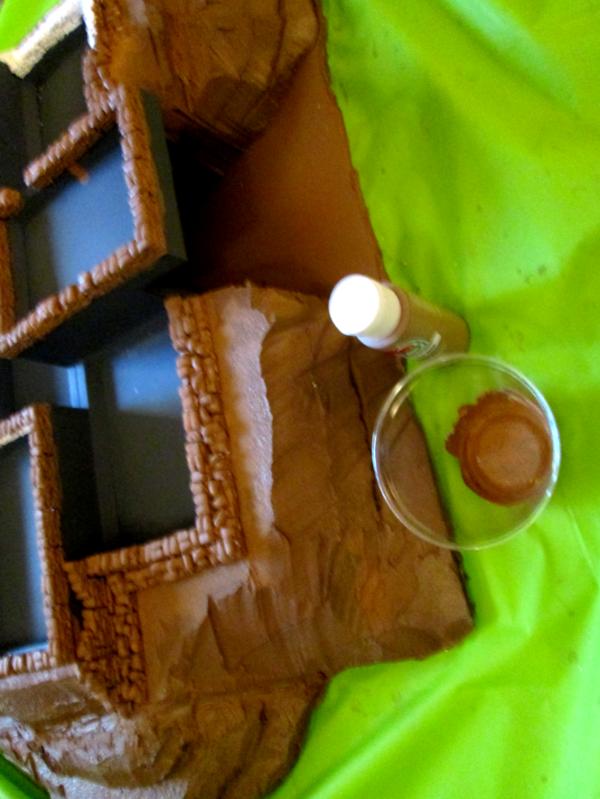
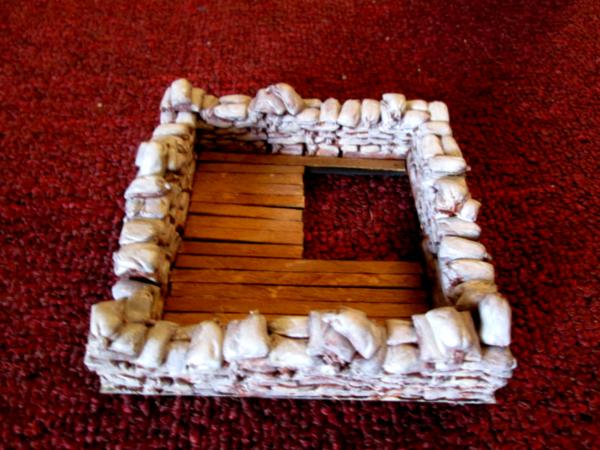
This is an overhead view showing a trench strong point. I intended it for artillery, and you can see the ammo cutter's position in its own revetment. It could also be a platoon command post and the ammo cutter's space becomes a flanking machinegun position. The basic material is pink foam board on a base of poster board, covered with a thinned solution of artist's media gel, painted and flocked. The sandbags are from Hirst Arts Mold# 340.
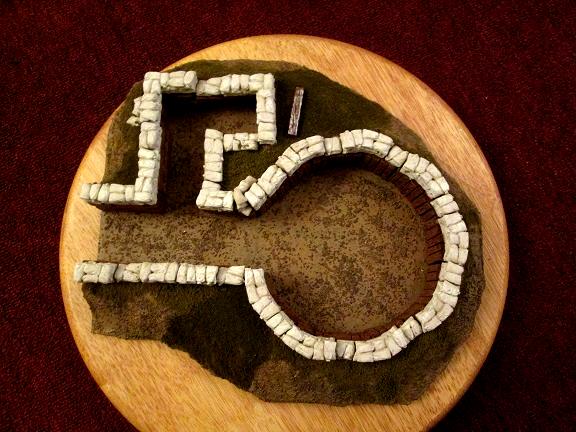
This is the first piece shown in my blog, and yes, I made the walls of the trench strong point the right height so the autocannon could fire over the top.

This artillery vignette is based on an old music CD or movie DVD. The space in the strong point was cut to exactly fit a base with that diameter.
Here's an overhead shot showing the piece being used by infantry. I intend this piece to be able to marry up with others to create configurable terrain for gaming.

Another shot showing infantry occupying the piece. The sandbags are Hirst Arts Mold# 340, the wooden trench wall pieces are Hirst Arts Mold# 222. Next time I make one of these, I'll recess the sandbags into the lip of the 'earth' and wash them with a diluted solution of plaster to fill in the gaps between molded pieces.
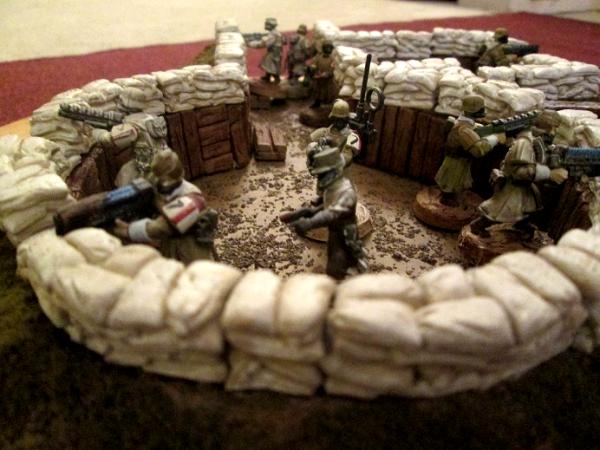
Here's a trooper from the Lucky 7's (1st Bn, 7th Infantry) occupying the ammo cutter's space.
Here's a Quad Gun occupying the strong point, complete with camo netting. The netting supports are made from coffee stir straws with engineering t-pins inserted at the top.

I hope you enjoyed seeing some of my pieces and I look forward to your constructive criticism.
|
"He fears his fate too much, or his desserts are small, who will not put it to a single touch; to win- or lose- it all."
Montrose Toast
|
|
|
|
|
2017/02/14 01:23:15
Subject: Re:Customizing, sCratchbuilding and Citbashing by Meer_Cat
|
|
Boom! Leman Russ Commander
|
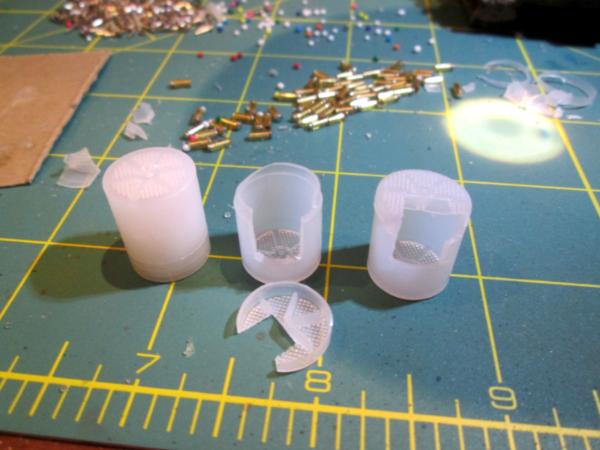
This next project is a genuine scratch build. I noticed that the pull-rings from a half gallon carton of milk looked a lot like a tank hatch- especially when the ring part was left attached to the plug part of the item. This series of pictures shows how to use the ring as the basis for a quick and easy and fairly realistic hatch.
The pull rings from half gallon milk cartons are made from what used to be called 'engineering plastic'- it's very slippery and many paints won't stick. I use Rust-o-leum spray paint to prime them, then hobby acrylics to paint.
I used a hobby punch to make rivets- on these hatches they are 1/16 inch, and glued them on at regular intervals around the rim. The valve stem on the top is made from a very short piece of 1/8 inch coffee stir straw with a slightly larger diameter 'rivet' on top of that (I think it is 3/16 inch). The hinge you see is a piece of thin sprue inserted into two more very short pieces of coffee stir straw.
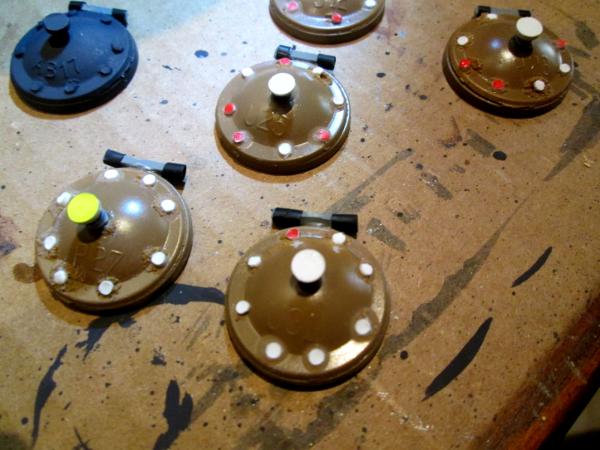
A coat of grey acrylic paint and it's really starting to look like something! I like the molded on serial number from the pull ring itself- makes it look like a real metal casting.

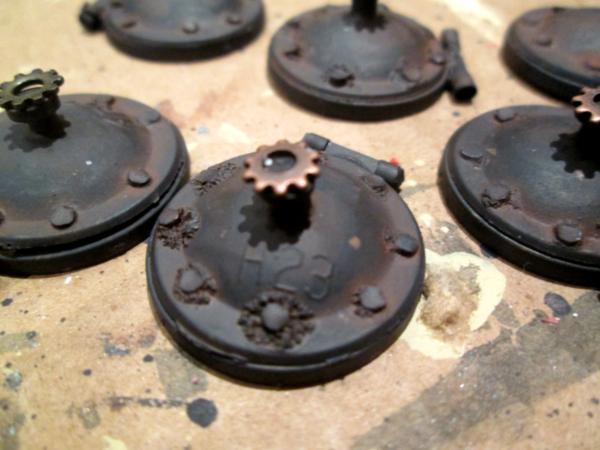
I hit the hatch with a heavy coat of rust wash- I use Micro-mark's "Rust'n'Dust" 4 step solution. The vale gear on top is actually a steampunk gear I got from Michael's- a package of about 100 cost me around $4.00. You can also see in this picture how the superglue I used to stick the rivets on ate at the plastic a bit and enhanced the 'rust-eaten' effect.
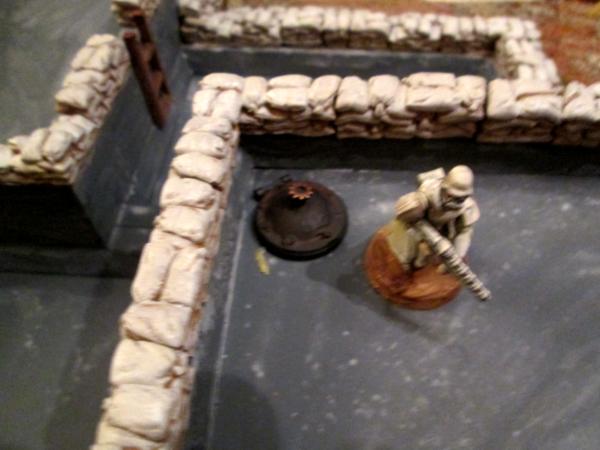
Here's a shot of a completed hatch on an Imperial firebase I built (shortly to be uploaded).

Here's another shot of a hatch in the firebase, with an Imperial Guardsman for scale. The figure is one of the Wargames Foundry Greatcoat Troopers, painted as a member of the Lucky 7's.
Hit them with a coat of matt varnish and that's it. I think these are handy for terrain building, as I've used them here, but also for tanks, other vehciles- especially orkish ones- anything that needs a hatch. I hope you enjoyed another piece of my work and I look forward to your feedback.
|
|
This message was edited 1 time. Last update was at 2017/02/14 01:28:41
"He fears his fate too much, or his desserts are small, who will not put it to a single touch; to win- or lose- it all."
Montrose Toast
|
|
|
|
|
2017/02/14 01:57:21
Subject: Customizing, sCratchbuilding and Citbashing by Meer_Cat
|
|

Gargantuan Great Squiggoth
|
Nice work, intrigued and subbed.
The hatches look great.
|
|
|
|
|
|
2017/02/16 00:05:40
Subject: Re:Customizing, sCratchbuilding and Citbashing by Meer_Cat
|
|
Boom! Leman Russ Commander
|
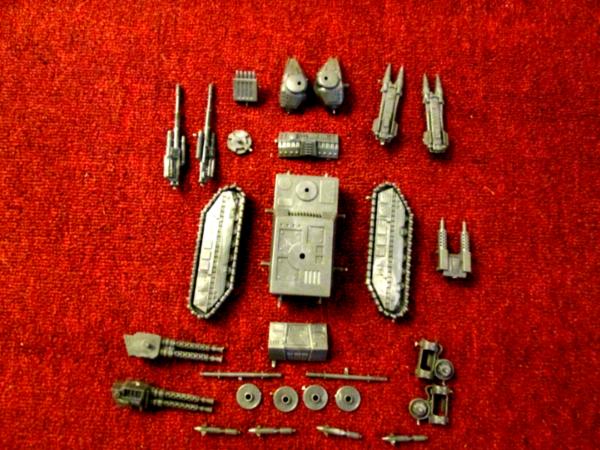
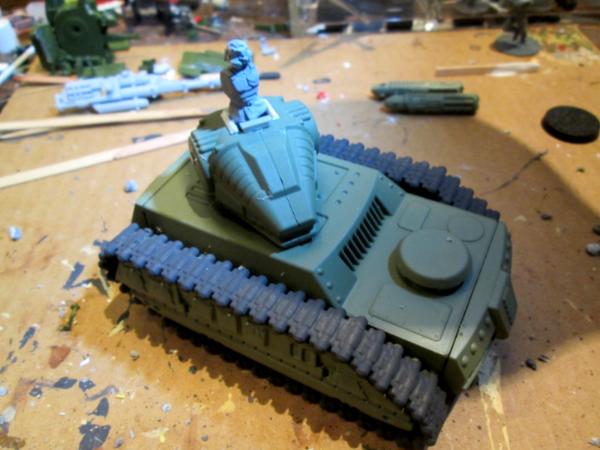
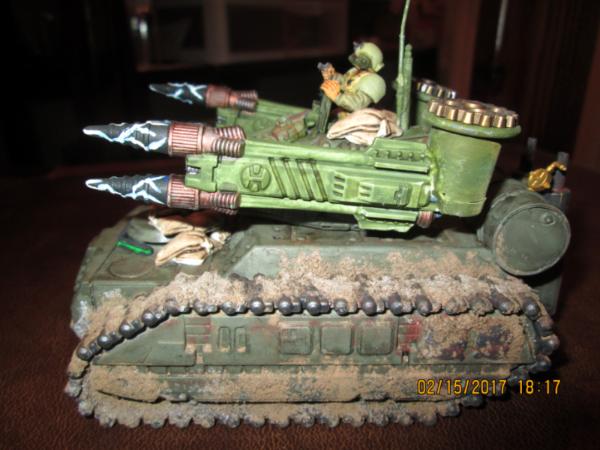
This next project I took a lot of pictures as I was going along, as I intended to post it up as a WIP. I very much liked the look of the Russian Bronekorpus tanks- these are the same folks that make the Robogear line of kits. At US$8.00, I bought two amongst some other things I couldn't live without. Here's the first stages of converting their flak tank into a 'counts-as-Hydra'. Overall, the Bronekorpus model is a bit shorter and narrower than a Chimera/Hydra, and even with the high turret, the quad guns are going to be lower as well. But it was a very fun project to make, and I'm still figuring out what to do with the other kit. It'll be something similar, but different enough to post here. I used almost all of the parts that came with the flak tank kit, plus a few from other Robogear kits, some Games Workshop bits and a few sandbag castings from Hirst Arts. Plus bits and bobs from Michaels, of course!
Here are the basic tank pieces that come with the kit:
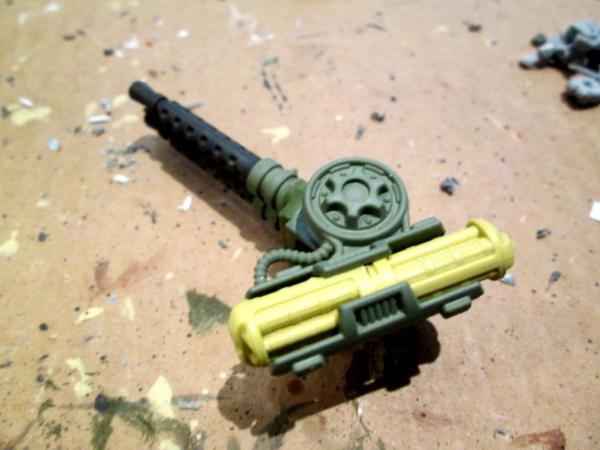
Here is a close up of the weapons that come with kit. I magnetized the three pairs you see (the autocannon pair, quad machineguns and quad laser cannon) and also used the paired machineguns you see in the upper right as the engine exhausts.

I had to shape the tank commander a considerable amount to get him to fit in the hatch the way I wanted. I know it looks cool in the movies, but after riding in an armored vehicle a time or two after 30 years in the Marine Corps and the Army, I can tell you that resting your butt in the edge of the hatch while moving over rough terrain is _not_ recommended.
A bisc fit of the primary guns and the commander. You can see how I lined the edge of the hatch to frame it in, using some strips of yard sale sign cut up. The hatch will end up being square, due to space constraints on the top of the turret. Even with the extra weight of the magazine holders on the back, the quad machineguns still balance nicely on the magnetic pivot points. This was not the case with the quad laser cannon, but we'll see that build a bit later.

These missiles are from the Robogear T-rex War Walker. I'm cutting them in half, and will use the lower piece as the magazine for one of the quad machineguns. Total needed of course, is four.

Another shot showing the 'magazine racks' and the commander in place. The muzzles of the guns are chewed up because this was my first time trying to drill out the barrels. In the end, I actually like the look- I think it makes them look battleworn, like the iridium lined barrels of the tanks in David Drake's "Hammers Slammers" series. Better pictures follow on later.

And here is a shot of the guns with their magazine rack complete with magazines.
Next chance I get to upload some more, I'll show you how to make cheap ammunition belts for just about anything.
|
"He fears his fate too much, or his desserts are small, who will not put it to a single touch; to win- or lose- it all."
Montrose Toast
|
|
|
|
|
2017/02/16 01:52:12
Subject: Customizing, sCratchbuilding and Citbashing by Meer_Cat
|
|
Stealthy Warhound Titan Princeps
|
I'd like to know how to do cheap ammunition belts! Cool stuff, keep it up!
|
|
|
|
|
2017/02/16 09:56:22
Subject: Customizing, sCratchbuilding and Citbashing by Meer_Cat
|
|
Pious Palatine
|
Awesome conversions. I'm really liking what you've done with the tanks.
EDC
|
|
|
|
|
2017/02/16 17:10:02
Subject: Re:Customizing, sCratchbuilding and Citbashing by Meer_Cat
|
|
Boom! Leman Russ Commander
|
Camkierhi, Kestral and evildrcheese- thank you for your kind comments and interest- more postings follow shortly!
|
"He fears his fate too much, or his desserts are small, who will not put it to a single touch; to win- or lose- it all."
Montrose Toast
|
|
|
|
|
2017/02/19 01:09:38
Subject: Re:Customizing, sCratchbuilding and Citbashing by Meer_Cat
|
|
Boom! Leman Russ Commander
|
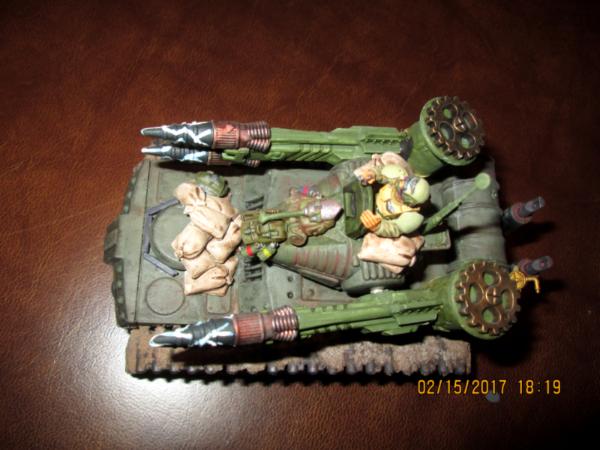
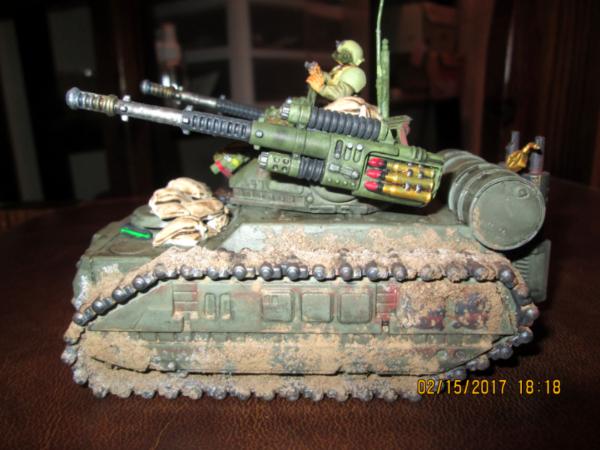
I wanted to add something to the back deck of the tank to make it look more 'built-up', so I took two Tamiya 55 gallon drums and glued them together, then carved out a notch in what will become the underside so it looks more integral to the hull.

Fuel tank added, but needed to move the turret forward slightly so it would clear the tank, also so the paired weapons could elevate and traverse. So I just punched a hole forward of the original.
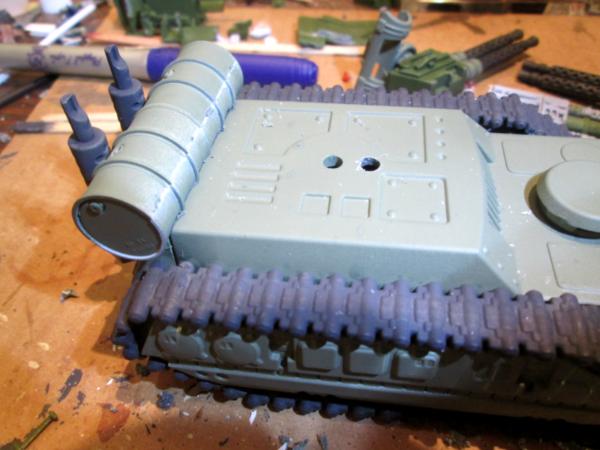
So, here now is the fuel tank added, the exhausts (which were included as a paired set of light machineguns) and the turret in place.

Here are the three pairs of weapons, now magnetized, that I want to use with the flak panzer. The ejection ports on the quad heavy machineguns (or autocannon) are covered over, because this is where the ammunition belts will attach. And even with the added weight of the magazines and racks, the guns still balance nicely on the magnet. So does the pair of heavy cannon- they won't need any modification. But the quad lascannon- they don't balance well at all- I had to add a counter weight and I think it came out looking ok- we'll see that shortly.
Two major steps to go- building the ammunition belts for the quad .50's and painting and weathering the whole vehicle and its commander. More follows soonest.
|
"He fears his fate too much, or his desserts are small, who will not put it to a single touch; to win- or lose- it all."
Montrose Toast
|
|
|
|
|
2017/02/20 01:15:38
Subject: Re:Customizing, sCratchbuilding and Citbashing by Meer_Cat
|
|
Boom! Leman Russ Commander
|
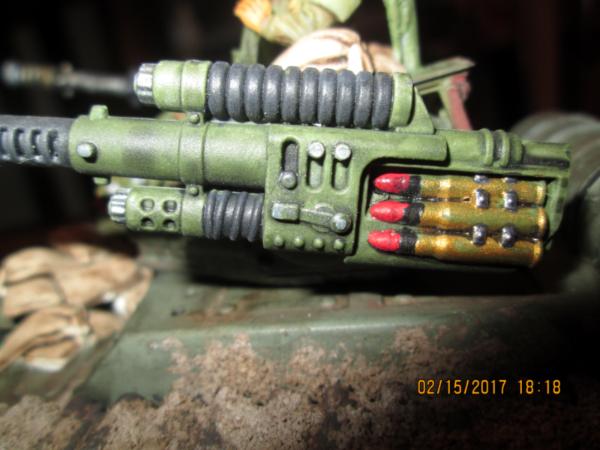
Here's how the belted ammunition for the quad machineguns came about: I started by clipping off a piece of 'plastic canvas' the length I wanted for my belt. You can get this stuff almost anywhere- Walmart, Michaels, even the Dollar Store, and it comes in very handy. I use it a lot for vehicle floor matting, for instance. The plastic canvas strip forms the belt that the individual rounds of ammunition will glue to. 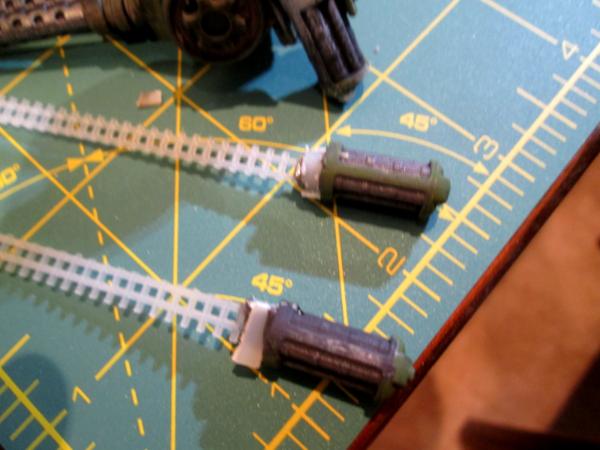 A test fit to show how the belts will stick out from the magazine, and bend around to attach to the gun itself.  Another view.  Belts are now glued in place at the magazine end and the gun feed port end, stuck to the turret by their magnets and test fitted to make sure they clear the decking- so that the turret can rotate. Also checking to make sure the belts aren't in the way to keep the guns from elevating. Towards weathering, I've added some dirt to the treads, but more later. 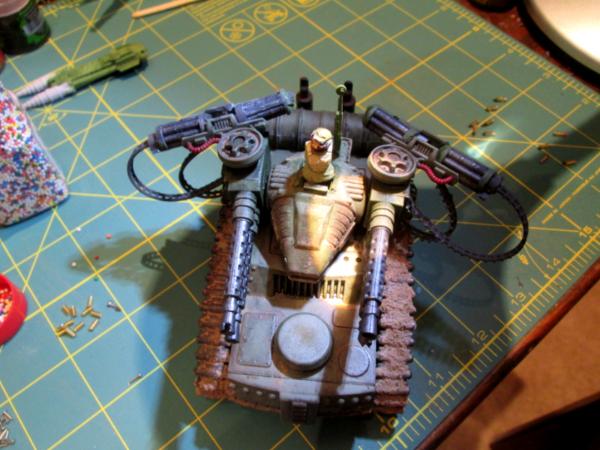 Here are the three components you need to make the rounds of ammunition: everyday pins cut to about 1/4 inch length, candy sprinkles (like for cakes or ice cream cones) and #2 Czech glass beads. I get the beads from Michaels, they cost about US$2.00 for 70 or so and come in different sizes, so you can make belted ammo for light machineguns up to heavy tank rounds and everything in between.  Dip the cylindrical bead in white glue and insert the pin 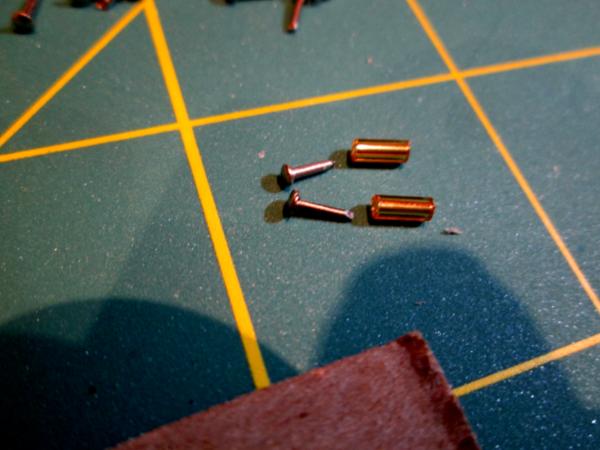 This forms a very nice brass casing with rim and primer base. You can scatter these around a heavy weapon- autocannon, etc, and they look darn good as expended brass  Glue a candy on the end as the projectile- try to pick uniform sizes as you go. 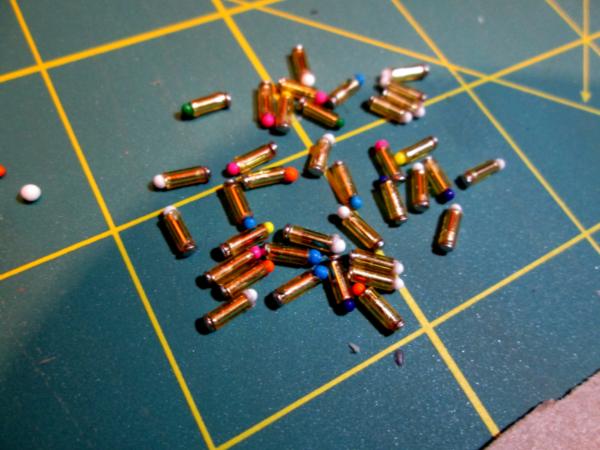 Glue the rounds onto the plastic canvas belt, and there you have it. Next instalment: weathering the tank, the commander and finished photos. 
|
|
This message was edited 1 time. Last update was at 2017/02/20 16:58:08
"He fears his fate too much, or his desserts are small, who will not put it to a single touch; to win- or lose- it all."
Montrose Toast
|
|
|
|
|
2017/02/28 20:36:01
Subject: Re:Customizing, sCratchbuilding and Citbashing by Meer_Cat: Counts-as Hydra now posted
|
|
Boom! Leman Russ Commander
|
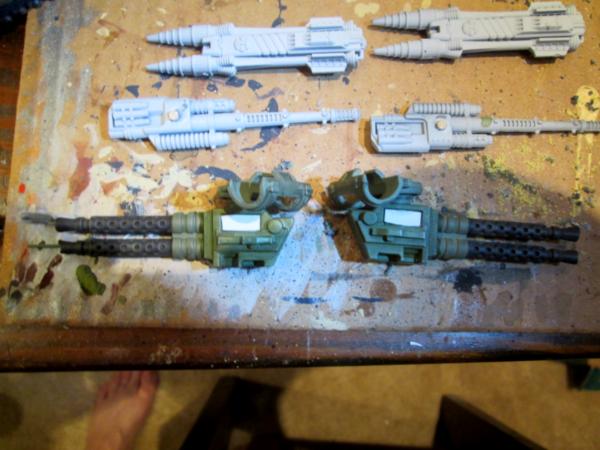
I misspoke in my last post- there was one more step to build out to be done with the construction phase of this project. The Bronekorpus/Robogear kit came with multiple weapons options, including three paired weapons systems- the dual autocannon, quad cannon and quad lasers.
I wanted to be able to use all three pairs, depending on the game. The dual autocannon balanced perfectly on the magnets. The quad cannon- even with all the weight (rather, _because_ of all the weight) of the belts and magazines and racks also balanced just fine. But the quad lasers just didn't have enough weight behind the balance point.
So, I cut open a 'do not eat' desiccant cylinder from a vitamin bottle and replaced the light silica gel crystals with sand.
Even that wasn't enough, so I added a steampunk gear to the top, and finally, I had enough weight behind and before the balance point to work.
Now, all three weapon pairs can be elevated to about 45 degrees, and the turret rotates 360. Here's a number of shots showing what we started with, and how it came out:


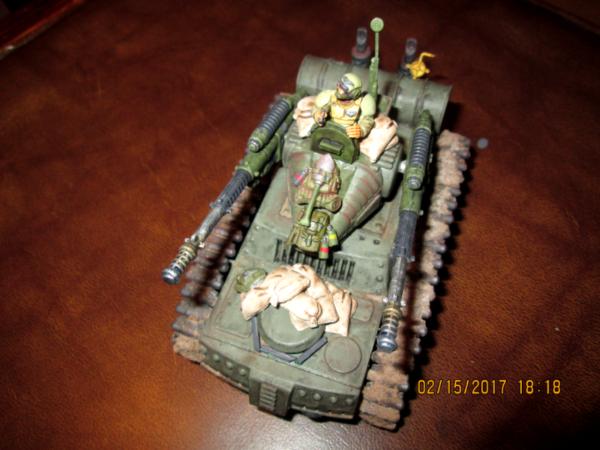
This project was a lot of fun to make, and cost (counting shipping for the Robogear tank kit) about US$15.00. I hope you like dseeing it, and hopefully there was something in the story that might come in handy one day. I look forward to your comments and constructive criticism.
Next up- I FINALLY learn how to paint eyes (thank you Dr. Faust!).
|
"He fears his fate too much, or his desserts are small, who will not put it to a single touch; to win- or lose- it all."
Montrose Toast
|
|
|
|
|
2017/03/01 09:10:22
Subject: Customizing, sCratchbuilding and Citbashing by Meer_Cat: Counts-as Hydra now posted
|
|
Ragin' Ork Dreadnought
Deep in the Outer Boroughs of NYC
|
I can't believe you made bullets out of candy and brass tubes. Simply stunning.
|
|
|
|
|
|
2017/03/02 10:16:59
Subject: Customizing, sCratchbuilding and Citbashing by Meer_Cat: Counts-as Hydra now posted
|
|
Gargantuan Great Squiggoth
|
That is looking fantastic, really nice work, annd for the money they are amazing.
Oh BTW your insane, those ammo belts? Going to steal the idea, had those same beeds sat in a drawer for over a year with similar thoughts, but now seeing it, excellent. As a BTB, instead of the slightly irregular candy, you could try the silicon beads from inside those sachets you get in everything to keep them dry, they tend to be a regular size.
|
|
|
|
|
|
2017/03/02 22:31:13
Subject: Re:Customizing, sCratchbuilding and Citbashing by Meer_Cat: Counts-as Hydra now posted
|
|
Boom! Leman Russ Commander
|
Hi Camkierhi- and thank you for the kind words; this project was really a lot of fun. The idea for the silicate beads from the sachets is terrific! I fooled around with a number of different items before I settled on the candy beads, never thought about the 'do not eats'. Twist of fate, after I had read your post I got into my car to head to the market to do the grocery- there were _two_ sachets on the floorboards of the passenger seat (and I usually keep a very clean car). They must have fallen out of something and slid under the eat, and re-appeared when I needed them.
BTW: I call those desiccant/keep dry packets 'do not eats' because they also came in certain components of our field rations while I served in the Army. They were labeled 'do not eat' so that some of our more civilizationally challenged soldiers didn't mistake them for a seasoning packet and sprinkle them onto something else pretending to be actual food. Altohugh how we were supposed to see the warning in the dark, which was mostly when we had time to eat, I'll never know.
|
"He fears his fate too much, or his desserts are small, who will not put it to a single touch; to win- or lose- it all."
Montrose Toast
|
|
|
|
|
2017/03/04 09:19:23
Subject: Customizing, sCratchbuilding and Citbashing by Meer_Cat: Counts-as Hydra now posted
|
|
Grim Dark Angels Interrogator-Chaplain
|
Love these - much respect from a fellow Bronekorpus converter! Great work, and the new artillery/AA style tank looks nice. May have to pick some up to go with my MBT/AFV style ones.
Automatically Appended Next Post:
One tip - if you want a bit more height, glue the tracks onto the hull sat just below where the locator pins normally snap-fit. Gives a taller tank.
|
|
This message was edited 1 time. Last update was at 2017/03/04 09:20:12
 Stormonu wrote: Stormonu wrote:For me, the joy is in putting some good-looking models on the board and playing out a fantasy battle - not arguing over the poorly-made rules of some 3rd party who neither has any power over my play nor will be visiting me (and my opponent) to ensure we are "playing by the rules"
|
|
|
|
|
2017/03/04 21:24:30
Subject: Re:Customizing, sCratchbuilding and Citbashing by Meer_Cat: Counts-as Hydra now posted
|
|
Boom! Leman Russ Commander
|
That is a great tip! I'm thinking if I do that, to get a bit more height, and add a bit of tubing to the 'snap-on' pins to widen the track base (and hide the gap with some sheet plastic track shrouds) I'll have a vehicle that comes very close to the dimensions of a standard Chimera.
I have a couple of the Bronekorpus MBT kits waiting their turn- I have an idea to convert one of them into a Salamander recon vehicle or even maybe a Griffin mortar carrier. I've also ordered one of the new Caban Pattern Assault Cyber tanks from the Ciberion Robogear line- it was too interesting to pass up. Not sure what I'll do with it yet, but something will come!
At US$8.00 per kit, it's no big deal to experiment with converting and learning new skills.
|
"He fears his fate too much, or his desserts are small, who will not put it to a single touch; to win- or lose- it all."
Montrose Toast
|
|
|
|
|
2017/03/07 01:27:03
Subject: Re:Customizing, sCratchbuilding and Citbashing by Meer_Cat: DreamForge Panzerjeagers now posted
|
|
Boom! Leman Russ Commander
|
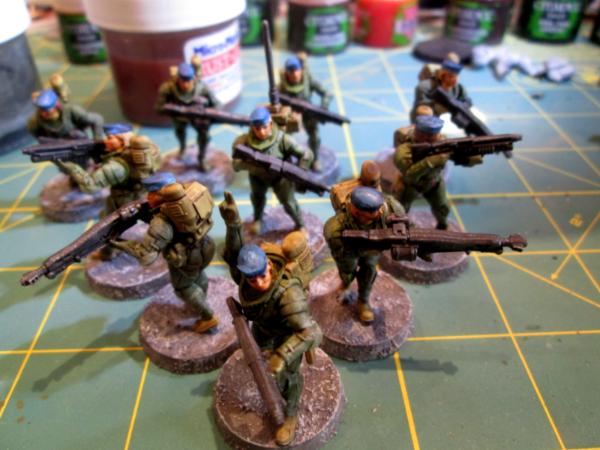
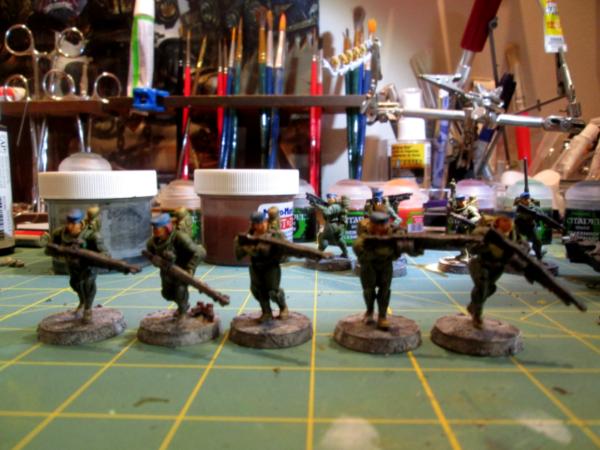
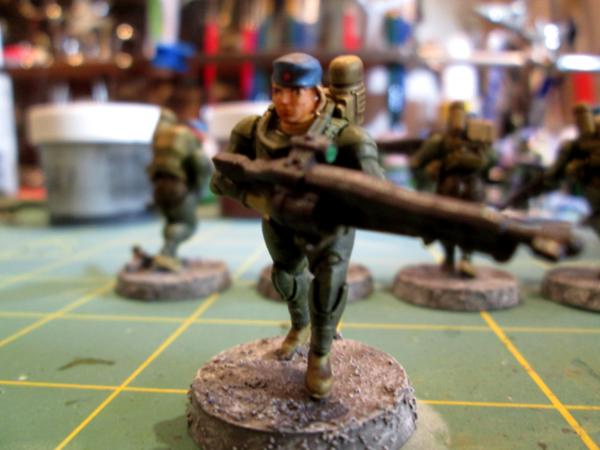
I finally have a chance to work here some more, so here are some photos of the latest squad to be painted- female Panzerjeagers by DreamForge Games. This post is actually three product reviews in one, because I'm very pleased with the figures, the Citadel Paints Astrogranite, ,Citadel washes and the quick and easy painting tutorial by Dr. Faust on YouTube on how to paint eyes. 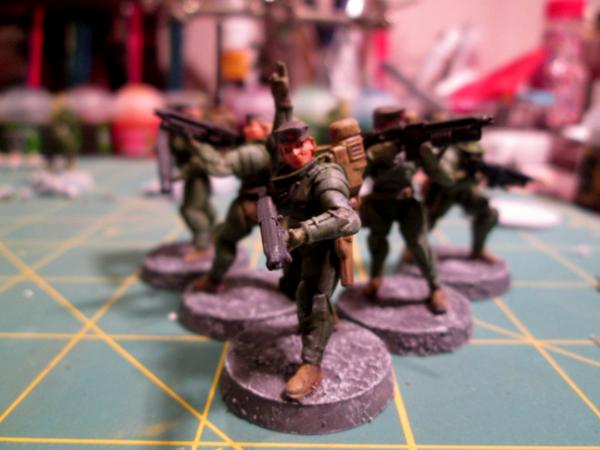 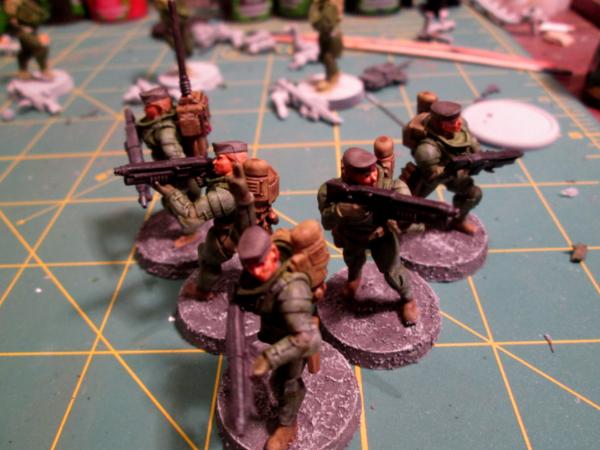 The DreamForge Games figures (formerly part of Wargames Factory, I think, and now under independent manufacture) are terrific. The moldings are crisp and clean- almost no clean up needed for mold lines. The articulation and animation are very realistic and there are enough extra parts in the kit to go crazy making variations. And they are very reasonably priced ( IMO). 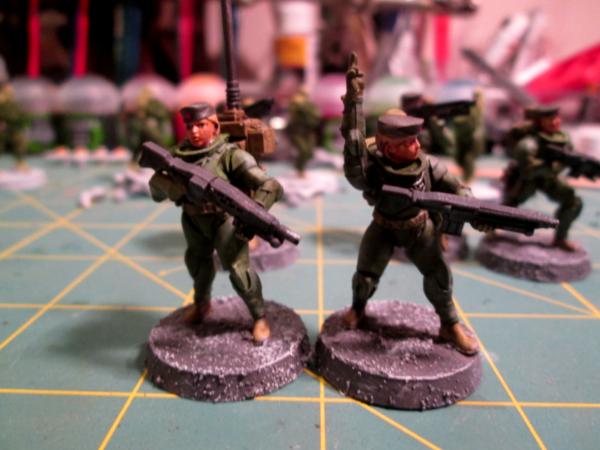  This is the first project that I undertook to be more than 'gaming quality'. I'm quite happy to be my age and still trying to learn new things, and you folks here at DakkaDakka inspire me all the time to try new things. These are the first figures where I've tried to deliberately use washes in targeted areas, rather than generally apply a coat to blend things together. On these figures, I used several different washes in different places, and also tried adding dry-brushed highlights. I chose the field cap option, rather than the various helmet options, both to accentuate the fact that these are female panzertruppen and also to have a color a bit different from the greens and browns of the uniform and kit to try to make the figures pop a bit. 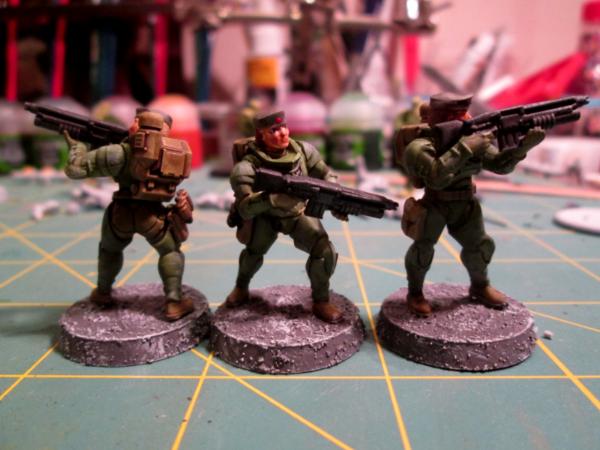  I used Citadel Texture Astrogranite on the bases, dry-brushed with white. This product is as close to Base-tex as I have seen in many years. I only ever found Base-tex in Great Britain, when I was stationed in North Yorkshire and loved the stuff. It went on a bit more gravelly than the Citadel Texture, but I'm happy not to have to mix my own from Artists' Media Gel and sand. It makes painting up a common base very easy. 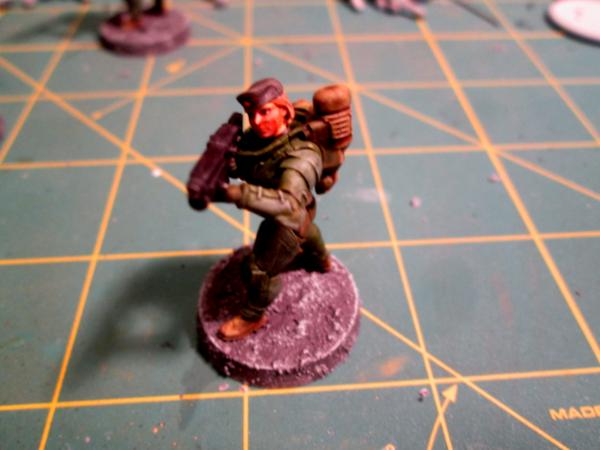 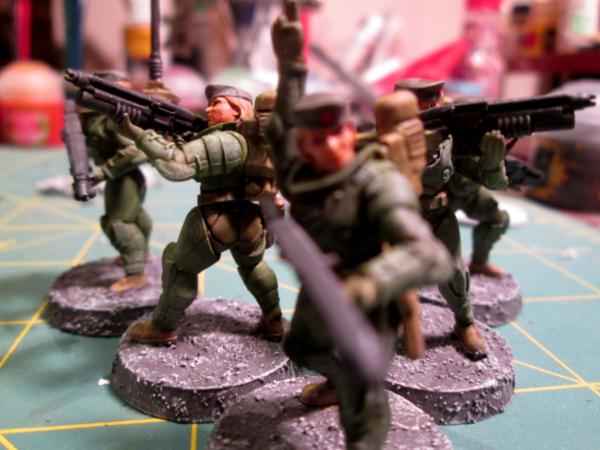 Finally, I've been looking over the great work you all do here on DakkaDakka, and viewing various YouTube videos that try to teach heavy handed painters like me how to paint more betterly. I found a tutorial by Dr. Faust for doing eyes that was just right for me. It relies heavily on painting _up to a line_, rather than trying to paint the line itself, which is what I need. The link is here: https://www.youtube.com/watch?v=dhH-GWvHG00&t=287s As you'll see in these last two pics, I think I'm correct in believing that I've come along way in my skill doing human faces. The radioman is a Kromlech Imperial Guardsman Highlander figure, and was my previous best effort.  So, I like the Citadel Texture, I like the Citadel washes (talent in a bottle, indeed!), I love the DreamForge figures and thanks to Dr. Faust, I believe I'm a better painter. I hope you enjoyed seeing some more of my work and I appreciate any constructive criticism you care to leave. Now all I have to do is go back and repaint the face on every figure I've ever done!
|
|
This message was edited 1 time. Last update was at 2017/03/07 02:16:48
"He fears his fate too much, or his desserts are small, who will not put it to a single touch; to win- or lose- it all."
Montrose Toast
|
|
|
|
|
2017/03/08 01:15:34
Subject: Re:Customizing, sCratchbuilding and Citbashing by Meer_Cat: DreamForge Panzerjeagers now posted!
|
|
Boom! Leman Russ Commander
|
Next up is the most ambitious terrain projects I've undertaken to date. It literally started in a Goodwill store when I saw a multi-picture, multi-level frame and I thought "For $5 bucks, I bet I can make something out of that!"
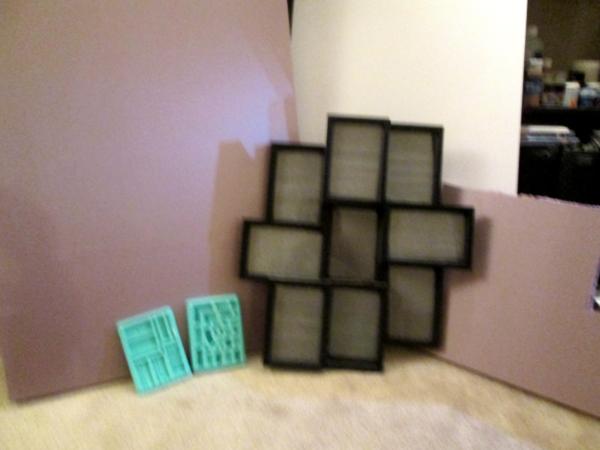
The picture is blurry, but the basic materials were the multi-picture frame, some poster board, some pink insulation foam and many castings from the Hirst Arts Sandbag and girder bridge molds.
First, I needed to shape the general outline. I wanted a vehicle bay big enough to admit a Leman Russ, and this semi-dictated the width and height of the piece, as I wanted reasonable slopes for infantry to assault up when finished. The ultimate goal wasn't to build a static diorama, but to have a great piece of terrain for gaming.

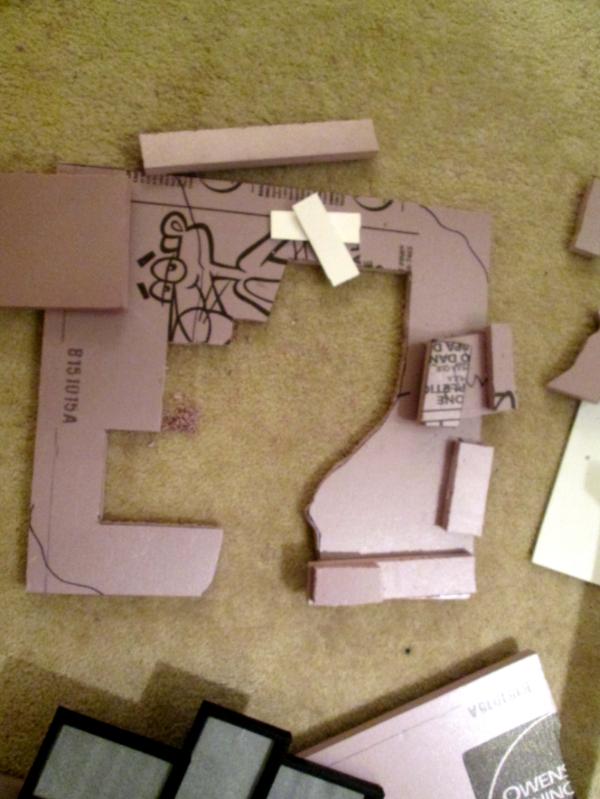
As I created the layers, with the vehicle bay cavity, I had to add spacers to help create the surface I wanted.

More follows soonest.
|
"He fears his fate too much, or his desserts are small, who will not put it to a single touch; to win- or lose- it all."
Montrose Toast
|
|
|
|
|
2017/03/15 00:21:12
Subject: Re:Customizing, sCratchbuilding and Citbashing by Meer_Cat: DreamForge Panzerjeagers now posted!
|
|
Boom! Leman Russ Commander
|
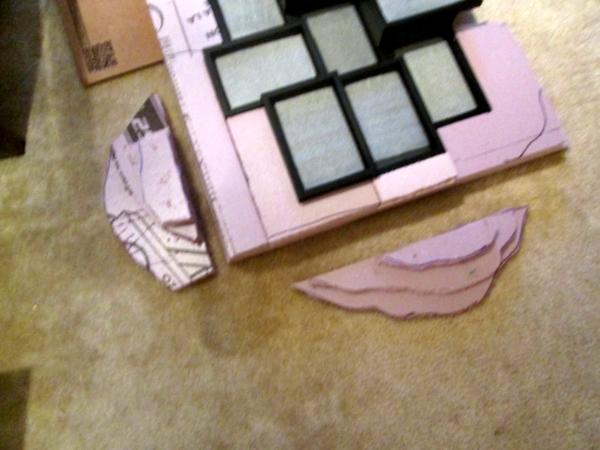
In this next photo, you can see that the sections forming the main firebase (with the vehicle bay) have been glued together and mounted to a piece of foam board. The spacers have been added so that the picture frame fits in quite nicely. I may add another piece of wood paneling underneath to stiffen everything up and make it less likely to break during transport- the project got 'way bigger than I imagined and I actually would like to sell it one day (local pick up or delivery, I don't see any way to pack this thing to mail and have it arrive in one piece).
The 'wings' are additions I want to fit on to break up the otherwise very square outline of the 'hill'. I always imagined the Imperial Guard to be rather arrogant when dealing with Mother Nature- like the Romans- and building exactly what they want exactly where they want. But even the Empire of Man has its limits, so I figure that even the vaunted Imperial Engineer Corps will have to accept landscaping only 'mostly' everything. Also, the piece was getting too big and heavy, so I added contours to only the two sides you see.

Another photo showing the 'hill' and the 'wings' to be added, plus I've gotten some sculpting in with my hot wire foam cutter:

So here you see everything assembled- toothpicks to help hold the layers together and also to stick the wings into the foam of the hill itself. I painted everything with one basecoat of Rustoleum spray paint and then spackled the joins. This first layer dried fairly well (and is advertised to be flexible, so I'm hoping it doesn't crack if flexed a little bit in moving) and I added a second layer to smooth everything out.

Next is to fit the picture frame in permanently and start seriously addressing painting the terrain. Upcoming builds: adding sandbags to all the revetments, a 'water extractor plant', an observation tower, anti-aircraft guns for the tower and signage (the military base hasn't been built where there aren't a million signs telling you what to do every step of the way).
More follows soonest.
|
"He fears his fate too much, or his desserts are small, who will not put it to a single touch; to win- or lose- it all."
Montrose Toast
|
|
|
|
|
2017/03/15 04:47:03
Subject: Customizing, sCratchbuilding and Citbashing by Meer_Cat: Imperial Firebase Under Construction!
|
|
Gargantuan Great Squiggoth
|
Very interesting shape and concept, like it.
|
|
|
|
|
|
2017/03/15 06:49:35
Subject: Customizing, sCratchbuilding and Citbashing by Meer_Cat: Imperial Firebase Under Construction!
|
|
Pious Palatine
|
Such a brilliant idea, looking forward to seeing how this turns out.
EDC
|
|
|
|
|
2017/03/20 23:14:56
Subject: Re:Customizing, sCratchbuilding and Citbashing by Meer_Cat: Imperial Firebase Under Construction!
|
|
Boom! Leman Russ Commander
|
This next photo of the firebase shows all the layers of pink foam insulation fastened together and base-coated with Rust-o-leum, the wings attached to round out the hill shape and the picture frame epoxied down. This angle is looking directly into the vehicle bay and you can see the sculpting that has been done with a hot wire foam cutter (lots of fun!):

Now the sandbags are added (made of dental plaster and cast in Hirst Arts Mold #340) and base-coated with inexpensive acrylic craft paint (the kind you get at Walmart for 50 cents a bottle):
These next three shots show the process of creating a textured, earthy, weathered look by layering first light grey painted splotches and dollar store sand:
Then a heavy wash of orange water color paint also from the dollar store, a kid's set and dry-brushing highlights in cream color acrylic:

And finally adding a wash of grey, then some grass flocking and 'scrub brush':
I deliberately left some indication of the joint lines between the layers of foam- they're one inch thick and can be used to visually determine the distance infantry figures can move up the slopes without having to apply a tape measure.
Next up, some good overall shots of the basic firebase showing all the sandbagged revetments and the weathering for the 'concrete'. Then, the water extractor, details of the fighting positions, finishing the vehicle bay, building the observation tower and a good anti-aircraft gun to stick up on top.
Thank you for looking over my work- your constructive criticism is very much appreciated.
|
"He fears his fate too much, or his desserts are small, who will not put it to a single touch; to win- or lose- it all."
Montrose Toast
|
|
|
|
|
2017/03/21 21:19:05
Subject: Re:Customizing, sCratchbuilding and Citbashing by Meer_Cat: Imperial Firebase Under Construction!
|
|
Boom! Leman Russ Commander
|
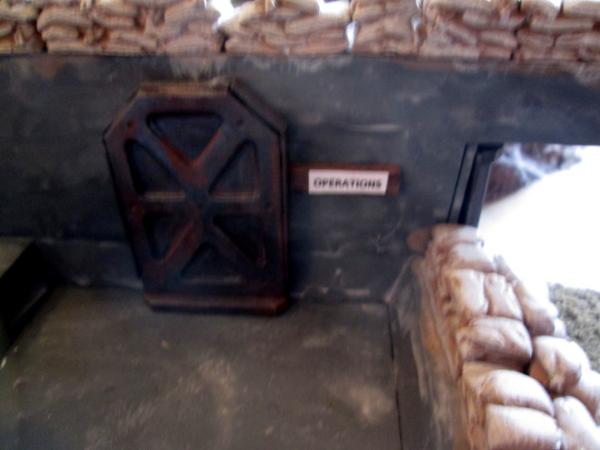
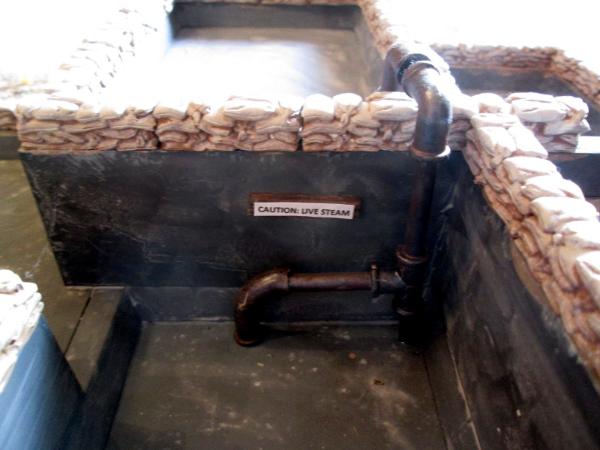
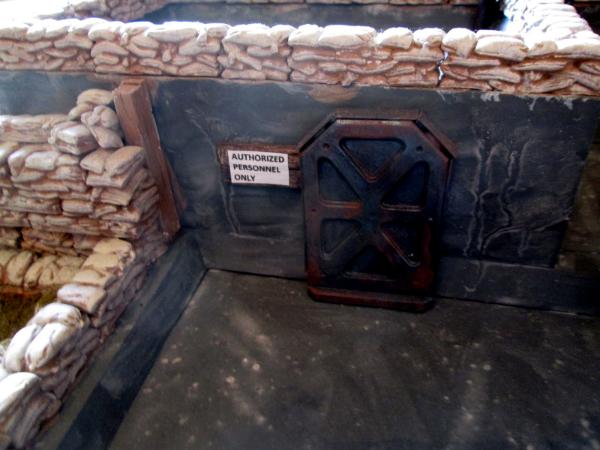
Here are some 'overall shots' of the firebase, with all sandbags, hatches, doors and signage in place:
The overhead view (you can see the compass orientation arrow for in-bound flights painted on the center revetment; a windsock hangs from the observation tower- pics coming soon- to indicate wind direction for incoming Vulture and Valkyrie):

Entrance to the Operations Bunker (sorry for fuzzy shot- I'm getting a new camera sometime in the near future):
The entrance to the vehicle bay:

The 'water extractor plant' pipage (made from a kid's crazy straw kit from the local supermarket and some extra rivets):
The Commissars' Entrance to the 'Emperor's Fighting Platform':
The Northern Spur:

The Eastern Face:
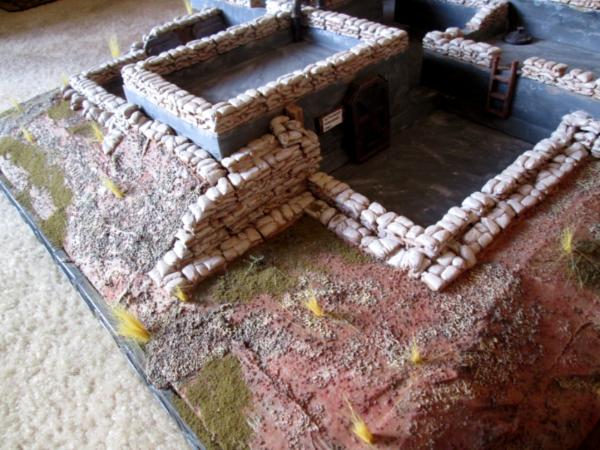
Another shot of the Eastern Face, showing the retaining wall the combat engineers installed (no spur or wing here to break up the square outline of the hill to save width and weight):
I 'weathered' the concrete/grey surfaces with a wash of two different shades of grey watercolor- not sure I like how it came out, but it is playable, I reckon. The sandbags came out better than on earlier projects I've done using Hirst Arts molds. I need to hit the retaining wall with another coat of rust wash- it is entirely too civilized looking.
Next up, the observation tower, the anti-aircraft gun and pics of the firebase fully manned by elements of the 1st Battalion, 7th Regiment of Infantry (the Lucky Sevens).
As always, thank you for an opportunity to show off some of my work- especially the techniques that I've learned right here on DakkaDakka. Your constructive criticism and feedback are most appreciated.
|
"He fears his fate too much, or his desserts are small, who will not put it to a single touch; to win- or lose- it all."
Montrose Toast
|
|
|
|
|
2017/03/27 22:02:40
Subject: Re:Customizing, sCratchbuilding and Citbashing by Meer_Cat: Imperial Firebase now w/AA Gun Tower!
|
|
Boom! Leman Russ Commander
|
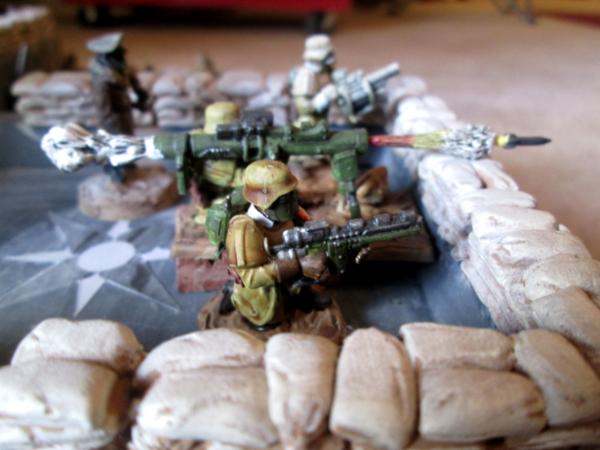
Here are some shots of the observation tower for the firebase with its fighting platform and the anti-aircraft gun to go on it:


All the sandbags were cast from Hirst Arts Mold #340 (I use that one a lot). The steel girders are pieces cast from Hirst Arts Mold #274- you can build bridges, landing pads, anything from this one. I painted the tower pieces base coat Pavement Grey (which is really a black), then washed heavily with Gunmetal Grey then washed lightly with MicroMark's Rust-n-Dust. The wooden boards on the fighting platform are coffee stir sticks.
Here's the tower fitted into the center of the firebase (those retaining wall panels are cast from Hirst Arts Mold #276- they make great floor panels for Space Hulk layouts):

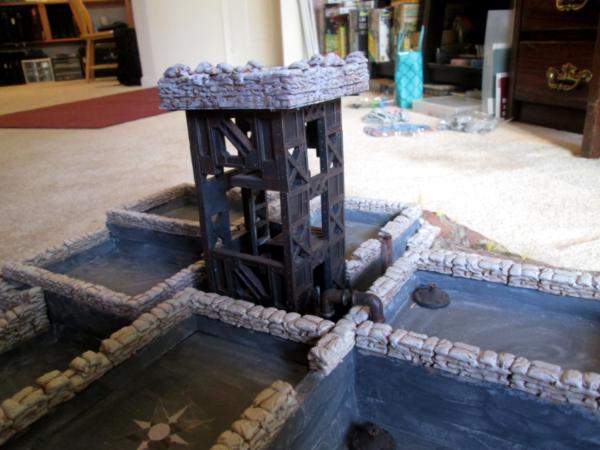
Here's a long shot and a close up of the gun:


The gun commander and gunner are from the Wargames Factory Heavy Weapons kit, the gun itself is a 1/35 Tamiya quad 20mm kit and the gunshield is the transmission case cover from a first edition Land Raider (circa 1991). I can post additional pictures if there is any interest.
Thank you for the chance to show off some of my work- your constructive criticism is most welcome.
Next posting: final pics of the firebase fully manned and featuring armored vehicles sallying out the vehicle bay.
|
"He fears his fate too much, or his desserts are small, who will not put it to a single touch; to win- or lose- it all."
Montrose Toast
|
|
|
|
|
2017/03/29 00:11:42
Subject: Re:Customizing, sCratchbuilding and Citbashing by Meer_Cat: Imperial Firebase now with AA Gun Tower!
|
|
Boom! Leman Russ Commander
|
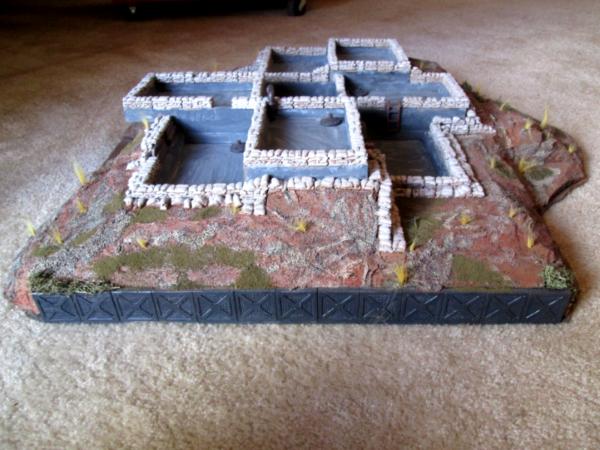
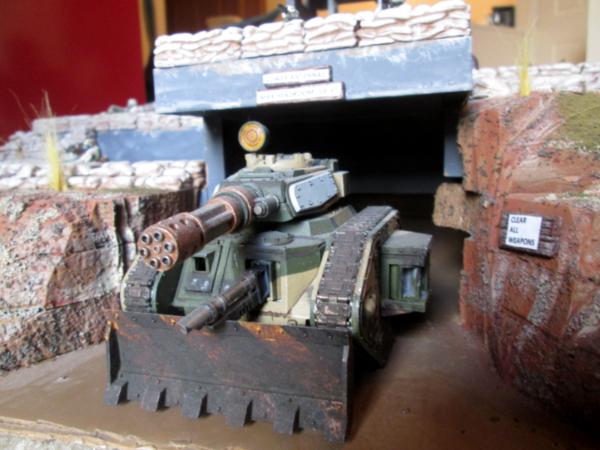
And here's the finished firebase, manned and ready:

There are seven fighting platforms in the firebase, each can hold 15-20 figures, so the whole she-bang can accommodate an Imperial Company, with heavy weapons, and two vehicles to sortie from the vehicle bay. Here's a Leman Russ exiting:
And a Chimera:

The blast doors that close the opening at other times are freestanding and cast from molds by Hirst Arts.
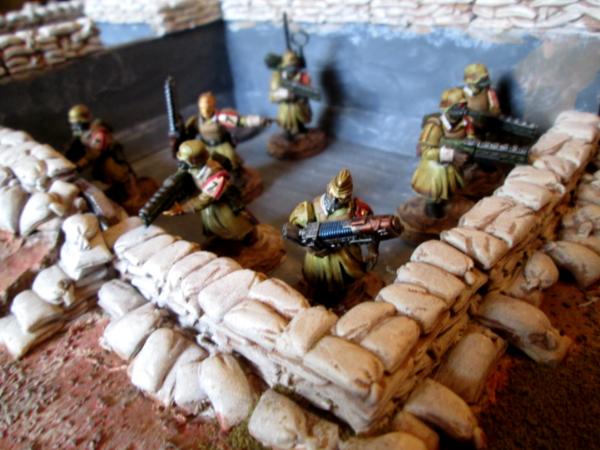
Here are some views of the infantry manning the fighting platforms:


This project was a lot of fun and started with a $5 picture frame from Goodwill. I hope you enjoyed seeing it- I enjoyed the chance to show it off. I look forward to your constructive criticism.
Next chance I get to post, I have an update on the Panzerjaegers I built a little bit ago, plus a heavily converted transport for them.
|
"He fears his fate too much, or his desserts are small, who will not put it to a single touch; to win- or lose- it all."
Montrose Toast
|
|
|
|
|
2017/03/30 22:12:49
Subject: Re:Customizing, sCratchbuilding and Citbashing by Meer_Cat: Imperial Firebase- finished!
|
|
Boom! Leman Russ Commander
|
|
"He fears his fate too much, or his desserts are small, who will not put it to a single touch; to win- or lose- it all."
Montrose Toast
|
|
|
|
|
2017/03/30 22:29:03
Subject: Customizing, sCratchbuilding and Citbashing by Meer_Cat: Imperial Firebase- finished!
|
|
Legendary Master of the Chapter
|
Oh wow thats cleaver. never though to use one of those crazy photo frame things.
|
 Unit1126PLL wrote: Unit1126PLL wrote: Scott-S6 wrote: Scott-S6 wrote:And yet another thread is hijacked for Unit to ask for the same advice, receive the same answers and make the same excuses.
Oh my god I'm becoming martel.
Send help!
|
|
|
|
|
2017/03/30 22:38:34
Subject: Re:Customizing, sCratchbuilding and Citbashing by Meer_Cat: Imperial Firebase- finished!
|
|
Boom! Leman Russ Commander
|
When I spotted the frame at the Goodwill, it was on it's side- facing up. If it had been hanging on the wall, or on the shelf but verticle, it probably wouldn't have caught my eye.
But lying over as it was, I couldn't help but say 'Oh man, for $5 I can make something out of this!"
Automatically Appended Next Post: So, having finished the panzerjaeger squad, they need a transport.
The next project, then, is to take this:
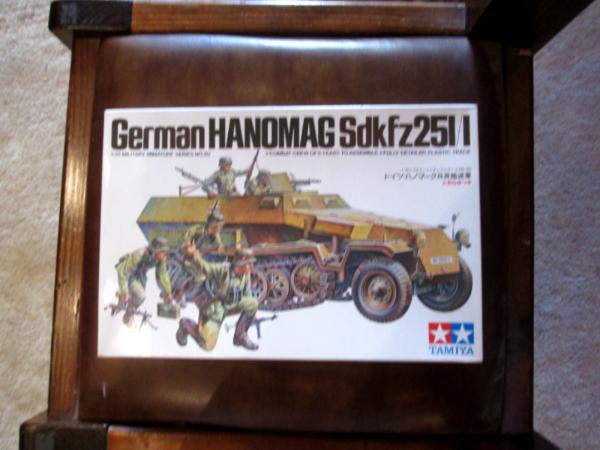
And make it look something more like this:

I picked up the Hanomag kit for US$8.00 on eBay with free shipping. As much as I like the Kielerkopf kit from DreamForge, the price was a little steep. And as noted earlier, I like converting things.
Thank you for the opportunity to show off some of my work, and I look forward to your constructive criticism and comments.
|
|
This message was edited 1 time. Last update was at 2017/03/30 22:42:20
"He fears his fate too much, or his desserts are small, who will not put it to a single touch; to win- or lose- it all."
Montrose Toast
|
|
|
|
|
2017/03/30 22:46:10
Subject: Customizing, sCratchbuilding and Citbashing by Meer_Cat: Imperial Firebase- finished!
|
|
Longtime Dakkanaut
|
Great use of "stuff" here mate! All very Rogue Trader, being of a similar vintage I also made the deodorant land speeder !
|
|
|
|
|
|
2017/03/30 22:59:39
Subject: Re:Customizing, sCratchbuilding and Citbashing by Meer_Cat: Imperial Firebase- finished!
|
|
Boom! Leman Russ Commander
|
Thank you Big H! In the earliest days, Games Workshop had several figure lines, but no vehicles. It was deodorant sticks and homemade arts and crafts or nothing, as you know!
|
"He fears his fate too much, or his desserts are small, who will not put it to a single touch; to win- or lose- it all."
Montrose Toast
|
|
|
|
|
|
|