| Author |
Message |
 |
|
|
|
|
Advert
|
Forum adverts like this one are shown to any user who is not logged in. Join us by filling out a tiny 3 field form and you will get your own, free, dakka user account which gives a good range of benefits to you:
- No adverts like this in the forums anymore.
- Times and dates in your local timezone.
- Full tracking of what you have read so you can skip to your first unread post, easily see what has changed since you last logged in, and easily see what is new at a glance.
- Email notifications for threads you want to watch closely.
- Being a part of the oldest wargaming community on the net.
If you are already a member then feel free to login now. |
|
 |
2012/09/09 01:06:05
Subject: Citizen Luka's P&M Blog - Sep 2013 - Ultramarine Vindicator Finished! + Deathwatch Terminators Begin
|
|

Xeno-Hating Inquisitorial Excruciator
|
Hi dakka, thought I'd start posting all my efforts with miniatures so far as a way to motivate myself and keep track of all my work. I started with AOBR last September and while being flat-out with university, I've made some progress slowly but surely!
I'll start with posting my first marine models and hope for some constructive criticism!
|
|
This message was edited 7 times. Last update was at 2013/09/03 14:22:37
|
|
|
 |
|
2012/09/09 01:09:49
Subject: Re:Citizen Luka's P&M Blog
|
|
Xeno-Hating Inquisitorial Excruciator
|
This model was pretty much a step-by-step following of GW's website recipe for the model. I finished him in January as a test of painting in layers. VERY time consuming but because I liked this miniature so much I was able to power through in about 4 days.
|
|
|
|
|
|
2012/09/09 01:14:57
Subject: Re:Citizen Luka's P&M Blog
|
|
Xeno-Hating Inquisitorial Excruciator
|
Here you can see my marines as I struggled with the step by step painting of different sections. When I first began I figured that any technique I didn't possess could be circumvented by being VERY SLOW and VERY CAREFUL. The best example of this would be the blue armour. Using Regal Blue, it took me two hours to apply two coats over a single marine - not particularly exciting but satisfying after only a couple of months of starting painting.
|
|
|
|
|
|
2012/09/09 01:18:16
Subject: Re:Citizen Luka's P&M Blog
|
|
Xeno-Hating Inquisitorial Excruciator
|
Quick assembly of my efforts after an entire summer!
|
|
|
|
|
|
2012/09/09 01:20:11
Subject: Re:Citizen Luka's P&M Blog
|
|
Xeno-Hating Inquisitorial Excruciator
|
AOBR Marine Sergeant
|
|
|
|
|
|
2012/09/09 01:21:47
Subject: Re:Citizen Luka's P&M Blog
|
|
Xeno-Hating Inquisitorial Excruciator
|
Another mini-army shot.
|
|
|
|
|
|
2012/09/09 01:26:33
Subject: Re:Citizen Luka's P&M Blog
|
|
Xeno-Hating Inquisitorial Excruciator
|
Testing a new flesh recipe. I used Dwarf Flesh layered up to Elf Flesh with an Ogryn Flesh wash. I think I used Devlan Mud as well. FInally layered on a little Codex Grey for the 5 o'clock shadow look.
|
|
|
|
|
|
2012/09/11 12:51:18
Subject: Re:Citizen Luka's P&M Blog
|
|
Xeno-Hating Inquisitorial Excruciator
|
Thought I'd include a nicer photo of my AOBR Dreadnought. I was pretty happy at the time with my effort. Though I've recently decided to change over from using metallic paints for battle damage - I'm hoping to use grey and brown to shoot for a more subtle effect.
|
|
|
|
|
|
2012/09/11 13:08:23
Subject: Re:Citizen Luka's P&M Blog
|
|
Xeno-Hating Inquisitorial Excruciator
|
Oops! Forgot to add pictures of my new toys! (New... is a relative term though...) Earlier this year I was really frustrated with not being able to get much painting done with University on so I researched and settled on investing in an airbrush set-up. Fortunately for me there happens to be ONE specialty supplier in my hometown that stocks everything. I ordered an Iwata HP-CS, a compressor, spray booth and an assortment of cleaning fluids and tools.
I experimented on a piece of paper first and then almost immediately tackled some terrain.
My chosen victim was the WH 40k battlescape. The large size of the piece was very forgiving. I sprayed at about 25 psi which I've since decided is probably a little unwieldy for detail work, but I managed to prime, base-coat and muck around with some highlighting. This took me only about 4 hours - though I was nervous and taking my time - and an additional hour of cautious cleaning.
Overall, it was a very successful session and it was actually a lot of fun once I got used to the feel of the airbrush.
![[Thumb - IMG_1256.JPG]](/s/i/at/2012/9/11/de5a4306cac2250655d5842bb1918c0e_61953.jpg__thumb)
|
![[Thumb - IMG_1257.JPG]](/s/i/at/2012/9/11/ce341d8c5522a157730c48e613e29c7a_61953.jpg__thumb)
|
![[Thumb - IMG_1259.JPG]](/s/i/at/2012/9/11/f4ac23a605de23b1a9fd23cd7bfb555b_61953.jpg__thumb)
|
![[Thumb - IMG_1266.JPG]](/s/i/at/2012/9/11/ba1471a9190cd33cc967896cb13a7f16_61953.jpg__thumb)
|
![[Thumb - IMG_1265.JPG]](/s/i/at/2012/9/11/cf5549463f90a389a11b6c6e7756ff17_61953.jpg__thumb)
|
|
|
|
|
|
|
2012/09/11 13:18:30
Subject: Re:Citizen Luka's P&M Blog
|
|
Xeno-Hating Inquisitorial Excruciator
|
After my first experiment with an airbrush I was relieved to move back to using the trusty ol' paintbrush. I decided on drybrushing the stones and trees as a suitable approach. The trees were already base-coated with VGC Heavy Charcoal, which I followed up with a drybrush of Khemri Brown and the Fortress Grey on the upper surfaces. The stones were drybrushed as well but with Codex Grey and Fortress Grey. For the wrecked rhino and scattered debris; I stippled on Dark Flesh, then drybrushed Blazing Orange.
|
|
|
|
|
|
2012/09/11 13:22:52
Subject: Citizen Luka's P&M Blog
|
|
Lady of the Lake
|
That's starting to look pretty good now. I like the tone of the rocks in that last picture.
|
|
This message was edited 1 time. Last update was at 2012/09/11 13:23:05
|
|
|
|
|
2012/09/11 13:38:04
Subject: Citizen Luka's P&M Blog
|
|

Student Curious About Xenos
essex
|
very cool scenery, also awesome ultramarines, the dread weatherings great 
|
The infection must die  |
|
|
|
|
2012/09/11 13:44:34
Subject: Re:Citizen Luka's P&M Blog
|
|
Xeno-Hating Inquisitorial Excruciator
|
As I am intending to create a proper Space Marine army I thought I'd take a short break from the terrain and sacrifice some models to the airbrush. I also wanted to try my hand at making some scenic bases utilizing cork tiles. I tore up the 6mm board and applied it to some infantry bases with super glue. I waited a day, then applied modeling sand with watered down PVA glue. I was annoyed with how much taller the cavalry base made a bike with rider so I slice the cork in half. I kept the 6mm cork on the infantry bases as my intended victims are some SM Scouts. I've pinned them, so in the unfortunate case that they end up far too tall Ill just pull them back out and hopefully recycle the bases for display models.
The bases were primed with Vallejo Grey Primer and then base-coated with VGC Black. I then drybrushed with Space Wolves Grey. I had purchased some pigments recently so I then mixed Vallejo Burnt Umber with a little water and washed it onto the bases - This was actually a lot of fun as I was able to see a really quick transformation of my bases from start to near finish.
I also primed and attempted shading my Scouts - which I am honestly not pleased with but I think reasonable for a first try.
...And I bought some new paints to try out...
Automatically Appended Next Post:
 n0t_u wrote: n0t_u wrote:That's starting to look pretty good now. I like the tone of the rocks in that last picture.
Thanks n0t_u! Automatically Appended Next Post:  mingus89 wrote: mingus89 wrote:very cool scenery, also awesome ultramarines, the dread weatherings great
Cheers mingus89; that's very kind of you, I really appreciate it!
![[Thumb - IMG_1401.JPG]](/s/i/at/2012/9/11/a8f307dc6cbe35b4c6ceb9e81f9a9834_61953.jpg__thumb)
|
![[Thumb - IMG_1390.jpg]](/s/i/at/2012/9/11/13dbc346e1b6d98062eddecbe7c9ead4_61953.jpg__thumb)
|
![[Thumb - IMG_1443.JPG]](/s/i/at/2012/9/11/012d2a0b2196bcb930cef59ef39b1391_61953.jpg__thumb)
|
![[Thumb - IMG_1452.JPG]](/s/i/at/2012/9/11/7b9dd37cdc1516a5625422a6bfb12053_61953.jpg__thumb)
|
![[Thumb - IMG_1464.JPG]](/s/i/at/2012/9/11/93f2bf99ce1c465cb7d8fcb559c07ab6_61953.jpg__thumb)
|
![[Thumb - IMG_1463.JPG]](/s/i/at/2012/9/11/6e264ddfeb3f464c161cd4e08bd8620a_61953.jpg__thumb)
|
![[Thumb - IMG_1462.JPG]](/s/i/at/2012/9/11/1ec36da71de6c7db9f0ab4c210bef42c_61953.jpg__thumb)
|
![[Thumb - IMG_1471.jpg]](/s/i/at/2012/9/11/429cd22a91cff61fecdb5830cbc60f9b_61953.jpg__thumb)
|
![[Thumb - IMG_1450.JPG]](/s/i/at/2012/9/11/b96c1bb205a9d09e3af882812fe84778_61953.jpg__thumb)
|
|
|
This message was edited 4 times. Last update was at 2012/09/11 13:54:34
|
|
|
|
|
2012/09/21 15:38:28
Subject: Re:Citizen Luka's P&M Blog
|
|
Xeno-Hating Inquisitorial Excruciator
|
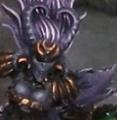
So i've been quite keen to start varnishing my miniatures after reading so many horror stories. I then discovered that the layers of paint from the airbrush are so thin that any tiny scratch or friction against another surface will rub it right off! I would've liked to include a photo of the scratches i inflicted on my poor battlescape, but thy happen to be just tiny enough to not show up on my crappy iphone camera. Regardless, I volunteered a brave member of the Ultramarines 1st company to sacrifice himself to some gloss varnish. I was quite scared of clogging my airbrush but managed to get a good coverage. I stripped the airbrush down into all its components straight after to ensure none of the varnish dried inside - while the shop is local it's still an hour drive there and back plus I don't fancy explaining that I nearly ruined the damn thing on my 3rd or 4th session!
I've included before and after shots of the AOBR Terminator who volunteered. I should name him just for being such a fine example of Astartes' bravery - any ideas? I also repainted the edge of his base using black through the airbrush before the varnish. I wanted to test my ability to freehand on a relatively small area and was happy with the results. I managed to only get the tiniest amount of overspray onto the base of the skull decoration. I dialed down the pressure to 10 psi for this and was able to get a quick nice coverage.
Also below are the scouts with a little progress. I apologize for not including step-by-step photos as I've been a little distracted with uni assignments.
Anyway... I decided as the sniper scouts are meant to be stealth/black-ops I'd try a limited colour scheme. While they are meant to be Ultramarines 10th company, I think Greys and Blacks will provide some flavour to the models' concept. I'm not yet sure how to do the battle damage on these guys as I was planning to use 50:50 Black & Brown and I'm worried it will look like dried mud but I guess I'll tackle that bridge when I get to it.
I airbrushed black and heavy grey to cover from the bottom and top respectively then did a quick gloss varnish. The next day I went in with watered down black and touched up the overspray and filled in the necessary areas. Next was my first experiment with VMA Silver Metallic - it is amazing! While it does look very light i will be shading later on with pigments and oils. This paint went straight on with no proper diluting aside from throwing it straight on my wet pallet (which i need to show a photo of soon!) and going from there. I also made a quick pass at covering the cloaks with Codex Grey but I haven't decided whether to keep it at this stage or highlight up to Fortress Grey. After all the black, silver and grey I was itching to try the face and have so far done a basecoat of Dwarf Flesh, 2 FULL washes of Ogryn Flesh and then a DETAIL ONLY wash of Devlan Mud. I waited for each wash to dry fully before applying the next. I still would like to add some highlighting and stubble but I am pretty surprised with the quality at this stage.
While my last wash was drying I thought I'd quickly make some headway into my Ultramarines Bike Army. I have 19 bikes built so far and again I asked for a volunteer! I've named him Basic Bob as he was built to look exactly like the image on the box though I did add a piece on the rear of the bike to cover some unsightly damage. Looking at Bob now I'm annoyed I didn't attack the mold lines on his legs with a little more enthusiasm but I guess I can only try to improve from here on! Poor Bob!
I have to stress how efficient the airbrush makes the early stages - even with just one model. I purposely reduced the pressure to about 12 psi to practice controlling my freehand. In roughly 3 hours I managed to prime in grey, pre-shade in black, basecoat in VGC Imperial blue AND spray a Gloss Varnish. By hand that could have easily taken me 3-4 times as long.
All comments and criticism are welcome as I'm keen to refine my painting abilities and would appreciate any advice! Cheers - more to come soon!
![[Thumb - IMG_1473.JPG]](/s/i/at/2012/9/21/0adfc3df7b8d3788a2c76c92509937bc_61953.jpg__thumb)
|
![[Thumb - IMG_1536.JPG]](/s/i/at/2012/9/21/eaa659852f886a44e1277b66cf248acf_61953.jpg__thumb)
|
![[Thumb - IMG_1530.JPG]](/s/i/at/2012/9/21/bbcdde885509d60852e1096e4fc4457b_61953.jpg__thumb)
|
![[Thumb - IMG_1531.jpg]](/s/i/at/2012/9/21/86a1def0ddd6c81943d40a9e2f67b1c5_61953.jpg__thumb)
|
![[Thumb - IMG_1524.JPG]](/s/i/at/2012/9/21/ebc340759be14ed2ffcd19d2ddf1f100_61953.jpg__thumb)
|
![[Thumb - IMG_1527.JPG]](/s/i/at/2012/9/21/82b96a71a178554c12f51b639d99d87b_61953.jpg__thumb)
|
![[Thumb - IMG_1528.JPG]](/s/i/at/2012/9/21/f72acdc33247a3abbc3312956c5dbe44_61953.jpg__thumb)
|
![[Thumb - IMG_1533.jpg]](/s/i/at/2012/9/21/32e50bc4a4df10c3cc805e78ada76a43_61953.jpg__thumb)
|
|
|
This message was edited 2 times. Last update was at 2012/09/21 15:47:08
|
|
|
|
|
2012/09/24 14:29:32
Subject: Re:Citizen Luka's P&M Blog
|
|
Xeno-Hating Inquisitorial Excruciator
|
Just powered through yesterday and today's afternoon and evening making progress on my Biker Marine Basic Bob. I blacked out the areas for the metallics, applying VMA Silver Metallic and Vallejo Liquid Metallic Old Gold. Decals were added using Micro Industries Micro Set and Micro Sol. All that's left for Bob is some light battle damage, pigments, oil wash and final varnish.
I'm pretty happy with this colour scheme test so far. I was originally planning to do the Ultramarine's 3rd company but when I compared doing the one-step process of liquid gold against 3 or 4 layers of red to achieve the same quality - 2nd Company seemed A LOT easier to accomplish. The other reason was trying to stick to a limited colour scheme. With the main colours being blue, silver and black I didn't want to detract from the simplicity of the pattern. I feel that the reflective quality of the gold blends in with the silver, so the little red and green (not pictured) I've used doesn't look confusing.
I'd like to attempt some careful OSL with the Headlamp instead of doing a very difficult 3 colour highlight in that tiny space, though I think it will have to wait until after the oil wash.
As always comments and criticism are highly appreciated!
![[Thumb - IMG_1537.JPG]](/s/i/at/2012/9/24/e47a9ae2c79a03e70b1a39ab6996f17a_61953.jpg__thumb)
|
![[Thumb - IMG_1539.JPG]](/s/i/at/2012/9/24/2a8aa1a8f5282e784924c52018b4964f_61953.jpg__thumb)
|
![[Thumb - IMG_1540.JPG]](/s/i/at/2012/9/24/b3313c4b35e768dcd547ad4026080b23_61953.jpg__thumb)
|
|
|
|
|
|
|
2012/09/24 14:51:23
Subject: Citizen Luka's P&M Blog
|
|
Jovial Plaguebearer of Nurgle
England
|
Those cork tile bases look gorgeous, I have to try making some of those. Good looking ultramarines, too, that's a nice rich blue you've got. Looking forward to seeing more of these.
|
 Did you know? The Reach belongs to the Forsworn. Did you know? The Reach belongs to the Forsworn. |
|
|
|
|
2012/09/26 08:53:29
Subject: Citizen Luka's P&M Blog
|
|
Xeno-Hating Inquisitorial Excruciator
|
 A Kvlt Ghost wrote: A Kvlt Ghost wrote:Those cork tile bases look gorgeous, I have to try making some of those. Good looking ultramarines, too, that's a nice rich blue you've got. Looking forward to seeing more of these.
Thanks A Kvit Ghost! I highly recommend using cork - it's a bit extra work and wait with the glue but drybrushing alone looks amazing. I'm hoping to finish my scouts in the next few days and get cracking on my Ultras soon after. With Uni on again next week I'll be squeezing only a little hobby time in every other evening - I'm still hoping to have 1500 points ready for Summer holidays in December.
|
|
|
|
|
|
2013/01/11 03:22:13
Subject: Re:Citizen Luka's P&M Blog
|
|
Xeno-Hating Inquisitorial Excruciator
|
Hi Dakka, long time no post. Between university exams, renovations and the Christmas season, my hobby goals fell far behind my original plan and timetable. Fortunately since the start of the New Year I've been able to make significant progress. I've changed my current painting recipe by including white as a pre-highlight and 50/50 black/brown as pre-shade before my blue base coat. I am currently hoping to finish my current batch within next week and start gluing my second batch of bikers immediately after. I've included WIP pictures of my efforts, mostly my mucking about with posing and then some quick snapshots of my painting marathon. Please comment and criticize - feedback is greatly appreciated.
Regards.
|
|
|
|
|
|
2013/01/22 14:39:59
Subject: Re:Citizen Luka's P&M Blog
|
|
Xeno-Hating Inquisitorial Excruciator
|
Hi dakka. Slowly but surely - some more progress! I've reached the stage where I can chip and weather my models, but I decided to apply the vallejo liquid gold first as I felt the need for some instant gratification. My other bikers are still in various stages of partial assembly so hopefully they can receive the same treatment and assembly tomorrow before I attempt to slug through the weathering all at once. Comments and criticisms are well appreciated.
Regards.
|
|
This message was edited 1 time. Last update was at 2013/01/22 14:41:44
|
|
|
|
|
2013/01/22 14:43:46
Subject: Re:Citizen Luka's P&M Blog
|
|
Xeno-Hating Inquisitorial Excruciator
|
Apologies, my iphone decided to prove its general unreliability yet again - I just emailed my photos to myself since everything was appearing upside and duplicated! Then iphoto wasn't working either... (sigh)... fingers crossed...
|
|
This message was edited 2 times. Last update was at 2013/01/22 15:57:30
|
|
|
|
|
2013/03/18 11:45:05
Subject: Re:Citizen Luka's P&M Blog
|
|
Xeno-Hating Inquisitorial Excruciator
|
Hi dakka, yet another long period of no updates - family and now uni has kept me exceedingly busy! Since January I've managed to attempt
1. Battle damage
2. Gloss Varnishing
3. Oil washing
4. Matte Varnishing
5. Pigments & Sandy paste
Overall I am happy so a far, the iphone5 isn't the best camera, though the HD option seems to curiously dull the metallics right down. All that's left is some more matte varnish to secure the pigments and some OSL on my second Plasma Gunner and hopefully the headlights of the bikes. Not sure about colour but I'm leaning towards a very gentle and subtle yellow - I'm open to some better suggestions/advice.
As ever, comments and criticisms are hugely appreciated - I look forward to any feedback - especially after such a grueling and drawn out process!
Cheers
|
|
|
|
|
|
2013/03/18 11:49:02
Subject: Re:Citizen Luka's P&M Blog
|
|
Xeno-Hating Inquisitorial Excruciator
|
More WIP photos
|
|
|
|
|
|
2013/03/18 11:51:24
Subject: Re:Citizen Luka's P&M Blog
|
|
Xeno-Hating Inquisitorial Excruciator
|
yet more WIP photos
|
|
|
|
|
|
2013/03/18 11:54:17
Subject: Re:Citizen Luka's P&M Blog
|
|
Xeno-Hating Inquisitorial Excruciator
|
And some additional close ups and angles...
|
|
|
|
|
|
2013/03/18 11:59:11
Subject: Re:Citizen Luka's P&M Blog
|
|
Xeno-Hating Inquisitorial Excruciator
|
More of the same.
|
|
|
|
|
|
2013/03/18 12:07:54
Subject: Re:Citizen Luka's P&M Blog
|
|
Boom! Leman Russ Commander
|
Not gonna lie, some of these are pretty damn good.
Keep up the good work.
|
|
|
|
|
|
2013/03/18 14:17:19
Subject: Re:Citizen Luka's P&M Blog
|
|
Xeno-Hating Inquisitorial Excruciator
|
Thanks Scipio, I really appreciate it!
|
|
|
|
|
|
2013/07/05 05:05:44
Subject: Re:Citizen Luka's P&M Blog - July 5th 2013 - Attempt at Plasma Gun OSL
|
|
Xeno-Hating Inquisitorial Excruciator
|
Long time no update Dakka,
After finally finishing university exams my time is my own again! Nearly a year since I first started them my bike squad and captain are finally finished. I sealed the pigments with varnish and had another cautious attempt at OSL with one of my Plasma Gunners. I highlighted the headlights as well, and I'll upload their final results shortly, but thought I'd seek some C&C on this OSL effort before I head off to work soon.
Cheers
|
|
This message was edited 4 times. Last update was at 2013/07/05 05:08:59
|
|
|
|
|
2013/07/17 15:05:15
Subject: Re:Citizen Luka's P&M Blog - July 5th 2013 - Plasma OSL attempt
|
|
Xeno-Hating Inquisitorial Excruciator
|
Hey dakka, you know when you look at all those mold lines on plain grey models, and all the sanding and filing etc and you think 'not today thanks!'
Two days of airbrush work later... some mistakes that need to be fixed tomorrow but not bad for my first proper vehicle. Hopefully have it done by this time next week..
C&C welcome!
|
|
|
|
|
|
2013/07/20 08:52:17
Subject: Re:Citizen Luka's P&M Blog - July 18th 2013 - Vindicator WIP
|
|
Xeno-Hating Inquisitorial Excruciator
|
More WIP photos of my first SM Vindicator, finished the metallics and added another coat of gloss varnish - all that's left is oil washes, some battle damage and pigments.
C&C welcome!
|
|
|
|
|
|
|
|
