| Author |
Message |
 |
|
|
|
|
Advert
|
Forum adverts like this one are shown to any user who is not logged in. Join us by filling out a tiny 3 field form and you will get your own, free, dakka user account which gives a good range of benefits to you:
- No adverts like this in the forums anymore.
- Times and dates in your local timezone.
- Full tracking of what you have read so you can skip to your first unread post, easily see what has changed since you last logged in, and easily see what is new at a glance.
- Email notifications for threads you want to watch closely.
- Being a part of the oldest wargaming community on the net.
If you are already a member then feel free to login now. |
|
 |
2012/10/09 07:47:06
Subject: Philmorgan75's workshop blog - Legion of the Dead
|
|

Regular Dakkanaut
|
I've been away too long and thought now would be a good time to start a blog - to keep track of what I'm making/painting/converting at the moment and plans for the future. Without further ado, Here's some large SM I've made over the past few weeks/months:
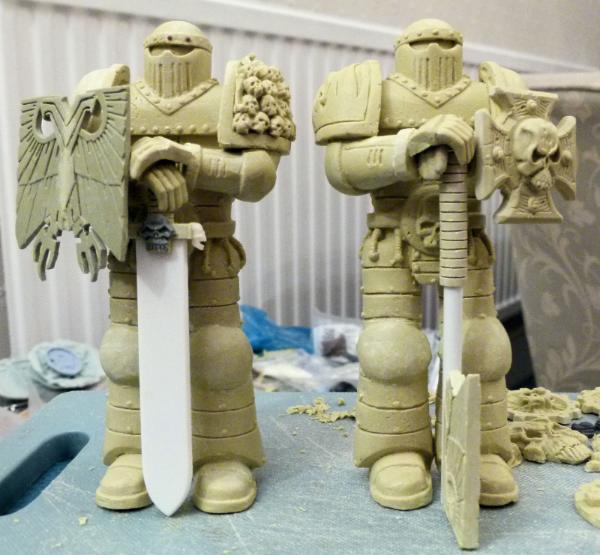
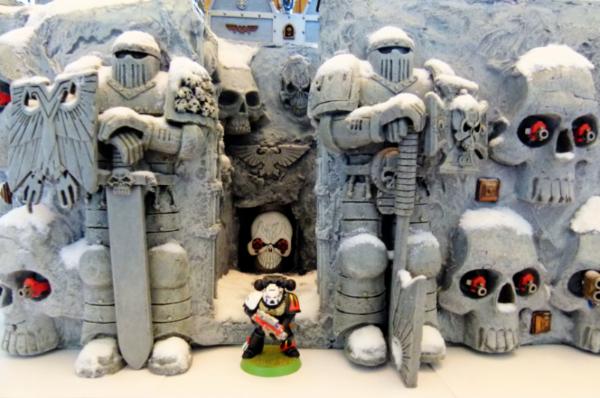
These are my two 15cm+ SM Mk2 statues that will stand either side of my SM Fortress. They were sculpted over many nights out of milliput and then silicon putty moulds were taken to speed up the process of making the second one.
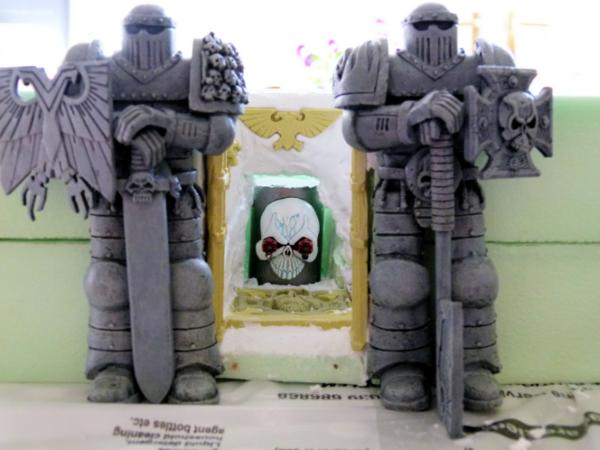
This shot shows them painted and in position. There's a warm welcome for any unwanted visitors - Twin Assault Cannons!!
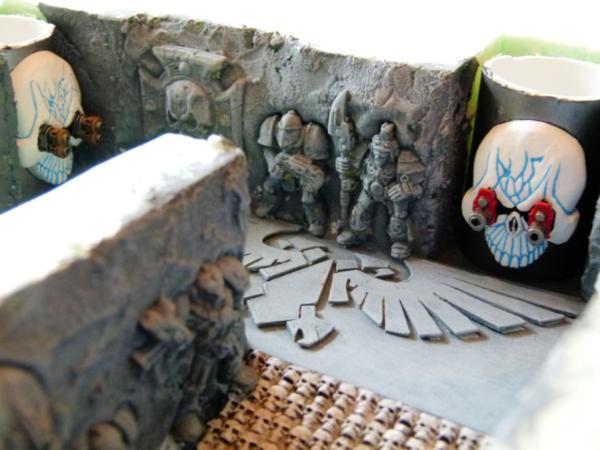
This shows a sot of the almost finished first floor landing. Older Mk armour variants were sunk into polyfilla and once dry, painted to look like they were carved out of rock. The ramps were made from lots of skulls embedded into milliput. I also placed 2 weapon turrets to cover the approaches, a Twin Heavy Bolter and Twin Heavy Flamer. The Imperial Eagle on the floor was carved out of plasticard.
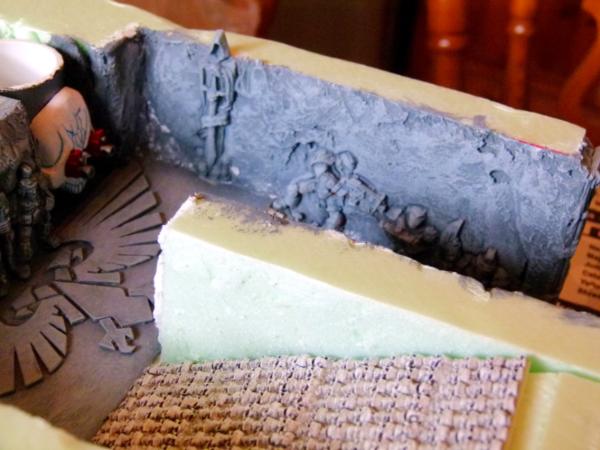
This shows the second ramp and more SM different Mk armour can be seen on the furthest wall.
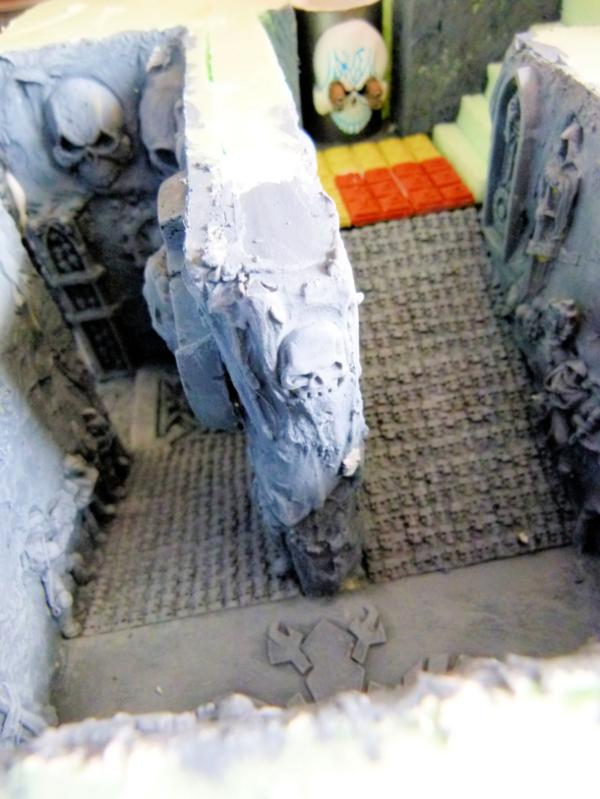
This shows both ramps. The final weapons turret is a Twin Multi Melta.
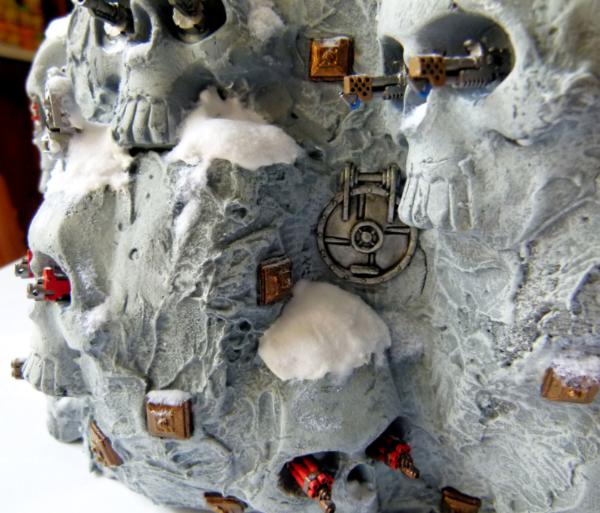
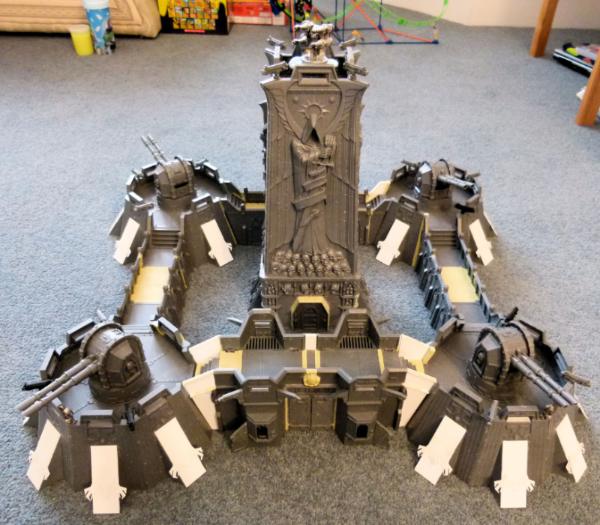
After many months, here are some shots of the final Imperial Space Marine Outpost. As this fortress is only guarded by 1 Tactical squad, I thought they would have lots of auto weapons to ensure any unwelcome visitors would be stopped before they can get to the Fortress perched on top of the cliff. I added snow as I thought it would improve the look of the terrain piece. You can see in the top right hand corner the quad assault cannon AA turret that would defend the outpost from aerial assault.
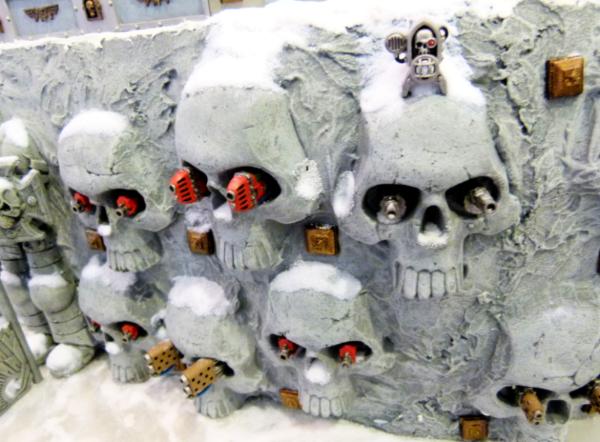
Heres what a few of the weapon skulls have been armed with.

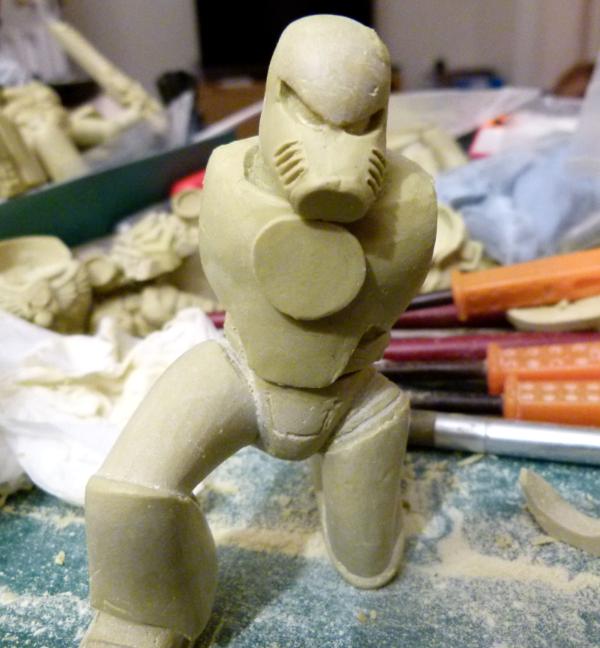
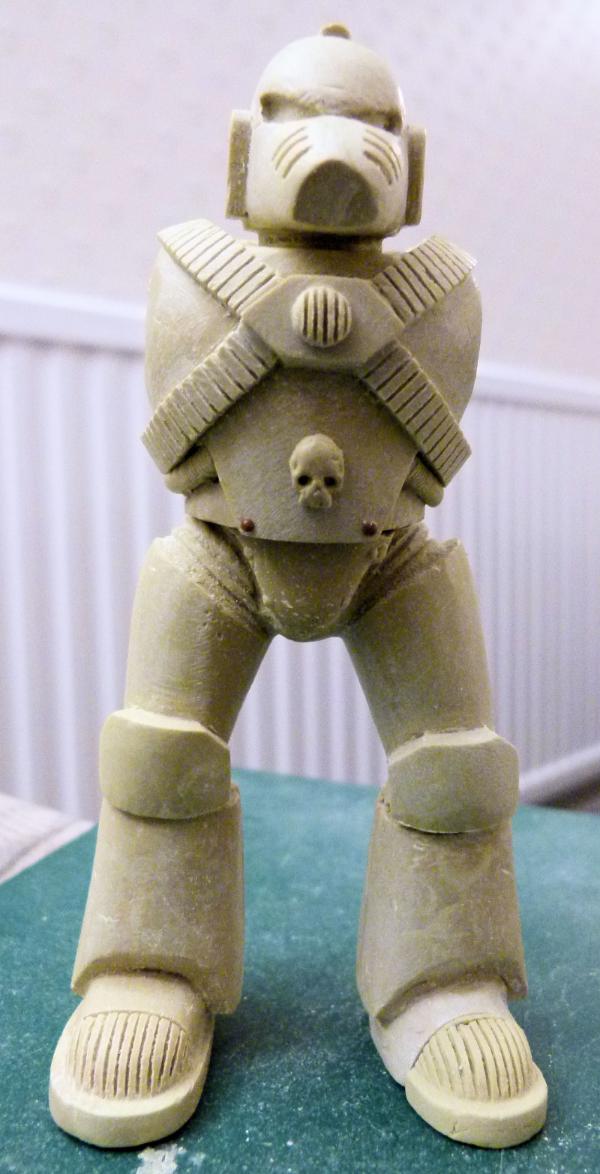
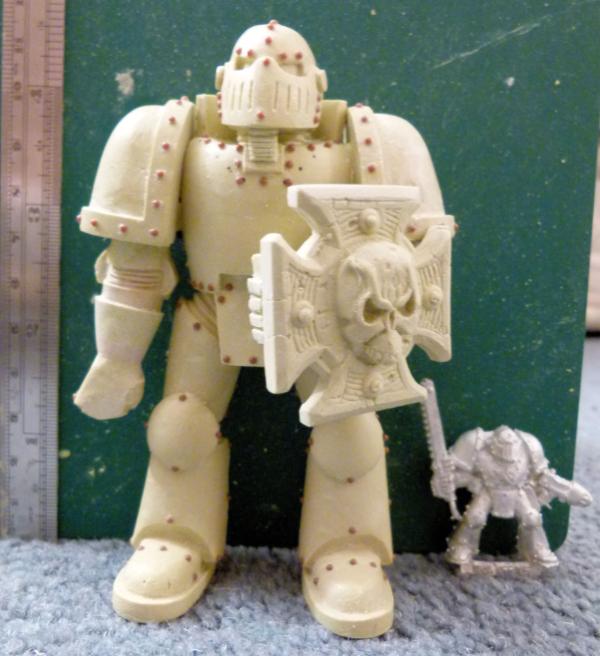
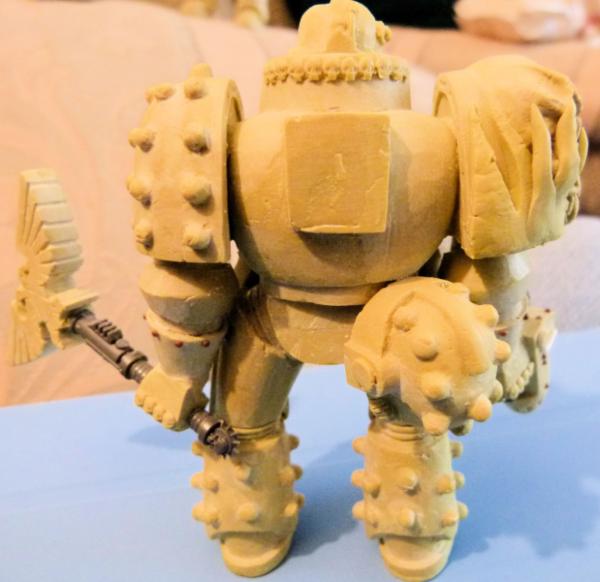
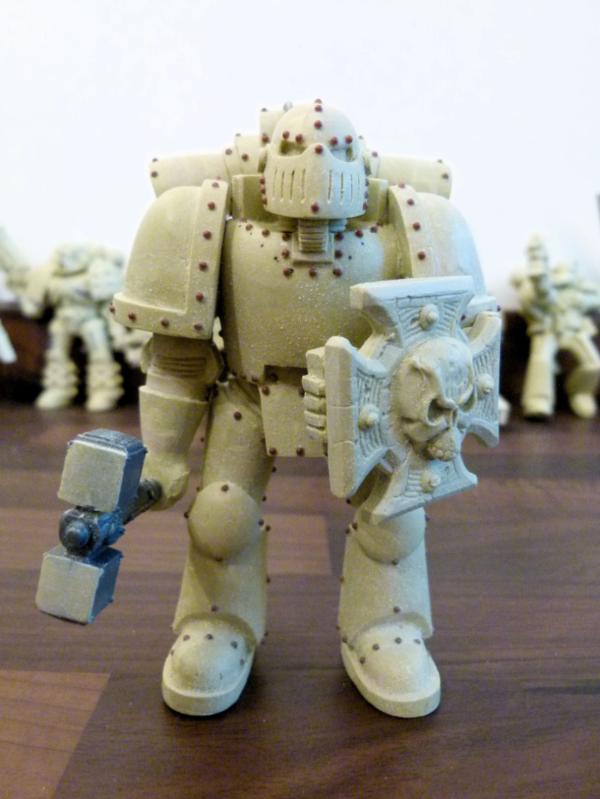
This shows one of the sides of the outpost. I've used a large scale 10cm+ SM to ensure any visitors know who owns this outpost. He was sculpted out of milliput. I like making these and I'll show you some more in future entries.
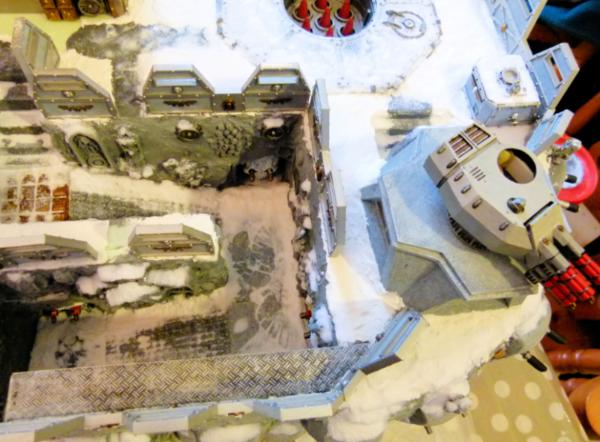
This shows the almost completed plan shot. Just neede to cover the quad assault cannons with snow.
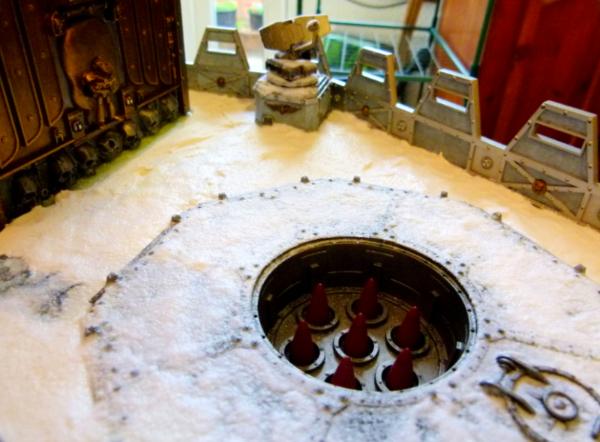
The missile silo with FW Radar in the background.
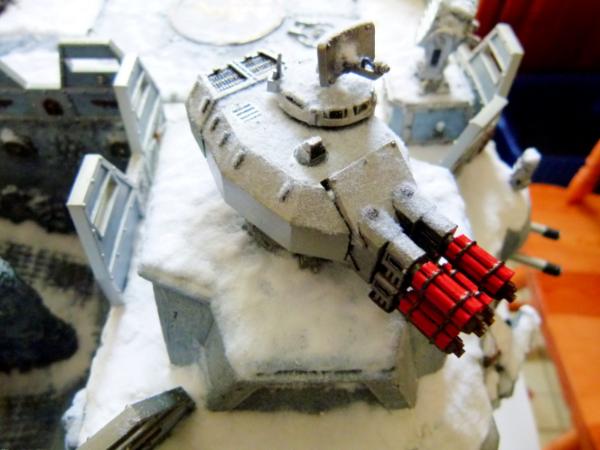
Completed radar assisted quad assault cannons.
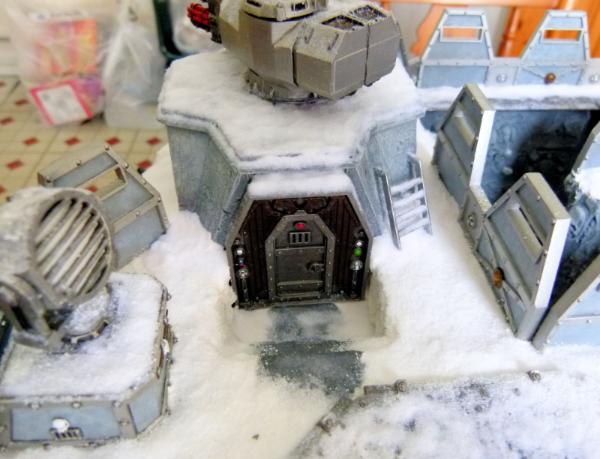
Rear entrance to the quad assault cannon bunker. Also a FW Searchlight can be seen in the left hand side of the picture to illuminate visitors.
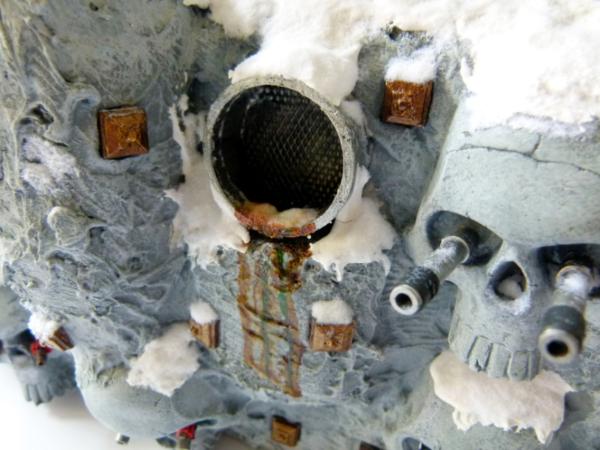
Heres a shot of the waste pipe. I wanted to give the attackers a would be entrance point (genestealers anyone!). But not to make it to easy, there are lots of weapons around and frag mines as well!
All fortress needs secret escape hatches, so here's mine!
I'll put some more pictures up after I get home from work tonight. Any thoughts/comments/critiques are welcome.
Regards, Phil
|
|
|
|
 |
|
2012/10/09 07:55:53
Subject: Philmorgan75's workshop blog - Legion of the Dead
|
|
Fixture of Dakka
|
Shouldn't the secret escape hatch lead to a nice secure platform or set of stairs rather than a sheer drop?
Just kidding  Awesome work anyway Statues in particular are very well made.
|
|
|
|
|
|
2012/10/09 20:49:27
Subject: Re:Philmorgan75's workshop blog - Legion of the Dead
|
|
Regular Dakkanaut
|
Back from work! Some more shots of my Fortress.
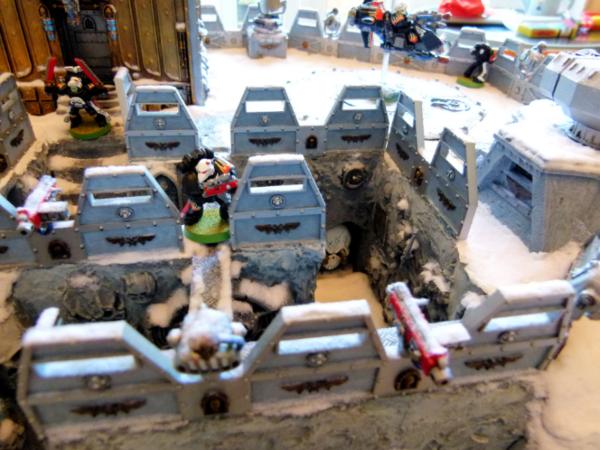
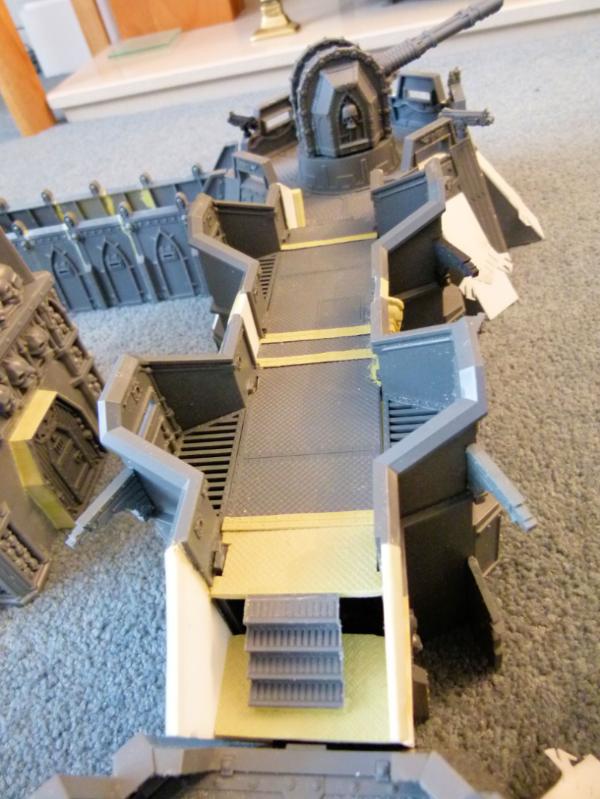
I added some Fortress of Redemption searchlights and Heavy Bolters around the Skyshield turret emplacements around the perimeter. This would help sentries have heavy weaponary to ward off any intruders. I added a walkway to allow troops to quickly get from the Fortress to the front lines.
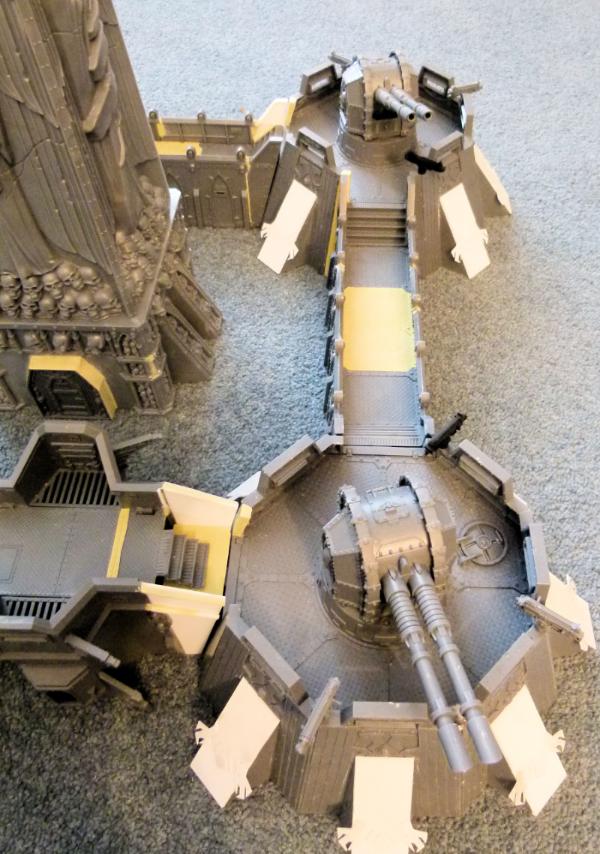
Here's another shot of the perimeter barricades. The Quad Autocannons can be used for both Aerial and Frontal assault.
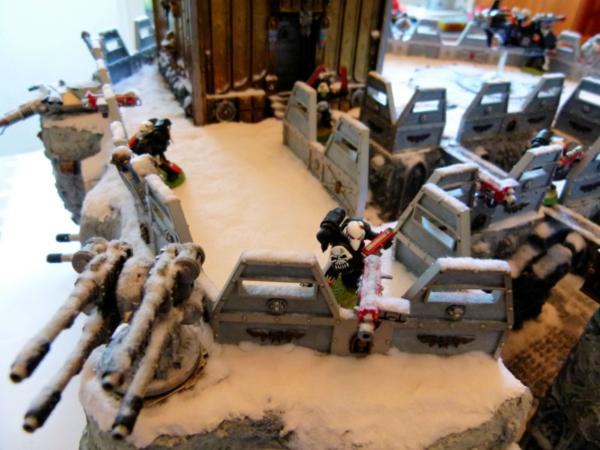
Shot of the garage entrance and a patrolling razorback. Heavy flamers, frag mines and twin hurricane bolters all guard the entrance to the garage.
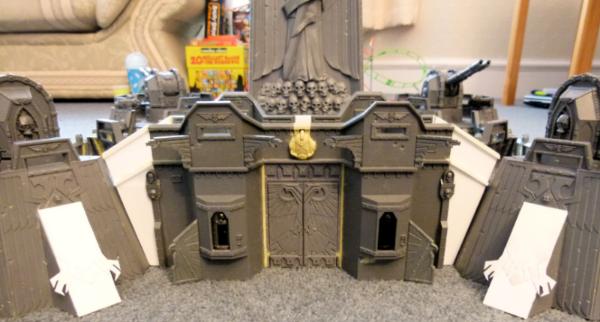
Here's a shot of the completed Fortress - Shrine of Aquilla on all 4 fronts. The head was converted to be horizontal rather than the usual "look to the stars".
The entrance to the Fortress. If they get through all of the cliff face weaponary, there's a final heavy flamer to stop anybody from gaining access.
For more shots of the completed Space Marine Fortress, go to my Gallery.
Here's what is currently on my work tray:
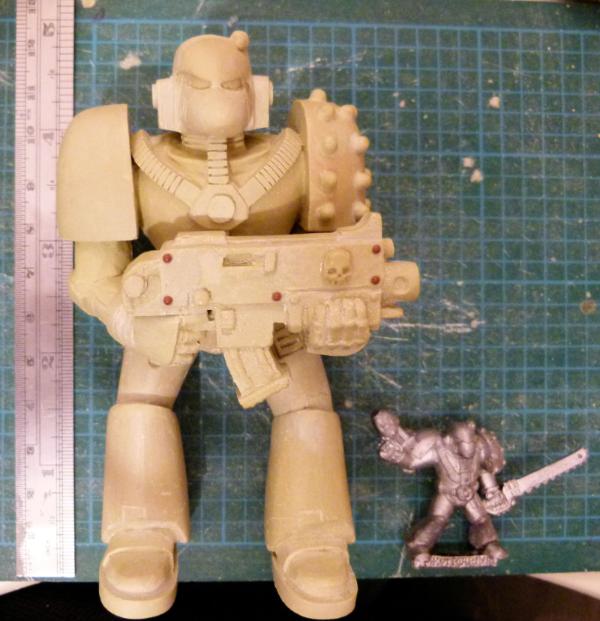
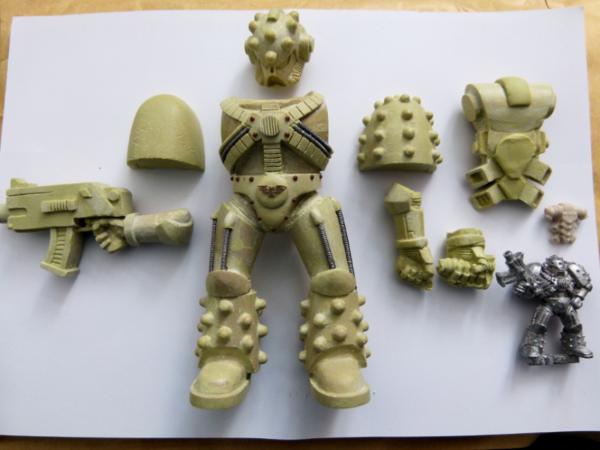
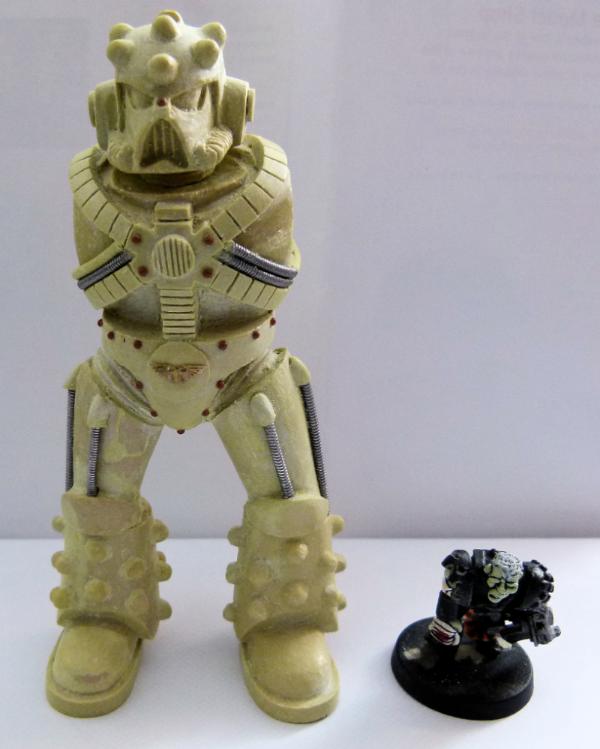
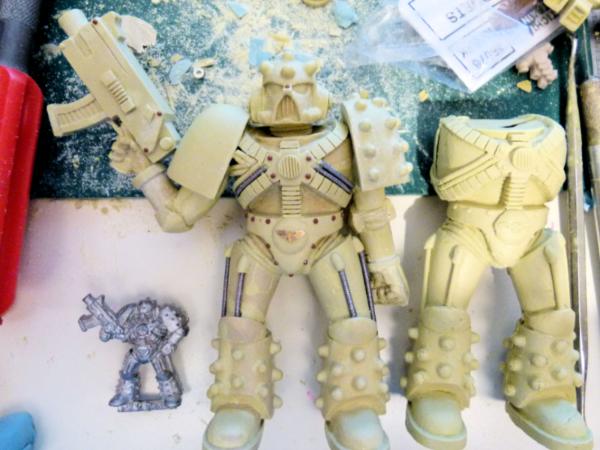
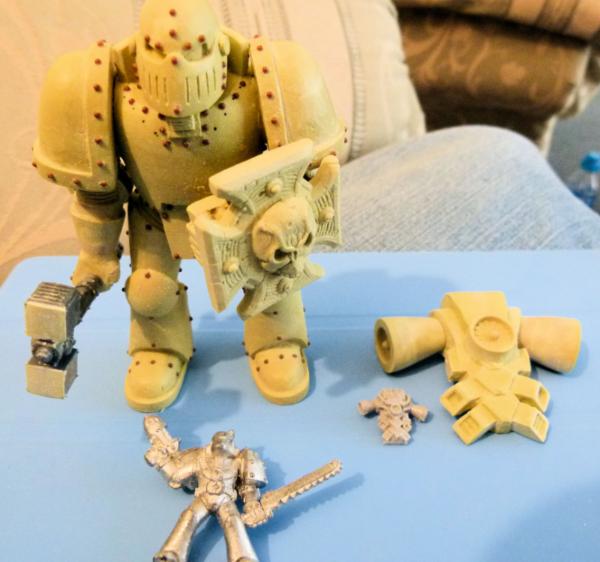
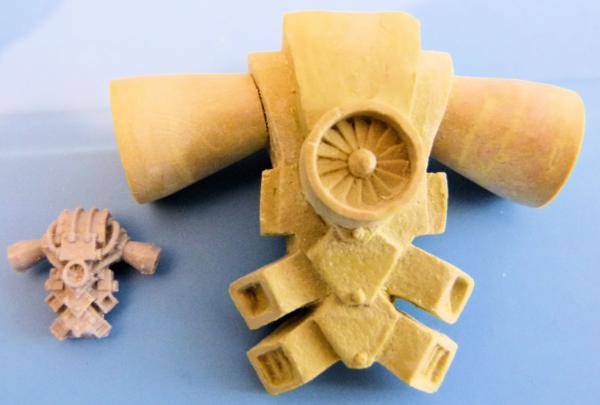
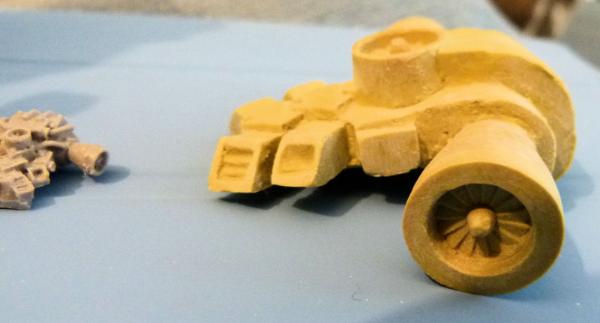
A large 10cm+ Mk6 Space Marine almost completed. Just need to complete his backpack and it's done. More to follow!
|
|
|
|
|
|
2012/10/14 21:20:51
Subject: Re:Philmorgan75's workshop blog - Legion of the Dead
|
|
Regular Dakkanaut
|
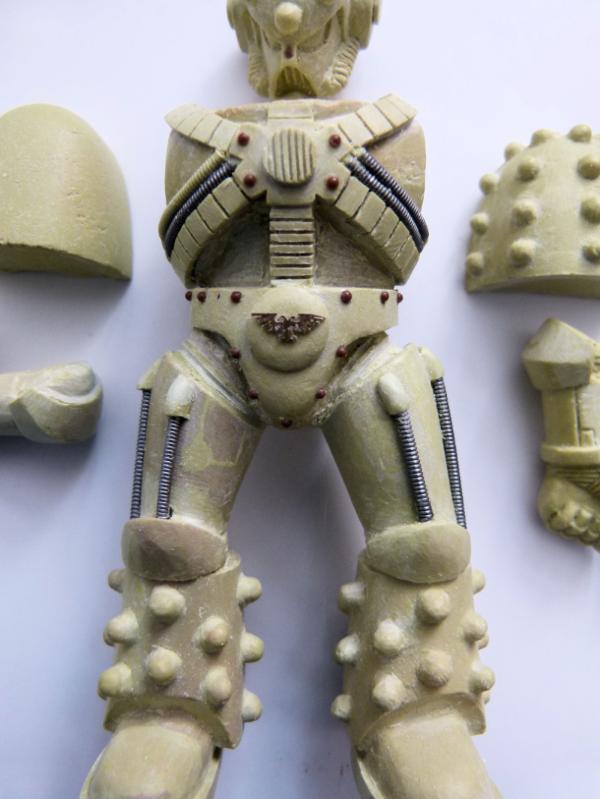
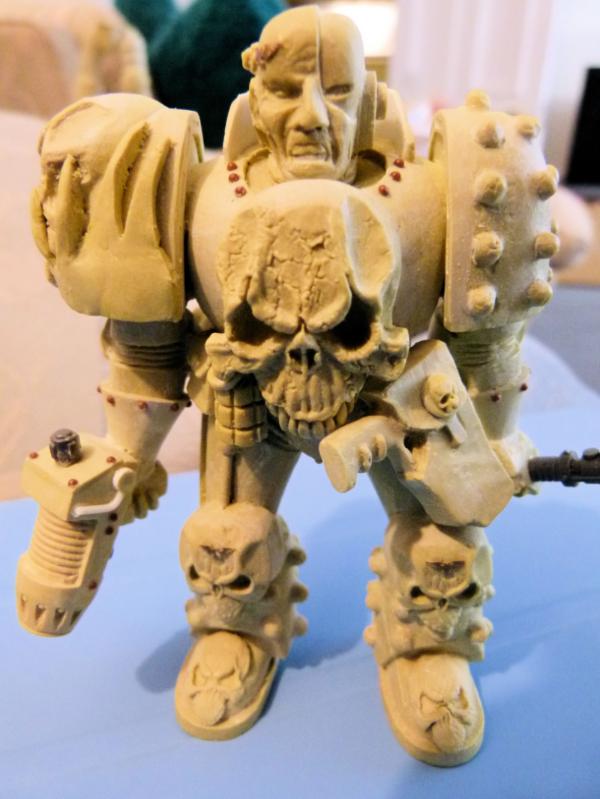
On the Mk6 above, I decided to remove some of the ribbing joining the chest to his helmet eventhough the artwork depicts this, it just doesn't look right. I'm slowly making an older back pack to go with this one and then take a mould to speed up the process in the future. I'm also going to make an earlier mark Bolt Gun and may consider replacing the modern Bolt Gun on the Mk6 with the "older" version - we'll see!
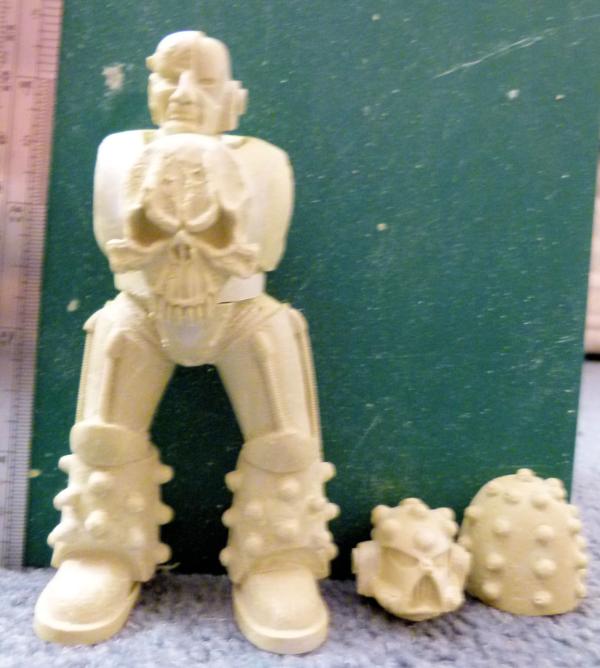
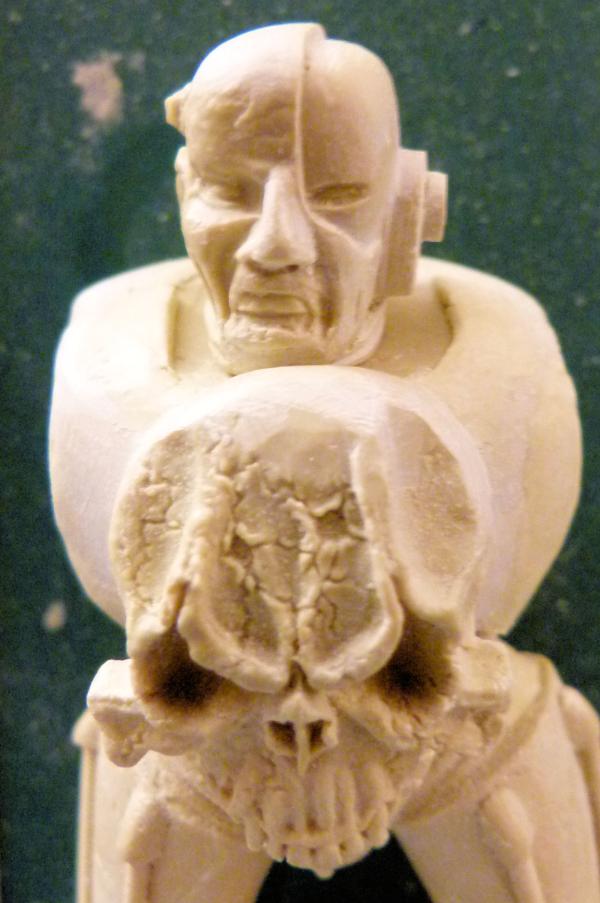
I've started a Mk4 variant also, but I'm going to have to go back to the drawing board on his helmet - it just doesn't look right. Since this photo has been taken, I've added his chest ribbing, making the large circle of milliput into the respirator type thing and the little skull for his belly button. I'm 90% finished on the chest and will go back to this once I've finished this......
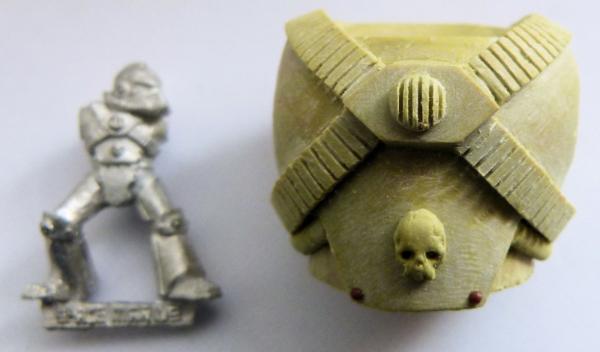
After the milliput dries, I'll use a razorsaw to mark the chest ribbing and use a scalpel to sharpen the edges of the ribbings. I've had some fun making the right leg! When the millipt dries, I'll sand around the studs to blend them in better and I'll then make a mould to save having to make another for his left leg!! I want to pose my Mk5 similar to the GW metal version in the bottom of the picture. I'm not sold on the "I'm a little teapot" pose of his left arm - Any suggestions? I'm trying to replicate and upscale the Bolt Gun of the GW version.

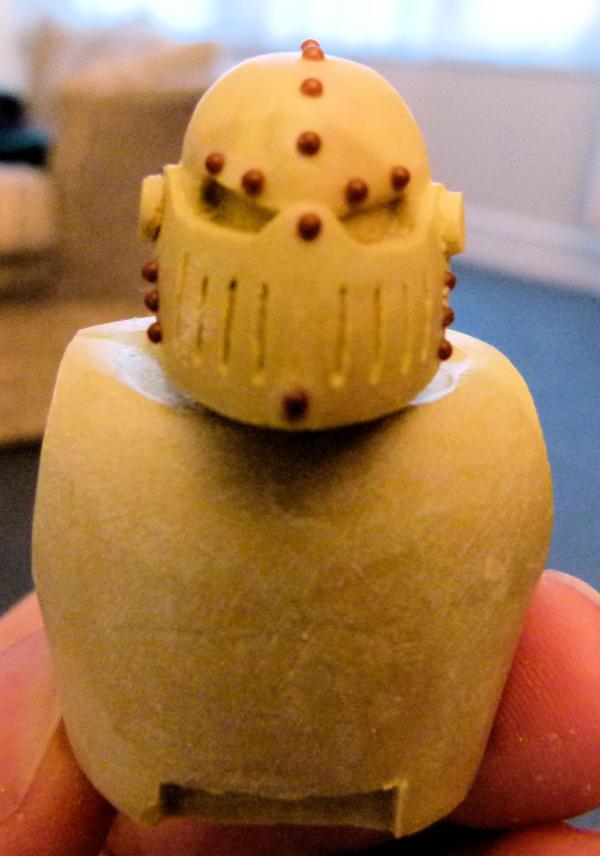
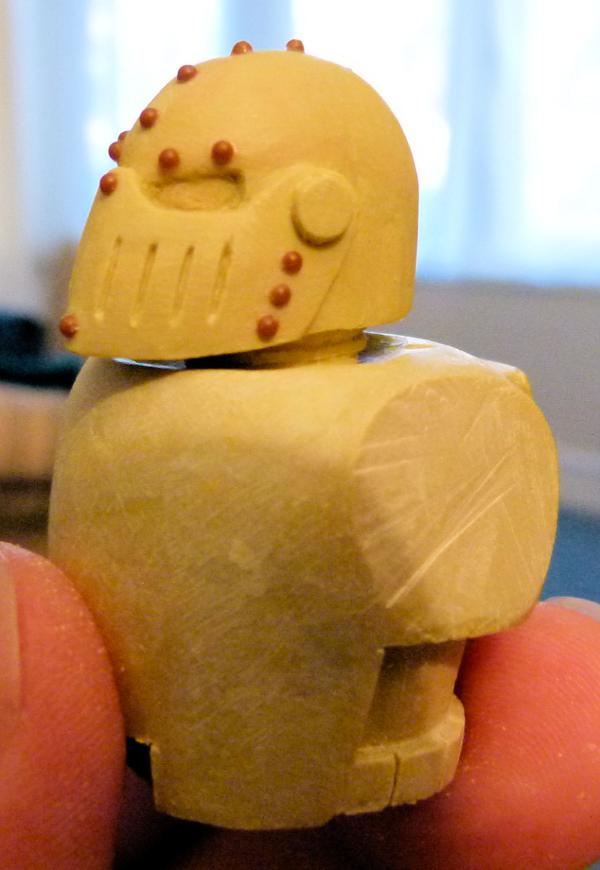
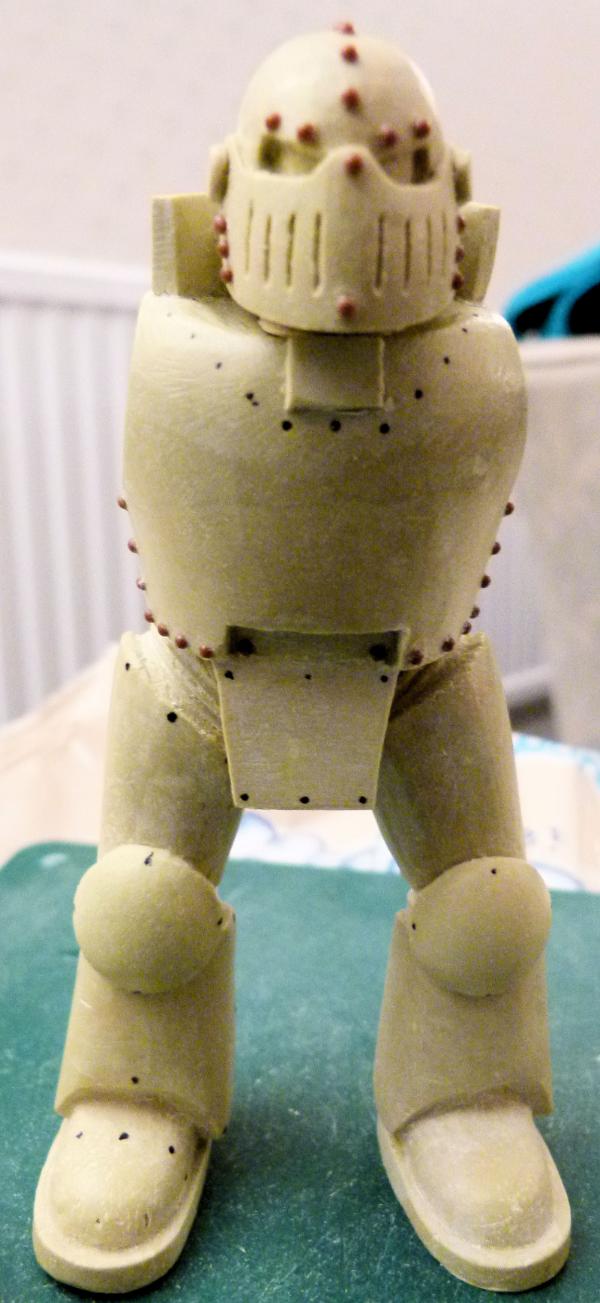
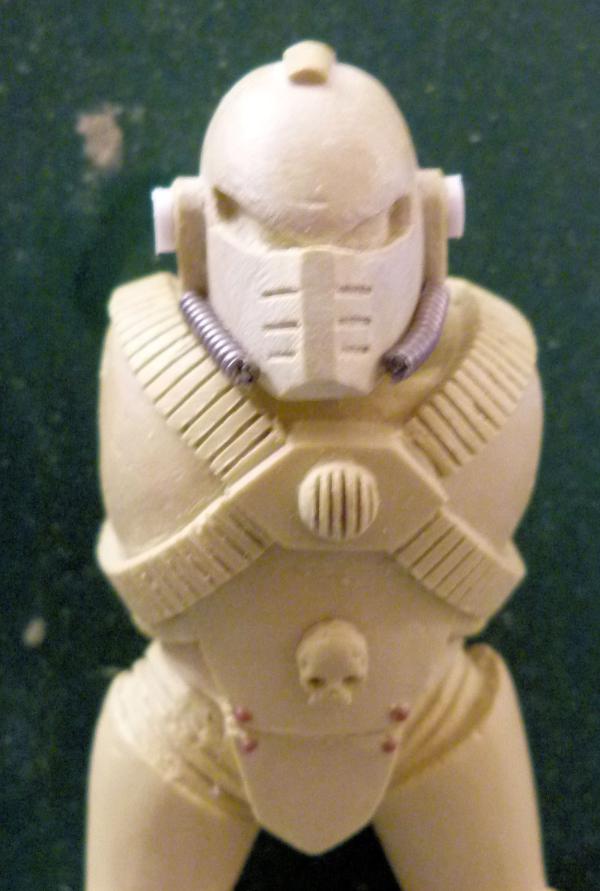
Here's a close up of the Mk5 Heresy Helmet I've converted/sculpted. I think the Mk5 armour is going to look brilliant in this scale!!!!
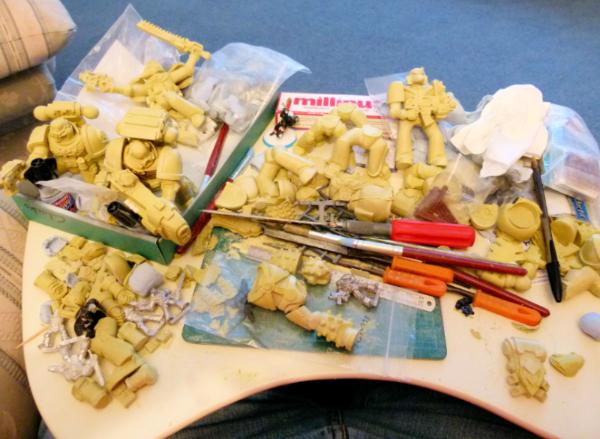
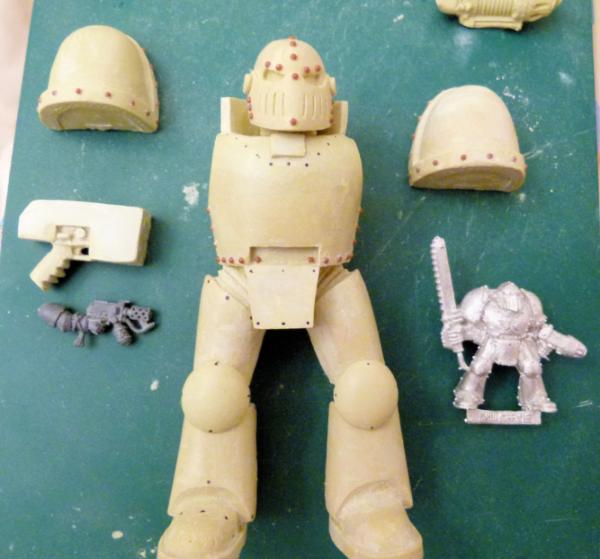
Thought you'd like to see my little laptop tray with what I'm working on at the moment - eventhough it looks messy, I know where everything lives!! You should be able to see the different GW metal Mk armour dotted around the place. I want to make a Mk2, Mk3, Mk4, Mk5 and Mk6 versions before I go back to either a) completing my LR Spartan, b) Start making a "Plasma" Fellblade and/or c) make another Fortress of Redemption like building (I've got 4 missile silo/Lascannon weapons and 24 "Imperial Eagles" that will be fitted around the octogon edges. The 4 Large Lascannons will be dotted on each corner of a square and the Fortress itself will be placed in the centre. I really want to make this, but I don't know if I have the storage space!)
Any comments/critiques welcome.
Regards, Phil
|
|
|
|
|
|
2012/10/14 21:37:31
Subject: Philmorgan75's workshop blog - Legion of the Dead
|
|

Mutated Chosen Chaos Marine
|
Damn, those sculpts are nice.
|
|
|
|
|
2012/10/14 21:48:51
Subject: Philmorgan75's workshop blog - Legion of the Dead
|
|
Aspirant Tech-Adept
|
Cool, it's like Skeletor got fed up of annoying visitors and decided to weaponise Castle Greyskull. I think the skulls are maybe a little excessive but I really like the layout - the entry ramp is cool. And all the details like the drainage pipe are really nicely done. Oh and I like the snow.
The statues are looking good. Are you planning to use them all as statues or are you trying to one-up the current truescale trend? My only criticism is that if they are statues they ought to look more like they have been hewn from a single block.
|
|
|
|
|
|
2012/10/18 07:17:30
Subject: Philmorgan75's workshop blog - Legion of the Dead
|
|
Regular Dakkanaut
|
 Bruticus wrote: Bruticus wrote:Cool, it's like Skeletor got fed up of annoying visitors and decided to weaponise Castle Greyskull. I think the skulls are maybe a little excessive but I really like the layout - the entry ramp is cool. And all the details like the drainage pipe are really nicely done. Oh and I like the snow.
The statues are looking good. Are you planning to use them all as statues or are you trying to one-up the current truescale trend? My only criticism is that if they are statues they ought to look more like they have been hewn from a single block.
Well SM's are supposed to be He-man like Bruticus!!!
In answer to your question, I would love to make a full Tactical and Assault Large Scale Squad but each SM takes a number of weeks to construct so progress will be slow. I have so many things I want to do, but working fulltime and having a 6 and 4 year old boys with busy social lives, I normally only get 45 minutes in my lunch break and around another 2 hours in the evenings to do my beloved hobby!!
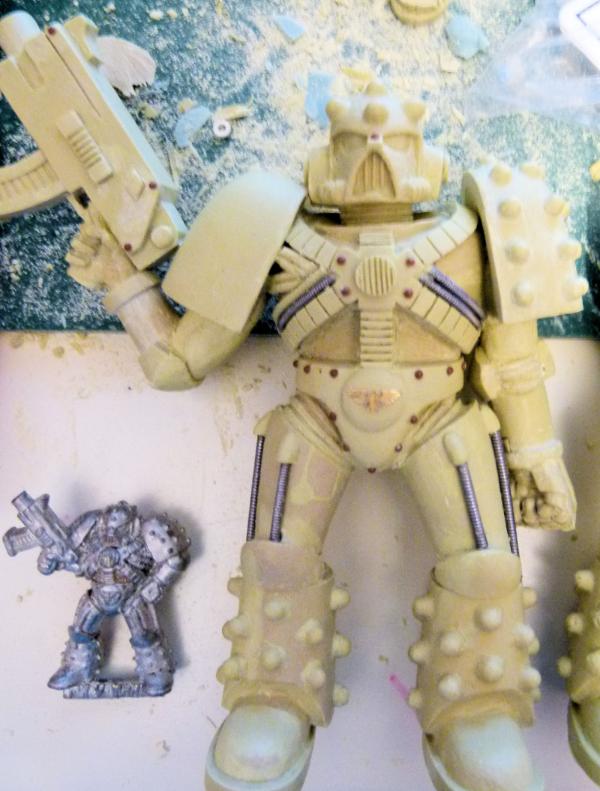
Here are some shots of the updates on the Mk5 Heresy Armour:
The harness has been finished. Just need to add a FW Brass Etch Imperial Eagle to his belt buckle to finish his chest.
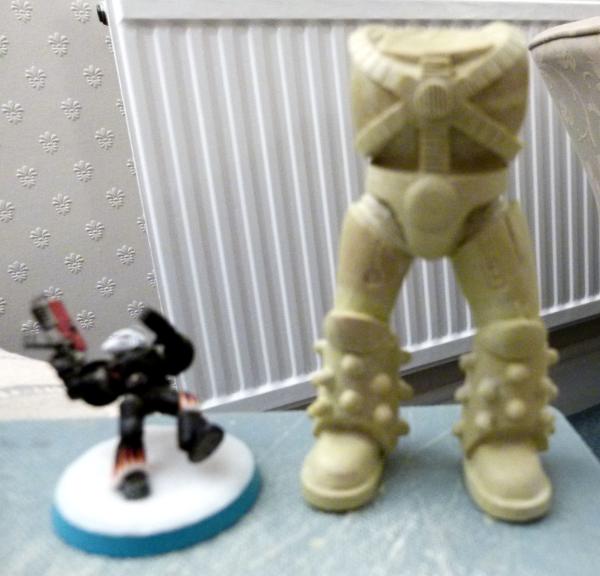
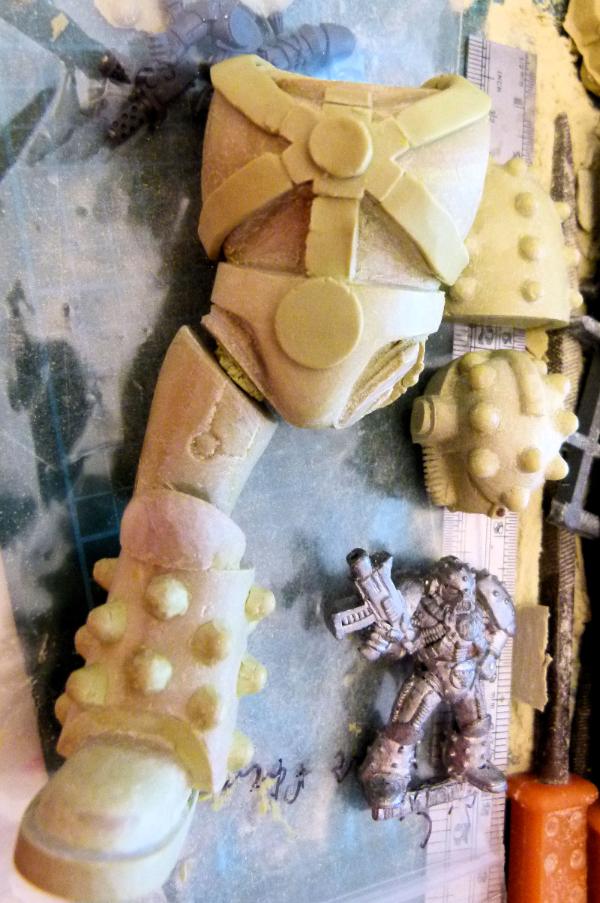
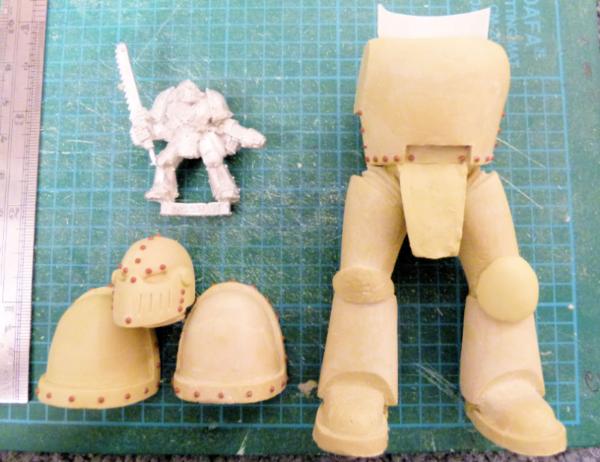
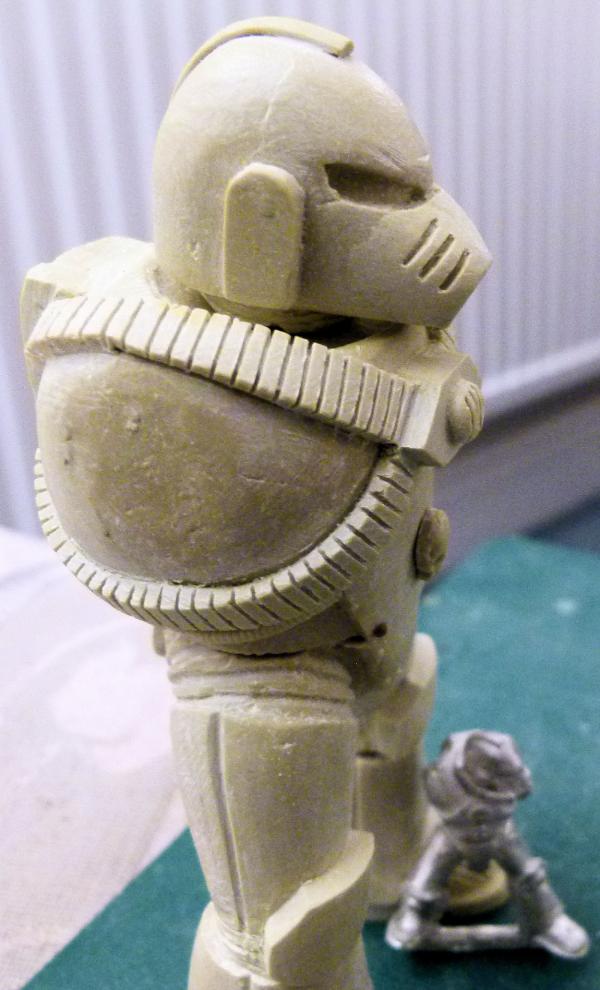
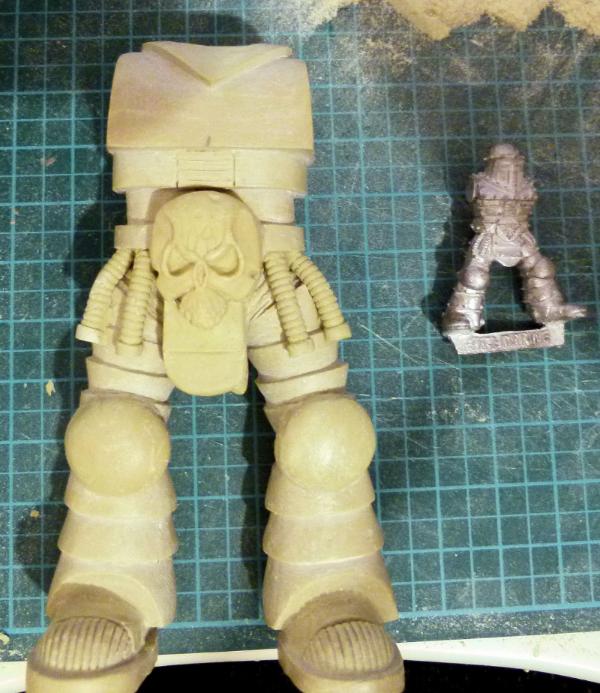
Apologies for the bluriness of this photo but it shows the scale compared to a normal SM. I'm still sorting out the legs, which will need to be filed and sanded to look the part.
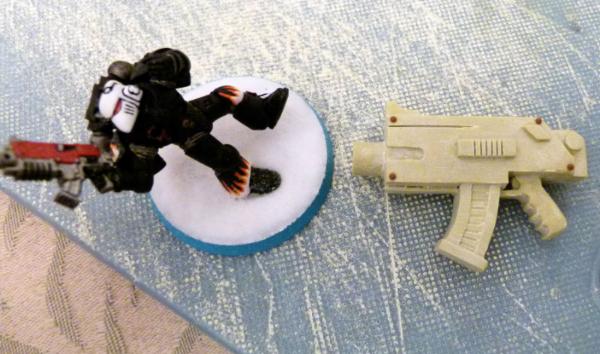
Here's what I've done with the Bolt Gun. I wanted to make an old school Bolt Gun and used the original SM Mk5 Heresy Armour variant I showed in an earlier post.
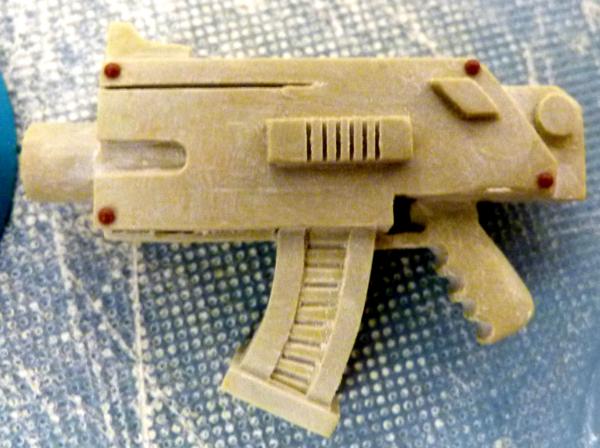
Here's a close up.
Whilst I'm waiting for the milliput to dry, I'm moving onto what to do with his left arm. I'm planning on having his arm down by his side and then sticking a Frag grenade in his hand, so will involve sculpting a clenched fist - something I haven't done before.
Off to work time.
Any comments/critiques welcome. Regards, Phil.
|
|
|
|
|
|
2012/10/18 07:28:18
Subject: Philmorgan75's workshop blog - Legion of the Dead
|
|

Regular Dakkanaut
|
It looks a real good work.....can you add a photo where is visible the whole structure!?
|
|
|
|
|
2012/10/21 16:54:14
Subject: Re:Philmorgan75's workshop blog - Legion of the Dead
|
|
Regular Dakkanaut
|
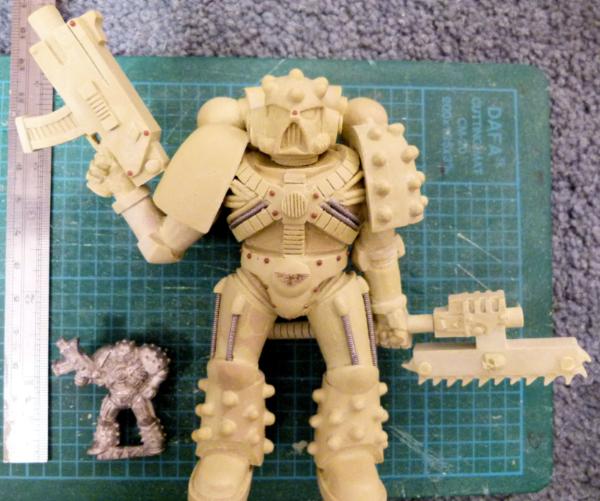
Update time:
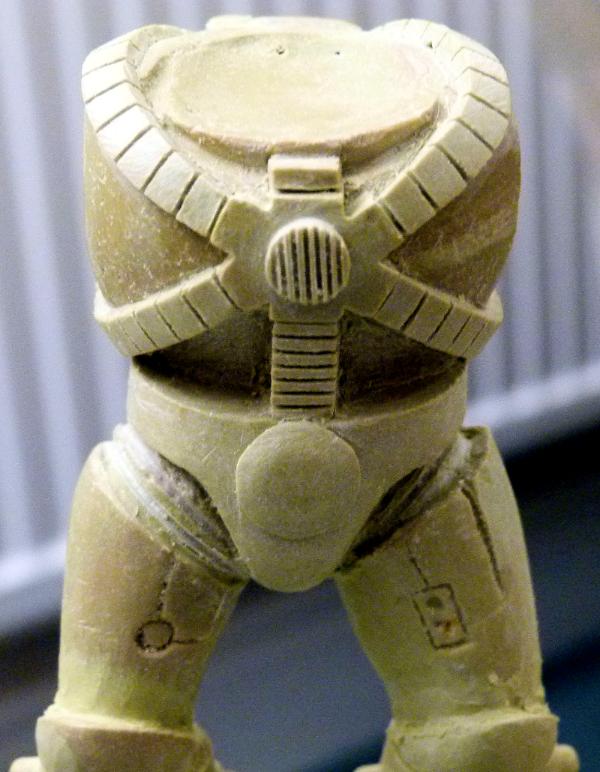
This is the finished Mk4 Chest piece with the (blurred!!) GW RT version to the side of it. I've added a ribbed pipe under each "harness" which I've seen on the new FW versions - These aren't on the GW RT variety but I thought they added something extra. Need to work on the Helmet, legs and "gauntlets" to finish this Mk4 trooper.
Here's the progress on the Mk5 Heresy version. I've made a press mould of my Bolt gun, so the one I've added to his right hand needs a small bit of milliput to hide the imperfections and a few rivets and this will be done. His left arm is in the process of being converted - I want to swop his left "shooting" hand with the clenched hand and am thinking of adding a World Eater like Chain Axe with a chain wrapped around his wrist and the chain axe handle. I've gone back to the drawing board on the backpack. I'm now trying to go back and use the original RT version - a lot of work is needed here.
I've done a lot of work on his chest and legs. I've added rivets from Tichytraingroup, power cables from Zinge Industries and a FW Brass Etch Imperial Eagle on his belt buckle.
I'm really hapy with how this has turned out. I'm not going to be able to do much more with him until I get some more silicon putty so I can make some moulds and be able to make more versions in the future.
Comments and critiques always welcome.
Regards, Phil
|
|
|
|
|
|
2012/10/21 18:05:39
Subject: Philmorgan75's workshop blog - Legion of the Dead
|
|

Stealthy Space Wolves Scout
|
Oh my god this is amazing! It looks gigantic from what I can gather, any chance of an aerial view of the entire thing?
|
 The Rout, Vlka Fenryka, Warrior Kings of Fenris.... the Space Wolves. Horus Heresy. Sixth Great Company. 1500pts. In progress. The Rout, Vlka Fenryka, Warrior Kings of Fenris.... the Space Wolves. Horus Heresy. Sixth Great Company. 1500pts. In progress.
"Atop a sea, a crimson red,
Axe to bare, land paved with dead,
Strode the Jaw, teeth bared in snarl,
Glimmering maw, death in hand."
Saga of the Gristlefang |
|
|
|
|
2012/10/27 20:32:51
Subject: Re:Philmorgan75's workshop blog - Legion of the Dead
|
|
Regular Dakkanaut
|
My silicon putty has arrived so I could make a mould of the Mk5 Heresy Armour and progress the model further.
The model on the left is slowly coming along. Things left to do:
Sand his right tricep and add some more ribbing joining the back of his right arm to the shoulder pad
Use razor saw to help make fingers on left hand
Make Chain Axe to be held in his left hand
Make Chain to wrap around left arm, hand and Chain Axe
Add some more ribbing to left chest area joining arm to shoulder pad
The model on the right is the first cast from the mould. It will still take a lot of work - BUT it will still be a lot quicker than making a new one from scratch. I plan on adapting the legs to make the Mk4 version. The Knee pads need to be changed/heightened slightly, I need to remove the vertical ribbing and instead add a vertical line all the way down the inside and outside of each leg and finally, add lots of grooves to the toe area. I've gone back to basics on the Mk4 helmet and need to do some more work before I add another picture.
Another shot of the WIP Mk5 Heresy Armour. Another couple of days and this model should be finished.
Here's a Mk3 Iron Armour helmet I've just about finished. The body is slowly taking shape. A few rivets, an imperial eagle on the front of the chest and (in my version) some ribbing around the sides.
Side view of helmet.
I've started on the Mk3 legs. The front will be Mk7 legs, but the back will have to be sculpted from scratch, so I can see this taking a while to complete.
The good thing about milliput is that it takes a long time to dry rock hard, so it gives me time to flit between lots of different projects/Mk Armour.
Critiques welcome as always!
Regards, Phil.
|
|
|
|
|
|
2012/10/30 22:38:47
Subject: Re:Philmorgan75's workshop blog - Legion of the Dead
|
|
Regular Dakkanaut
|
Almost finished my Mk5 Heresy Armour:
I've only got a small amount of work to do on the Chain Axe and this model will be done.
I need to file the 2 round bits smooth of milliput and add a small thin wire connecting the skull to the Chain Axe engine for the whole of this model to be finished.
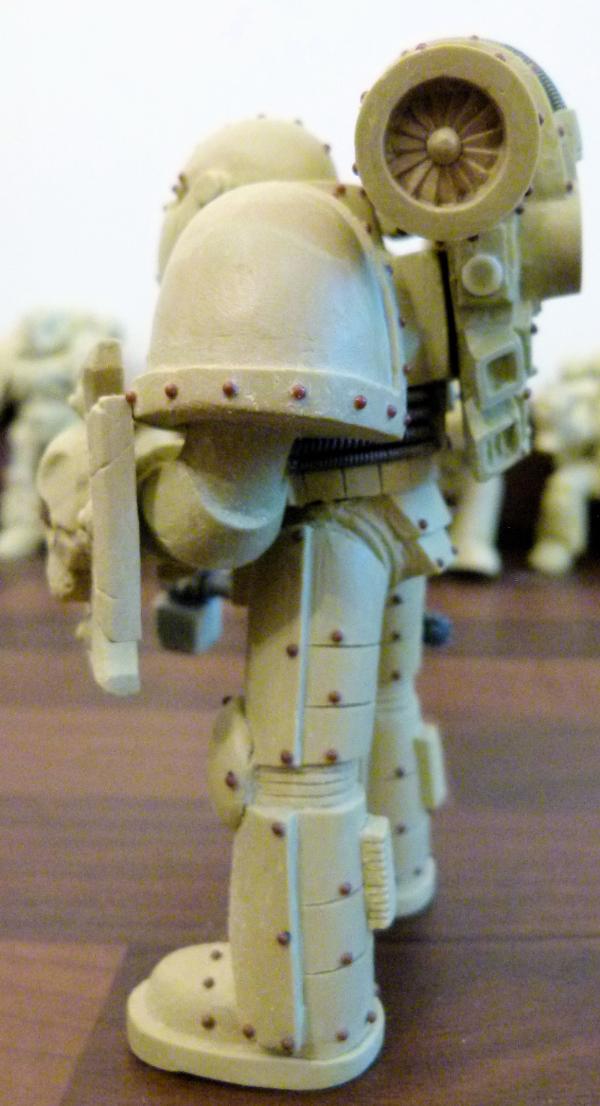
Here's a shot of the Mk5's rear with the old school backpack.
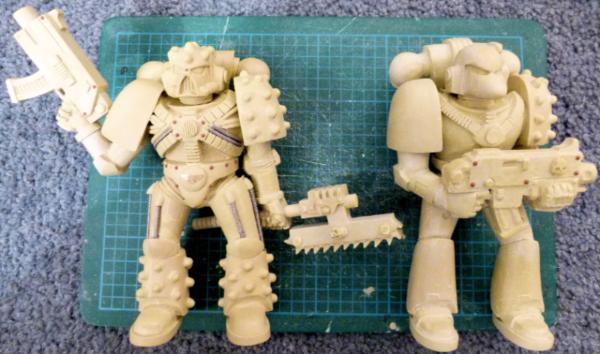
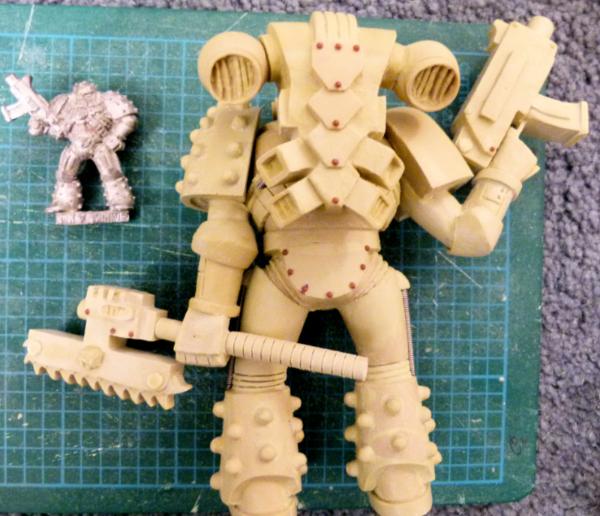
Shot of the Mk5 and Mk6 together.
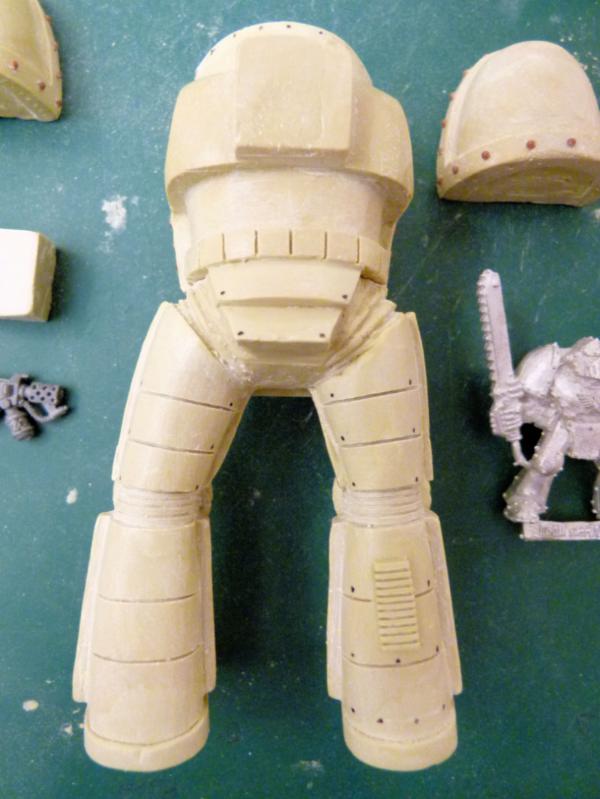
Making some progress on the Mk3 Iron Armour. I used the Mk5 legs and have sanded all the bumps and power cables off. I am in the process of making the much larger and rounder knee pad on the left. Once I'm happy with the completed knee pad, I'll make a quick mould to make an exact copy for the other leg. The crotch armour still needs a bit of work to match the GW version. The neck armour has just had plasticard added to it. I'll add some milliput around it to thicken it. I've also started converting the back of the legs. I'm going to give it a few more hours on the radiator to completely set rock hard before I begin the laborius task of sanding and shaping. I'll post a shot soon to show what I've done.
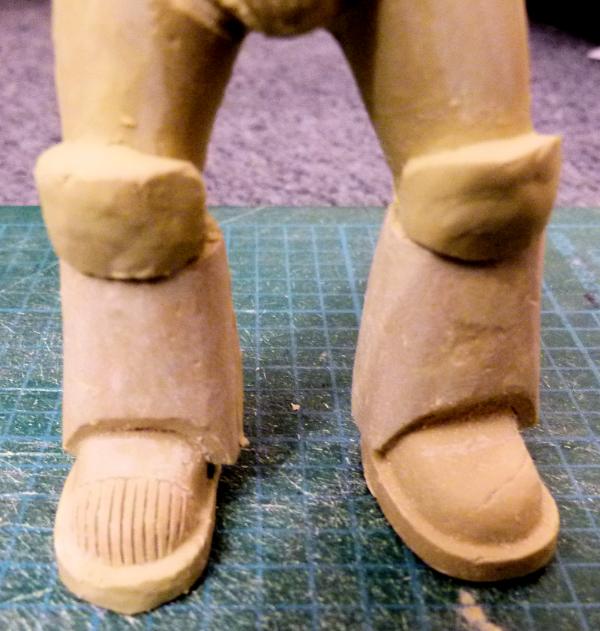
Finally, I've started making a Mk4 pair of legs (again using the Mk5 which I have denobbled!!). This is very early in the process as the milliput hasn't been sanded and shaped yet on the knee pads. You can see the progress I have made on his right foot (like the GW version). To save time, I will probably take a cast of the right foot and use a copy on his left.
As always, feel free to ask questions.
Regards, Phil.
|
|
|
|
|
|
2012/11/01 21:24:23
Subject: Re:Philmorgan75's workshop blog - Legion of the Dead
|
|
Regular Dakkanaut
|
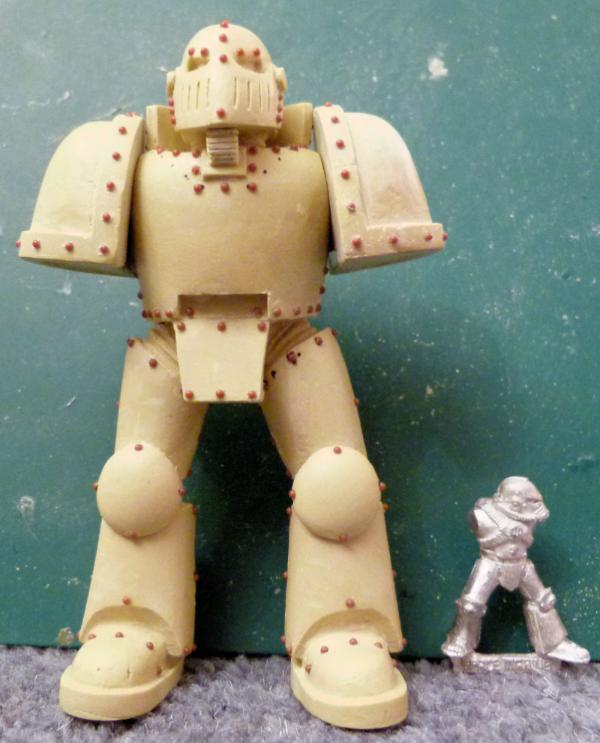
I've made some progress on the Large Scale Mk3 Iron Armour Space Marine:
All the black dots are where I'll add some 0.050" rivets when I can get some new super glue. I don't know what's happened to the brush on my current super glue, but it now resembles a kids paint brush!!!!
I need to add some power cables to attach the top of the chest to the bottom of the helmet. You can see to the left of the photo the progress I've made on the Hand Flamer. I've just got the basic box shape - I'll start adding more detail when a new batch of milliput arrives in the post!!
You can just see in the top right hand corner the start of an old variant of the Plasma Pistol to be used on the next sculpt.
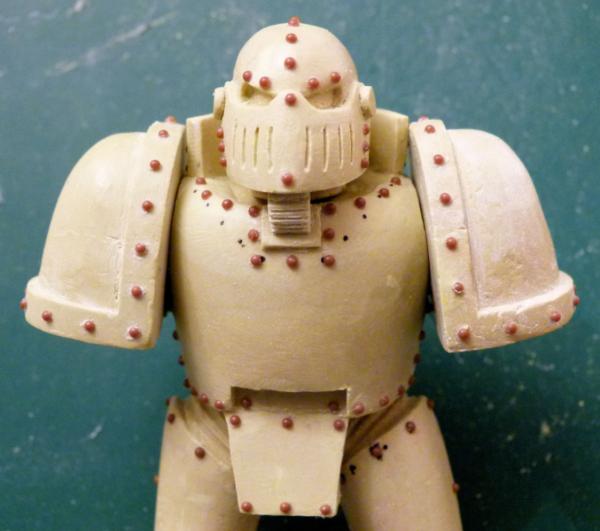
Here's a close up of the front view.
This shows what I've done with his back. Again, lots of rivets will need to be added here. I've just created a mini mould of the right power cable on his right calf to have an exact copy on his left. I'll add some Zinge Industries power cables to join the front armour to his backpack.
Here's the progress I've made on the Mk4 Maximus Armour Large Scale Space Marine. The chest has been completed. The helmet needs to have the power cables attached to the sides and the "breathing" grooves on the left hand side need to be worked on.
I need to add a "crotch" plate, smooth and blend some milliput onto his left foot and add a few rivets to the knee pads for his legs to be finished.
Here's a shot from the side. As stated above, I need to add a power cable to the side of the helmet and a very small bot of milliput needs to be added to the very end of the snout.
I'm off to Legoland Windsor for the next few days, so I don't expect to be updating this blog for a couple of days.
Any comments/critiques welcome.
Regards, Phil.
|
|
|
|
|
|
2012/11/06 21:48:06
Subject: Re:Philmorgan75's workshop blog - Legion of the Dead
|
|
Regular Dakkanaut
|
Progress on my Mk3 Iron Armour Large Scale Space Marine:
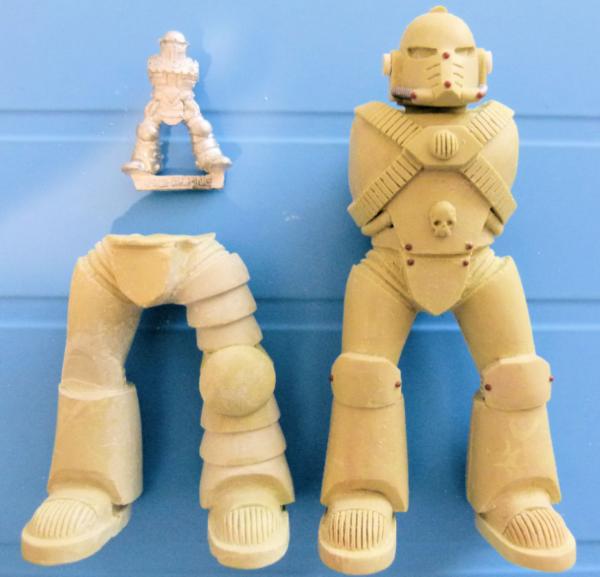
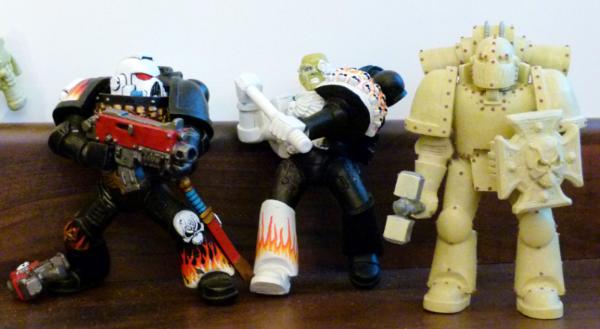
As you can see, I've added all the rivets (front and back) on the helmet, body, legs and shoulder pads. I'm still in the process of making his arms and weapons - I'll take some shots when I've made a bit more progress. Please excuse the Mk4 GW SM to the right of this shot - It's purely to show scale.
Here's a close up of the helmet and chest. I've decided not to add a large Imperial Eagle on his chest as per the original GW model. As far as I can remember, only 1 Legion was allowed (Emperor's Children?) to display an Imperial Eagle before the Horus Heresy and as I don't know what era I will be painting this model in, I'll refrain from modelling this icon!

I thought I'd show you the WIP on a Mk4 Maximus Armour. I just need to smooth the join between the chest and groin area and to add 2 small skulls onto the Knee pads and this part will be finished for me to take a mould for future builds.
Till next time, Regards Phil.
|
|
|
|
|
|
2012/11/10 20:23:52
Subject: Re:Philmorgan75's workshop blog - Legion of the Dead
|
|
Regular Dakkanaut
|
Another update:
I've decided to change the weapons he will be carrying - I'm keeping the Boarding/Storm Shield, but am going to go with a Power Mace in his right hand. The mace will be based on the GW Black Templar. I think it has a very medieval feel to it!
I've just received a FW Mk3 Backpack and want to copy it as best I can in this scale. This will probably take a number of days as I have lots of things going on in my "real life" - Son's football training, Boss's leaving party, School Governors meeting and a Manager job interview. I probably won't have any spare time till next weekend to complete this model.
Here's the progress on the Mk4 Maximus Armour. I have rebuilt the helmet and have got to this shape. I need to add a small amount of milliput to blend the power cable onto the helmet, a couple of rivets and I need to finish his ears off. I then need to add arms and weapons. Any suggestions for what this Mk4 should be equipped with?
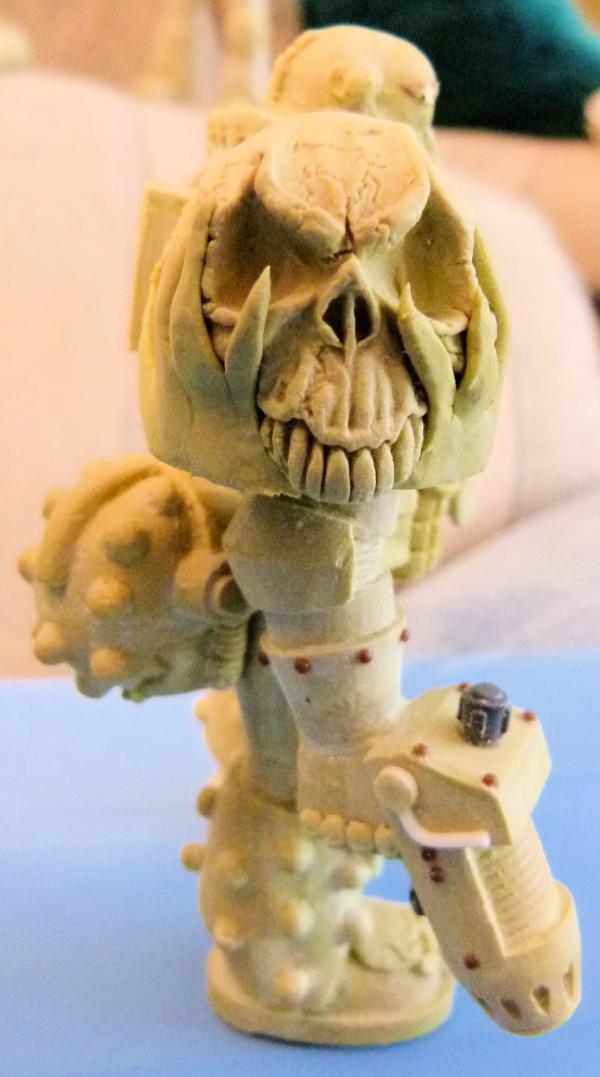
Here's a quick shot of another Large Scale I'm in the process of making - A Chaplain! He will be encased in Mk5 Heresy Armour. His helmet will be attached to his belt.
Things I want to do:
Add large skulls to cover his knee pads.
Make a Rosarius which will dangle around his neck
Make a Crozius Arcanum to be held in his left hand. I want to make it a double faced Imperial Eagle resting on a Skull.
Use a modern Plasma Pistol in his right hand.
A close up showing his partially rebuilt skull from a previous war!
Any critiques welcome.
Regards, Phil.
|
|
|
|
|
|
2012/11/25 19:33:06
Subject: Re:Philmorgan75's workshop blog - Legion of the Dead
|
|
Regular Dakkanaut
|
Update time:
I decided after spending many hours making a maul that using a converted GK Dreadknight Hammer looked really cool. My WIP Mk3 Backpack can be seen in the top right hand corner.

Here's a side shot. I used 2 GK Dreadknight hammers to make this.
Here's a shot of the WIP backpack with the FW version I'm using as a template. I used a mould of a Lego cone to make the exhaust vents!
Here's a shot to show the inside of the vents.
Just to show an update of the Chaplain I posted last time:

I'm really happy with how this has turned out (lots of skulls!!!). I think the Old School Plasma Pistol turned out really cool! I need to sand and smooth out the flames on his right shoulder pad and need to add a rosarius around his neck (attached by a chain) for this to be Large Scale model to be finished.
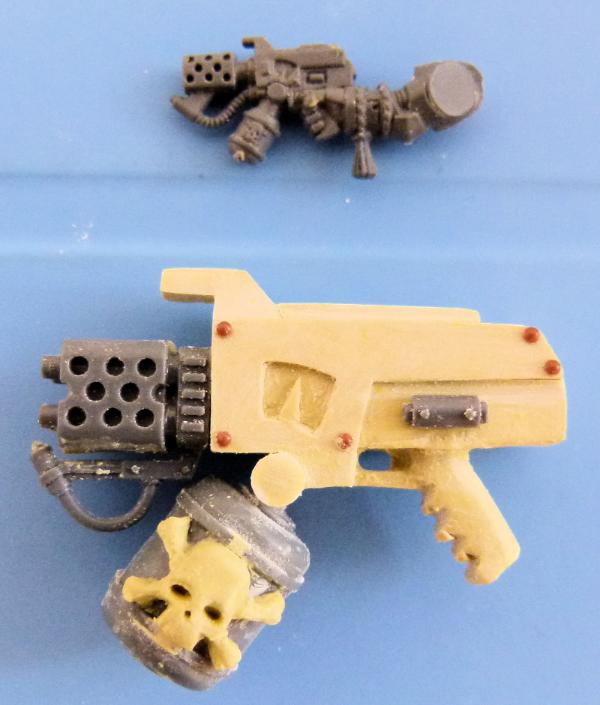
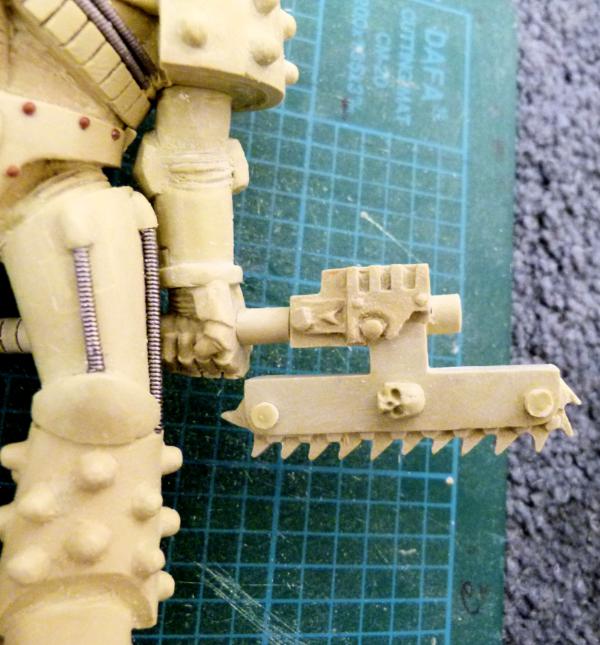
Here's one of the weapons I've made for the Large Scale Maximus Armour - A Hand Flamer!! The nozzle was taken from the GK Dreadknight incinerator and the fuel cannister was taken from the Baal Predator with an added skull and cross bones
And finally, the next Large Scale I'm moving onto:
I used a mould of Mk4 Maximus Armour legs and started to make Mk2 Crusade Armour. The left leg is partially finished (need to add rivets and power cables). It's involved a LOT of sanding to cut the armour plates to get to this stage!
Any questions welcomed. Regards, Phil.
|
|
|
|
|
|
2012/12/19 19:01:48
Subject: Re:Philmorgan75's workshop blog - Legion of the Dead
|
|
Regular Dakkanaut
|
Update time!
Finally finished the Mk3 Iron Armour Large Scale Space Marine:
This shot shows what I did to the side of the back pack.
This shows the whole of his back pack. I seem to be keeping tichytrain group in business with all these rivets!!
I thought I'd post a few shots of all of my completed Large Scale Space Marines:
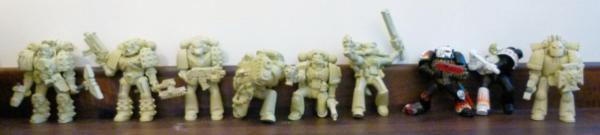
Almost made a full squad! I am toying with retro fitting jump packs to all of the Assault weapon armed troops -we'll see!!!
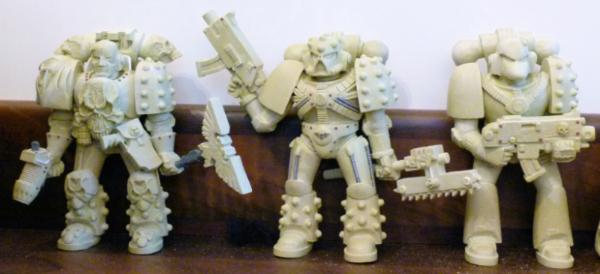
Chaplain, Mk5 and Mk6.
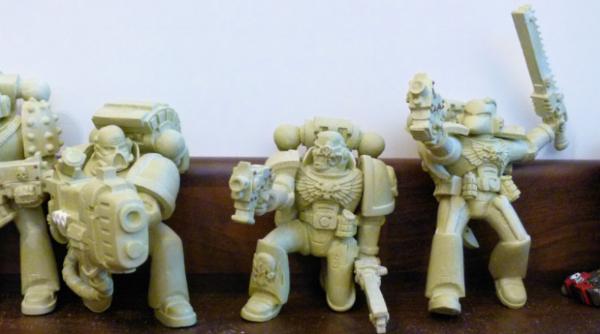
Plasma Cannon, Mk6 Sergeant and another Mk6.
Mk8, Mk6 and Mk3.
I thought I'd show you my current WIP - a Mk2 Crusade Armour Space Marine:
I need to sort out his crotch plate and add LOTS of rivets!!!!!
This is the backpack I'm going to use - A Mk2 Crusade Armour Jump Pack:
I need to add some more flexible cables joining the backpack to the Storm Raven "Jet Packs" and a small vertical cable at the top to finish this. I was toying with sculpting all of this from milliput, but I saw the Storm Raven engines and thought I could save a lot of time AND effort by using them!
Here's a shot from the other side.
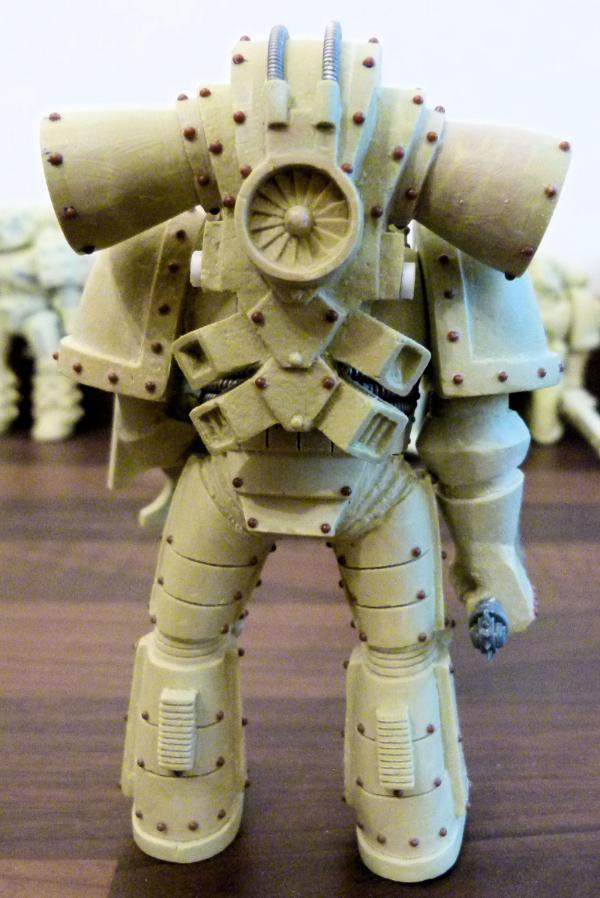
I've almost finished my Mk4 Large Scale and have also decided to make a Mk4 Jump Pack. This is as far as I have got:
I haven't copied it exactly. I think the large fan turbine looks cool!! I need to add a few things (the vertical side pipes - I'm still undecided on how to make these) to finish this.
Here's the side shot.
Back to adding rivets to the Mk2. Critiques welcome/expected.
Regards, Phil.
|
|
|
|
|
|
2013/02/12 15:32:49
Subject: Re:Philmorgan75's workshop blog - Legion of the Dead
|
|
Regular Dakkanaut
|
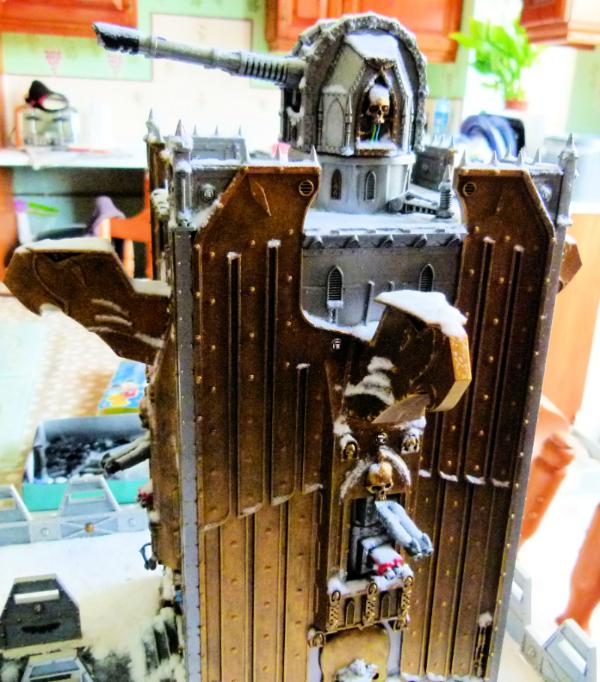
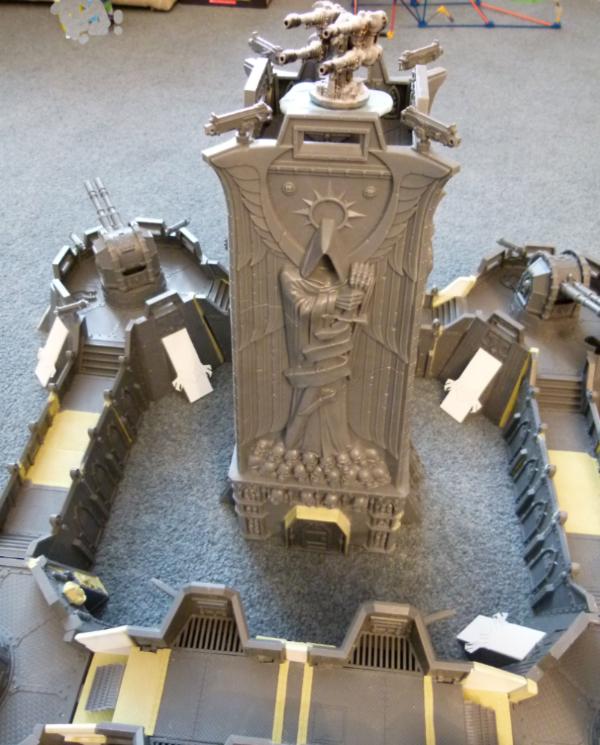
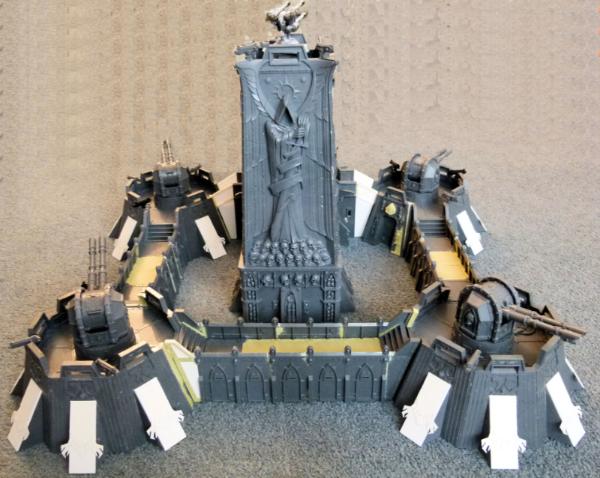
Another almost completed project - The "Fort"ress of the Damned:
This front shot shows the size of the Fortress. The only things missing are the Heavy Bolter for the Bastions. I'm still trying to aquire 4 of them.
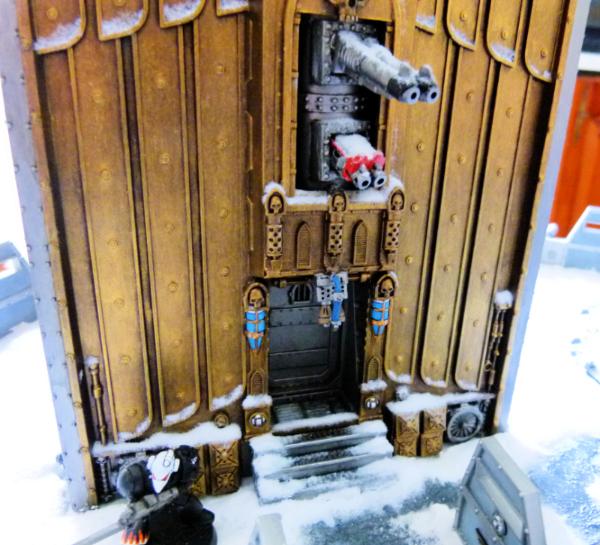
This shows the 99% completed Front Gate. I've added some Cities of Death Imperial Eagles to the top and bottom parts of the Bastion to increase the eagle count!
This plan shot shows the walkway above the Front Gate and the front right bunker. You can see the extra Heavy Bolters on each Bunker. I plan on adding mini 2mm magnets to the bottom of each weapon to aid in the storage.
This shows the whole of the right hand side, two bunkers and the corridor.
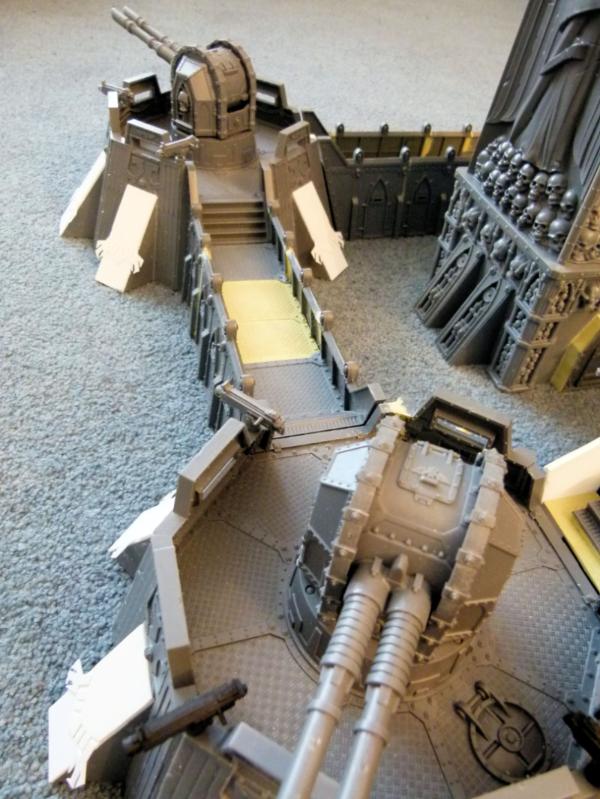
This shows the whole of the left hand side.
This shows the near complete Tower. I have added an aerial defense weapon - The Aegis Autocannon. I need to remove the blue silicon mould underneath the temporary Aegis Autocannons which I have borrowed from the other outpost I have already completed. Aegis Autocannons go for ridiculous sums on ebay! I still need to purchase another one of these to finish the Tower.
This shot shows the whole of the rear section. I have spent more time constructing the rear corridor and Front Gate section than the whole of the rest of the Fortress!
I have decided to paint the Fortress like this:

Gunzhard has done a fab paint job on his Fortress above and I can see me wanting to do a similar paint job. Any suggestions on what he has used to get the dark red colour? I want the weather to improve before I undercoat and start painting mine.
Until I get a new Aegis Autocannon and 4 Bastion Heavy Bolters and 17 2mm magnets, this project will be put away and I now want to start my next project, a Plasma Fellblade. Check out my Blog for more details.
Comments and critiques welcome as always.
Regards, Phil.
|
|
|
|
|
|
2013/02/14 21:21:49
Subject: Re: Philmorgan75's workshop blog - Legion of the Dead
|
|
Regular Dakkanaut
|
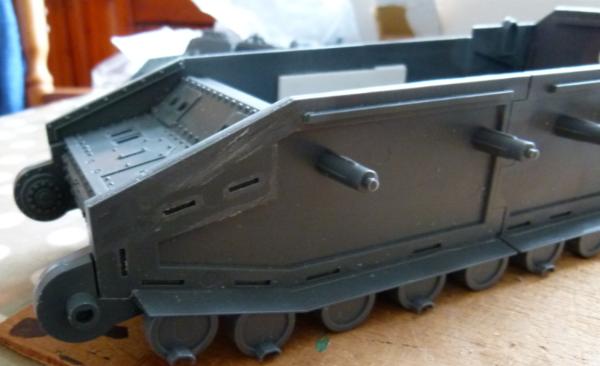
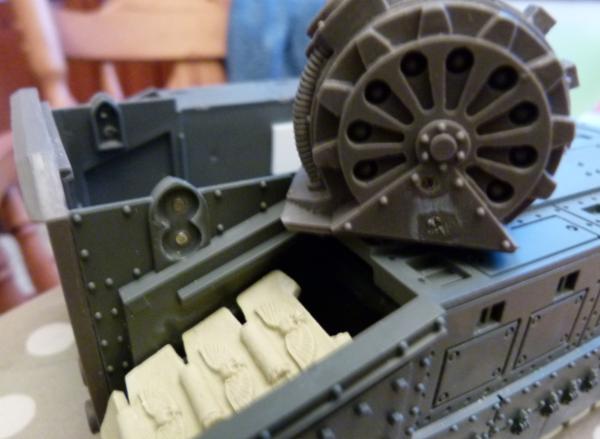
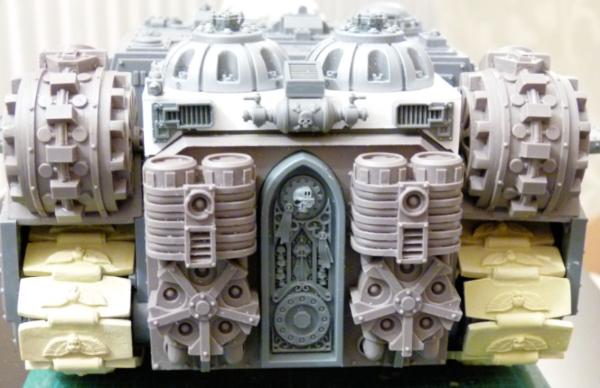
I have always loved the Fellblade models by Machinator and over the last few years, I have slowly bought enough parts to build one. I want to make this topic picture heavy to show what I've done. With no further avail:
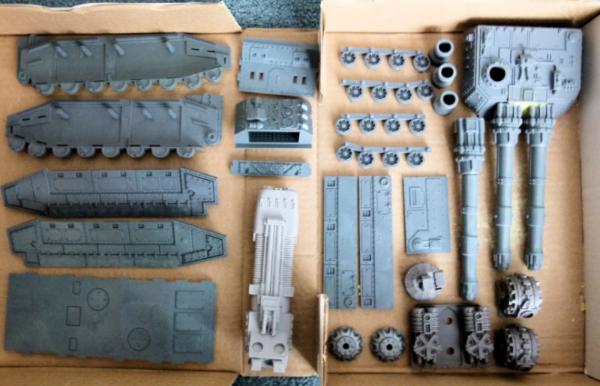
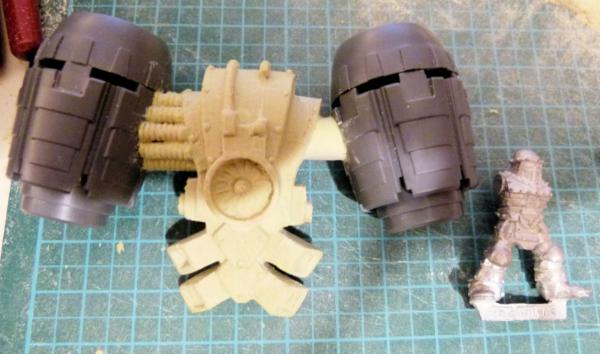
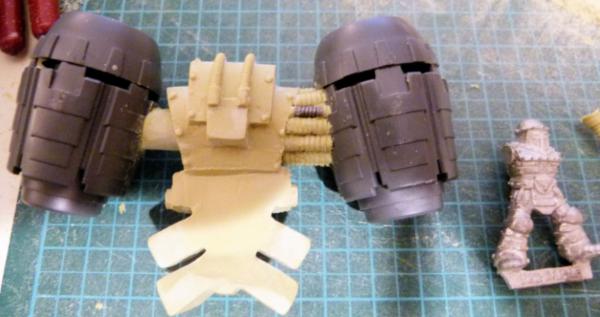
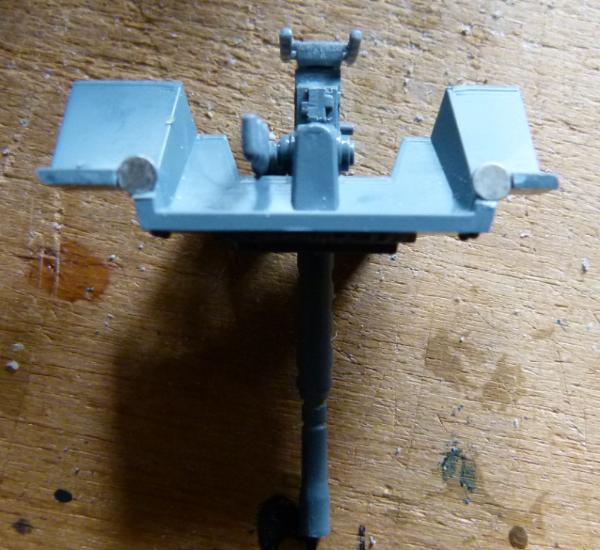
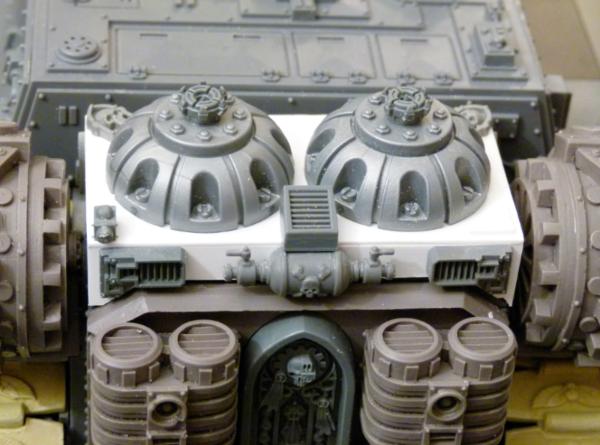
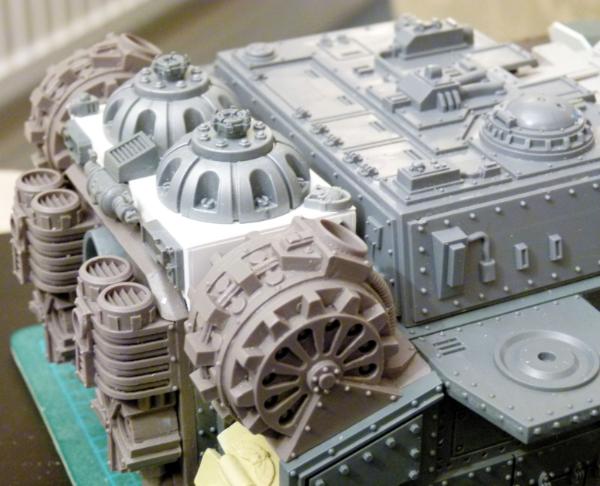
This shot shows the main components to be used in the build. I want to make a Fellblade which will be the fore runner to the Storm Blade. In the centre, you can see a Warhound Plasma Cannon that I managed to get off of ebay for half the price of a new one and will use this as the starting point of my fellblade. I received a couple of weeks ago some parts from Machinator and want to trick the Fellblade out with as much Plasma weaponary as possible. You can also see some Pegasus Chemical Plant parts that I will make Plasma Reactors with (stealing Machinator's DA idea here!)
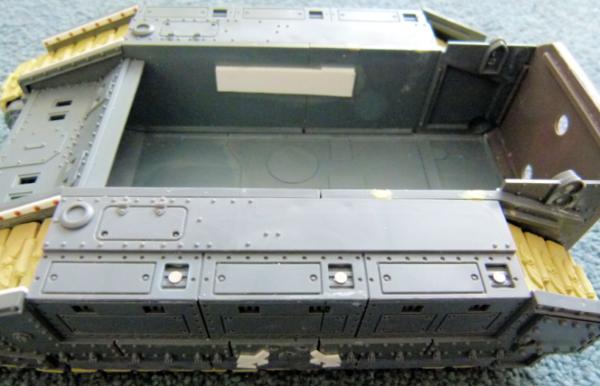
To get as much bang for my buck as I could, I decided to use the chassis for the Fellblade and through use of magnets, be able to convert it into all of the sword and blade variants - Storm Blade, Storm Lord, Bane Sword, Bane Hammer and Twin Shadowsword.
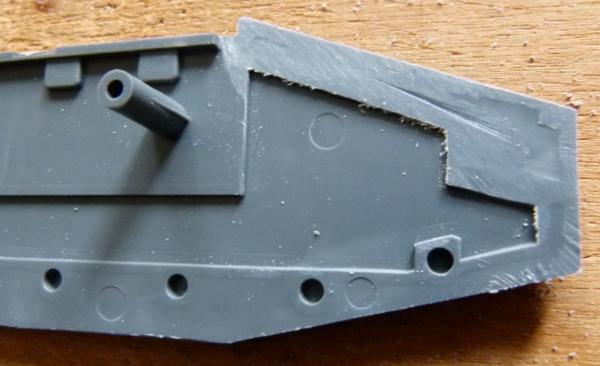
I constructed the bottom, front, rear and the internal parts of the sides as per the instructions. I then added some white plasticard on the inside to assist with future conversions. These ledges will assist in the conversion from fellblade to Shadowsword etc.
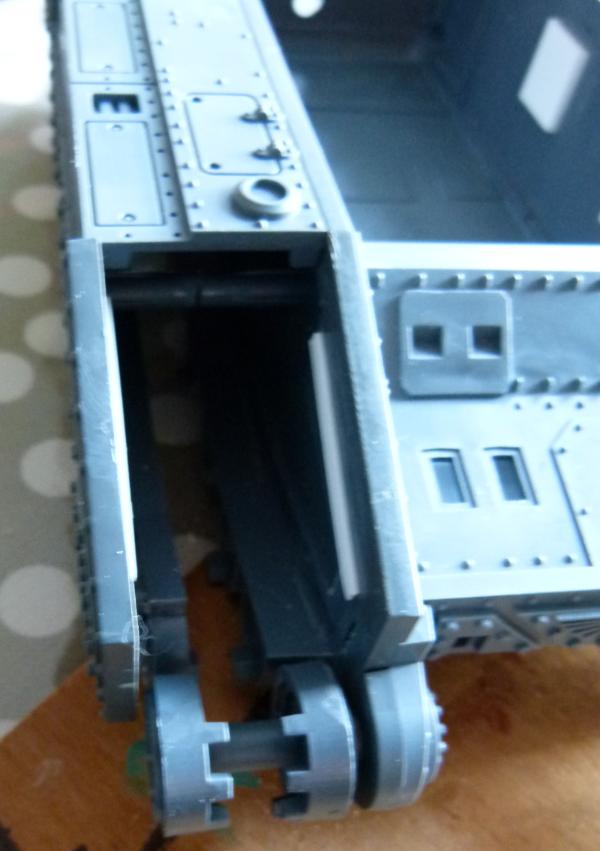
I added 2 little 2mm by 1 mm magnets on both sides, towards the back of the chassis. This will be used to hold the Heavy Stubbers when I want to field a Storm Lord. You can also see one of the rear wheels that has been attached.
I added two more magnets under the Heavy Stubber as well.
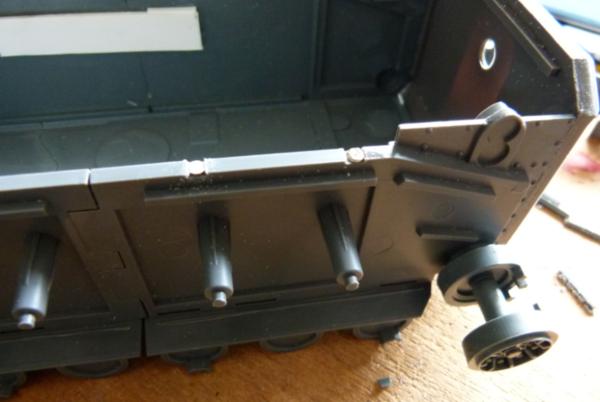
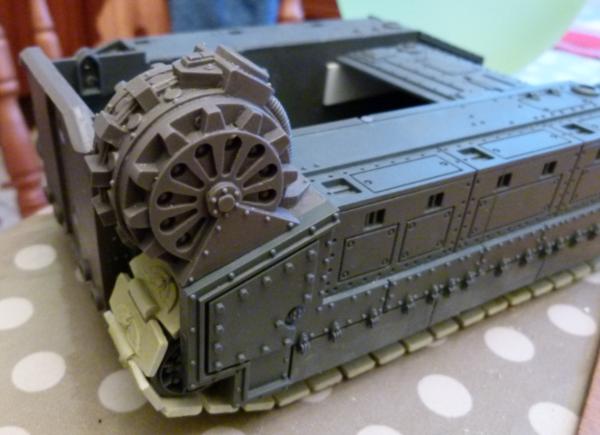
Track Section
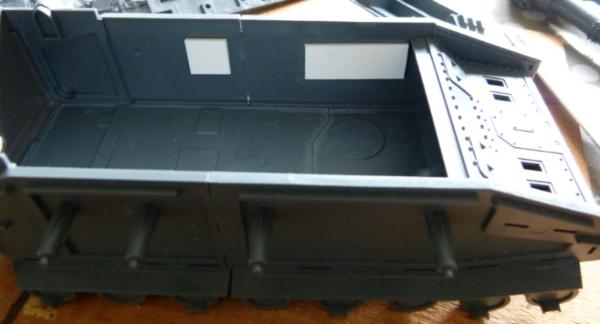
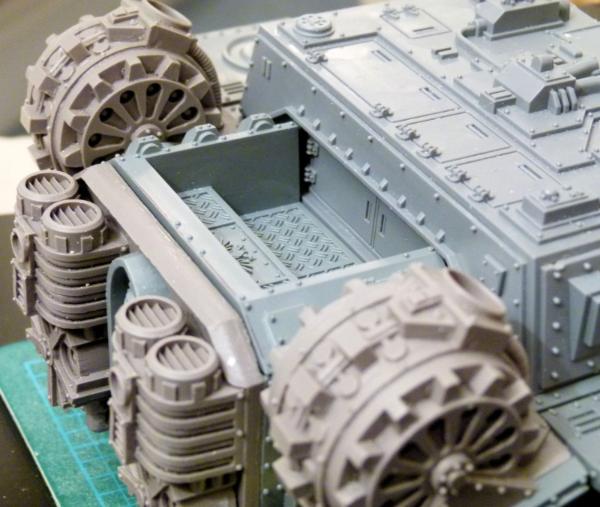
I didn't want to use the standard Baneblade treads, so I decided to make my own:
I thought this would be enough, but as I found out later, I needed another 3 single tank treads - oh well, back to my mould and my milliput!
This shows a close up of the Tank Tread. Not perfectly cast, but good enough for the ones underneath the tank.
To fit the new tracks, I had to remove all of the ledges that would have been used for the original tracks and mudguard.
I also had to remove the ledges on the outside parts.
I then glued the inside and outside track section together, as well as the top part. I then used a small piece of white plasticard on both sides of the track section to use as a ledge for the new tracks to rest on.
I added a 6 Tank Tread section onto the diagonal part and then added a single Tank Tread to start wrapping around the front wheel. I want the Tracks to be as close as possible, but I'm not afraid of using a bit of milliput to fill the gaps.
I then added a 4 Tank Tread section diagonally to get to the ground.
I then slowly wrapped the rest of the tracks around the rest of the wheels.
This is what it currently looks like until I make some more tracks.
Fuel/Power Source
To swop between Pre and Post Heresy vehicles, I added some more magnets into the fuel hose housing and then some more to Machinators Plasma field generator.
Eventhough the magnets are small, they hold the resin perfectly.
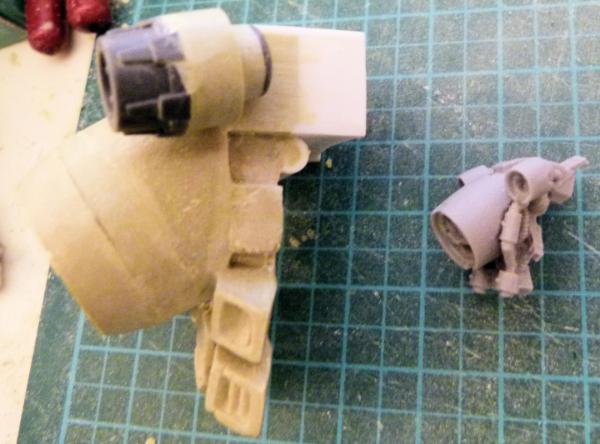
The original fuel drums fit without the need for glue nor magnets.
And finally, here's a final shot of the progress I've made today.
I hope to have some progress to show to you tomorrow.
Comments/Critiques welcome as usual.
Regards, Phil.
|
|
|
|
|
|
2013/02/15 20:51:04
Subject: Re:Philmorgan75's workshop blog - Legion of the Dead
|
|
Regular Dakkanaut
|
Small amount of progress today:
I added some rivets in the front where the front mudguard should be (you can just make out the white plasticard and brown rivets (from Tichytraingroup). I've seen this on Machinator's versions, so I thought I'd follow suit. This shot shows the chassis laid out as a Shadowsword with the correct fuel cells/drums.
This one shows a Shadowsword with Machinator's Tank Dynamo replacing the fuel cell/drum. I think this looks better myself. What do you think?
This shot shows the chassis in the Storm Lord version.
This shot shows the Bane Hammer. I only realised after taking the shot that I hadn't converted this properly. The main turret ?!? should be further forward than it is (like the Storm Lord) but I'll remember that for the future. I'm unable to make the Bane Sword as I have stuck all of the ends of the 3 Volcano Cannons that I have. Ah well!
This varient is armed with Twin Volcano cannons. I've got some Pegasus Chemical Plant parts that I purchased through Hoard o Bits a while ago after seeing Machinator's Dark Angel Fellblade. I want to add 2 Plasma Reactors to replace the existing engine parts for the Twin Volcano, Storm Blade and Fellblade variants.
This shows the progress I've made on the Storm Blade. I wasn't happy cutting up the FW Warhound Plasma Cannon, but sacrifices have to be made! This is only a mock up. I have just purchased some strong magnets on ebay and when I get them, I can finish the armament properly on this varient.
The plan for the side of the tracks (where the sponson goes) is to make a large Imperial Eagle out of plasticard to cover the majority of the armour. My only problem is that it will be difficult to move the sponson around depending on which variant I am using. What I'm thinking of doing is making 2 different versions of the side armour, 1 with the sponson in the middle, and another with the sponson at the back. It's almost impossible to get my hands on a sponson without buying a very expensive full GW Baneblade kit, so I'll need to think about making my own out of plasticard, plastic tubing and lots of rivets!! I want to start making the sides over the coming weekend. More shots to follow!!
Till next time, Phil.
|
|
|
|
|
|
2013/02/15 20:56:22
Subject: Philmorgan75's workshop blog - Legion of the Dead
|
|
Longtime Dakkanaut
|
Holy crap, I love this. Amazing work on your fortress. My Ork Warband would love to storm it.
|
|
|
|
|
2013/03/03 18:50:39
Subject: Re:Philmorgan75's workshop blog - Legion of the Dead
|
|
Regular Dakkanaut
|
Progress shots:
Family life and lack of interest has slowed the progress on this project. I would have expected to have finished this (apart from all the rivets) and moved onto the second Fellblade but life throws bricks at you sometimes.
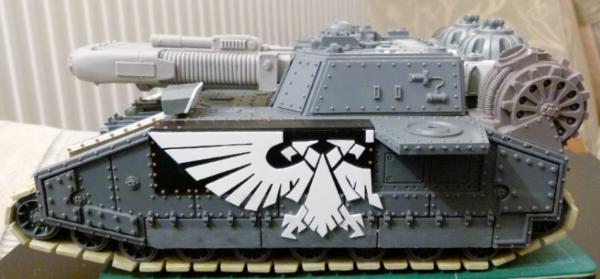
Here's what I'm currently working on - Imperial Eagle Side Armour:
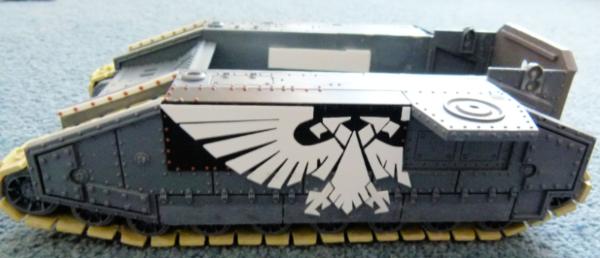
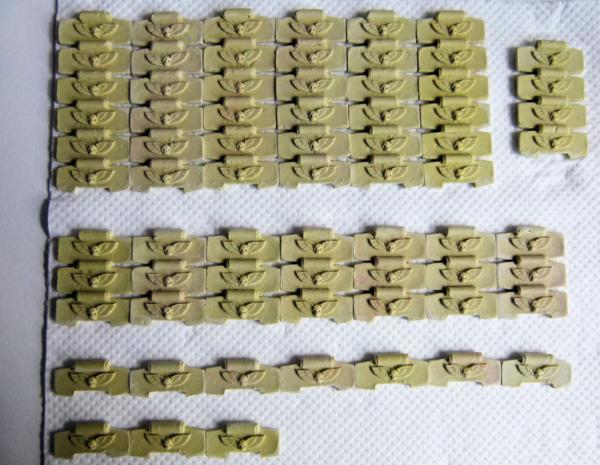
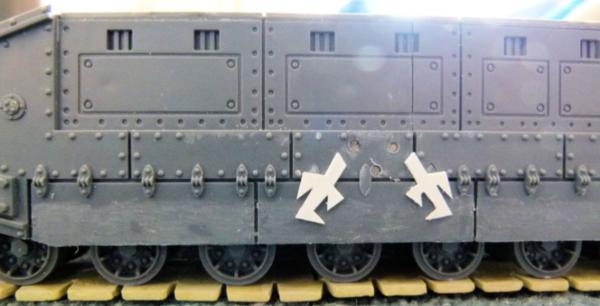
I used 1mm black plasticard to form an inverted 'L' shape base armour. 0.75mm white plasticard was then used to create a large Imperial Eagle. A number of rivets and hinges had to be shaved off to accomodate the eagle. I can't finish this piece until 5 packets of rivets come from Tichytraingroup that I ordered this morning.
Apart from enemies using the eagle as an aiming point for shooting at (a la Shermans in WW2), I think this will look cool when painted.The main colour of the Fellblade will be black and I aim to have a background of flames surrounding the Eagle. I'm unsure what colour to paint the Eagle - any ideas??
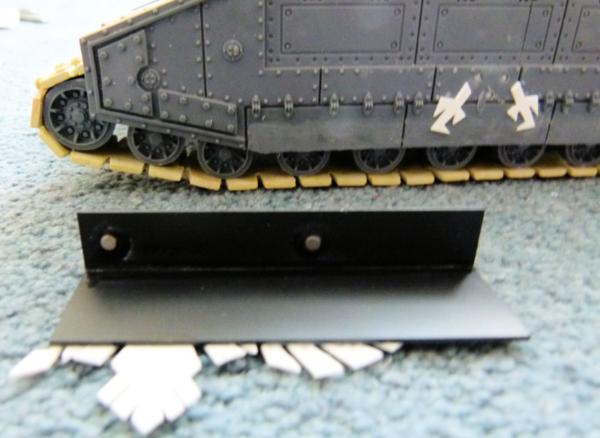
Here's how the armour is fixed - 2 magnets.
Here's the corresponding magnets on the Fellblade to attach the side armour to.
The Eagle's claws have been permanently attached to the side. You can see 3 recessed magnets where the body should be.
This allows the sponson to move from the rear to the middle position.
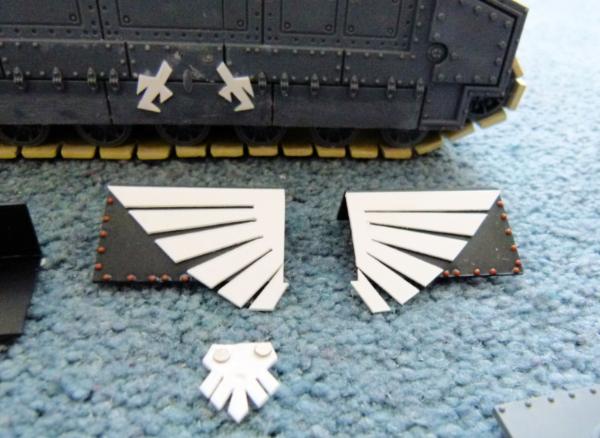
These are the 2 pieces of side armour with rivets added onto the front. The rear of the tail feathers have small magnets attached to allow the quick change from rear to middle sponsons.
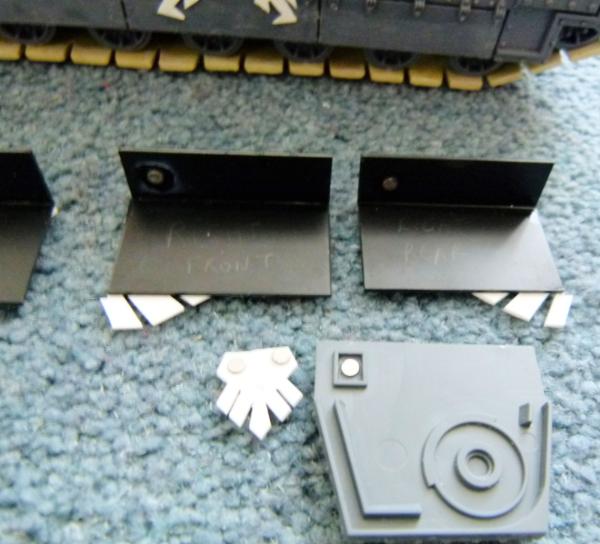
This shot shows the rear of the side armour pieces and the top of the sponson with their magnets.
Apart from rivets, the right hand side is completed. I have spent a couple of hours this afternoon making the left hand side and they are around 90% finished as I write this.
I have been looking at a lot of tutorials on Youtube recently, showing how to weather a vehicle realistically. Mig Jiminez is amazing!!! With that in mind, I have just spent around £50 buying AK Interactive streaking and chipping effects, rust pigment and various other products through mail order and hope to get them in the next couple of days. I really want to get an air brush and air compressor to start the mammoth task of painting the many Land Raider variants I have constructed over the past few years, Imperial outpost and all of my Fellblades.
Can anyone give me advice on a cheap airbrush and compressor? I have seen a couple on Amazon, but don't want to take the plunge and cost in case it turns out to be a waste of money. Any advice would be appreciated.
Till next time, Phil.
|
|
|
|
|
|
2013/03/03 19:28:59
Subject: Re:Philmorgan75's workshop blog - Legion of the Dead
|
|
Hoary Long Fang with Lascannon
|
Nice work, Phil. Thhat's a great idea for using extra armor, and I especially like the idea of using platicard for the Eagle. May have to try that on a couple of my vehicles... when I get around to building them.
|
|
|
|
|
|
2013/03/03 22:34:50
Subject: Re:Philmorgan75's workshop blog - Legion of the Dead
|
|
Regular Dakkanaut
|
 Yellowbeard wrote: Yellowbeard wrote:Nice work, Phil. That's a great idea for using extra armor, and I especially like the idea of using plasticard for the Eagle. May have to try that on a couple of my vehicles... when I get around to building them.
Please feel to try Yellowbeard. It's a simple trick of getting an Imperial Eagle and then use a photocopier to blow/shrink the size until it fits what ever vehicle you wish to use. Others use some form of low tack to stick the paper to the plasticard, but I just press my scalpel straight through the paper at the corners and using my scalpel to trace the round edges creating little grooves in the plasticard and try not to move the paper on the plasticard too much. To make these scratches stand out more, I use a pencil to rub over the lines to make it easier to see. Using a new scalpel and a metal ruler I then cut out the parts. Use a bit of plastic glue to reassemble on your chosen site of placement.
I've used this technique on a number of occasions and it works out sweet!
Regards, Phil.
|
|
|
|
|
|
2013/03/10 21:06:55
Subject: Re:Philmorgan75's workshop blog - Legion of the Dead
|
|
Regular Dakkanaut
|
March Update time:
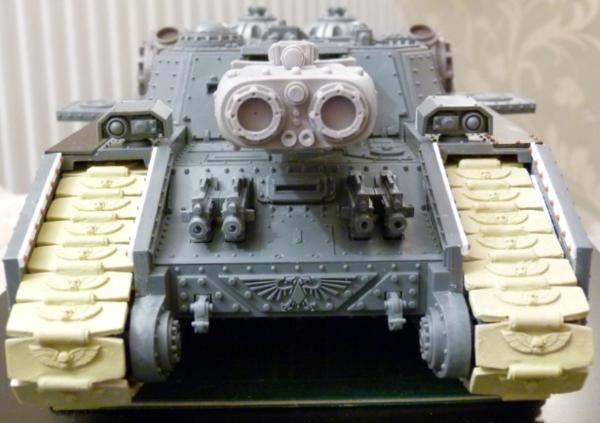
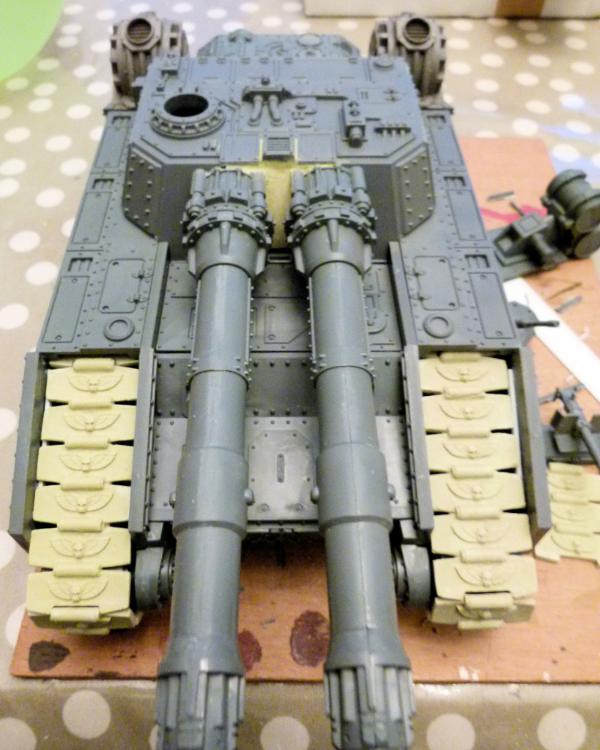
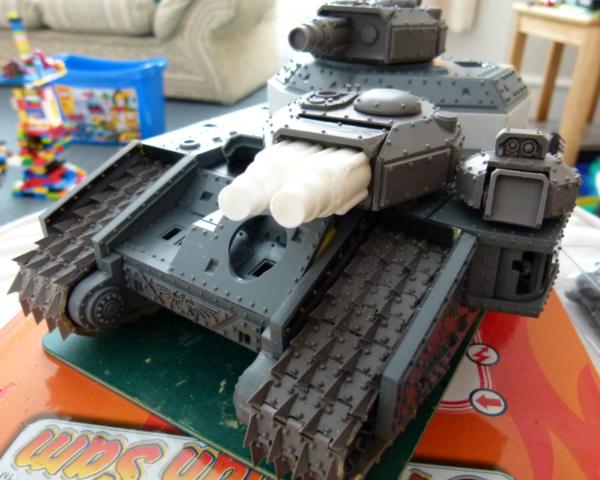
Looking down the business end of a Storm/Fell Blade. I've added 2 Twin Heavy Bolters to the front and the Drivers slit in the middle. 2 Valkyrie Targetters have been added, 1 to each side ( a small conversion was required on the left hand side one looking from the front - the whole targetter was turned 180 degrees and with a bit of chopping and some milliput to be added, no one should be able to tell it's been converted). I've added magnets so the targetters can be removed for ease of painting and to allow them to swivel.
I've also added some small magnets to the back of the extra armour at the front of the turret. This will allow me to swop them depending on which weapons will be used.
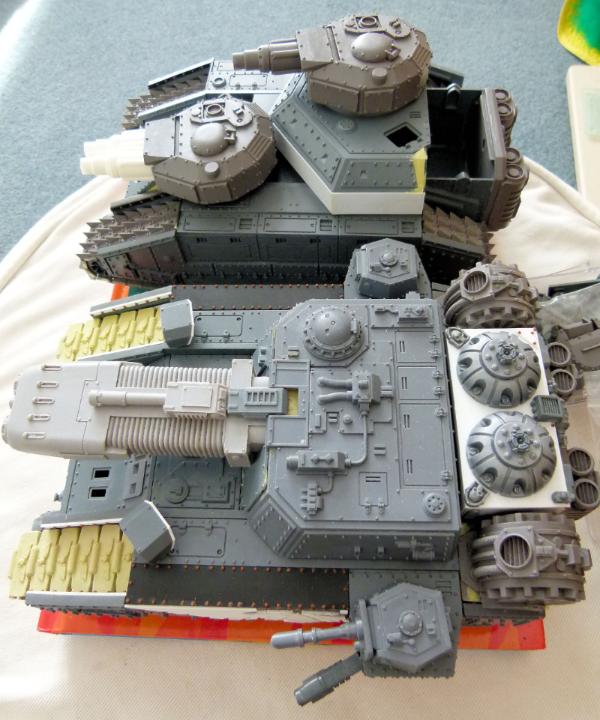
This gives a higher view of the front. The partially completed Plasma Reactors can be seen at the back. I think the top of the Large Plasma Cannon where it joins the turret is looking a bit empty. I'm going to add something like the targetter from the Vulcan Mega Bolter to fill the gap.
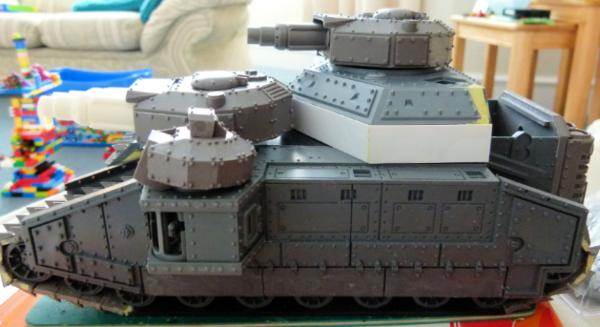
This side view shows the progress I've made. I haven't finished building the sponson yet. I'm waiting for magnets from ebay to allow me to swop the weapons depending on which variant I want to field before glueing the sponson parts together. I'm also waiting for rivets to come from America to add to all of the converted pieces to make them look like they came on the original tank.
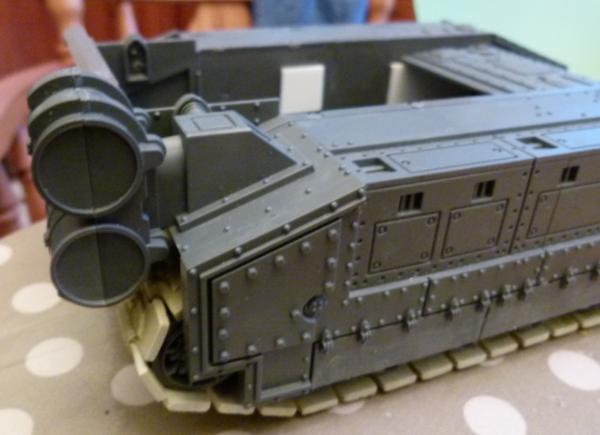
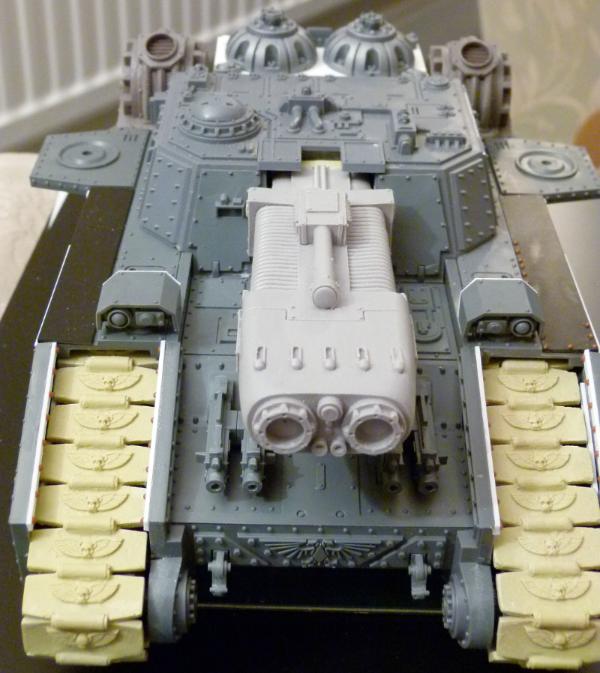
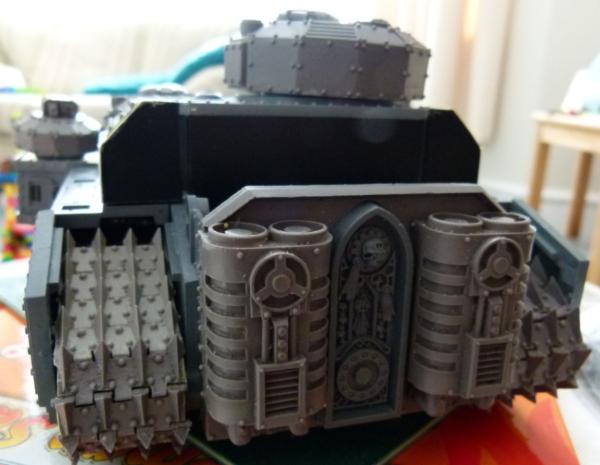
This shows the rear of the tank. Machinators engines and dynamo have been added and also following Machinators Plasma Fellblade I saw on his Fellblades of Reknown blog, I've created (from parts from the Pegasus Chemical Plant) some Plasma Reactors. All in all, I used plasticard, magna grapples from the Storm Raven kit, engine exhausts from a Land Speeder Typhoon missile launchers, the Heavy Flamer fuel cannister from the SoB Immolator kit, air intake from the Land Raider and 2 skulls from the Cities of Death sprues.
I just need to add a few rivets and this section will be completed. I plan on a) getting an airbrush and compressor and b) use the airbrush to use OSL like plasma colouring to the top of the reactors. I've seen Marneus on Youtube do this and it looks quite effective. We'll see how easy it is in the future!!!!
With reactors ........
.... and without - ready for the usual Shadowsword engine piece.
So, what's left to do:
1) Wait for rivets to arrive and then sprinkle liberally over the whole of the tank!
2) Wait for magnets to arrive from ebay. Mount the magnets to allow the sponson weapons and the turret weapons to be interchangeable.
3) Make from white plasticard parts of an Imperial Eagle and through use of magnets allow me to add to the side of the sponson. One part of the Eagle will need to be made when the sponson is in the rear position, and another Eagle part if the sponson is in the middle position.
Not much left to do for this little beauty to be finished!!
Comments and critiques welcome as usual. Regards, Phil.
|
|
|
|
|
|
2013/03/13 07:38:41
Subject: Re:Philmorgan75's workshop blog - Legion of the Dead
|
|
Regular Dakkanaut
|
Finally taken the plunge and bought an Airbrush and Compressor! I opted for a package that Marneus from Youtube recommended and this will hopefully be here before the weekend. I know it's going to be a steep learning curve but I've been watching a lot of Youtube clips on how to use an Airbrush and have read Imperial Masterclass Book 1. I'm purchasing lots of different AK Interactive paint effects and Vallejo Model Air paints and can't wait to try them out.
All of this should help push me to finish the construction of this Fellblade.
Looking forward to playing with my new toys!!
Regards, Phil.
|
|
|
|
|
|
2013/03/13 09:28:23
Subject: Re:Philmorgan75's workshop blog - Legion of the Dead
|
|

Mutilatin' Mad Dok
|
those statues are bloody spectacular
very good
|
|
|
|
|
|
2013/03/19 20:45:38
Subject: Re:Philmorgan75's workshop blog - Legion of the Dead
|
|
Regular Dakkanaut
|
Capamaru wrote:Awesome work Phil  .
I would suggest that this isn't the first model you try your airbrush on thought... Run some tests around first on both large and small minis to get a good grip of how the airbrush behaves and then give a go on this wonderful tank .
If you have any questions regarding airbrush operation give as a post and always remember with the airbrush applying less paint than intended can be fixed by adding some more... more paint than intended , well you can't really go back.
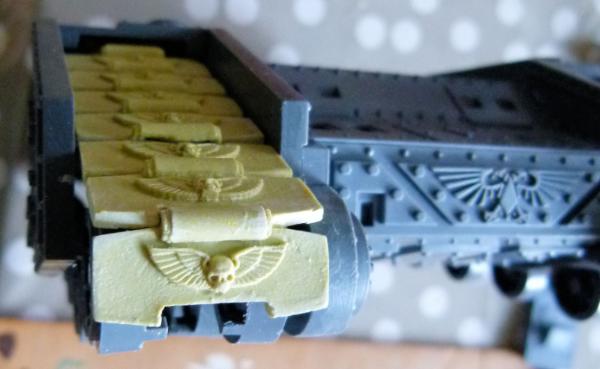
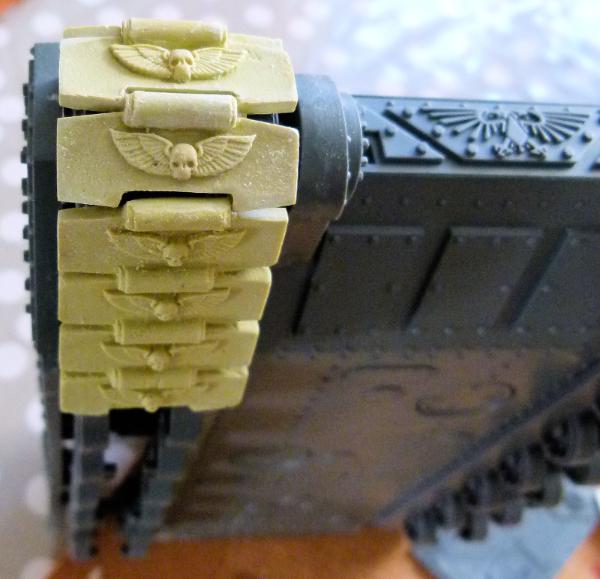
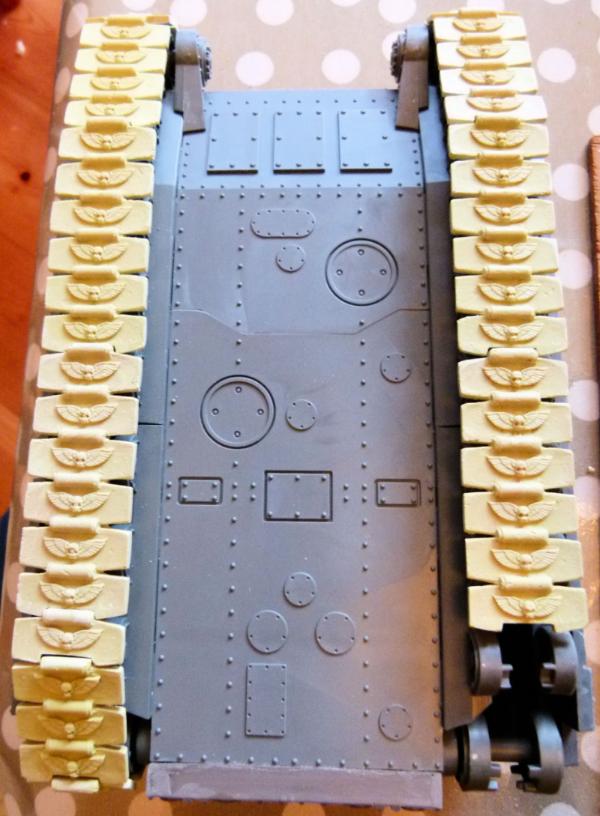
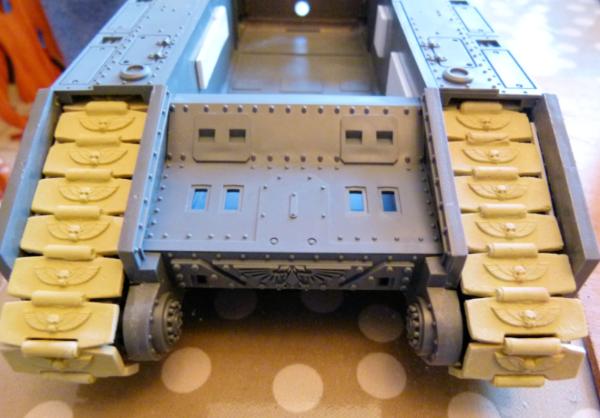
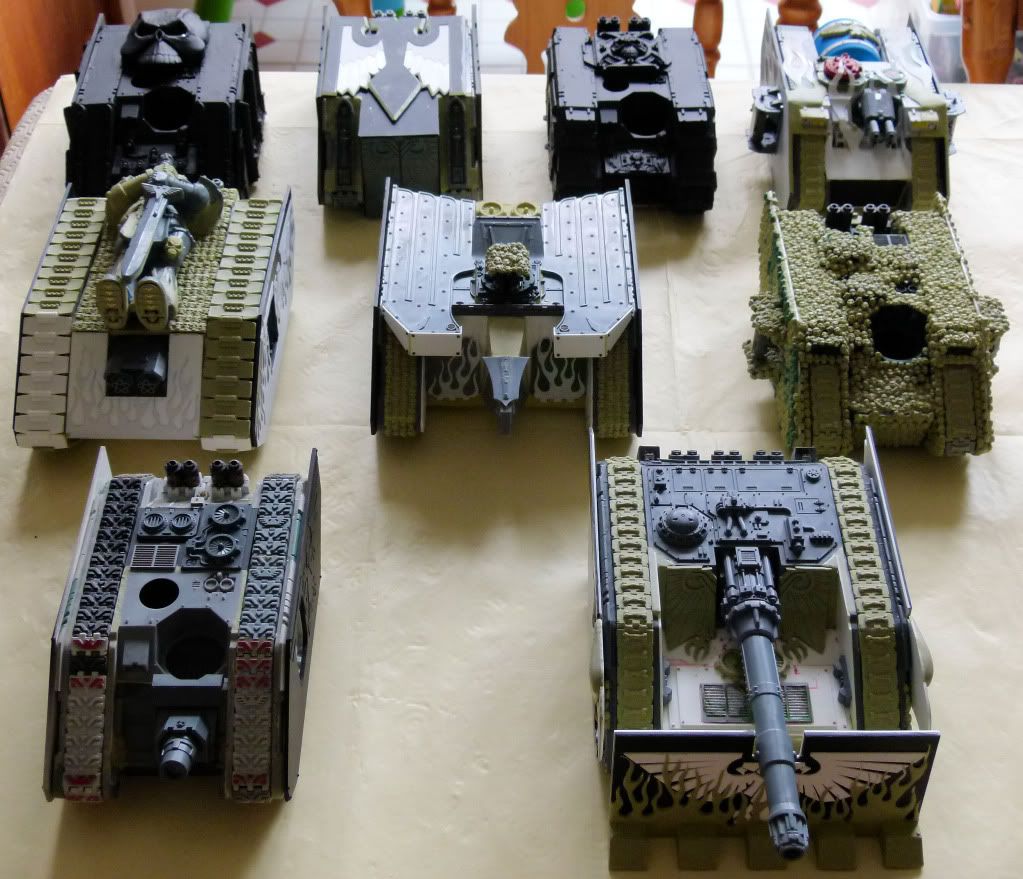
Thats very kind of you Capamaru! I haven't taken it out of the box yet to have a play - work, bad weather, family time and Wales winning the Six Nations in rugby hasn't allowed much time for my hobby !! I plan on practising a lot before I go past undercoating any of my vehicles let alone use the airbrush to its full potential - Here's a group shot of some of my Land Raiders I still have to paint as well:
Orinoco wrote:nice work with the rear reactors.
Thank you Orinoco, I'm also happy with how they turned out. I really want to use the airbrush and spray directly down using a tutorial I saw on youtube to give a blue plasma glow to the reactors.
Small amount of progress:

Magnetised the Stormsword Twin weapon mounts. Just need to add some milliput on the white plasticard surrounding the weapon mount to hide the small gap and I also need to add some rivets (still waiting for delivery from the USA).
The Lascannon turrets are magnetised. The weapon and mount can come off and be substituted for a variety of weapons - See below!!!!!!!!

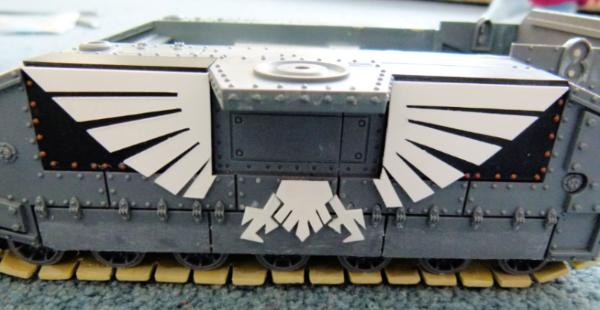
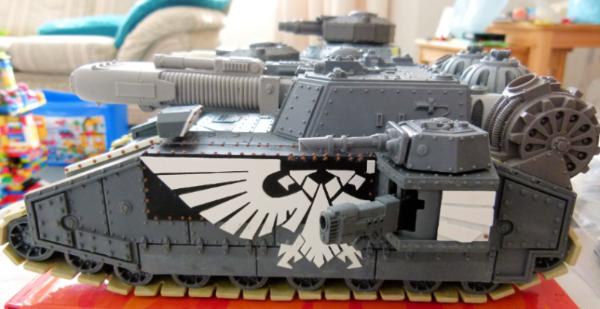
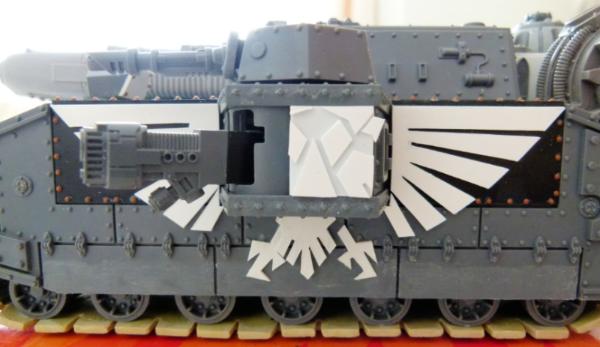
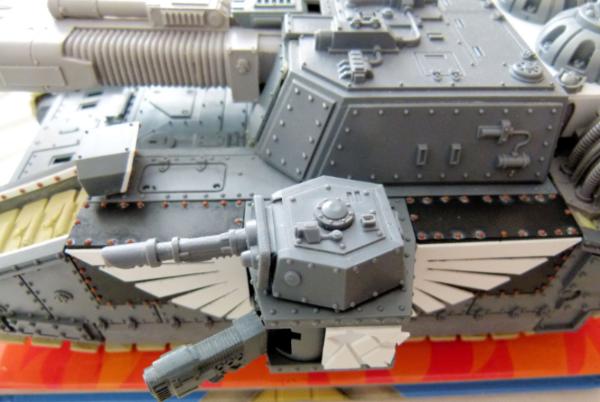
This shot shows the sponson placed in the middle. I have magnetised the Heavy Flamers and can swop them out for a number of other weapons depending on which variant I want to field. I've added a magnetised white plasticard Imperial Eagle on the side of the sponson so if you look directly at the tank from the side, it gives a better impression of the Aquila. Just need to add rivets again!
Not the best shot but this shows the sponson in the rear position. The white plasticard wing tips look better in real life than what you can see here.
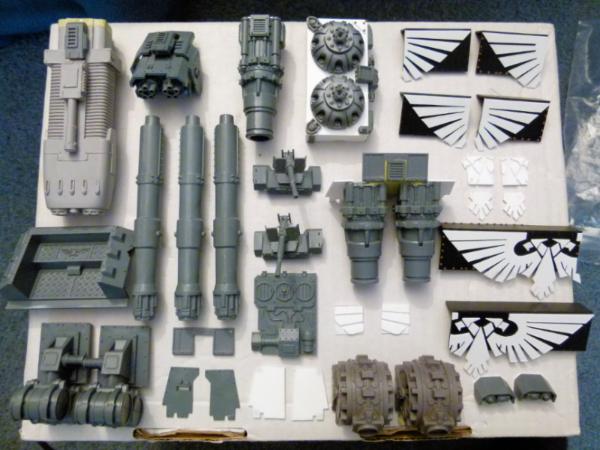
Here are all the parts to make all the Fellblade/Shadowsword variants.
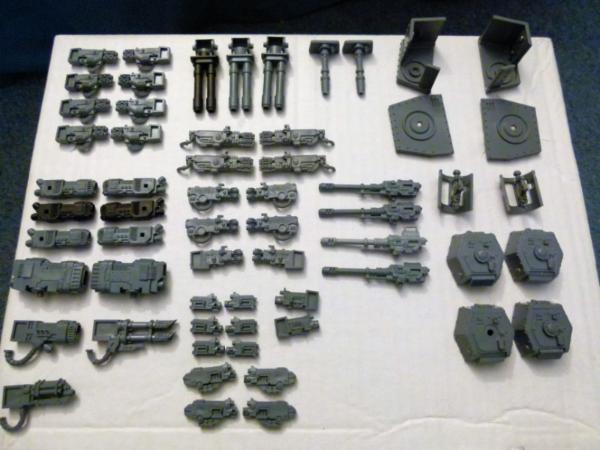
Here's the different weapon bits I've got for this and other Fellblades I plan on building:
8 Multi Melta for the Iron Breaker Fellblade I want to make next
6 Storm Raven Plasma Cannon's - Use 4 in a sponson
2 Landspeeder Vengeance Plasma Cannon - Use in a sponson?
1 Venerable Plasma Cannon - 1 on order - Use in a sponson?
1 Venerable Lascannon - Get 3 others to make into quad sponsons
1 Venerable Assault cannon - Get 3 others to make into a sponson
3 Twin autocannon - Get 1 more - make into a Quad sponson
4 SoB Heavy Flamer
4 Baneblade Heavy Flamers (already magnetised)
2 Leman Russ Heavy Flamer
6 Baneblade front turret Heavy Bolters - Use 4 for turrets
2 Leman Russ Heavy Bolters
4 Baneblade Heavy Bolters (already magnetised)
2 Lascannon (already magnetised)
4 Autocannon
What weapons would be used for sponson and turrets on a Fellblade?
Regards, Phil
|
|
|
|
|
|
2013/03/30 14:10:47
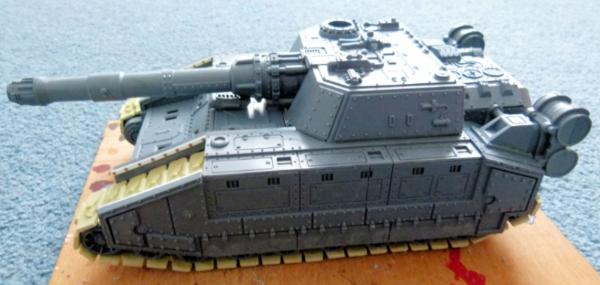
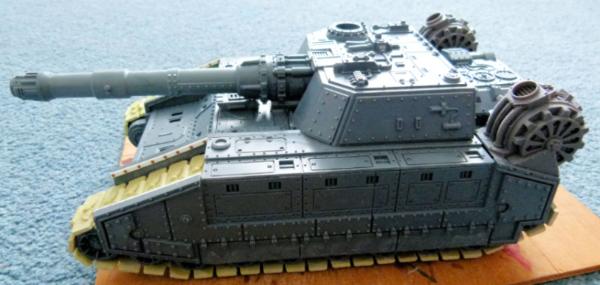
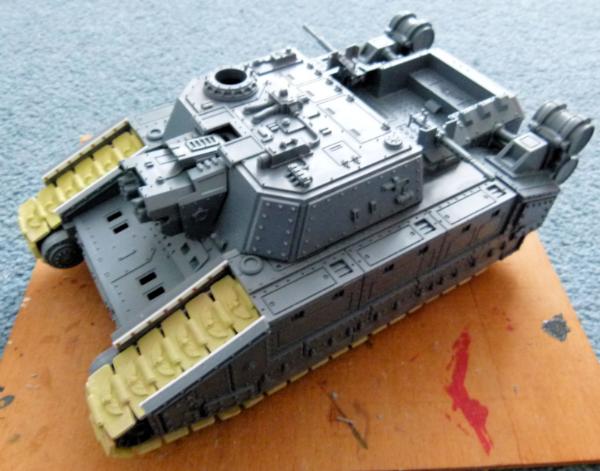
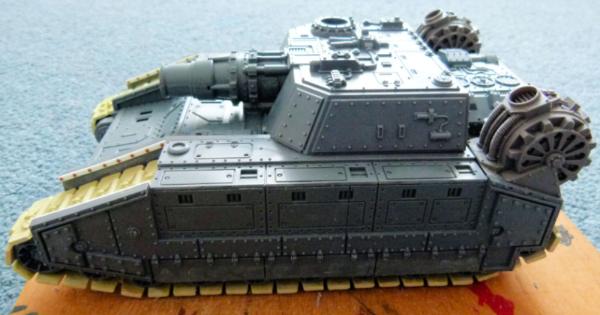
Subject: Re:Philmorgan75's workshop blog - Legion of the Dead
|
|
Regular Dakkanaut
|
Update time:
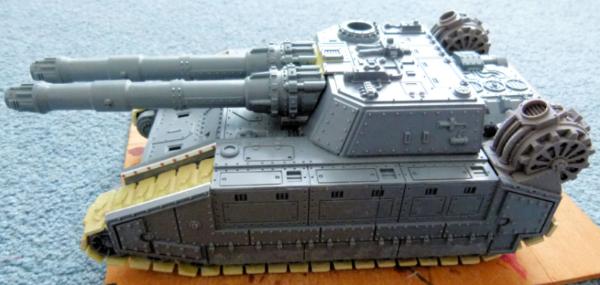
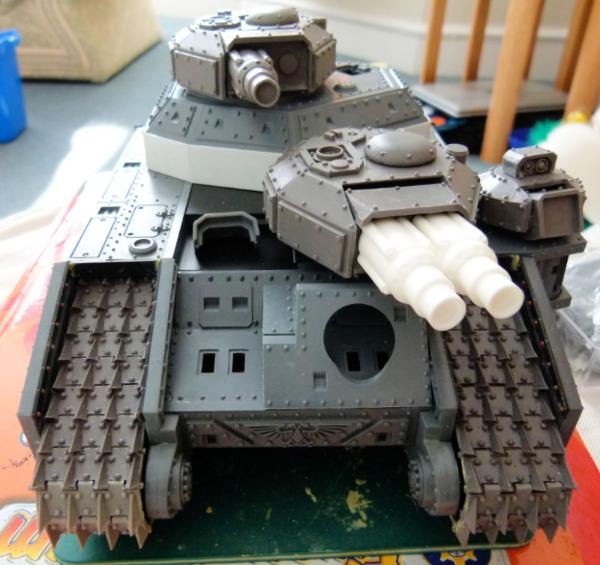
Here's the completed Plasma fellblade after all the rivets have been added. I'm slowly purchasing from bitz providers lots of different weapons and once magnetised, I should be able to field any sponson/turret weapons that I want to field.
This shows the completed sponson in the middle position. The sponson weapon here is the Venerable Dreadnought Plasma Cannon that I have magnetised.
This shows the top view of the side.
When I get used to the Airbrush, I'll start to paint this beauty.
In the meantime.......
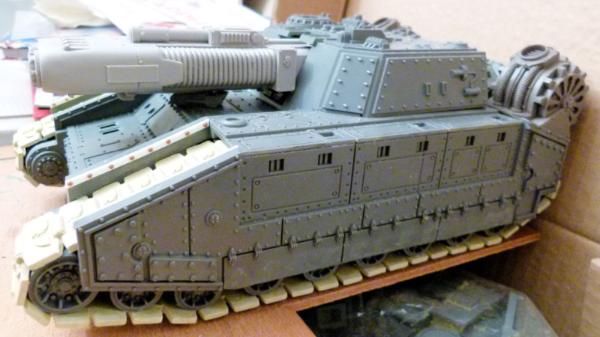
Here's my second Fellblade, a Warmaul! I'm really liking Machinator's resin parts and cannot recommend him highly enough - Excellent customer service, fair pricing and quick delivery.
Another shot from the front/side. I love these tracks, they are so vicious!!
I didn't add the tracks at the bottom where they touch the ground as I thought it would be a waste as in reality, the spike would have dug into the ground and you would not be able to see them. I've used plasticard that I have scribed to look like the rest of the tracks. I'm waiting for 1.5mm plasticard rod to arrive to completely finish off the track sections. I've just place another order with Machinator and will shortly be getting fuel tanks and 3 Sponson turrets. The only thing I have left to get is another set of sponsons from GW. I'll probably wait until after next pay day before I get these as I have spent a small fortune this month buying lots of parts and equipment for the airbrush.
Just need to add the 4 exhausts to the engines for this section to be completed. I'll wait until I finish the top of the engine section before I do this.
Here's a shot of both of my beauties!!
I really want to make sure I do a good job on the painting of these models so I want to be fairly proficient with the airbrush before I do much work on these. I have quite a few converted Land Raiders that I think I will start first, to get used to the airbrush and to practise on.
As always, please feel free to ask any questions.
Regards, Phil.
|
|
|
|
|
|
2013/03/30 15:00:31
Subject: Philmorgan75's workshop blog - Legion of the Dead
|
|
Massive Knarloc Rider
|
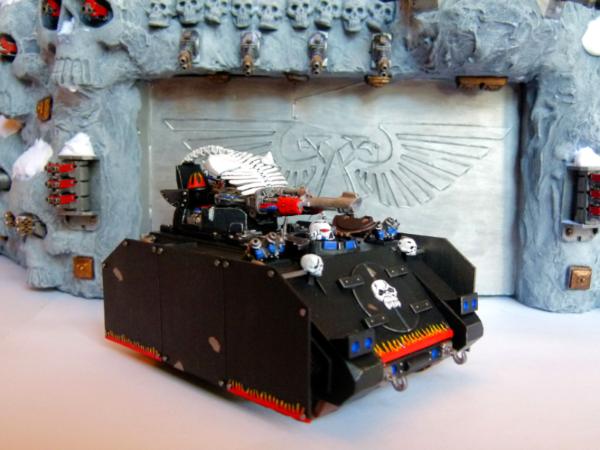
Is there... is there a landraider there covered in skulls?
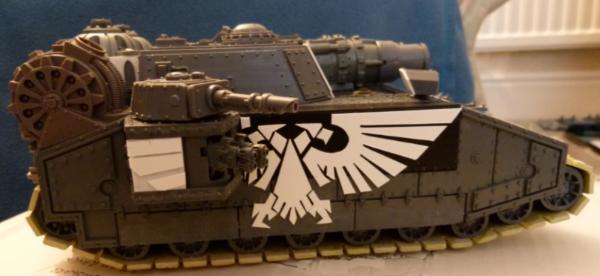
Love the battering ram Eagle tank!
|
|
|
|
|
|
|
|