| Author |
Message |
 |
|
|
|
|
Advert
|
Forum adverts like this one are shown to any user who is not logged in. Join us by filling out a tiny 3 field form and you will get your own, free, dakka user account which gives a good range of benefits to you:
- No adverts like this in the forums anymore.
- Times and dates in your local timezone.
- Full tracking of what you have read so you can skip to your first unread post, easily see what has changed since you last logged in, and easily see what is new at a glance.
- Email notifications for threads you want to watch closely.
- Being a part of the oldest wargaming community on the net.
If you are already a member then feel free to login now. |
|
 |
2013/03/30 17:17:38
Subject: Philmorgan75's workshop blog - Legion of the Dead
|
|

Regular Dakkanaut
|
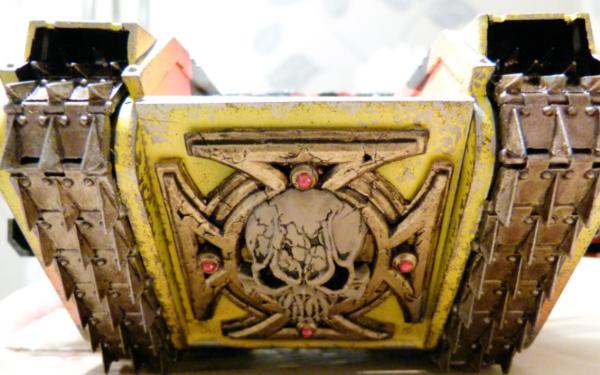
 ghosty wrote: ghosty wrote:Is there... is there a landraider there covered in skulls?
Love the battering ram Eagle tank!
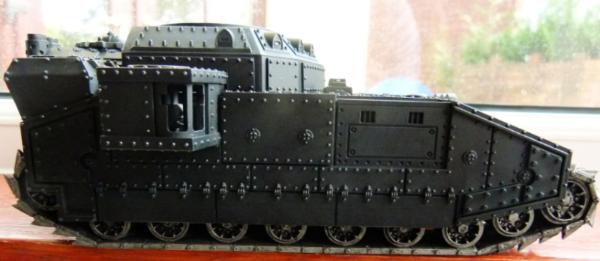
Almost lost the will when covering the "Skull" raider with skulls ghosty!? I much prefer the converting side to painting but when I have finished this Fellblade, I want to start painting all of my vehicles.
I have read imperial armour master class and watched lots of weathering clips on YouTube and am itching to see what I can do paint wise.
With regards to the battering ram, I've tried to make as many variants as I could think of. This LR was great fun putting together.
Regards, Phil.
|
|
|
|
 |
|
2013/04/15 08:33:43
Subject: Re:Philmorgan75's workshop blog - Legion of the Dead
|
|
Regular Dakkanaut
|
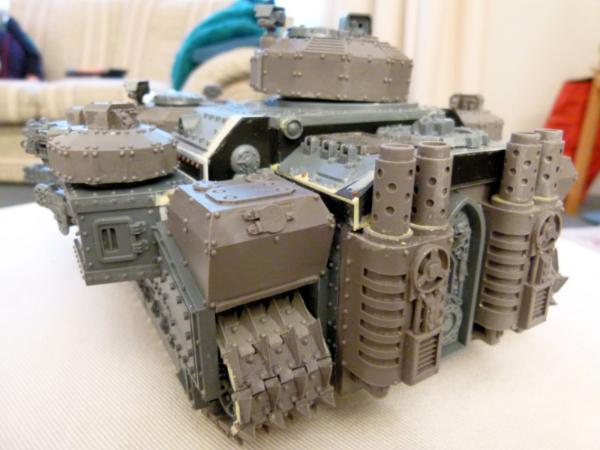
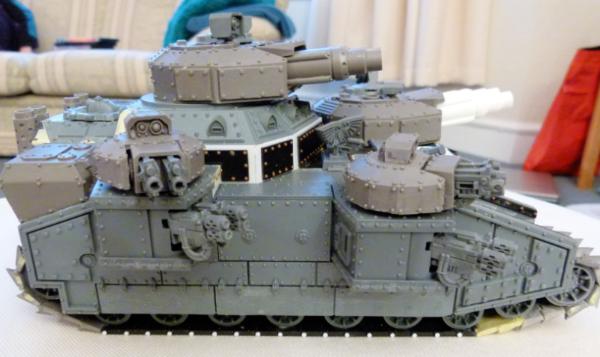
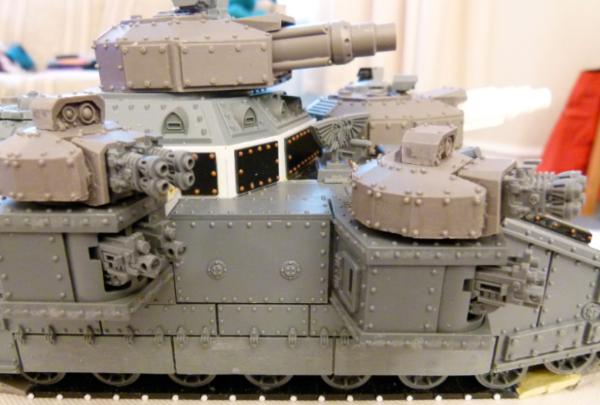
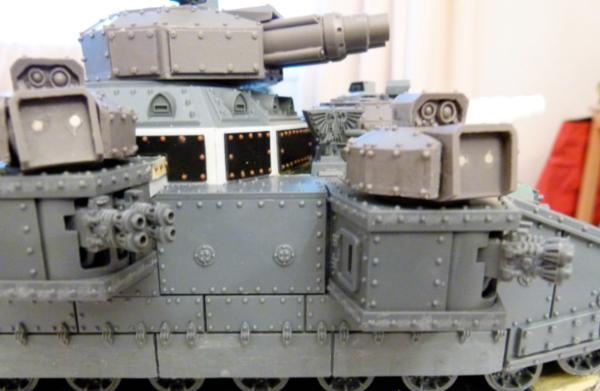
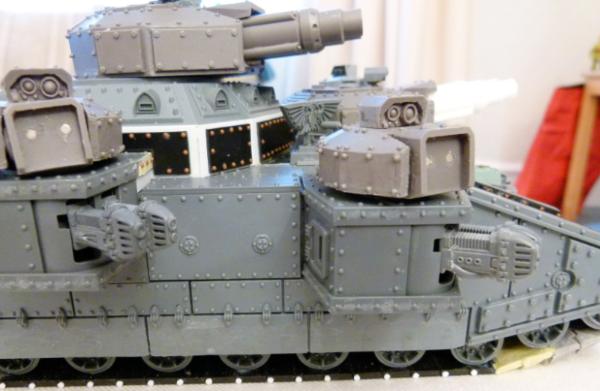
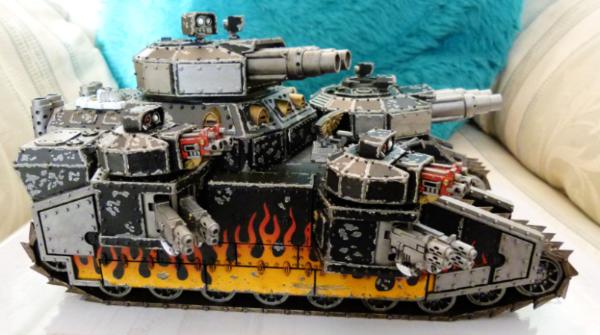
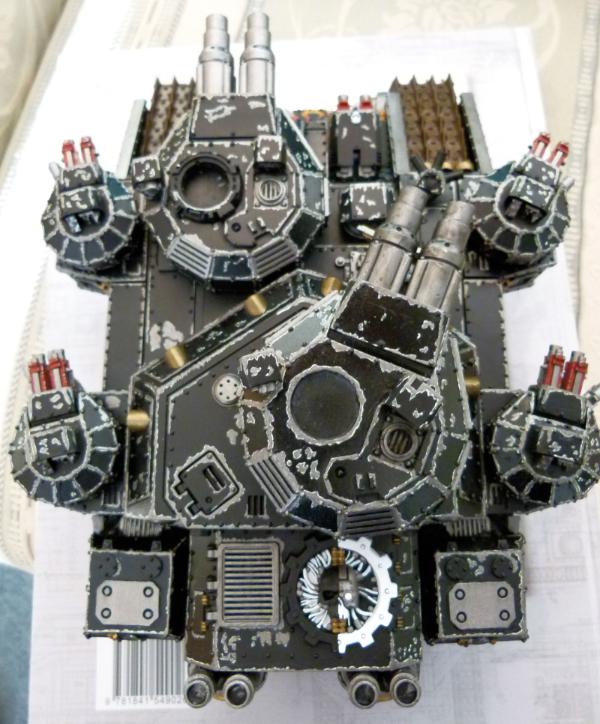
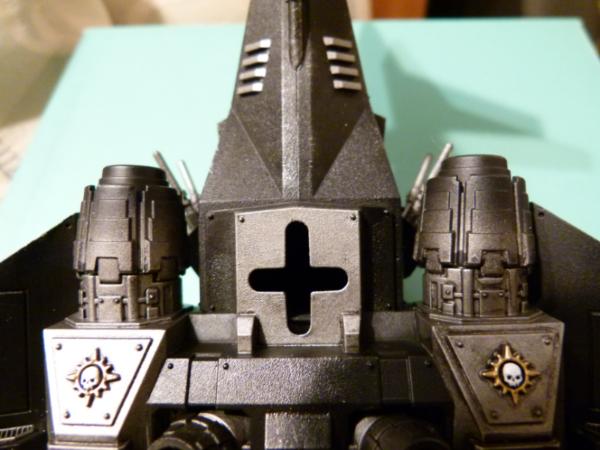
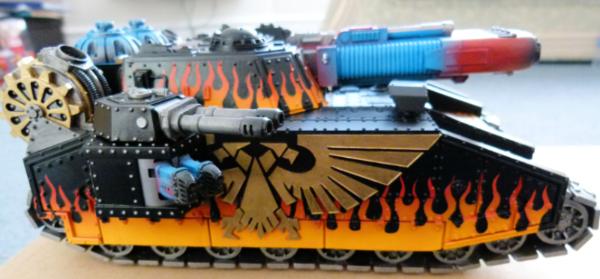
I haven't updated this thread in a while:
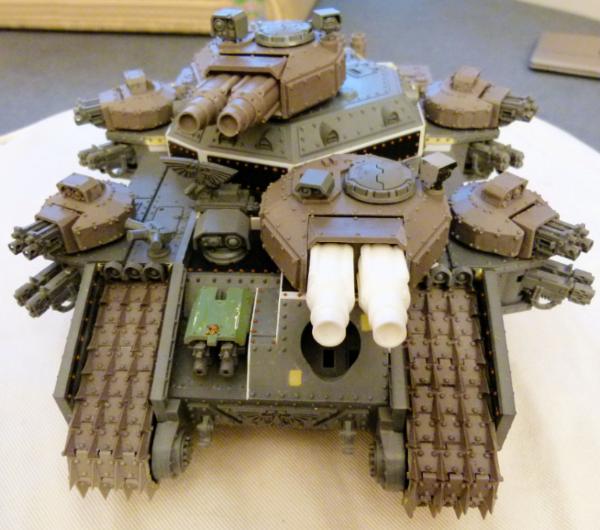
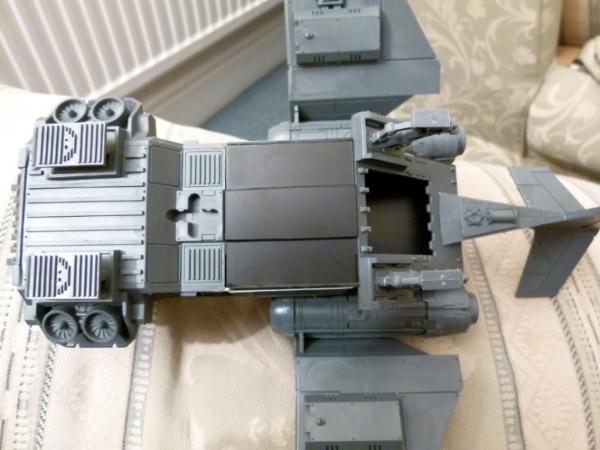
I've almost finished the Fellblade Warmaul. Machinator's parts have arrived and they look fab on the old girl! The only thing to finish is to think of something to go over the large hole (where the demolisher cannon normally goes on the baneblade). Any suggestions in keeping with my army would be appreciated.
I have tried to magnetise the majority of parts on this project: All the turrets, smoke launchers, imperial eagle radar, large sensors, sensors and searchlights. This will help with storage and on the gaming table, allow things to swivel and not break off if they were glued down. The cupola's are not glued as I want to make a variety of different ones to fit different roles e.g. SM firing the storm bolter and also using a Multi melta from the LR Crusader kit.
I think it looks intimidating to any opponent - All hail the mighty Emperor!!!
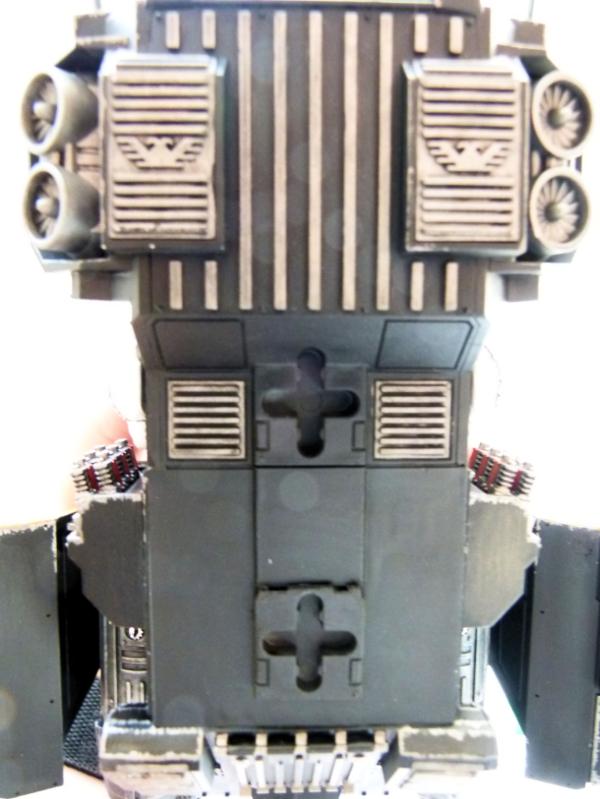
Looking at all of those rivets really makes me want to do a good paint job on this model. I started to use the airbrush for the first time, undercoating some Large SM I've made previously and another LR conversion (the one with the huge Skull cannon). It really is difficult getting the right consistency, air pressure, distance from the model etc - I suppose with practise it will get easier!
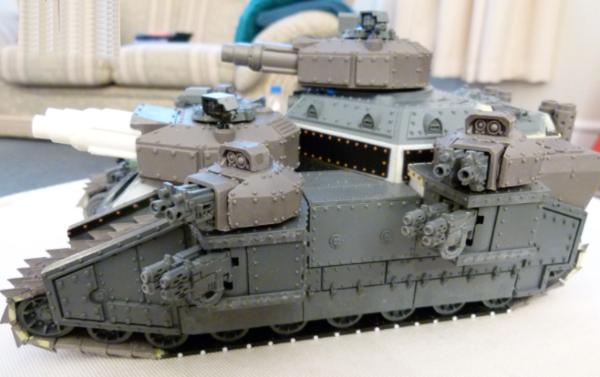
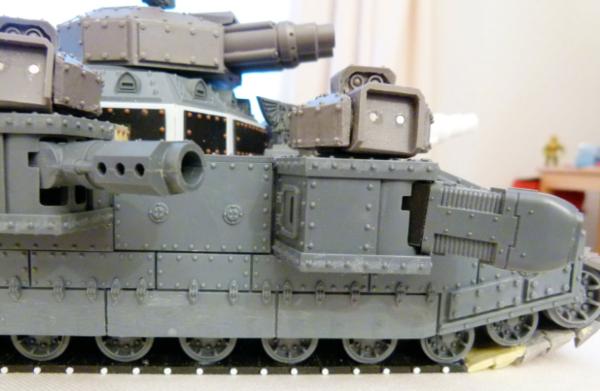
I'm not sure about adding something in between the front and rear sponsons (to break up the large flat area)? I have some large Imperial Eagles from Bulldog Battlegear or some of the Imperial Eagle Weapon Emplacement covers from the Wall of Martyrs kit also fit. What do you think - should I add them (and if so, which one) or leave it alone?
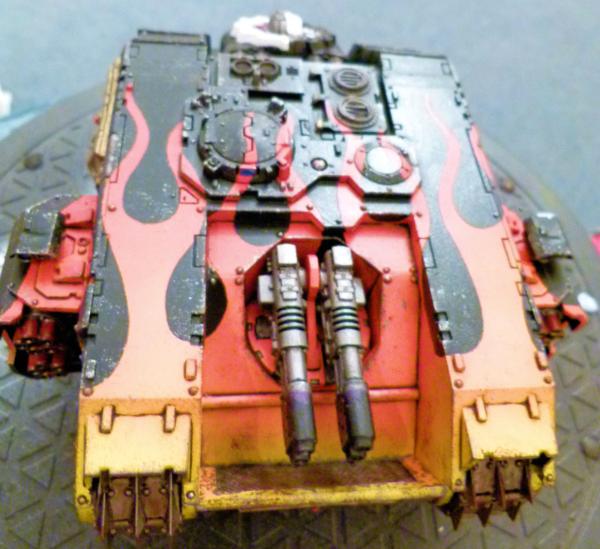
The lovely fuel tanks from Blood and Skulls Industries. I really don't want my wife to know how much this model has cost to build!!!!
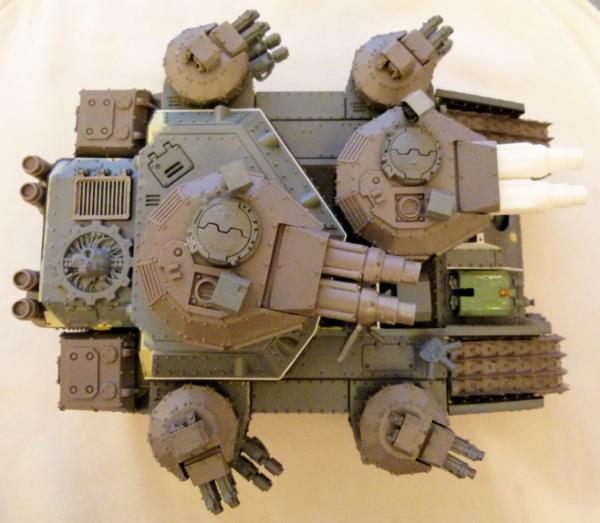
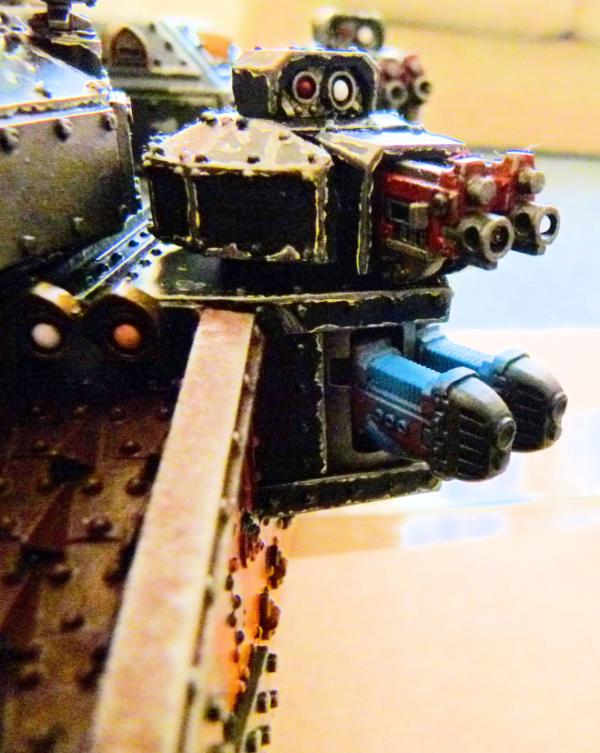
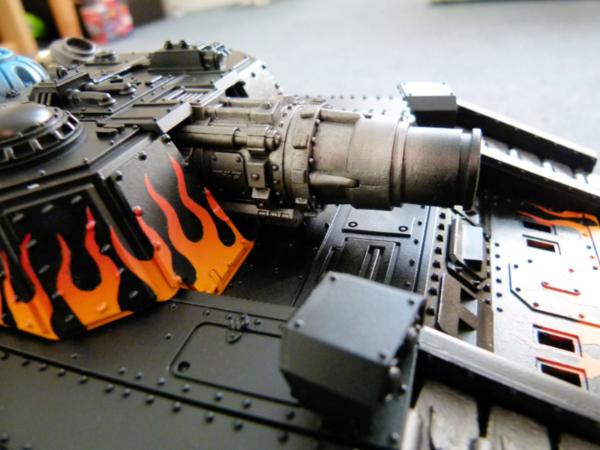
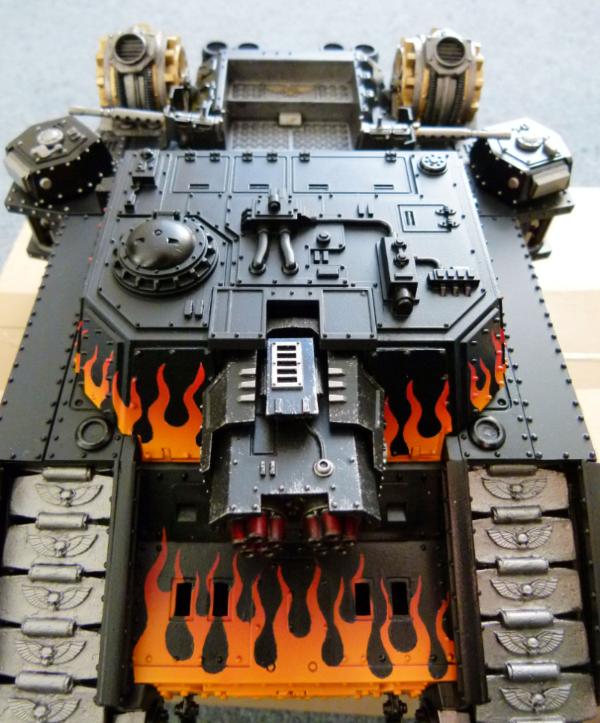
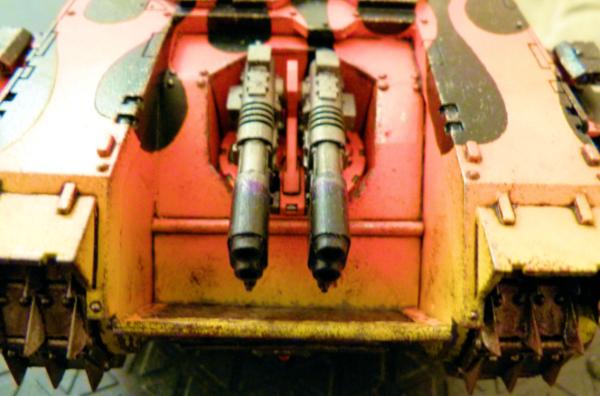
Just look at all the fire power: 4 Siege Cannons, 10 Heavy Bolters, 8 Multi Meltas and a partridge in a pear tree!
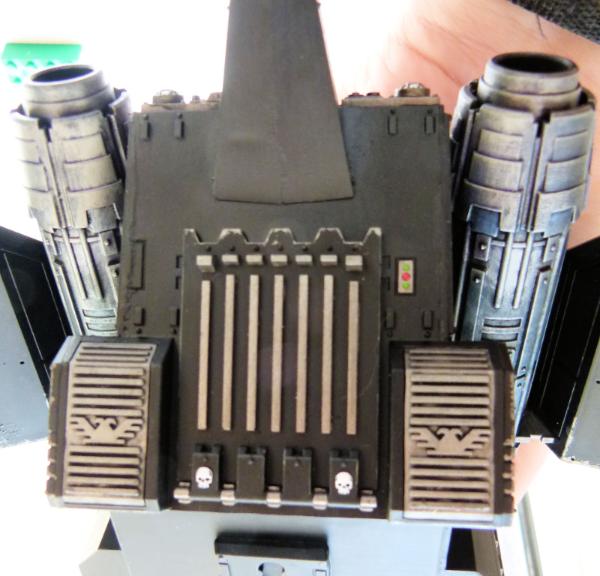
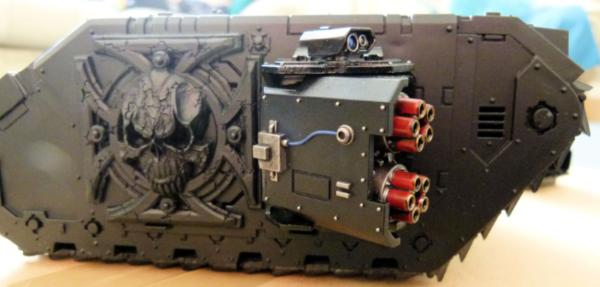
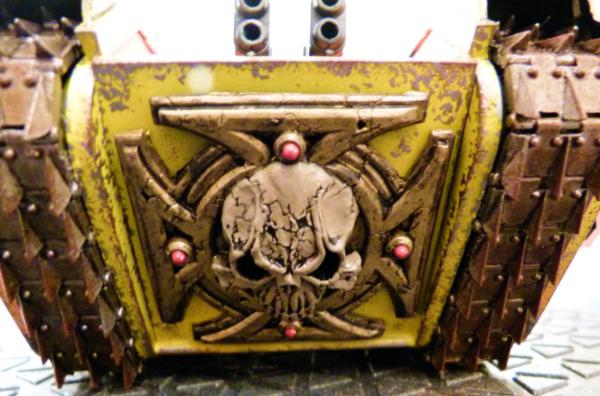
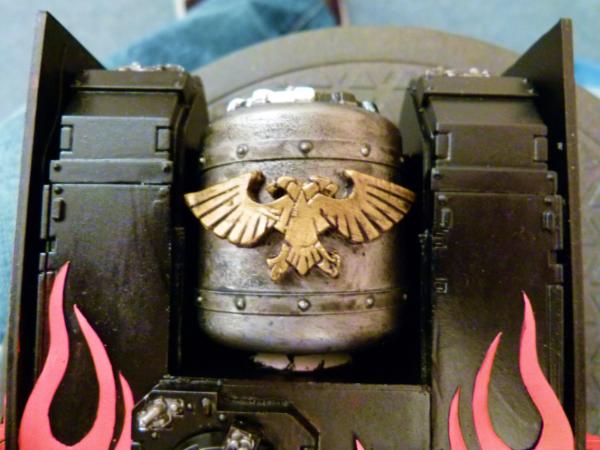
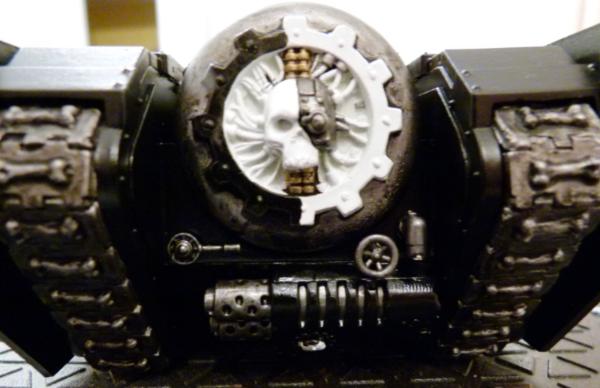
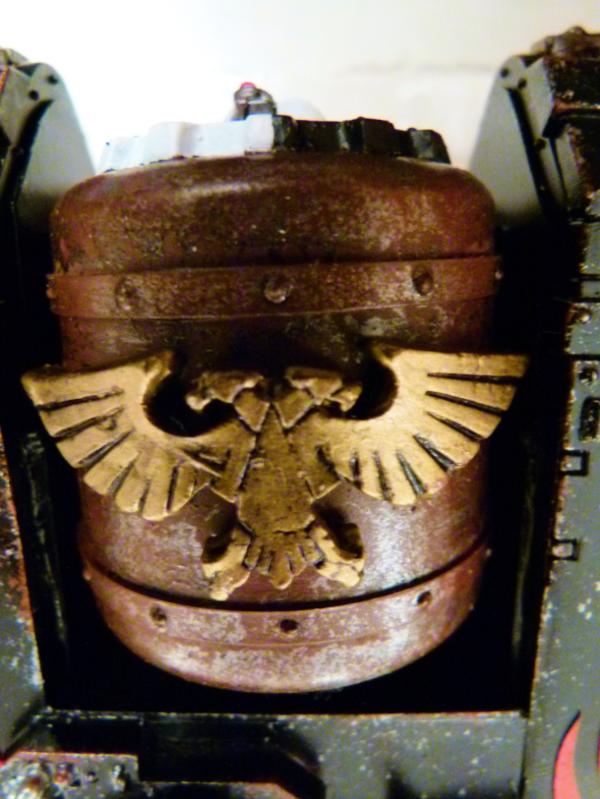
I've added the Adeptus Mechanicus logo from the COD sprue to the rear engine cover. This ties in with other LR conversions I have made previously and for fluff purposes, my Legion has close ties with Mars and the Adeptus Mechanicus, ensuring they have access to all manner of goodies!
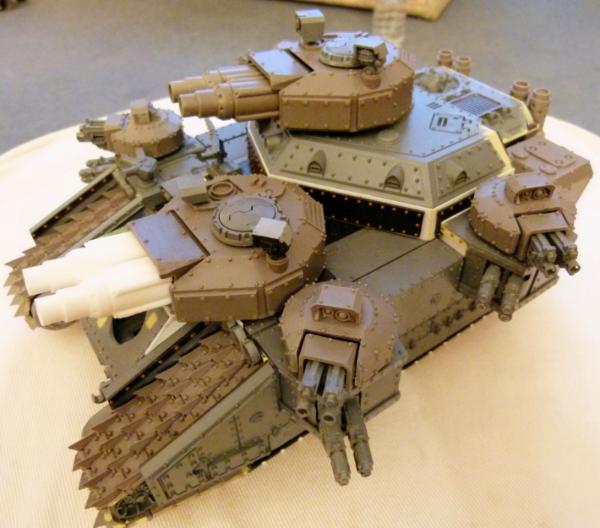
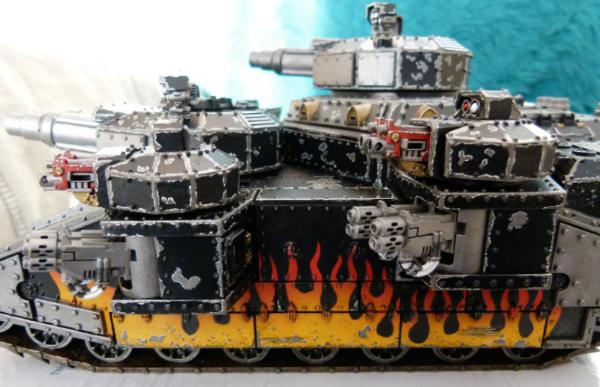
This is the usual Sponson/turret weapons load: Twin Multi Melta sponsons and Twin Heavy Bolter turrets. But as these are magnetised ........
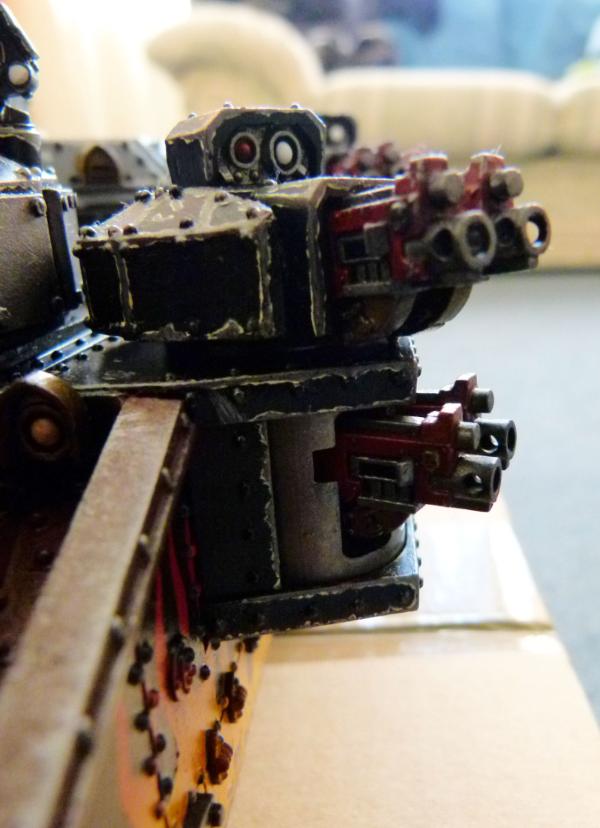
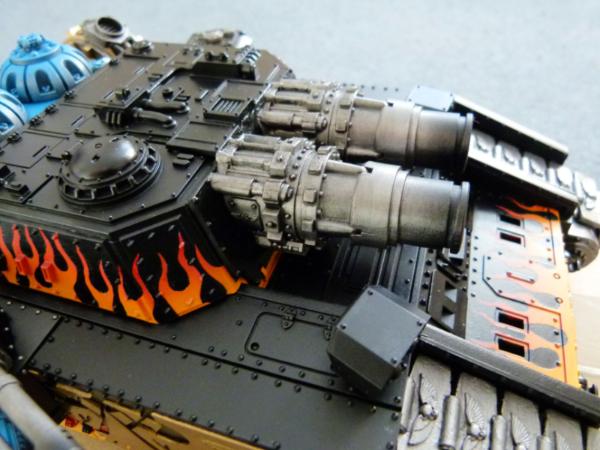
I can change them to Twin Heavy Bolter sponsons and Twin Heavy Flamer turrets or ......
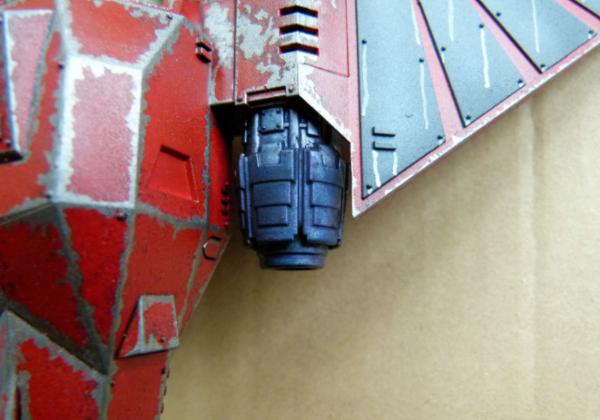
Twin Heavy Flamer sponsons. You can see the magnets in the turrets in this shot.
Twin Heavy Plasma Cannon sponsons.
Or even a Hellhammer nova cannon and a Plasma Executioner cannon.
I'm slowly converting a lot of different weapons to fit this fellblade and the previous variant as well. I want to start painting this as soon as I can BUT I want to make sure my airbrushing skills improve first.
Any comments/critiques welcome as always. Regards, Phil.
|
|
|
|
|
|
2013/04/17 21:37:12
Subject: Re:Philmorgan75's workshop blog - Legion of the Dead (now with added SM Aircraft)
|
|
Regular Dakkanaut
|
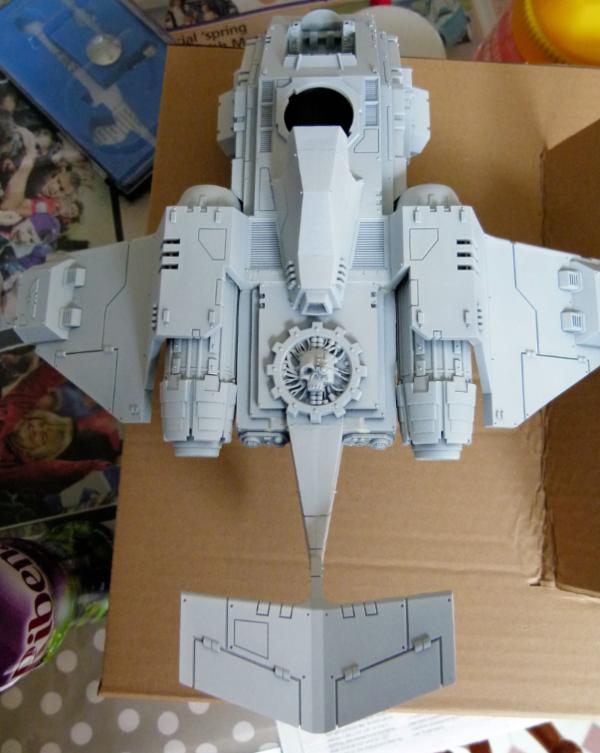
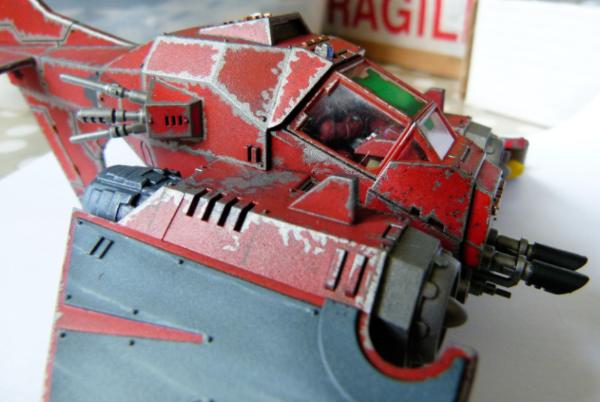
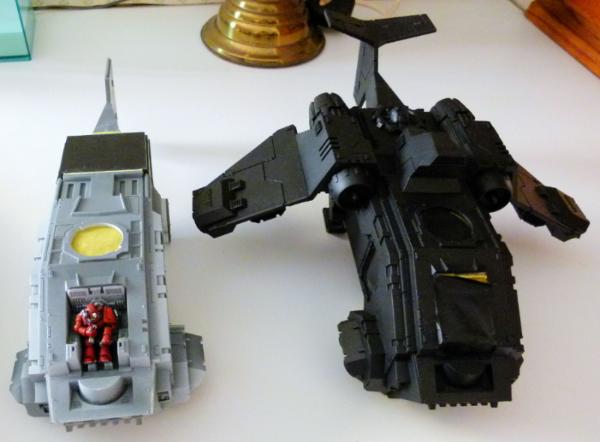
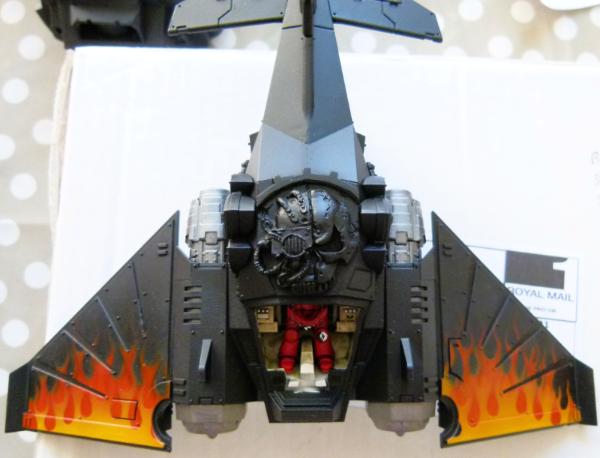
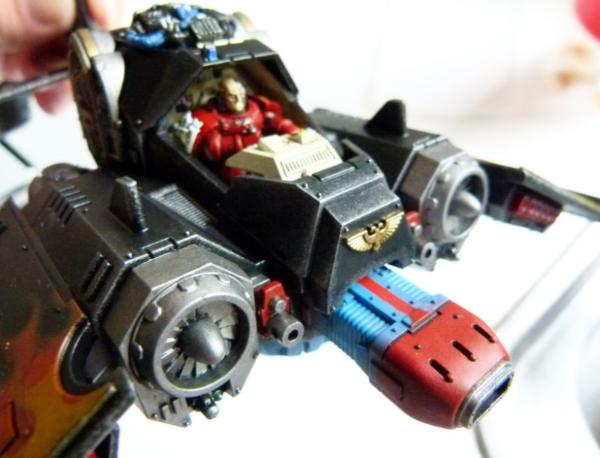
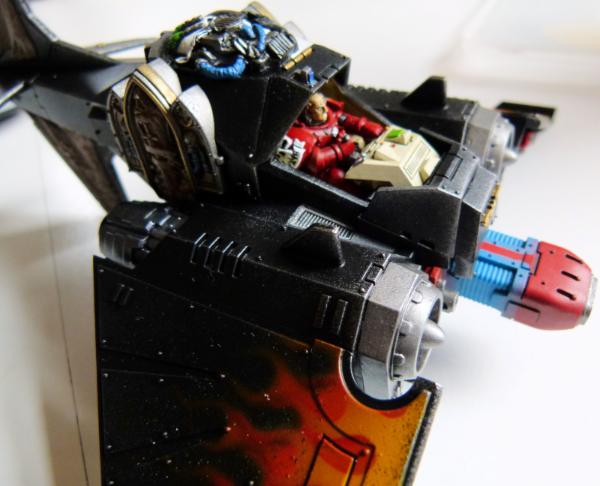
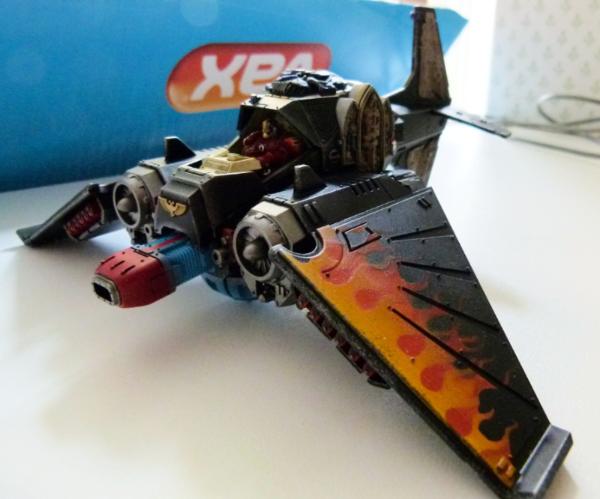
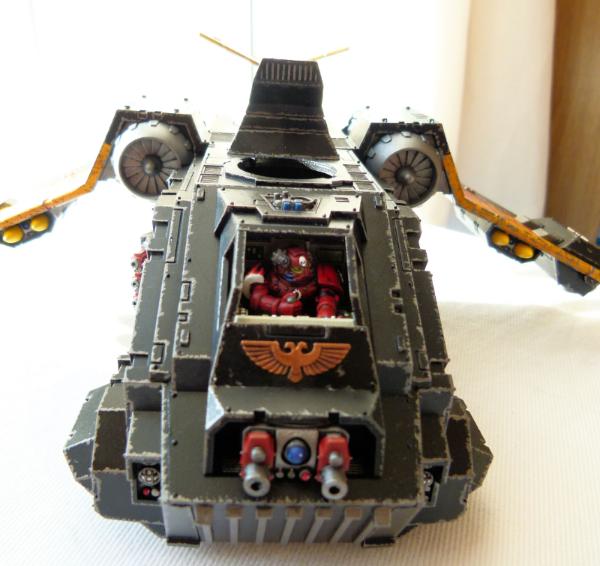
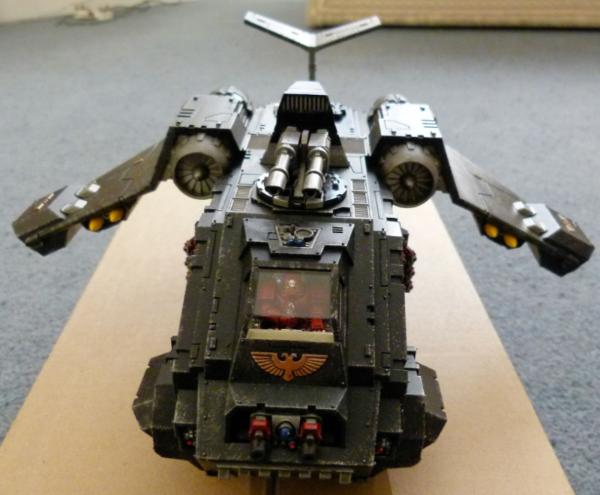
Having finished the construction of my second fellbIade and having bought up lots of bits over the past number of months (enough to build 3 Storm Raven, 1 Storm Talon, 1 Dark Talon (and am in the process of getting enough parts for a second Dark Talon)), I've decided to build some SM Aircraft:
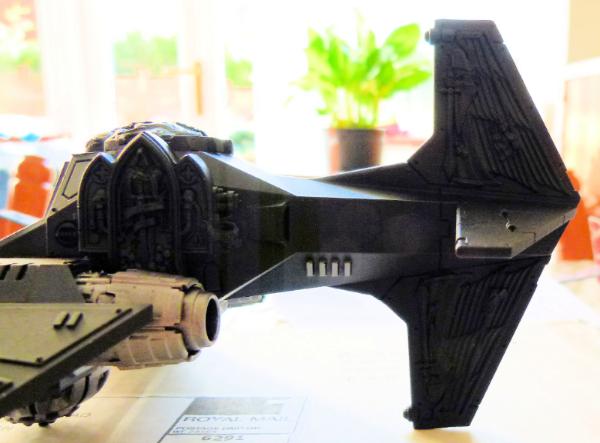
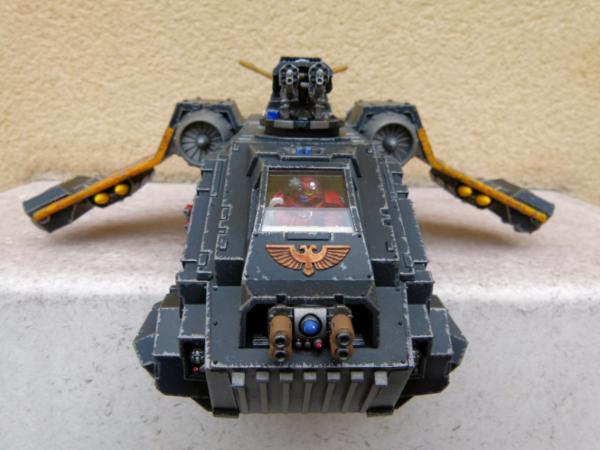
Dark Talon:

This kit was a real pleasure to put together and it only took a few hours to get to this undercoat stage. I added some magnets to the under slung weapons pod. This will allow me to swop between Hurricane Bolters and missiles as the mission dictates. I am not sticking the main weapon to again allow me to swop between Twin Las Cannons, Rift cannon and Mega Bolter variants.
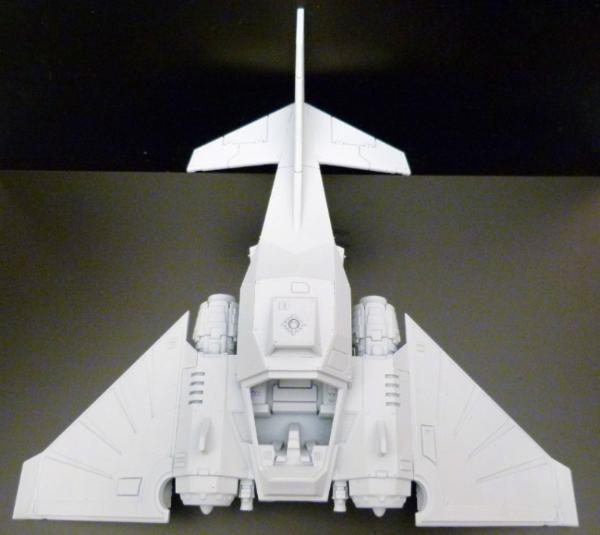
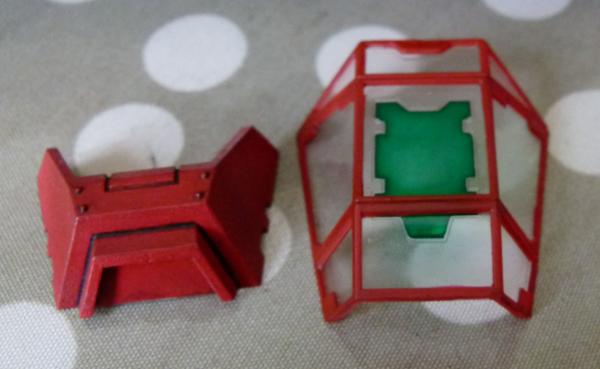
I've seen fire4effekt's Dark Talon painted in red and liked his paint scheme. I want to do something similar, paint the main body Vallejo Model Air Fire Red but I want to then paint the Imperial Eagle black with grey highlights. I think this will be visually striking. My sticking point is the colour of the cockpit. I'm thinking of painting the interior with a cream colour that I've seen lots of others do on their Land Raiders etc. What do you others think?

Through scalpels and files, I removed all trace of Dark Angels iconography from the under slung weapon pods .........
.... and from the front of the bottom tail fin. This will look fab if the picture in my head can be transferred on to actual model!
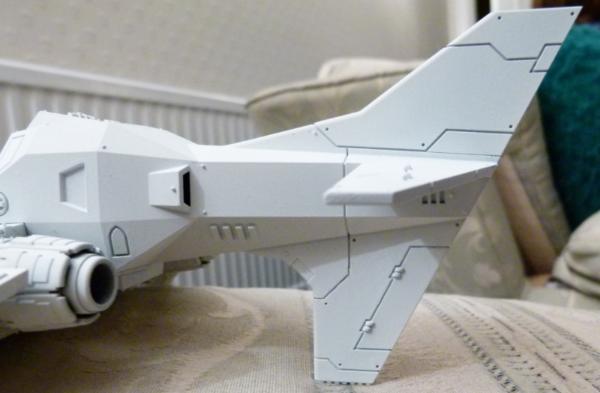
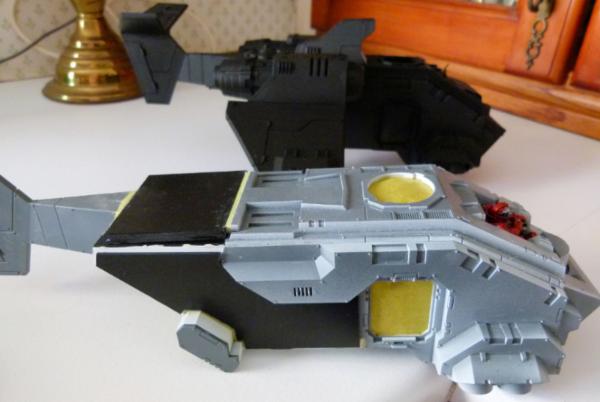
Storm Raven
I've never liked the original Storm Raven - far to short and stubby. I've seen others "stretch" out the body and have seen Chapterhouse conversion kit and thought I would give it a go....
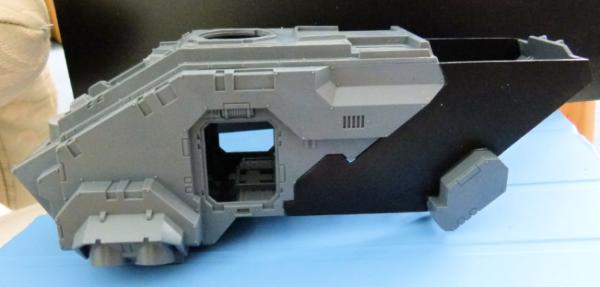
I traced the outline of the rear section and added an extra 2 inches (5cm) of plasticard. I felt this was large enough to accommodate the supposed amount of SM's that a Storm Raven is supposed to carry.
To hide the joins between the plasticard and the original model, I added another layer of plasticard (the white parts). Only after taking this shot did I realise I had glued the top tail fin the wrong way around.. DOH!!!!!
It looks plain at the moment, but I plan on adding Hurricane Bolter sponsons not on the door as per normal, but just to the right of this doorway. This will allow me to use chapter specific doors and will also allow exit by front, rear and from the side.
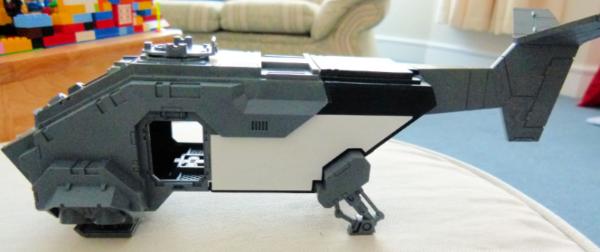
This shot shows the rear section. Milliput has been added to hide small gaps and after curing, will be sanded smooth. I need to add some small rivets and the gap between the air intake/cowl and tail will be filled by a large Adeptus Mechanicus Logo from Cities of Death. This will reinforce the close bond between my Chapter and the men from Mars!
This plan shot shows the extra length that has been added. I have made some templates for the plasticard to decrease the build time of the next 2 Storm Ravens.
A final shot of the underside. I don't have any plans to add extra detail on anything on this view.
I'm writing this as I wait for the milliput to cure. Time for bed I think.
Regards, Phil.
|
|
This message was edited 1 time. Last update was at 2013/05/06 20:05:23
|
|
|
|
|
2013/05/06 21:40:06
Subject: Re:Philmorgan75's workshop blog - Legion of the Dead
|
|
Regular Dakkanaut
|
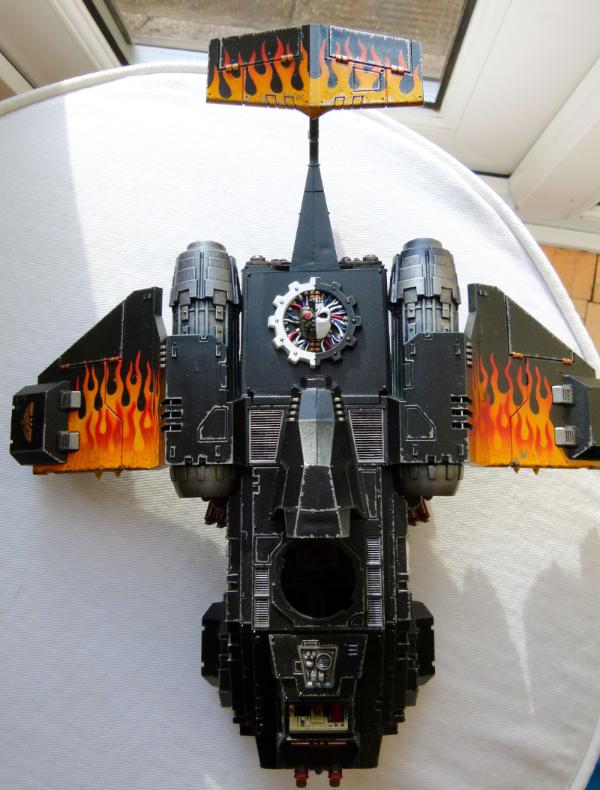
Fellblade update time:
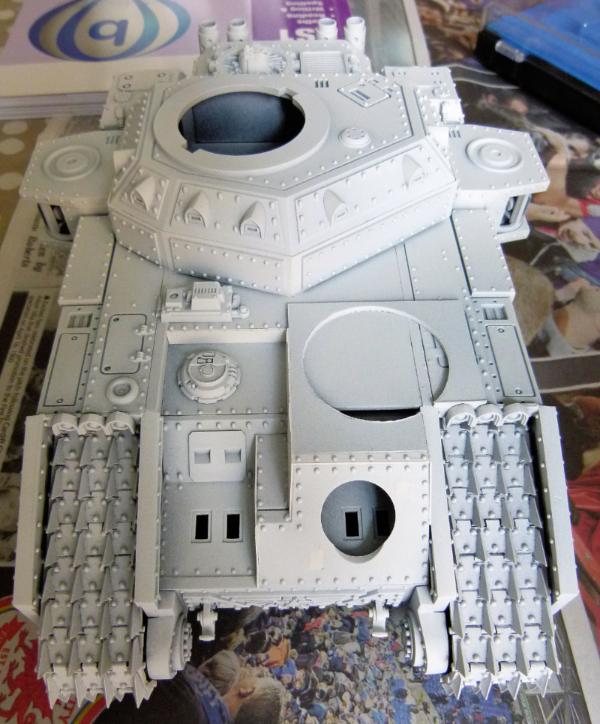
I finally plucked up the courage and started to paint my fellblade. When I say paint, I mean undercoat!!!!! I haven't had much joy with my airbrush - I'm spending more time cleaning the brush than actually painting! I used Halfords White Primer rather than an airbrush on this as I got so frustrated with my airbrush. After getting headaches/feeling unwell later in the evening after using the airbrush (even though the windows and outside door were open continually), my wife has insisted I use a face mask. Face mask and glasses that get fogged up quickly is no fun!!
I used Vallejo Model Air black this morning and sprayed the whole model (after 2 cleans!). Pictures to follow soon...........
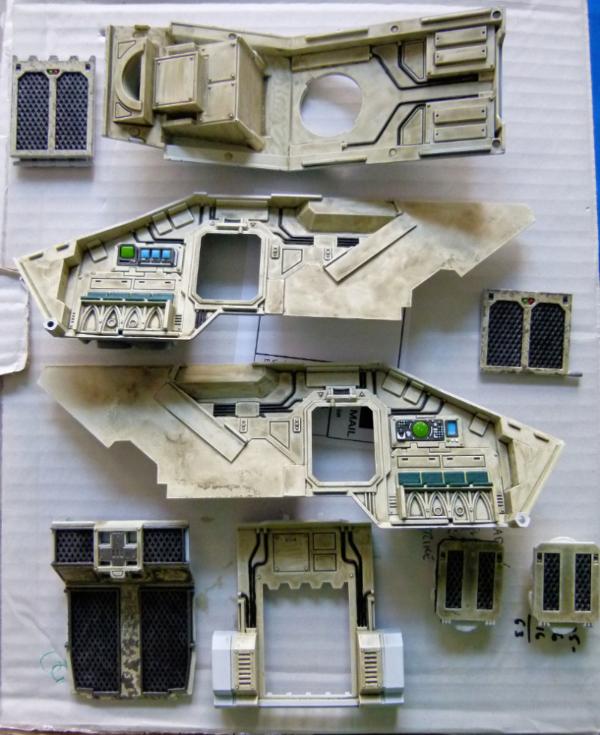
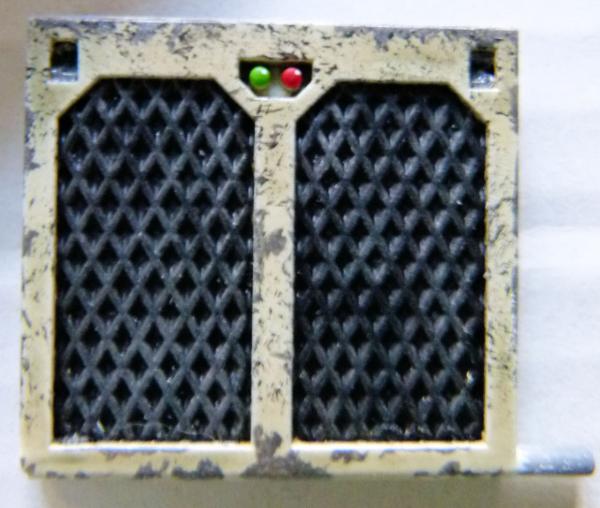
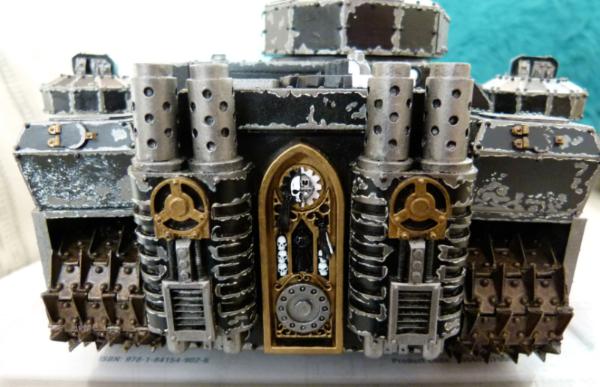
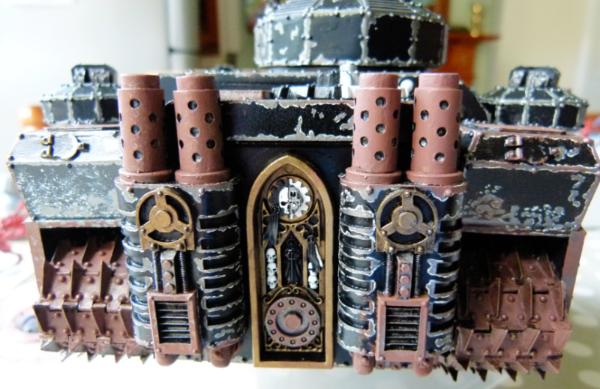
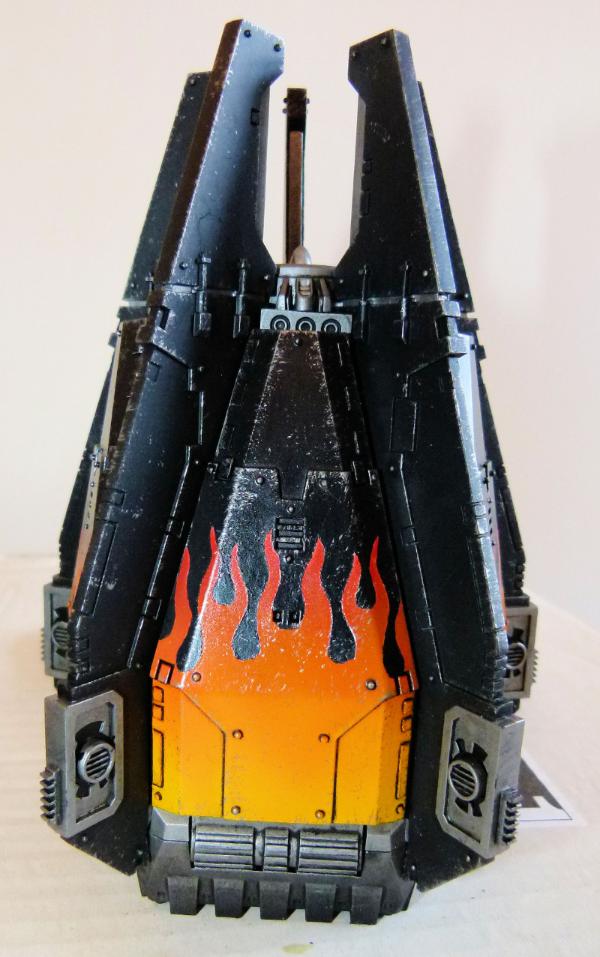
Started to paint my Fortress:
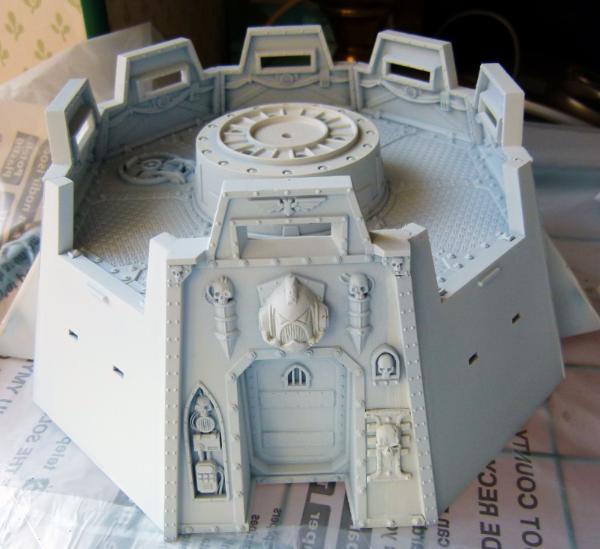
I'm still toying with my airbrush. The primer in my airbrush kept on clogging up the tip. I tried reducing/increasing pressure, thinning the mix to no avail. After much frustration, I used Halfords White Primer to spray the 4 octagon emplacements and 3 of the corridors.
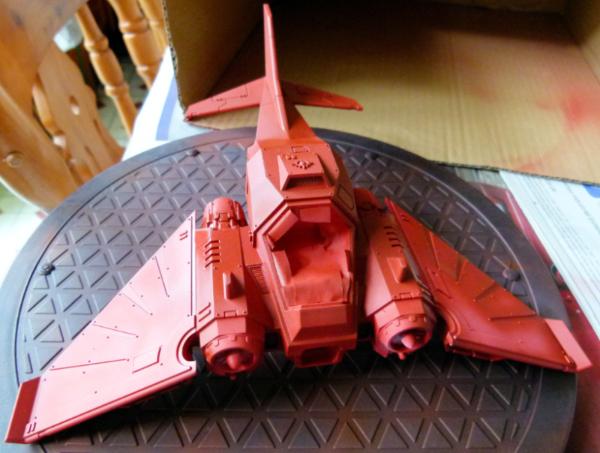
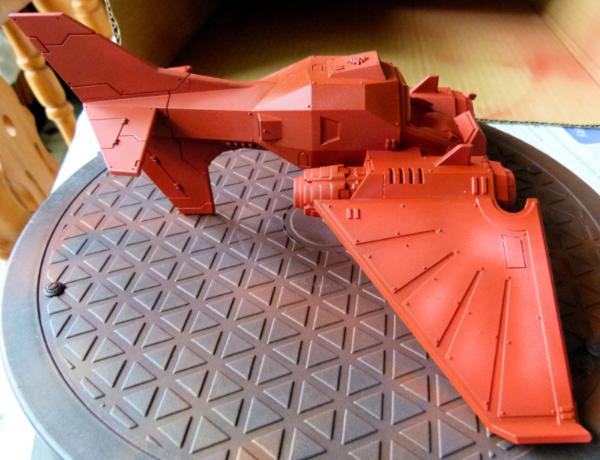
I switched to Vallejo Model Air Fire Red and this worked a breeze through the airbrush:
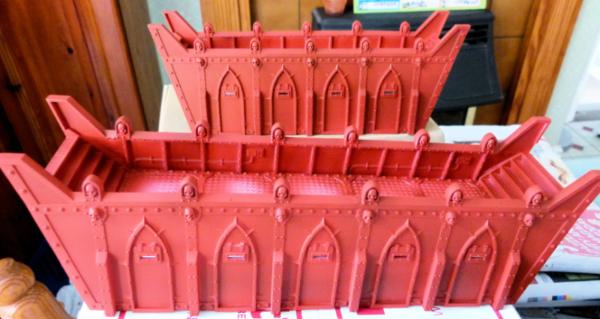
This shows the colour I've gone for. After viewing and reading lots on weathering, I sprayed a thinned down Vallejo Acrylic Gloss Varnish all over to assist in the wash stage.
I used GW Baal red wash all over. It darkened the red, but it left streaks and pools in places. I'm not happy with the result and am toying with respraying with Fire Red and starting again. I've started painting a Dark Talon in the same Fire Red colour and with this, I used a black wash from oil paint and thinner and I was really happy with the results. I currently have too many painting projects on the go at the same time!!!!!!!!!!!!!!!!
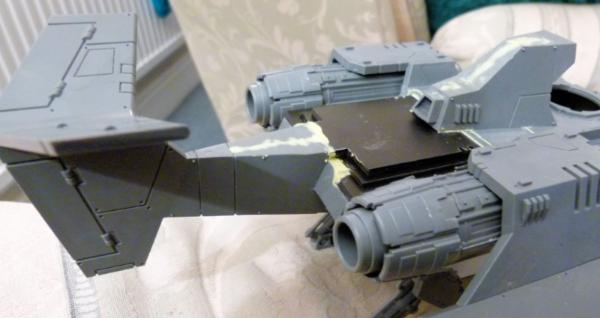
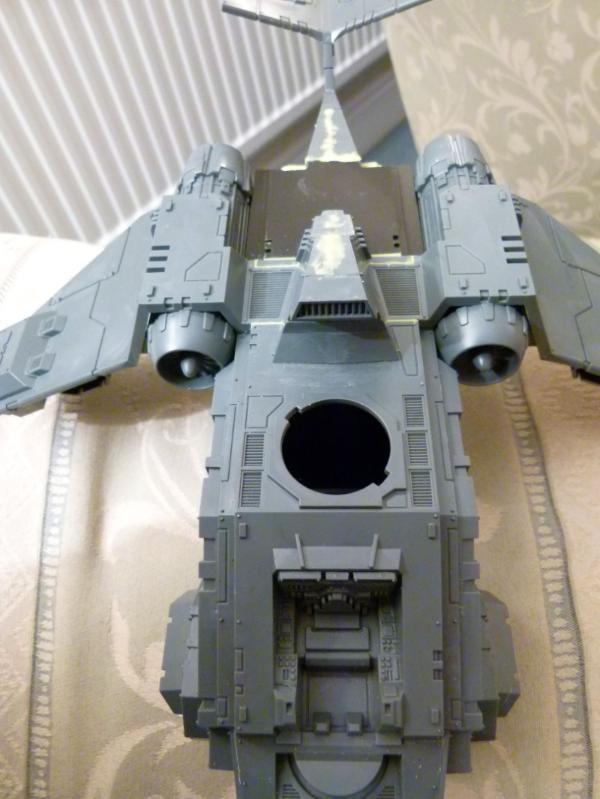
Updates on my Extended Storm Raven and Dark Talon:
This shows the plan view of my Extended Storm Raven after I undercoated it. After much cutting, sawing and filing, I added the Cities of Death Adeptus Mechanicus Logo to the top to show the close links my Chapter has with the planet Mars. I had great fun building this and plan on building another 2 Storm Ravens to this extended pattern.
This shows a WIP of my Dark Talon. I used Vallejo's Fire Red Model Air to basecoat the model after using some Tamiya masking tape to cover the cockpit.
I then used watered down Vallejo Gloss Varnish Acrylic to cover all of the model to assist in the wash process.
I used some black smoke oil paint from AK Interactive mixed with some thinner to create a wash and as carefully as I could, added the wash into all the cracks. After a few minutes, using thinner and a clean brush, I then proceeded to clean up any spillages.
This shows a top view of the WIP black lining process. As oil paint takes ages to dry, I put this aside for 2 days to give the paint time to dry. To ensure no impact on other weathering processes, I used another layer of watered down Gloss Varnish.
As I wanted the Aquila on the wings to stand out, I used some Tamiya Masking tape to mask the areas around the Aquila ready for some airbrushing! This process took ages!!
I started off spraying the Aquila Vallejo Model Air Black as an undercoat. I would have liked to have kept the Aquila darker, but due to issues with my airbrush clogging up and lack of fine control, the Aquila came out a lot greyer than I would have liked.
Never mind, Rome wasn't built in a day and an airbrush is a difficult tool to learn.
I think overall, it turned out well.
There is a small amount of leakage and a small amount of edges missed by the airbrush, but I sprayed the whole area with watered down Gloss Varnish again to protect my work.
I have been purchasing a lot of AK Interactive weathering products recently and want to try out a few of them on the Dark Talon, namely streaking grime from all of the rivets and rain marks for Nato to be applied from the rivets on the Aquila.
Before I do this though, I wish to try out some "sponge" chipping effects on some parts of the fuselage. I want the Dark Talon to be the start of my "Weathering" journey. I have tonnes of non painted vehicles that will look cool with all of the things Mig Jiminez does on a regular basis with his vehicles. If I can get my models to be just half as good as his, I'll be a happy man!
Over the next couple of days, I want to paint all the metal parts and the cockpit then weather these as well.
More updates to follow.
Regards, Phil.
|
|
|
|
|
|
2013/05/12 19:49:38
Subject: Re: Philmorgan75's workshop blog - Legion of the Dead
|
|
Regular Dakkanaut
|
Update time:
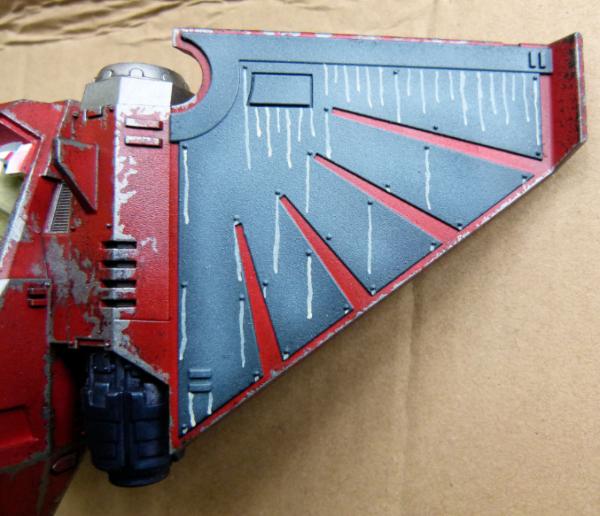
I started weathering the Dark Talon with some black paint using the sponge technique. I found this incredibly messy and I just didn't like the effect. I ended up using a brush and using a GW Silver base colour and have probably gone over board with the exposed metal but it's a learning curve!! I'll explain the extreme weathering with some fluff e.g. The Legion of the Dead Chapter are in the middle of a sweeping crusade and have reached planet X - A planet under constant acidic rain etc...
The White Lines running vertically down the wings are AK Interactives Nato Rain Marks before they are merged into the wing. You'll see the results later. I added more exposed metal across the engine covers either side of the cockpit - This is pathway the Techmarine would take to get in and out of the cockpit.
This shows the bottom view. This has taken hours to get to this position!! I'm really happy with how this has turned out.
Here's a closer look at the bottom. Next time, I'll try AK Interactives Chipping Effects and see how it goes.
Here's the WIP shot of an engine. After giving it a base coat of GW iron base colour, I then shaded it with Vallejo Black Shade. I wanted to give a used, hot metal look, so I gave it a purple game colour wash and once dry, added Burnt Steel Blue pigment from Vallejo. I plan on finishing the engines off by giving a light drybrush of silver and then lastly, some Black Smoke pigment.
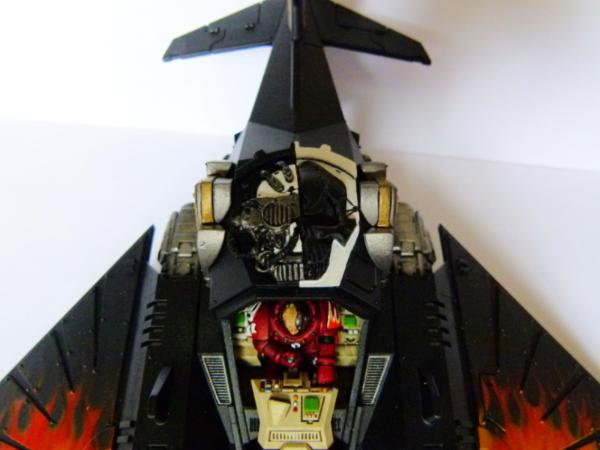
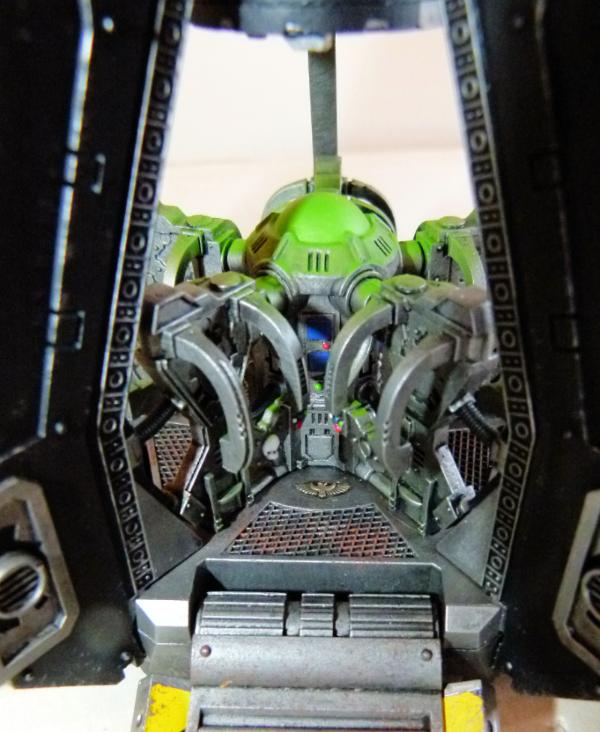
Here's a shot of the front. I've used some cremeweiss as the cockpit colour. After using some Gloss Varnish, I then used the enamel interior wash from AK which turned out quite well. After another Gloss Varnish coat, the next job is to add some Interior Grime Streaks. That will finish the interior walls before I then finish off the instruments. I want to use an emerald colour for the seat, with lots of gloss coats to give a new leather like impression. I think it will look really "Deathwing" like. I've ordered 3 Techmarine pilots from a Bits site in the USA (to finish the 3 Dark Talons I'm in the process of making), so I won't be able to button up the cockpit for a few more weeks yet.
This shows how bright the Nato Rain Marks are when straight out of the bottle.
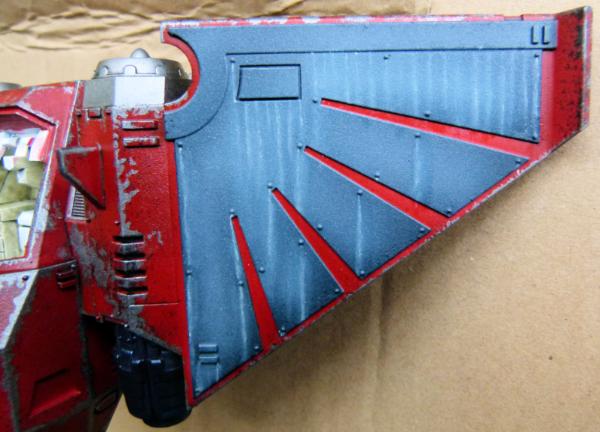
After 5 mins of drying time, white spirit is used to soften and merge/draw out the colour. I think it turned out rather well!!
To do:
Finish off the exterior - Exterior Streaking Grime to be added to all the rivets
- Add antennae, front armour and weapon systems
Finish off the Interior - Interior Streaking Grime, instruments and Techmarine
Critiques welcome as always.
Regards, Phil.
|
|
|
|
|
|
2013/05/23 17:56:01
Subject: Re:Philmorgan75's workshop blog - Legion of the Dead
|
|
Regular Dakkanaut
|
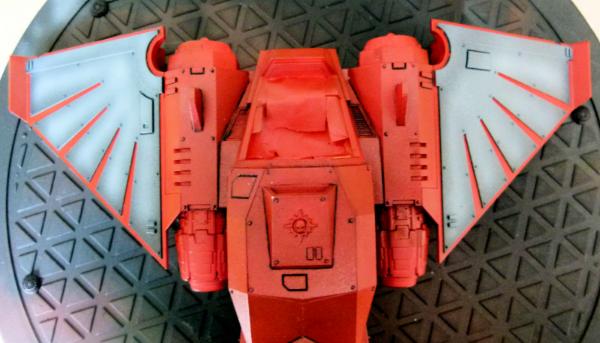
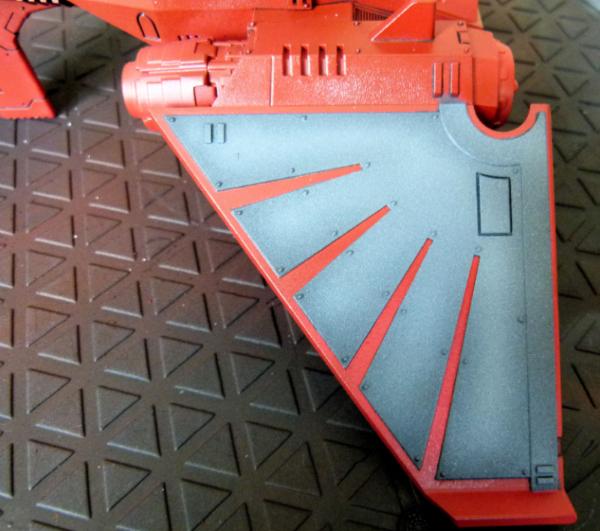
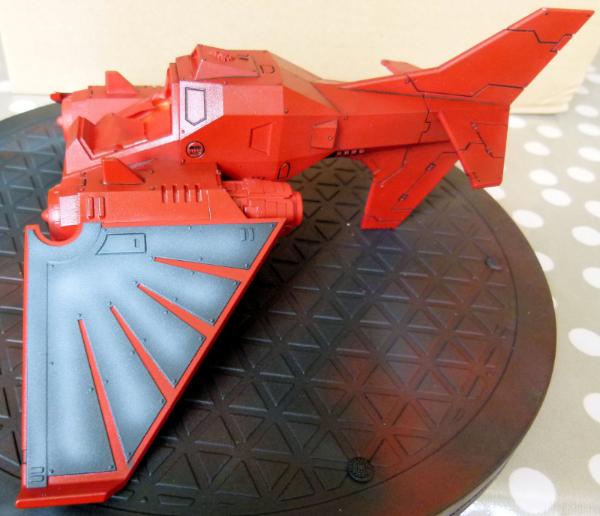
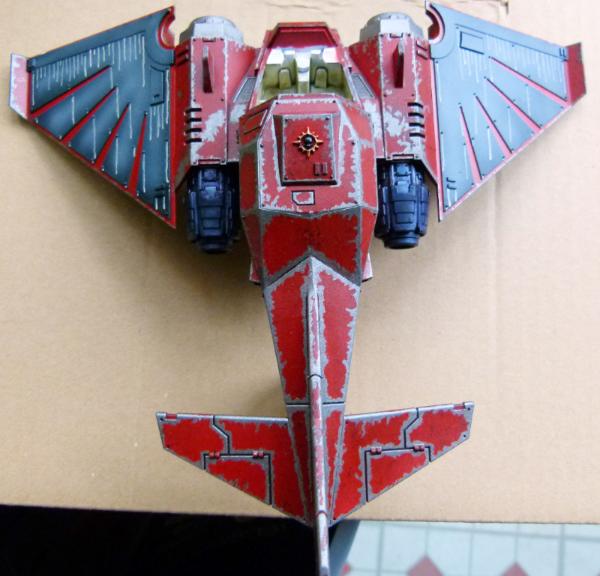
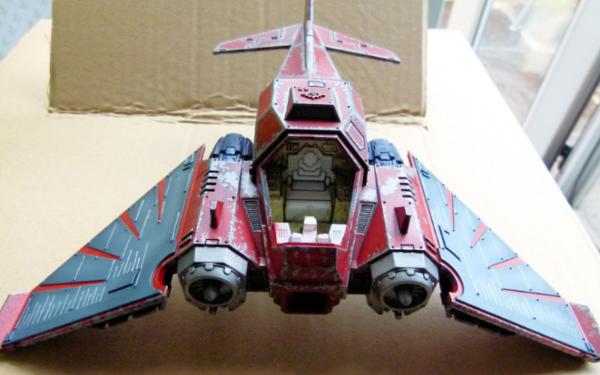
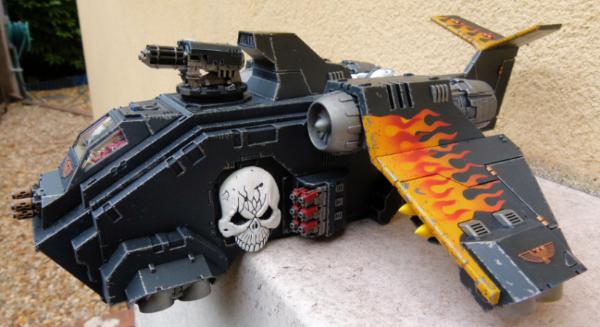
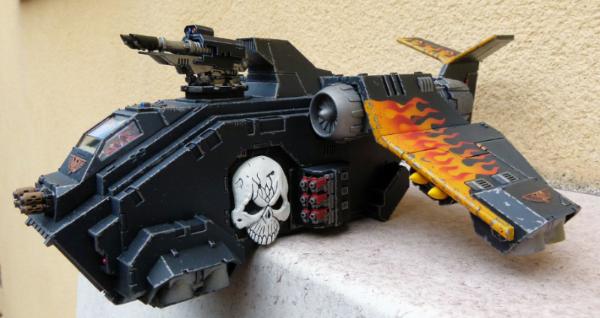
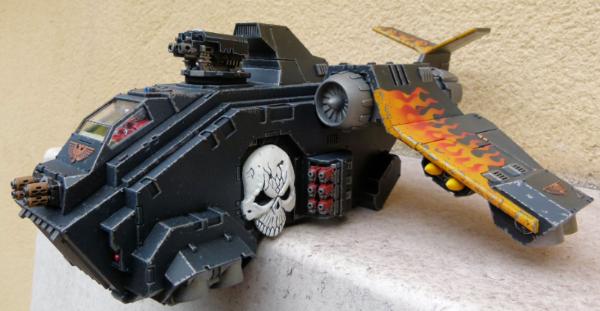
Finally finished my Dark Talon:
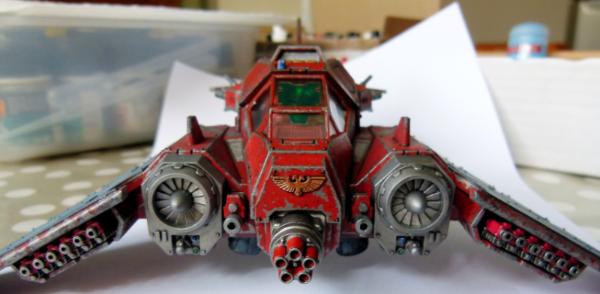
Here's what she looks like!
Armed with Assault Cannon, Twin Heavy Bolters and Hurricane Bolters.
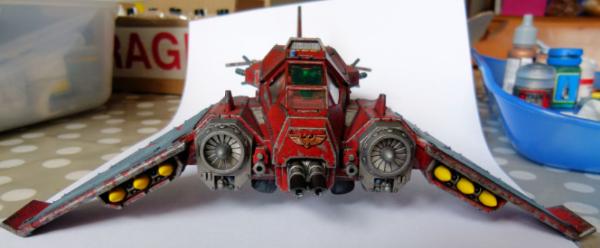
Armed with Twin Lascannons, Twin Heavy Bolters and Missile Launchers

Armed with Assault Cannon, Twin Heavy Bolters and Hurricane Plasma Guns
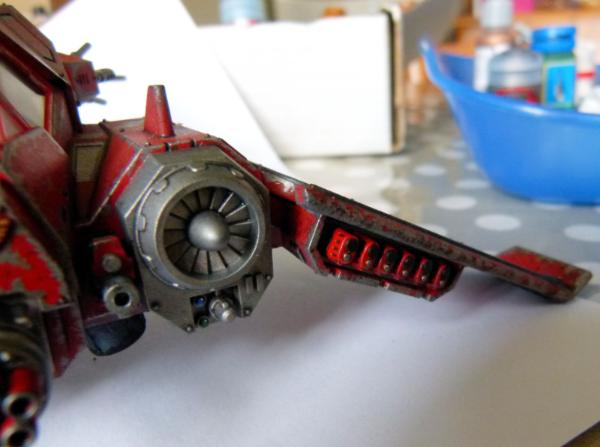
Here's a close up of the Hurricane Plasma Guns.
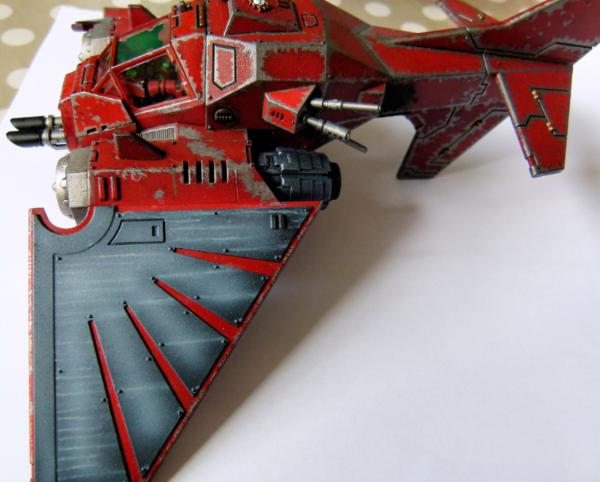
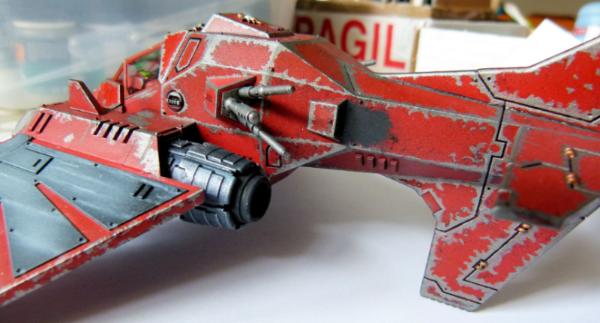
This shows the side view.
I've tried some black smoke pigment for the first time on the exhausts and engines. I don't know if I am 100% happy or not, but I did use this model as a test for lots of different paint techniques and I can only get better!!
This shows the HUD. I was toying with adding characters and symbols to the HUD, but in the end, I chickened out.
I used a very old GW Green Ink mixed with some Vallejo Gloss Varnish and ended up with this. I'm happy with how this turned out.
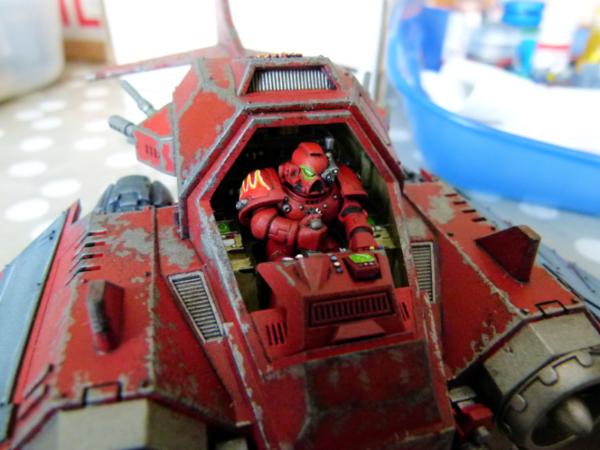
I've tried for the first time to paint a "glowing" effect for the eye. I added my Chapter's flames on his right shoulder pad.....
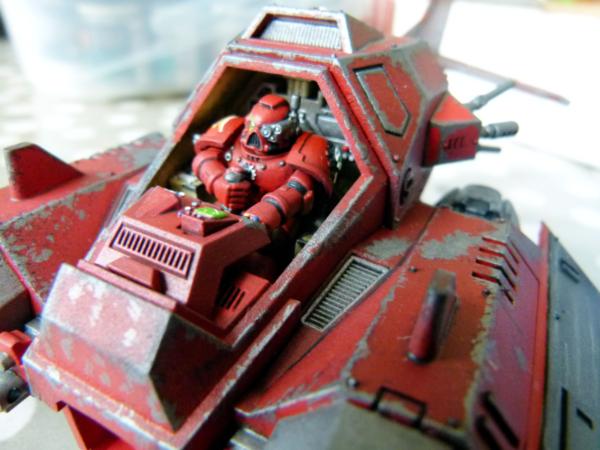
.... and the Adeptus Mechanicus logo on his left shoulder pad.

More Black Smoke pigment added to the thrusters.
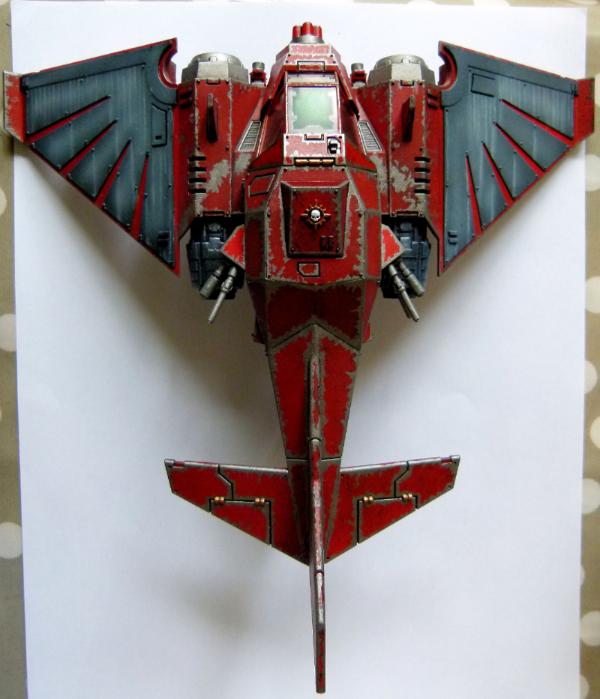
And finally, a plan shot.
I really enjoyed this little project, trying out my airbrush, weathering effects and pigments and I hope with each project to improve.
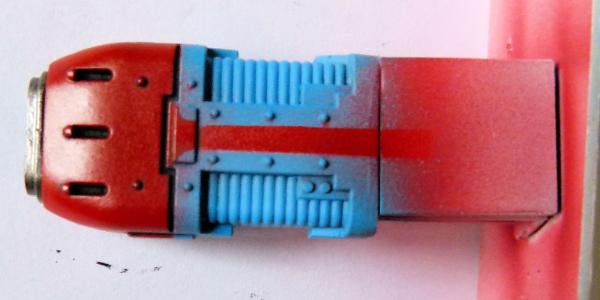
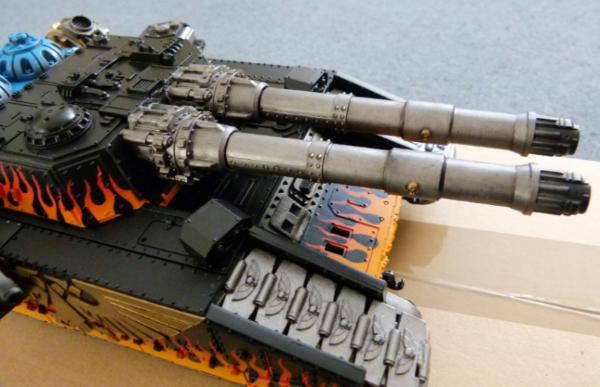
I plan on painting my Fellblade next. Here's a shot of one of the Heavy Plasma Executioner sponson weapons:
More to come in the near future ........
|
|
|
|
|
|
2013/06/09 21:27:54
Subject: Re:Philmorgan75's workshop blog - Legion of the Dead
|
|
Regular Dakkanaut
|
For some unknown reason, rather than paint my first extended Storm Raven, I started another:
As you can see, the first Storm Raven on the right has been undercoated and then airbrushed black. I've bought a flame airbrush stencil and after trying it on my second Dark Talon first, I want to add a number of flames over the wings and body. The Storm Raven on the left is around 80% completed. I have a 45 minute lunch break and use this time to paint little projects - The pilot is one of them. I'll show some close up's later on. The yellow you can see is Tamiya masking tape to prevent exterior paint from getting into the interior.
I've added some milliput this afternoon to some gaps and cracks, so I won't be able to sand/file the edges until tomorrow.
Add some rivets and the exterior construction will be completed. I want this Storm Raven to be in flight, so the landing gear will be stowed. The extension means the existing flight stand holder is in the incorrect place from the existing kit. Once I finish the construction, I can work out the correct place to put a replacement flight stand holder.
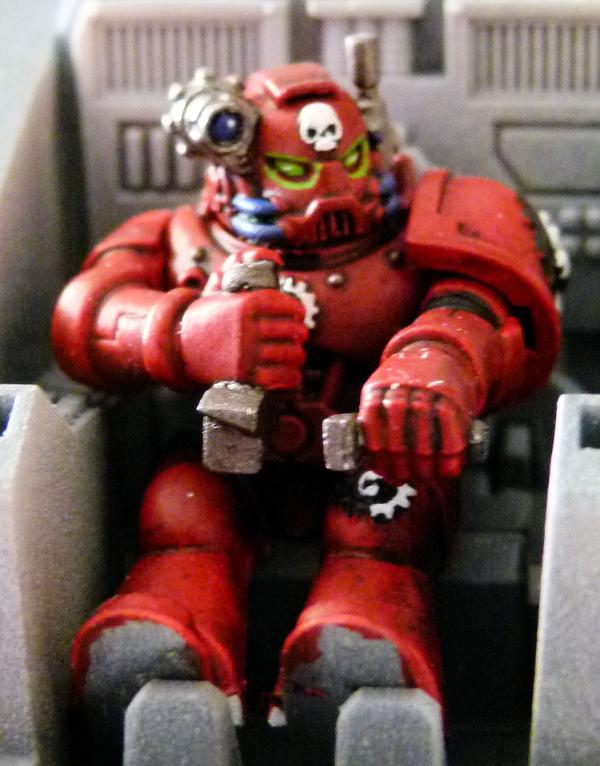
My Techmarine pilot almost finished. Just his right shoulder pad to paint and he's done. I've learnt from my first Dark Talon not to spend too much time on the pilot as most of him can't be seen when you button up the canopy. The "glow" effect around the eyes isn't perfect, but I don't have time to correct it.
Here's the almost completed interior of the second Storm Raven. AK Interactive products were used (cremeweiss and Interior enamel wash) to weather the interior. You can see the plain parts of the plasticard that I used for the extension. In this shot, I still had the rear floor and top rear to construct out of plasticard.

A rough and ready paint job was given to the interior as for 99% of the time, you won't see any of this and even if the doors/hatches are open on the completed Storm Raven, at least 70% of the paint job won't be seen.
This is the interior of the front hatch. I've tried to give some realistic weathering to the edges of the hatch, sponged on black paint and then some silver paint to represent flaking paint from Space Marines' boots. I attempted to dry fit this part to the body, only for the left hand peg to snap off!!!!! I've used a magnet instead as it would be impossible to stick a replacement peg onto the hatch.
Here's a shot of the rear hatch and also what I did for the rear floor - I bought a spare front floor, chopping off the raised part (using the flight stand receiver elsewhere) and sticking it to a piece of plasticard.
This shows the completed interior before I glue on the top pieces. I added some Tamiya Tape on all of the interior doorways to prevent any paint intrusion when I airbrush the exterior. I hope the tape will come off easily when I finish the paint job!!!!
Here's another shot of the Hatches for one of the Storm Raven.
Once the milliput is dry tomorrow, I'll file and sand the edges and add some rivets. This will allow me to undercoat the Storm Raven and hopefully start the paint job asap.
Why have 1 project on the go, when you can have two!!!! Here's a shot of my second Dark Talon. I want this one to be plasma heavy - I've constructed a Plasma reactor to replace the 4 thrusters underneath and I have already made and painted some "Hurricane" plasma guns for the weapon pods underneath the wings. I want to add a Plasma Executioner as it's primary weapon (I just need to find one on ebay/bits sites).
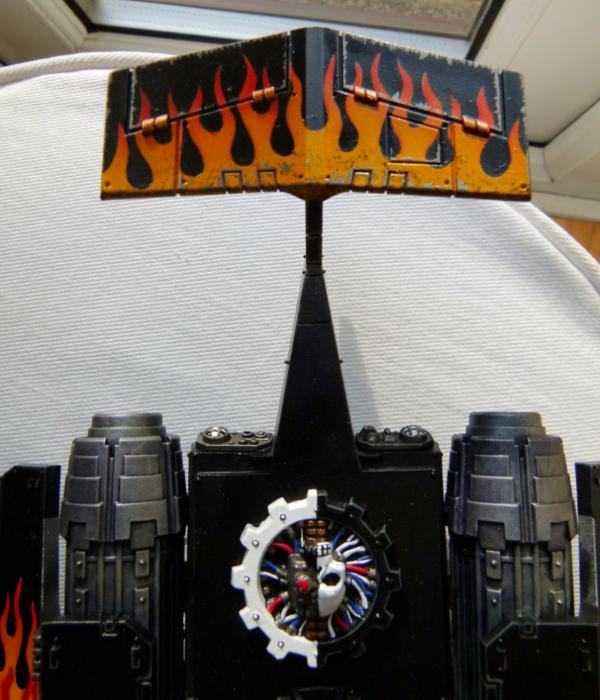
To show how close my Legion of the Dead are with the Adeptus Mechanicus who created this "Plasma Talon", I added an Adeptus Mechanicus Skull and Cog logo on the very top of the aircraft. The yellow tape is Tamiya Masking tape to ensure there will be no overspray when I start using the airbrush on the wings.
Here's what I've done with the wings. I used a flame airbrush template I got from ebay and after a lot of trial and error, I've got to this stage. I'm not exactly happy with how it turned out, but to protect what I have done already, I gave it a coat of gloss varnish. I plan on using the template again and to use some orange paint to define some of the round "hollow" bits. I'll need to use some black paint as well to cover up some overspray.
Lots to do as usual. Comments welcome as always.
Regards, Phil.
|
|
|
|
|
|
2013/06/17 19:19:57
Subject: Re:Philmorgan75's workshop blog - Legion of the Dead
|
|
Regular Dakkanaut
|
Slowly making progress on my SM Flyers:
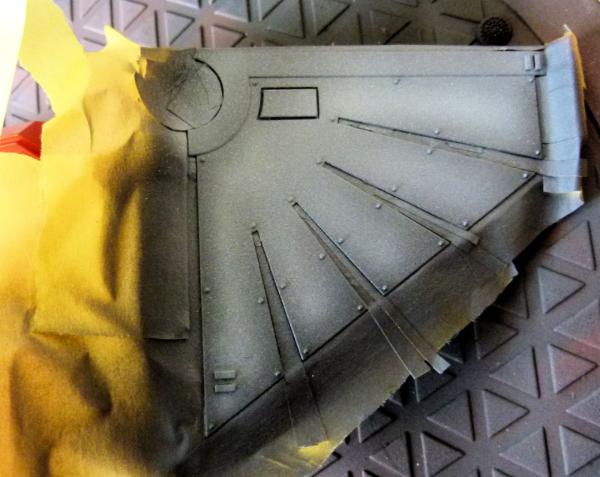
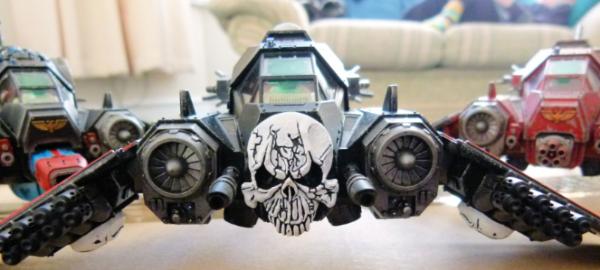
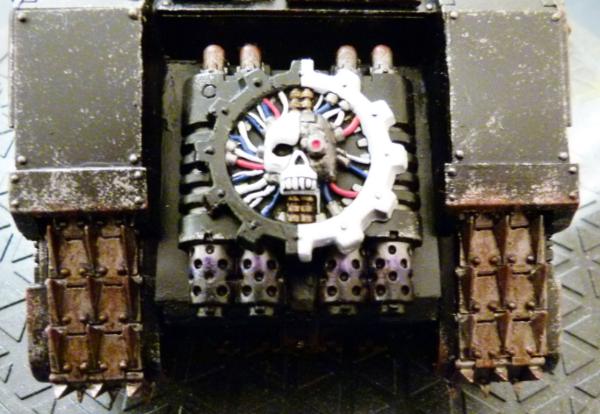
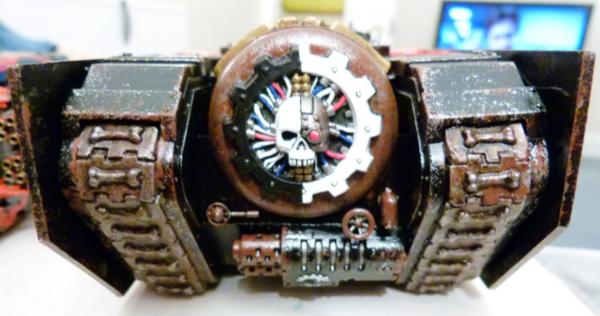
This shows my first attempt of painting flames with an airbrush. I used a template I got from ebay and with lots of patience, got to this point. I'm 80% happy with how the flames turned out and will use the template in future vehicle paint jobs. This shot shows the Adeptus Mechanicus logo I'm using on the top. Unfortunately, the white part of the skull is the part that has bionics on. I don't think leaving the right hand side of the skull black will provide much of a contrast with the rest of the Talon, so I plan to paint the right hand side white and the left black. Is this blasphemy or not?????

I didn't move the template as much on this side of the wings when painting the flames nearest the front, so I don't think It turned out as well as the other wing, but as with my previous Red Talon, I am happy to learn and improve with every vehicle I attempt.
I want to add a few weathering bits to the flames. I want to mask some of the dust that seems to have dried in between the layers of varnish and coats of paint.
You can just about make out the pilot in this shot. I'm painting his helmet less head separately and only have the bionic bits on the skull and the flames on 1 shoulder pad to finish off the Techmarine. I've painted the buttons and screens in the cockpit white and will paint them with red/blues/greens etc before buttoning the cockpit down. I've bought the Dark Talons from bits suppliers over the past few months but can't seem to get the clear Perspex canopy. I now need 2 more of these so that I can finish off this model and start on the next variant.
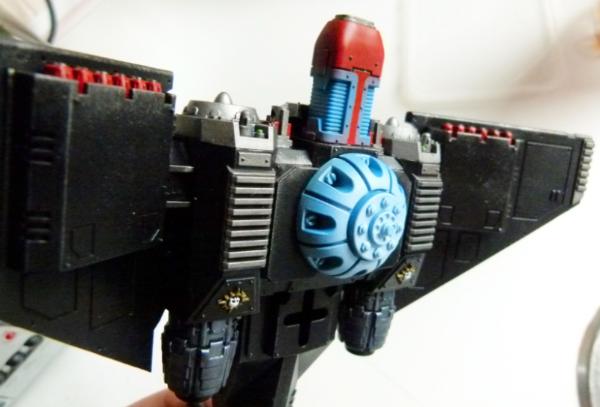
Apologies for the darkness in this shot, but I just want to show what I have done with this conversion. I've added a Plasma Reactor dangling from where the thrusters are normally located - hardly safe in real life but this is 40K
The reactor was made from some plasticard (to cover the thruster parts) and a part from the Pegasus Chemical Plant that I had left over after completing my plasma engines for my first fellblade. I added the central hub of the Attack Bikes third wheel to finish it off. I plan on using the airbrush to spray dark blue to light blue to white in the very centre, to hopefully give a little "plasma" like paint job. I've just ordered a Plasma cannon off a Leman Russ to replace another I painted for my first fellblade's sponson:
This is what the front weapon will be rather than the usual Mega Bolter or Twin Las Cannon. I plan on sticking it horizontally rather than vertically. Added to the Hurricane Plasma Guns, this Talon pumps out lots of hot stuff!!!!
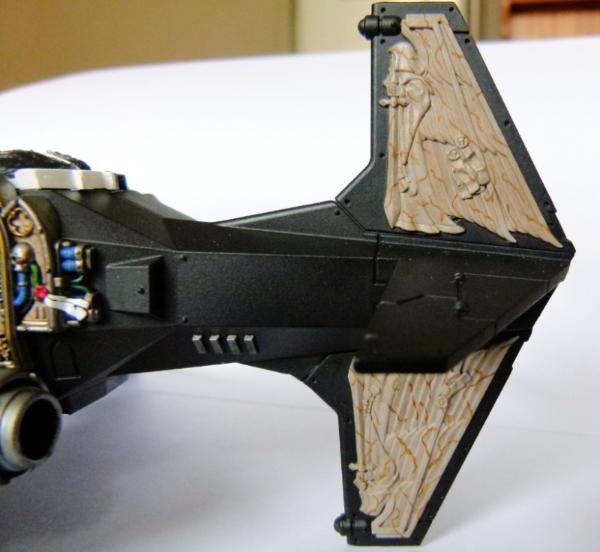
This shows what I decided to do with the tail fin. As this would be my most venerable Talon, I decided to use as many of the bling bits from the original Nephilum model. As I hadn't used the winged DA holding the sword on the Red Talon, I thought it would be cool to actually use 2 on this variant. The engines will have washes of blue and purple ink and a small amount of black smoke pigment added to the very end.
I normally have 2 or 3 things on the go at the same time, so when I get bored with one vehicle, I move onto another. Here's the progress I've made on the second extended Storm Raven (the one with the fully painted interior:
Just need to paint a few buttons and screens and the cockpit will be complete. With both flyers, I plan on using a medium grey along all of the edges to give an edge highlight (breaking up the black monochrome landscape) and then add a few areas of weathering and rust to certain edges and rivets.
I've left all the masking tape in place to (hopefully!!) ensure the painted interior gets overspray whilst finishing off the rest of the model. I've painted one of the engines GW Leadbelcher silver base layer and added some Vallejo Black wash to the rear part. Tomorrow, I'll add some more black wash to the front and once dry, a light drybrush of Leadbelcher alone the edges and flat parts.
To keep in with my Legion of the Dead Chapter, I'm leaning towards adding airbrush flames on the front and top of the wings (similar to the Plasma Talon) and a few more flames along the bottom part of the sides of the Storm Raven (where the side doors are located).
Comment and critiques welcome as always.
Regards, Phil.
|
|
|
|
|
|
2013/06/23 23:01:11
Subject: Philmorgan75's workshop blog - Legion of the Dead
|
|

Terminator with Assault Cannon
|
Don't know why you don't have more comments, your stuff is fantastic!
Love the fellblade conversions. I can also say the Machinator's stuff is fantastic. (Blood and Skull industries on ebay)
The fortress is just plain awesome.
I chose to with the chapterhouse kit for my Stormraven. You did a fantastic job on the conversions.
|
SickSix's Silver Skull WIP thread
My Youtube Channel
JSF wrote:... this is really quite an audacious move by GW, throwing out any pretext that this is a game and that its customers exist to do anything other than buy their overpriced products for the sake of it. The naked arrogance, greed and contempt for their audience is shocking.
= Epic First Post.
|
|
|
|
|
2013/06/24 20:12:10
Subject: Philmorgan75's workshop blog - Legion of the Dead
|
|
Regular Dakkanaut
|
 SickSix wrote: SickSix wrote: Don't know why you don't have more comments, your stuff is fantastic!
Love the fellblade conversions. I can also say the Machinator's stuff is fantastic. (Blood and Skull industries on ebay)
The fortress is just plain awesome.
I chose to with the chapterhouse kit for my Stormraven. You did a fantastic job on the conversions.
Thanks for your comments SickSix. I probably would have had more comments if I started a separate link for each mini project I started, but I thought a blog would be the best way of keeping everything under one roof.
I was umming and ahhing over getting the Chapterhouse Storm Raven Extension kit but 2 things put me off, 1) I purchased their Land Raider sponson kit a few years back and due to it costing more than £15.00, I was walloped with an import duty and a Royal Mail handling charge of almost the same amount as the kit (ie I paid double what I thought I was going to pay) and 2) The cost of the CH Storm Raven Extension kit. I have lots of plasticard and was happy to muck about until I got something I was happy with. I have now made plasticard templates so future extensions should be completed really quickly (got enough parts to make another 1.5 Storm Ravens).
Today's progress:
Apologies for the slightly out of focus shot. This shows the front view of the Plasma Dark Talon. I've finished all of the cockpit and have almost finished the metal parts. To finish this view, I need to paint the scope lenses underneath the turbine fans and to add some magnets to the already painted Plasma Executioner (to be added where the Twin Lascannon/Assault Cannon normally goes).
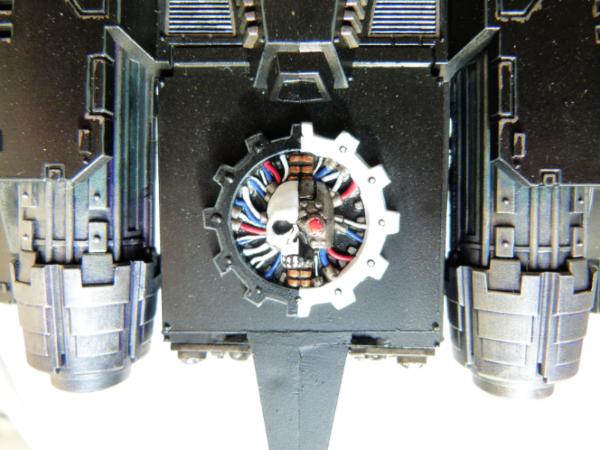
This shows the plan view. I decided to paint the Adeptus Mechanicus logo correctly (leaving the right hand side black). To finish this view, I need to paint all of the pipes around the mechanics on the skull.
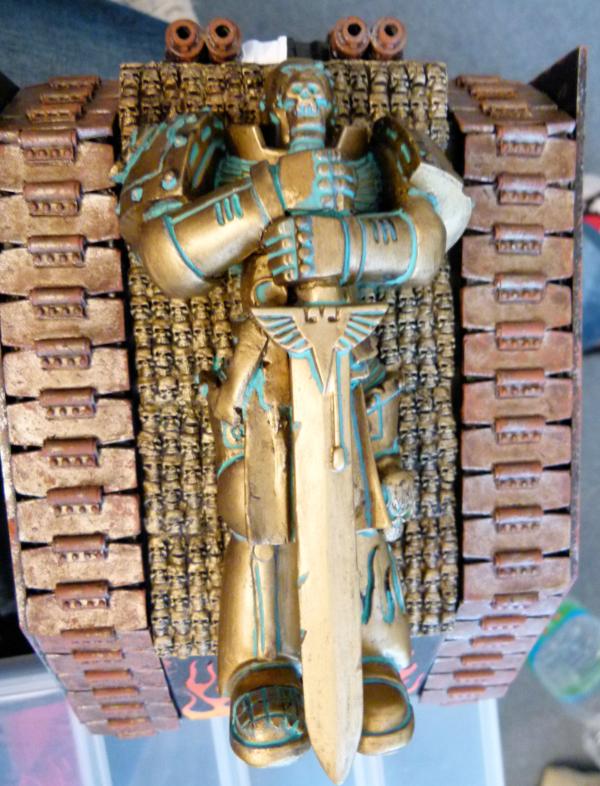
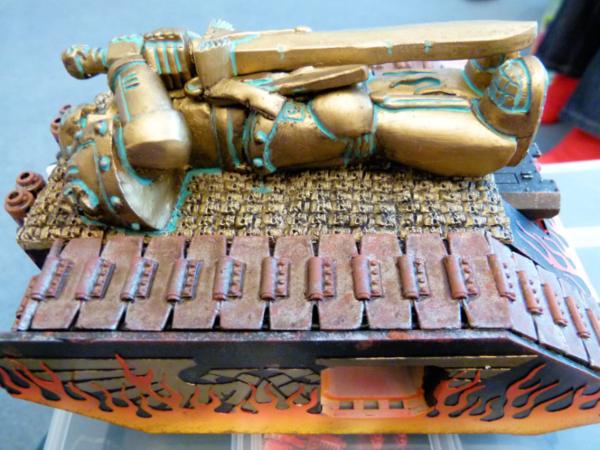
I opted to go with a "Marble" effect on the Hooded Winged DA emblems on the tail. I attempted to copy the paint effect I saw in WD a few months back when they painted a Fortress of Redemption and painted the large DA Hooded Man with this paint effect. I think it turned out well. I did originally paint it dark grey and had finished the first layer of lighter grey (leaving a small amount of dark grey in the recesses). Unfortunately, I didn't have a steady hand and there were too many places that I would need to touch up. I then went for the marble look. To finish this view, I need to paint the scope lenses at the top edge of each vertical tail piece.
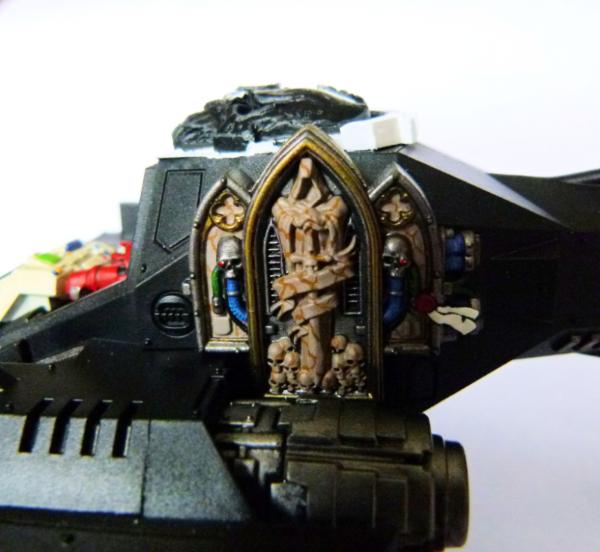
This is the complete Relic part of the kit painted with a complimenting marble effect to the tail decoration. To finish this view, I need to add purple ink to the engine exhaust, followed by a dusting of blue steel pigment to give a suitably weathered look. The canopy handle needs to be painted metal and weathered.
In all shots, I still plan to edge highlight all of the armour with Dark Grey to help break up the vast areas of black. Once done and varnished, I plan on adding a small amount of weathering to the edges (but not as much as my Red Dark Talon!). I still need to buy the clear canopy - no one seems to have any in stock at the moment ahhhhhhhhhh!!!!!!!!!
As with every project I start, I move onto the next project......
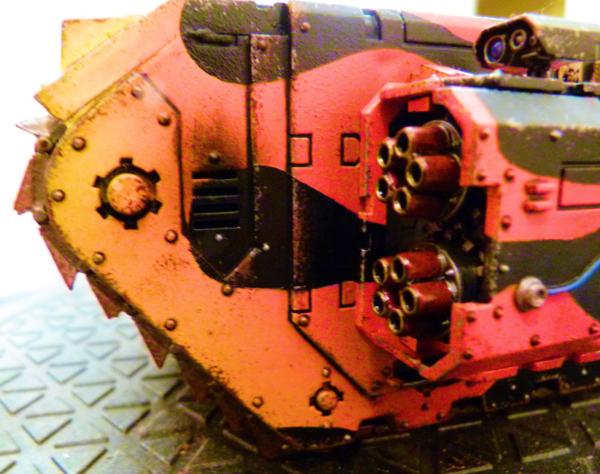
a Tank busting Multimelta/Lascannon killing machine!!! I added Twin Lascannons to where Heavy Bolters are normally located. I thought this gave it a very Thunderbolt like appearance. There will a large skull going on the front covering the usual location of the Assault Cannon.
Here's a close up of the Quad Multi Meltas under each wing.
Plan shot.
and finally, a shot from below.
Comments and critiques welcome.
Regards, Phil.
|
|
|
|
|
|
2013/06/30 15:32:40
Subject: Re:Philmorgan75's workshop blog - Legion of the Dead
|
|
Regular Dakkanaut
|
Finally finished my Plasma Dark Talon (minus the clear plastic windshield that I still haven't managed to buy yet):

I added some magnets to the Plasma Executioner this afternoon to assist weapon swops and to aid in storage. The Heavy Bolters are also attached by magnets as well.
If in real life you saw this view, you would be moments from being fried!!!!! You can just about make out the Plasma Generator I airbrushed underneath the Dark Talon. I have "sponged" some light weathering onto the lead edges of the wings and tail fins.
Here's a close up of the Plasma Generator. I airbrushed the different shades of blue going to white to avoid any tell tale lines. The whole part is magnetised, so I can field this Dark Talon with a normal payload if required.
I have continued to paint one of my Storm Raven. The cockpit is finished and I'll show some progress shots later.
Regards, Phil.
|
|
|
|
|
|
2013/07/29 21:17:36
Subject: Re:Philmorgan75's workshop blog - Legion of the Dead
|
|
Regular Dakkanaut
|
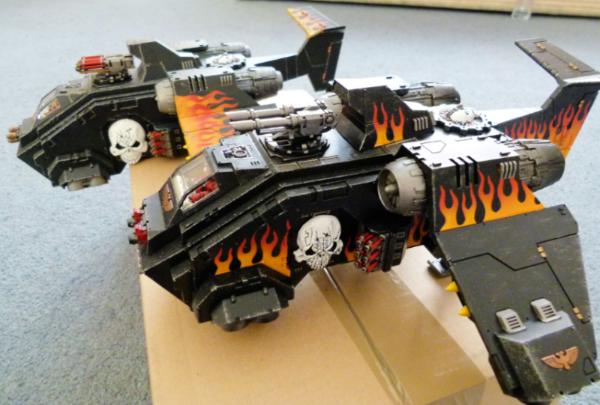
Almost finished the Extended Storm Raven:
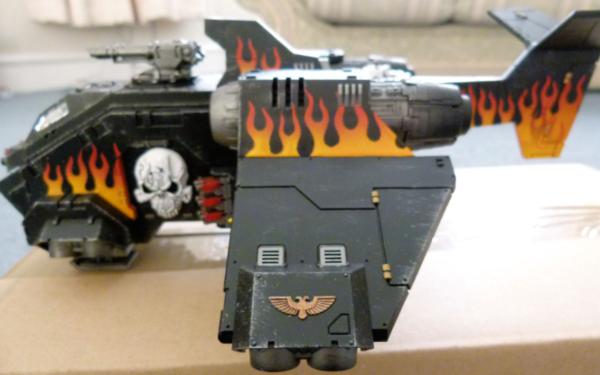
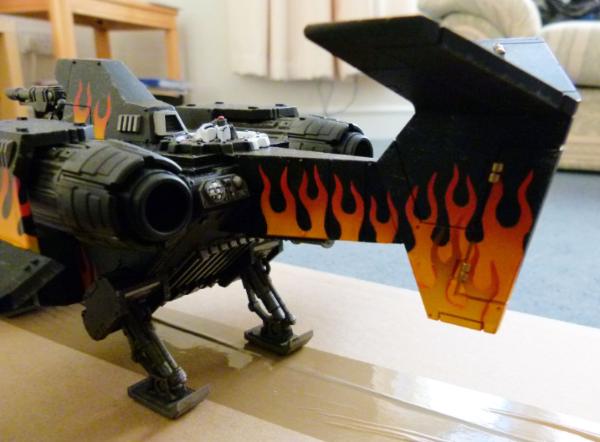
I made some flame templates out of thin plasticard and through lots of masking tape and blu-tack, used my airbrush to paint the flames. Overall, I'm happy with how this has turned out (apart from the length of time for the painting process).
I have some small things to complete before I can say this model is finished. These will be listed/shown later.
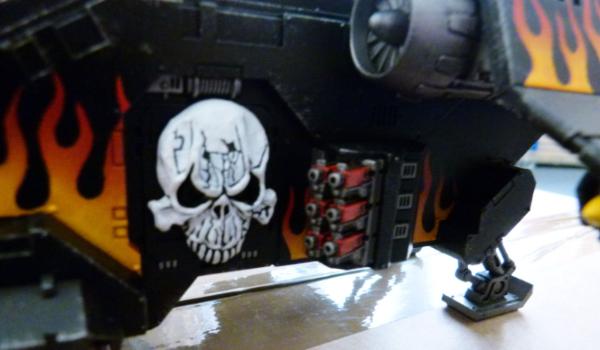
I've gone for some "light" weathering around the leading edges of the armour. The large skulls cover the side hatches and I've moved the hurricane bolters back to lay down covering fire for when the troops disembark.
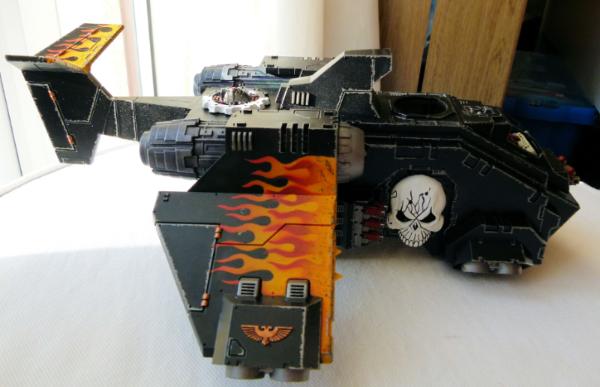
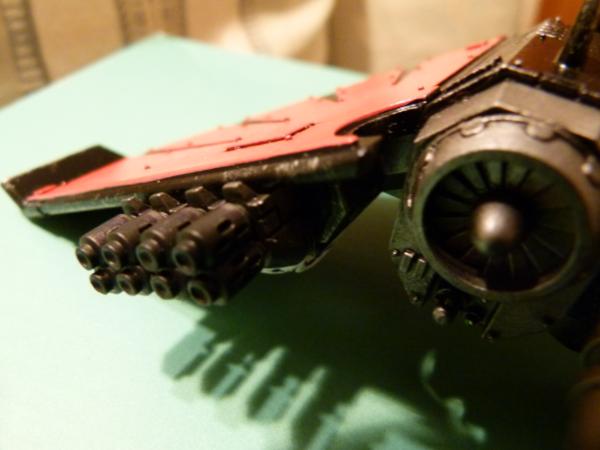
This shows the whole right hand side of the extended Storm Raven. To finish this view, I need to add a "Razorback" weapon turret into the hole at the front and to add some black exhaust smoke around each thruster.
A close up of the left wing.....
...and a close up of the right wing. I'm not 100% happy with how this turned out. If you look closely, you can see the remains of the blu-tack that I used to mask the black areas in the black sections between the flames. I couldn't face stripping and starting again, so it will have to do!!
This shows a close up of the tail. I'm really happy with how this turned out.
This shows the Adeptus Mechanicus logo. As said before, my Chapter has close ties with the Adeptus Mechanicus and it is displayed prominently.
To finish the front, I need to add the clear Perspex after I have given the whole model an airbrush of Matt Varnish to dull the previous Gloss Varnish used to protect the progress of the painting.
The Heavy Bolters at the front are not glued and can be swopped for the Multi Melta or Missile Launcher variants.
You can see that I've added another mount further back. After the extension at the rear, the balance was all wrong. Now, depending on what angle I want the Storm Raven at, I can use either of the mounts.
I added blue and purple ink washes to the engines to (hopefully) give a real life finish. I also painted the Adeptus Mechanicus logo in the correct paint scheme as well.
And finally, the rear hatch.
So, a quick spray of Matt Varnish, add the clear Perspex window in the cockpit and the clear lenses on the wing edges, some soot around the thruster exhausts and finally, to add the Razorback weapon mount and this beast will at last be finished!!
I now need to decide which model is next in the painting line, a fellblade or another Dark Talon. What do you think I should do?
|
|
This message was edited 1 time. Last update was at 2013/08/11 18:53:32
|
|
|
|
|
2013/08/11 18:42:57
Subject: Re:Philmorgan75's workshop blog - Legion of the Dead
|
|
Regular Dakkanaut
|
Finally finished off my extended Storm Raven:
I gave the whole model a blast of Vallejo Matt Varnish. This really dulled the black to an almost dark grey colour. Has anyone else had this problem? I had something similar with Vallejo Satin Varnish and thought it was a duff pot of paint but both Matt and Satin??? WTF?
The cockpit perspex has been added. I chose not to add the clear plastic on the wings as I have multiple layers of paint to make the flames on the wings and didn't want to wreck the paint job.
I've added one of my twin linked assault cannons from my Razorback collection. I thought it would fit perfectly, but the hole for the Servitor turret is slightly smaller than the Razorback. I'll need to make a few modifications but it won't take too long to do.
Here's the side view. As you can see, the turret stands slightly proud.
Here's the twin linked lascannons turret.
Here's the twin linked heavy bolters.
I enjoyed this paint job on the Storm Raven and have another one base coated black ready to go BUT I fancy something different - A fellblade!!!!
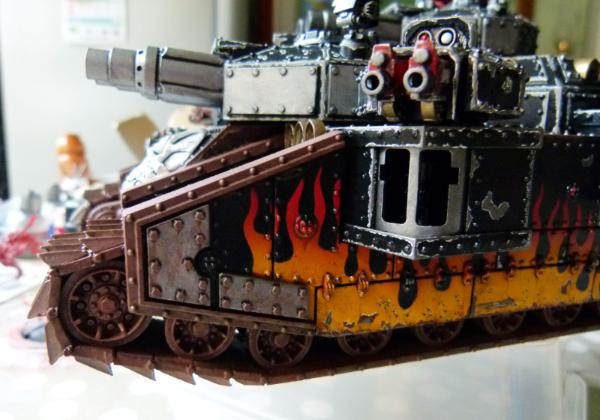
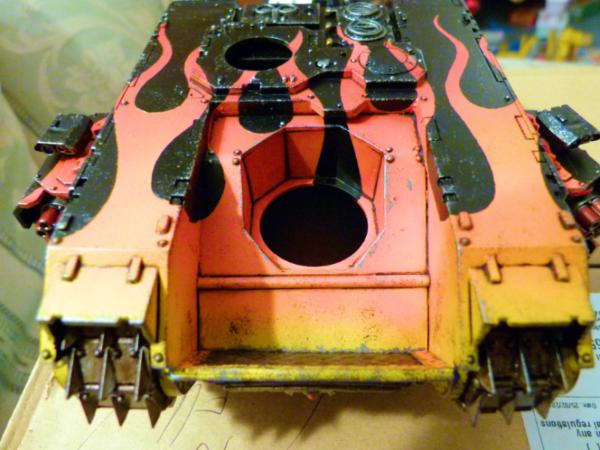
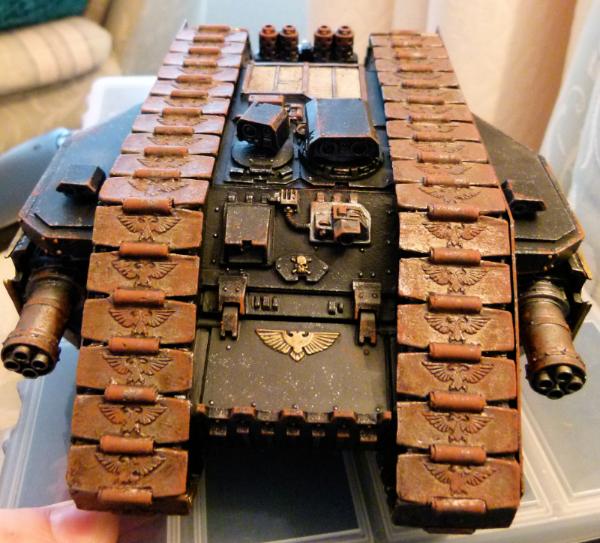
I airbrushed Vallejo Model Air Black all over, but had to go over again with a brush to ensure everything was covered in black. I added some GW Ironbelcher (Leadbelcher?) to the tracks followed by some Vallejo Black Shade. I'll add some more rust, mud etc towards the end of the paint job. I plan on adding some flames to the front glacis plate with the airbrush.
Here's a side view. I plan to add some flames all along the sides as well. I'll start masking the tracks and then add the flame templates tomorrow and then I'll start airbrushing the flames. More updates to follow.
Regards, Phil.
|
|
|
|
|
|
2013/08/14 19:49:43
Subject: Re:Philmorgan75's workshop blog - Legion of the Dead
|
|
Regular Dakkanaut
|
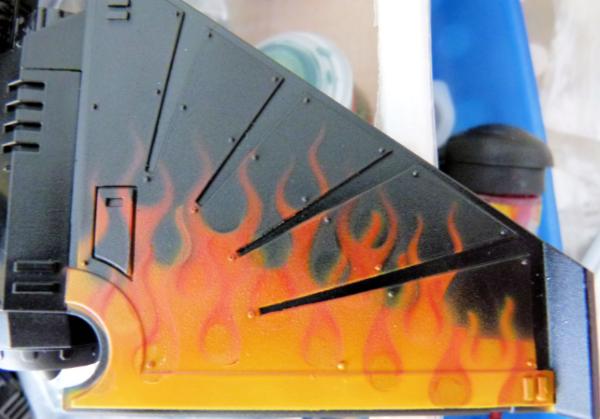
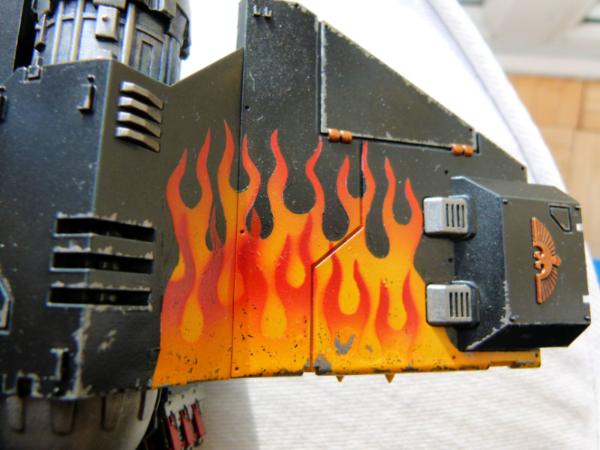
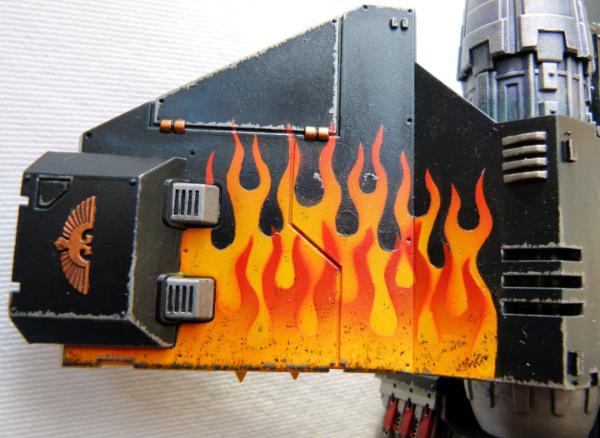
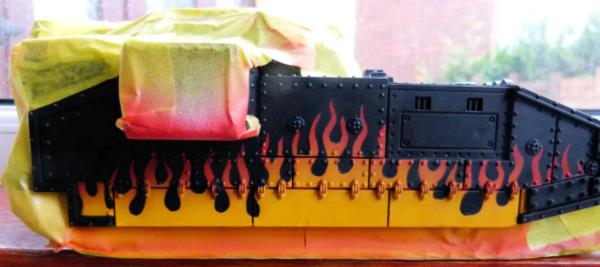
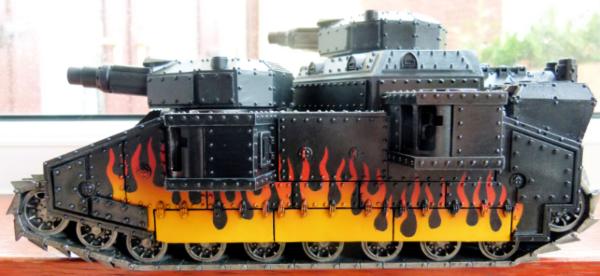
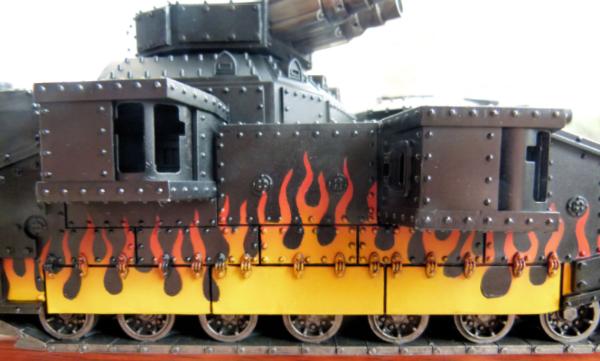
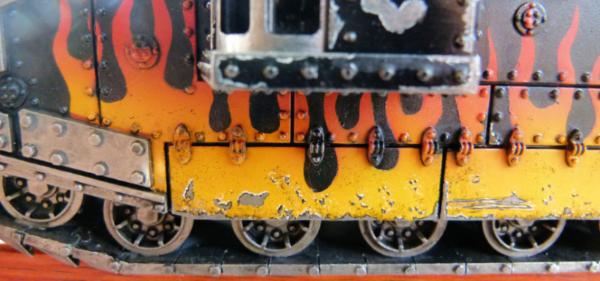
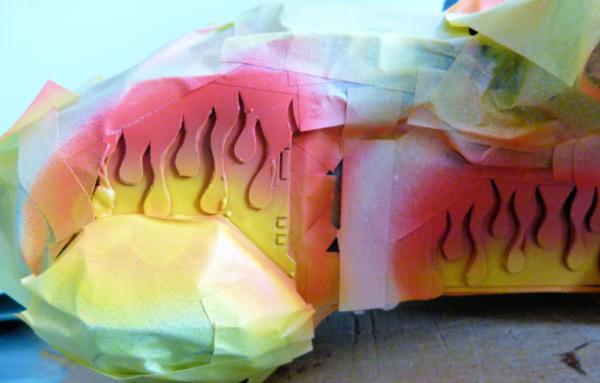
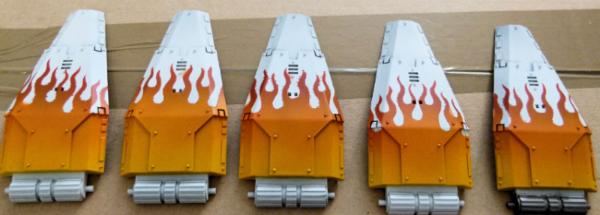
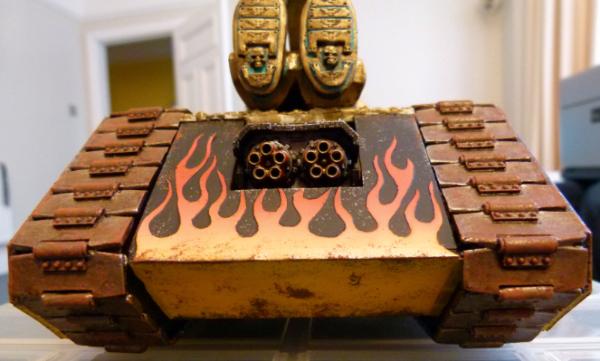
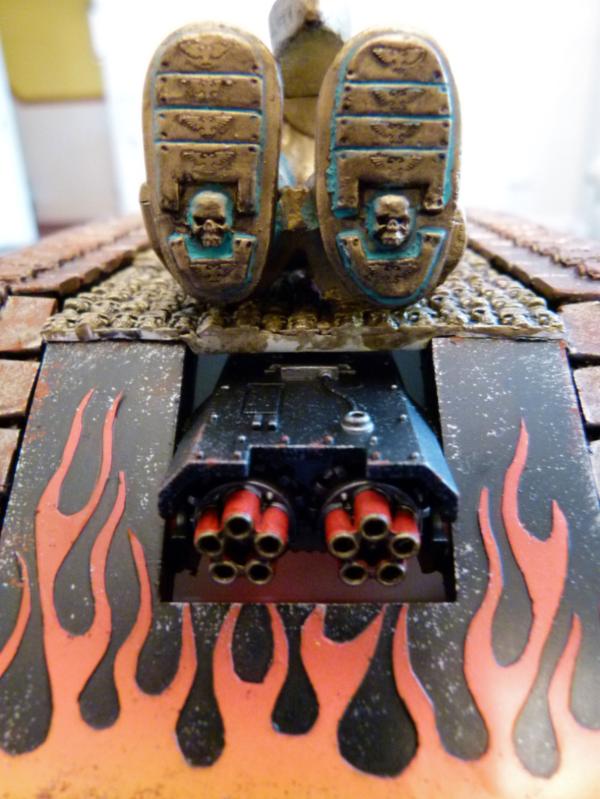
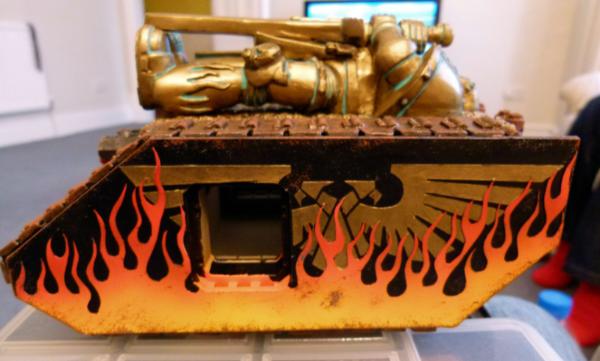
I thought I'd show everyone how I make my flames on my vehicles:
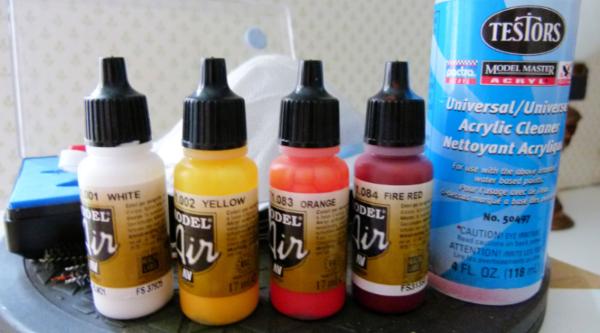
These are the paints I use in my airbrush: Vallejo Model Air White, Yellow, Orange and Fire Red
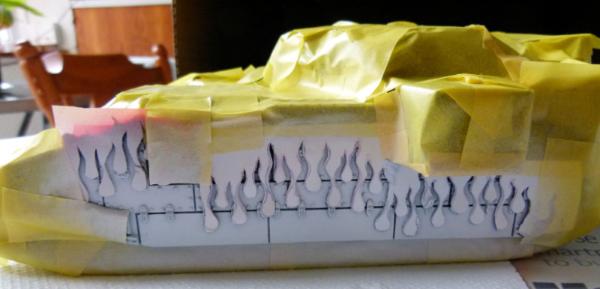
After cutting out a flame template from very thin plasticard, I attached this carefully to my fellblade using blu-tack. I use blu-tack to ensure minimal paint seepage over uneven surfaces (the amount of rivets and hinges on the fellblade is unbelievable!). It doesn't matter how carefully I spray using the airbrush I always gets paint flecks over parts I don't want, so I use Tamiya Masking Tape and cover all exposed parts. I then airbrushed some white paint to allow the flame colours to shine brighter.
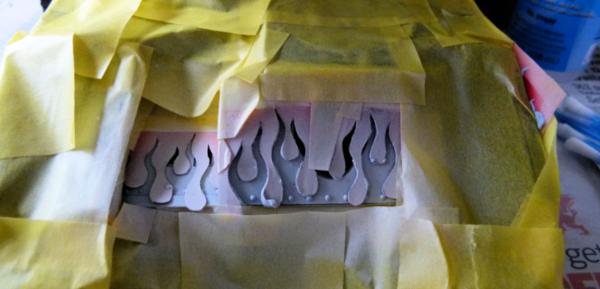
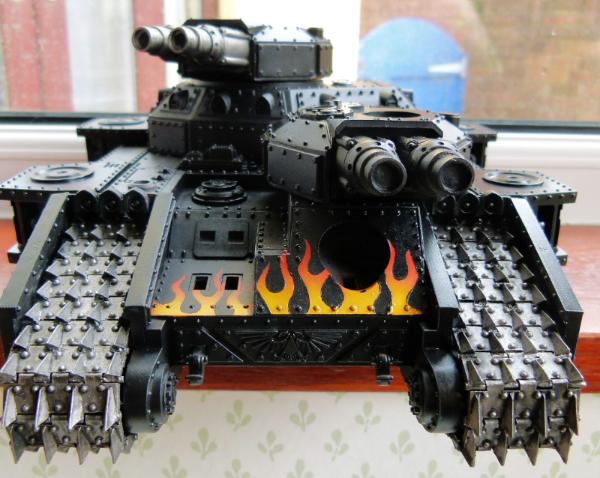
I did the same for the front...
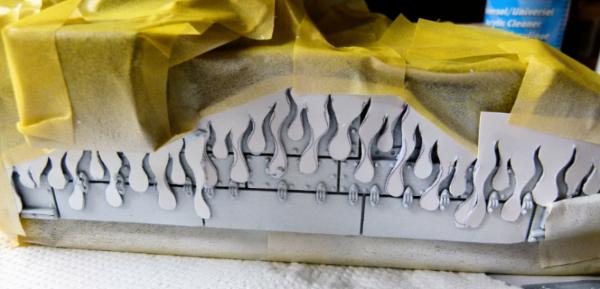
.... and the other side.
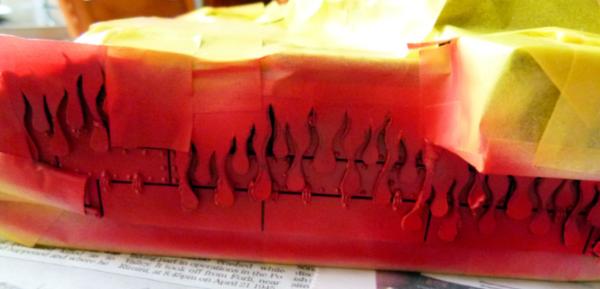
A coat (or two) of Fire Red was then airbrushed over the template.

Though it is difficult to see, I airbrushed a number of Orange coats towards the bottom of the flames. I tried to leave some of the Fire Red at the top of the flames.

I then airbrushed a number of coats (using a hair dryer in between each coat to help speed up the drying process) of yellow to the bottom of the flames.
Once the paint was dry, I removed the masking tape and flame templates. A spare bit of blu-tack was used to "pat" and remove the blu-tack bits still stuck to the tank. As can be seen, there was a small amount of seepage from the airbrush.
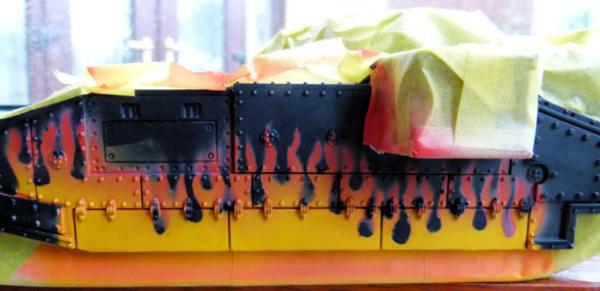
After some touch up with Vallejo Model Air Black with a paint brush, I got to this stage.
Here's the other side...
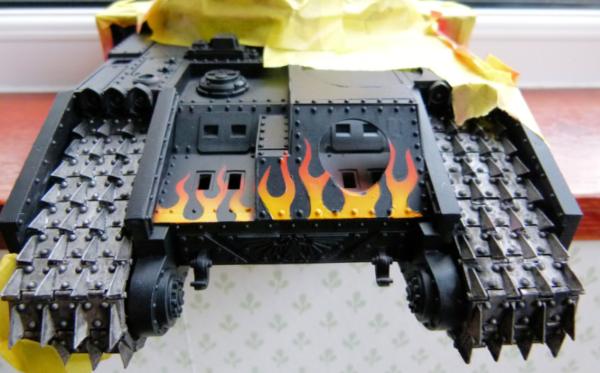
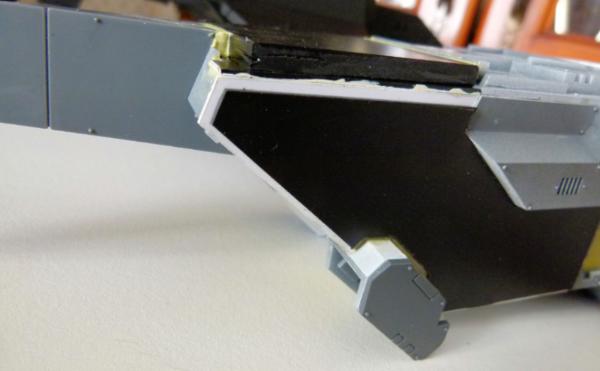
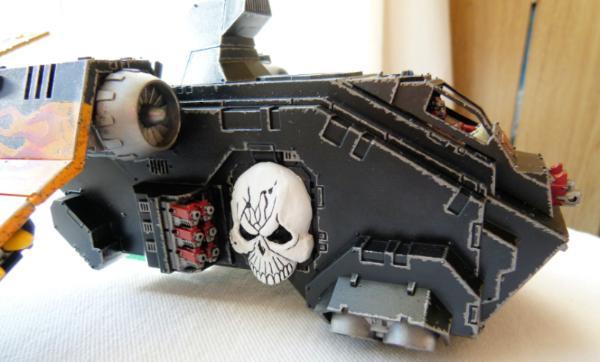
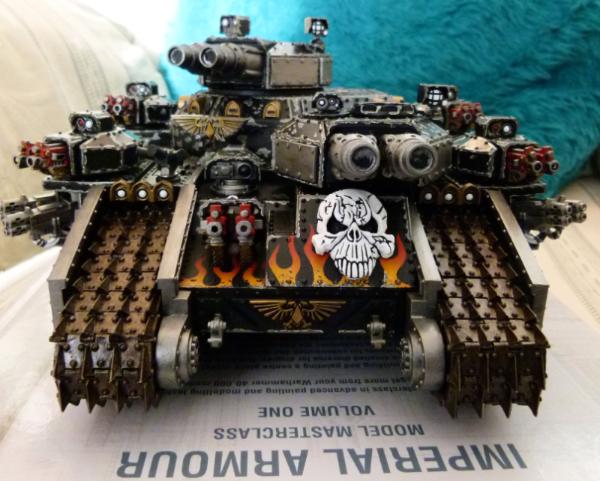
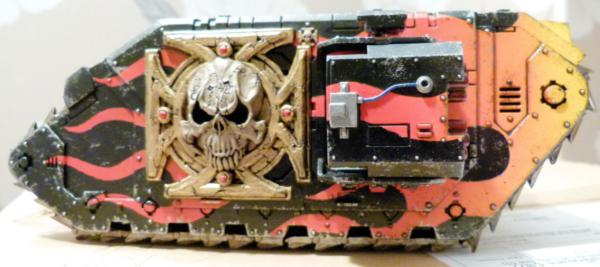
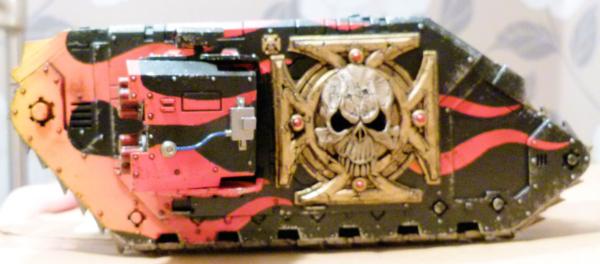
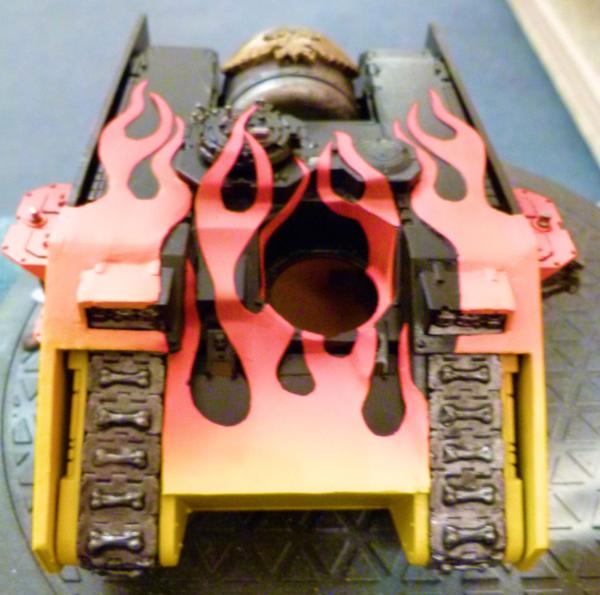
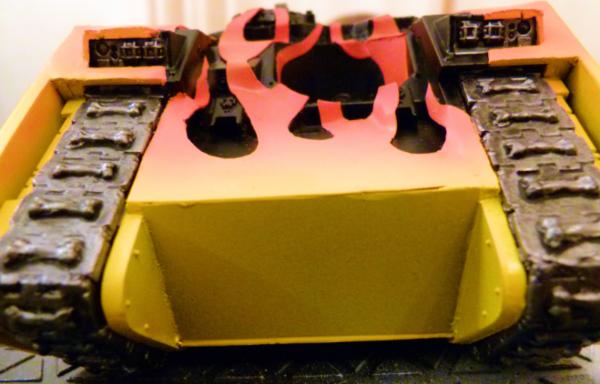
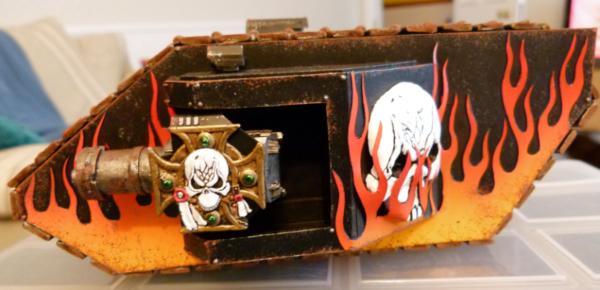
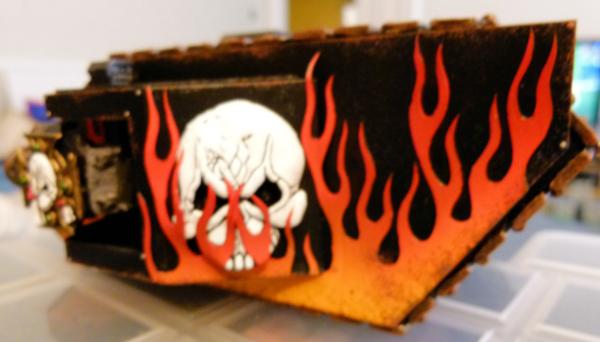
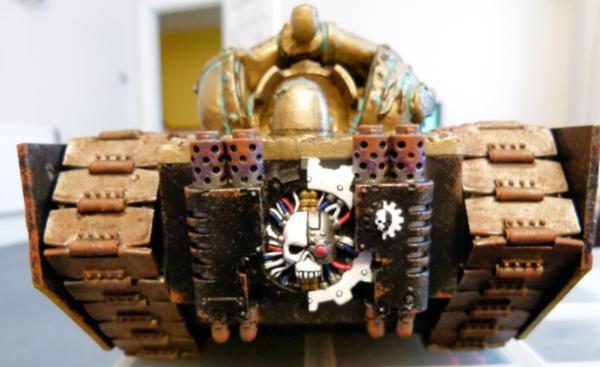
... and the front. I plan on adding a large skull over the large hole left where the demolisher cannon normally goes.
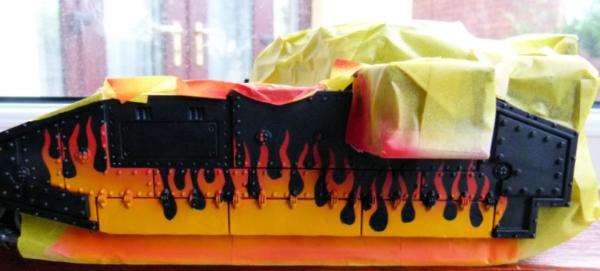
I plan on spraying a coat of Vallejo Gloss Varnish over the flames and the rest of the bodywork tomorrow morning to protect the paint work and to also allow me to start the weathering process.
To do:
1) Use a black oil paint/white spirit wash over the rivets, hinges and joints in the armour that have been painted flames. More white spirit will then be used to clean up any excess black wash.
2) Add some "rain" marks vertically from every rivet.
3) Add some weathering to the bottom parts of the armour, exposed metal etc.
4) Add some mud and dirt to the bottom parts of the armour and tracks.
Lots to do -Updates to follow.
Regards, Phil.
|
|
|
|
|
|
2013/08/16 14:09:22
Subject: Re:Philmorgan75's workshop blog - Legion of the Dead
|
|
Regular Dakkanaut
|
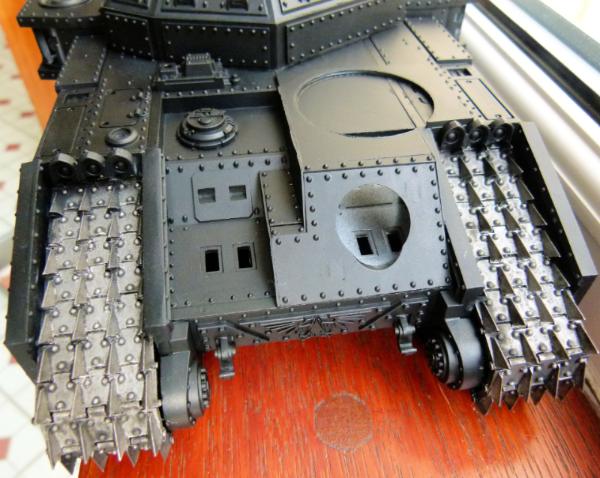
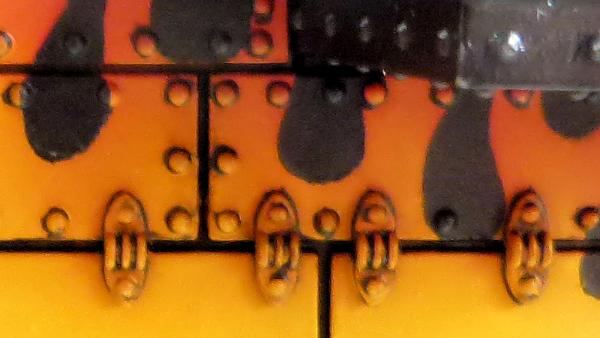
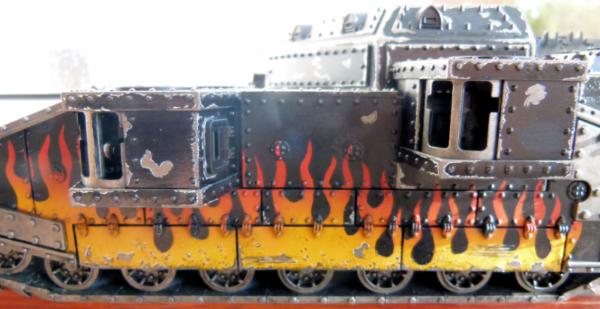
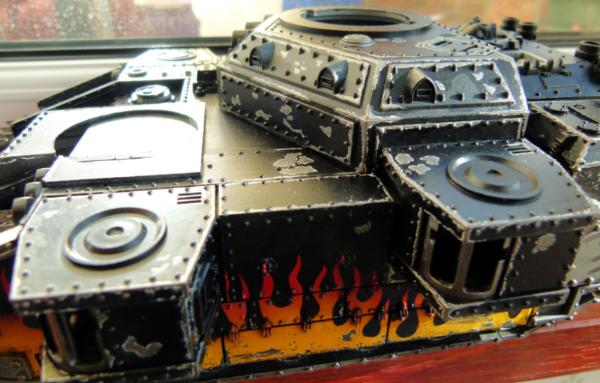
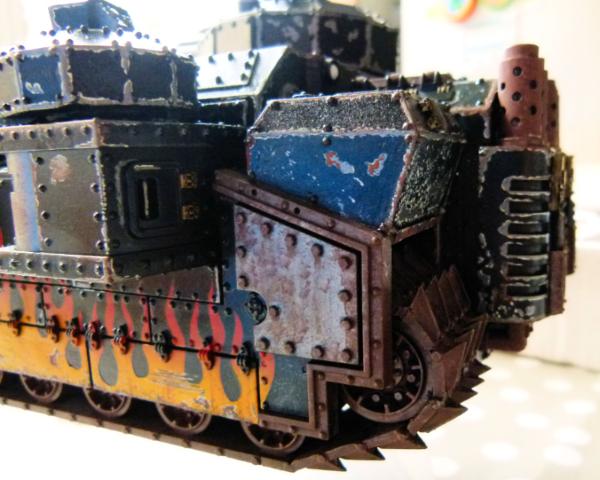
I gloss varnished the whole of the Fellblade yesterday, and once dry, I mixed up some Black Oil paint and white spirit and painted this wash around all the rivets and hinges that were within the flames:
I started to edge paint in Dark Grey but I'm not sure if I'm going to do this. With the weathering I want to do, I don't think it will look natural. What do others think?
You can see the effect after cleaning up the excess wash in the next picture:
I've got my hands on "The Weathering Magazine" from AK Interactive (Rust, Dust, Chipping and Mud episodes) and really want to have a go on this model. Time will show how good a job I will do.
This shows the other side....
.... and the front.
I'm going to add some small skulls onto the sponson sides and some more airbrushed flames onto the mantle of the battlecannons further down the line.
After the Black Oil wash dries, I'll varnish it again before I move onto the next process. I'll varnish after adding Streaking Grime, Rain effects, Rust effects, Dust effects and Mud.
Updates soon,
Phil.
|
|
|
|
|
|
2013/08/16 16:44:51
Subject: Philmorgan75's workshop blog - Legion of the Dead
|
|

Despised Traitorous Cultist
|
All I have to say is...
My God.
This is some beautiful EVERYTHING.
|
"I had a dream I could buy my way to heaven... When I woke, I spent that on a necklace" - Martin Luther King Jr.
|
|
|
|
|
2013/08/18 18:48:35
Subject: Philmorgan75's workshop blog - Legion of the Dead
|
|
Regular Dakkanaut
|
I aim to please!!!!
Update time:
I've concentrated on the left hand side of the fellblade, adding chips and scratches. I've read about and tried to give more of a 3D effect to the scratches by adding a thin cream layer around the scratches/chips. I think it looks quite effective on the flames.
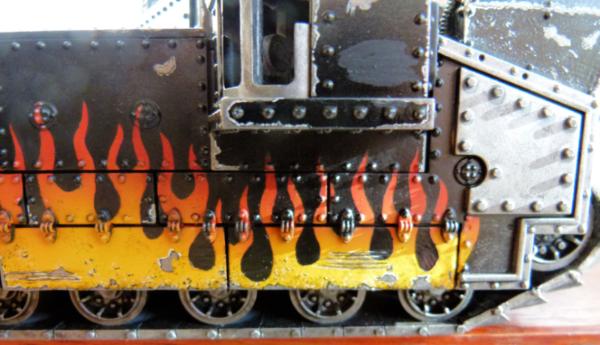
Here's a shot of the rear. I saw in the Weathering Magazine "Chips" edition a JCB with scratches along the rear of the cabin and I wanted to give it a try on this model. I'm quite happy with how this turned out. The different shade of black on the sponson will disappear when I give it a coat of gloss varnish before I move onto the next weathering stage.
On all of the bare metal sections, I plan on attempting to add some form of rust effects.
I'm slowly moving my way over the top as well.
To do:
1) Spray Gloss Varnish over whole model after chips have been finished.
2) Use AK Interactive Rain Marks for Nato Vehicles on all rivets. Spray Gloss Varnish over whole model.
3) Add Rust effects to certain rivets and some exposed metal parts. Spray Gloss Varnish over whole model.
4) Add track wash.
5) Use Dust effects on bottom sections of side armour, wheels and tracks.
6) Use dry, dark and wet mud effects and pigments on bottom of side armour, wheels and tracks. Spray Gloss Varnish over whole of model.
7) Spray Matt Varnish over whole of model.
Quite a few weathering steps to do!!!
Updates to follow.
Regards, Phil.
|
|
|
|
|
|
2013/09/17 06:54:10
Subject: Re:Philmorgan75's workshop blog - Legion of the Dead
|
|
Regular Dakkanaut
|
Monthly update time:
I've blocked in the main colours and "chipped" the hull and turrets. This beast is taking ages to paint!!
I need to lay down another coat of gloss varnish before I start adding a black oil wash over most of the tank. I'll use some white spirit to clean up and smooth out the wash.
I've got FW's Imperial Armour Masterclass Part 1 - A very good read with brilliant models. I hope my fellblade will turnout as good as one of theirs!
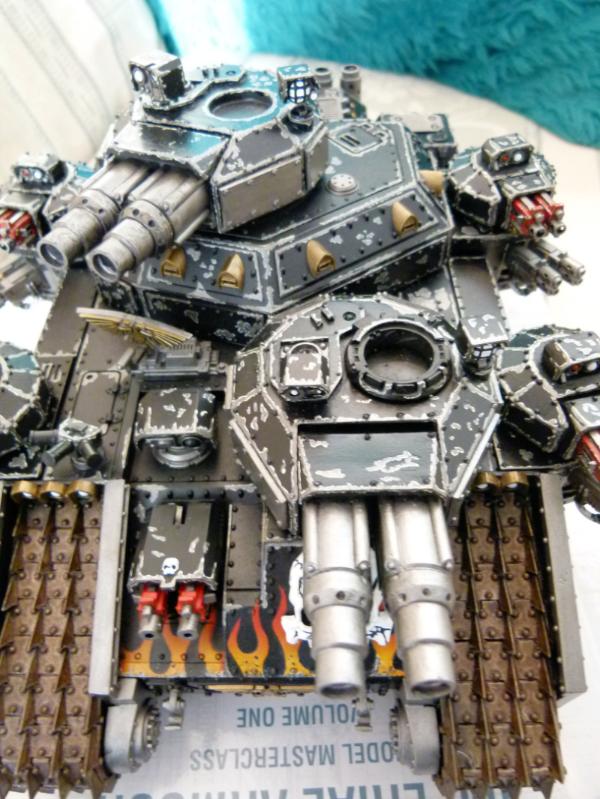
This shows the front from the top. The turret hatches are being painted separately and it can be either modelled open or closed. I've just got Chronus from ebay and think he will look cool looking out of the top turret!
This side shot shows the progress on the sponsons and weapons. The heavy bolters have been "chipped" and with the mutli meltas, need a gloss varnish before I weather with a black oil wash.
This shot shows I still have to paint the power cables on the multi meltas (something I'll do after the oil wash has been finished).
A shot of the engines and exhausts before I "rust" them up a bit!!!!!
Finally, a shot from above. The Adeptus Mechanicus logo is still a WIP.
I hope to gloss varnish the beast this week and start the washes this weekend. More shots to follow (hopefully) soon.
Regards, Phil.
|
|
|
|
|
|
2013/10/30 19:05:27
Subject: Re:Philmorgan75's workshop blog - Legion of the Dead
|
|
Regular Dakkanaut
|
Another month has come and gone. Here's what I've been up to:
Fellblade
I've started to sponge some rust streaks from AK Interactive and rust pigment over the tracks, wheels and exposed metal. I'm not 100% sure I'm happy with the effect and may sponge some more gun metal back over the rust to make it less "brown"!!
Here's the rear left quadrant. Again, I'll sponge some more gun metal onto the rusted areas and I still need to add dust and mud effects.
I need to spray some black soot to the top of the exhaust stacks to finish off those.
Compulsory front shot. Again, gun metal to be added. I need to remember to paint the inside of the gun barrels black.
Space Hulk
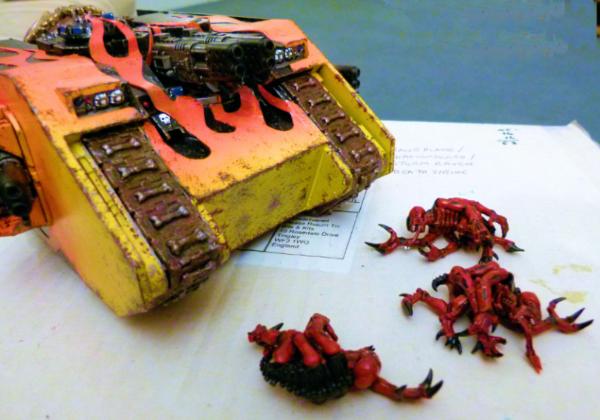
I've lost my drive to finish off this project. My 7 year old and 5 year old sons have started to get interested into 40k now and we have played a couple of games of Space Hulk together. As a result, I started to paint a number of Genestealers.......
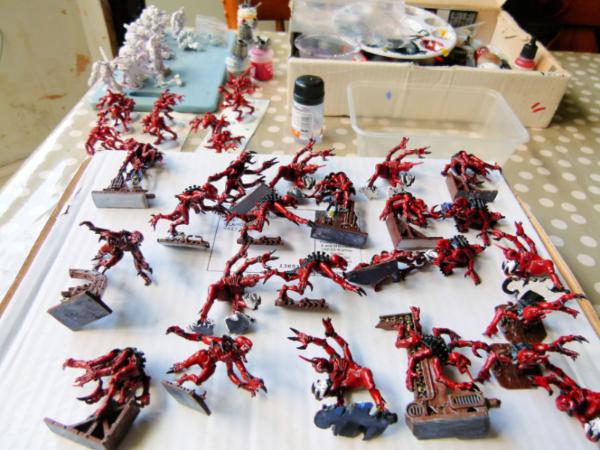
Here's a group shot of what I have completed so far. I've gone for a fairly simple (but effective) paint job of Fire Red and Black. After painting a few coats of Vallejo Model Air Fire Red, I used matt varnish to protect them. I then made a mix of black oil paint and odourless thinner to darken all of the recesses. The claws and ribbed areas were then painted black. Their teeth were painted white and all of the "metal" areas were aged with rust paint and pigment being sponged and painted on. Lots of matt varnish was used to try and stop the paint from coming off in the hands of my boys!!!!!!!!!
I think the models are brilliant to paint and are brilliantly sculpted. Lots of character has been put into every model. I have quickly realised though that only the running ones can be used in the Space Hulk game as some are too unwieldy to use.
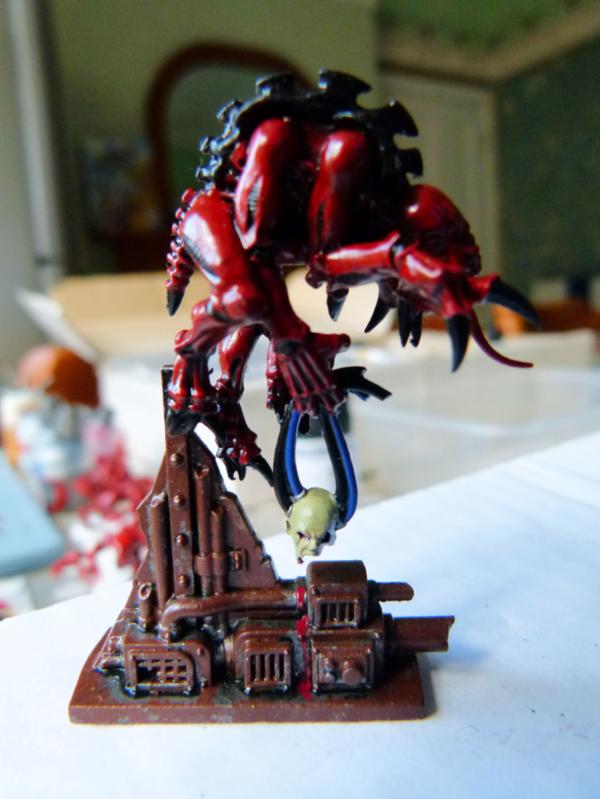
I enjoyed painting the freshly ripped off head!!
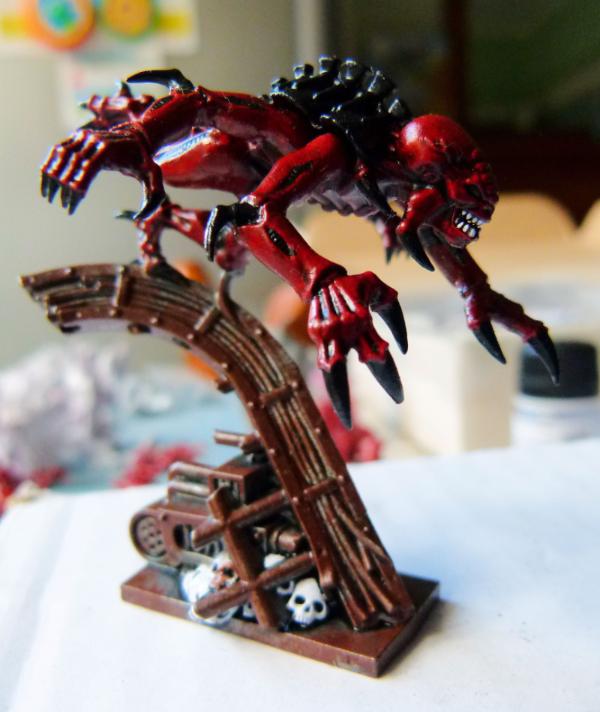
This is a cool model! Just a pain in the bum to keep upright when playing!
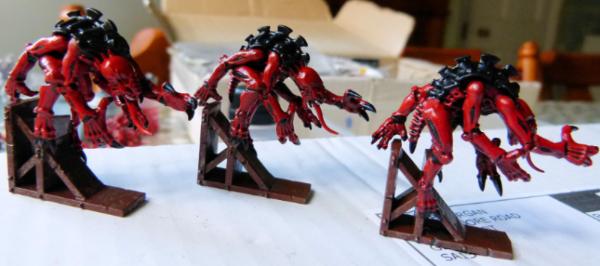
Here are 3 of the same pose. Very Praying Mantis like!
I thought the base on this one was cool. The half exposed head in the helmet is class!
I had great fun painting these! The piles of skulls are really gothic like!!
HUDSON!!!!!!!!!!!!!!!!!!!!!!!!!!!!!!!!!
I think is possibly the best sculpt. This pose really depicts what a genestealer is all about.
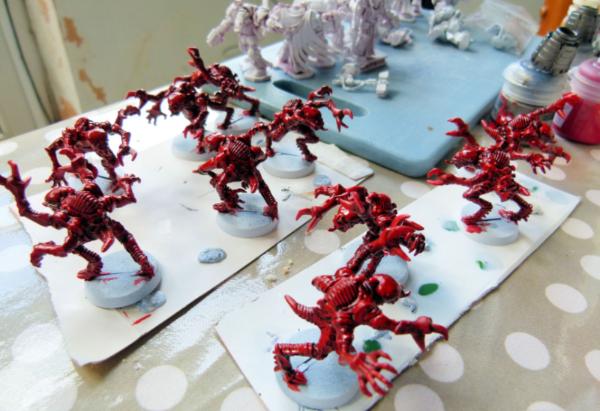
To have a few more running Genestealers, I've started to paint up some Space Hulk Mk 1 Genestealers I had from 20 years ago when the first version of Space Hulk originally came out. Rather than have all the same static pose, I chopped each arm off and super glued them back on in different poses. These have just been black oil washed and oce dry, some matt varnish will be used to protect them.
The undercoated Space Hulk Terminators can be seen in the background, as well as some metallic bits for my next Dark Talon (the multi melta version).
Dark Vengeance
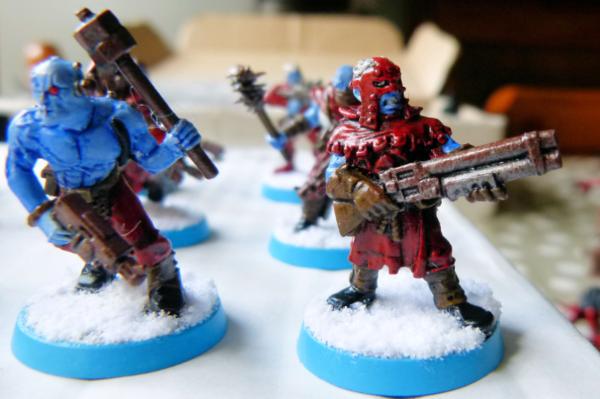
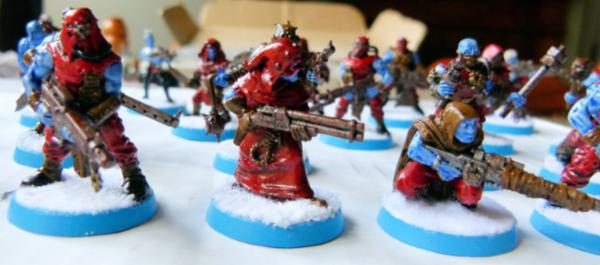
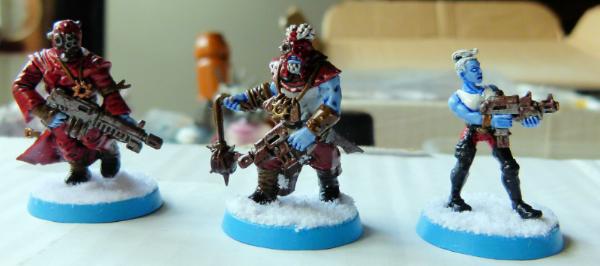
I plan on giving the boys my unopened copy of the Limited Edition Dark Vengeance for Christmas. To get a head start on the painting of all the models, I have been picking up some of the models on ebay and plan on letting them be used. Here's what I've done so far:

I've finished 28 so far and will add some more over the next couple of weeks.
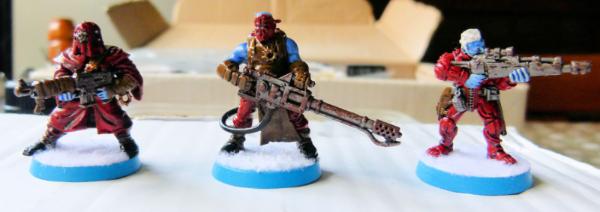
My youngest son wanted to see snow covered bases, so my back story is these chaos cultists come from an ice world (hence their blue skin).
I tried to make sure the models that came with the kits with the same poses were converted (head and weapon swops) to give different looks. Rust effects were added to all exposed metal bits as well.
A House Cawdor from Necromunda was used from ebay.....
.... as well as a Redemptionist from Necromunda and "Mad Larkin" from Gaunts Ghosts.....
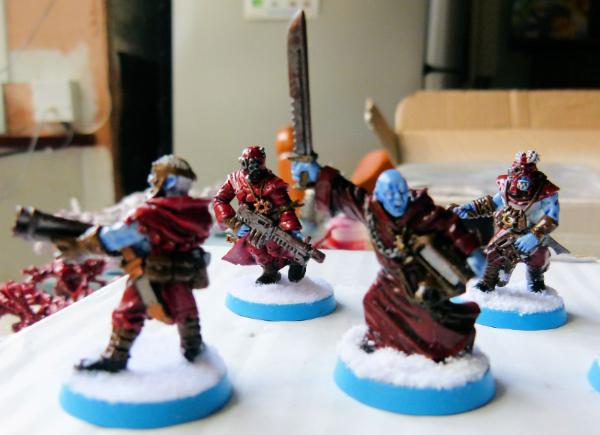
... and a zealot.....
....a Van Saar.....
..... Clan Escher...
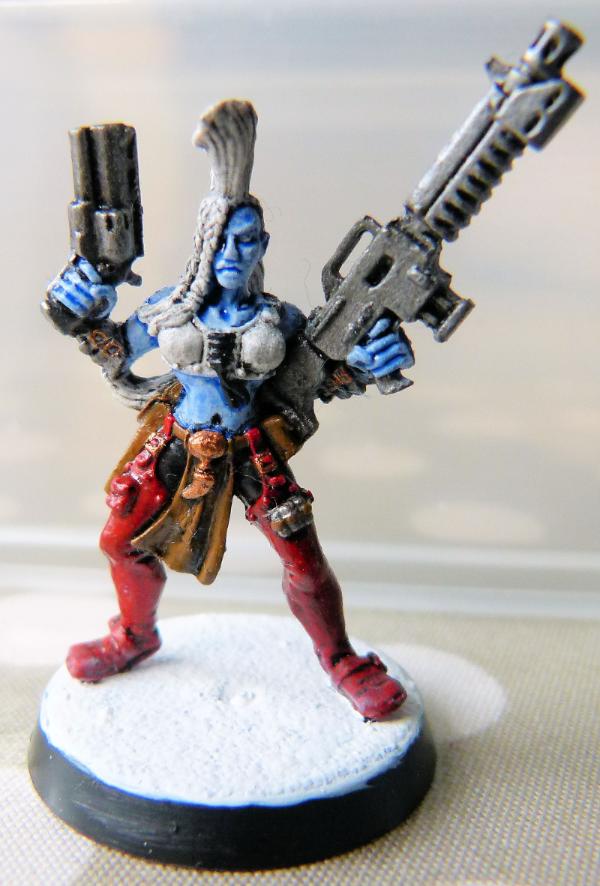
and finally, a WIP Escher warrior.
Storm Raven
I masked out some flames using Tamiya masking tape, plasticard templates and blu- tac and then used the airbrush to get to this stage.
Here's a close up of the flames. I have to admit that I was a bit careless and didn't mask the other side and as a result, there is quite a bit of over spray. So I'll need to give the other side a quick coat of black before I mask off that side and spray some more flames.
PS to myself - remember to cover the flames I've already done to stop over spray from wrecking them!!!
And finally..
Here's what I've decided to use on the front of my Multi Melta Dark Talon.
Too many projects, not enough time!
I hope you like! Any comments would be appreciated.
Regards, Phil
|
|
|
|
|
|
2013/12/21 20:27:42
Subject: Re:Philmorgan75's workshop blog - Legion of the Dead
|
|
Regular Dakkanaut
|
Apologies for the delay in posting any updates. I haven't been slacking - honest!!!
Storm Talon/Dark Talon:

Finally finished my Dark Talon Squad. Each of them are armed for specific roles on the battlefield/in the air. I had fun painting these in different colour schemes and testing out different paint effects.
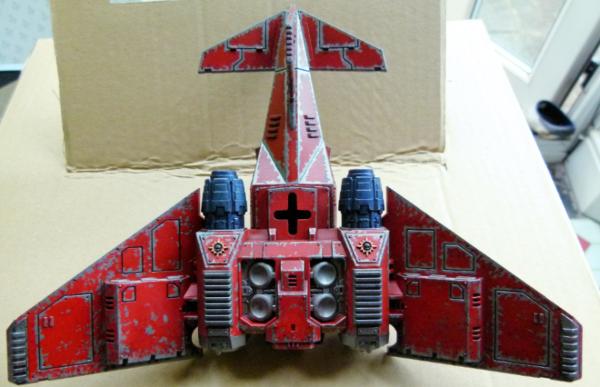
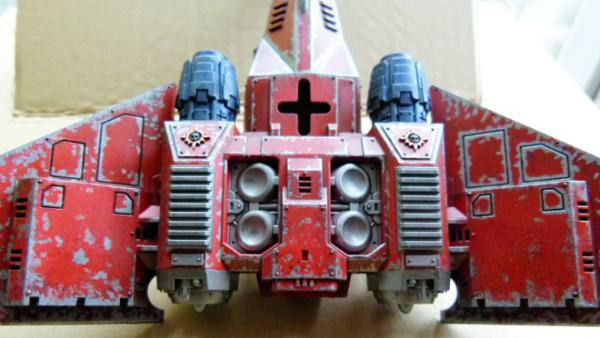
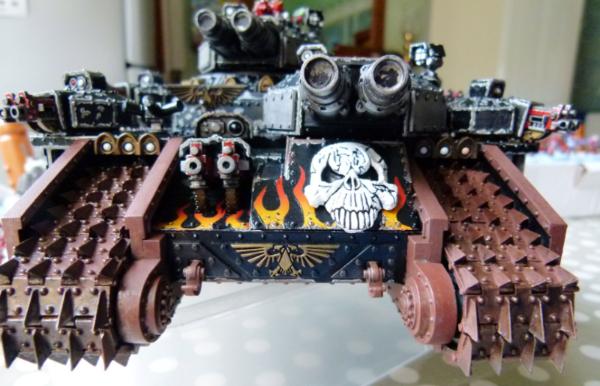
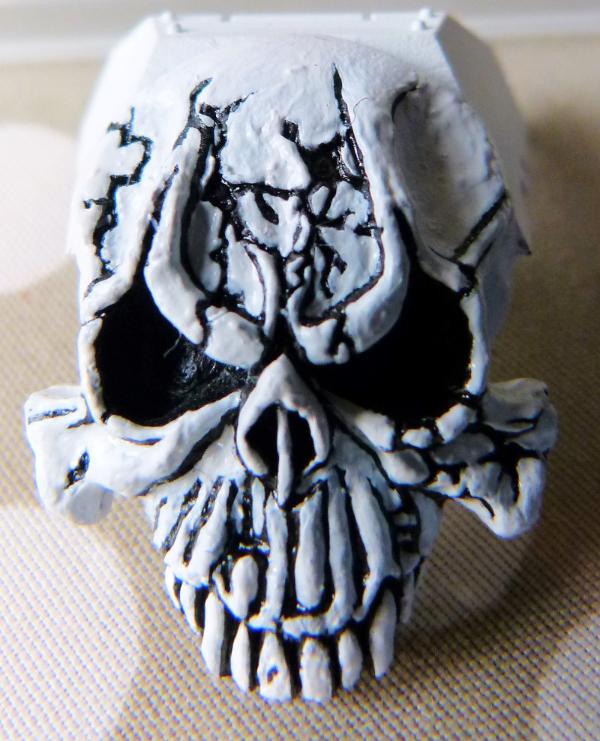
Here's the business end of my tank destroyer!!! 8 Multi Meltas and Twin Las Cannons. As my Legion likes flames and skulls, I thought I'd add one to the front.
After adding a purple and then a blue wash (to imitate metal surfaces exposed to heat), I used an airbrush and sprayed some black on the end of the multi melta barrels to give a burnt look.
I also used the airbrush again and sprayed some black on the end of the exhaust to give a burnt look.
I have enough parts to make a complete Storm Talon and 80% of another Dark Talon. I'll put these on the back burner whilst I try and start/finish the plethora of other projects I wish to do.
Extended Storm Raven No.2
I didn't go for heavily weathered look on this one - just a light sponging of gun metal on leading edges. I spent a bit of time filing the inner edge of a Razorback/Land Raider Turret to ensure it would fit in the top Storm Raven turret hole. I think this looks far better than the servitor one that comes with the kit.

The Heavy Bolters are not glued, so can be swopped for Multi Meltas or missiles depending on the enemy/mission. I airbrushed some black to the end of the barrels to show some carbon scorching.
This shows the completed left hand side. I deliberately chose to paint the flames differently on each of the Storm Ravens.
This is a close up of the Side hatch and the Hurricane Bolter sponson. As previously discussed, I think placing the Hurricane Bolters in the side doorways seems a bit silly from a practical leaving the aircraft asap, so I did some cutting and filing and then moved them back an inch. A skull was then added to the door to tie in with the paint scheme of my Legion.
The tail has some compulsory flames. The exhausts also have some carbon scorching added.
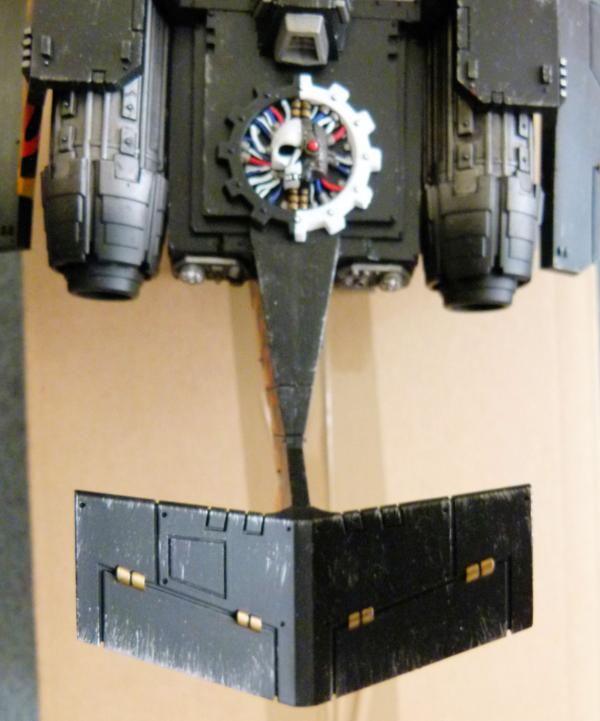
The Adeptus Mechanicus logo has been added to show my Legion's close ties with the men from Mars.

As I magnetised the turret, I can swop the Lascannon to a Twin Heavy Bolter or ....................
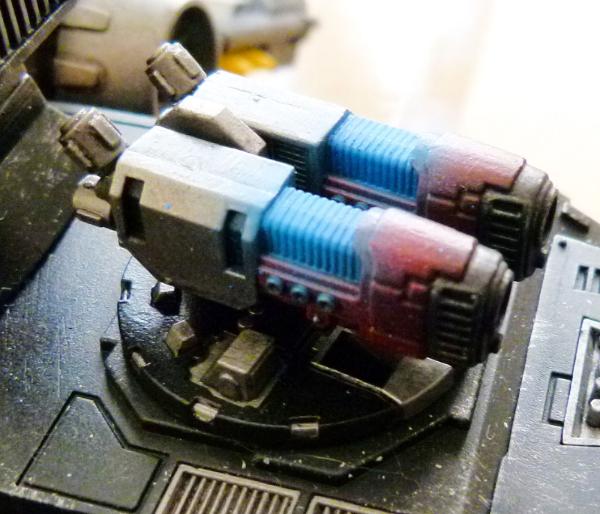
..... a Twin Plasma Cannon. I airbrushed the "plasma" glow. The Twin Assault Cannon can be seen on my first Storm Raven.
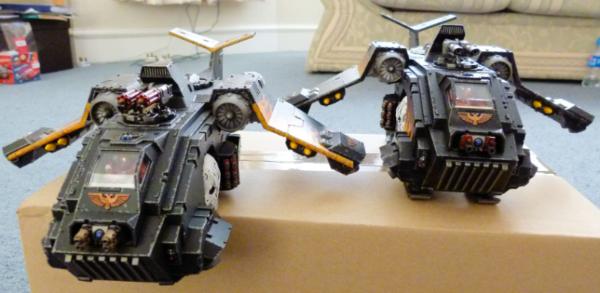
Here's my Storm Raven Squadron so far ...... (I've got another one to build in the future).
This shows their left sides.......

.... and their right.
I thought I'd try another form of Space Marine delivery.....
... My first drop pod. I tried a different way of masking on these doors (I cut the flames out of the masking tape and then attached it to the door). I'm not 100% happy with final version BUT it was so quicker than cutting a template out of plastic and using lots of blu- tac to ensure no bleed from the template. This and my second fellblade are currently on the painting table to be completed. More to follow.......
--------------------------------------------------------------------------------------------------------------------------------------------------------------------------------------------------------------------------------------------------------
Fellblades
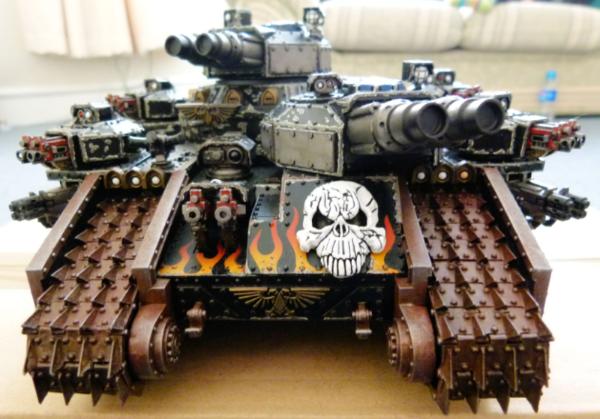
I decided enough was enough on this Glaive and put my paint brush down. This shot shows the "normal" weapon payload. But .......
..... these are the alternatives I've painted for this and my second fellblade that I've recently started to base coat paint.
This shows the sponsons loaded with plasma cannons and the turret with heavy bolter.
This shows the sponsons and turret loaded with heavy bolters.

This shows the sponsons and turrets loaded with heavy flamers.
Turrets loaded with battle cannon.
I've started my second fellblade/shadowsword/etc.....
There are still a lot of processes to be finished on this one. Since taking these photo's, I've black oil washed all the rivets and added a wash to the tracks. I am writing this blog as I await the matt varnish coat to dry before I can move onto the next process.
This shows the right hand side with just the base coats of paint (apart from the weapons that are finished). I loved painting the titan plasma cannon!
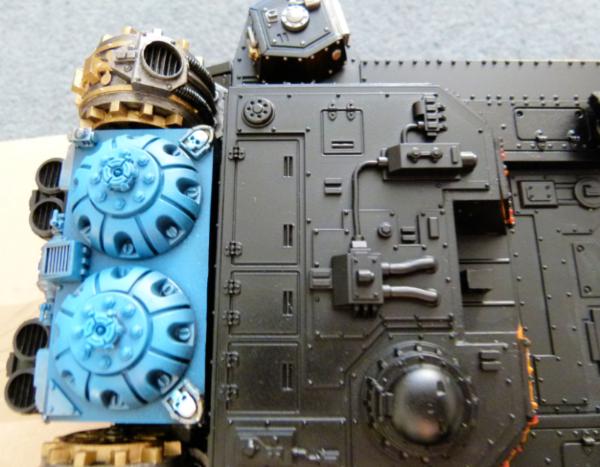
This shows the plasma reactors in a finished state. I used the airbrush to (hopefully) give a plasma glow.
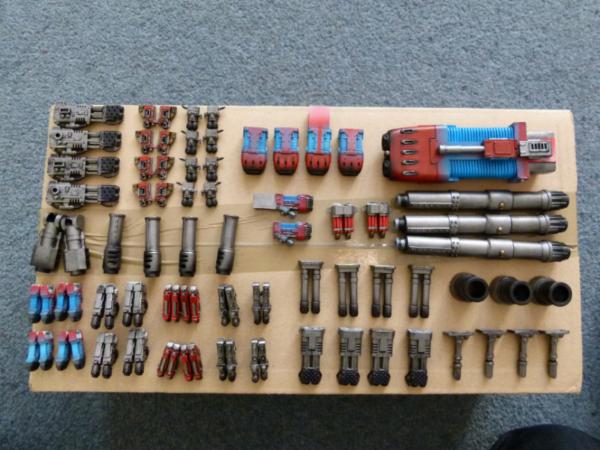
As everything is magnetised, I can make the fellblade into a Shadowsword or ......
.....Twin Shadowsword .....
...Stormsword........
....Twin Stormsword.....
..... and Storm Lord.
I'm off for the next 9 days over the Christmas period, so I hope to get as many of my projects finished.
Here's a sneak peak of another project I've just started....
An Assault Land Raider!! The Vulcan Mega Bolter sponson's are finished - just the rest to finish now!!!
Comments/critiques welcome as always.
Regards, Phil.
|
|
|
|
|
|
2013/12/26 06:36:50
Subject: Philmorgan75's workshop blog - Legion of the Dead
|
|

Fixture of Dakka
|
Awesome stuff! great job
|
|
|
|
|
|
2013/12/26 13:50:23
Subject: Philmorgan75's workshop blog - Legion of the Dead
|
|
Perturbed Blood Angel Tactical Marine
|
Needs more guns imo
|
Purge the heretic. |
|
|
|
|
2014/01/01 20:56:17
Subject: Re:Philmorgan75's workshop blog - Legion of the Dead
|
|
Regular Dakkanaut
|
99.99% Completed my Storm Blade/Sword etc.
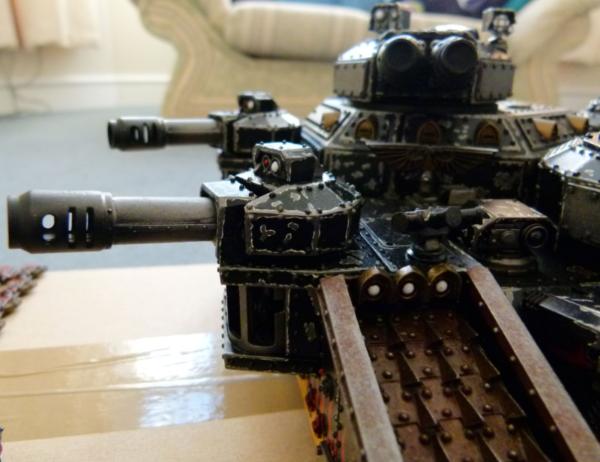
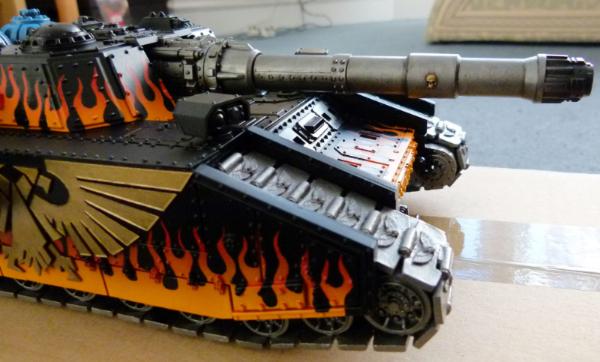
I refrained from weathering this fellblade as much as my first. I only added a small amount of rust to the front and tracks and used the sponging technique to add the exposed metal areas around the edges. The only thing I need to do to complete this behemoth is to airbrush some VMA black over the front of the Twin Twin Heavy Bolters to give them some Carbon weathering.
This shows the right hand side, with Lascannon turret and Twin Heavy Plasma Gun Sponsons. Boy, did I have fun painting those rivets!!!!!!!
Here's a shot of my 2 fellblades together. I've had a lot of fun painting these. I've managed to practise a lot of painting and weathering techniques on these and will continue to learn with each model I work on.
I can now box these boys up and finally take them out of my living room (my wife will be happy LOL!!). I have enough Baneblade bits to make another fellblade in the future, but I need to slowly buy parts from Machinator over the next couple of months. In the meantime, I'm going to start painting some of my many Land Raider Variants.
Assault Land Raider
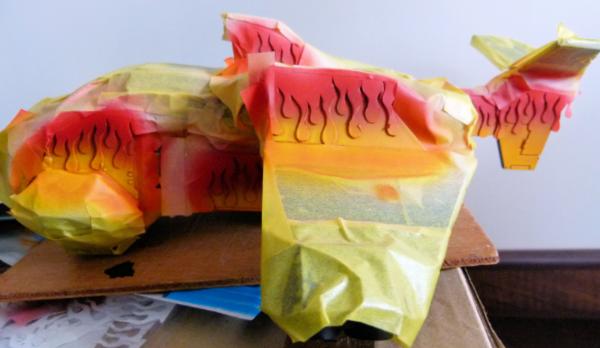
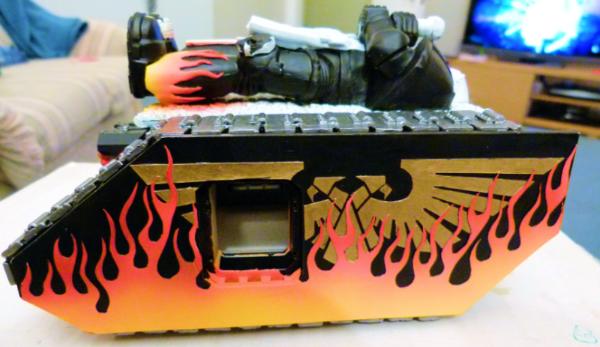
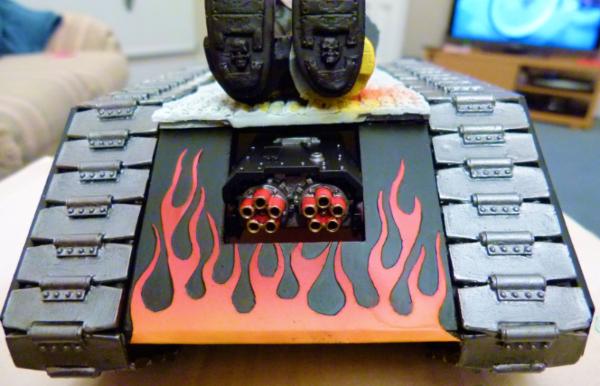
The construction of this back to front (WW1 style) Assault Land Raider was completed a number of years ago - I just never got round to painting it. I want to paint larger flames than I have been currently doing on my fellblades, so after cutting out some templates out of Tamiya masking tape, I spent a lot of time adding them over the top and the sides, ensuring the flames flowed over the sponson weapons as well .
This shot was taken after some VMA Fire Red was airbrushed over the top parts of the flames and then some VMA Orange over the middle parts of the flames. Only some VMA Yellow needed to be added at the bottom of the flames to complete the effect.
This shows the flames on the left hand side of the LR after the template was removed (and a bit of VMA black painted with a brush to remove any over spray). Before I started adding any weathering washes, I blocked in the basecoat colours on the Crux Terminator logo and the other parts of the LR not covered in flames.
This shows the base coated front view. It looks a bit yellow at this point, but with a bit of weathering, this will tone down.
This shows the plan view. I think the flames look great flowing over the LR in this shot. In an ideal world, I would do another set of flames closer to the front to give a more realistic look, but with the inevitable over spray from the airbrush, I thought best not too.
The rear of the LR. I want to add some purple and blue wash to the exhaust stacks (to show heat on metal), followed by some rust and then an airbrush on VMA Black to give the effect of Carbon on the end of the exhausts.
Before adding a black oil wash over the rivets and Crux Terminator logo, I gave the whole LR a coat of Matt Varnish through the airbrush to assist the next stage in the painting process. After the black oil wash was added and another track wash from AK Interactive, I cleaned the excess oil with some white spirit. This wash was allowed this to dry and then I gave it another coat of matt varnish to protect the paint work. Then I moved onto the weathering................
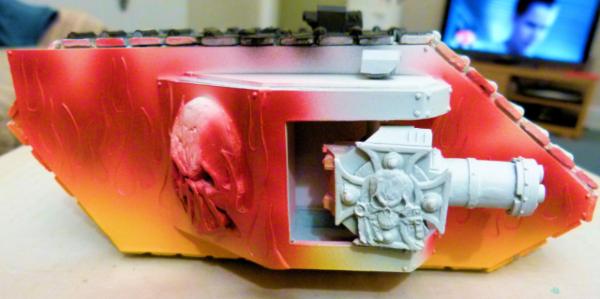
This shows the front view after VMA Black and Army Painter Gun Metal was sponged along the edges. I highlighted the skull on the Crux logo and added some red to the "jewels". I just need to add a small amount of rust to finish this view.
This gives a slightly higher front view. I'm awaiting parts for the weapon mount before I can finish the construction and painting of this view. The cupola and hatch will have the flame painted to ensure it matches the rest of the painted flames.
This shows the right hand side after weathering. I tried to match the flames across the sponson weapon
... and this shows the left hand side.
You can see the front assault ramp in this shot. I just need to sponge a small amount of rust over the exposed metal tread to finish this view.
A close up of the Vulcan Mega Bolter Sponson after it was weathered.
The completed Adeptus Mechanicus logo on the exhausts. You can see the purple and blue wash I have added to the exhaust stacks in this shot. Once dry, I'll add some rust and then airbrush some soot out of the end of the exhaust stacks.
I'll add some more shots after the new parts arrive and this project is completed.
Here's a sneak peak of another Land Raider project I've started......
This is the Storm Shield of my Hell Cannon Land Raider. There are lots of skulls and flames on this LR - my legion's favourite icons!!!!!
Drop Pod
Finally, Here are some shots of my completed Drop Pod.......
The flash has made this look a lot more shiny than what you can see on the actual Drop Pod. When I eventually break out the VMA black through my airbrush, I want to add some soot deposits going up the sides of the Drop Pod to give the impression of how hot the outside has been during atmospheric entry.
I airbrushed VMA Yellow onto the edges of the hatches. Once dry and then varnished, I used Tamiya Masking Tape and then airbrushed VMA Black to make the hazard strips. Some sponged on Gun Metal and rust finished this view.
I wanted to give the impression that there was a "glowing" green radar display at the centre of the Drop Pod that the marines inside would look at. I constructed the harnesses and after painting, I airbrushed some light green directly overhead, ensuring there was a small amount of overspray to mimic the glow creeping within the Drop Pod. I'm really happy how this turned out.
Since this photo was taken, I have added the Storm Bolter weapons and finished this project. This has got me thinking about building out of plasticard a Dreadnought Drop Pod. Too many projects, not enough time!!!!!!
As always, any comments/critiques welcome.
Regards, Phil.
|
|
This message was edited 2 times. Last update was at 2014/01/10 19:46:10
|
|
|
|
|
2014/01/10 08:12:32
Subject: Re:Philmorgan75's workshop blog - Legion of the Dead
|
|
Regular Dakkanaut
|
Assault Land Raider
Finished it at last:
I airbrushed the front turret to match the flame colours of the rest of the front.
This gives a close up of the Twin Redeemer Cannons. I have added some magnets to the turret and cannons so the weapons can be swopped if needs be in the future.

You can just make out the purple wash on the end of barrels to mimic hot metal. I probably went overboard with the airbrush spraying black to mimic carbon scorching on the end of the barrels.
This shows the front ramp after weathering and rust had been added. I deliberately didn't add to much weathering to this Land Raider. Sponging is so quick and effective. When I finish all my projects, I intend going back over my 1987-2010 Space Marine collection and giving all the vehicles a small amount of weathering.
The engine after rust, weathering and carbon scorching on the end of the exhausts had been added.
I sprayed a small amount of black above the vents at the front to mimic smoke damage. The black oil/turps wash around the rivets really works well. I was considering "dribbling" rust vertically from some rivets, but a) I didn't have the nerve and b) I didn't have the time. I have plenty more to get one with.
New projects........
Land Raider Hellhound
I made this a couple of years ago after seeing the FW Hellhound when it first came out. Rather than masking the flames, I used thin plasticard and milliput to make the flames (to give a more 3D impact). It was easier to airbrush the flames from a white undercoat on this project BUT I have now had to spend a lot of time painting the rest of the armour black. Normally, I undercoat in black and then using templates and masking tape, airbrush white over the area I wish to put a flame. I don't know which is quicker!!
This front shot shows the main colours, with a black oil/turps wash over rivets etc. I'm waiting for this to dry a bit before I remove any excess black oil with a clean brush and turps.
This give an enemy view of the front of the LR. I can see I missed a few rivets with the black oil wash and will need to remedy this. Weathering and the lights still need to be painted on this view.

This shows the front right quadrant of the LR. I can't wait for black oil wash to dry, be cleaned up and then varnished before I start the weathering process. I think this LR is going to turn out fab!!!! The sponson has had a rectangle magnet added to it. I have made plenty of different sponson weapons (with a washer added to ensure the weapons all stick to the magnet - don't have to worry about polarity issues then ) that I have started to paint. This LR will have Twin Redeemer Flame throwers in the sponsons and front turret.
This shows the converted fuel tank at the rear (taking up the passenger compartment). It started live as a kids pencil sharpener and I added a few embellishments to 40k it!
The black oil wash needs to be cleaned up and after varnishing, I plan on adding some rust and streaking to give a more weathered look than I have tried before. This will be fun!
This is the rear of the LR. The large Adeptus Mechanicus logo covers the hole of the pencil sharpener. I added some pipes and wheels to give it a bit more realism. Again, all of these will be rusted in the future. The track will have my usual tread wash from AK Interactive added, varnished and then rust and metal weathering to finish it off.
Honoured Imperium LR
As I had my airbrush out painting the hellhound LR, I thought I may as well start painting a second project at the same time. This is my Honoured Imperium LR. I converted one of the Honoured Imperium statues, extended the width of the LR to accommodate the statue on top, added plasticard flames over the front and sides and then used Machinators treads "wrapped" around. Totally impractical in real life BUT 40k is not real life!!!
I ran out of Vallejo Model Air Yellow in the process of spraying the flames, so I have ordered some more and am waiting for it to arrive in the post. Once it does, I'll give the rest of the flames on the front and sides a quick blast to finish the flames. A Vulcan Mega Bolter has been recessed into the front turret.

A bit more yellow at the bottom and the flames will be finished. The Imperial Eagle was cut out of thin plasticard and carefully glued to the side of another shaped piece of plasticard. I'm in two minds on what colour to paint the Imperial Eagle - either weathered gold (like on my second fellblade) or a white marbled effect. The gold will be quicker but I think the white marble will be more striking. What do others think?

This is the statue in the process of being painted. For storage sake, the whole statue and bed of skulls comes off. I had to remove the shield from the original kit and then using milliput, sculpted another arm and hand. I wanted the statue to be holding a double handed sword. I decided to paint it up in my normal colours rather than a gold statue. I still don't know mind????
This shows the finished flames on the statues left leg....
...... and his right shoulder pad.
Any comments/critiques welcome as always.
Regards, Phil
|
|
This message was edited 2 times. Last update was at 2014/01/18 18:40:39
|
|
|
|
|
2014/01/18 19:16:13
Subject: Re:Philmorgan75's workshop blog - Legion of the Dead
|
|
Regular Dakkanaut
|
Update time:
Land Raider Hellhound:
I just finished my LR Hellhound:
I armed the LR with 6 Redeemer Flame Cannons (3 Twin variants).
Here's a close up of the front. I used sponges to add weathering and rust effects to the front. If any enemies saw this view, they would be moments away from being turned into burnt toast!!!
This shows the completed left side. Purple ink can be seen on the end of the Flame Cannon to give the illusion of heated metal.
This shows the right.
This blurry photo shows the plan. I may have gone overboard on the rust effect on the fuel tank but, what the hell!
A close up of the fuel tank.
The completed rear. I really enjoyed adding little extras here (lever, wheel and tap).
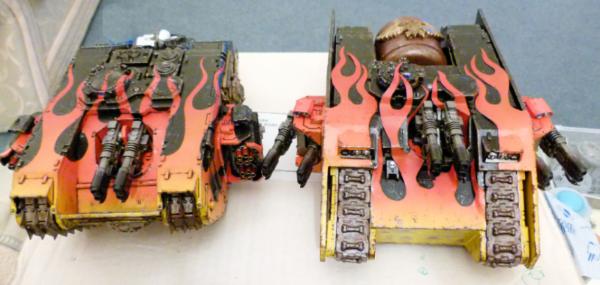
Both my little flame Land Raiders together. I can now pack these up and put in my completed model cupboard.
I deliberately magnetise the sponsons so that I can change the sponspon weapons.......
Some of the weapons that have been airbrushed VMA Fire Red, black oil washed and then matt varnished. I just need to paint the metal, black oil wash the metal, matt varnish them and then airbrush some blue "plasma glow".
Just a final shot of the Hellhound with some road kill!!!!!!
Honoured Imperium
As the painting process is done in lots of different stages (lots of waiting for varnish and oil washes to dry), I have a number of projects on the go. One of these is my Honoured Imperium Land Raider:
This shows a WIP Left side shot. I need to add a black oil wash followed by a matt varnish coat to the imperial eagle before I start adding some weathering and rust.
Here's a WIP shot of the front. The tracks need to have some AK Track effects added and once dry, I'll varnish the tracks (the track effects has a tendency to rub off and cover everything!) and start weathering.
and finally......
Another Land Raider project .... Thunder fire Cannon sponsons.
Comments/Critiques welcome.
Regards, Phil.
|
|
This message was edited 1 time. Last update was at 2014/01/18 20:45:36
|
|
|
|
|
2014/01/19 15:43:00
Subject: Philmorgan75's workshop blog - Legion of the Dead
|
|
Veteran Wolf Guard Squad Leader
|
Some awesome work here :O I'm not sure if that fellblade has enough guns though  looking forward to seeing some more scenery as well at some point
Young Logan
|
30K Blog: hobbyfromtheaett.blogspot.com
  Bran Redmaws Great Company - 5500pts Bran Redmaws Great Company - 5500pts
30K Space Wolves - 1500pts
  Deathguard -2300 pts Deathguard -2300 pts  |
|
|
|
|
2014/01/19 18:19:25
Subject: Philmorgan75's workshop blog - Legion of the Dead
|
|
Regular Dakkanaut
|
 Young_Logan wrote: Young_Logan wrote:Some awesome work here :O I'm not sure if that fellblade has enough guns though looking forward to seeing some more scenery as well at some point
Young Logan
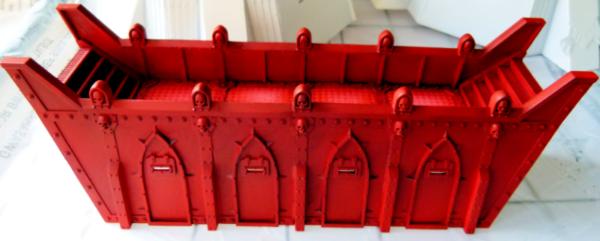
Cheers Young Logan! I started to undercoat my "Fort"ress of Redemption and have airbrushed most parts with VMA Fire Red but that's as far as I've gone. It has been placed on the back burner whilst I have my "tread head" on and get some more LR variants finished.
My problem is I have too many projects and not enough time to start/finish any of them. Perhaps after finishing my next 2 LRs, I'll think about finishing the "Fort"ress off.
Regards, Phil
|
|
|
|
|
|
2014/02/02 20:30:06
Subject: Re:Philmorgan75's workshop blog - Legion of the Dead
|
|
Regular Dakkanaut
|
Update time:
Finding it hard to motivate myself at the moment to get the 2 Land Raiders finished. It's to dark and I'm too tired after work to get make much progress. The weekends are also getting lost to my boys football games and other family matters. The weather has also been terrible, making it difficult to use the airbrush as well. Never mind! I didn't set myself a time scale, so get it done in little steps.
Thunderfire Land Raider

This shows the front. I've sponged on some Gun Metal to the edges and then sponged some rust on as well. The tracks had a wash of AK Interactive Track Wash and once dry, a sponging of rust. To finish this view, I need to matt varnish the whole LR and then dry brush some Gun Metal on the raised parts of the tracks where they would touch the ground.
This shows the completed Left Side. The skulls where painted White Scar white and then a sponging of VMA Black, Army Painter Gun Metal and AK Interactive Medium Rust pigment (added to some white spirit) was added. The purity seals were finished as were the jewels on the Crux Terminus. Just the matt varnish coat to finish this view.
Apologies for the blurry photo. This is the rear of the left hand side. I'm really happy with how the plasticard "3D" flames worked out. The white skull really pops in contrast to the flames.

Again, apologies for the blurry shot. The Adeptus Mechanicus logo was painted as per my usual paint scheme. A purple wash was added to the top of the exhaust stacks and once dry, the usual rust sponging was added. I just need to airbrush a touch of black at the top of the exhaust stacks to complete this shot.
3 shots in a row blurred!!!! I added extra radiator/vents at the top to assist in removing the extra fumes/heat from the inside of the Land Raider. A light rust sponging has been added. Just need to spray a small amount of black "soot" from the airbrush to finish this view.
This shows the plan view. I wish I had kept a note of the sponson plasticard measurements so I could quickly mass produce them for future conversions. I think the FW LR MK IIB sponson looks by far the best on a LR. It makes it very WW1 like! In real life, the 2 tracks are equally spaced out unlike this photo.
Finally, this shows a top view of the front. As I thought the Thunderfire Cannon Sponsons needed extra help to ensure a 100% accuracy, I added the FW LR Prometheus front and an extra targetter from a Vindicator. This was a fun build. Not much left to finish off this one......
Honoured Imperium Land Raider
My tracked tribute to a fallen Space Marine Hero....
I just need to paint some black where the "skull bed" joins the top front of the LR to finish this view. The usual sponging was done. A Matt Varnish finish, a dry brush of gun metal over the raised parts of the track and a light black airbrush on the Vulcan Mega Bolter to simulate soot deposits is needed to finish this view.
A close up of the statues feet and Vulcan Mega Bolter. I went to GW Swansea this morning to pick up some Nihilakh Oxide to try out on aging the bronze statue.
This shows the completed Left Side. I'm not 100% happy with how the verdigree turned out. I'll dry brush some Gold VMA over the statue to see if it improves it.
Rather than sticking a sponson into the hatch hole, I plan on adding some magnets to allow sponsons to be swopped.
This shows the finished rear .....
.... and the top.
A final shot of Statue.
Land Raider weapons
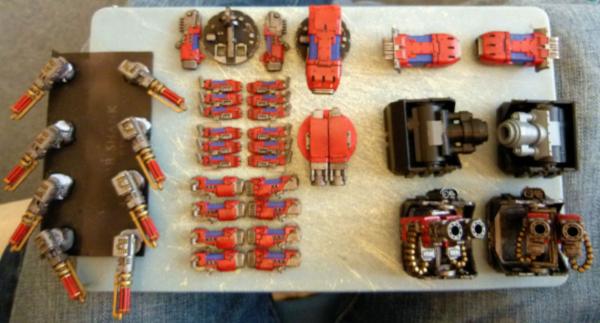
Here's a WIP on the Plasma and Frag Cannon turret/sponson weapons for my LR's. All of the Plasma weapons need an airbrush of black VMA on the muzzle (for soot deposits) and a light blue airbrush to give my usual "plasma glow".

Here are my Demolisher sponsons and Twin Frag Cannon sponsons. The Demolisher sponson are magnetised to allow me to swop with a Plasma Executioner should I need to. The Twin Frag Cannon sponsons are almost finished - just a brief sponging of rust on the exposed metal framework of the sponson frame and it's done!
Here's a close up of my Plasma "Hurricane" guns, quad Heavy Plasma guns, Heavy Plasma gun Turret, Plasma Executioner Turret and Twin Frag Cannon Turret. Apart from the soot and plasma glow, the only thing extra will be a light sponging of gun metal (to show some weathering) and to paint the turret part of the Twin Frag Cannons.

Finally, quad Assault Cannon's.
Till next time ..... Phil.
|
|
This message was edited 1 time. Last update was at 2014/02/03 07:33:50
|
|
|
|
|
2014/02/02 20:58:38
Subject: Philmorgan75's workshop blog - Legion of the Dead
|
|
Rampaging Reaver Titan Princeps
|
Good grief lots of great vehicles done well. Have to admit I'm glad you went with the obvious skull option to cover the Demolisher mount on the Fellblade. I'll also admit your about the only person I now who looks at 40k and thinks this scenery needs mooooorrrreee ssskkkkuullllllllssssssss
|
"But me no buts! Our comrades get hurt. Our friends die. Falkenburg is a knight who swore an oath to serve the church and to defend the weak. He'd be the first to tell you to stop puling and start planning. Because what we are doing-at risk to ourselves-is what we have sworn to do. The West relies on us. It is a risk we take with pride. It is an oath we honour. Even when some soft southern burgher mutters about us, we know the reason he sleeps soft and comfortable, why his wife is able to complain about the price of cabbages as her most serious problem and why his children dare to throw dung and yell "Knot" when we pass. It's because we are what we are. For all our faults we stand for law and light.
Von Gherens This Rough Magic Lackey, Flint & Freer
Mekagorkalicious -Monkeytroll
2017 Model Count-71
|
|
|
|
|
2014/02/02 21:06:03
Subject: Philmorgan75's workshop blog - Legion of the Dead
|
|
Regular Dakkanaut
|
 Llamahead wrote: Llamahead wrote:Good grief lots of great vehicles done well. Have to admit I'm glad you went with the obvious skull option to cover the Demolisher mount on the Fellblade. I'll also admit your about the only person I now who looks at 40k and thinks this scenery needs mooooorrrreee ssskkkkuullllllllssssssss
Ha Ha Ha Llamahead!
I feel I have a bit of Khorne in me!!!!!!!
Regards, Phil.
|
|
|
|
|
|
|
|